check engine light FORD F650 2017 13.G Owner's Manual
[x] Cancel search | Manufacturer: FORD, Model Year: 2017, Model line: F650, Model: FORD F650 2017 13.GPages: 382, PDF Size: 5.18 MB
Page 194 of 382
the coolant is visible and the radiator
is almost full. If coolant is added to
bring the level within the minimum and
maximum range when the engine is not
cold, the system may remain
underfilled.
4. Replace the coolant reservoir cap, turn
it clockwise until you feel a strong
resistance.
5. Check the coolant level in the coolant reservoir the next few times you drive
your vehicle. If necessary, add enough
prediluted engine coolant to bring the
coolant level to the proper level.
Note: If prediluted coolant is not available,
use the approved antifreeze concentrate
diluting it to 50/50 with distilled water. See
Capacities and Specifications (page 258).
Using water that has not been deionised
may contribute to deposit formation,
corrosion or plugging of the small cooling
system passageways.
If you have to add more than 1.1 qt (1 L) of
engine coolant per month, have your
vehicle checked as soon as possible.
Operating an engine with a low level of
coolant can result in engine overheating
and possible engine damage.
Note: During normal vehicle operation, the
coolant may change color from orange to
pink or light red. As long as the coolant is
clear and uncontaminated, this color change
does not indicate the coolant has degraded
nor does it require the coolant to be drained,
the system to be flushed, or the coolant to
be replaced. Note:
In case of emergency, you can add a
large amount of water without coolant in
order to reach a vehicle service location.
Water alone, without coolant, can cause
engine damage from corrosion, overheating
or freezing. When you reach a service
location, you must have the cooling system
drained, flushed and refilled using the
correct specification prediluted coolant or
antifreeze concentrate. See
Capacities and
Specifications (page 258).
Do not use the following as a coolant
substitute:
• Alcohol.
• Methanol.
• Brine.
• Any coolant mixed with alcohol or
methanol antifreeze.
Alcohol and other liquids can cause engine
damage from overheating or freezing.
Do not add extra inhibitors or additives to
the coolant. These can be harmful and
compromise the corrosion protection of
the coolant.
Recycled Coolant
We do not recommend the use of recycled
coolant as an approved recycling process
is not yet available.
Dispose of used engine coolant in an
appropriate manner. Follow your
community ’s regulations and standards
for recycling and disposing of automotive
fluids.
191
F-650/750 (TBC) , enUSA, First Printing Maintenance
Page 197 of 382
You may notice a reduction in vehicle
speed caused by reduced engine power.
In order to manage the engine coolant
temperature. Your vehicle may enter this
mode if certain high-temperature and
high-load conditions take place. The
amount of speed reduction depends on
vehicle loading, grade and ambient
temperature. If this occurs, there is no need
to pull off the road. You can continue to
drive your vehicle.
The air conditioning may automatically
turn on and off during severe operating
conditions to protect the engine from
overheating. When the coolant
temperature decreases to the normal
operating temperature, the air conditioning
turns on.
If the coolant temperature gauge moves
fully into the red zone, or if the coolant
temperature warning or service engine
soon messages appear in your information
display, do the following:
1. Pull off the road as soon as safely
possible and shift the transmission into
park (P).
2. Leave the engine running until the coolant temperature gauge needle
returns to the normal position. After
several minutes, if the temperature
does not drop, follow the remaining
steps.
3. Switch the engine off and wait for it to
cool. Check the coolant level.
4. If the coolant level is at or below the minimum mark, add prediluted coolant
immediately.
5. If the coolant level is normal, restart the engine and continue. ENGINE COOLANT CHECK -
6.7L DIESEL WARNINGS
Do not add engine coolant when the
engine is hot. Steam and scalding
liquids released from a hot cooling
system can burn you badly. Also, spilling
coolant on hot engine parts can burn you. Do not put engine coolant in the
windshield washer fluid container. If
sprayed on the windshield, engine
coolant could make it difficult to see
through the windshield. To reduce the risk of personal injury,
make sure the engine is cool before
unscrewing the coolant pressure
relief cap. The cooling system is under
pressure. Steam and hot liquid can come
out forcefully when you loosen the cap
slightly. Do not add coolant further than the
MAX
mark.
When the engine is cold, check the
concentration and level of the coolant at
the intervals listed in the scheduled
maintenance information. See Scheduled
Maintenance
(page 316).
Note: Make sure that the coolant level is
between the
MIN and MAX marks on the
coolant reservoir.
Note: Coolant expands when it is hot. The
level may extend beyond the
MAX mark.
Maintain coolant concentration within
48% to 50%, which equates to a freeze
point between -30°F (-34°C) and -34°F
(-37°C). Coolant concentration should be
checked using a refractometer. We do not
recommend the use of hydrometers or
coolant test strips for measuring coolant
concentration.
194
F-650/750 (TBC) , enUSA, First Printing Maintenance
Page 199 of 382
If you have to add more than 1.1 qt (1 L) of
engine coolant per month, have your
vehicle checked as soon as possible.
Operating an engine with a low level of
coolant can result in engine overheating
and possible engine damage.
Note: During normal vehicle operation, the
coolant may change color from orange to
pink or light red. As long as the coolant is
clear and uncontaminated, this color change
does not indicate the coolant has degraded
nor does it require the coolant to be drained,
the system to be flushed, or the coolant to
be replaced.
Note: In case of emergency, you can add a
large amount of water without coolant in
order to reach a vehicle service location.
Water alone, without coolant, can cause
engine damage from corrosion, overheating
or freezing. When you reach a service
location, you must have the cooling system
drained, flushed and refilled using the
correct specification prediluted coolant or
antifreeze concentrate. See
Capacities and
Specifications (page 258).
Do not use the following as a coolant
substitute:
• Alcohol.
• Methanol.
• Brine.
• Any coolant mixed with alcohol or
methanol antifreeze.
Alcohol and other liquids can cause engine
damage from overheating or freezing.
Do not add extra inhibitors or non-specified
additives to the coolant. These can be
harmful and compromise the corrosion
protection of the coolant. Engine and Secondary Cooling
System Refill Procedure
The following procedure should be used
when refilling the engine or secondary
cooling systems after it has been drained
or become extremely low:
1. Before you remove the cap, turn the
engine off and let it cool.
2. When the engine is cool, wrap a thick cloth around the cap. Slowly turn cap
counterclockwise until pressure begins
to release.
3. Step back while the pressure releases.
4. When you are sure that all the pressure
has been released, use the cloth to turn
it counterclockwise and remove the
cap.
5. Slowly add prediluted engine coolant to the coolant reservoir until the
coolant level is within the minimum
and maximum range as listed on the
reservoir.
6. Reinstall the pressure relief cap.
7. Start and run the engine at 2000 rpm for 2 minutes.
8. Shut engine off, and remove the pressure relief cap as previously
outlined.
9. If required, add prediluted engine coolant to the coolant reservoir until
the coolant level is within the minimum
and maximum range as listed on the
reservoir.
10. Engine cooling system:
Repeat
Step 5 until the coolant level has
stabilized (is no longer dropping after
each step) and the upper radiator
hose at the radiator is warm to the
touch (indicating that the engine
thermostat is open and coolant is
flowing through the radiator).
196
F-650/750 (TBC) , enUSA, First Printing Maintenance
Page 205 of 382
DRAINING THE FUEL FILTER
WATER TRAP - 6.7L DIESEL
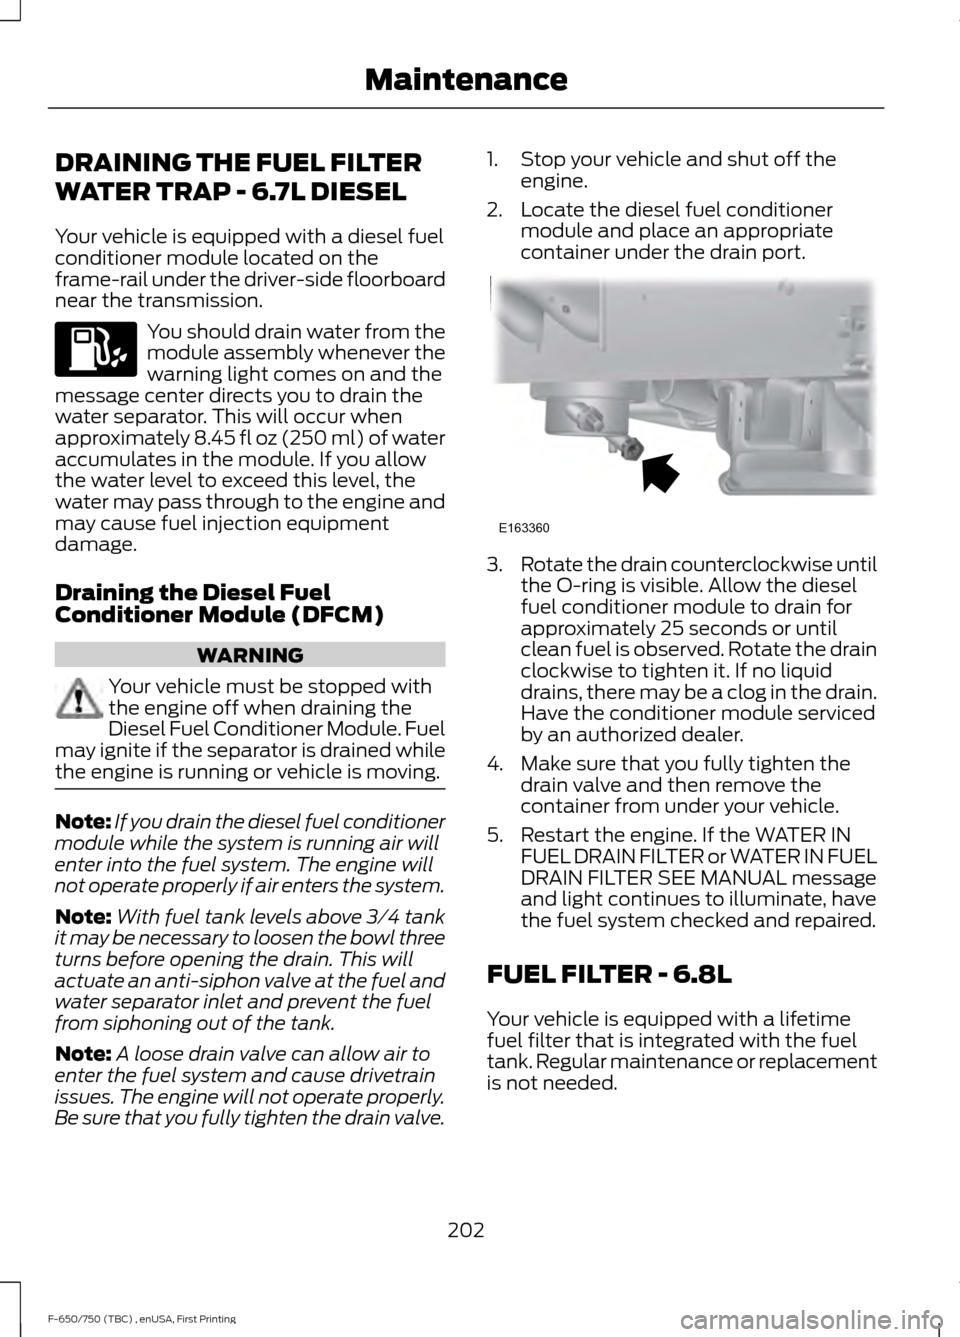
Your vehicle is equipped with a diesel fuel
conditioner module located on the
frame-rail under the driver-side floorboard
near the transmission.
You should drain water from the
module assembly whenever the
warning light comes on and the
message center directs you to drain the
water separator. This will occur when
approximately 8.45 fl oz (250 ml) of water
accumulates in the module. If you allow
the water level to exceed this level, the
water may pass through to the engine and
may cause fuel injection equipment
damage.
Draining the Diesel Fuel
Conditioner Module (DFCM) WARNING
Your vehicle must be stopped with
the engine off when draining the
Diesel Fuel Conditioner Module. Fuel
may ignite if the separator is drained while
the engine is running or vehicle is moving. Note:
If you drain the diesel fuel conditioner
module while the system is running air will
enter into the fuel system. The engine will
not operate properly if air enters the system.
Note: With fuel tank levels above 3⁄4 tank
it may be necessary to loosen the bowl three
turns before opening the drain. This will
actuate an anti-siphon valve at the fuel and
water separator inlet and prevent the fuel
from siphoning out of the tank.
Note: A loose drain valve can allow air to
enter the fuel system and cause drivetrain
issues. The engine will not operate properly.
Be sure that you fully tighten the drain valve. 1. Stop your vehicle and shut off the
engine.
2. Locate the diesel fuel conditioner module and place an appropriate
container under the drain port. 3.
Rotate the drain counterclockwise until
the O-ring is visible. Allow the diesel
fuel conditioner module to drain for
approximately 25 seconds or until
clean fuel is observed. Rotate the drain
clockwise to tighten it. If no liquid
drains, there may be a clog in the drain.
Have the conditioner module serviced
by an authorized dealer.
4. Make sure that you fully tighten the drain valve and then remove the
container from under your vehicle.
5. Restart the engine. If the WATER IN FUEL DRAIN FILTER or WATER IN FUEL
DRAIN FILTER SEE MANUAL message
and light continues to illuminate, have
the fuel system checked and repaired.
FUEL FILTER - 6.8L
Your vehicle is equipped with a lifetime
fuel filter that is integrated with the fuel
tank. Regular maintenance or replacement
is not needed.
202
F-650/750 (TBC) , enUSA, First Printing Maintenance E163360
Page 324 of 382
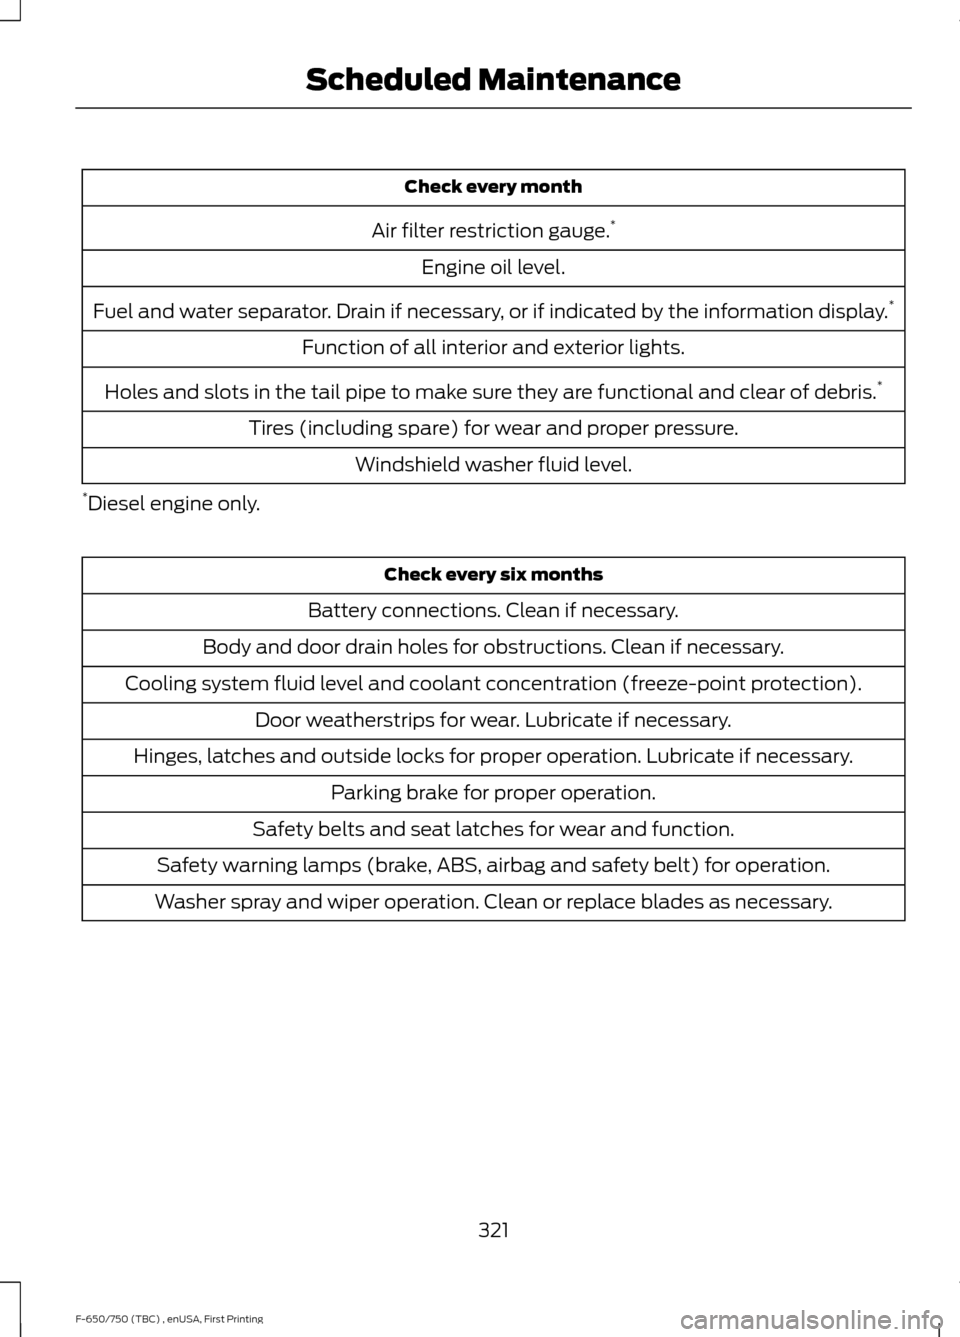
Check every month
Air filter restriction gauge. *
Engine oil level.
Fuel and water separator. Drain if necessary, or if indicated by the information display. *
Function of all interior and exterior lights.
Holes and slots in the tail pipe to make sure they are functional and clear of debris. *
Tires (including spare) for wear and proper pressure. Windshield washer fluid level.
* Diesel engine only. Check every six months
Battery connections. Clean if necessary.
Body and door drain holes for obstructions. Clean if necessary.
Cooling system fluid level and coolant concentration (freeze-point protection). Door weatherstrips for wear. Lubricate if necessary.
Hinges, latches and outside locks for proper operation. Lubricate if necessary. Parking brake for proper operation.
Safety belts and seat latches for wear and function.
Safety warning lamps (brake, ABS, airbag and safety belt) for operation.
Washer spray and wiper operation. Clean or replace blades as necessary.
321
F-650/750 (TBC) , enUSA, First Printing Scheduled Maintenance
Page 340 of 382
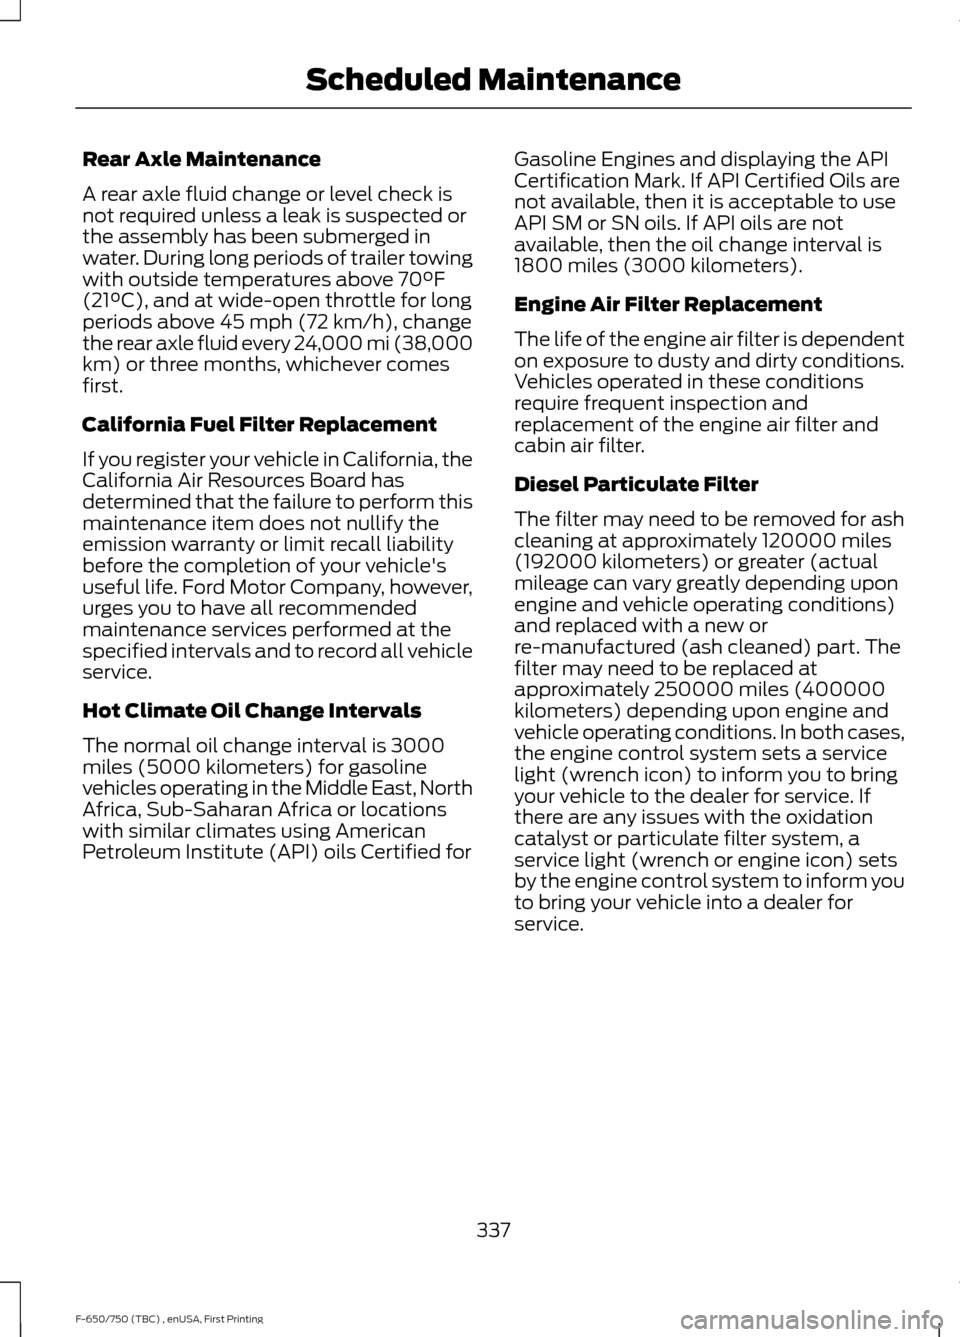
Rear Axle Maintenance
A rear axle fluid change or level check is
not required unless a leak is suspected or
the assembly has been submerged in
water. During long periods of trailer towing
with outside temperatures above 70°F
(21°C), and at wide-open throttle for long
periods above 45 mph (72 km/h), change
the rear axle fluid every 24,000 mi (38,000
km) or three months, whichever comes
first.
California Fuel Filter Replacement
If you register your vehicle in California, the
California Air Resources Board has
determined that the failure to perform this
maintenance item does not nullify the
emission warranty or limit recall liability
before the completion of your vehicle's
useful life. Ford Motor Company, however,
urges you to have all recommended
maintenance services performed at the
specified intervals and to record all vehicle
service.
Hot Climate Oil Change Intervals
The normal oil change interval is 3000
miles (5000 kilometers) for gasoline
vehicles operating in the Middle East, North
Africa, Sub-Saharan Africa or locations
with similar climates using American
Petroleum Institute (API) oils Certified for
Gasoline Engines and displaying the API
Certification Mark. If API Certified Oils are
not available, then it is acceptable to use
API SM or SN oils. If API oils are not
available, then the oil change interval is
1800 miles (3000 kilometers).
Engine Air Filter Replacement
The life of the engine air filter is dependent
on exposure to dusty and dirty conditions.
Vehicles operated in these conditions
require frequent inspection and
replacement of the engine air filter and
cabin air filter.
Diesel Particulate Filter
The filter may need to be removed for ash
cleaning at approximately 120000 miles
(192000 kilometers) or greater (actual
mileage can vary greatly depending upon
engine and vehicle operating conditions)
and replaced with a new or
re-manufactured (ash cleaned) part. The
filter may need to be replaced at
approximately 250000 miles (400000
kilometers) depending upon engine and
vehicle operating conditions. In both cases,
the engine control system sets a service
light (wrench icon) to inform you to bring
your vehicle to the dealer for service. If
there are any issues with the oxidation
catalyst or particulate filter system, a
service light (wrench or engine icon) sets
by the engine control system to inform you
to bring your vehicle into a dealer for
service.
337
F-650/750 (TBC) , enUSA, First Printing Scheduled Maintenance
Page 374 of 382
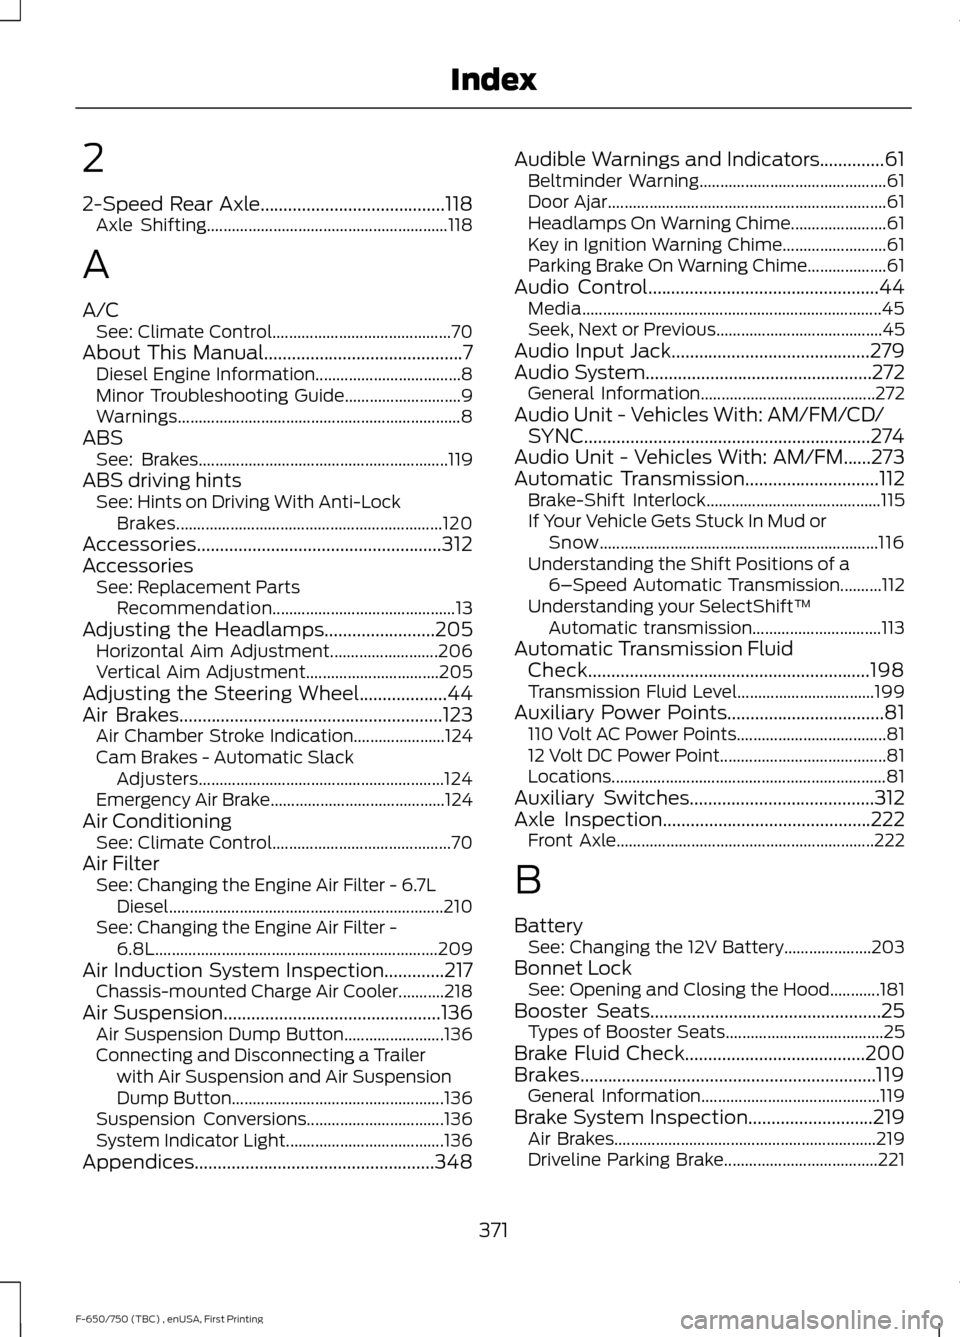
2
2-Speed Rear Axle........................................118
Axle Shifting.......................................................... 118
A
A/C See: Climate Control........................................... 70
About This Manual...........................................7
Diesel Engine Information................................... 8
Minor Troubleshooting Guide............................ 9
Warnings.................................................................... 8
ABS See: Brakes............................................................ 119
ABS driving hints See: Hints on Driving With Anti-Lock
Brakes................................................................ 120
Accessories.....................................................312
Accessories See: Replacement Parts
Recommendation............................................ 13
Adjusting the Headlamps........................205 Horizontal Aim Adjustment.......................... 206
Vertical Aim Adjustment................................ 205
Adjusting the Steering Wheel
...................44
Air Brakes.........................................................123 Air Chamber Stroke Indication...................... 124
Cam Brakes - Automatic Slack Adjusters........................................................... 124
Emergency Air Brake.......................................... 124
Air Conditioning See: Climate Control........................................... 70
Air Filter See: Changing the Engine Air Filter - 6.7L
Diesel.................................................................. 210
See: Changing the Engine Air Filter - 6.8L.................................................................... 209
Air Induction System Inspection.............217 Chassis-mounted Charge Air Cooler...........218
Air Suspension
...............................................136
Air Suspension Dump Button........................ 136
Connecting and Disconnecting a Trailer with Air Suspension and Air Suspension
Dump Button................................................... 136
Suspension Conversions................................. 136
System Indicator Light...................................... 136
Appendices....................................................348 Audible Warnings and Indicators..............61
Beltminder Warning............................................. 61
Door Ajar................................................................... 61
Headlamps On Warning Chime....................... 61
Key in Ignition Warning Chime......................... 61
Parking Brake On Warning Chime................... 61
Audio Control
..................................................44
Media........................................................................\
45
Seek, Next or Previous........................................ 45
Audio Input Jack...........................................279
Audio System
.................................................272
General Information.......................................... 272
Audio Unit - Vehicles With: AM/FM/CD/ SYNC..............................................................274
Audio Unit - Vehicles With: AM/FM
......273
Automatic Transmission.............................112
Brake-Shift Interlock.......................................... 115
If Your Vehicle Gets Stuck In Mud or Snow................................................................... 116
Understanding the Shift Positions of a 6– Speed Automatic Transmission..........112
Understanding your SelectShift™ Automatic transmission............................... 113
Automatic Transmission Fluid Check.............................................................198
Transmission Fluid Level................................. 199
Auxiliary Power Points..................................81 110 Volt AC Power Points.................................... 81
12 Volt DC Power Point........................................ 81
Locations.................................................................. 81
Auxiliary Switches
........................................312
Axle Inspection.............................................222
Front Axle.............................................................. 222
B
Battery See: Changing the 12V Battery..................... 203
Bonnet Lock See: Opening and Closing the Hood............181
Booster Seats..................................................25 Types of Booster Seats...................................... 25
Brake Fluid Check.......................................200
Brakes................................................................119 General Information........................................... 119
Brake System Inspection...........................219 Air Brakes............................................................... 219
Driveline Parking Brake..................................... 221
371
F-650/750 (TBC) , enUSA, First Printing Index