check engine FORD F650/750 2021 Owner's Manual
[x] Cancel search | Manufacturer: FORD, Model Year: 2021, Model line: F650/750, Model: FORD F650/750 2021Pages: 390, PDF Size: 5.16 MB
Page 115 of 390
Your vehicle may not pass the I/M test if
the service engine soon indicator is on or
not working properly (bulb is burned out),
or if the OBD-II system has determined
that some of the emission control systems
have not been properly checked. In this
case, the vehicle is not ready for I/M
testing.
If the vehicle
’s engine or transmission has
just been serviced, or the battery has
recently run down or been replaced, the
OBD-II system may indicate that the
vehicle is not ready for I/M testing. To
determine if the vehicle is ready for I/M
testing, turn the ignition key to the on
position for 15 seconds without cranking
the engine. If the service engine soon
indicator blinks eight times, it means that
the vehicle is not ready for I/M testing; if
the service engine soon indicator stays on
solid, it means that your vehicle is ready
for I/M testing.
The OBD-II system checks the emission
control system during normal driving. A
complete check may take several days.
If the vehicle is not ready for I/M testing,
you can perform the following driving cycle
consisting of mixed city and highway
driving:
1. 15 minutes of steady driving on an expressway or highway followed by 20
minutes of stop-and-go driving with at
least four 30-second idle periods.
2. Allow your vehicle to sit for at least eight hours with the ignition off. Then,
start the vehicle and complete the
above driving cycle. The vehicle must
warm up to its normal operating
temperature. Once started, do not turn
off the vehicle until the above driving
cycle is complete.
If the vehicle is still not ready for I/M
testing, you need to repeat the above
driving cycle. SELECTIVE CATALYTIC
REDUCTANT SYSTEM - DIESEL
Your vehicle may have a selective catalytic
reduction system. The system helps reduce
emission levels of oxides of nitrogen from
the exhaust system. The system
automatically injects diesel exhaust fluid
into the exhaust system to enable correct
selective catalytic reduction system
function.
Note:
Selective catalytic reduction systems
are not fitted to vehicles in markets where
only high-sulfur diesel fuel is available.
Diesel Exhaust Fluid Level
In order for the system to operate correctly
you must maintain the diesel exhaust fluid
level.
The system has a sensor to monitor fluid
level and quality/concentration. A warning
message appears in the information
display when the diesel exhaust fluid level
is low. If a warning message appears, refill
the diesel exhaust fluid tank as soon as
possible. See Information Messages
(page 73).
Filling the Diesel Exhaust Fluid
Tank WARNING:
Keep diesel exhaust
fluid out of reach of children. Avoid
contact with skin, eyes or clothing. In
case of contact with your eyes, flush
immediately with water and get prompt
medical attention. In case of contact
with your skin, clean immediately with
soap and water. If you swallow any
diesel exhaust fluid, drink plenty of
water, call a physician immediately.
112
F650750 (TBC) , enUSA, Edition date: 202010, Second-Printing Engine Emission Control
Page 117 of 390
1. Remove the diesel exhaust fluid
container cap. Place the spout on to
the container and tighten it until you
feel a strong resistance.
2. Remove the diesel exhaust fluid tank filler cap.
3. Insert the spout into the filler neck until
the seal on the spout seats on to the
filler neck. Pour the fluid into the tank.
When the tank is full the fluid stops. In
case of direct fill tank, the spout does
not seal against the fill tank interface
and does not stop the flowing
automatically.
4. Return the container to the vertical position slightly below the diesel
exhaust fluid filler neck. Allow any fluid
remaining in the spout to drain back in
to the container.
5. Remove the spout from the diesel exhaust fluid filler neck. Replace the
diesel exhaust fluid tank cap.
6. Remove the spout from the diesel exhaust fluid container and replace the
cap.
Note: If there is diesel exhaust fluid left in
the container retain it for later use. The
spout is re-useable. Wash the spout with
clean water prior to storage. Do not use the
diesel exhaust fluid spout with any other
fluid.
Filling the Diesel Exhaust Fluid Tank in
Cold Climates
Diesel exhaust fluid freezes if the ambient
temperature is below 12°F (-11°C). Your
vehicle has a preheating system which
allows diesel exhaust fluid to operate
below
12°F (-11°C). If you do not use your
vehicle for an extended period when the
ambient temperature is below 12°F (-11°C),
the fluid in the tank freezes. If the tank is
overfilled and the fluid freezes it may
damage the tank. This is not covered by
the vehicle warranty. Diesel Exhaust Fluid Warning
Messages and Vehicle Operations WARNING:
Diesel exhaust fluid
must be refilled when low or replaced
when contaminated or your vehicle
speed becomes limited to
50 mph
(80 km/h). In these conditions, drive with
caution and refill diesel exhaust fluid
immediately. If the diesel exhaust fluid
becomes empty or contaminated and
fluid is not replaced, your vehicle
becomes limited to engine idle only once
stopped. In these conditions, be cautious
where you stop your vehicle because you
may not be able to drive long distances
or maintain highway speeds until you
refill or replace the diesel exhaust fluid.
Note: Diluted diesel exhaust fluid must be
drained and replaced. WARNING:
Tampering with or
disabling the selective catalytic
reduction system results in severe
vehicle performance limitation including
eventual speed limiting to
5 mph
(8 km/h).
The information display shows a series of
messages about the amount of diesel
exhaust fluid available. A systems check
displays messages indicating the amount
of diesel exhaust fluid available or displays
a warning message indicating the
approximate distance remaining as the
fluid in the diesel exhaust fluid tank nears
empty. See
Information Messages
(page 73).
114
F650750 (TBC) , enUSA, Edition date: 202010, Second-Printing Engine Emission Control
Page 122 of 390
Before you start operator commanded
regeneration, do the following:
•
Shift into park (P) or if you have an
RNDM selector shift into neutral (N)
and apply the parking and or air brake,
on stable, level ground.
• Park your vehicle outside of any
structure.
• Park your vehicle 10– 15 ft (3–5 m)
away from any obstructions and away
from materials that can easily combust
or melt, for example paper, leaves,
petroleum products, fuels, plastics and
other dry organic material.
• Make sure there is a minimum of 1/8
tank of fuel.
• Make sure all fluids are at proper levels.
How to Start Operator Commanded
Regeneration WARNING:
Stay clear of the
exhaust tailpipe during regeneration. Hot
exhaust gases can burn you badly.
Note: You cannot use the operator
commanded regeneration until the diesel
particulate filter load percentage has
reached 100%. The diesel particulate filter
load percentage fluctuates up and down
when driving your vehicle due to active and
passive regenerations.
Note: During the use of operator
commanded regeneration, you may observe
a light amount of white smoke. This is
normal. You may not be able to use
operator commanded
regeneration if the service engine
soon warning lamp appears in the
information display Information Display Procedure
Start your vehicle engine and when it has
reached the normal operating temperature,
arrow through the display to get to the
Diesel Particulate Filter Status on the
Truck Info tab. Exhaust Filter XX%/FULL
displays. Operator commanded
regeneration can only be initiated when
FULL
See Information Display Control
(page 53). If a message advising that the
exhaust filter is full appears in the
information display, press and hold the OK
button to initiate Exhaust Cleaning. If
successful, a second prompt appears
regarding exhaust position required to
initiate operator commanded regeneration.
Be sure to understand each prompt. If you
are not sure what is being asked by each
prompt, contact an authorized dealer. If
the exhaust system meets the position
requirements then press and hold the OK
button to fully activate the Operator
Commanded Regeneration. The display
confirms the operation has started and
when it has finished.
You can also drive to clean the filter. When the system is at the point
of oversaturation, the service
engine warning lamp illuminates
and a message appears in the information
display. You cannot initiate filter cleaning.
You must have your vehicle checked as
soon as possible.
Once operator commanded regeneration
starts, engine speed increases to
approximately 1600 rpm and the cooling
fan speed increases. You will hear a
change in audible sound due to engine
speed and cooling fan speed increases.
It is not necessary to open the hood on the
engine compartment. Once operator
commanded regeneration completes, the
engine speed returns to normal idling. The
exhaust system remains very hot for
several minutes even after regeneration is
119
F650750 (TBC) , enUSA, Edition date: 202010, Second-Printing Engine Emission Control
Page 123 of 390
complete. Do not reposition the vehicle
over materials that could burn until the
exhaust system has had sufficient time to
cool. Depending on the amount of soot
collected by the diesel particulate filter,
ambient temperature and altitude,
operator commanded regeneration lasts
approximately 30 minutes.
Operator Commanded Regeneration
with Automatic Regeneration Control
(If Equipped)
If your vehicle is operated with significant
stationary operation, low speed drive
cycles less than 25 mph (40 km/h), short
drive cycles, drive time less than 15 minutes
or the vehicle does not fully warm up,
passive and active regeneration may not
sufficiently clean the diesel particulate
filter system. You can switch off automatic
regeneration until better driving conditions
are available, for example steady high
speed driving. You can then switch
automatic regeneration back on to clean
the diesel particulate filter.
Switching Automatic Regeneration
Control On and Off
To switch operator commanded
regeneration on and off, use the
information display control on the steering
wheel. See Information Display Control
(page 53). Scroll through the Settings tab
to ensure there is a check in the box next
to Auto Regeneration, this means it is
active. To deactivate Auto Regeneration,
uncheck the box. A message appears “Auto
Exhaust Cleaning Off ” along with an icon
indicating that Auto Exhaust Cleaning is
disabled. The icon stays illuminated until
you switch Auto Exhaust Cleaning back on
by checking the box. How to Interrupt or Cancel Operator
Commanded Regeneration
If you need to cancel the operator
commanded regeneration, pressing the
brake, accelerator or switching the engine
off stops the procedure. Depending on the
amount of time you allowed the operator
commanded regeneration to operate, soot
may not have had sufficient time to be fully
eliminated, but the exhaust system and
exhaust gas may still be hot. If you shut
your vehicle off during operator
commanded regeneration, you may notice
turbo flutter. This is a normal consequence
caused by shutting off a diesel engine
during boosted operation and is considered
normal.
Filter Service and Maintenance
Over time, a slight amount of ash builds
up in the diesel particulate filter, which is
not removed during the regeneration
process. The filter may need to be replaced
with a new or remanufactured part at
approximately 250,000 mi (400,000 km).
Actual mileage varies depending on engine
and vehicle operating conditions.
If filter service is required, the
engine control system warning
lamp illuminates in the
information display. If there are any issues with the
diesel particulate filter system,
the engine control system
warning lamp and a service
engine soon warning lamp
illuminate to inform you that
your vehicle requires service. Have your
vehicle checked as soon as possible.
120
F650750 (TBC) , enUSA, Edition date: 202010, Second-Printing Engine Emission Control
Page 128 of 390
To prevent the engine from running at too
low an RPM, which could cause it to stall,
SelectShift still makes some downshifts
if it has determined that you have not
downshifted in time. Although SelectShift
makes some downshifts for you, it still
allows you to downshift at any time if the
SelectShift determines there is no damage
to the engine from over-revving.
SelectShift does not automatically upshift,
even if the engine is approaching the RPM
limit. Shift manually by pressing the +
button.
Note:
Engine damage could occur if you rev
the engine excessively and hold it without
shifting.
Progressive Range Selection - PRS
(If Equipped)
Progressive Range Selection gives you the
ability to lockout gears from the automatic
shifting range. This could provide you with
an improved driving experience, for
example, in slippery conditions or when
experiencing a steep slope.
With the gearshift lever in drive (D), press
the – button to activate progressive range
selection. The instrument cluster indicates
the available and selected gears.
All available gears display with the current
gear indicated. Press the – button again to
lock out gears beginning with the highest
gear. For example, press the – button twice
to lock out sixth (6) and fifth (5) gears.
Only the available gears display, and the
transmission shifts between the available
gears. Press the + button to unlock gears
to allow the transmission to shift to higher
gears. The transmission shifts within the
gear range you select. Automatic Transmission Adaptive
Learning
This feature could increase durability and
provide consistent shift feel over the life
of your vehicle. A new vehicle or
transmission may have firm shifts, soft
shifts, or both. This is normal and does not
affect the function or durability of the
transmission. Over time, the adaptive
learning process fully updates transmission
operation.
Brake-Shift Interlock
WARNING: Do not drive your
vehicle until you verify that the
stoplamps are working. WARNING:
When doing this
procedure, you need to take the
transmission out of park (P) which
means your vehicle can roll freely. To
avoid unwanted vehicle movement,
always fully apply the parking brake prior
to doing this procedure. Use wheels
chocks if appropriate. WARNING:
If the parking brake is
fully released, but the brake warning
lamp remains illuminated, the brakes
may not be working properly. Have your
vehicle checked as soon as possible.
Your vehicle has a feature that prevents
the gearshift lever from moving from park
(P) when you switch the ignition on but
you are not pressing on the brake pedal.
If you cannot move the gearshift lever out
of the park (P) position with the ignition in
the on position and the brake pedal
pressed, a malfunction could have
occurred. It is possible that a fuse has
blown, or your vehicle ’s brake lamps are
not operating properly.
See Fuse
Specification Chart (page 193).
125
F650750 (TBC) , enUSA, Edition date: 202010, Second-Printing Transmission
Page 133 of 390
GENERAL INFORMATION
WARNING: Do not apply the brake
pedal and accelerator pedal
simultaneously. Applying both pedals
simultaneously for more than a few
seconds will limit engine performance,
which may result in difficulty maintaining
speed in traffic and could lead to serious
injury.
Note: Occasional brake noise is normal. If
a metal-to-metal, continuous grinding or
continuous squeal sound is present, the
brake linings may be worn-out. Have the
system checked as soon as possible. If your
vehicle has continuous vibration or shudder
in the steering wheel while braking, have it
checked by an authorized dealer.
All standard equipment brakes are
self-adjusting. Automatic adjustment,
when required, occurs whenever you apply
and release the brakes during forward or
reverse operation.
Know the required stopping distances for
all driving conditions you may encounter.
For longer brake lining life, take full
advantage of engine braking power when
coming to a stop.
Wet brakes result in reduced braking
efficiency. Gently press the brake pedal a
few times when driving from a car wash or
standing water to dry the brakes.
If the brakes do not grip well:
• Check brake adjustment.
• Check the brake linings for excessive
wear.
• Check the system air pressure on
vehicles with air brakes. •
Let the brakes cool if you have been
using them excessively, as in mountain
driving or after several fast, high-speed
stops.
• If you have been driving through deep
water, gently apply the brakes several
times while your vehicle is moving
slowly.
Brake Over Accelerator
In the event the accelerator pedal
becomes stuck or entrapped, apply steady
and firm pressure to the brake pedal to
slow the vehicle and reduce engine power.
If you experience this condition, apply the
brakes and bring your vehicle to a safe
stop. Move the transmission to park (P),
switch the engine off and apply the parking
brake. Inspect the accelerator pedal for
any interference. If none are found and the
condition persists, have your vehicle towed
to the nearest authorized dealer
Anti-lock Brake System
This system helps you maintain steering
control during emergency stops by keeping
the brakes from locking. This lamp momentarily
illuminates when you switch the
ignition on. If the light does not
illuminate during start up, remains on or
flashes, the system may be disabled. Have
the system checked by an authorized
dealer. If you connect a PLC trailer with
the ignition on, the trailer ABS
light also illuminates. If the light
fails to illuminate, if it remains on after you
start the vehicle or continues to flash, have
the system serviced immediately.
See
Warning Lamps and Indicators
(page 66).
130
F650750 (TBC) , enUSA, Edition date: 202010, Second-Printing Brakes E210335
Page 138 of 390
Vehicles with Automatic Transmission
You cannot turn the system on or off.
When you switch the ignition on, the
system automatically turns on.
AIR BRAKES (IF EQUIPPED)
WARNING: Do not drive or continue
to drive if the low air pressure buzzer is
sounding or the brake warning light is lit.
These warnings indicate that air pressure
is not to normal operating level.
Continued use of the vehicle could result
in loss of braking ability. WARNING:
Avoid repeated light
application of the brake pedal. This
depletes air pressure faster and could
result in loss of braking capability. WARNING:
Do not move the
vehicle when the air pressure is
insufficient because the brake system
may be inoperative.
After starting the engine, give the air
compressor time to build up the air
pressure to
60 psi (414 kPa) before moving
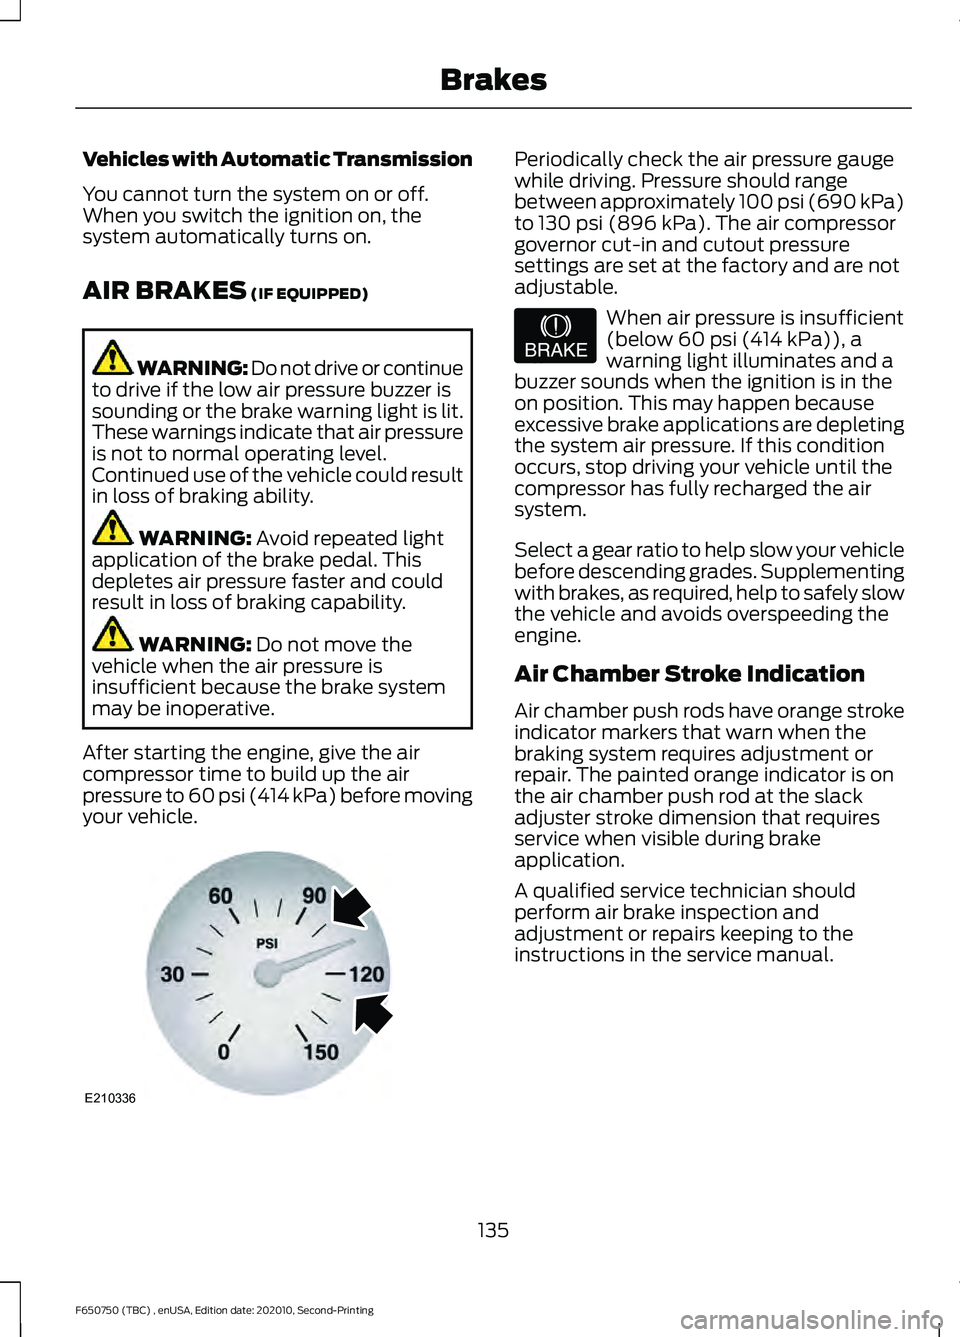
your vehicle. Periodically check the air pressure gauge
while driving. Pressure should range
between approximately 100 psi (690 kPa)
to
130 psi (896 kPa). The air compressor
governor cut-in and cutout pressure
settings are set at the factory and are not
adjustable. When air pressure is insufficient
(below
60 psi (414 kPa)), a
warning light illuminates and a
buzzer sounds when the ignition is in the
on position. This may happen because
excessive brake applications are depleting
the system air pressure. If this condition
occurs, stop driving your vehicle until the
compressor has fully recharged the air
system.
Select a gear ratio to help slow your vehicle
before descending grades. Supplementing
with brakes, as required, help to safely slow
the vehicle and avoids overspeeding the
engine.
Air Chamber Stroke Indication
Air chamber push rods have orange stroke
indicator markers that warn when the
braking system requires adjustment or
repair. The painted orange indicator is on
the air chamber push rod at the slack
adjuster stroke dimension that requires
service when visible during brake
application.
A qualified service technician should
perform air brake inspection and
adjustment or repairs keeping to the
instructions in the service manual.
135
F650750 (TBC) , enUSA, Edition date: 202010, Second-Printing BrakesE210336 E206772
Page 146 of 390
Use the traction control button
on the instrument panel to
switch the system off or on.
If your vehicle is stuck in mud or snow,
switching traction control off is beneficial
as this allows the wheels to spin.
Press the button again to switch the
traction control system on.
System Indicator Light
Note: If the traction control light does not
flash during a traction control event or stays
on, the system is not operating. Have the
system checked as soon as possible.
During a traction control event, the traction
control light rapidly flashes. Pressing
further on the accelerator does not cause
the engine to rev higher. This is normal and
is no reason for concern.
When the system turns the traction control
off, the OFF light illuminates on the
instrument cluster. If a traction event
occurs in either mode, the stability control
and traction control light rapidly flashes.
143
F650750 (TBC) , enUSA, Edition date: 202010, Second-Printing Traction ControlE330660
Page 154 of 390
The set speed does not erase.
Resuming the Set Speed
Press and release the button.
Your vehicle speed returns to the
previously set speed and gap setting. The
set speed displays continuously in the
information display when the system is
active.
Note: Only use resume if you are aware of
the set speed and intend to return to it.
Automatic Cancellation
The system is not functional at vehicle
speeds below 12 mph (20 km/h). The
information display indicates low engine
speed, an audible alarm sounds and the
automatic braking releases if the vehicle
drops below this speed.
Automatic cancellation can also occur
when:
• The tires lose traction.
• You apply the parking brake.
Note: If the engine speed drops too low, an
audible warning sounds and a message
appears in the information display.
Automatic braking releases.
Hilly Condition and Trailer Tow
Usage
You should select a lower gear when the
system is active in situations such as
prolonged downhill driving on steep
grades, for example in mountainous areas.
The system needs additional engine
braking in these situations to reduce the
load on the vehicle ’s regular brake system
to prevent it from overheating. Note:
An audible alarm sounds and the
system shuts down if it applies brakes for
an extended period of time. This allows the
brakes to cool. The system functions
normally again after the brakes cool.
Note: When towing with adaptive cruise
control, switch on Tow/Haul Mode and
Diesel Engine Brake.
Switching Adaptive Cruise Control
Off Press and release the button
when the system is in standby
mode, or switch the ignition off.
Note: You erase the set speed and gap
setting when you switch the system off.
Detection Issues WARNING: On rare occasions,
detection issues can occur due to the
road infrastructures, for example bridges,
tunnels and safety barriers. In these
cases, the system may brake late or
unexpectedly. At all times, you are
responsible for controlling your vehicle,
supervising the system and intervening,
if required. WARNING:
If the system
malfunctions, have your vehicle checked
as soon as possible.
The radar sensor has a limited field of
view. It may not detect vehicles at all or
detect a vehicle later than expected in
some situations. The lead vehicle graphic
does not illuminate if the system does not
detect a vehicle in front of you.
151
F650750 (TBC) , enUSA, Edition date: 202010, Second-Printing Cruise Control - Vehicles With: Adaptive Cruise Control E265297
Page 163 of 390
Why is the feature not available (line markings are gray) when I can see the lane markings
on the road?
There is standing water on the road.
Faint lane markings, for example partial yellow lane markings on concrete roads.
Lane width is too narrow or too wide.
The camera has not been calibrated after a windshield replacement.
Driving on tight roads or on uneven roads.
Vehicle accessories are blocking the camera, for example a snow plow.
STEERING
Hydraulic Power Steering
To help prevent damage to the power
steering system:
• Do not hold the steering wheel at its
furthest turning points for more than
three to five seconds when the engine
is running.
• Avoid continuously steering back and
forth with elevated engine RPM as this
may overheat the system. If trying to
free a stuck vehicle, pause between
attempts to allow the power steering
system to cool or seek assistance.
Typical steering and driving maneuvers
allow the system to cool.
• Do not operate the vehicle if the power
steering pump fluid level is below the
MIN mark on the reservoir.
• Some noise is normal during operation.
If excessive, check for low power
steering pump fluid level before
seeking service by your dealer. •
Heavy or uneven efforts may be caused
by low power steering fluid. Check for
low power steering pump fluid level
before seeking service by your dealer.
• Do not fill the power steering pump
reservoir above the MAX mark on the
reservoir, as this may result in leaks
from the reservoir.
If the power steering system breaks down
or if you switch the engine off, you can
steer the vehicle manually, but it takes
more effort.
If you have any steering components
serviced or replaced, install new fasteners.
Many fasteners have coatings with thread
adhesive, or have prevailing torque
features you cannot reuse. Do not reuse a
bolt or nut. Torque fasteners to
specifications.
Steering Tips
If the steering wanders or pulls, check for:
• An improperly inflated tire.
• Uneven tire wear.
• Loose or worn suspension
components.
• Loose or worn steering components.
• Improper vehicle alignment.
160
F650750 (TBC) , enUSA, Edition date: 202010, Second-Printing Driving Aids