engine oil FORD F650/750 2023 Owner's Manual
[x] Cancel search | Manufacturer: FORD, Model Year: 2023, Model line: F650/750, Model: FORD F650/750 2023Pages: 378, PDF Size: 5.65 MB
Page 189 of 378
alcohol based additives to correct fuel
gelling. This may result in damage to the
fuel injectors and system. Use the proper
anti-gel and performance improvement
product. See Engine Oil Capacity and
Specification (page 292).
Your vehicle is equipped with a fuel and
water separator that recirculates fuel from
the engine to help prevent fuel filter
clogging. To avoid engine fuel starvation
during cold weather operation of 32°F
(0°C) or below, we recommended that
the fuel level in your tank should not drop
below 1⁄4 full. This helps prevent air from
entering the fuel system and stalling the
engine.
Your vehicle is equipped with a selective
catalyst reduction system that uses Diesel
Exhaust Fluid (DEF) to operate properly.
You need to replenish your vehicle’s DEF
at certain intervals. When filling your
vehicle’s DEF tank in cold weather, you
must take special care to prevent damage
to the tank. See Selective Catalytic
Reductant System (page 118).
In cold weather below 32°F (0°C), the
engine may slowly increase to a higher idle
speed if left idling in park (P) or neutral
(N).
If you operate your vehicle in a heavy
snowstorm or blowing snow conditions,
snow and ice can clog the engine air
induction. If this occurs, the engine may
experience a significant reduction in power
output. At the earliest opportunity, clear
all the snow or ice away from inside the air
filter assembly. Remove the air cleaner
cover and the pleated paper filter, leaving
the foam filter in and remove any snow or
ice. Make sure you install the foam filter
correctly in place. Remove any debris,
snow or ice on the foam filter by brushing
the surface with soft brush. Once you have
cleared all of the debris, reinstall the air
filter and assembly.Do not use water, solvents, or a hard brush
for cleaning the foam filter.
WARNING: To reduce the risk of
vehicle damage and/or personal burn
injuries do not start your engine with the
air filter removed and do not remove it
while the engine is running.
In order to operate the engine in
temperatures of 32°F (0°C) or lower, read
the following instructions:
• Make sure that the batteries are of
sufficient size and are fully charged.
Check other electrical components to
make sure they are in optimum
condition
• Use the proper coolant solution at the
concentration recommended
protecting the engine against damage
from freezing
• Try to keep the fuel tank full as much
as possible at the end of operation to
prevent condensation in the fuel
system
• Make sure you use proper cold weather
engine oil and that it is at its proper
level. Also, if necessary, make sure to
follow the engine oil and filter change
schedule found under the Special
operating conditions section listed in
the scheduled maintenance
information
• At temperatures of -9°F (-23°C) or
below, it is recommended that you use
an engine block heater to improve cold
engine starting
• If operating in arctic temperatures of
-20°F (-29°C) or lower, consult your
truck dealer for information about
special cold weather equipment and
precautions
185
Driving Hints
Page 191 of 378
Avoid driving too fast during the first
1,000 mi (1,600 km). Vary your speed
frequently and change up through the
gears early. Do not labor the engine.
Drive your new vehicle at least 1,000 mi
(1,600 km) before towing a trailer. Make
sure you use the specified engine oil. See
Engine Oil Capacity and Specification
(page 292).
Do not add friction modifier compounds
or special break-in oils during the first few
thousand miles (kilometers) of operation.
These additives may prevent piston ring
seating.
DRIVING THROUGH WATER
WARNING: Do not drive through
flowing or deep water as you may lose
control of your vehicle.
Note:Driving through standing water can
cause vehicle damage.
Note:Engine damage can occur if water
enters the air filter.
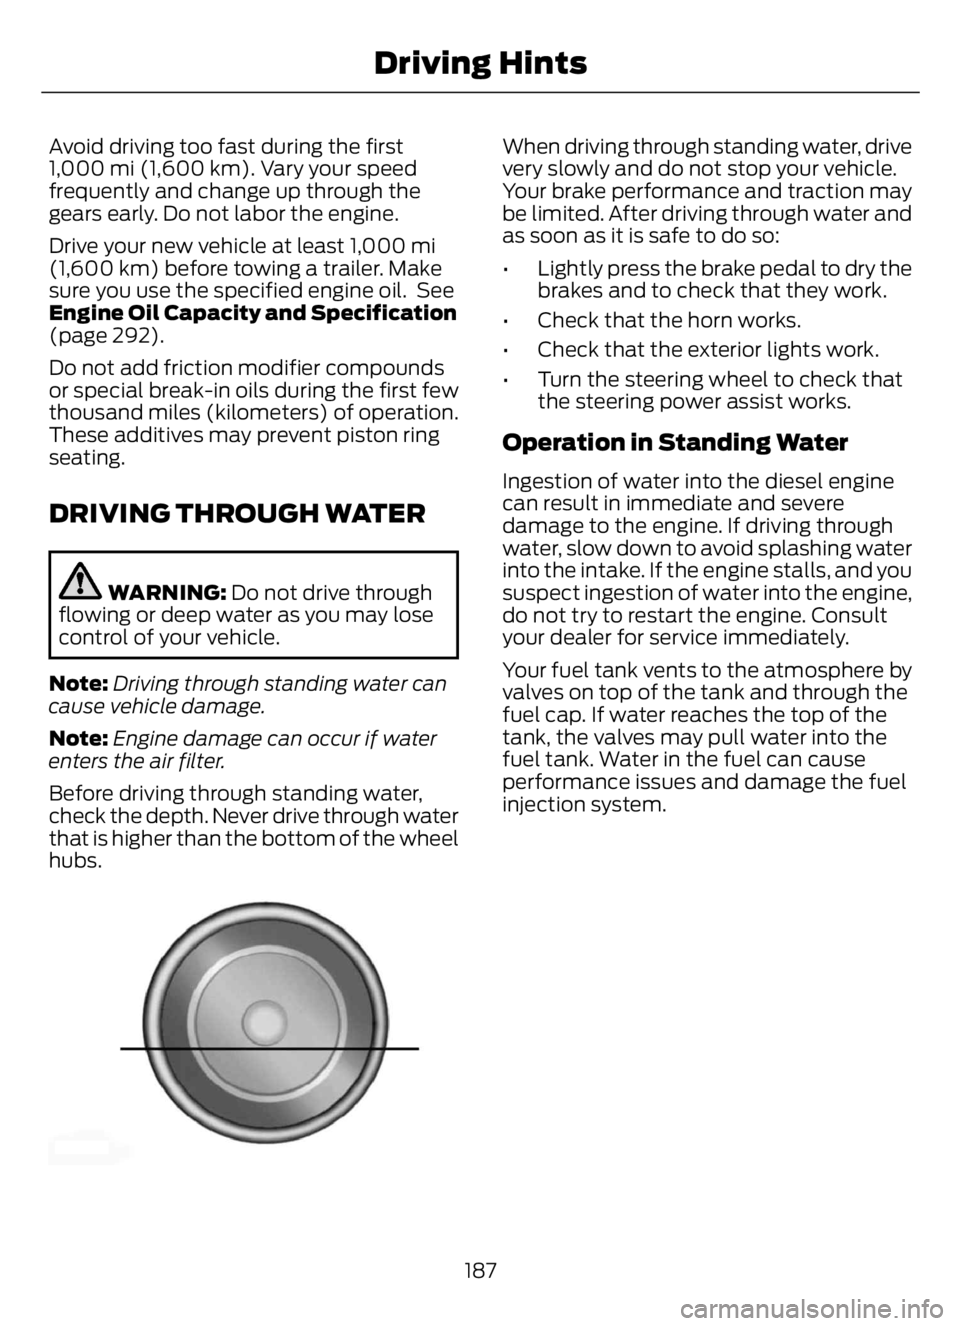
Before driving through standing water,
check the depth. Never drive through water
that is higher than the bottom of the wheel
hubs.
E176913E176913
When driving through standing water, drive
very slowly and do not stop your vehicle.
Your brake performance and traction may
be limited. After driving through water and
as soon as it is safe to do so:
• Lightly press the brake pedal to dry the
brakes and to check that they work.
• Check that the horn works.
• Check that the exterior lights work.
• Turn the steering wheel to check that
the steering power assist works.
Operation in Standing Water
Ingestion of water into the diesel engine
can result in immediate and severe
damage to the engine. If driving through
water, slow down to avoid splashing water
into the intake. If the engine stalls, and you
suspect ingestion of water into the engine,
do not try to restart the engine. Consult
your dealer for service immediately.
Your fuel tank vents to the atmosphere by
valves on top of the tank and through the
fuel cap. If water reaches the top of the
tank, the valves may pull water into the
fuel tank. Water in the fuel can cause
performance issues and damage the fuel
injection system.
187
Driving Hints
Page 214 of 378
VEHICLE INSPECTION
INFORMATION
To make sure your vehicle is ready to
operate, conduct a pre-trip inspection at
the beginning of each work period. Follow
the steps listed in this section to verify a
proper vehicle inspection procedure.
WARNING: Exercise great caution
when working on a vehicle equipped with
an automatic fan clutch. The fan starts
in motion only after the engine coolant
reaches a predetermined temperature
or the refrigerant pressure (if equipped
with air conditioning) reaches a
predetermined setting. The fan starts at
this point with no advance warning.
Never reach near, or permit objects to
protrude into, the fan blade radius while
the engine is running as this could result
in vehicle damage, personal injury or
death.
WARNING: Do not operate the
vehicle if any suspension conditions
listed in the following charts are evident.
Loss of steering or suspension could
result in property damage, personal injury
or death.
WARNING: If a wheel must be
changed, obtain expert tire service help.
Mounting and un-mounting of tires
should only be performed by a qualified
technician using necessary safety
procedures and equipment, otherwise
the result could be property damage,
personal injury or death.
Note:Always make sure you apply the
parking brake before starting the engine.
Engine compartment (with engine off)
Use the dipstick to verify the oil level is in the proper operating
range. See Engine Oil Dipstick (page 224). Engine oil
Look through the plastic reservoir and verify the coolant level
is within the proper operating range. Do not remove the
pressure cap until the coolant has cooled. See Engine
Coolant Check (page 238). Engine coolant
Verify that the fluid level is in the proper operating range. See
Power Steering Fluid Check (page 245). Power steering fluid
Remove the master cylinder caps and inspect the fluid level.
See Brake Fluid Check (page 244). Brake fluid
210
Vehicle Inspection Guide
Page 215 of 378
Engine compartment (with engine off)
Inspect for glazing, fraying or cracking. There should be no
more than 5-7 cracks per rib, per 1 in (2.5 cm) Belts (fan, alternator,
water pump and air
conditioning
compressor)
Inspect for signs of fluid puddles or dripping fluid on the
ground under the engine, or the underside of the engine. Fluid leaks
Inspect for debris that may have collected on the HVAC air
inlet grille or inside the exterior module as this may reduce
system performance. HVAC air inlet
Engine starting (with parking brake applied)
Before entering the cab, verify that the vehicle is equipped
with spare electrical fuses (if used), three red reflective
triangles, a properly charged and rated fire extinguisher and
wheel chocks. Safety and emergency
equipment
Walk around the vehicle and verify all steps and grab handles,
inside and out (as well as behind), are tight and clean. Use
extreme caution and a three-point stance at all times.
Inspect door latches for proper closing, latching and locking.
Set the parking brake. Make sure the gearshift lever is in
neutral (N) or park (P) (if equipped with a park position). Starting the engine
Diesel engine: Turn the key to the on position. Turn the key
to start when the wait to start indicator light in the instrument
cluster turns off.
Gasoline engine: Turn the key to start, and then release it
as soon as the engine starts.
Verify pressure builds to normal operating range. Engine oil pressure
A tone indicating low air pressure should sound immediately
after the engine starts but before the compressor has built-
up pressure. The tone should stop when the air pressure
reaches 70 psi (483 kPa). Let the air pressure build to
governed cutout pressure, which should occur between
115–130 psi (793–896 kPa). Low air pressure warning
tone (if equipped with an
air compressor)
Press the accelerator and verify that it operates smoothly,
without any binding or irregular feel. Release the pedal and
verify the engine returns to idle speed immediately. Accelerator
211
Vehicle Inspection Guide
Page 226 of 378
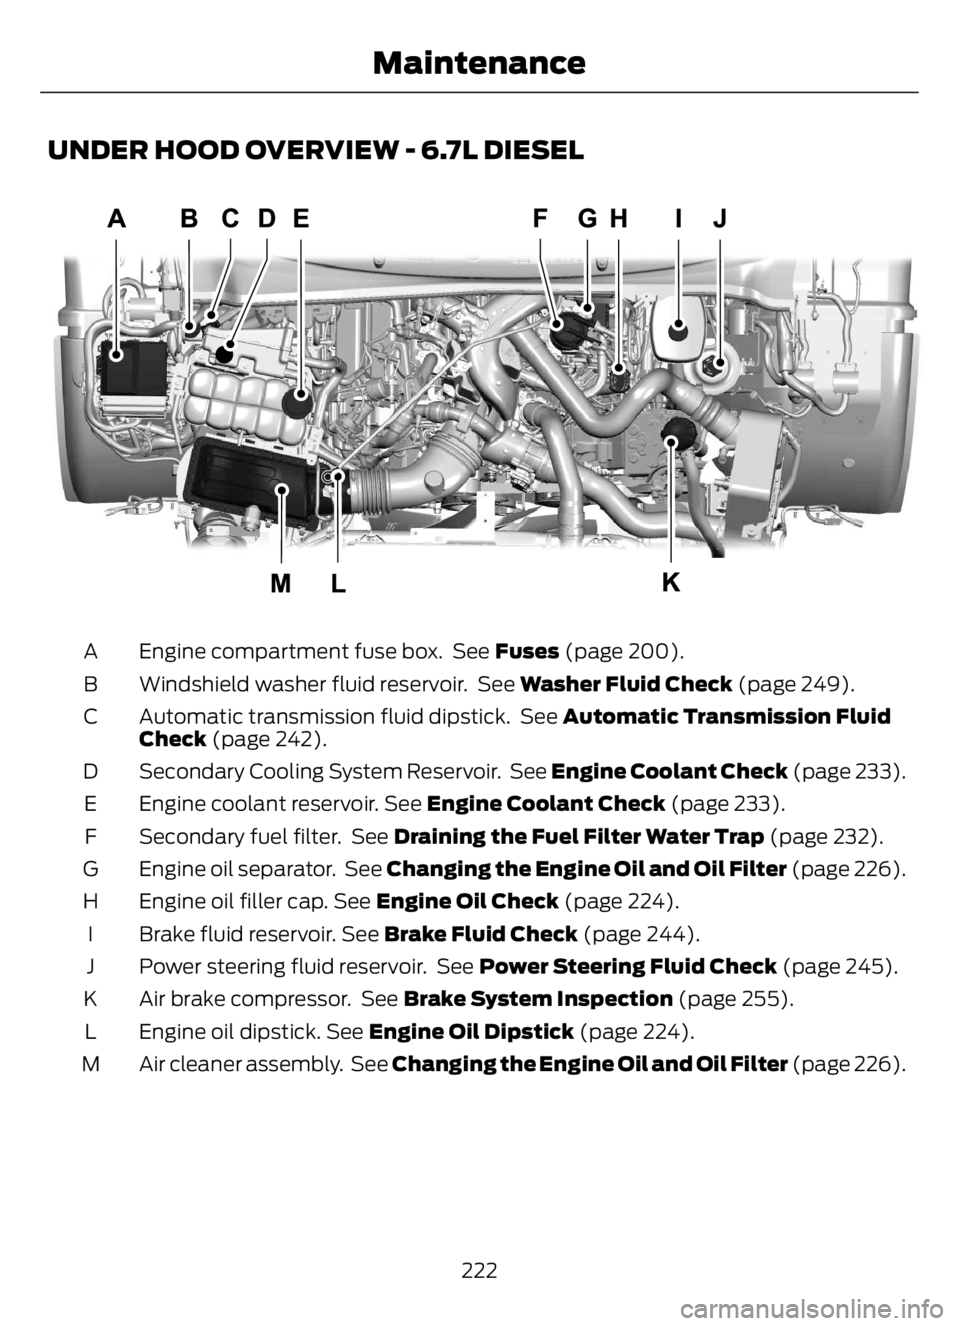
UNDER HOOD OVERVIEW - 6.7L DIESEL
E313700E313700
Engine compartment fuse box. See Fuses (page 200). A
Windshield washer fluid reservoir. See Washer Fluid Check (page 249). B
Automatic transmission fluid dipstick. See Automatic Transmission Fluid
Check (page 242). C
Secondary Cooling System Reservoir. See Engine Coolant Check (page 233). D
Engine coolant reservoir. See Engine Coolant Check (page 233). E
Secondary fuel filter. See Draining the Fuel Filter Water Trap (page 232). F
Engine oil separator. See Changing the Engine Oil and Oil Filter (page 226). G
Engine oil filler cap. See Engine Oil Check (page 224). H
Brake fluid reservoir. See Brake Fluid Check (page 244). I
Power steering fluid reservoir. See Power Steering Fluid Check (page 245). J
Air brake compressor. See Brake System Inspection (page 255). K
Engine oil dipstick. See Engine Oil Dipstick (page 224). L
Air cleaner assembly. See Changing the Engine Oil and Oil Filter (page 226). M
222
Maintenance
Page 227 of 378
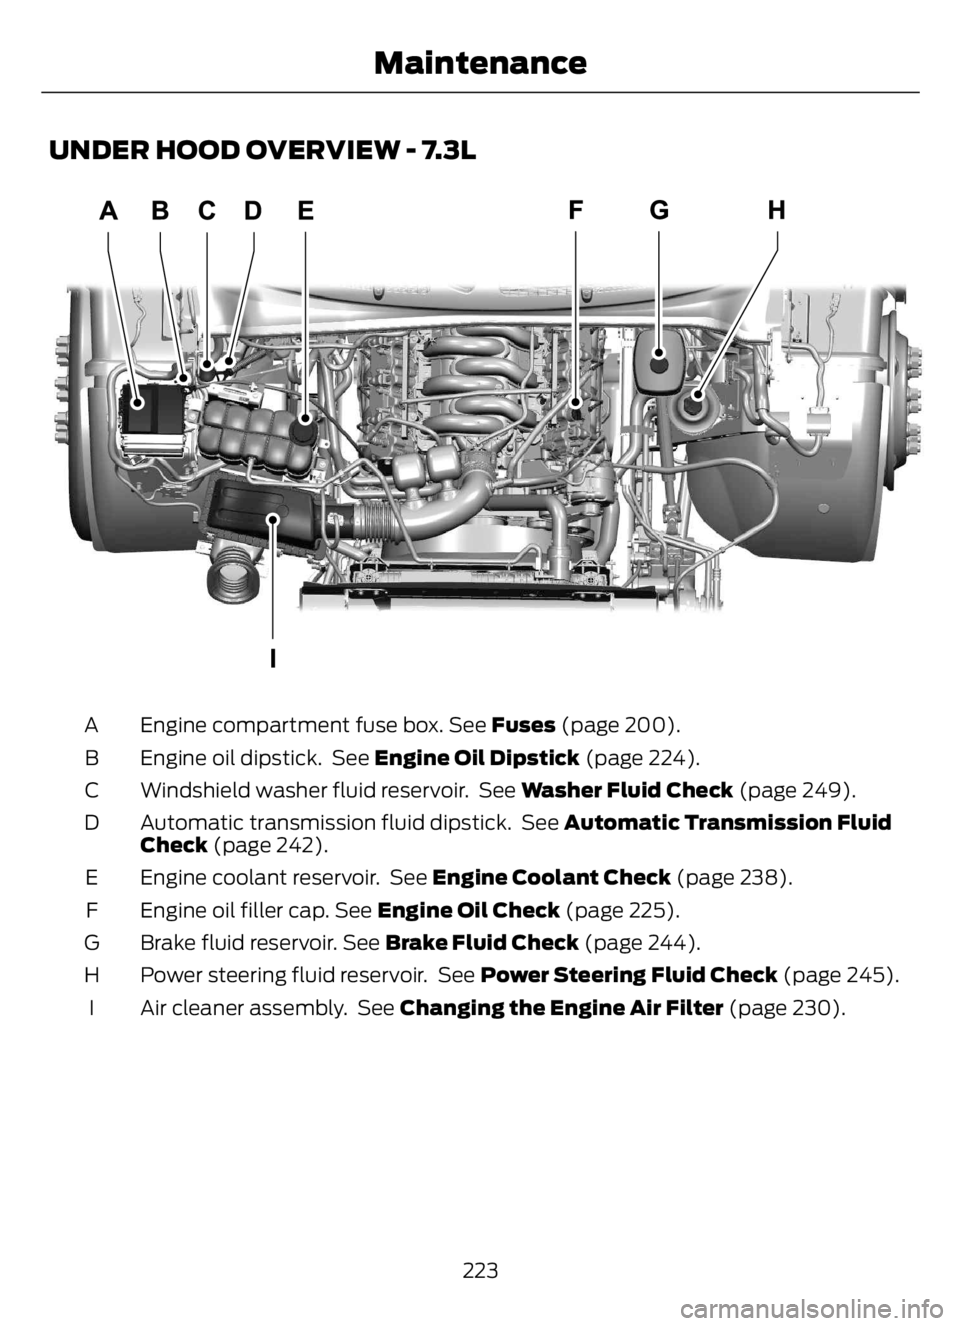
UNDER HOOD OVERVIEW - 7.3L
E330964E330964
Engine compartment fuse box. See Fuses (page 200). A
Engine oil dipstick. See Engine Oil Dipstick (page 224). B
Windshield washer fluid reservoir. See Washer Fluid Check (page 249). C
Automatic transmission fluid dipstick. See Automatic Transmission Fluid
Check (page 242). D
Engine coolant reservoir. See Engine Coolant Check (page 238). E
Engine oil filler cap. See Engine Oil Check (page 225). F
Brake fluid reservoir. See Brake Fluid Check (page 244). G
Power steering fluid reservoir. See Power Steering Fluid Check (page 245). H
Air cleaner assembly. See Changing the Engine Air Filter (page 230). I
223
Maintenance
Page 228 of 378
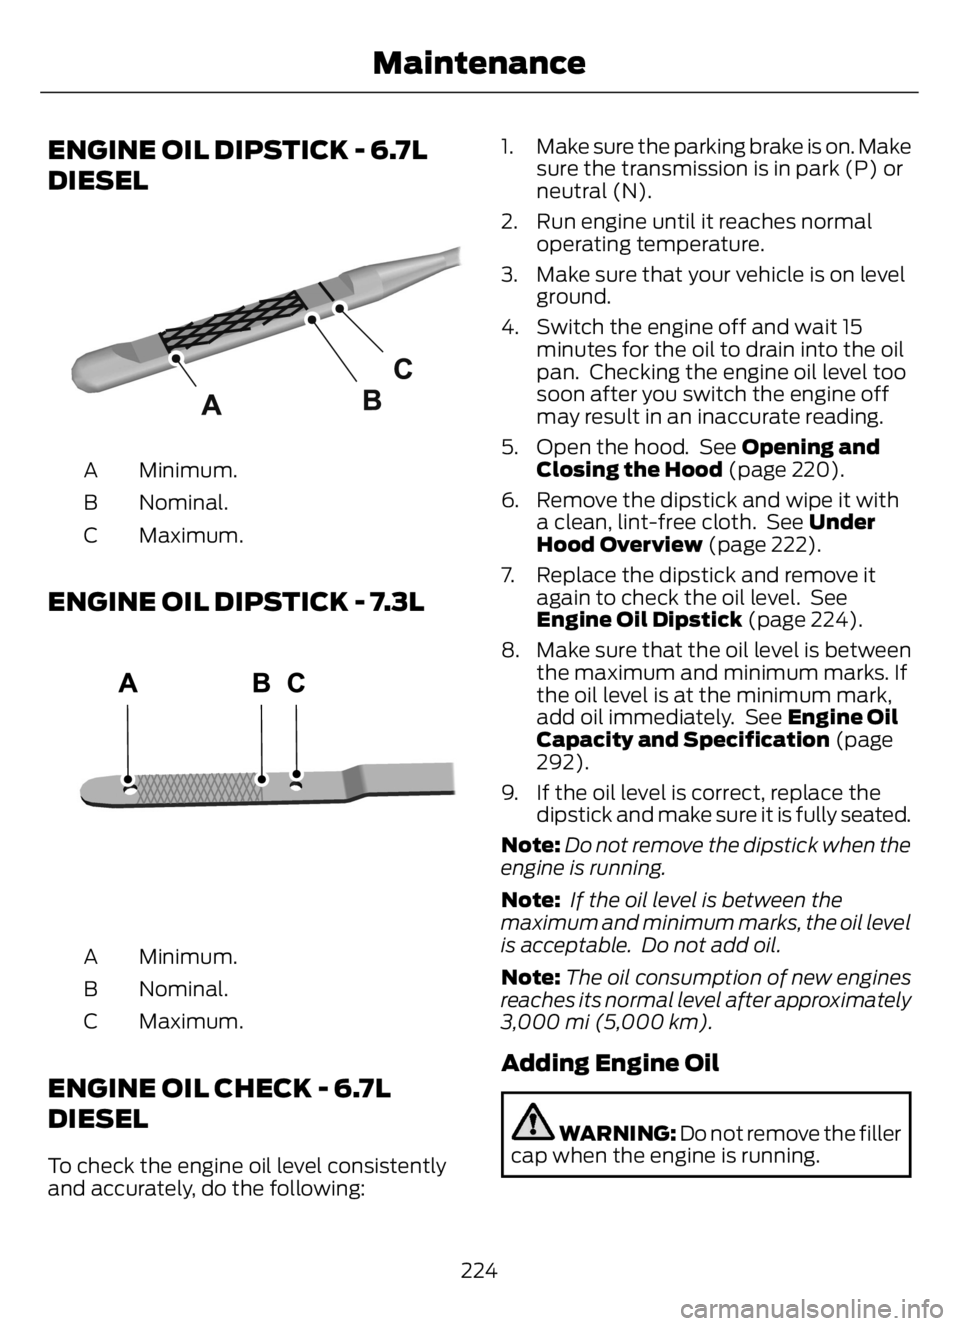
ENGINE OIL DIPSTICK - 6.7L
DIESEL
E249448
Minimum. A
Nominal. B
Maximum. C
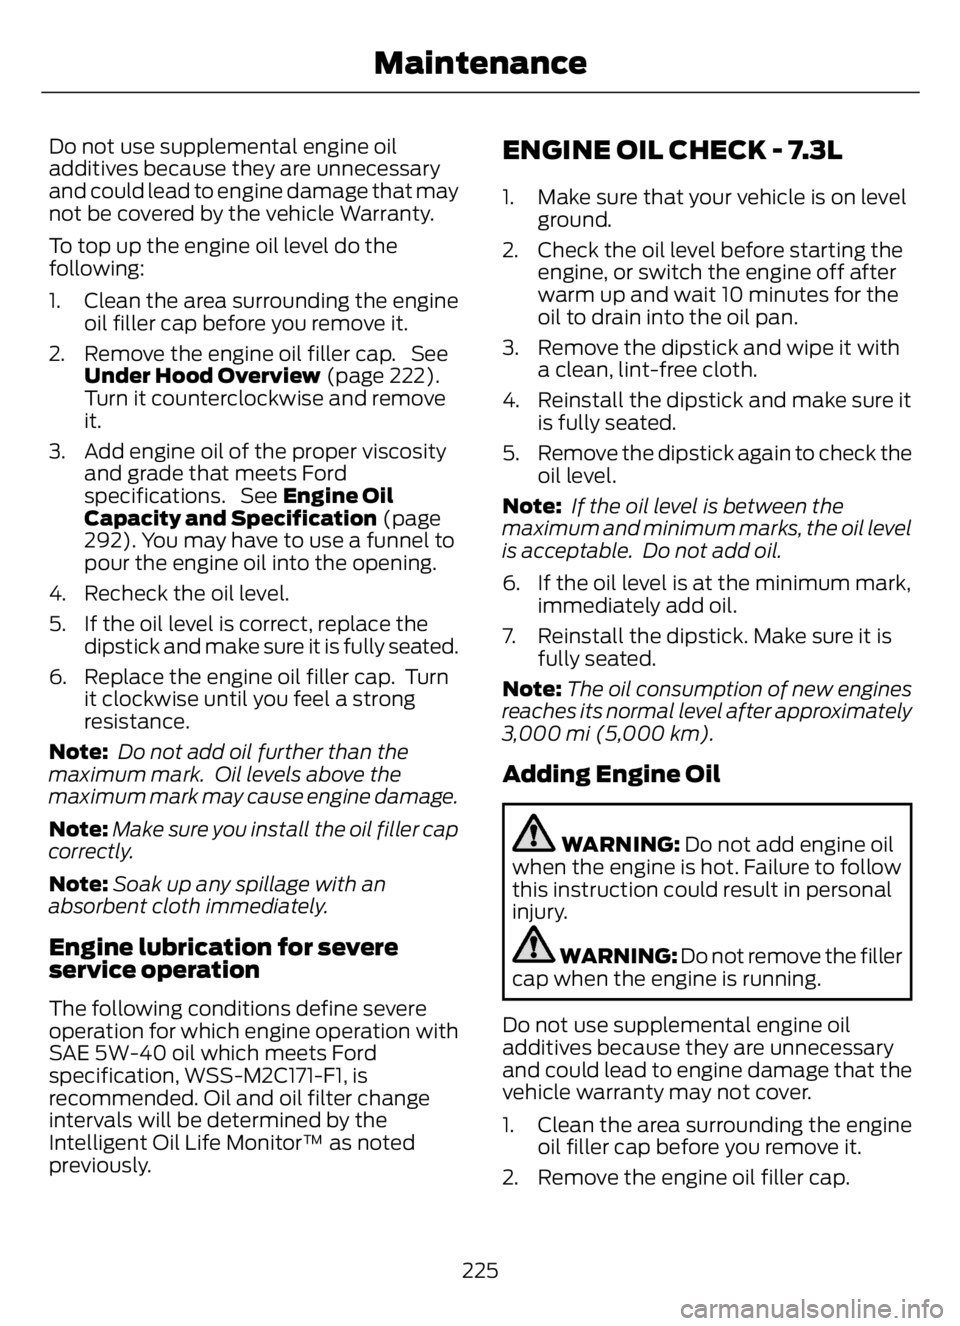
ENGINE OIL DIPSTICK - 7.3L
E250320E250320
Minimum. A
Nominal. B
Maximum. C
ENGINE OIL CHECK - 6.7L
DIESEL
To check the engine oil level consistently
and accurately, do the following:1. Make sure the parking brake is on. Make
sure the transmission is in park (P) or
neutral (N).
2. Run engine until it reaches normal
operating temperature.
3. Make sure that your vehicle is on level
ground.
4. Switch the engine off and wait 15
minutes for the oil to drain into the oil
pan. Checking the engine oil level too
soon after you switch the engine off
may result in an inaccurate reading.
5. Open the hood. See Opening and
Closing the Hood (page 220).
6. Remove the dipstick and wipe it with
a clean, lint-free cloth. See Under
Hood Overview (page 222).
7. Replace the dipstick and remove it
again to check the oil level. See
Engine Oil Dipstick (page 224).
8. Make sure that the oil level is between
the maximum and minimum marks. If
the oil level is at the minimum mark,
add oil immediately. See Engine Oil
Capacity and Specification (page
292).
9. If the oil level is correct, replace the
dipstick and make sure it is fully seated.
Note:Do not remove the dipstick when the
engine is running.
Note: If the oil level is between the
maximum and minimum marks, the oil level
is acceptable. Do not add oil.
Note:The oil consumption of new engines
reaches its normal level after approximately
3,000 mi (5,000 km).
Adding Engine Oil
WARNING: Do not remove the filler
cap when the engine is running.
224
Maintenance
Page 229 of 378
Do not use supplemental engine oil
additives because they are unnecessary
and could lead to engine damage that may
not be covered by the vehicle Warranty.
To top up the engine oil level do the
following:
1. Clean the area surrounding the engine
oil filler cap before you remove it.
2. Remove the engine oil filler cap. See
Under Hood Overview (page 222).
Turn it counterclockwise and remove
it.
3. Add engine oil of the proper viscosity
and grade that meets Ford
specifications. See Engine Oil
Capacity and Specification (page
292). You may have to use a funnel to
pour the engine oil into the opening.
4. Recheck the oil level.
5. If the oil level is correct, replace the
dipstick and make sure it is fully seated.
6. Replace the engine oil filler cap. Turn
it clockwise until you feel a strong
resistance.
Note: Do not add oil further than the
maximum mark. Oil levels above the
maximum mark may cause engine damage.
Note:Make sure you install the oil filler cap
correctly.
Note:Soak up any spillage with an
absorbent cloth immediately.
Engine lubrication for severe
service operation
The following conditions define severe
operation for which engine operation with
SAE 5W-40 oil which meets Ford
specification, WSS-M2C171-F1, is
recommended. Oil and oil filter change
intervals will be determined by the
Intelligent Oil Life Monitor™ as noted
previously.
ENGINE OIL CHECK - 7.3L
1. Make sure that your vehicle is on level
ground.
2. Check the oil level before starting the
engine, or switch the engine off after
warm up and wait 10 minutes for the
oil to drain into the oil pan.
3. Remove the dipstick and wipe it with
a clean, lint-free cloth.
4. Reinstall the dipstick and make sure it
is fully seated.
5. Remove the dipstick again to check the
oil level.
Note: If the oil level is between the
maximum and minimum marks, the oil level
is acceptable. Do not add oil.
6. If the oil level is at the minimum mark,
immediately add oil.
7. Reinstall the dipstick. Make sure it is
fully seated.
Note:The oil consumption of new engines
reaches its normal level after approximately
3,000 mi (5,000 km).
Adding Engine Oil
WARNING: Do not add engine oil
when the engine is hot. Failure to follow
this instruction could result in personal
injury.
WARNING: Do not remove the filler
cap when the engine is running.
Do not use supplemental engine oil
additives because they are unnecessary
and could lead to engine damage that the
vehicle warranty may not cover.
1. Clean the area surrounding the engine
oil filler cap before you remove it.
2. Remove the engine oil filler cap.
225
Maintenance
Page 230 of 378
3. Add engine oil that meets our
specifications. See Capacities and
Specifications (page 288).
4. Reinstall the engine oil filler cap. Turn
it clockwise until you feel a strong
resistance.
Note: Do not add oil further than the
maximum mark. Oil levels above the
maximum mark may cause engine damage.
Note:Immediately soak up any oil spillage
with an absorbent cloth.
Engine Oil Pressure Warning Lamp
WARNING: If it illuminates when
you are driving do not continue your
journey, even if the oil level is correct.
Have your vehicle checked.
It illuminates when you switch
the ignition on.
If it illuminates when the engine
is running this indicates a malfunction.
Stop your vehicle as soon as it is safe to
do so and switch the engine off. Check the
engine oil level. If the oil level is sufficient,
this indicates a system malfunction. Have
your vehicle checked as soon as possible.
CHANGING THE ENGINE OIL
AND OIL FILTER
WARNING: Do not add engine oil
when the engine is hot. Failure to follow
this instruction could result in personal
injury.If your vehicle has a diesel engine, an
Intelligent Oil Life Monitor™ calculates the
proper oil change service interval. When
the information display indicates: OIL
CHANGE REQUIRED, change the engine
oil and oil filter. See Information
Displays (page 70).
The engine oil filter protects your engine
by filtering harmful, abrasive or sludge
particles and particles significantly smaller
than most available will-fit filters. See
Motorcraft Parts (page 290).
1. Unscrew the oil filter and oil pan drain
plug and wait for the oil to drain.
2. Replace the filter.
3. Reinstall the oil pan drain plug.
4. Refill the engine with new oil. See
Engine Oil Capacity and
Specification (page 295).
5. For diesel engines, you need to reset
the Intelligent Oil Life Monitor™. See
Information Displays (page 70).
Engine Lubrication for Severe
Service Operation
The following conditions define severe
operation:
• Frequent or extended idling such as
over 10 minutes per hour of normal
driving.
• Low-speed operation or stationary use.
• If the vehicle is operated in sustained,
ambient temperatures below -9°F
(-23°C) or above 100°F (38°C).
• Frequent low-speed operation, or
consistent heavy traffic less than
25 mph (40 km/h).
• Operating in severe dust conditions.
• Operating the vehicle off road.
• Towing a trailer over 1,000 mi
(1,600 km).
226
Maintenance
Page 231 of 378
• Sustained, high-speed driving at the
gross vehicle weight rating.
• Use of fuels with sulfur content other
than ultra-low sulfur diesel (ULSD).
• Use of high-sulfur diesel fuel.
Only use engine oil that meets our
specifications. See Capacities and
Specifications (page 288).
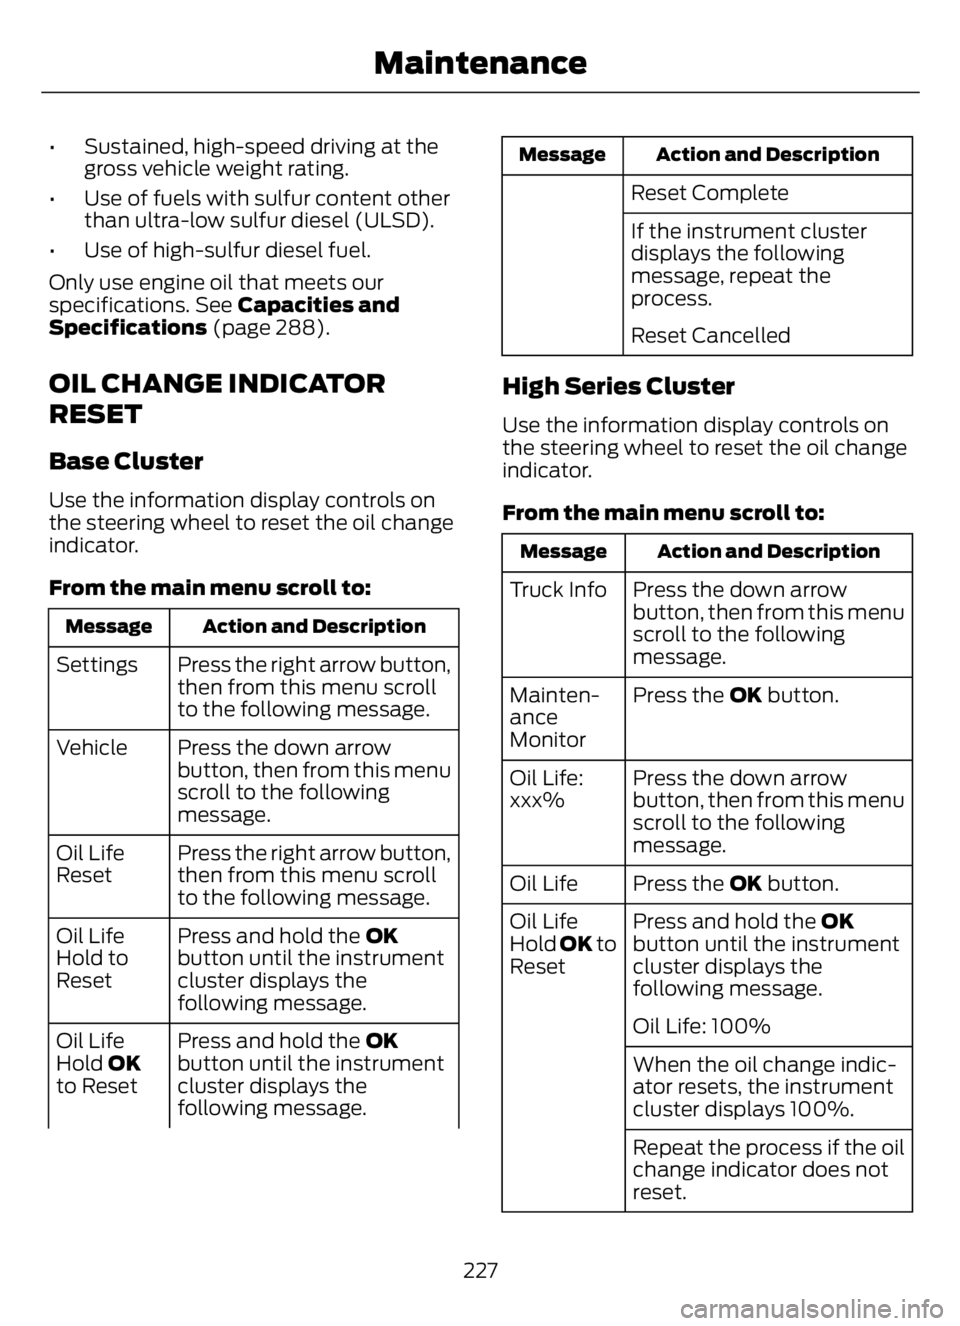
OIL CHANGE INDICATOR
RESET
Base Cluster
Use the information display controls on
the steering wheel to reset the oil change
indicator.
From the main menu scroll to:
Action and Description Message
Press the right arrow button,
then from this menu scroll
to the following message. Settings
Press the down arrow
button, then from this menu
scroll to the following
message. Vehicle
Press the right arrow button,
then from this menu scroll
to the following message. Oil Life
Reset
Press and hold the OK
button until the instrument
cluster displays the
following message. Oil Life
Hold to
Reset
Press and hold the OK
button until the instrument
cluster displays the
following message. Oil Life
Hold OK
to Reset
Action and Description Message
Reset Complete
If the instrument cluster
displays the following
message, repeat the
process.
Reset Cancelled
High Series Cluster
Use the information display controls on
the steering wheel to reset the oil change
indicator.
From the main menu scroll to:
Action and Description Message
Press the down arrow
button, then from this menu
scroll to the following
message. Truck Info
Press the OK button. Mainten-
ance
Monitor
Press the down arrow
button, then from this menu
scroll to the following
message. Oil Life:
xxx%
Press the OK button. Oil Life
Press and hold the OK
button until the instrument
cluster displays the
following message. Oil Life
Hold OK to
Reset
Oil Life: 100%
When the oil change indic-
ator resets, the instrument
cluster displays 100%.
Repeat the process if the oil
change indicator does not
reset.
227
Maintenance