ECO mode FORD F650/750 2023 Owners Manual
[x] Cancel search | Manufacturer: FORD, Model Year: 2023, Model line: F650/750, Model: FORD F650/750 2023Pages: 378, PDF Size: 5.65 MB
Page 9 of 378
Repairing Minor Paint Damage .............266
Cleaning the Wheels .................................266
Vehicle Storage ............................................267
Wheels and Tires
Tire Care .........................................................269
Using Snow Chains ....................................284
Changing a Road Wheel ..........................284
Technical Specifications .........................286
Capacities and Specifications
Engine Specifications - 6.7L Diesel ......288
Engine Specifications - 7.3L ...................289
Motorcraft Parts - 6.7L Diesel ................290
Motorcraft Parts - 7.3L ...............................291
Bulb Specification Chart ..........................292
Engine Oil Capacity and Specification -
6.7L Diesel .................................................292
Engine Oil Capacity and Specification -
7.3L ...............................................................295
Cooling System Capacity and
Specification - 6.7L Diesel ...................297
Cooling System Capacity and
Specification - 7.3L ................................298
Fuel Tank Capacity - Diesel ....................298
Fuel Tank Capacity - Gasoline ..............299
Air Conditioning System Capacity and
Specification - 6.7L Diesel ..................300
Air Conditioning System Capacity and
Specification - 7.3L .................................301
Washer Fluid Specification ......................301
Diesel Exhaust Fluid Capacity and
Specification ............................................302
Automatic Transmission Fluid Capacity
and Specification ...................................302
Brake Fluid Specification .........................303
Rear Axle Fluid Capacity and
Specification - Diesel ...........................304
Rear Axle Fluid Capacity and
Specification - Gasoline ......................305Hydraulic Power Steering Fluid Capacity
and Specification ...................................306
Vehicle Identification
Vehicle Identification Number ...............307
Connected Vehicle
Connected Vehicle Requirements .......308
Connected Vehicle Limitations .............308
Connecting the Vehicle to a Mobile
Network - Vehicles With: Modem .....308
Connected Vehicle – Troubleshooting
.......................................................................3 0 8
Audio System
General Information ..................................309
Audio Unit .....................................................309
Connecting a Bluetooth® Device ..........312
Streaming Bluetooth Audio .....................312
Playing Media From a USB Device ........312
Audio Input Jack ...........................................313
USB Port .........................................................314
Using Voice Recognition ...........................314
Accessories
Auxiliary Switches .......................................315
Ford Protect
Ford Protect ...................................................317
Scheduled Maintenance
General Maintenance Information .......319
Normal Scheduled Maintenance ..........323
Special Operating Conditions Scheduled
Maintenance ............................................329
Customer Information
Rollover Warning ........................................338
Radio Frequency Certification Labels
........................................................................338
5
Table of Contents
Page 11 of 378
ABOUT THIS MANUAL
Thank you for choosing Ford. We
recommend that you take some time to
get to know your vehicle by reading this
manual. The more that you know about
your vehicle, the greater the safety and
pleasure you will get from driving it.
WARNING: Driving while distracted
can result in loss of vehicle control, crash
and injury. We strongly recommend that
you use extreme caution when using any
device that may take your focus off the
road. Your primary responsibility is the
safe operation of your vehicle. We
recommend against the use of any
hand-held device while driving and
encourage the use of voice-operated
systems when possible. Make sure you
are aware of all applicable local laws
that may affect the use of electronic
devices while driving.
Note: Always use and operate your vehicle
in line with all applicable laws and
regulations.
Note: Pass on this manual when selling
your vehicle. It is an integral part of your
vehicle.
Note:Your vehicle’s powertrain control
systems can detect and store information
about vehicle modifications that increase
horsepower and torque output such as
whether or not performance-enhancing
powertrain components commonly referred
to as performance chips have been used.
This information will stay in the system’s
memory and cannot be erased even if the
modification is removed. Ford Motor
Company, Ford of Canada, Ford of Mexico
and service or repair facilities can retrieve
this information when servicing your vehicle.
Ford Motor Company may use this
information to determine if your warranty
covers any needed repairs.Note:Some aftermarket products may
cause severe engine/transmission and/or
exhaust system damage; refer to your
warranty information for more information.
Your new diesel engine will feel, drive and
function somewhat differently than a
gasoline engine. Therefore it is very
important that you read and thoroughly
familiarize yourself and others operating
the vehicle with this guide. There is a
special procedure for turning off the diesel
engine. See Starting a Diesel Engine
(page 102). It is important to read and
understand this material in order to
maintain the best service life for your
engine.
Ford may discontinue models or change
specifications without any notice and
without incurring obligations.
Note:Either Ford Motor Company or an
authorized Ford dealer may have originally
sold this incomplete vehicle to a vehicle
modifier who upfitted it. As a result, some
of the options and features on this vehicle
may differ from what we describe in this
manual.
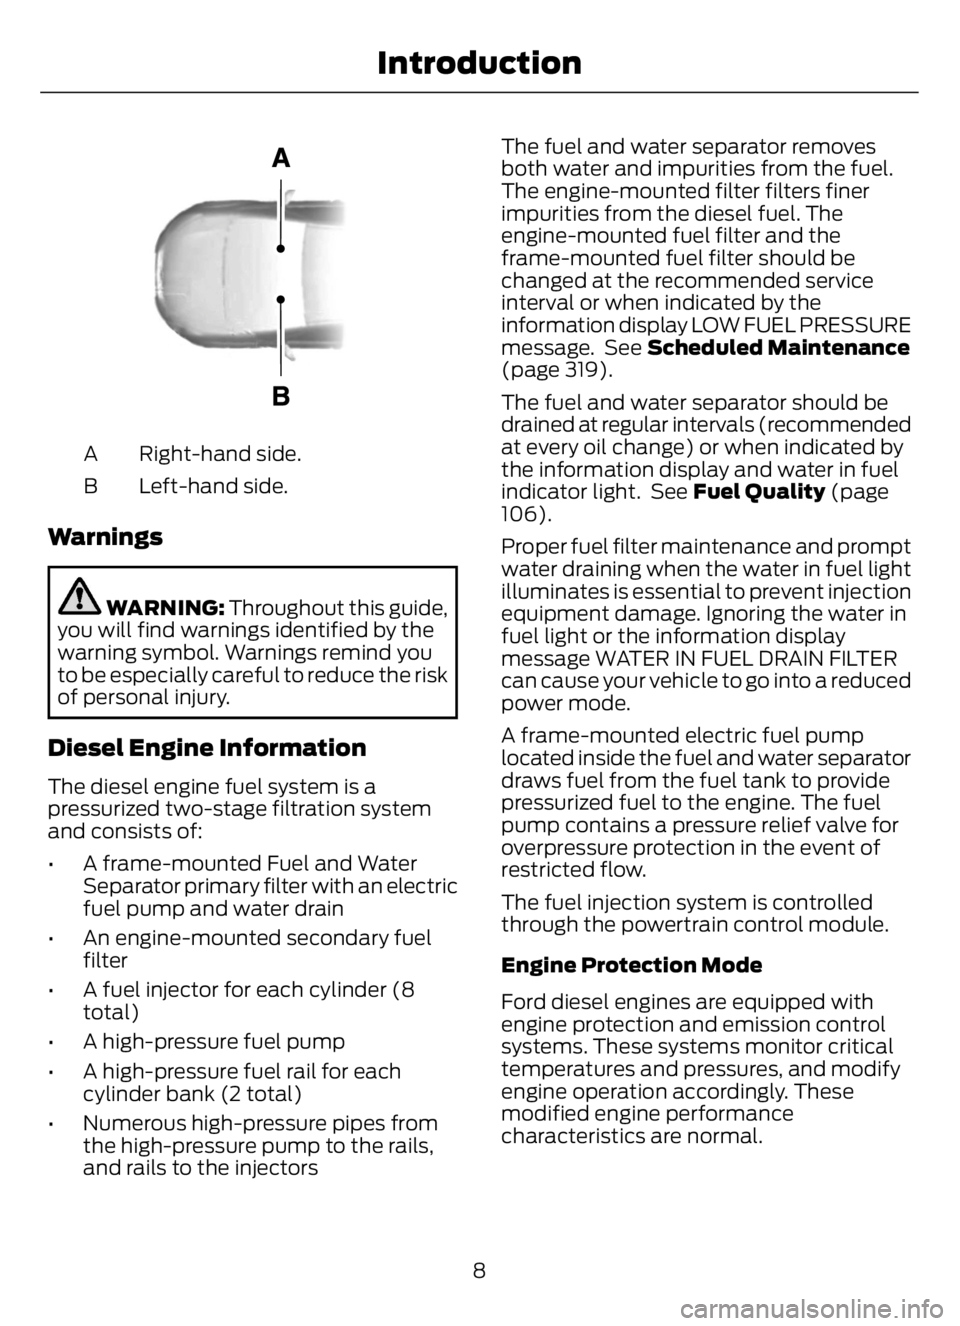
This manual may qualify the location of a
component as left-hand side or right-hand
side. The side is determined when facing
forward in the seat.
7
Introduction
Page 12 of 378
E154903
Right-hand side. A
Left-hand side. B
Warnings
WARNING: Throughout this guide,
you will find warnings identified by the
warning symbol. Warnings remind you
to be especially careful to reduce the risk
of personal injury.
Diesel Engine Information
The diesel engine fuel system is a
pressurized two-stage filtration system
and consists of:
• A frame-mounted Fuel and Water
Separator primary filter with an electric
fuel pump and water drain
• An engine-mounted secondary fuel
filter
• A fuel injector for each cylinder (8
total)
• A high-pressure fuel pump
• A high-pressure fuel rail for each
cylinder bank (2 total)
• Numerous high-pressure pipes from
the high-pressure pump to the rails,
and rails to the injectorsThe fuel and water separator removes
both water and impurities from the fuel.
The engine-mounted filter filters finer
impurities from the diesel fuel. The
engine-mounted fuel filter and the
frame-mounted fuel filter should be
changed at the recommended service
interval or when indicated by the
information display LOW FUEL PRESSURE
message. See Scheduled Maintenance
(page 319).
The fuel and water separator should be
drained at regular intervals (recommended
at every oil change) or when indicated by
the information display and water in fuel
indicator light. See Fuel Quality (page
106).
Proper fuel filter maintenance and prompt
water draining when the water in fuel light
illuminates is essential to prevent injection
equipment damage. Ignoring the water in
fuel light or the information display
message WATER IN FUEL DRAIN FILTER
can cause your vehicle to go into a reduced
power mode.
A frame-mounted electric fuel pump
located inside the fuel and water separator
draws fuel from the fuel tank to provide
pressurized fuel to the engine. The fuel
pump contains a pressure relief valve for
overpressure protection in the event of
restricted flow.
The fuel injection system is controlled
through the powertrain control module.
Engine Protection Mode
Ford diesel engines are equipped with
engine protection and emission control
systems. These systems monitor critical
temperatures and pressures, and modify
engine operation accordingly. These
modified engine performance
characteristics are normal.
8
Introduction
Page 13 of 378
If these modified engine performance
characteristics persist for an extended
period and either the service engine soon
or powertrain malfunction, reduced power,
electronic throttle control light is
illuminated, have the system checked by
an authorized dealer.
Service engine soon
Powertrain malfunction, reduced
power, electronic throttle control
Diesel Lubrication System
It is important to change the engine oil at
the recommended service intervals or
when indicated by the information display
to maintain oil viscosity. Extending the oil
and filter change interval beyond the
recommended interval can negatively
affect engine performance, fuel economy
and engine life. See Engine Oil Check
(page 224).
Engine and secondary cooling system
The cooling system contains a primary
cooling loop to cool the engine and a
secondary cooling loop to cool the
transmission, charge air, and fuel. The
coolant serves three primary purposes: to
provide heat transfer, freeze point
protection, and corrosion protection using
additives.
Vehicles with diesel engines typically are
used to carry heavy loads and accumulate
mileage rapidly. These two factors may
cause the additives in the coolant to wear
out in a shorter time. You can find more
information about coolant additives and
coolant change intervals in the coolant
chapter. See General Maintenance
Information (page 319). Operating the
engine with insufficient coolant or coolant
additive can cause severe engine damage.Selective catalytic reduction system
Your vehicle is equipped with a selective
catalytic reduction system designed to
reduce emission levels of nitrogen oxides
from the exhaust of your diesel engine. This
system relies on the use of Diesel Exhaust
Fluid (DEF) that you must replenish at
certain intervals. Failure to maintain proper
DEF levels or if the DEF becomes
contaminated will result in vehicle speed
limitations or result in your vehicle entering
an idle-only mode. See Selective
Catalytic Reductant System (page 118).
Minor Troubleshooting Guide
If the engine won’t crank
WARNING: Battery posts,
terminals and related accessories
contain lead and lead compounds. Wash
hands after handling.
Turn on the headlights. If the lights are dim,
do not go on at all or when the ignition is
turned to the start position, the lights
become dim or go out, the battery
connections may be loose or corroded, or
the battery may be discharged. If there is
a clicking or stuttering sound coming from
the engine compartment when you turn
the key to the start position, this may also
indicate a loose or corroded battery
connection.
Check the battery connections at the
battery posts, cable connection to the
engine grounding point and at the starter
connection.
If you suspect a discharged battery, have
it checked and corrected.
9
Introduction
Page 14 of 378
• The gearshift lever must be in P (Park)
or N (Neutral) in order for the starter
to operate.
• Try operating the starter switch several
times. This operation may clean
potentially corroded contacts or make
the switch temporarily operable until
you can reach the dealer.
• If all electrical connections are tight
and you need assistance to start, See
Jump Starting the Vehicle (page 190).
If engine cranks but won’t start
Prolonged starter cranking (in excess of 10
seconds) could cause damage to the
starter motor or the high-pressure fuel
pump.
• Check the fuel gauge. You may be out
of fuel. If the gauge shows that there
is fuel in the tank, the trouble may be
in the electrical system or the fuel
system. If equipped with an auxiliary
tank, be sure that the tank control
switch is set for the tank with fuel and
not on an empty tank.
• Leaving your ignition key turned to on
for over two minutes without starting
may make starting difficult because
the glow plugs will cease activation.
Reset the system by turning the ignition
key to off and then back to on again.
Note:If the system is out of fuel and the
engine will not start, do not continue
cranking the engine. Continued cranking can
damage the high-pressure fuel pump.
If the engine runs hot
The following could cause the engine to
overheat:
• Lack of coolant
• Dirty cooling system.
• Plugged radiator fins, A/C condenser
and/or oil cooler
• Malfunctioning fan drive• Driving with frozen coolant
• Sticking thermostat
• Overloading or pulling heavy trailers
during hot weather
• Grill or radiator air blockage
• Slipping or missing drive belt
• Plugged or very dirty air filter
If fuses burn out
WARNING: Replacement fuses and
circuit breakers must always be the
same rating as the original equipment
shown. Never replace a fuse or circuit
breaker with one of a higher rating.
Higher rated fuses or circuit breakers
could allow circuit overloading in the
event of a circuit malfunction, resulting
in severe vehicle damage or personal
injury due to fire.
Burned-out or blown fuses usually indicate
an electrical short-circuit, although a fuse
may occasionally burn out from vibration.
Insert a second fuse. If this fuse
immediately burns out and you cannot
locate the cause, return your vehicle to
your dealer for a circuit check. See
Changing a Fuse (page 208).
Selective catalytic reduction system
speed limit and Idle-only modes
If the vehicle’s speed is limited or in an
idle-only mode, the selective catalytic
reduction system may be limiting the
vehicle’s functions due to low or
contaminated DEF. Check the DEF. See
Selective Catalytic Reductant System
(page 118).
SYMBOLS GLOSSARY
These are some of the symbols you may
see on your vehicle.
10
Introduction
Page 32 of 378
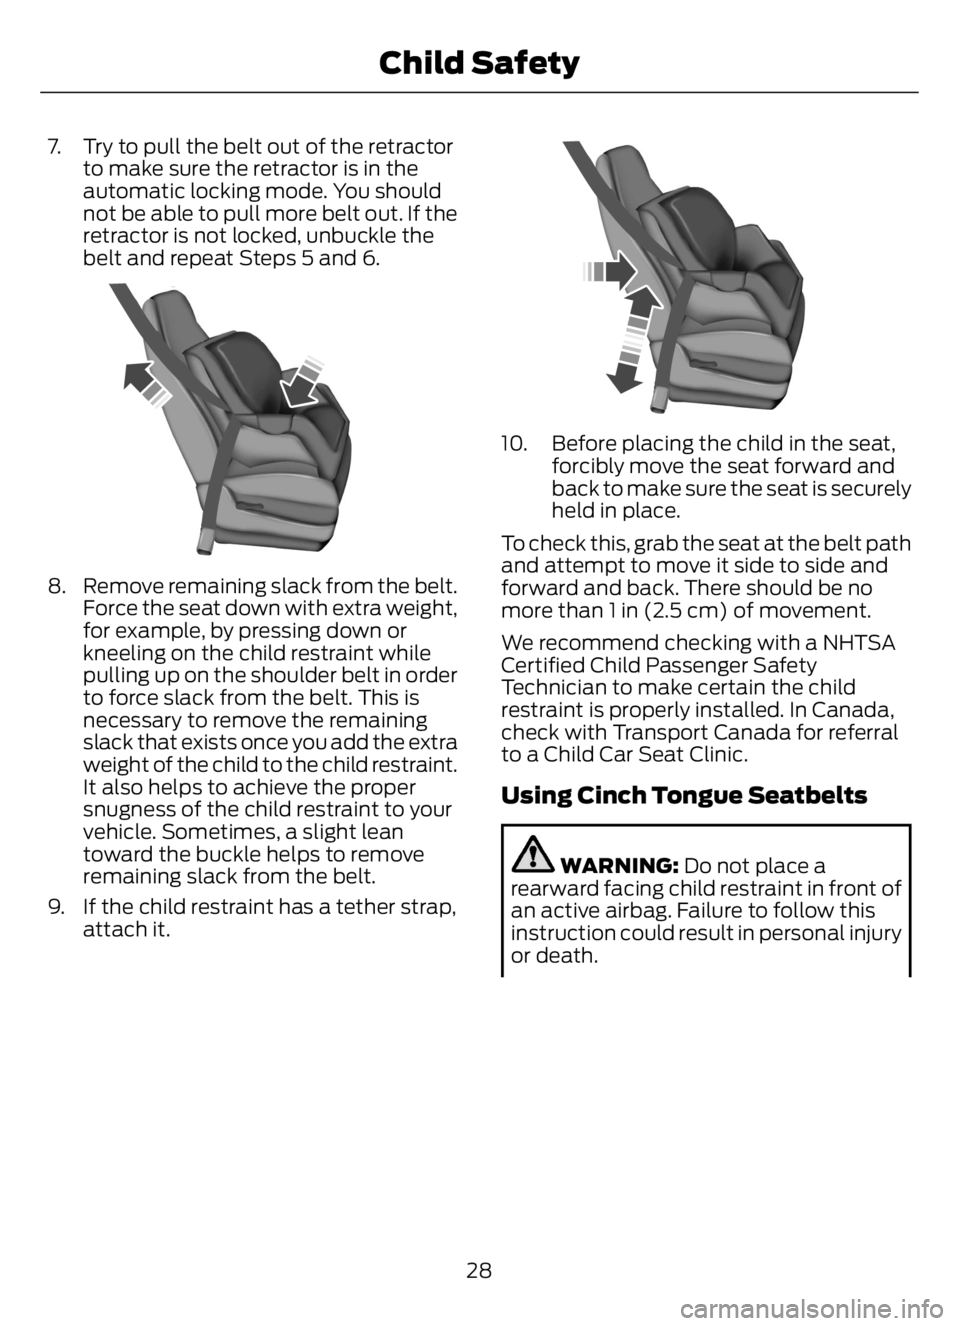
7. Try to pull the belt out of the retractor
to make sure the retractor is in the
automatic locking mode. You should
not be able to pull more belt out. If the
retractor is not locked, unbuckle the
belt and repeat Steps 5 and 6.
E142533
8. Remove remaining slack from the belt.
Force the seat down with extra weight,
for example, by pressing down or
kneeling on the child restraint while
pulling up on the shoulder belt in order
to force slack from the belt. This is
necessary to remove the remaining
slack that exists once you add the extra
weight of the child to the child restraint.
It also helps to achieve the proper
snugness of the child restraint to your
vehicle. Sometimes, a slight lean
toward the buckle helps to remove
remaining slack from the belt.
9. If the child restraint has a tether strap,
attach it.
E142534
10. Before placing the child in the seat,
forcibly move the seat forward and
back to make sure the seat is securely
held in place.
To check this, grab the seat at the belt path
and attempt to move it side to side and
forward and back. There should be no
more than 1 in (2.5 cm) of movement.
We recommend checking with a NHTSA
Certified Child Passenger Safety
Technician to make certain the child
restraint is properly installed. In Canada,
check with Transport Canada for referral
to a Child Car Seat Clinic.
Using Cinch Tongue Seatbelts
WARNING: Do not place a
rearward facing child restraint in front of
an active airbag. Failure to follow this
instruction could result in personal injury
or death.
28
Child Safety
Page 41 of 378
PRINCIPLE OF OPERATION
WARNING: Always drive and ride
with the seat backrest upright and the
lap belt snug and low across the hips.
WARNING: To reduce the risk of
injury, make sure children sit where they
can be properly restrained.
WARNING: Never let a passenger
hold a child on his or her lap while your
vehicle is moving. The passenger cannot
protect the child from injury in a crash
which may result in serious injury or
death.
WARNING: All occupants of the
vehicle, including the driver, should
always properly wear their safety belts,
even when an airbag supplemental
restraint system is provided. Failure to
properly wear your safety belt could
seriously increase the risk of injury or
death.
WARNING: It is extremely
dangerous to ride in a cargo area, inside
or outside of a vehicle. In a crash, people
riding in these areas are more likely to be
seriously injured or killed. Do not allow
people to ride in any area of your vehicle
that is not equipped with seats and
safety belts. Be sure everyone in your
vehicle is in a seat and using a safety belt
properly.
WARNING: In a rollover crash, an
unbelted person is significantly more
likely to die than a person wearing a
safety belt.
WARNING: Each seating position
in your vehicle has a specific safety belt
assembly which is made up of one
buckle and one tongue that are designed
to be used as a pair. 1) Use the shoulder
belt on the outside shoulder only. Never
wear the shoulder belt under the arm. 2)
Never swing the safety belt around your
neck over the inside shoulder. 3) Never
use a single belt for more than one
person.
WARNING: When possible, all
children 12 years old and under should
be properly restrained in a rear seating
position. Failure to follow this could
seriously increase the risk of injury or
death.
WARNING: Safety belts and seats
can become hot in a vehicle that has
been closed up in sunny weather; they
could burn a small child. Check seat
covers and buckles before you place a
child anywhere near them.
WARNING: Front and rear seat
occupants, including pregnant women,
should wear safety belts for optimum
protection in an accident.
All seating positions in this vehicle have
lap and shoulder safety belts. All
occupants of the vehicle should always
properly wear their safety belts, even when
an airbag supplemental restraint system
is provided.
The safety belt system consists of:
• Lap and shoulder safety belts.
• Shoulder safety belt with automatic
locking mode, (except driver safety
belt).
37
Seatbelts
Page 47 of 378
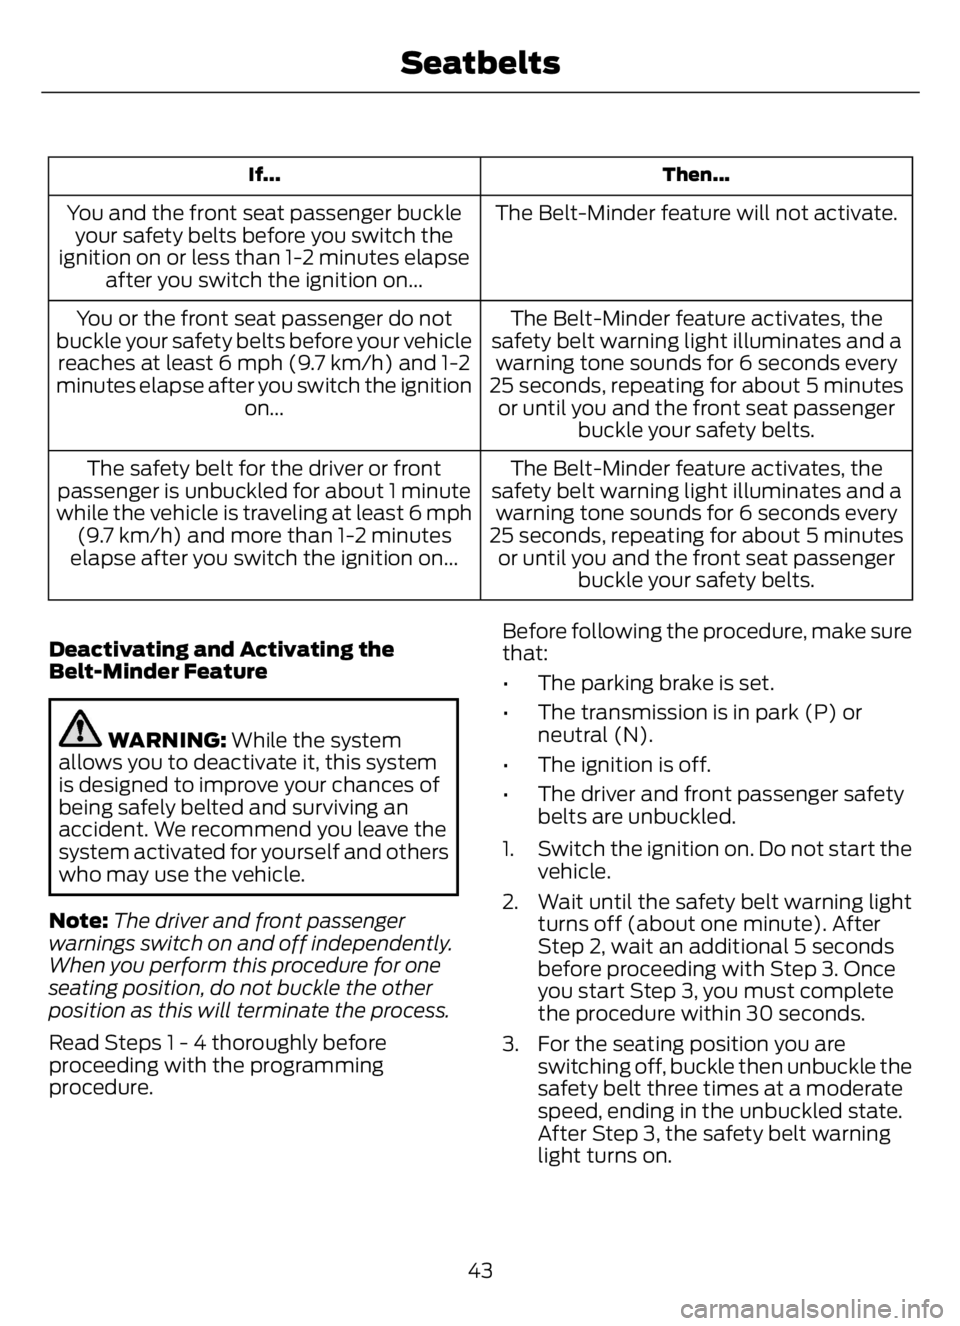
Then... If...
The Belt-Minder feature will not activate. You and the front seat passenger buckle
your safety belts before you switch the
ignition on or less than 1-2 minutes elapse
after you switch the ignition on...
The Belt-Minder feature activates, the
safety belt warning light illuminates and a
warning tone sounds for 6 seconds every
25 seconds, repeating for about 5 minutes
or until you and the front seat passenger
buckle your safety belts. You or the front seat passenger do not
buckle your safety belts before your vehicle
reaches at least 6 mph (9.7 km/h) and 1-2
minutes elapse after you switch the ignition
on...
The Belt-Minder feature activates, the
safety belt warning light illuminates and a
warning tone sounds for 6 seconds every
25 seconds, repeating for about 5 minutes
or until you and the front seat passenger
buckle your safety belts. The safety belt for the driver or front
passenger is unbuckled for about 1 minute
while the vehicle is traveling at least 6 mph
(9.7 km/h) and more than 1-2 minutes
elapse after you switch the ignition on...
Deactivating and Activating the
Belt-Minder Feature
WARNING: While the system
allows you to deactivate it, this system
is designed to improve your chances of
being safely belted and surviving an
accident. We recommend you leave the
system activated for yourself and others
who may use the vehicle.
Note:The driver and front passenger
warnings switch on and off independently.
When you perform this procedure for one
seating position, do not buckle the other
position as this will terminate the process.
Read Steps 1 - 4 thoroughly before
proceeding with the programming
procedure.Before following the procedure, make sure
that:
• The parking brake is set.
• The transmission is in park (P) or
neutral (N).
• The ignition is off.
• The driver and front passenger safety
belts are unbuckled.
1. Switch the ignition on. Do not start the
vehicle.
2. Wait until the safety belt warning light
turns off (about one minute). After
Step 2, wait an additional 5 seconds
before proceeding with Step 3. Once
you start Step 3, you must complete
the procedure within 30 seconds.
3. For the seating position you are
switching off, buckle then unbuckle the
safety belt three times at a moderate
speed, ending in the unbuckled state.
After Step 3, the safety belt warning
light turns on.
43
Seatbelts
Page 48 of 378
4. While the safety belt warning light is
on, buckle and then unbuckle the
safety belt. After Step 4, the safety belt
warning light flashes for confirmation.
• This will switch the feature off for that
seating position if it is currently on.
• This will switch the feature on for that
seating position if it is currently off.
CHILD RESTRAINT AND
SEATBELT MAINTENANCE
Inspect the vehicle seatbelts and child
safety seat systems periodically to make
sure they work properly and are not
damaged. Inspect the vehicle and child
restraint seatbelts to make sure there are
no nicks, tears or cuts. Replace if
necessary. All vehicle seatbelt assemblies,
including retractors, buckles, front seatbelt
buckle assemblies, buckle support
assemblies (slide bar-if equipped),
shoulder belt height adjusters (if
equipped), shoulder belt guide on seat
backrest (if equipped), child safety seat
LATCH and tether anchors, and attaching
hardware, should be inspected after a
crash. Read the child restraint
manufacturer's instructions for additional
inspection and maintenance information
specific to the child restraint.
We recommend that all seatbelt
assemblies in use in vehicles involved in a
crash be replaced. However, if the crash
was minor and an authorized dealer finds
that the belts do not show damage and
continue to operate properly, they do not
need to be replaced. Seatbelt assemblies
not in use during a crash should also be
inspected and replaced if either damage
or improper operation is noted.
Properly care for seatbelts. See Vehicle
Care (page 262).
SEATBELT EXTENSIONS
WARNING: Persons who fit into
the vehicle's seatbelt should not use an
extension. Unnecessary use could result
in serious personal injury in the event of
a crash.
WARNING: Only use extensions
provided free of charge by our dealers.
The dealer will provide an extension
designed specifically for this vehicle,
model year and seating position. The use
of an extension intended for another
vehicle, model year or seating position
may not offer you the full protection of
your vehicle's seatbelt restraint system.
WARNING: Never use seatbelt
extensions to install child restraints.
WARNING: Do not use a seatbelt
extension with an inflatable seatbelt.
WARNING: Do not use extensions
to change the way the seatbelt fits
across the torso, over the lap or to make
the seatbelt buckle easier to reach.
If, because of body size or driving position,
it is not possible to properly fasten the
seatbelt over your lap and shoulder, an
extension that is compatible with the
seatbelts is available free of charge from
our dealers. Only use our seatbelt
extensions made by the original equipment
seatbelt manufacturer with our seatbelts.
Ask your authorized dealer if your extension
is compatible with your vehicle restraint
system.
44
Seatbelts
Page 52 of 378
LOCKING AND UNLOCKING
You can use the power door lock control
or the remote control to lock and unlock
your vehicle.
Power Door Locks (If Equipped)
The power door lock control is on the driver
and front passenger door panels.
ABE163049
Unlock. A
Lock. B
Remote Control (If Equipped)
Unlocking the Doors (Two-Stage
Unlock)
E138629
Press the button to unlock the
driver door.
Press the button again within
three seconds to unlock all doors. The
direction indicators flash.
Press and hold both the lock and unlock
buttons on the remote control for four
seconds to disable or enable two-stage
unlocking. Disabling two-stage unlocking
allows all vehicle doors to unlock with one
press of the button. The direction
indicators flash twice to indicate a change
to the unlocking mode. The unlocking
mode applies to the remote control.Locking the Doors
E138623
Press the button to lock all the
doors. The direction indicators
flash.
Press the button again within three
seconds to confirm that all the doors lock.
The doors lock again, the horn sounds and
the direction indicators flash if all the doors
lock.
Mislock
If any door is open or if the hood is open on
vehicles with an anti-theft alarm or remote
start, the horn sounds twice and the lamps
do not flash.
Smart Unlocks (If Equipped)
This feature helps prevent you from locking
yourself out of your vehicle if your key is
still in the ignition.
When you open the driver door and lock
your vehicle with the power door lock
control, all the doors lock, then unlock if
your key is still in the ignition.
You can still lock your vehicle with the key
in the ignition by:
• Using the manual lock on the door.
• Locking the driver door with a key.
• Using the lock button on the remote
control.
Autolock (If Equipped)
Autolock locks all the doors when:
• All doors closed.
• The ignition is on.
• You shift into any gear putting your
vehicle in motion.
• Your vehicle reaches a speed greater
than 12 mph (20 km/h).
48
Doors and Locks