Oil FORD F750 2010 12.G User Guide
[x] Cancel search | Manufacturer: FORD, Model Year: 2010, Model line: F750, Model: FORD F750 2010 12.GPages: 274, PDF Size: 1.51 MB
Page 166 of 274
WINDOWS AND WIPER BLADES
The windshield, rear and side windows and the wiper blades should be
cleaned regularly. If the wipers do not wipe properly, substances on the
vehicle’s glass or the wiper blades may be the cause. These may include
hot wax treatments used by commercial car washes, tree sap, or other
organic contamination. To clean these items, please follow these tips:
•The windshield, rear windows and side windows may be cleaned with
a non-abrasive cleaner such as Motorcraft Ultra Clear Spray Glass
Cleaner (ZC-23), available from your dealer.
•Do not use abrasives, as they may cause scratches.
•Do not use fuel, kerosene, or paint thinner to clean any parts.
•Wiper blades can be cleaned with isopropyl (rubbing) alcohol or
windshield washer solution. Be sure to replace wiper blades when they
appear worn or do not function properly.
INSTRUMENT PANEL AND CLUSTER LENS
Clean the instrument panel with a damp cloth, then dry with a dry cloth.
•Avoid cleaners or polish that increase the gloss of the upper portion of
the instrument panel. The dull finish in this area helps protect the
driver from undesirable windshield reflection.
•Be certain to wash or wipe your hands clean if you have been in
contact with certain products such as insect repellent and suntan
lotion in order to avoid possible damage to the painted surfaces.
INTERIOR TRIM
•Clean the interior trim areas with a damp cloth, then dry by wiping
with a dry, soft, clean cloth.
•Do not use household or glass cleaners as these may damage the
finish.
INTERIOR
For fabric, carpets, cloth seats and safety belts:
•Remove dust and loose dirt with a vacuum cleaner.
•Remove light stains and soil with Motorcraft Professional Strength
Carpet and Upholstery Cleaner (ZC-54).
•If grease or tar is present on the material, spot-clean the area first
with Motorcraft Spot and Stain Remover (ZC-14).
•Never saturate the seat covers with cleaning solution.
Cleaning
166
2010 F-650/750(f67)
Supplement(supplement), 1st Printing
USA(fus)
Page 167 of 274
•Do not use household cleaning products or glass cleaners, which can
stain and discolor the fabric and affect the flame retardant abilities of
the seat materials.
WARNING:Do not use cleaning solvents, bleach or dye on the
vehicle’s seat belts, as these actions may weaken the belt
webbing.
LEATHER SEATS (IF EQUIPPED)
Your leather seating surfaces have a clear, protective coating over the
leather.
•To clean, use a soft cloth with Motorcraft Deluxe Leather and Vinyl
Cleaner (ZC-11–A). Dry the area with a soft cloth.
•To help maintain its resiliency and color, use the Motorcraft Deluxe
Leather Care Kit (ZC-11–D), available from your authorized dealer.
•Do not use household cleaning products, alcohol solutions, solvents or
cleaners intended for rubber, vinyl and plastics, or oil/petroleum-based
leather conditioners. These products may cause premature wearing of
the clear, protective coating.
UNDERBODY
Flush the complete underside of your vehicle frequently. Keep body and
door drain holes free from packed dirt.
FORD CAR CARE PRODUCTS
Your vehicle’s dealer has many quality products available to clean your
vehicle and protect its finishes. These quality products have been
specifically engineered to fulfill your automotive needs; they are custom
designed to complement the style and appearance of your vehicle. Each
product is made from high quality materials that meet or exceed rigid
specifications. For best results, use the following products or products of
equivalent quality:
Motorcraft Bug and Tar Remover (ZC-42)
Motorcraft Car Care Kit (ZC-26)
Motorcraft Car Wash (Canada only) (CXC-83)
Motorcraft Custom Bright Metal Cleaner (ZC-15)
Motorcraft Custom Clear Coat Polish (ZC–8–A)
Motorcraft Custom Vinyl Protectant (U.S. only) (ZC-40-A)
Cleaning
167
2010 F-650/750(f67)
Supplement(supplement), 1st Printing
USA(fus)
Page 175 of 274
Hydraulic brakes - fluid level
Fluid level should be at the bottom edge of the ring on each reservoir fill
port. Do not fill the master cylinder to the top of the reservoir.
Note:If brake fluid requires attention to maintain a proper master
cylinder level, this is an indication of either severe operation (pad wear)
or fluid system leakage. A more frequent and thorough brake inspection
will be required.
Hydraulic brakes - brake lines, hoses and fittings
Inspect these components every 4,000 miles (6,400 km).
•Check lines for kinks, dents, corrosion or rupture.
•Check hoses for abrasions, kinks, soft spots or rupture, collapse,
cracks, twists or loose frame supports. When replacing a hose, be sure
there is adequate clearance to the hose to avoid an abrasion to the
new hose.
•Examine all connections for leaks.
•Repair or replace brake line tubes, hoses or fittings as required.
Driveline parking brake
Parking brake adjustment should only be performed by a qualified
technician, and in accordance with the instructions in the service
manual.
WARNING:Use wheel chocks and exercise caution when
inspecting under the vehicle. A vehicle roll-away could result in
property damage, personal injury or death.
Catalytic converter
If your diesel engine is equipped with a catalytic converter, it is
important to review the maintenance schedule to ensure proper
functioning of the catalytic converter. Also, take precautions not to
damage the catalytic converter when servicing your engine or storing
your vehicle.
Note:If your vehicle is equipped with a catalytic converter/muffler,do
notblend waste oil with Diesel fuel. Operate only on ultra low sulfur
(less than 15 parts per million sulfur) diesel fuel with a cetane value of
45 or higher.
Maintenance and Specifications
175
2010 F-650/750(f67)
Supplement(supplement), 1st Printing
USA(fus)
Page 180 of 274
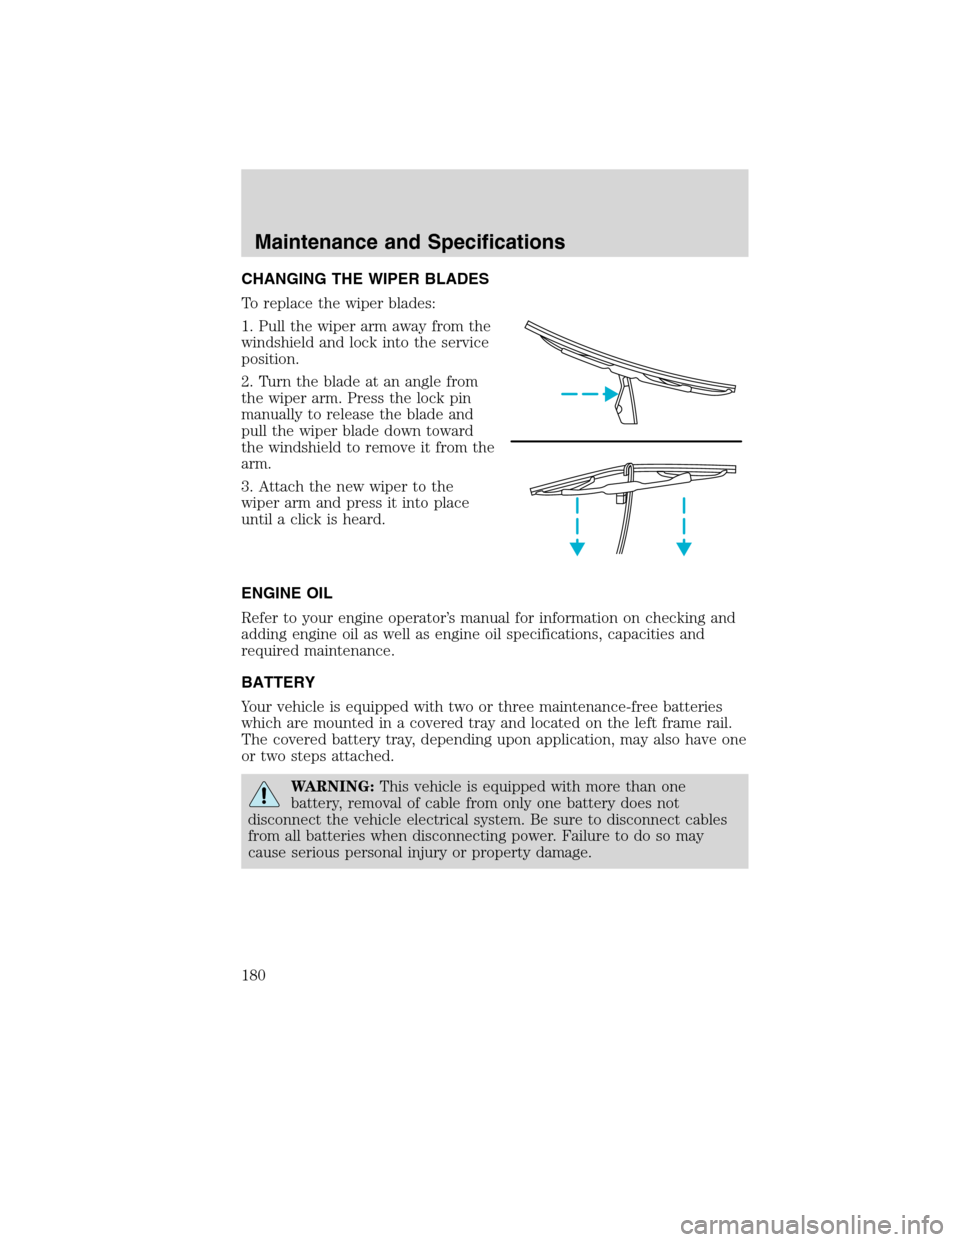
CHANGING THE WIPER BLADES
To replace the wiper blades:
1. Pull the wiper arm away from the
windshield and lock into the service
position.
2. Turn the blade at an angle from
the wiper arm. Press the lock pin
manually to release the blade and
pull the wiper blade down toward
the windshield to remove it from the
arm.
3. Attach the new wiper to the
wiper arm and press it into place
until a click is heard.
ENGINE OIL
Refer to your engine operator’s manual for information on checking and
adding engine oil as well as engine oil specifications, capacities and
required maintenance.
BATTERY
Your vehicle is equipped with two or three maintenance-free batteries
which are mounted in a covered tray and located on the left frame rail.
The covered battery tray, depending upon application, may also have one
or two steps attached.
WARNING:This vehicle is equipped with more than one
battery, removal of cable from only one battery does not
disconnect the vehicle electrical system. Be sure to disconnect cables
from all batteries when disconnecting power. Failure to do so may
cause serious personal injury or property damage.
Maintenance and Specifications
180
2010 F-650/750(f67)
Supplement(supplement), 1st Printing
USA(fus)
Page 186 of 274
Drivingchapter. Diesel fuel containing no more than 5% biodiesel may
be used. Biodiesel fuel is a product that has been converted from
renewable fuel sources, including vegetable oil, animal fat and cooking
oil. Raw or refined vegetable oil, animal fat, cooking oil or recycled
greases should not be used.
Since it is normal for a small amount of unburned fuel to enter the
crankcase and mix with the engine oil, the use of biodiesel requires that
the engine oil and filter be changed more often. Refer to theExceptions
section of theScheduled Maintenance Guidechapter for more
information.
Do not use home heating oil or any diesel fuel not intended for
highway use. Red dye is used to identify fuels intended for
agricultural and non-highway use. Damage to the fuel injection
system, engine and exhaust catalyst can occur if an improper fuel
is used. Do not add gasoline, gasohol or alcohol to diesel fuel.
This practice creates a serious fire hazard and engine
performance problems.
NOTE:Use of any fuel other than those recommended may cause
powertrain damage, a loss of vehicle performance, and repairs may not
be covered under warranty.
WARNING:Using low sulfur (16-500 ppm) or high sulfur
(greater than 500 ppm) diesel fuel in a diesel engine designed to
use only Ultra Low Sulfur Diesel fuel increases the likelihood of engine
oil dilution with fuel which may lead to major engine damage.
WARNING:Using low sulfur (16-500 ppm) or high sulfur
(greater than 500 ppm) diesel fuel in a diesel engine designed to
use only Ultra Low Sulfur Diesel fuel will cause certain emission
components to malfunction which may also cause the Service Engine
Soon (
SERVICE
ENGINE
SOON) light to illuminate indicating an emissions-related
concern.
WARNING:Do not mix diesel fuel with gasoline, gasohol or
alcohol. This could cause an explosion resulting in personal
injury.
Maintenance and Specifications
186
2010 F-650/750(f67)
Supplement(supplement), 1st Printing
USA(fus)
Page 187 of 274
WARNING:Do not use starting fluid such as ether or gasoline.
Such fluids can cause immediate explosive damage to the engine
and possible personal injury.
Fuel quality
It should not be necessary to add any aftermarket additives to your fuel
tank if you use a properly formulated diesel fuel that meets ASTM D 975
specification. Aftermarket additives can damage the injector system or
engine. Repairs to correct the effects of using an aftermarket product in
your fuel may not be covered by your warranty.
Do not blend used engine oil with diesel fuel under any
circumstances.Blending used oil with the fuel will significantly increase
your vehicle’s exhaust emissions and reduce engine life due to increased
internal wear.
Many of the world’s automakers approved the World-wide Fuel Charter
that recommends diesel fuel specifications to provide improved
performance and emission control system protection for your vehicle.
Diesel fuel that meet the World-wide Fuel Charter should be used when
available. Ask your fuel supplier about fuel that meet the World-Wide
Fuel Charter.
Running out of fuel
Avoid running out of fuel as this will allow air to enter the fuel system,
which will make restarting the vehicle difficult.
If you have run out of fuel:
•If your vehicle is equipped with dual fuel tanks,add at least
4–5 gallons (15–19 liters) of fuel to each tank before attempting to
restart the engine.
•The fuel system must be primed before attempting to restart the
engine. Refer to the engine operator’s manual for instructions on
priming the engine.
•Use caution not to overheat and damage the starterby cranking
the engine for an excessive period of time. You may need to crank the
engine for a longer time than normal. If the engine fails to start in
30 seconds, turn the ignition to the off position and wait for two
minutes before cranking the engine again.
•Any remaining trapped air will self-purge from the fuel system once
the engine starts running.
Maintenance and Specifications
187
2010 F-650/750(f67)
Supplement(supplement), 1st Printing
USA(fus)
Page 193 of 274
The engine speed may increase slightly. To allow parked regeneration to
continue uninterrupted:
1. The vehicle must remain parked
2. The transmission must remain in P (Park) or N (Neutral) (as
previously described in Step 2).
3. The accelerator pedal, service brake pedal, and clutch pedal (if
equipped) must not be pressed
4. The parking brake must remain set
On average (depending on filter level and other factors), the process will
take 20–30 minutes to complete. The DPF lamp will turn off when the
process is complete. Repeat Steps 1–5, if parked regeneration is interrupted.
To discontinue parked regeneration (Cummins engine only)
Press any of the floor pedals to discontinue parked regeneration.
Diesel particulate filter maintenance and service
The DPF is designed to retain a relatively large amount of residual ash
and provide many miles and hours of maintenance-free operation. At
some point, generally beyond 150,000 miles (240,000 km) or 5,000 hours
of operation (whichever comes first), the DPF will require professional
cleaning to remove the accumulated ash
The exact number of miles or hours of operation will vary greatly
depending upon vehicle/engine loading and operating conditions, ash
content of the engine oil, and quality of the diesel fuel used in your
truck. Adhering to your engine manufacturer’s recommended oil and fuel
specifications will maximize the miles and hours of operation before a
DPF professional cleaning is required. Refer to your engine
manufacturer’s owner’s manual for more details regarding recommended
maintenance and service of your DPF.
Exhaust outlet assembly
WARNING:The normal operating temperature of the exhaust
system is very high. Never work around or attempt to repair any
part of the exhaust system until it has cooled. Failure to follow these
instructions may result in serious personal injury.
The exhaust outlet assembly on your vehicle is a uniquely functioning
device that accompanies the DPF assembly. It is designed to help control
the temperature of the exhaust during the DPF regeneration process.Do
Maintenance and Specifications
193
2010 F-650/750(f67)
Supplement(supplement), 1st Printing
USA(fus)
Page 195 of 274
Engine and Driveline System
•Transmission Enclosure:inspect for cracks, holes, and tears. Clean
any deposits such as oil, dirt, and stones.
•Engine valve covers and block covers are made to damp out engine
mechanical noise and, if needed, should be replaced with
recommended parts. Check for mechanical isolations.
Exhaust System
•Inspect the exhaust system for leaks at various joint connections and
tighten the clamps.
•Do a visual inspection for cracks or holes in the muffler and tail pipe.
•Always use the recommended parts when items need to be replaced.
•The tail pipe elbow or offset tail pipe orientation must not be changed
from the standard position as originally received.
•To avoid abnormal changes in vehicle sound levels, it is necessary for
the owner to perform inspections and necessary maintenance at the
intervals shown in theScheduled Maintenance Guidechapter.
POWER STEERING FLUID
Check the power steering fluid level using the following procedure. If
adding fluid is necessary, refer toLubricant Specificationsin this
chapter for the proper fluid type. Refer to theScheduled Maintenance
Guidechapter for the recommended service intervals.
1. Set the parking brake, shift into N (Neutral) (automatic transmission)
or 1 (First) (manual transmission) and turn the engine off.
2. Open the hood.
3. Clean the top of the power steering fluid reservoir.
4. Remove the dipstick from the reservoir and wipe the dipstick clean.
Maintenance and Specifications
195
2010 F-650/750(f67)
Supplement(supplement), 1st Printing
USA(fus)
Page 202 of 274
manufacturer, to ensure that any additional body lights and accessories
are connected to circuits that are both appropriate and not overloaded.
No modification should be made to any vehicle control system without
first contacting your dealer.
SUSPENSION INSPECTION
Note:Do not adjust air suspension height to any setting other than the
specified setting. Altering the height setting will change the driveline
angle and may result in unwarrantable component damage, such as
transmission component damage.
Verify drive axle air suspension height and height control valve
performance at engine lube oil change intervals.
Periodically:
•Check condition of spring leaves for evidence of fatigue, bending or
breakage.
•Check condition of suspension mounting brackets and bushings.
•Check that torque rod mounting fasteners are tight.
•Check to be sure the suspension alignment is maintained at all times.
•Check U-bolts after the chassis has been operating under load for
1,000 miles (1,600 km) or six months, whichever comes first, the
U-Bolt nuts must be re-torqued. The U-Bolt nuts thereafter must be
re-torqued every 36,000 miles (58,000 km). The U-Bolt and nut
threads and seats should be cleaned and lubricated to ensure a “like
new” condition when re-torquing.
Note:See theU-Bolt Nut Torquechart later in this section.
Supporting your vehicle for service
When performing service repairs on your vehicle, first prepare the
vehicle by doing the following:
1. Park the vehicle on a level concrete floor.
2. Set the parking brake and block the wheels to prevent the vehicle
from moving.
3. Select a jack with a rated capacity sufficient to lift and hold up the
vehicle.
4. Raise the vehicle with the jack applied to the axle(s). DO NOT use the
bumper as a lifting point.
5. Support the vehicle with floor stands under the axle(s). If the axle or
the suspension are being serviced, support the vehicle with floor stands
under the frame side-members, preferably between the axles.
Maintenance and Specifications
202
2010 F-650/750(f67)
Supplement(supplement), 1st Printing
USA(fus)
Page 206 of 274
Oil lubricated front wheel bearings
During normal vehicle duty cycle, the lube and air inside the hub/wheel
cavity expands and if not vented, causes pressure build-up that could
cause accelerated seal wear.
There are two venting methods:
•a slit or small hole in the rubber check vent or
•the window
You can use either of these methods to prevent pressure build-up.
Normal maintenance
Over a period of time, if not routinely cleaned, a slight film of oil can
collect dirt around the rubber fill plug and face, which could appear to
be a leak. Routine cleaning ensures that the lube level can be easily
observed through the clear window as intended. In situations where the
window is clean on the outside but discolored on the inside, the lube
level may be checked by inserting a finger through the rubber check
vent hole.
The specified lube level for a clear window type hubcaps is from the
minimum line to + 5/16 inch above the minimum line.
If the lube level should suddenly drop dramatically below the minimum
level, see theWorkshop Manualfor diagnostic procedure.
Installation, tightening and alignment
When installing wheels, be certain that the threads on studs and nuts are
clean to permit correct torque. The mounting surfaces of rims, wheels,
spacer rings and clamps must be free of dirt, rust, lubricants or damage.
Use a wire brush to clean the mounting contact surfaces. Do not use
lubricant on threads.
After the rim or wheel has been properly tightened, it should be checked
for alignment. Rotate the wheel with a piece of chalk attached to a steady,
firm surface, and placed to just barely clear the outside surface of the tire
bead seat. This procedure will point out the high spot. A high spot does
not necessarily mean that the lug nuts have been unevenly tightened. This
condition or misalignment could be caused by a bent wheel.
Use the following installation procedure:
1. Slide inner rear or front tire and wheel in position over studs and push
it back as far as possible. Use care so that the threads on studs are not
damaged.
Maintenance and Specifications
206
2010 F-650/750(f67)
Supplement(supplement), 1st Printing
USA(fus)