ABS FORD F750 2012 12.G Owners Manual
[x] Cancel search | Manufacturer: FORD, Model Year: 2012, Model line: F750, Model: FORD F750 2012 12.GPages: 306, PDF Size: 1.74 MB
Page 14 of 306
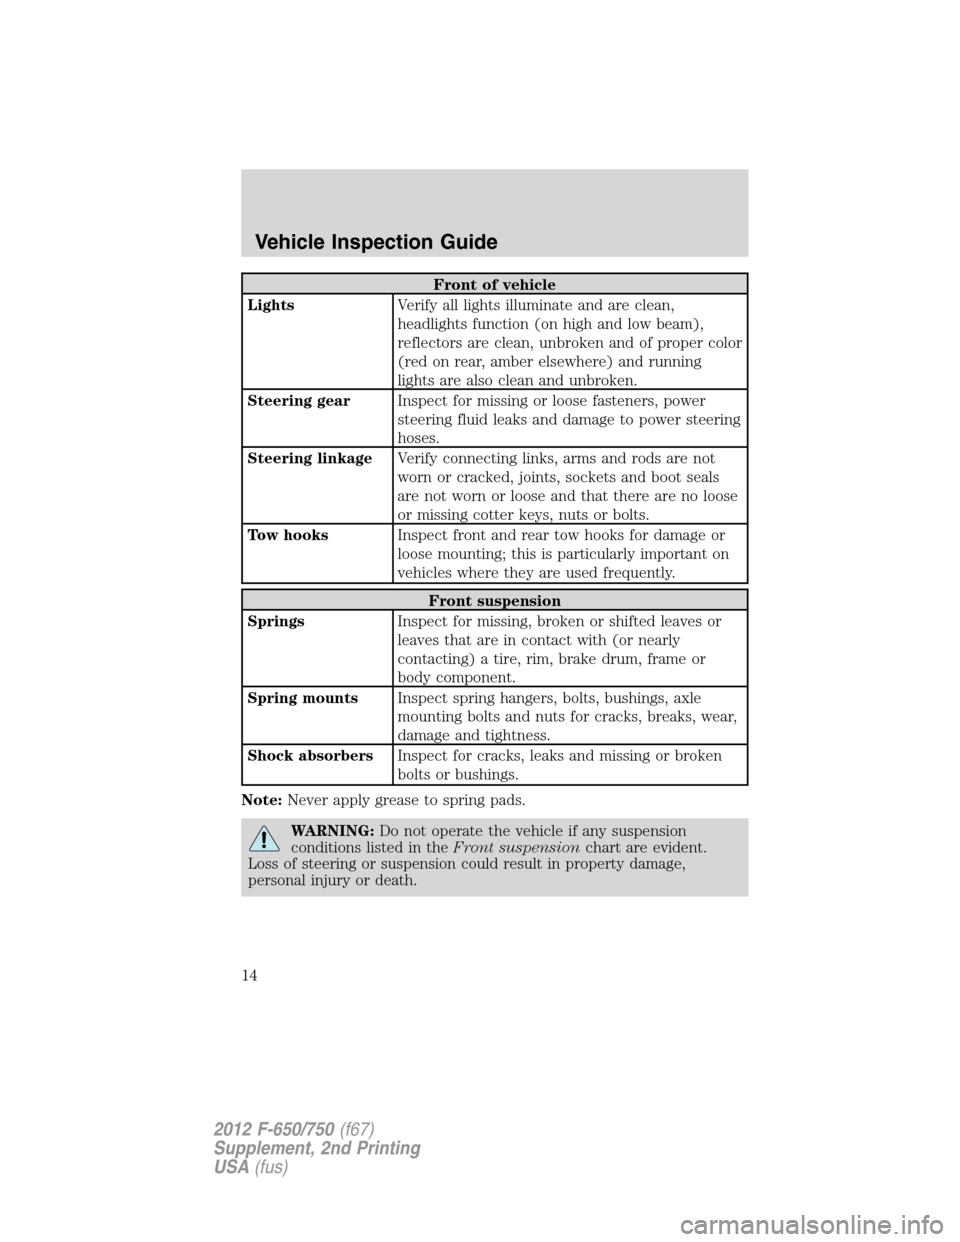
Front of vehicle
LightsVerify all lights illuminate and are clean,
headlights function (on high and low beam),
reflectors are clean, unbroken and of proper color
(red on rear, amber elsewhere) and running
lights are also clean and unbroken.
Steering gearInspect for missing or loose fasteners, power
steering fluid leaks and damage to power steering
hoses.
Steering linkageVerify connecting links, arms and rods are not
worn or cracked, joints, sockets and boot seals
are not worn or loose and that there are no loose
or missing cotter keys, nuts or bolts.
Tow hooksInspect front and rear tow hooks for damage or
loose mounting; this is particularly important on
vehicles where they are used frequently.
Front suspension
SpringsInspect for missing, broken or shifted leaves or
leaves that are in contact with (or nearly
contacting) a tire, rim, brake drum, frame or
body component.
Spring mountsInspect spring hangers, bolts, bushings, axle
mounting bolts and nuts for cracks, breaks, wear,
damage and tightness.
Shock absorbersInspect for cracks, leaks and missing or broken
bolts or bushings.
Note:Never apply grease to spring pads.
WARNING:Do not operate the vehicle if any suspension
conditions listed in theFront suspensionchart are evident.
Loss of steering or suspension could result in property damage,
personal injury or death.
Vehicle Inspection Guide
14
2012 F-650/750(f67)
Supplement, 2nd Printing
USA(fus)
Page 18 of 306
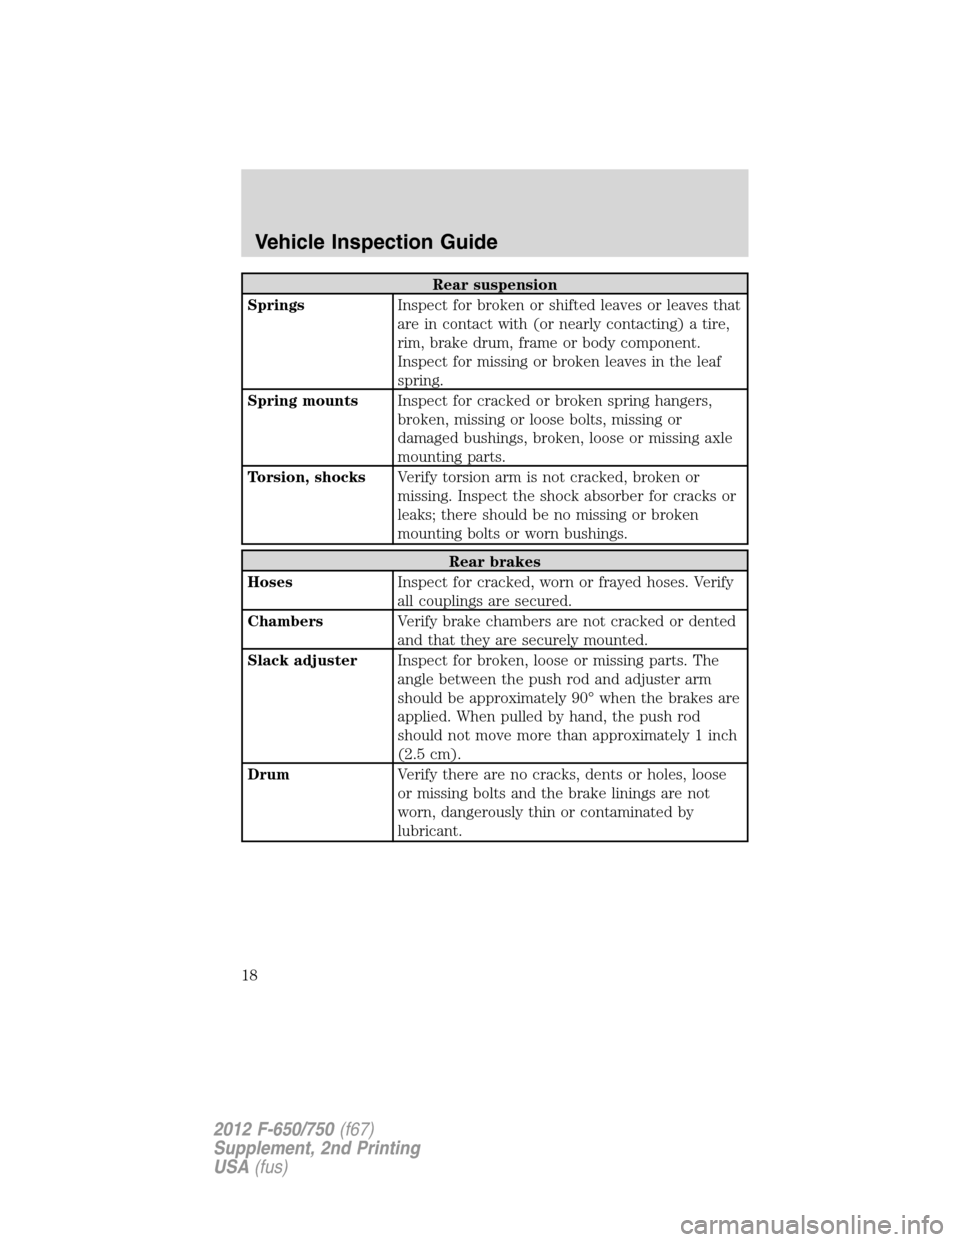
Rear suspension
SpringsInspect for broken or shifted leaves or leaves that
are in contact with (or nearly contacting) a tire,
rim, brake drum, frame or body component.
Inspect for missing or broken leaves in the leaf
spring.
Spring mountsInspect for cracked or broken spring hangers,
broken, missing or loose bolts, missing or
damaged bushings, broken, loose or missing axle
mounting parts.
Torsion, shocksVerify torsion arm is not cracked, broken or
missing. Inspect the shock absorber for cracks or
leaks; there should be no missing or broken
mounting bolts or worn bushings.
Rear brakes
HosesInspect for cracked, worn or frayed hoses. Verify
all couplings are secured.
ChambersVerify brake chambers are not cracked or dented
and that they are securely mounted.
Slack adjusterInspect for broken, loose or missing parts. The
angle between the push rod and adjuster arm
should be approximately 90° when the brakes are
applied. When pulled by hand, the push rod
should not move more than approximately 1 inch
(2.5 cm).
DrumVerify there are no cracks, dents or holes, loose
or missing bolts and the brake linings are not
worn, dangerously thin or contaminated by
lubricant.
Vehicle Inspection Guide
18
2012 F-650/750(f67)
Supplement, 2nd Printing
USA(fus)
Page 21 of 306
when you start your vehicle to make sure the bulb works. If any light
remains on after starting the vehicle, refer to the respective system
warning light for additional information.
Note:Some warning lights are
reconfigurable telltale (RTT)
indicator lights and illuminate in the
message center. These lights
function the same as the other
warning lights.
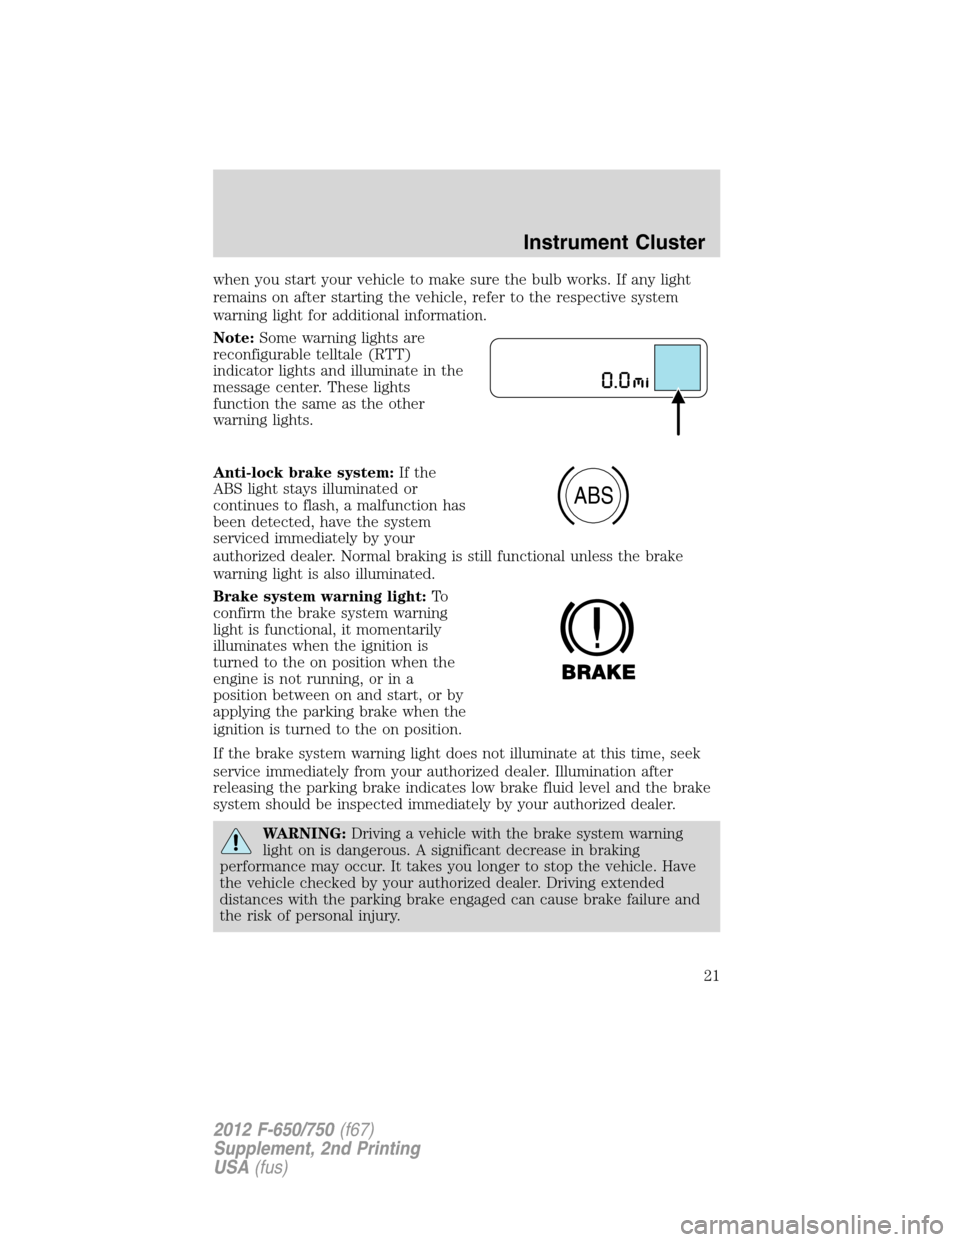
Anti-lock brake system:If the
ABS light stays illuminated or
continues to flash, a malfunction has
been detected, have the system
serviced immediately by your
authorized dealer. Normal braking is still functional unless the brake
warning light is also illuminated.
Brake system warning light:To
confirm the brake system warning
light is functional, it momentarily
illuminates when the ignition is
turned to the on position when the
engine is not running, or in a
position between on and start, or by
applying the parking brake when the
ignition is turned to the on position.
If the brake system warning light does not illuminate at this time, seek
service immediately from your authorized dealer. Illumination after
releasing the parking brake indicates low brake fluid level and the brake
system should be inspected immediately by your authorized dealer.
WARNING:Driving a vehicle with the brake system warning
light on is dangerous. A significant decrease in braking
performance may occur. It takes you longer to stop the vehicle. Have
the vehicle checked by your authorized dealer. Driving extended
distances with the parking brake engaged can cause brake failure and
the risk of personal injury.
ABS
Instrument Cluster
21
2012 F-650/750(f67)
Supplement, 2nd Printing
USA(fus)
Page 26 of 306
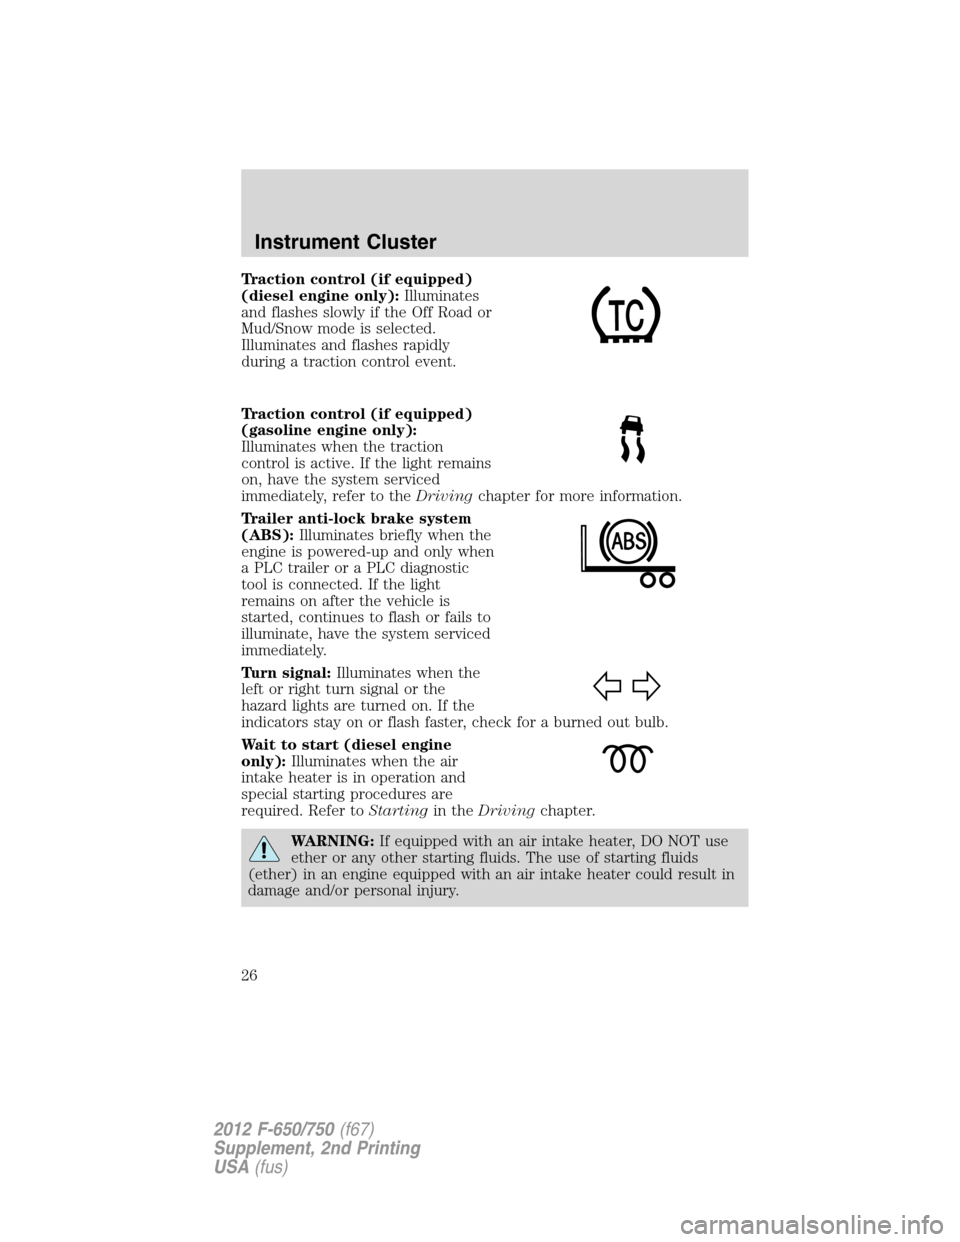
Traction control (if equipped)
(diesel engine only):Illuminates
and flashes slowly if the Off Road or
Mud/Snow mode is selected.
Illuminates and flashes rapidly
during a traction control event.
Traction control (if equipped)
(gasoline engine only):
Illuminates when the traction
control is active. If the light remains
on, have the system serviced
immediately, refer to theDrivingchapter for more information.
Trailer anti-lock brake system
(ABS):Illuminates briefly when the
engine is powered-up and only when
a PLC trailer or a PLC diagnostic
tool is connected. If the light
remains on after the vehicle is
started, continues to flash or fails to
illuminate, have the system serviced
immediately.
Turn signal:Illuminates when the
left or right turn signal or the
hazard lights are turned on. If the
indicators stay on or flash faster, check for a burned out bulb.
Wait to start (diesel engine
only):Illuminates when the air
intake heater is in operation and
special starting procedures are
required. Refer toStartingin theDrivingchapter.
WARNING:If equipped with an air intake heater, DO NOT use
ether or any other starting fluids. The use of starting fluids
(ether) in an engine equipped with an air intake heater could result in
damage and/or personal injury.
Instrument Cluster
26
2012 F-650/750(f67)
Supplement, 2nd Printing
USA(fus)
Page 33 of 306
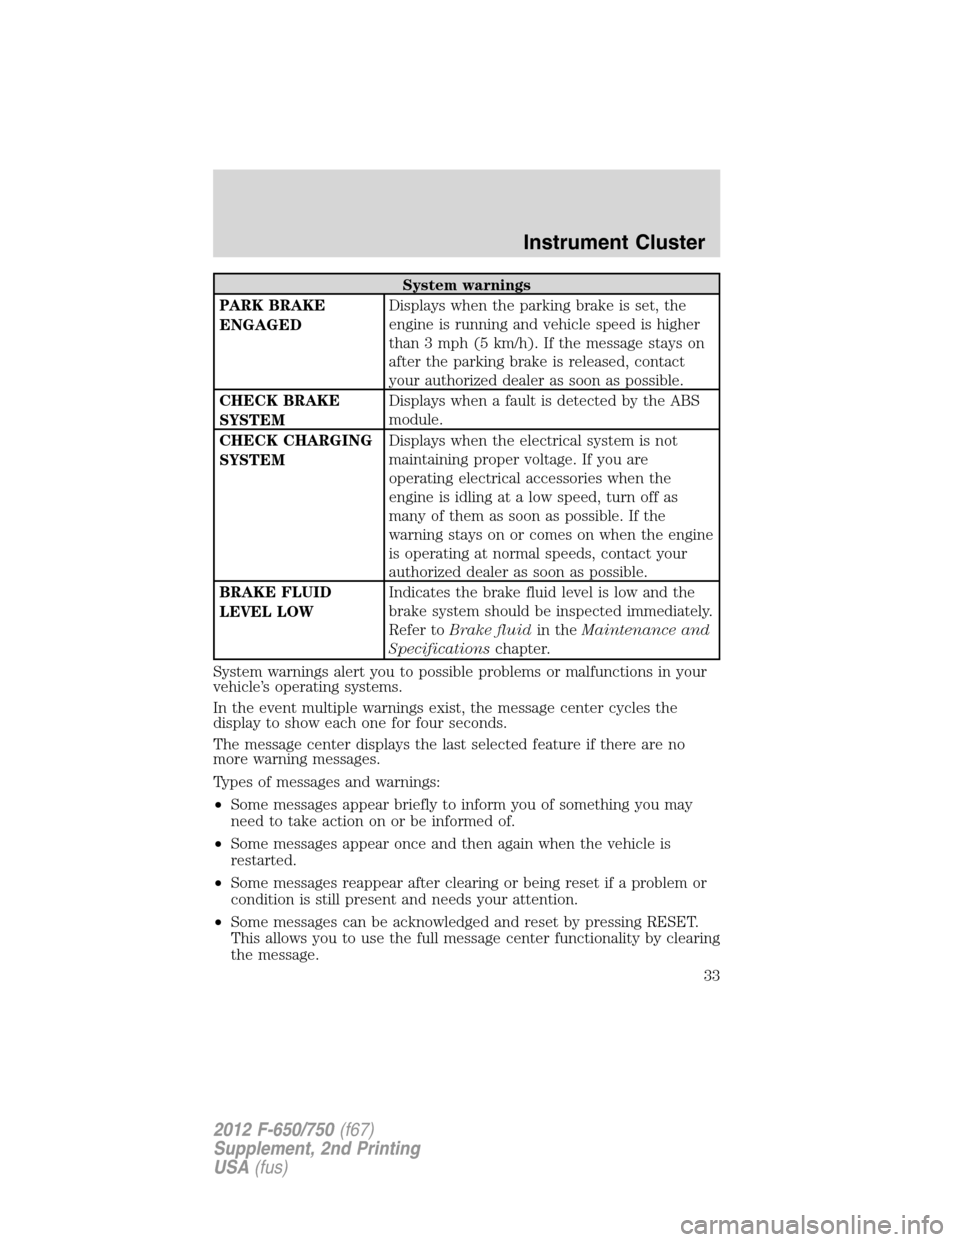
System warnings
PARK BRAKE
ENGAGEDDisplays when the parking brake is set, the
engine is running and vehicle speed is higher
than 3 mph (5 km/h). If the message stays on
after the parking brake is released, contact
your authorized dealer as soon as possible.
CHECK BRAKE
SYSTEMDisplays when a fault is detected by the ABS
module.
CHECK CHARGING
SYSTEMDisplays when the electrical system is not
maintaining proper voltage. If you are
operating electrical accessories when the
engine is idling at a low speed, turn off as
many of them as soon as possible. If the
warning stays on or comes on when the engine
is operating at normal speeds, contact your
authorized dealer as soon as possible.
BRAKE FLUID
LEVEL LOWIndicates the brake fluid level is low and the
brake system should be inspected immediately.
Refer toBrake fluidin theMaintenance and
Specificationschapter.
System warnings alert you to possible problems or malfunctions in your
vehicle’s operating systems.
In the event multiple warnings exist, the message center cycles the
display to show each one for four seconds.
The message center displays the last selected feature if there are no
more warning messages.
Types of messages and warnings:
•Some messages appear briefly to inform you of something you may
need to take action on or be informed of.
•Some messages appear once and then again when the vehicle is
restarted.
•Some messages reappear after clearing or being reset if a problem or
condition is still present and needs your attention.
•Some messages can be acknowledged and reset by pressing RESET.
This allows you to use the full message center functionality by clearing
the message.
Instrument Cluster
33
2012 F-650/750(f67)
Supplement, 2nd Printing
USA(fus)
Page 70 of 306
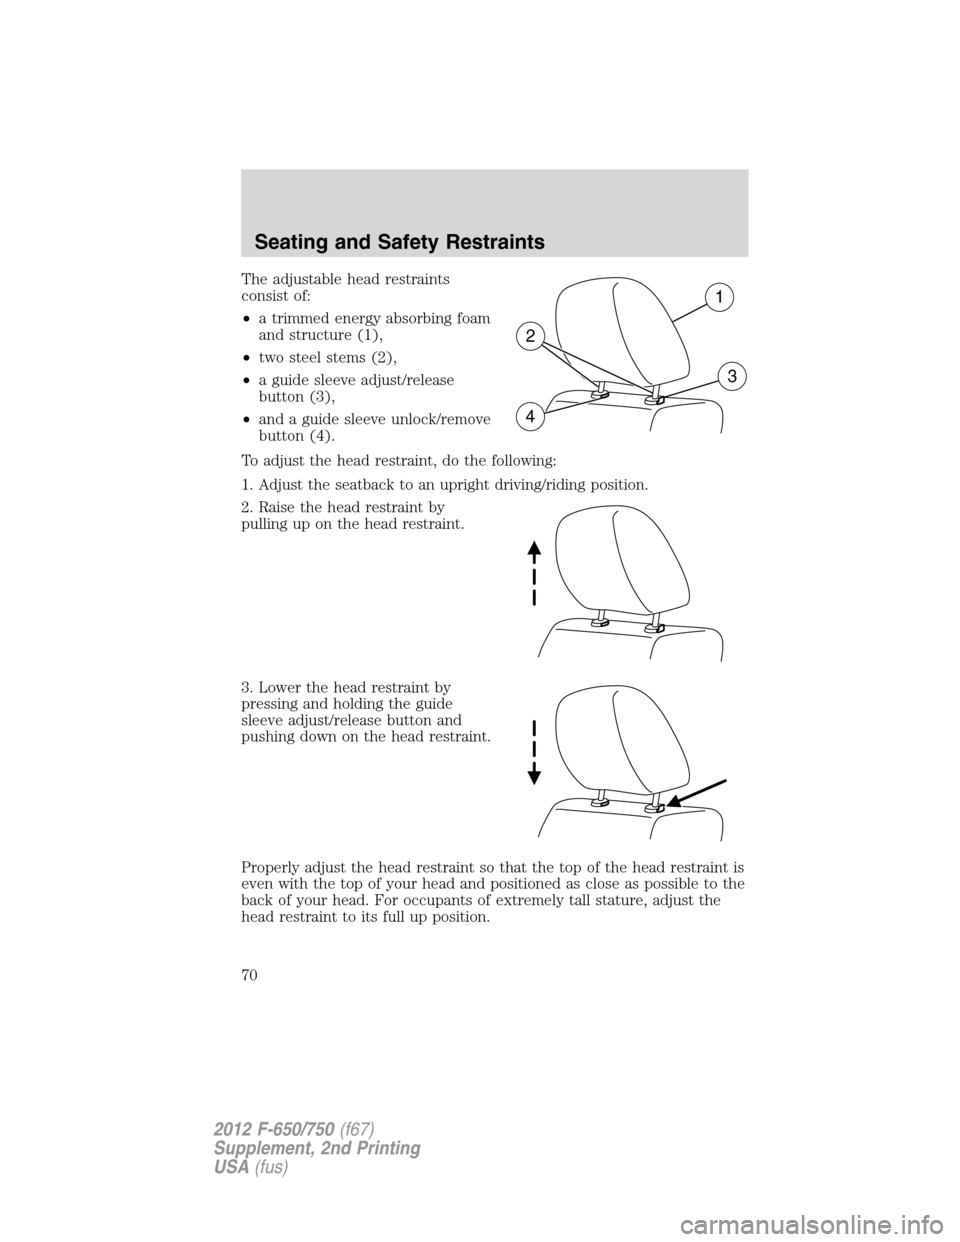
The adjustable head restraints
consist of:
•a trimmed energy absorbing foam
and structure (1),
•two steel stems (2),
•a guide sleeve adjust/release
button (3),
•and a guide sleeve unlock/remove
button (4).
To adjust the head restraint, do the following:
1. Adjust the seatback to an upright driving/riding position.
2. Raise the head restraint by
pulling up on the head restraint.
3. Lower the head restraint by
pressing and holding the guide
sleeve adjust/release button and
pushing down on the head restraint.
Properly adjust the head restraint so that the top of the head restraint is
even with the top of your head and positioned as close as possible to the
back of your head. For occupants of extremely tall stature, adjust the
head restraint to its full up position.
3
1
2
4
Seating and Safety Restraints
70
2012 F-650/750(f67)
Supplement, 2nd Printing
USA(fus)
Page 72 of 306
Properly adjust the head restraint so that the top of the head restraint is
even with the top of your head and positioned as close as possible to the
back of your head. For occupants of extremely tall stature, adjust the
head restraint to its full up position.
WARNING:To minimize the risk of neck injury in the event of a
crash, head restraints must be installed properly.
Front row center non-adjustable head restraint (if equipped)
Vehicles equipped with a front center seat have a head restraint that is
non-adjustable.
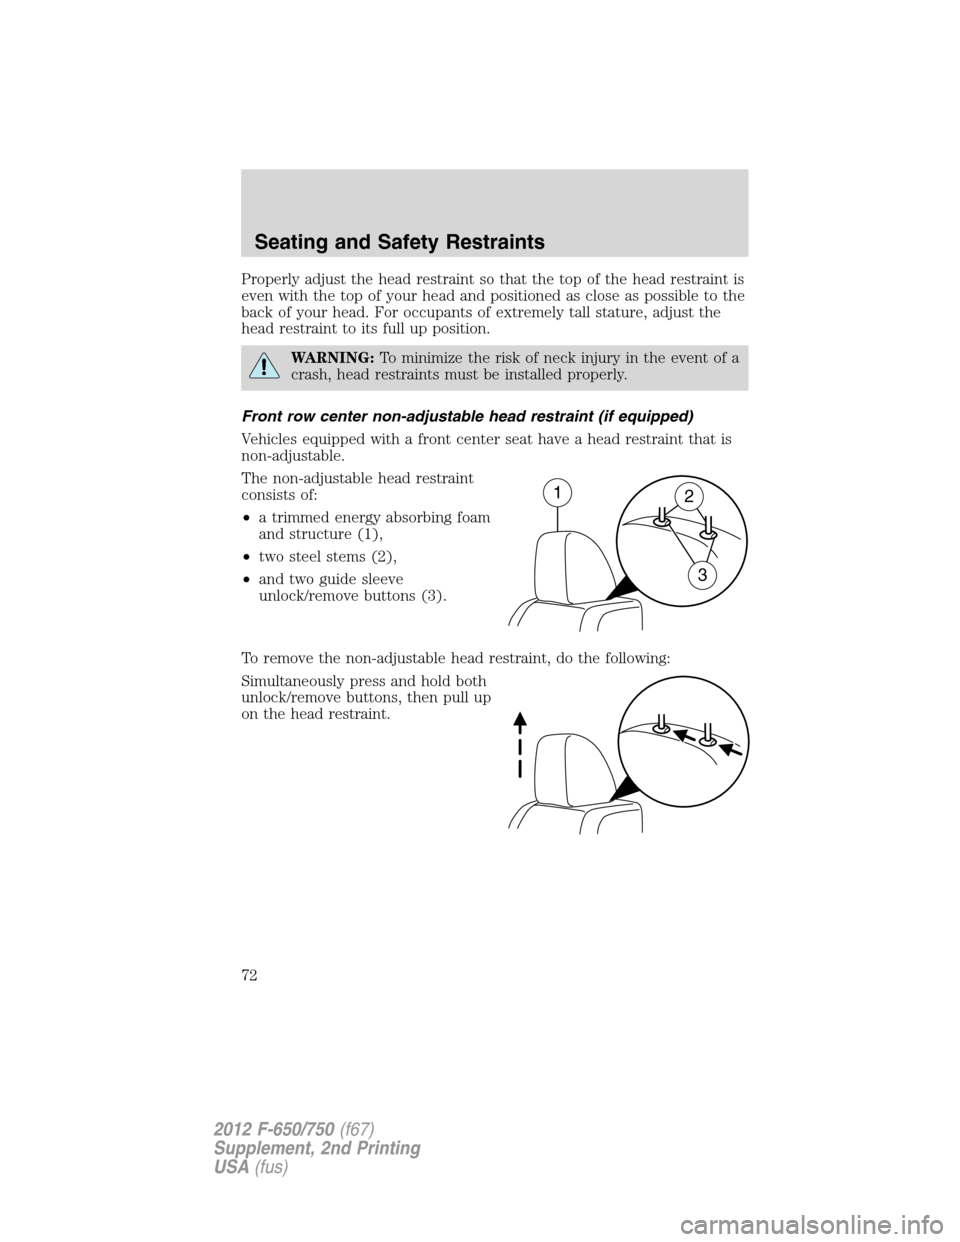
The non-adjustable head restraint
consists of:
•a trimmed energy absorbing foam
and structure (1),
•two steel stems (2),
•and two guide sleeve
unlock/remove buttons (3).
To remove the non-adjustable head restraint, do the following:
Simultaneously press and hold both
unlock/remove buttons, then pull up
on the head restraint.
12
3
Seating and Safety Restraints
72
2012 F-650/750(f67)
Supplement, 2nd Printing
USA(fus)
Page 78 of 306
REAR SEATS
Non-adjustable second-row head restraints
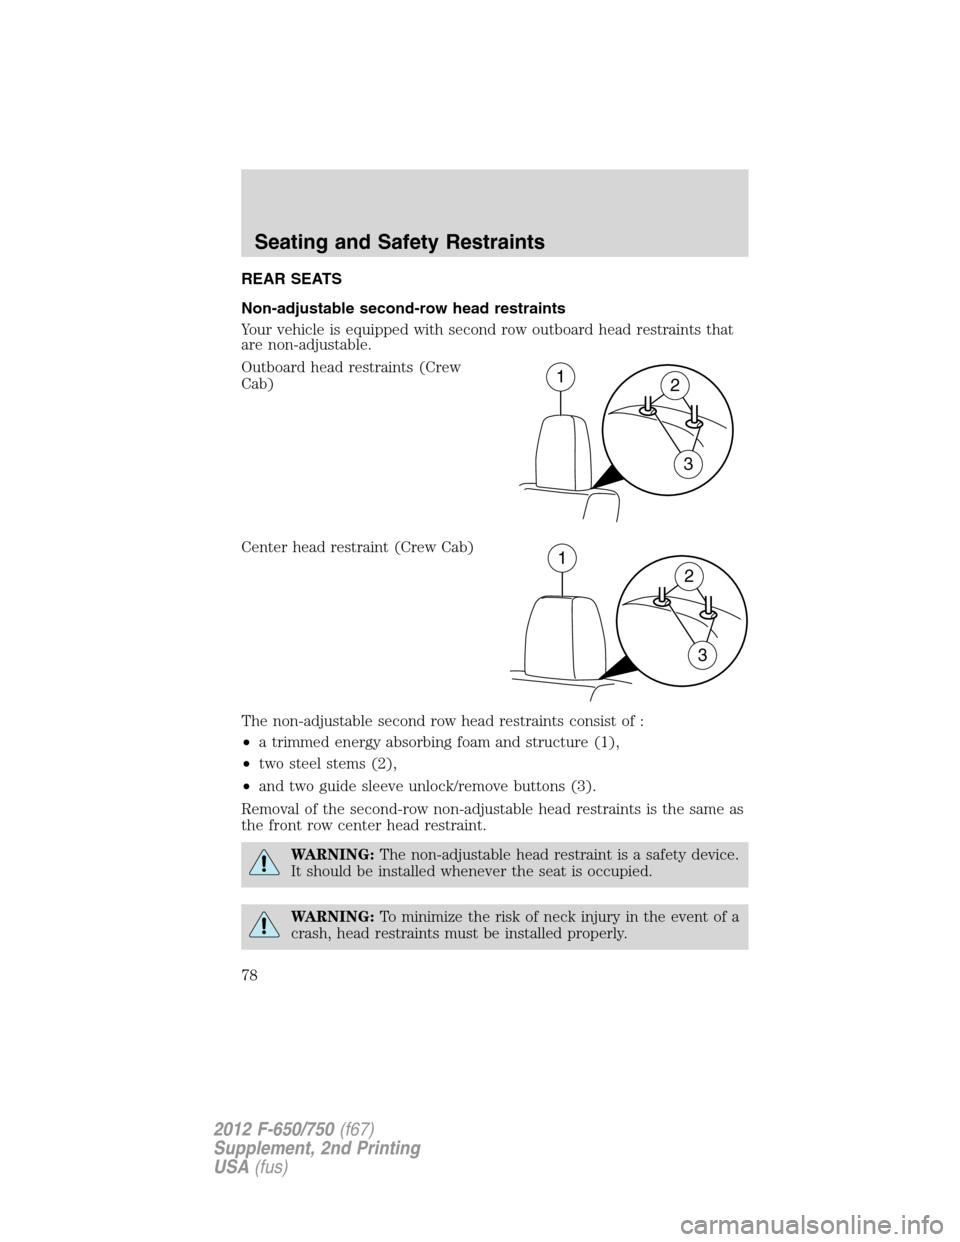
Your vehicle is equipped with second row outboard head restraints that
are non-adjustable.
Outboard head restraints (Crew
Cab)
Center head restraint (Crew Cab)
The non-adjustable second row head restraints consist of :
•a trimmed energy absorbing foam and structure (1),
•two steel stems (2),
•and two guide sleeve unlock/remove buttons (3).
Removal of the second-row non-adjustable head restraints is the same as
the front row center head restraint.
WARNING:The non-adjustable head restraint is a safety device.
It should be installed whenever the seat is occupied.
WARNING:To minimize the risk of neck injury in the event of a
crash, head restraints must be installed properly.
12
3
1
2
3
Seating and Safety Restraints
78
2012 F-650/750(f67)
Supplement, 2nd Printing
USA(fus)
Page 110 of 306
WARNING:Do not drive with your foot resting on the brake
pedal. This results in abnormally high brake temperatures,
excessive lining wear and increased stopping distances.
Before descending a long or steep hill, shift to a lower gear and avoid
continuous application of the brakes. Normally, choose the same gear to
descend the hill that you use to ascend the hill.
WARNING:Continuous application of the brakes causes the
brakes to overheat, resulting in a temporary loss of braking.
If brakes do not grip well
•If you have been driving through deep water, gently apply the brakes
several times while the vehicle is moving slowly.
•Let the brakes cool if you have been using them excessively, as in
mountain driving or after several fast, high-speed stops.
•Check brake adjustment.
•Check brake linings for excessive wear.
•Check system air pressure on vehicles equipped with air brakes.
HYDRAULIC BRAKES (IF EQUIPPED)
Full Power Brake System
This system incorporates standard braking, an anti-lock braking system
(ABS) and optional Power Park Brake into one fully-integrated hydraulic
brake system. With the Full Power Brake System, braking energy is
stored, similar to an air brake system, resulting in faster response times
and shorter stopping distances. This is accomplished using motor/pump
assemblies that pressurized the system by pumping brake fluid into
accumulators. This is similar to the air compressor of an air brake system
pressurizing the air tanks. The system includes a master cylinder that
provides the normal pedal “feel” and transfers the pedal force, via brake
fluid, to the main components of the system.
Note:The motor/pumps run momentarily with the ignition switch in the
on or run positions or the switch is in the off position and the brake
pedal is pressed.
Driving
110
2012 F-650/750(f67)
Supplement, 2nd Printing
USA(fus)
Page 127 of 306
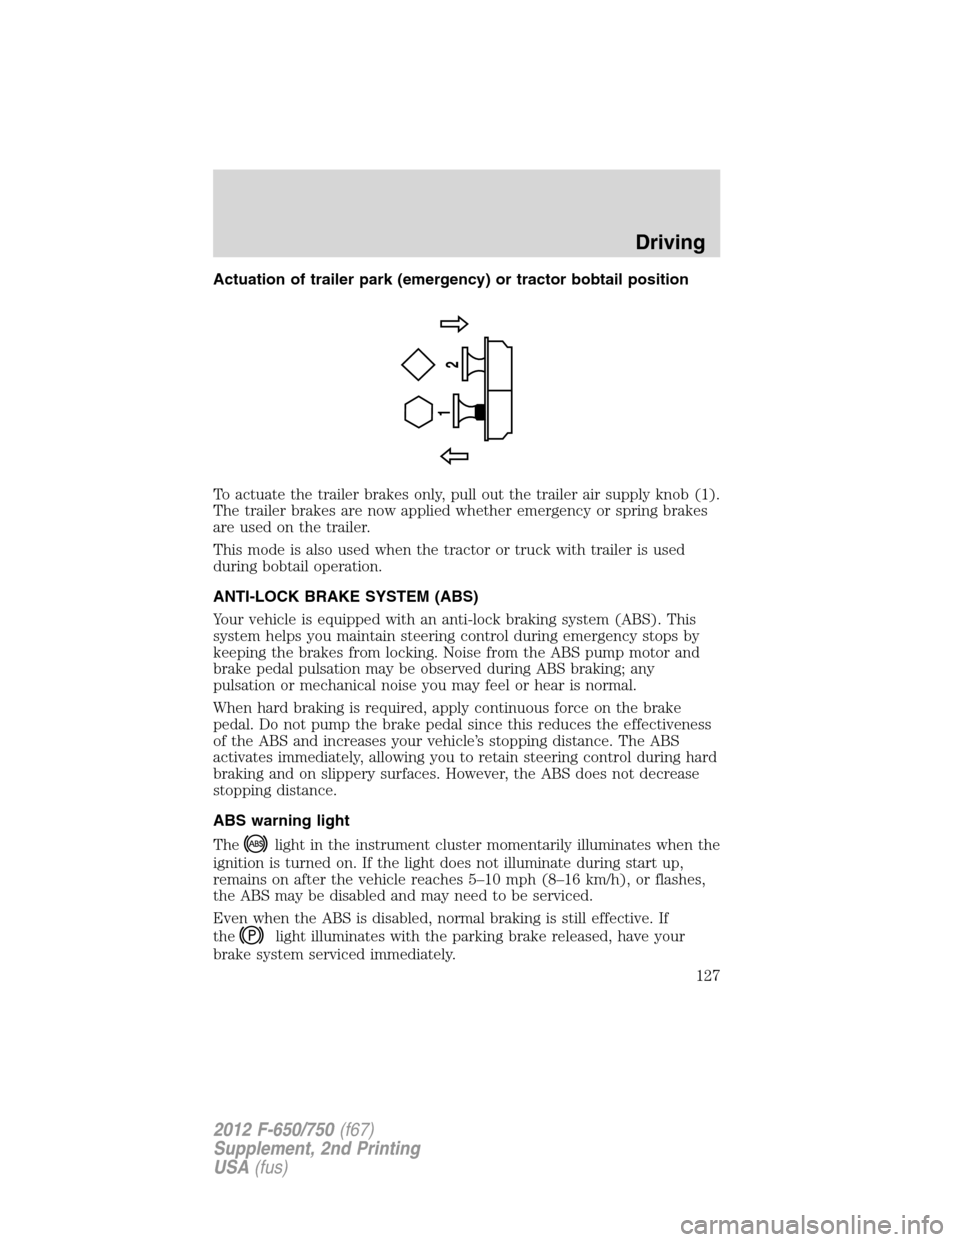
Actuation of trailer park (emergency) or tractor bobtail position
To actuate the trailer brakes only, pull out the trailer air supply knob (1).
The trailer brakes are now applied whether emergency or spring brakes
are used on the trailer.
This mode is also used when the tractor or truck with trailer is used
during bobtail operation.
ANTI-LOCK BRAKE SYSTEM (ABS)
Your vehicle is equipped with an anti-lock braking system (ABS). This
system helps you maintain steering control during emergency stops by
keeping the brakes from locking. Noise from the ABS pump motor and
brake pedal pulsation may be observed during ABS braking; any
pulsation or mechanical noise you may feel or hear is normal.
When hard braking is required, apply continuous force on the brake
pedal. Do not pump the brake pedal since this reduces the effectiveness
of the ABS and increases your vehicle’s stopping distance. The ABS
activates immediately, allowing you to retain steering control during hard
braking and on slippery surfaces. However, the ABS does not decrease
stopping distance.
ABS warning light
The
light in the instrument cluster momentarily illuminates when the
ignition is turned on. If the light does not illuminate during start up,
remains on after the vehicle reaches 5–10 mph (8–16 km/h), or flashes,
the ABS may be disabled and may need to be serviced.
Even when the ABS is disabled, normal braking is still effective. If
the
light illuminates with the parking brake released, have your
brake system serviced immediately.
1
2
Driving
127
2012 F-650/750(f67)
Supplement, 2nd Printing
USA(fus)