steering wheel FORD F750 2015 13.G User Guide
[x] Cancel search | Manufacturer: FORD, Model Year: 2015, Model line: F750, Model: FORD F750 2015 13.GPages: 384, PDF Size: 4.95 MB
Page 162 of 384

•At temperatures of –4°F (–20°C) or below, it is recommended that
you use a crankcase-mounted coolant heater to improve cold engine
starting.
•If operating in arctic temperatures of –20°F (–29°C) or lower, consult
your truck dealer for information about special cold weather
equipment and precautions.
Hot Weather
•Use a permanent-type engine coolant to protect the engine against
damage from overheating.
•Fill the fuel tank at the end of daily operation to prevent
condensation in the fuel system.
•Keep external surfaces of the engine, radiator, charge air cooler, air
conditioning condenser and accessories clean to avoid dirt build-up.
•You may experience above normal coolant temperatures while driving
in a transmission gear ratio that lugs the engine. To correct this
problem, increase engine speed by downshifting into the next lower
gear.
STEERING
Your vehicle is equipped with power steering. Power steering uses energy
from the engine to decrease the driver’s effort in steering your vehicle.
To help prevent damage to the power steering pump:
•Never hold the steering wheel to the extreme right or the extreme
left for more than a few seconds when the engine is running.
•Do not operate your vehicle with the power steering pump fluid level
below the ADD mark on the MAX COLD side of the power steering
reservoir dipstick.
•Some noise is normal during operation. If the noise is excessive,
check for low power steering pump fluid level before seeking service
by an authorized dealer.
•Low power steering pump fluid levels may cause heavy or uneven
steering efforts. Check the power steering pump fluid level before
seeking service from an authorized dealer.
•Do not fill the power steering pump reservoir above the FULL mark
on the MAX HOT side of the power steering reservoir dipstick, as this
may result in leaks from the reservoir.
If the power steering system breaks down (or if the engine is turned
off), you can steer your vehicle manually, but it takes more effort.
Driving Aids161
2015 F-650/750(f67)
Owners Guide gf(ownloose), 1st Printing, December 2013
Canadian_French(fr_can)
Page 163 of 384
If the steering wanders or pulls, check for:
•Underinflated tire(s) on any wheel(s)
•Uneven vehicle loading
•High crown in center of road
•High crosswinds
•Wheels out of alignment
•Loose or worn suspension components.
AIR SUSPENSION (IF EQUIPPED)
Note:Do not operate your vehicle without air in the suspension springs.
Operating your vehicle without air in the suspension springs damages the
suspension, degrades ride performance and may cause property damage.
The air suspension system automatically adjusts to different loads to
maintain a constant frame height, allows for ease of vehicle loading,
provides improved vehicle ride, and increased driver comfort.
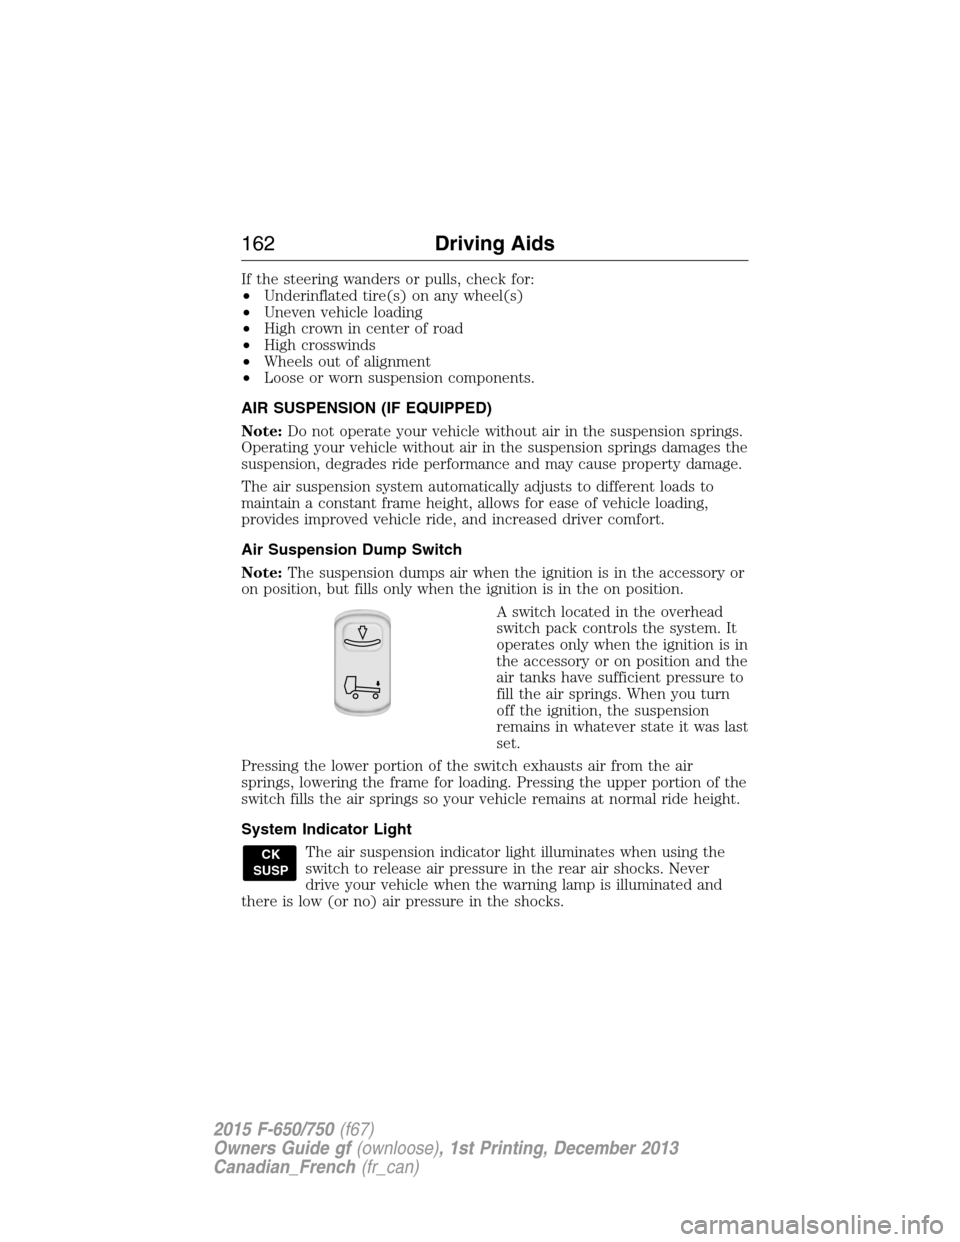
Air Suspension Dump Switch
Note:The suspension dumps air when the ignition is in the accessory or
on position, but fills only when the ignition is in the on position.
A switch located in the overhead
switch pack controls the system. It
operates only when the ignition is in
the accessory or on position and the
air tanks have sufficient pressure to
fill the air springs. When you turn
off the ignition, the suspension
remains in whatever state it was last
set.
Pressing the lower portion of the switch exhausts air from the air
springs, lowering the frame for loading. Pressing the upper portion of the
switch fills the air springs so your vehicle remains at normal ride height.
System Indicator Light
The air suspension indicator light illuminates when using the
switch to release air pressure in the rear air shocks. Never
drive your vehicle when the warning lamp is illuminated and
there is low (or no) air pressure in the shocks.
CK
SUSP
162Driving Aids
2015 F-650/750(f67)
Owners Guide gf(ownloose), 1st Printing, December 2013
Canadian_French(fr_can)
Page 164 of 384
Connecting and Disconnecting a Trailer with Air Suspension and
Air Suspension Dump Switch
When connecting to a trailer:
•Press the lower portion of the switch to exhaust air from the air
suspension system.
•Press the upper portion of the switch, and then raise the landing gear
after making the connection to the trailer.
When disconnecting the trailer:
•Lower the landing gear, and then press the lower portion of the
switch.
•Disconnect the brake hoses, trailer-side and rear light connectors,
then pull the release lever on the fifth wheel.
You must press the upper portion of the switch before operating with a
trailer or operating in the bobtail mode.
Suspension Conversions
WARNING:When operating a loaded vehicle, the driver must
keep all adjustable axles on the ground at all times, supporting
their share of the vehicle’s load. Failure to do so can overload other
axles, tires, wheels, springs, steering components, brakes and frames,
resulting in early component failure, loss of vehicle control, possible
property damage and personal injury.
We do not recommend performing, or approve of, suspension
conversions. However, we understand that, on occasion, others install
aftermarket add-on suspensions on the truck chassis that allow operator
control for weight transfer from other axles (such as air lift axles).
Driving Aids163
2015 F-650/750(f67)
Owners Guide gf(ownloose), 1st Printing, December 2013
Canadian_French(fr_can)
Page 179 of 384

Vehicles Sold in Canada: Getting Roadside Assistance
Canadian customers who require roadside assistance, call:
1–800–665–2006.
Vehicles Sold Canada: Using Roadside Assistance
Complete the roadside assistance identification card and place it in your
wallet for quick reference. In Canada, the card is found in the warranty
information in the glove box.
Canadian Roadside coverage and benefits may differ from the U.S.
coverage. Please see your warranty information or visit our website at
www.ford.ca for information on Canadian services and benefits.
Canadian customers who need to obtain roadside information, call
1-800-665-2006 or visit our website at www.ford.ca.
HAZARD FLASHER CONTROL
Note:With extended use, the flasher may run down your battery.
The hazard flasher is located on the
steering column, just behind the
steering wheel. The hazard flashers
operate when the ignition is in any
position or if the key is not in the
ignition.
•Press the flasher control to flash
all front and rear direction
signals.
•Press the flasher control again to turn them off.
Use it when your vehicle is creating a safety hazard for other motorists.
JUMP-STARTING THE VEHICLE
WARNING:The gases around the battery can explode if exposed
to flames, sparks, or lit cigarettes. An explosion could result in
injury or vehicle damage.
WARNING:Batteries contain sulfuric acid which can burn skin,
eyes and clothing, if contacted.
178Roadside Emergencies
2015 F-650/750(f67)
Owners Guide gf(ownloose), 1st Printing, December 2013
Canadian_French(fr_can)
Page 198 of 384
GENERAL INFORMATION
WARNING:Making modifications to various parts, components
and systems of the vehicle, such as brake and steering systems,
can adversely affect the quality, reliability and operation of your vehicle
and could result in property damage, personal injury or death. Such
modifications must be avoided.
WARNING:Failure to properly perform maintenance and
servicing procedures could result in vehicle damage, personal
injury or death.
WARNING:Take care when performing any maintenance,
system check or service on your vehicle. Some of the materials
may also be hazardous if used, serviced or handled improperly and
could result in property damage, personal injury or death.
Always use care when performing vehicle maintenance, repairs or system
checks. Improper or incomplete service could result in your vehicle not
working properly which may result in personal injury or damage to your
vehicle or equipment. It is the operator’s responsibility to see that your
vehicle receives proper care and maintenance. If you have any questions
about performing service, have the service done by a qualified
technician.
Servicing Guidelines
When servicing your vehicle:
•Always wear safety glasses for eye protection.
•Always set the parking brake or chock the wheels.
•Always use support stands, not a jack, when working under a raised
vehicle.
•Always turn off the ignition unless a procedure requires the engine to
be running.
•Always avoid contact with hot metal parts. Allow the components to
cool before working with, or around, them.
•Always operate the engine in a well-ventilated area.
•Do not wear loose-fitting clothing, hanging jewelry, watches or rings.
•Do not smoke.
•Do not work on the brakes or the clutch unless you take the proper
precautions to avoid inhaling friction material dust.
Maintenance197
2015 F-650/750(f67)
Owners Guide gf(ownloose), 1st Printing, December 2013
Canadian_French(fr_can)
Page 205 of 384
provided by the service manual. Hydraulic brake systems are
power-assisted. There is a great reduction in braking capabilities
without engine assist.
•Proper fluid level. The level should be at the bottom edge of the ring
on each reservoir fill port. Do not fill the master cylinder to the top of
the reservoir. If fluid level requires attention to maintain a proper
master cylinder level, this is an indication of either severe operation
(pad wear) or fluid leakage. A more frequent and thorough brake
inspection is required.
•Brake lines, hoses and fittings. Repair or replace brake line tubes,
hoses or fittings as required. Inspect these components every
4000 miles (6000 kilometers):
•Lines for kinks, dents, corrosion or rupture.
•Hoses for abrasions, kinks, soft spots or rupture, collapse, cracks,
twists or loose frame supports. When replacing a hose, be sure
there is adequate clearance to the hose to avoid an abrasion to the
new hose.
•All connections for leaks.
Driveline Parking Brake
WARNING:Use wheel chocks and exercise caution when
inspecting under the vehicle. A vehicle roll-away could result in
property damage, personal injury or death.
A qualified technician should adjust the parking brake and keep to the
instructions in the service manual.
Steering System
WARNING:Failure to maintain the steering system in proper
condition can cause reduced steering ability resulting in property
damage, personal injury or death.
Note:Have any steering problems immediately corrected by a qualified
service technician.
Ask your service technician to examine the steering mechanism. Only
minor adjustments may be necessary. Regular inspections should include:
•Checking the tie rod, drag link end clamp bolts and ball joints for
proper tightness.
•Checking for installation and spread of cotter pins and tightness of
nuts at both ends of the tie rod and drag link.
204Maintenance
2015 F-650/750(f67)
Owners Guide gf(ownloose), 1st Printing, December 2013
Canadian_French(fr_can)
Page 239 of 384

CLEANING THE INTERIOR
WARNING:Do not use cleaning solvents, bleach or dye on the
vehicle’s safety belts, as these actions may weaken the belt
webbing.
WARNING:On vehicles equipped with seat-mounted airbags, do
not use chemical solvents or strong detergents. Such products
could contaminate the side airbag system and affect performance of the
side airbag in a collision.
For fabric, carpets, cloth seats, safety belts and seats equipped with side
airbags:
•Remove dust and loose dirt with a vacuum cleaner.
•Apply a layer of high quality foam cleaner, designed for automotive
interiors, to the dry stained area (s) of the item you are cleaning and
allow soaking for one minute.
•If grease or tar is present on the material, spot-clean the area first
with Motorcraft Spot and Stain Remover. In Canada, use Motorcraft
Multi-Purpose Cleaner.
•If a ring forms on the fabric after spot cleaning, clean the entire area
immediately (but do not oversaturate) or the ring can set.
•Do not use household cleaning products or glass cleaners, which can
stain and discolor the fabric and affect the flame retardant abilities of
the seat materials.
CLEANING THE INSTRUMENT PANEL AND INSTRUMENT
CLUSTER LENS
WARNING:Do not use chemical solvents or strong detergents
when cleaning the steering wheel or instrument panel to avoid
contamination of the airbag system.
Clean the instrument panel and cluster lens with a clean, damp, white,
cotton cloth, then use a clean and dry, white, cotton cloth to dry these
areas.
•Avoid cleaners or polishes that increase the gloss of the upper portion
of the instrument panel. The dull finish in this area helps protect the
driver from undesirable windshield reflection.
238Vehicle Care
2015 F-650/750(f67)
Owners Guide gf(ownloose), 1st Printing, December 2013
Canadian_French(fr_can)
Page 248 of 384

Proper tire inflation, toe-in adjustment, loads, and road speeds are
important factors governing tire mileage, steering ease and
maneuverability.
Tire Loading
WARNING:Loading tires beyond their rated capacity decreases
tire life requiring more frequent replacement of tires. Overloading
creates an unsafe condition that may result in sudden air loss from a
tire failure resulting in an accident that could cause property damage,
personal injury or death.
Note:Your GAW/GVW rating is correct at the time of your vehicle
production, and reflects the exact rating of the tires specified. When
replacing tires, make sure that the replacement tire load rating (listed in
pounds and kilograms on the tire sidewall) is the same or higher than
the tire that you are replacing. Failure to do so adversely affects
maximum load carrying capacity. Tires with the same size specification
do not always have the same load specification.
Note:The tire installed as original equipment may not be the same as
the tire specified on the DOT label, but has enough load capacity to
carry the GAW/GVW specified.
Note:Tires with the same size specification do not always have the same
load specification.
Matching Tires
Dual Tires:Dual tires should be matched using tires of equivalent size.
Do not mount tires that differ more than one-quarter inch (6
millimeters) in diameter or three-quarters inch (19 millimeters) in
circumference on the same dual wheel assembly.
Mixing:Never mix bias and radial tires on this vehicle. Never mix
different tire sizes or constructions on the same axle.
Rotation:
Rotation is always advisable:
•If there is irregular wear on the front (steering) axle tires, move to
rear position.
•In a dual assembly, reverse the position of the tires if one tire wears
much faster than its mate does.
•On the drive axle, if heel and toe wear or alternate lug wear occurs,
rotating the tires from one end of the axle to the other end of the
axle may help even out this wear.
Wheels and Tires247
2015 F-650/750(f67)
Owners Guide gf(ownloose), 1st Printing, December 2013
Canadian_French(fr_can)
Page 249 of 384

Rotation may not advisable:
•Front (Steering) Axle:Remove tires when tread wears down to
four–thirty seconds inch (3 millimeters) or less. Retread or rotate
worn tires to drive position. We do not recommend using retreaded
tires on steering axles.
•Rear Axles:Remove tires when tread wears down to two–thirty
seconds inch (2 millimeters).
If using a rib tire on front axle and lug or off-road type on rear axle
positions:
•Front (Steering) Axle:Replace tires at front wheels when tread is
worn to four–thirty seconds inch (3 millimeters) or less.
•Rear Axles:Remove tires when the tread wears down to two–thirty
seconds inch (2 millimeters) or less. Tires identified with the word
re-groovable molded on the sidewall can be re-grooved. There must
be a minimum of three–thirty seconds inch (2.5 millimeters) of
under-tread at the bottom of the grooves.
Wheel and Tire Balancing
Out-of-round or out-of-balance wheels or tires can cause vehicle
vibration, bounce and shimmy. Replace damaged or out-of-round wheels.
You can correct out-of-round tires and wheel assemblies by re-clocking
the tire relative to the wheel.
You should then dynamically balance the tire and wheel assembly.
Tire Wear
Radial tires can exhibit three types of normal wear patterns:
•Even
•Erosion
•Chamfer
Even wear:A sign that the tire is being properly used and maintained.
Erosion wear:Also called rolling wear, channel or river wear, erosion
wear occurs more often on free-rolling tires. This is an indication of
using the tire in a slow wearing operation. What happens is that the belt
plies are held very rigid and the tread is not allowed to distort as it
passes through the contact area. Wear only occurs at the edge of the
tread. No corrective action required. If erosion gets to be one–sixteenth
inch (2 millimeters) or more, you can rotate the tire to a drive axle.
Chamfer or shoulder wear:With tires inflated properly, this is a
normal tendency of most radial tire designs. If both inside and outside
shoulders are wearing evenly around the tire, no further action is
required. Over-inflation is not effective in correcting this effect.
248Wheels and Tires
2015 F-650/750(f67)
Owners Guide gf(ownloose), 1st Printing, December 2013
Canadian_French(fr_can)
Page 258 of 384

Component SpecificationViscosity / Ambient
Temperature / NotesEquivalent Ford
Part Name / Number
Eaton-Spicer axle,
Spicer axle - Front
axle wheel bearing
grease, tie rod ends,
drag link, kingpin and
bushingEP2 Lithium
complex-based moly
grease (or equivalent)
GC/LB NLGI #2
multi-purpose lithium
complex greaseNote:Eaton-Spicer
and Meritor Easy Steer
axles: With chassis
load on axle, force
grease through thrust
bearings; then with
axle lifted clear of the
floor, force grease
between kingpin and
bushing surfaces.Motorcraft Premium
Long Life Grease /
XG-1-C
Steering
Power steering fluid MERCON V ATF — MERCON V /
XT-5-QMC; XT-5-QM;
XL-14
Steering gear Ross TAS
- Output Seal, Steering
column U-joints / slip
jointGC/LB NLGI #2 lithium
complex-based moly
grease or
multi-purpose lithium
complex grease— Motorcraft Premium
Long Life Grease /
XG-1-C
Capacities and Specifications257
2015 F-650/750(f67)
Owners Guide gf(ownloose), 1st Printing, December 2013
Canadian_French(fr_can)