rear axle FORD F750 2015 13.G Owners Manual
[x] Cancel search | Manufacturer: FORD, Model Year: 2015, Model line: F750, Model: FORD F750 2015 13.GPages: 384, PDF Size: 4.95 MB
Page 18 of 384
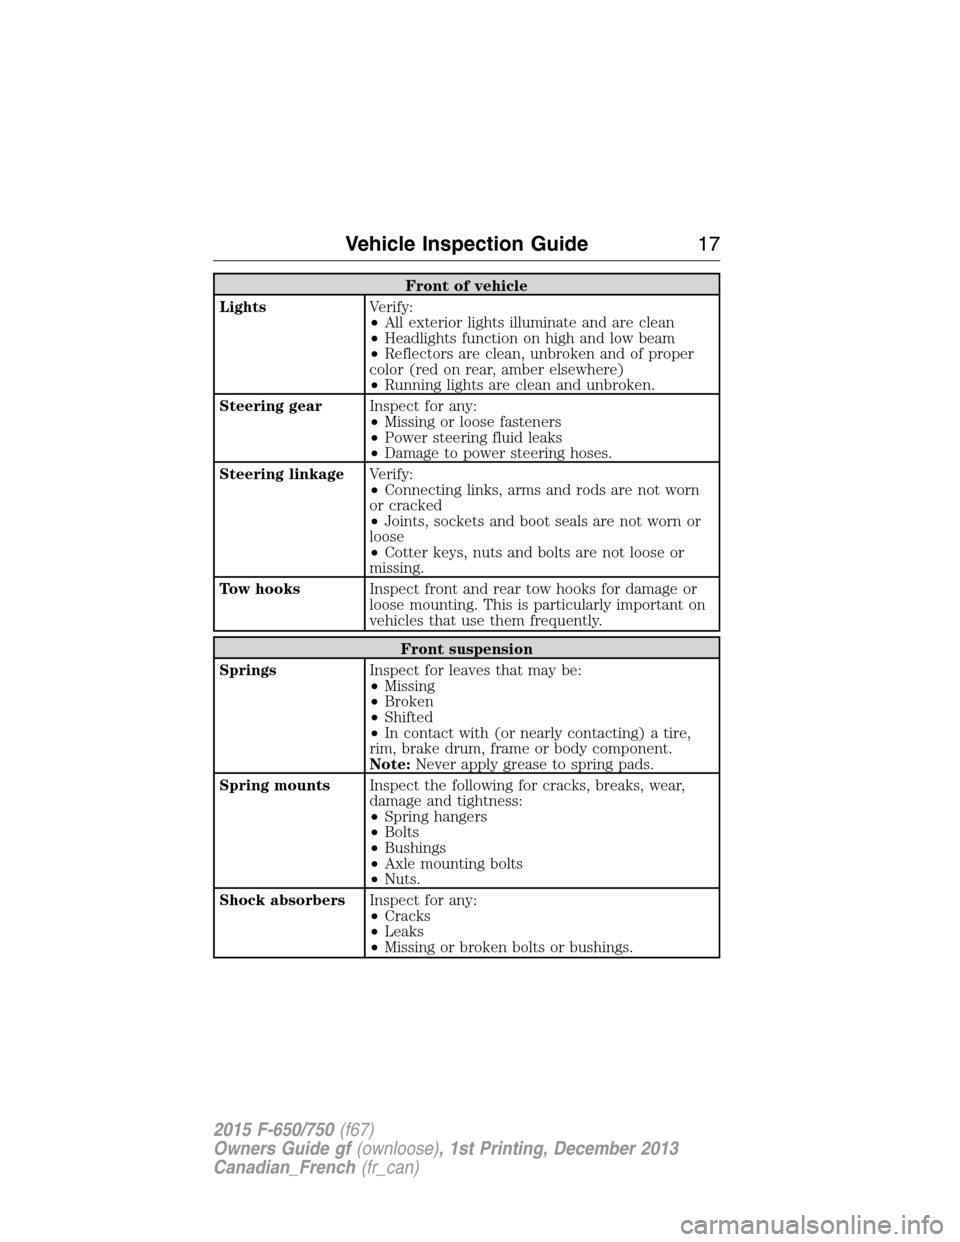
Front of vehicle
LightsVerify:
•All exterior lights illuminate and are clean
•Headlights function on high and low beam
•Reflectors are clean, unbroken and of proper
color (red on rear, amber elsewhere)
•Running lights are clean and unbroken.
Steering gearInspect for any:
•Missing or loose fasteners
•Power steering fluid leaks
•Damage to power steering hoses.
Steering linkageVerify:
•Connecting links, arms and rods are not worn
or cracked
•Joints, sockets and boot seals are not worn or
loose
•Cotter keys, nuts and bolts are not loose or
missing.
Tow hooksInspect front and rear tow hooks for damage or
loose mounting. This is particularly important on
vehicles that use them frequently.
Front suspension
SpringsInspect for leaves that may be:
•Missing
•Broken
•Shifted
•In contact with (or nearly contacting) a tire,
rim, brake drum, frame or body component.
Note:Never apply grease to spring pads.
Spring mountsInspect the following for cracks, breaks, wear,
damage and tightness:
•Spring hangers
•Bolts
•Bushings
•Axle mounting bolts
•Nuts.
Shock absorbersInspect for any:
•Cracks
•Leaks
•Missing or broken bolts or bushings.
Vehicle Inspection Guide17
2015 F-650/750(f67)
Owners Guide gf(ownloose), 1st Printing, December 2013
Canadian_French(fr_can)
Page 21 of 384
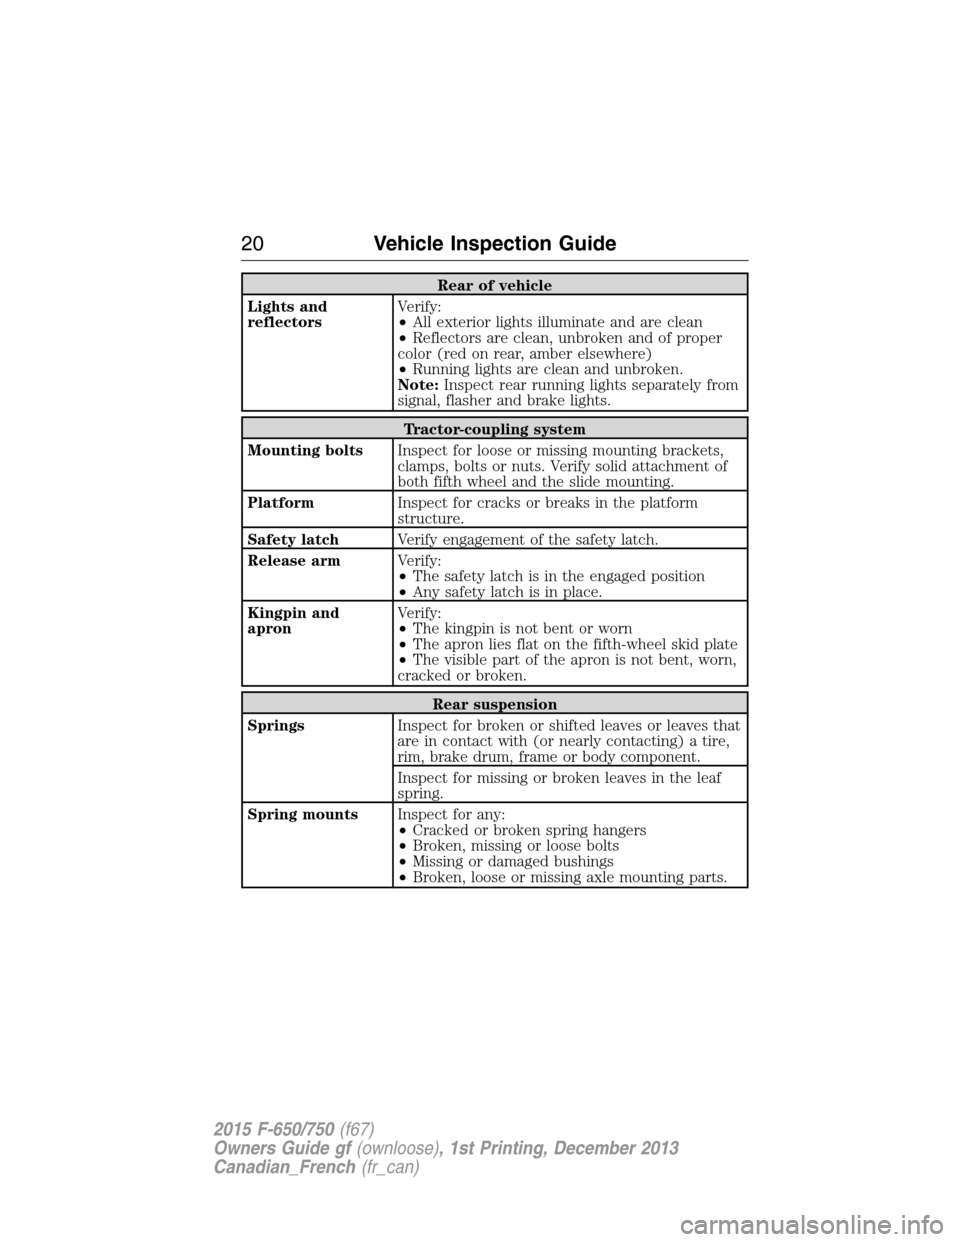
Rear of vehicle
Lights and
reflectorsVerify:
•All exterior lights illuminate and are clean
•Reflectors are clean, unbroken and of proper
color (red on rear, amber elsewhere)
•Running lights are clean and unbroken.
Note:Inspect rear running lights separately from
signal, flasher and brake lights.
Tractor-coupling system
Mounting boltsInspect for loose or missing mounting brackets,
clamps, bolts or nuts. Verify solid attachment of
both fifth wheel and the slide mounting.
PlatformInspect for cracks or breaks in the platform
structure.
Safety latchVerify engagement of the safety latch.
Release armVerify:
•The safety latch is in the engaged position
•Any safety latch is in place.
Kingpin and
apronVerify:
•The kingpin is not bent or worn
•The apron lies flat on the fifth-wheel skid plate
•The visible part of the apron is not bent, worn,
cracked or broken.
Rear suspension
SpringsInspect for broken or shifted leaves or leaves that
are in contact with (or nearly contacting) a tire,
rim, brake drum, frame or body component.
Inspect for missing or broken leaves in the leaf
spring.
Spring mountsInspect for any:
•Cracked or broken spring hangers
•Broken, missing or loose bolts
•Missing or damaged bushings
•Broken, loose or missing axle mounting parts.
20Vehicle Inspection Guide
2015 F-650/750(f67)
Owners Guide gf(ownloose), 1st Printing, December 2013
Canadian_French(fr_can)
Page 135 of 384
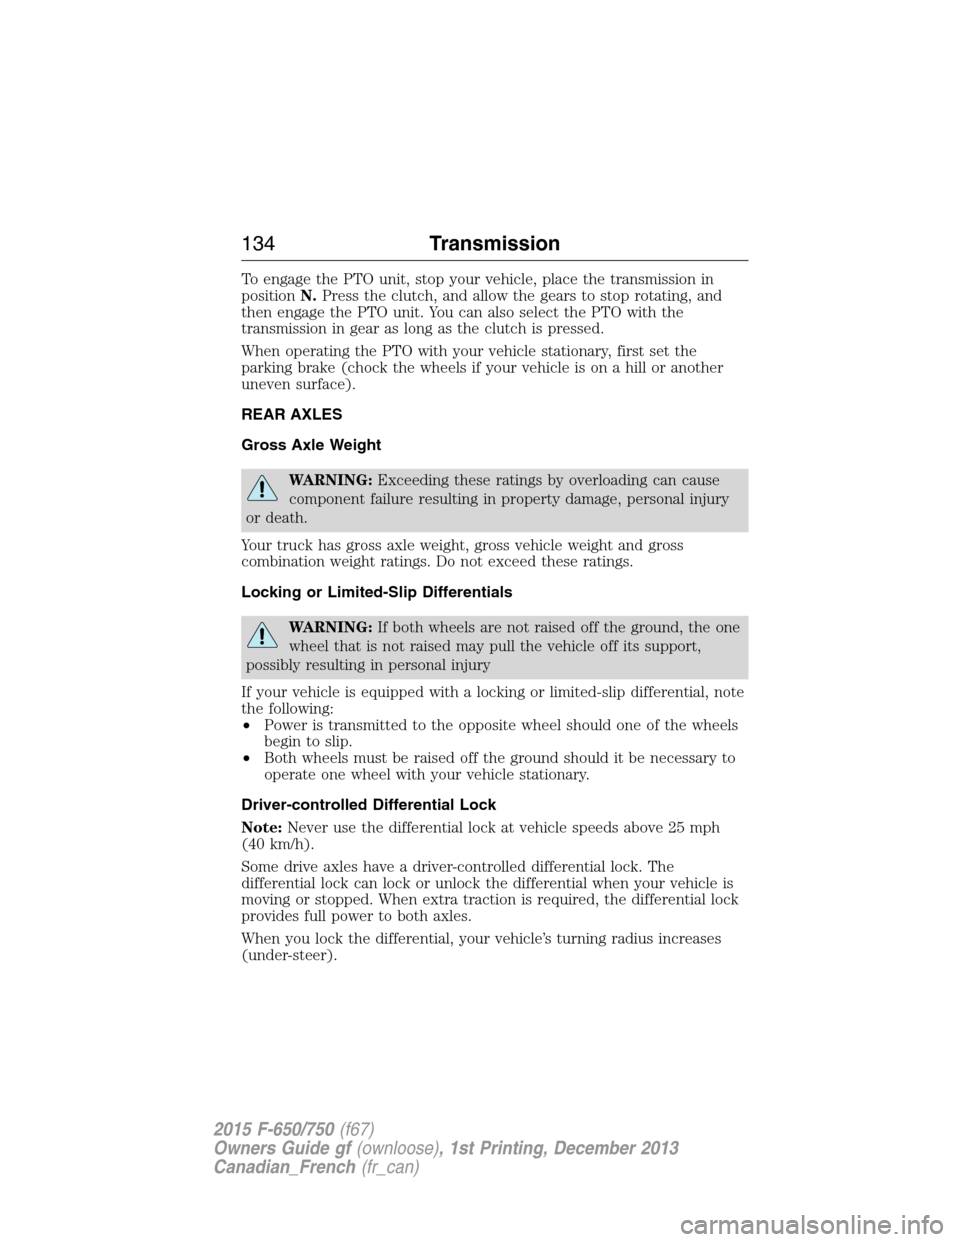
To engage the PTO unit, stop your vehicle, place the transmission in
positionN.Press the clutch, and allow the gears to stop rotating, and
then engage the PTO unit. You can also select the PTO with the
transmission in gear as long as the clutch is pressed.
When operating the PTO with your vehicle stationary, first set the
parking brake (chock the wheels if your vehicle is on a hill or another
uneven surface).
REAR AXLES
Gross Axle Weight
WARNING:Exceeding these ratings by overloading can cause
component failure resulting in property damage, personal injury
or death.
Your truck has gross axle weight, gross vehicle weight and gross
combination weight ratings. Do not exceed these ratings.
Locking or Limited-Slip Differentials
WARNING:If both wheels are not raised off the ground, the one
wheel that is not raised may pull the vehicle off its support,
possibly resulting in personal injury
If your vehicle is equipped with a locking or limited-slip differential, note
the following:
•Power is transmitted to the opposite wheel should one of the wheels
begin to slip.
•Both wheels must be raised off the ground should it be necessary to
operate one wheel with your vehicle stationary.
Driver-controlled Differential Lock
Note:Never use the differential lock at vehicle speeds above 25 mph
(40 km/h).
Some drive axles have a driver-controlled differential lock. The
differential lock can lock or unlock the differential when your vehicle is
moving or stopped. When extra traction is required, the differential lock
provides full power to both axles.
When you lock the differential, your vehicle’s turning radius increases
(under-steer).
134Transmission
2015 F-650/750(f67)
Owners Guide gf(ownloose), 1st Printing, December 2013
Canadian_French(fr_can)
Page 137 of 384
We do not recommend, or approve, performing axle conversions.
However, we understand that, on occasion, others install aftermarket
add-on axles on the truck chassis that allow operator control for weight
transfer from other axles (such as air lift axles).
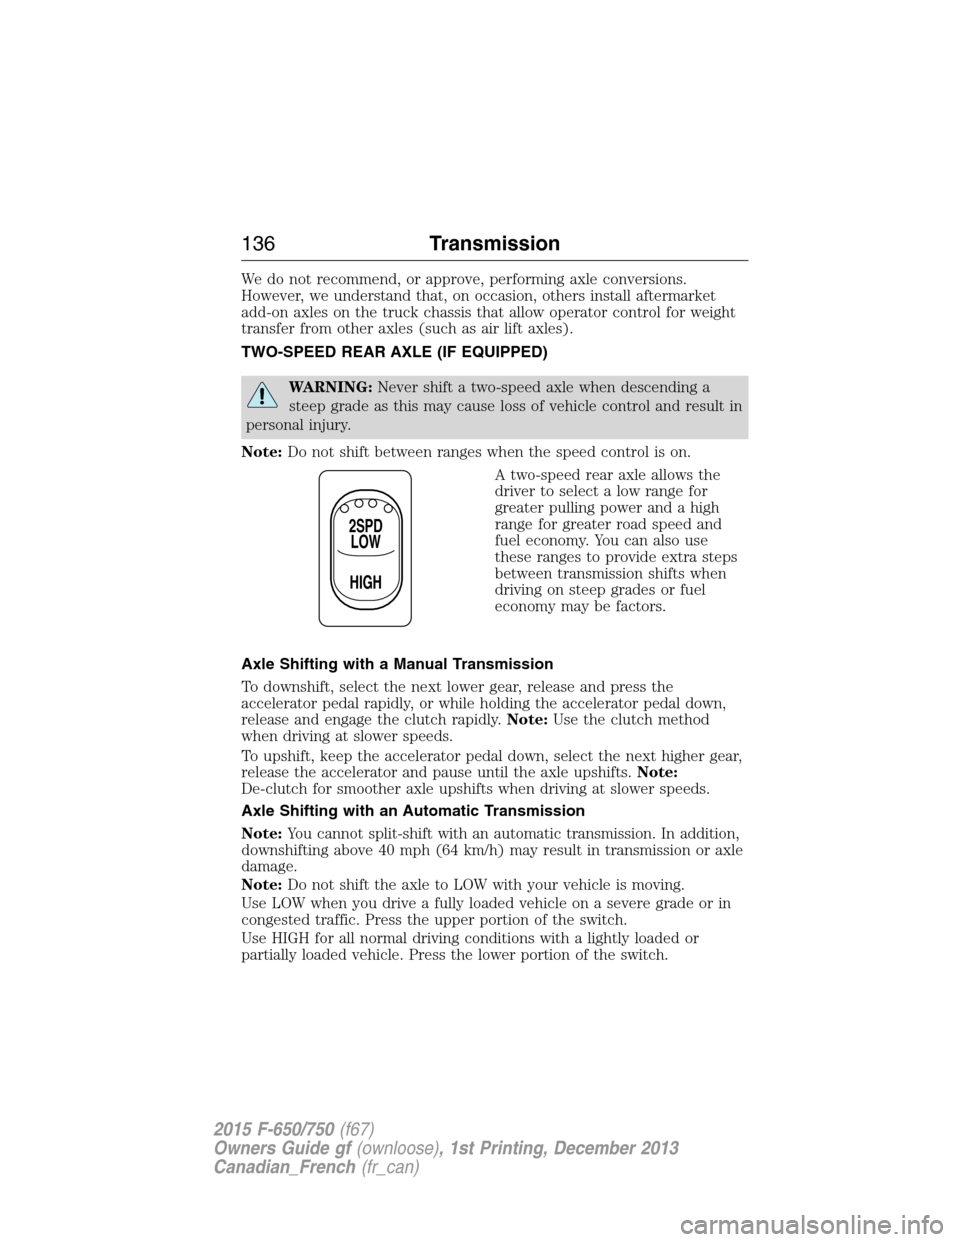
TWO-SPEED REAR AXLE (IF EQUIPPED)
WARNING:Never shift a two-speed axle when descending a
steep grade as this may cause loss of vehicle control and result in
personal injury.
Note:Do not shift between ranges when the speed control is on.
A two-speed rear axle allows the
driver to select a low range for
greater pulling power and a high
range for greater road speed and
fuel economy. You can also use
these ranges to provide extra steps
between transmission shifts when
driving on steep grades or fuel
economy may be factors.
Axle Shifting with a Manual Transmission
To downshift, select the next lower gear, release and press the
accelerator pedal rapidly, or while holding the accelerator pedal down,
release and engage the clutch rapidly.Note:Use the clutch method
when driving at slower speeds.
To upshift, keep the accelerator pedal down, select the next higher gear,
release the accelerator and pause until the axle upshifts.Note:
De-clutch for smoother axle upshifts when driving at slower speeds.
Axle Shifting with an Automatic Transmission
Note:You cannot split-shift with an automatic transmission. In addition,
downshifting above 40 mph (64 km/h) may result in transmission or axle
damage.
Note:Do not shift the axle to LOW with your vehicle is moving.
Use LOW when you drive a fully loaded vehicle on a severe grade or in
congested traffic. Press the upper portion of the switch.
Use HIGH for all normal driving conditions with a lightly loaded or
partially loaded vehicle. Press the lower portion of the switch.
2SPD
LOW
HIGH
136Transmission
2015 F-650/750(f67)
Owners Guide gf(ownloose), 1st Printing, December 2013
Canadian_French(fr_can)
Page 164 of 384
Connecting and Disconnecting a Trailer with Air Suspension and
Air Suspension Dump Switch
When connecting to a trailer:
•Press the lower portion of the switch to exhaust air from the air
suspension system.
•Press the upper portion of the switch, and then raise the landing gear
after making the connection to the trailer.
When disconnecting the trailer:
•Lower the landing gear, and then press the lower portion of the
switch.
•Disconnect the brake hoses, trailer-side and rear light connectors,
then pull the release lever on the fifth wheel.
You must press the upper portion of the switch before operating with a
trailer or operating in the bobtail mode.
Suspension Conversions
WARNING:When operating a loaded vehicle, the driver must
keep all adjustable axles on the ground at all times, supporting
their share of the vehicle’s load. Failure to do so can overload other
axles, tires, wheels, springs, steering components, brakes and frames,
resulting in early component failure, loss of vehicle control, possible
property damage and personal injury.
We do not recommend performing, or approve of, suspension
conversions. However, we understand that, on occasion, others install
aftermarket add-on suspensions on the truck chassis that allow operator
control for weight transfer from other axles (such as air lift axles).
Driving Aids163
2015 F-650/750(f67)
Owners Guide gf(ownloose), 1st Printing, December 2013
Canadian_French(fr_can)
Page 173 of 384
Towing the Vehicle with the Front Wheels Suspended
Note:To avoid transmission damage, do not tow your vehicle even a
short distance without suspending rear wheels or removing the axle
shafts or driveshaft.
Note:When towing a vehicle equipped with a tandem axle from the
front, raise the forward rear axle so it can clear the road surface and
secure it to the frame with chains or U-bolts, allowing only the rear rear
axle to contact the road surface. Remove axle shafts from the rear rear
axle assembly. Cover the wheel hub ends to prevent loss of axle lubricant
and entrance of contaminants. Use extreme care in securing the chains
or U-bolts to avoid possible damage to the brake lines, hoses or other
components.
When it is necessary to tow a vehicle with the front wheels suspended,
take extra precautions to avoid transmission or differential damage:
•Remove the axle shafts from the axle assembly to prevent the wheels
from driving the differential and the transmission.
•Cover the wheel hub ends to prevent loss of axle lubricant and
entrance of other contaminants. If you do not remove the axle shafts,
removal of the driveshaft is required.
Towing the Vehicle with the Rear Wheels Suspended
Note:To avoid damage to the cab roof or air deflector when towing your
vehicle backward (rear wheels suspended), remove the air deflector.
Whenever possible, it is preferable to tow a disabled vehicle from the
rear by raising the rear of the chassis. When towing a vehicle with the
rear of the chassis suspended, you must lock the front wheels in the
straight-ahead position.
Vehicles equipped with a manual transmission must have at least 1.0 pint
(0.5 liter) of transmission fluid drained from the case. This prevents the
transmission fluid from entering the clutch housing and saturating the
clutch discs. Make sure to replace the transmission fluid before returning
your vehicle to service.
Towing Vehicles Equipped with a Driver-controlled Differential
Lock
Note:If you have to tow your vehicle to a service facility with the drive
axle wheels on the ground, it is necessary to remove the axle shafts
before towing your vehicle.
172Towing
2015 F-650/750(f67)
Owners Guide gf(ownloose), 1st Printing, December 2013
Canadian_French(fr_can)
Page 201 of 384
Special applications may warrant a setting based on experience with the
type of tire operating loads and conditions. Radial tires are more
sensitive to toe-in setting than bias ply tires. Fine tuning school bus
alignment to line-haul truck standards does not drastically improve tire
tread life.
Rear Axle
Regular inspections should include:
•Checking for proper tightness of axle mounting U-bolt nuts, attaching
or mounting bolts and nuts. SeeSpring U-bolt checkslater in this
chapter.
•Checking the axle for damage, binding, worn parts and adequate
lubrication.
NoSpin Detroit Locker Positive Locking Differential
Vehicles equipped with this type differential have the operator’s manual
supplied with the vehicle. See that manual for maintenance inspections.
Brake System
Note:People handling brake linings should follow all precautions listed
below:
200Maintenance
2015 F-650/750(f67)
Owners Guide gf(ownloose), 1st Printing, December 2013
Canadian_French(fr_can)
Page 208 of 384
Periodically check:
•Condition of spring leaves for evidence of fatigue, bending or
breakage.
•Condition of suspension mounting brackets and bushings.
•Torque rod mounting fasteners for tightness.
•For proper suspension alignment. Maintain proper alignment at all
times.
•U-bolts. After the chassis has been operating under load for
1000 miles (1600 kilometers) or six months (whichever comes first),
the U-bolt nuts must be re-torqued. Re-torque the U-bolt nuts every
36000 miles (60000 kilometers) thereafter. Clean and lubricate the
U-bolt and nut threads and seats to make sure a like new condition
when re-torqueing.
Note:SeeSpring U-bolt checklater in this chapter.
Supporting Your Vehicle for Service
WARNING:Do not use a jack when working under a vehicle. It
may give way, causing the vehicle to fall and result in property
damage, personal injury or death. Always use floor stands to support
the vehicle.
Prepare your vehicle for service repairs by doing the following:
1. Park your vehicle on a level, concrete floor.
2. Set the parking brake and block the wheels to prevent your vehicle
from moving.
3. Select a jack with a rated capacity sufficient to lift and hold up your
vehicle.
4. Raise your vehicle with the jack applied to the axle(s). Do not use
the bumper as a lifting point.
5. Support your vehicle with floor stands under the axle(s). When
servicing the axle or the suspension, support your vehicle with floor
stands under the frame side-members, preferably between the axles.
Frame and Tow Hooks
Your vehicle’s chassis is manufactured with frame rails of either HSLA
steel or heat-treated steel. Handle each in a specific manner to make
sure maximum service life. Consult the service manual or an authorized
dealer before attempting frame repair or modification.
It is important, particularly on vehicles that use tow hooks frequently, to
inspect the front and rear tow hooks for damage or a loose mounting.
Maintenance207
2015 F-650/750(f67)
Owners Guide gf(ownloose), 1st Printing, December 2013
Canadian_French(fr_can)
Page 220 of 384
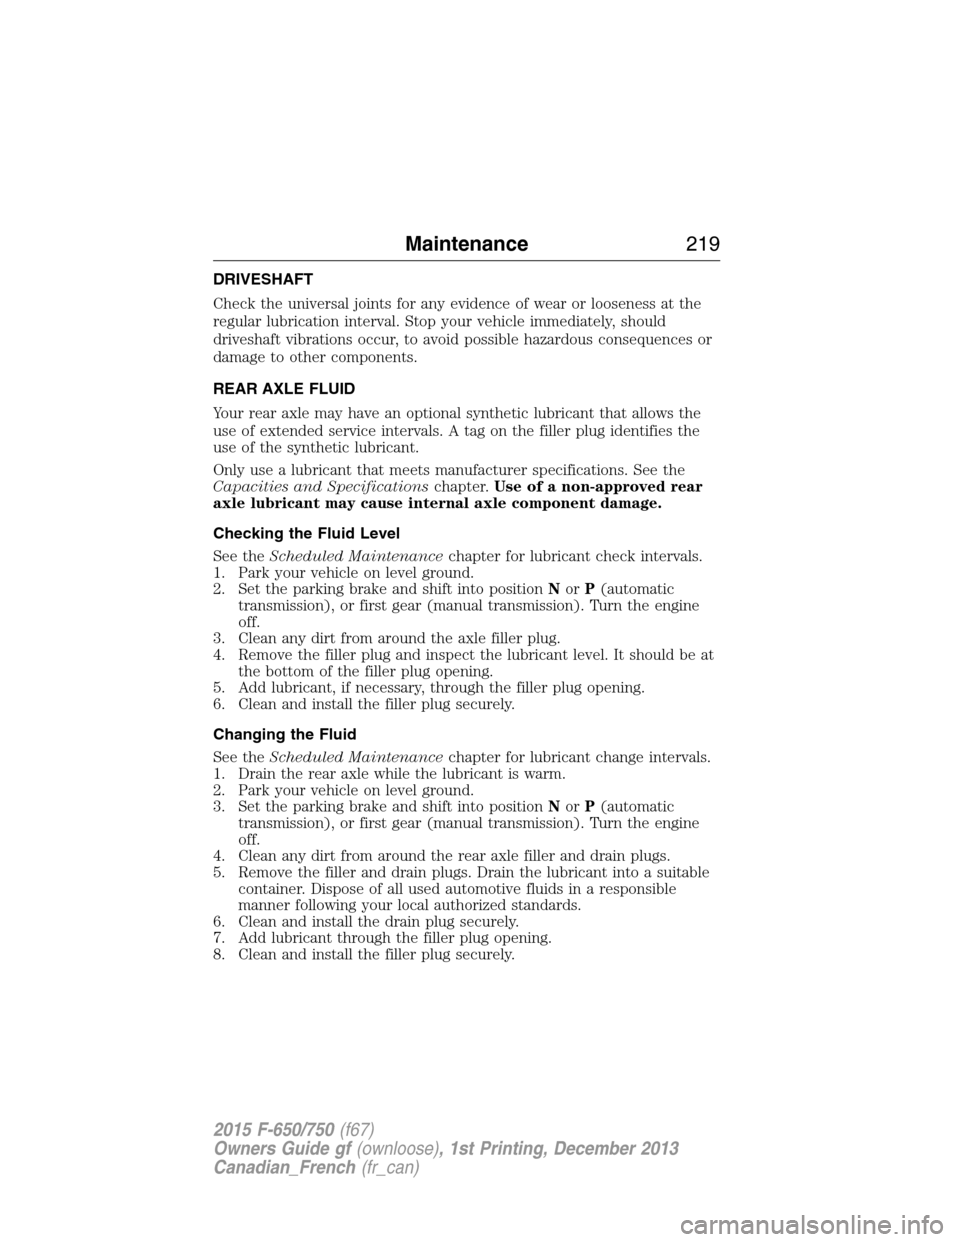
DRIVESHAFT
Check the universal joints for any evidence of wear or looseness at the
regular lubrication interval. Stop your vehicle immediately, should
driveshaft vibrations occur, to avoid possible hazardous consequences or
damage to other components.
REAR AXLE FLUID
Your rear axle may have an optional synthetic lubricant that allows the
use of extended service intervals. A tag on the filler plug identifies the
use of the synthetic lubricant.
Only use a lubricant that meets manufacturer specifications. See the
Capacities and Specificationschapter.Use of a non-approved rear
axle lubricant may cause internal axle component damage.
Checking the Fluid Level
See theScheduled Maintenancechapter for lubricant check intervals.
1. Park your vehicle on level ground.
2. Set the parking brake and shift into positionNorP(automatic
transmission), or first gear (manual transmission). Turn the engine
off.
3. Clean any dirt from around the axle filler plug.
4. Remove the filler plug and inspect the lubricant level. It should be at
the bottom of the filler plug opening.
5. Add lubricant, if necessary, through the filler plug opening.
6. Clean and install the filler plug securely.
Changing the Fluid
See theScheduled Maintenancechapter for lubricant change intervals.
1. Drain the rear axle while the lubricant is warm.
2. Park your vehicle on level ground.
3. Set the parking brake and shift into positionNorP(automatic
transmission), or first gear (manual transmission). Turn the engine
off.
4. Clean any dirt from around the rear axle filler and drain plugs.
5. Remove the filler and drain plugs. Drain the lubricant into a suitable
container. Dispose of all used automotive fluids in a responsible
manner following your local authorized standards.
6. Clean and install the drain plug securely.
7. Add lubricant through the filler plug opening.
8. Clean and install the filler plug securely.
Maintenance219
2015 F-650/750(f67)
Owners Guide gf(ownloose), 1st Printing, December 2013
Canadian_French(fr_can)
Page 221 of 384
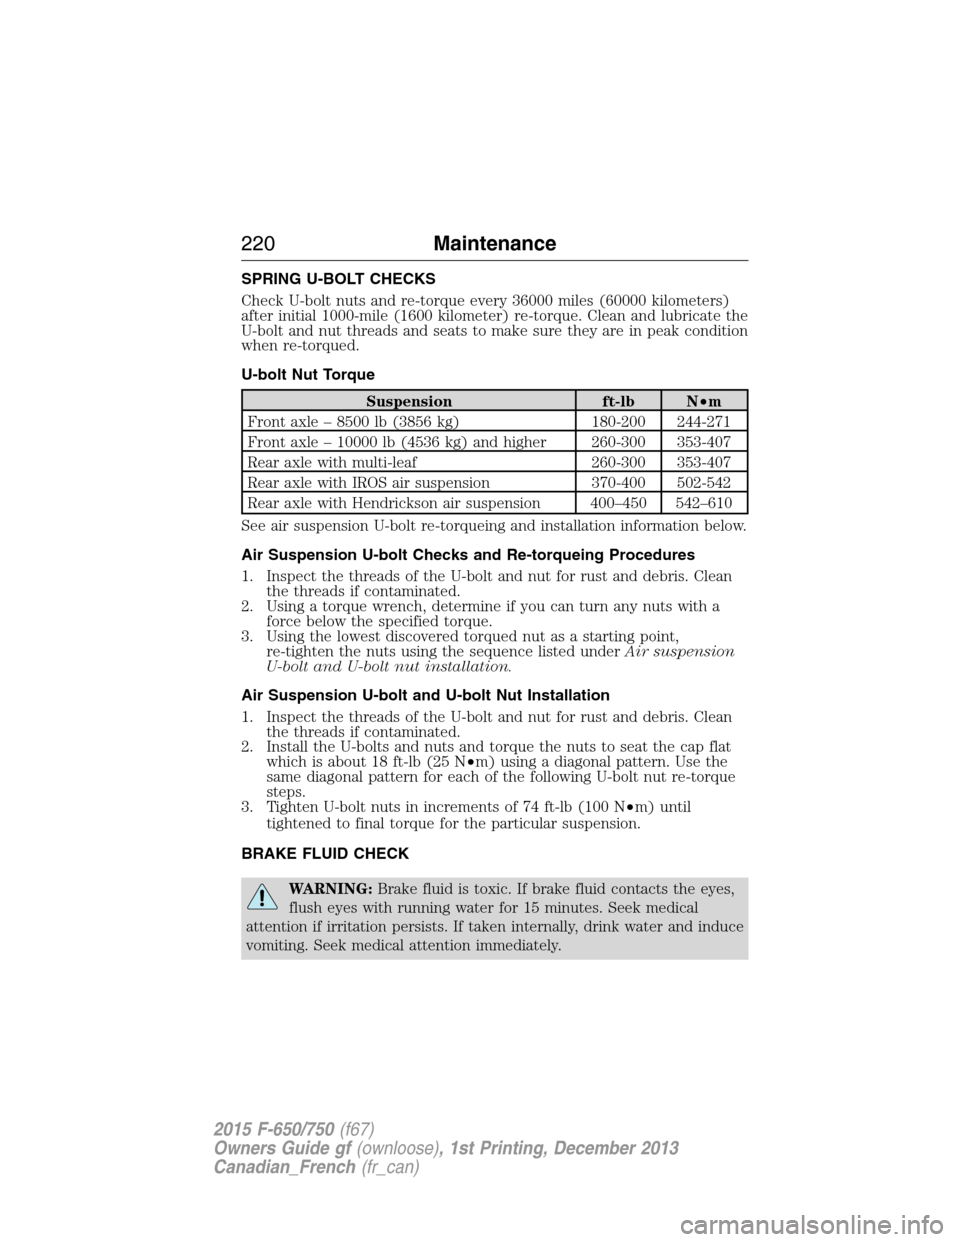
SPRING U-BOLT CHECKS
Check U-bolt nuts and re-torque every 36000 miles (60000 kilometers)
after initial 1000-mile (1600 kilometer) re-torque. Clean and lubricate the
U-bolt and nut threads and seats to make sure they are in peak condition
when re-torqued.
U-bolt Nut Torque
Suspension ft-lb N•m
Front axle – 8500 lb (3856 kg) 180-200 244-271
Front axle – 10000 lb (4536 kg) and higher 260-300 353-407
Rear axle with multi-leaf 260-300 353-407
Rear axle with IROS air suspension 370-400 502-542
Rear axle with Hendrickson air suspension 400–450 542–610
See air suspension U-bolt re-torqueing and installation information below.
Air Suspension U-bolt Checks and Re-torqueing Procedures
1. Inspect the threads of the U-bolt and nut for rust and debris. Clean
the threads if contaminated.
2. Using a torque wrench, determine if you can turn any nuts with a
force below the specified torque.
3. Using the lowest discovered torqued nut as a starting point,
re-tighten the nuts using the sequence listed underAir suspension
U-bolt and U-bolt nut installation.
Air Suspension U-bolt and U-bolt Nut Installation
1. Inspect the threads of the U-bolt and nut for rust and debris. Clean
the threads if contaminated.
2. Install the U-bolts and nuts and torque the nuts to seat the cap flat
which is about 18 ft-lb (25 N•m) using a diagonal pattern. Use the
same diagonal pattern for each of the following U-bolt nut re-torque
steps.
3. Tighten U-bolt nuts in increments of 74 ft-lb (100 N•m) until
tightened to final torque for the particular suspension.
BRAKE FLUID CHECK
WARNING:Brake fluid is toxic. If brake fluid contacts the eyes,
flush eyes with running water for 15 minutes. Seek medical
attention if irritation persists. If taken internally, drink water and induce
vomiting. Seek medical attention immediately.
220Maintenance
2015 F-650/750(f67)
Owners Guide gf(ownloose), 1st Printing, December 2013
Canadian_French(fr_can)