stop start FORD F750 2017 13.G Owner's Manual
[x] Cancel search | Manufacturer: FORD, Model Year: 2017, Model line: F750, Model: FORD F750 2017 13.GPages: 382, PDF Size: 5.18 MB
Page 126 of 382
FULL POWER BRAKE
WARNING
If the brake warning lamp in the
instrument cluster remains
illuminated after engine start up, this
indicates a system failure in the Full Power
Brake system. Stop the vehicle safely as
soon as possible and seek service
immediately. This system incorporates standard braking,
an anti-lock braking system (ABS) and
optional Power Park Brake into one fully
integrated hydraulic brake system. With
the Full Power Brake system, braking
energy is stored, similar to an air brake
system, resulting in faster response times
and shorter stopping distances. This is
accomplished using motor and pump
assemblies that pressurize the system by
pumping brake fluid into accumulators.
This is similar to the air compressor of an
air brake system pressurizing the air tanks.
The system includes a master cylinder that
provides the normal pedal feel and
transfers the pedal force, via brake fluid,
to the main components of the system.
Note:
The motor and pumps run
momentarily with the ignition switch in the
on or run position, or in the off position with
the brake pedal pressed.
Note: During normal driving, you may hear
the pump and motors replenishing the
accumulators. This is a normal function of
the system. AIR BRAKES WARNINGS
Do not drive or continue to drive if the
low air pressure buzzer is sounding
or the brake warning light is lit. These
warnings indicate that air pressure is not
to normal operating level. Continued use
of the vehicle could result in loss of braking
ability. Avoid repeated light application of
the brake pedal. This depletes air
pressure faster and could result in
loss of braking capability. Do not move the vehicle when the
air pressure is insufficient because
the brake system may be inoperative.
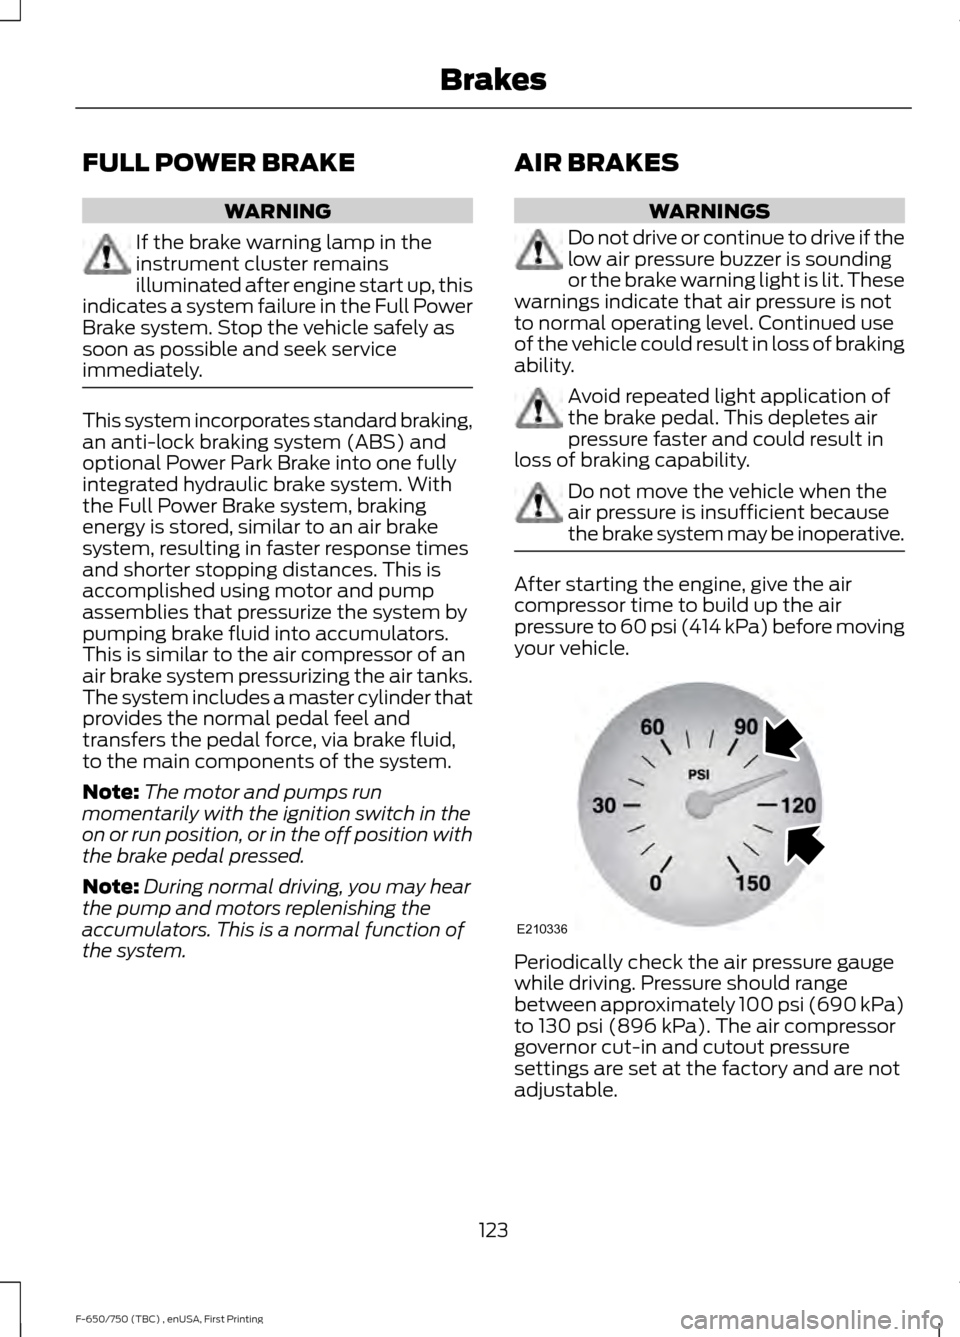
After starting the engine, give the air
compressor time to build up the air
pressure to 60 psi (414 kPa) before moving
your vehicle. Periodically check the air pressure gauge
while driving. Pressure should range
between approximately 100 psi (690 kPa)
to
130 psi (896 kPa). The air compressor
governor cut-in and cutout pressure
settings are set at the factory and are not
adjustable.
123
F-650/750 (TBC) , enUSA, First Printing BrakesE210336
Page 128 of 382
Note:
Installing an exhaust or auxiliary
brake does not necessarily protect the
engine from exceeding maximum governed
speed. Use the primary brakes to make sure
the engine never exceeds maximum
governed speed under any circumstance.
Note: Before starting the engine, make sure
that the exhaust brake switch is in the off
position. Do not turn the exhaust brake on
until the engine has reached normal
operating temperature.
Note: Maximum exhaust brake
performance relates to the type of
transmission your vehicle has.
Note: Engine speed has a major influence
of retarding performance. When engine
speed stays at the maximum allowable
level, the exhaust brake operates at peak
performance.
Note: Exhaust brakes operate effectively
with automatic transmissions, but
performance varies with engine speed and
the gear selected by the transmission.
An exhaust brake is an auxiliary braking
system that assists, but does not replace,
the primary service brake system. It helps
control vehicle speed; it is not a
vehicle-stopping device. A switch on the instrument panel, in
combination with the accelerator and
clutch pedal, allow the operator to make
maximum use of the exhaust brake in the
following conditions:
•
Off-highway driving.
• Mountain driving.
• Heavy traffic.
• High-speed highway driving.
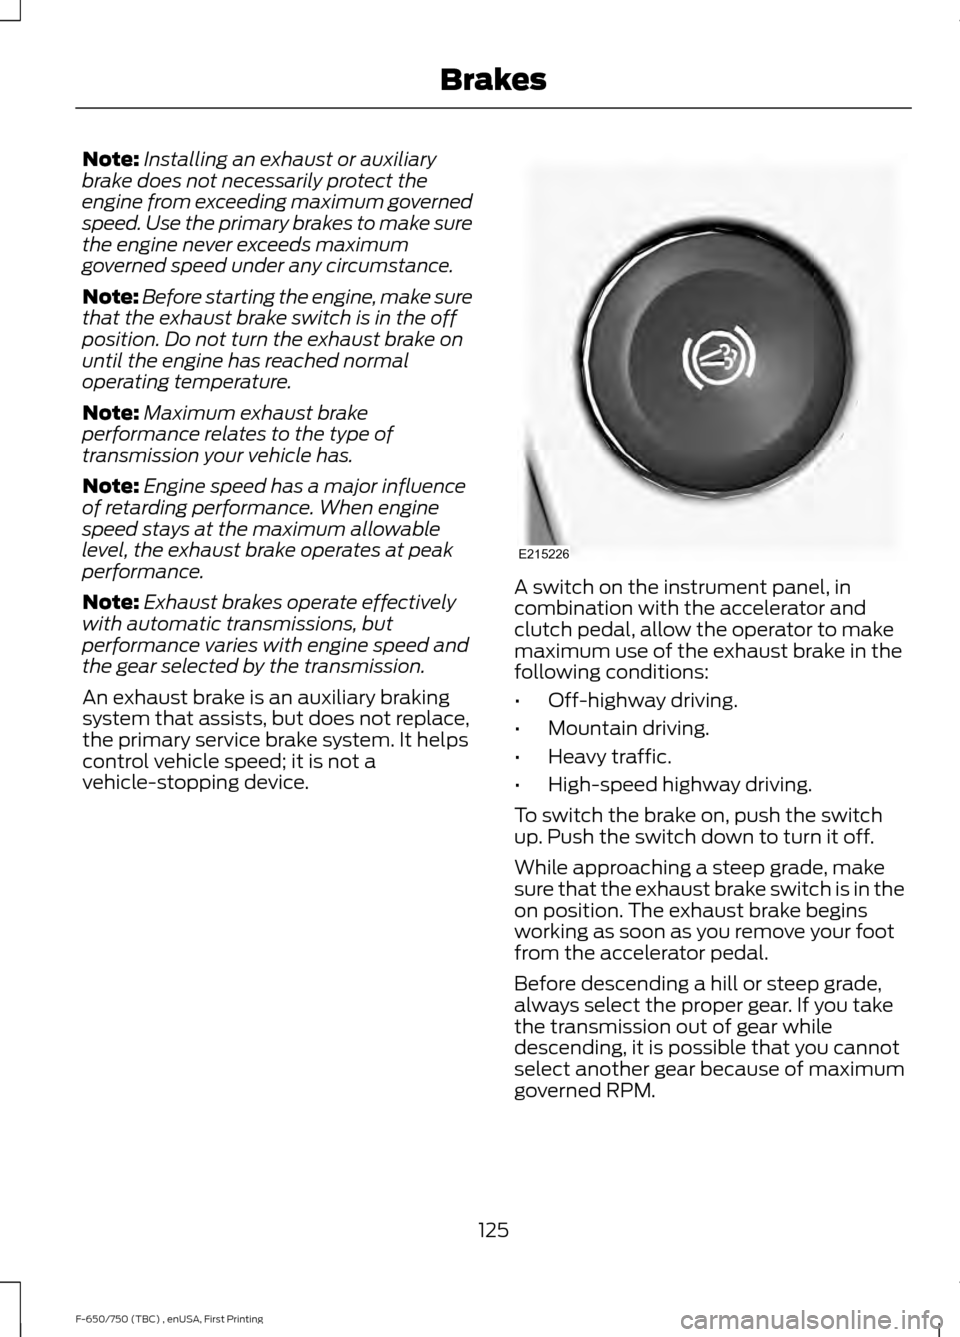
To switch the brake on, push the switch
up. Push the switch down to turn it off.
While approaching a steep grade, make
sure that the exhaust brake switch is in the
on position. The exhaust brake begins
working as soon as you remove your foot
from the accelerator pedal.
Before descending a hill or steep grade,
always select the proper gear. If you take
the transmission out of gear while
descending, it is possible that you cannot
select another gear because of maximum
governed RPM.
125
F-650/750 (TBC) , enUSA, First Printing BrakesE215226
Page 143 of 382
ESSENTIAL TOWING CHECKS
See Load limits in the Load Carrying
chapter for load specification terms found
on the tire label and Safety Compliance
label and instructions on calculating your
vehicle's load.
Remember to account for the trailer
tongue weight as part of your vehicle load
when calculating the total vehicle weight.
Hitches
Do not use a hitch that either clamps onto
the bumper or attaches to the axle. You
must distribute the load in your trailer so
that 10-15% of the total weight of the
trailer is on the tongue.
Safety Chains
Note: Do not attach safety chains to the
bumper.
Always connect the safety chains to the
frame or hook retainers of your vehicle
hitch.
To connect the safety chains, cross the
chains under the trailer tongue and allow
enough slack for turning tight corners. Do
not allow the chains to drag on the ground.
Trailer Brakes WARNING
Do not connect a trailer's hydraulic
brake system directly to your
vehicle's brake system. Your vehicle
may not have enough braking power and
your chances of having a collision greatly
increase. Electric brakes and manual, automatic or
surge-type trailer brakes are safe if you
install them properly and adjust them to
the manufacturer's specifications. The
trailer brakes must meet local and federal
regulations. The rating for the tow vehicle's braking
system operation is at the gross vehicle
weight rating, not the gross combined
weight rating.
Trailer Lamps
WARNING
Never connect any trailer lamp wiring
to the vehicle's tail lamp wiring; this
may damage the electrical system
resulting in fire. Contact your authorized
dealer as soon as possible for assistance
in proper trailer tow wiring installation.
Additional electrical equipment may be
required. Trailer lamps are required on most towed
vehicles. Make sure all running lights, brake
lights, turn signals and hazard lights are
working.
Before Towing a Trailer
Practice turning, stopping and backing up
to get the feel of your vehicle-trailer
combination before starting on a trip.
When turning, make wider turns so the
trailer wheels clear curbs and other
obstacles.
When Towing a Trailer
•
Check your hitch, electrical connections
and trailer wheel lug nuts thoroughly
after you have traveled 50 miles (80
kilometers).
• When stopped in congested or heavy
traffic during hot weather, place the
gearshift in position
P or position N to
aid engine and transmission cooling
and to help air conditioning
performance.
• Turn off the speed control with heavy
loads or in hilly terrain. The speed
control may turn off automatically
when you are towing on long, steep
grades.
140
F-650/750 (TBC) , enUSA, First Printing Towing
Page 147 of 382
Parking
WARNING
When parking your vehicle, do not
leave the transmission in gear; if the
key is in the on position and the
vehicle rolls, the engine could start. Failure
to follow these instructions could result in
an unattended vehicle moving, possibly
causing personal injury or property
damage. Always use the parking brake. When
parking on a grade, block the wheels and
turn the front wheels to one side so that if
your vehicle rolls, the front tires act against
the curb to stop your vehicle. The front
wheels are more effective at stopping a
rolling vehicle than the rear wheels.
ECONOMICAL DRIVING
Your fuel economy is affected by several
things, such as how you drive, the
conditions you drive under, and how you
maintain your vehicle.
You may improve your fuel economy by
keeping these things in mind:
•
Accelerate and slow down in a smooth,
moderate fashion.
• Drive at steady speeds without
stopping.
• Anticipate stops; slowing down may
eliminate the need to stop.
• Close the windows for high-speed
driving.
• Drive at reasonable speeds (traveling
at 55 mph [88 km/h] uses 15% less
fuel than traveling at 65 mph [105
km/h]).
• Keep the tires properly inflated and use
only the recommended size. •
Use the recommended engine oil.
• Perform all regularly scheduled
maintenance.
Avoid these actions; they reduce your fuel
economy:
• Sudden accelerations or hard
accelerations.
• Warm up your vehicle on cold
mornings.
• Use the air conditioner or front
defroster.
• Use the speed control in hilly terrain.
• Rest your foot on the brake pedal while
driving.
• Carry unnecessary weight
(approximately 1 mpg [0.4 km/L] is
lost for every 400 lb [180 kilogram] of
weight carried).
• Driving with the wheels out of
alignment.
Conditions
• Adding certain accessories to your
vehicle (for example bug deflectors,
rollbars, light bars, running boards, ski
racks or luggage racks) may reduce
fuel economy.
• Using fuel blended with alcohol may
lower fuel economy.
• Fuel economy may decrease with lower
temperatures during the first 8– 10
miles (12 –16 kilometers) of driving.
• Driving on flat terrain offers improved
fuel economy as compared to driving
on hilly terrain.
• Transmissions give their best fuel
economy when operated in the top
cruise gear and with steady pressure
on the gas pedal.
144
F-650/750 (TBC) , enUSA, First Printing Driving Hints
Page 150 of 382
Operation in Snow and Rain
Vehicle operation in heavy snowfall or
extreme rain conditions may feed
excessive amounts of snow or water into
the air intake system. This could plug the
air filter with snow and may cause the
engine to lose power and possibly shut
down.
We recommend the following actions after
operating your vehicle up to 199 mi
(320 km) in snowfall or extreme rain:
• Snow: At the earliest opportunity, open
the hood and clear all the snow and ice
from the air filter housing inlet (do not
remove the foam filter) and reset the
air filter restriction gauge.
Note: Removal of the foam filter degrades
your vehicle performance during snow and
hot weather conditions.
• Extreme rain: The air filter dries after
about 15– 30 minutes at highway
speeds. At the earliest opportunity,
open the hood and reset the air filter
restriction gauge.
DRIVING THROUGH WATER WARNING
Do not drive through flowing or deep
water as you may lose control of your
vehicle.
Note:
Driving through standing water can
cause vehicle damage.
Note: Engine damage can occur if water
enters the air filter.
Before driving through standing water,
check the depth. Never drive through water
that is higher than the bottom of the wheel
hubs. When driving through standing water, drive
very slowly and do not stop your vehicle.
Your brake performance and traction may
be limited. After driving through water and
as soon as it is safe to do so:
•
Lightly press the brake pedal to dry the
brakes and to check that they work.
• Check that the horn works.
• Check that the exterior lights work.
• Turn the steering wheel to check that
the steering power assist works.
Operation in Standing Water
Ingestion of water into the diesel engine
can result in immediate and severe
damage to the engine. If driving through
water, slow down to avoid splashing water
into the intake. If the engine stalls, and you
suspect ingestion of water into the engine,
do not try to restart the engine. Consult
your dealer for service immediately.
Your fuel tank vents to the atmosphere by
valves on top of the tank and through the
fuel cap. If water reaches the top of the
tank, the valves may pull water into the
fuel tank. Water in the fuel can cause
performance issues and damage the fuel
injection system.
147
F-650/750 (TBC) , enUSA, First Printing Driving HintsE176913
Page 152 of 382
This program is separate from the New
Vehicle Limited Warranty, but the coverage
is concurrent with the powertrain coverage
period of your vehicle.
Canadian customers who require roadside
assistance, call 1-800-665-2006.
Vehicles Sold in Canada: Using
Roadside Assistance
Complete the roadside assistance
identification card and place it in your
wallet for quick reference.
In Canada, this card is found in the
Warranty Guide in the glove compartment
of your vehicle.
Vehicles Sold in Canada: Roadside
Assistance Program Coverage
The service is available 24 hours a day,
seven days a week.
Canadian roadside coverage and benefits
may differ from the U.S. coverage.
For complete program coverage details
you may contact your dealer, you can call
us in Canada at 1-800-665-2006, or visit
our website at www.ford.ca.
HAZARD WARNING FLASHERS
Note:
The hazard warning flashers will
operate when the ignition is in any position
or if the key is not in the ignition. If used
when the engine is not running, the battery
will lose charge. As a result, there may be
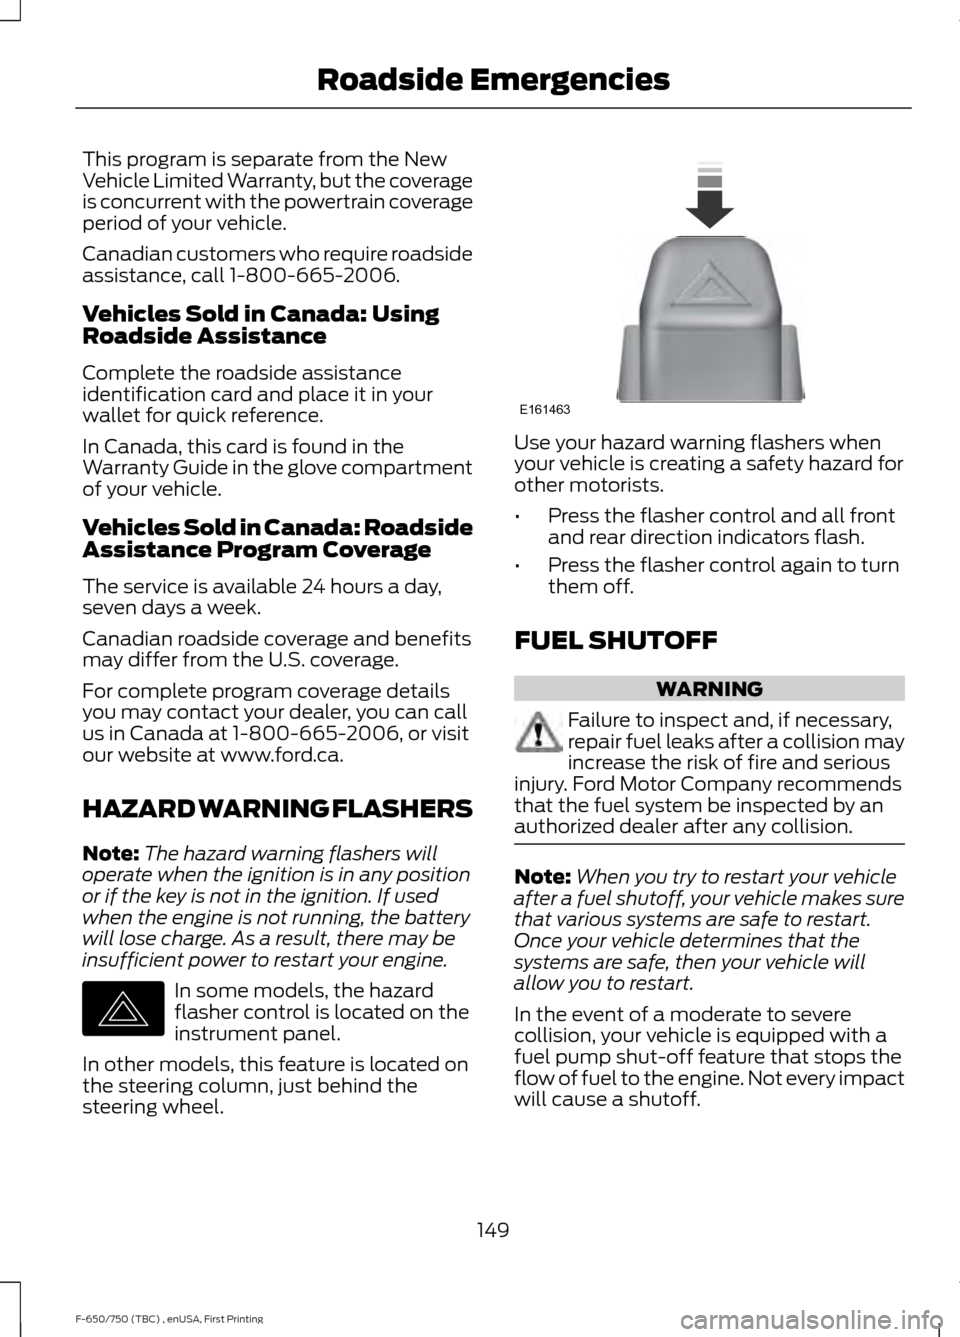
insufficient power to restart your engine. In some models, the hazard
flasher control is located on the
instrument panel.
In other models, this feature is located on
the steering column, just behind the
steering wheel. Use your hazard warning flashers when
your vehicle is creating a safety hazard for
other motorists.
•
Press the flasher control and all front
and rear direction indicators flash.
• Press the flasher control again to turn
them off.
FUEL SHUTOFF WARNING
Failure to inspect and, if necessary,
repair fuel leaks after a collision may
increase the risk of fire and serious
injury. Ford Motor Company recommends
that the fuel system be inspected by an
authorized dealer after any collision. Note:
When you try to restart your vehicle
after a fuel shutoff, your vehicle makes sure
that various systems are safe to restart.
Once your vehicle determines that the
systems are safe, then your vehicle will
allow you to restart.
In the event of a moderate to severe
collision, your vehicle is equipped with a
fuel pump shut-off feature that stops the
flow of fuel to the engine. Not every impact
will cause a shutoff.
149
F-650/750 (TBC) , enUSA, First Printing Roadside EmergenciesE142663 E161463
Page 166 of 382
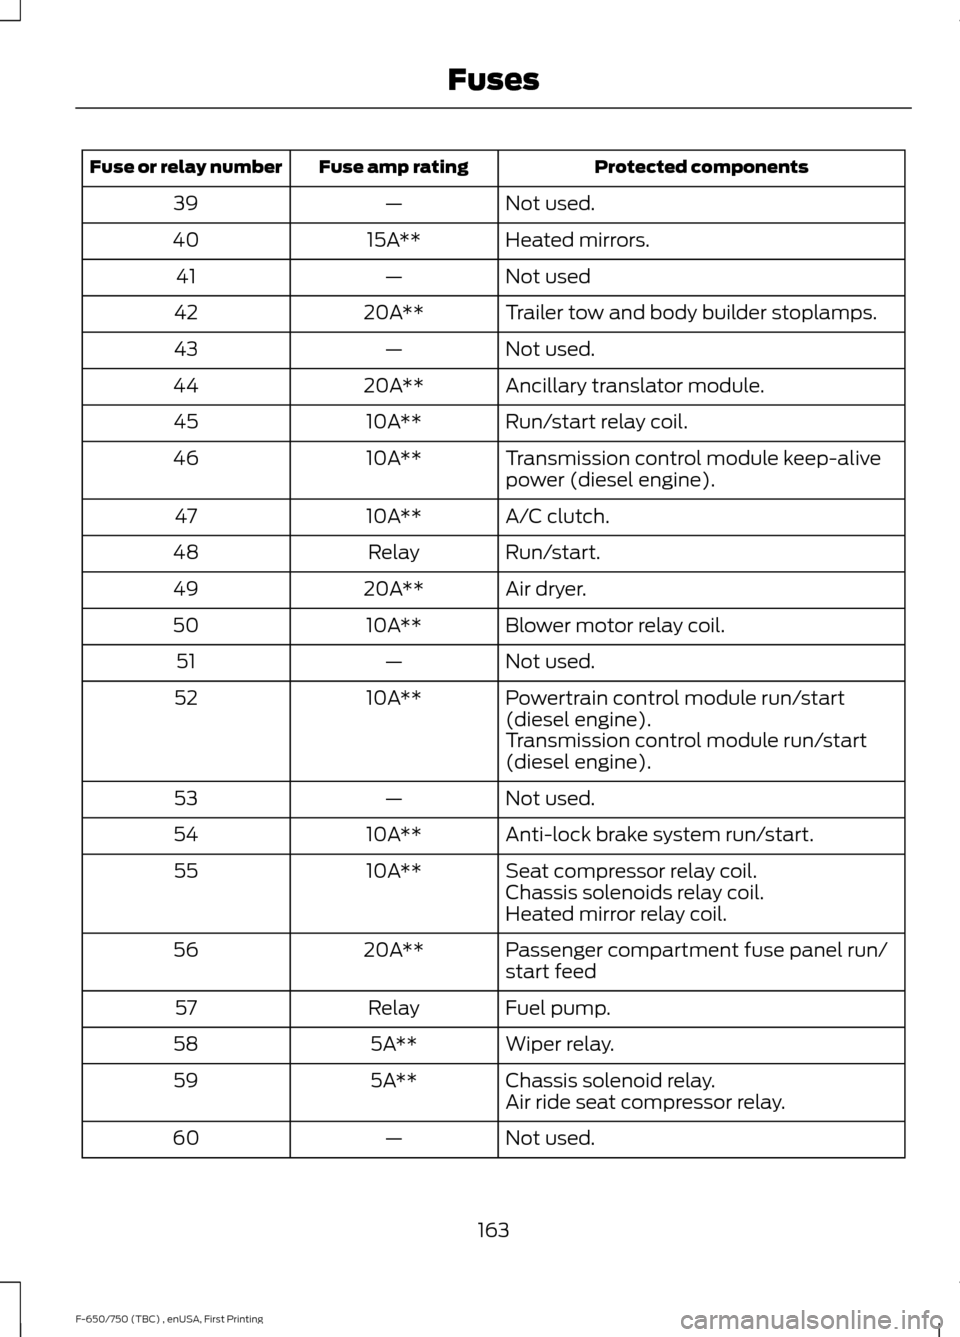
Protected components
Fuse amp rating
Fuse or relay number
Not used.
—
39
Heated mirrors.
15A**
40
Not used
—
41
Trailer tow and body builder stoplamps.
20A**
42
Not used.
—
43
Ancillary translator module.
20A**
44
Run/start relay coil.
10A**
45
Transmission control module keep-alive
power (diesel engine).
10A**
46
A/C clutch.
10A**
47
Run/start.
Relay
48
Air dryer.
20A**
49
Blower motor relay coil.
10A**
50
Not used.
—
51
Powertrain control module run/start
(diesel engine).
10A**
52
Transmission control module run/start
(diesel engine).
Not used.
—
53
Anti-lock brake system run/start.
10A**
54
Seat compressor relay coil.
10A**
55
Chassis solenoids relay coil.
Heated mirror relay coil.
Passenger compartment fuse panel run/
start feed
20A**
56
Fuel pump.
Relay
57
Wiper relay.
5A**
58
Chassis solenoid relay.
5A**
59
Air ride seat compressor relay.
Not used.
—
60
163
F-650/750 (TBC) , enUSA, First Printing Fuses
Page 168 of 382
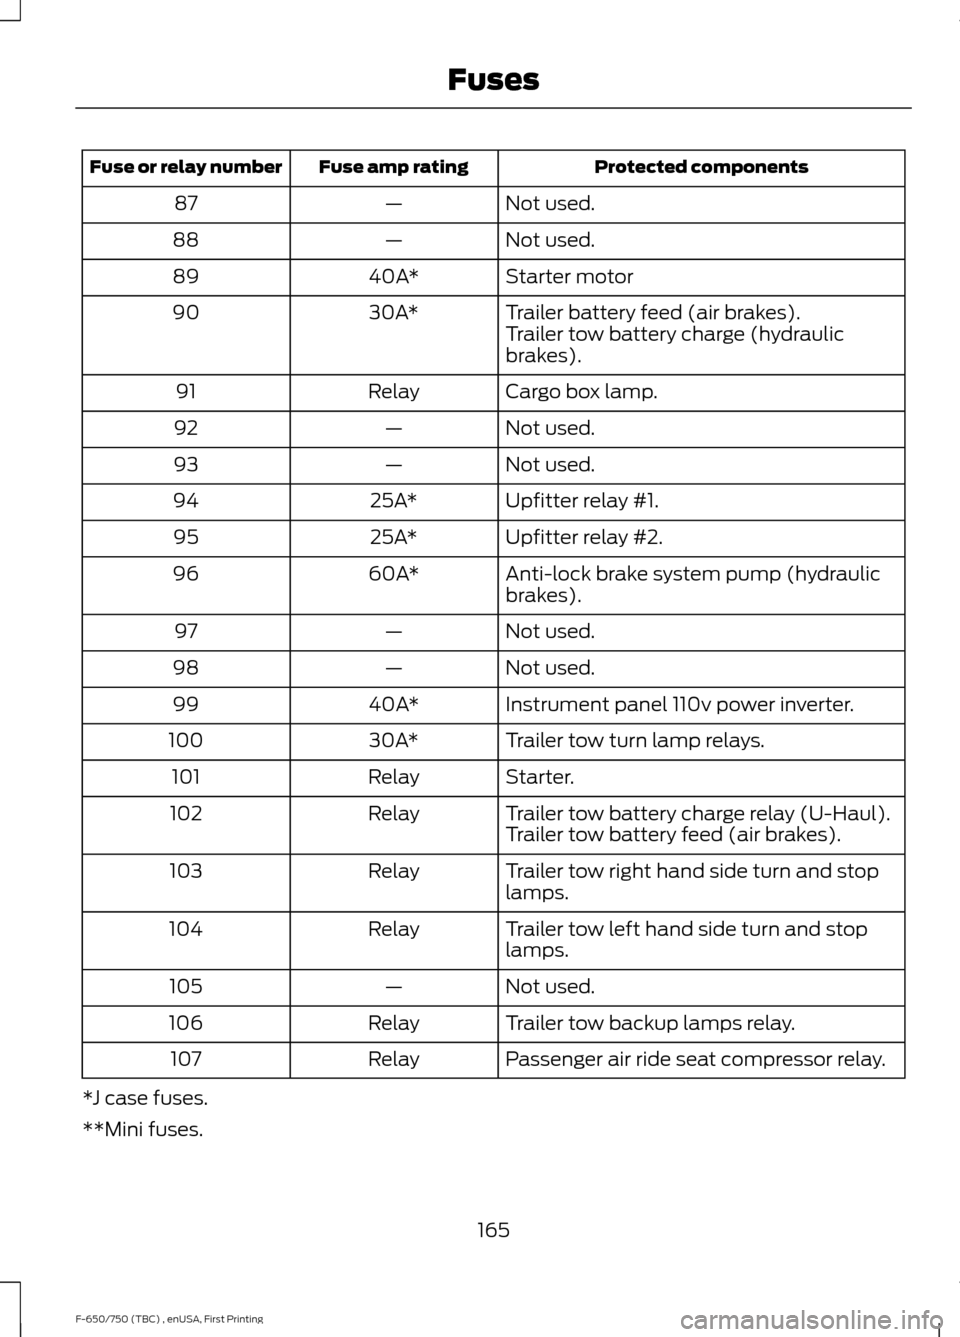
Protected components
Fuse amp rating
Fuse or relay number
Not used.
—
87
Not used.
—
88
Starter motor
40A*
89
Trailer battery feed (air brakes).
30A*
90
Trailer tow battery charge (hydraulic
brakes).
Cargo box lamp.
Relay
91
Not used.
—
92
Not used.
—
93
Upfitter relay #1.
25A*
94
Upfitter relay #2.
25A*
95
Anti-lock brake system pump (hydraulic
brakes).
60A*
96
Not used.
—
97
Not used.
—
98
Instrument panel 110v power inverter.
40A*
99
Trailer tow turn lamp relays.
30A*
100
Starter.
Relay
101
Trailer tow battery charge relay (U-Haul).
Relay
102
Trailer tow battery feed (air brakes).
Trailer tow right hand side turn and stop
lamps.
Relay
103
Trailer tow left hand side turn and stop
lamps.
Relay
104
Not used.
—
105
Trailer tow backup lamps relay.
Relay
106
Passenger air ride seat compressor relay.
Relay
107
*J case fuses.
**Mini fuses.
165
F-650/750 (TBC) , enUSA, First Printing Fuses
Page 175 of 382
Engine compartment (with engine off)
Inspect for glazing, fraying or cracking. There should be no
more than 5-7 cracks per rib, per 1 in (2.5 cm)
Belts (fan, alternator,
water pump and air
conditioning
compressor)
Inspect for signs of fluid puddles or dripping fluid on the
ground under the engine, or the underside of the engine.
Fluid leaks
Inspect for debris that may have collected on the HVAC air
inlet grille or inside the exterior module as this may reduce
system performance.
HVAC air inlet Engine starting (with parking brake applied)
Before entering the cab, verify that the vehicle is equipped
with spare electrical fuses (if used), three red reflective
triangles, a properly charged and rated fire extinguisher and
wheel chocks.
Safety and emergency
equipment
Walk around the vehicle and verify all steps and grab handles,
inside and out (as well as behind), are tight and clean. Use
extreme caution and a three-point stance at all times.
Inspect door latches for proper closing, latching and locking.
Set the parking brake. Make sure the gearshift lever is in
neutral (N) or park (P) (if equipped with a park position).
Starting the engine
Diesel engine:
Turn the key to the on position. Turn the key
to start when the wait to start indicator light in the instrument
cluster turns off.
Gasoline engine:
Turn the key to start, and then release it
as soon as the engine starts.
Verify pressure builds to normal operating range.
Engine oil pressure
A tone indicating low air pressure should sound immediately
after the engine starts but before the compressor has built-
up pressure. The tone should stop when the air pressure
reaches
70 psi (483 kPa). Let the air pressure build to
governed cutout pressure, which should occur between
115– 130 psi (793–896 kPa)
.
Low air pressure warning
tone (if equipped with an
air compressor)
Press the accelerator and verify that it operates smoothly,
without any binding or irregular feel. Release the pedal and
verify the engine returns to idle speed immediately.
Accelerator
172
F-650/750 (TBC) , enUSA, First Printing Vehicle Inspection Guide
Page 205 of 382
DRAINING THE FUEL FILTER
WATER TRAP - 6.7L DIESEL
Your vehicle is equipped with a diesel fuel
conditioner module located on the
frame-rail under the driver-side floorboard
near the transmission.
You should drain water from the
module assembly whenever the
warning light comes on and the
message center directs you to drain the
water separator. This will occur when
approximately 8.45 fl oz (250 ml) of water
accumulates in the module. If you allow
the water level to exceed this level, the
water may pass through to the engine and
may cause fuel injection equipment
damage.
Draining the Diesel Fuel
Conditioner Module (DFCM) WARNING
Your vehicle must be stopped with
the engine off when draining the
Diesel Fuel Conditioner Module. Fuel
may ignite if the separator is drained while
the engine is running or vehicle is moving. Note:
If you drain the diesel fuel conditioner
module while the system is running air will
enter into the fuel system. The engine will
not operate properly if air enters the system.
Note: With fuel tank levels above 3⁄4 tank
it may be necessary to loosen the bowl three
turns before opening the drain. This will
actuate an anti-siphon valve at the fuel and
water separator inlet and prevent the fuel
from siphoning out of the tank.
Note: A loose drain valve can allow air to
enter the fuel system and cause drivetrain
issues. The engine will not operate properly.
Be sure that you fully tighten the drain valve. 1. Stop your vehicle and shut off the
engine.
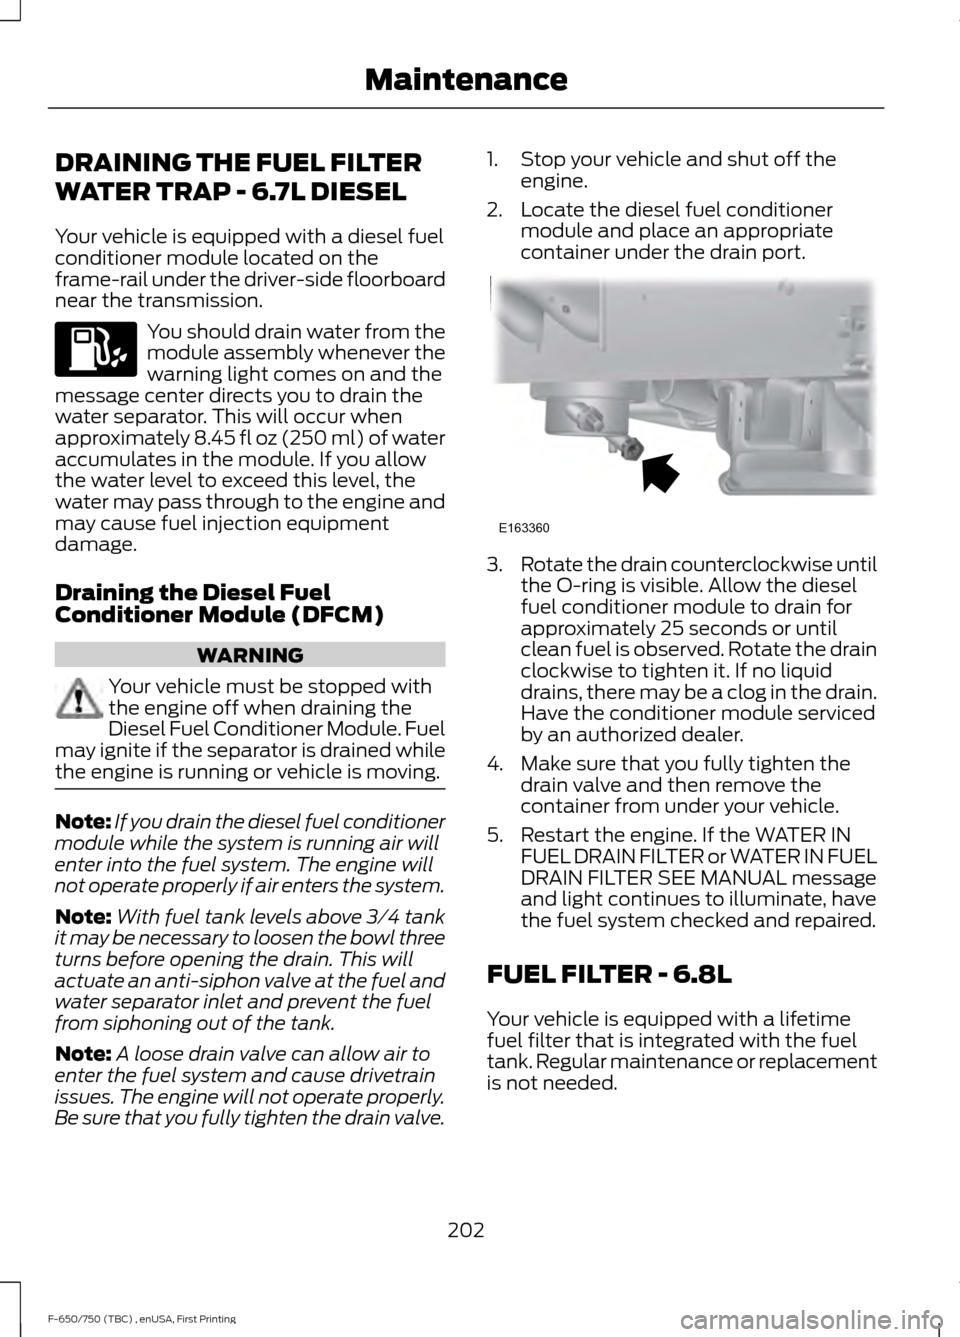
2. Locate the diesel fuel conditioner module and place an appropriate
container under the drain port. 3.
Rotate the drain counterclockwise until
the O-ring is visible. Allow the diesel
fuel conditioner module to drain for
approximately 25 seconds or until
clean fuel is observed. Rotate the drain
clockwise to tighten it. If no liquid
drains, there may be a clog in the drain.
Have the conditioner module serviced
by an authorized dealer.
4. Make sure that you fully tighten the drain valve and then remove the
container from under your vehicle.
5. Restart the engine. If the WATER IN FUEL DRAIN FILTER or WATER IN FUEL
DRAIN FILTER SEE MANUAL message
and light continues to illuminate, have
the fuel system checked and repaired.
FUEL FILTER - 6.8L
Your vehicle is equipped with a lifetime
fuel filter that is integrated with the fuel
tank. Regular maintenance or replacement
is not needed.
202
F-650/750 (TBC) , enUSA, First Printing Maintenance E163360