hood FORD F750 2017 13.G Owners Manual
[x] Cancel search | Manufacturer: FORD, Model Year: 2017, Model line: F750, Model: FORD F750 2017 13.GPages: 382, PDF Size: 5.18 MB
Page 6 of 382
Using Traction Control - Vehicles With:
Hydraulic Brakes.......................................130
Cruise Control
Principle of Operation.................................132
Using Cruise Control....................................132
Driving Aids
Steering............................................................134
Load Carrying
Load Limit
........................................................135
Air Suspension
...............................................136
Towing
Towing a Trailer.............................................138
Recommended Towing Weights............139
Essential Towing Checks...........................140
Fifth Wheel Operation
.................................141
Driving Hints
Breaking-In......................................................143
General Driving Points
................................143
Economical Driving......................................144
Cold Weather Precautions........................145
Driving Through Water................................147
Roadside Emergencies
Roadside Assistance
...................................148
Hazard Warning Flashers
..........................149
Fuel Shutoff
...................................................149
Jump Starting the Vehicle.........................150
Transporting the Vehicle
............................153
Customer Assistance
Getting the Services You Need................155
In California (U.S. Only).............................156
The Better Business Bureau (BBB) Auto Line Program (U.S. Only).......................157 Utilizing the Mediation/Arbitration
Program (Canada Only).........................157
Getting Assistance Outside the U.S. and Canada.........................................................158
Ordering Additional Owner's Literature.....................................................159
Reporting Safety Defects (U.S. Only).............................................................159
Reporting Safety Defects (Canada Only).............................................................160
Fuses
Fuse Specification Chart
............................161
Changing a Fuse...........................................169
Vehicle Inspection Guide
Vehicle Inspection Information.................171
Maintenance
General Information....................................180
Opening and Closing the Hood................181
Under Hood Overview - 6.8L...................183
Under Hood Overview - 6.7L Diesel......184
Engine Oil Dipstick - 6.8L..........................185
Engine Oil Dipstick - 6.7L Diesel.............185
Engine Oil Check - 6.8L
..............................185
Engine Oil Check - 6.7L Diesel.................186
Changing the Engine Oil and Oil Filter...............................................................187
Changing the Coalescer Filter Element.......................................................188
Oil Change Indicator Reset.......................189
Engine Coolant Check - 6.8L...................189
Engine Coolant Check - 6.7L Diesel......194
Automatic Transmission Fluid Check............................................................198
Brake Fluid Check.......................................200
Power Steering Fluid Check
.....................201
Washer Fluid Check
.....................................201
Draining the Fuel Filter Water Trap - 6.7L Diesel...........................................................202
3
F-650/750 (TBC) , enUSA, First Printing Table of Contents
Page 19 of 382
PROTECTING THE
ENVIRONMENT
You must play your part in protecting the
environment. Correct vehicle usage and
the authorized disposal of waste, cleaning
and lubrication materials are significant
steps toward this aim.
NOISE POLLUTION CONTROL
In order to keep to the federal exterior
noise regulations, your vehicle may be
equipped with noise emission items.
Depending on your vehicle configuration,
it may have all or some of the following
items:
Air Intake System
Inspect the air cleaner. Do not alter its
location. Do not alter inlet and outlet
piping.
Body
Inspect wheel well splash shields, cab
shields and under hood insulation for
deterioration, dislocation and orientation.
Cooling System
•
Inspect the fan for blade damage. If
you find any damage, replace with the
recommended parts. Inspect for
fan-to-shroud interference and any
damage to shroud, such as cracks and
holes.
• Do not change fan ratio or alter fan
spacer dimensions and positions.
• Inspect fan clutch for proper operation.
Make sure the fan is disengaged when
cooling of the engine is not required.
• Inspect radiator shutters (if equipped)
for proper operation. The shutters
should be open during normal
operating temperatures. Engine
Valve covers and block covers damp-out
engine mechanical noise. If they need
replacing, make sure to replace them with
the recommended parts. Check for
mechanical isolations.
Transmission Enclosure
Inspect for cracks, holes and tears. Clean
any deposits, such as oil, dirt and stones.
Exhaust System
•
Inspect for leaks at various joint
connections and loose clamps.
• Perform a visual inspection for cracks
or holes in the muffler and tail pipe.
• Always use the recommended
replacement parts.
• Do not change the tail pipe elbow or
offset tail pipe orientation from the
standard position as originally received.
• To avoid abnormal changes in vehicle
sound levels, it is necessary for the
owner to perform inspections and
necessary maintenance at specified
intervals. See Scheduled
Maintenance (page 316).
16
F-650/750 (TBC) , enUSA, First Printing Environment
Page 30 of 382
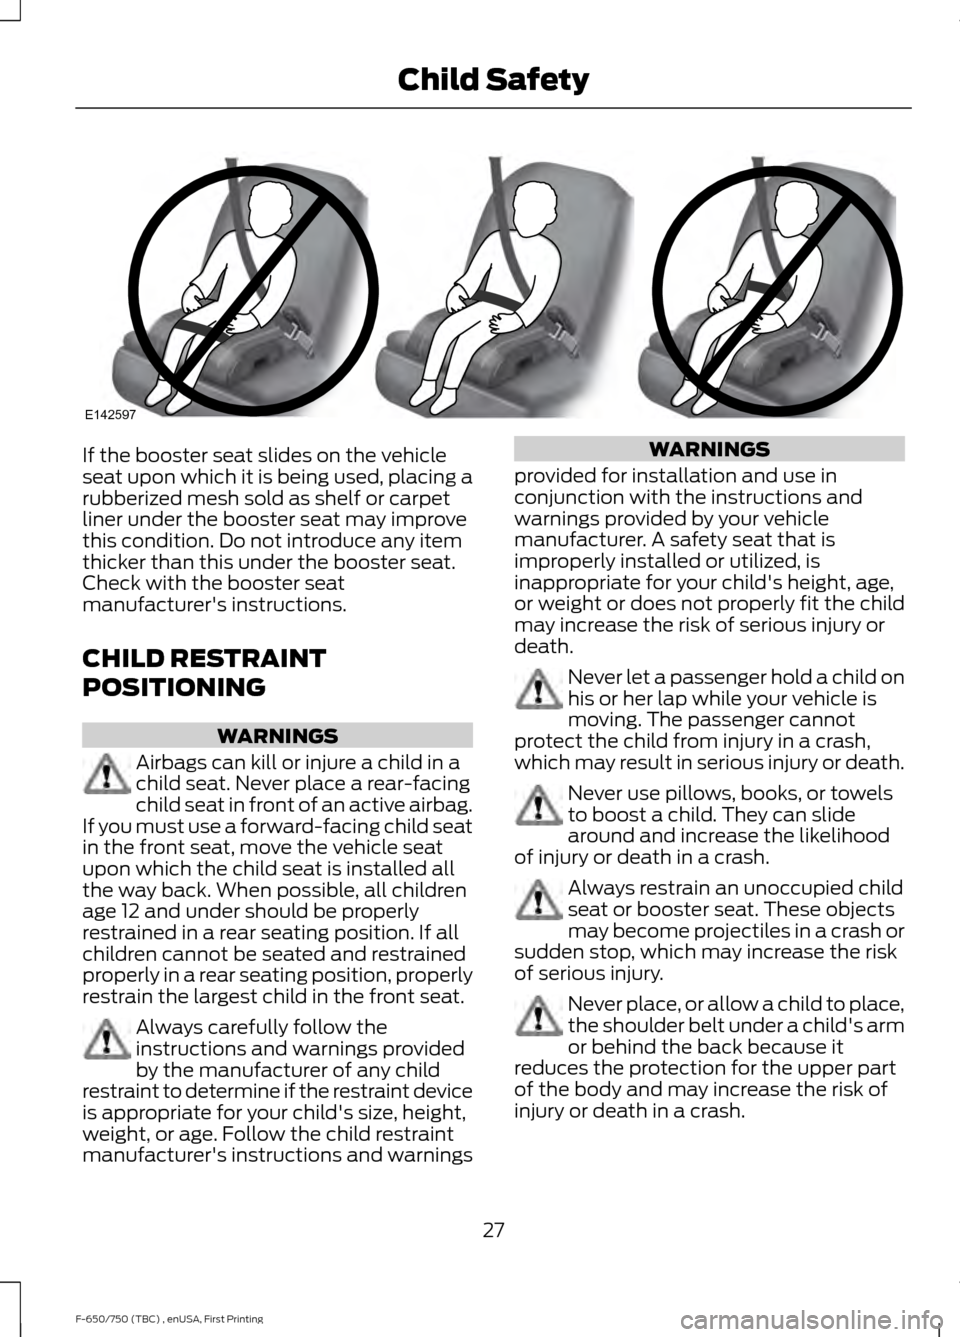
If the booster seat slides on the vehicle
seat upon which it is being used, placing a
rubberized mesh sold as shelf or carpet
liner under the booster seat may improve
this condition. Do not introduce any item
thicker than this under the booster seat.
Check with the booster seat
manufacturer's instructions.
CHILD RESTRAINT
POSITIONING
WARNINGS
Airbags can kill or injure a child in a
child seat. Never place a rear-facing
child seat in front of an active airbag.
If you must use a forward-facing child seat
in the front seat, move the vehicle seat
upon which the child seat is installed all
the way back. When possible, all children
age 12 and under should be properly
restrained in a rear seating position. If all
children cannot be seated and restrained
properly in a rear seating position, properly
restrain the largest child in the front seat. Always carefully follow the
instructions and warnings provided
by the manufacturer of any child
restraint to determine if the restraint device
is appropriate for your child's size, height,
weight, or age. Follow the child restraint
manufacturer's instructions and warnings WARNINGS
provided for installation and use in
conjunction with the instructions and
warnings provided by your vehicle
manufacturer. A safety seat that is
improperly installed or utilized, is
inappropriate for your child's height, age,
or weight or does not properly fit the child
may increase the risk of serious injury or
death. Never let a passenger hold a child on
his or her lap while your vehicle is
moving. The passenger cannot
protect the child from injury in a crash,
which may result in serious injury or death. Never use pillows, books, or towels
to boost a child. They can slide
around and increase the likelihood
of injury or death in a crash. Always restrain an unoccupied child
seat or booster seat. These objects
may become projectiles in a crash or
sudden stop, which may increase the risk
of serious injury. Never place, or allow a child to place,
the shoulder belt under a child's arm
or behind the back because it
reduces the protection for the upper part
of the body and may increase the risk of
injury or death in a crash.
27
F-650/750 (TBC) , enUSA, First Printing Child SafetyE142597
Page 43 of 382
LOCKING AND UNLOCKING
You can use the power door lock control
or the remote control to lock and unlock
your vehicle.
Power Door Locks (If Equipped)
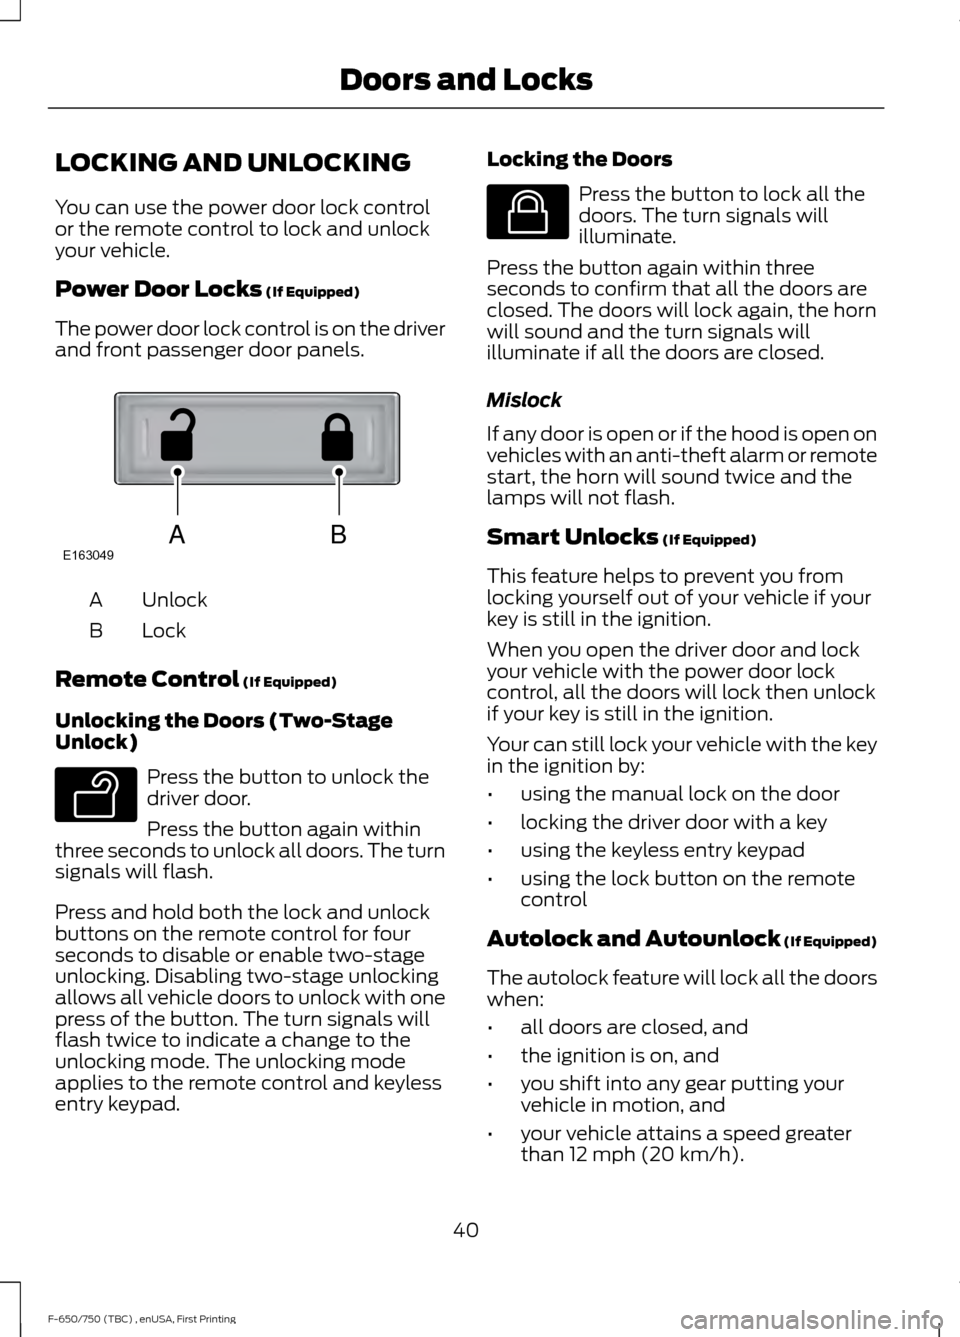
The power door lock control is on the driver
and front passenger door panels. Unlock
A
Lock
B
Remote Control
(If Equipped)
Unlocking the Doors (Two-Stage
Unlock) Press the button to unlock the
driver door.
Press the button again within
three seconds to unlock all doors. The turn
signals will flash.
Press and hold both the lock and unlock
buttons on the remote control for four
seconds to disable or enable two-stage
unlocking. Disabling two-stage unlocking
allows all vehicle doors to unlock with one
press of the button. The turn signals will
flash twice to indicate a change to the
unlocking mode. The unlocking mode
applies to the remote control and keyless
entry keypad. Locking the Doors Press the button to lock all the
doors. The turn signals will
illuminate.
Press the button again within three
seconds to confirm that all the doors are
closed. The doors will lock again, the horn
will sound and the turn signals will
illuminate if all the doors are closed.
Mislock
If any door is open or if the hood is open on
vehicles with an anti-theft alarm or remote
start, the horn will sound twice and the
lamps will not flash.
Smart Unlocks
(If Equipped)
This feature helps to prevent you from
locking yourself out of your vehicle if your
key is still in the ignition.
When you open the driver door and lock
your vehicle with the power door lock
control, all the doors will lock then unlock
if your key is still in the ignition.
Your can still lock your vehicle with the key
in the ignition by:
• using the manual lock on the door
• locking the driver door with a key
• using the keyless entry keypad
• using the lock button on the remote
control
Autolock and Autounlock
(If Equipped)
The autolock feature will lock all the doors
when:
• all doors are closed, and
• the ignition is on, and
• you shift into any gear putting your
vehicle in motion, and
• your vehicle attains a speed greater
than 12 mph (20 km/h).
40
F-650/750 (TBC) , enUSA, First Printing Doors and LocksABE163049 E138629 E138623
Page 111 of 382
Note:
You cannot use the operator
commanded regeneration until the diesel
particulate filter load percentage has
reached 100%. The diesel particulate filter
load percentage fluctuates up and down
when driving your vehicle due to active and
passive regenerations.
Note: During the use of operator
commanded regeneration, you may observe
a light amount of white smoke. This is
normal. You may not be able to use
operator commanded
regeneration if the service engine
soon warning lamp appears in the
information display
Information Display Procedure
Start with your vehicle engine and when it
has reached the normal operating
temperature, press the information display
control button on the steering wheel. See
Information Display Control (page 45).
If a message advising that the exhaust
filter is full appears in the information
display, press the OK button to set the
display to Y. Answer yes to this prompt
and then follow the next prompts
regarding exhaust position required to
initiate operator commanded regeneration.
Be sure to understand each prompt. If you
are not sure what is being asked by each
prompt, contact an authorized dealer. The
display confirms the operation has started
and when it has finished.
If the diesel particulate filter is near or at
saturation, a message requesting
permission to initiate filter cleaning
appears in the information display. See
Information Messages
(page 64).
Answer yes to this prompt and then follow
the next prompts regarding exhaust
position required to initiate operator
commanded regeneration. Be sure to understand each prompt. If you are not
sure what is being asked by each prompt,
contact an authorized dealer. The display
confirms the operation has started and
when it has finished. You can also drive to
clean the filter. When the system is at the point
of oversaturation, the service
engine warning lamp illuminates
and a message appears in the information
display. You cannot initiate filter cleaning.
You must have your vehicle checked as
soon as possible.
Once operator commanded regeneration
starts, engine speed increases to
approximately 2000– 2500 rpm and the
cooling fan speed increases. You will hear
a change in audible sound due to engine
speed and cooling fan speed increases.
It is not necessary to open the hood on the
engine compartment. Once operator
commanded regeneration completes, the
engine speed returns to normal idling. The
exhaust system remains very hot for
several minutes even after regeneration is
complete. Do not reposition the vehicle
over materials that could burn until the
exhaust system has had sufficient time to
cool. Depending on the amount of soot
collected by the diesel particulate filter,
ambient temperature and altitude,
operator commanded regeneration lasts
approximately 30 minutes.
Operator Commanded Regeneration
with Automatic Regeneration Control
(If Equipped)
If your vehicle is operated with significant
stationary operation, low speed drive
cycles less than 25 mph (40 km/h), short
drive cycles, drive time less than 15 minutes
or the vehicle does not fully warm up,
passive and active regeneration may not
sufficiently clean the diesel particulate
108
F-650/750 (TBC) , enUSA, First Printing Fuel and Refueling
Page 113 of 382
In the United States, federal law and
certain state laws prohibit removing or
rendering the emission control system
inoperative. Similar federal or provincial
laws may apply in Canada. We do not
recommend any vehicle modification
without determining applicable law.
Tampering with emissions
control system, including related
sensors or the diesel exhaust
fluid injection system can result in reduced
engine power and the service engine soon
warning lamp illuminating in the
information display.
Tampering with a Noise Control
System
Federal law prohibits the following acts or
the causing thereof:
• The removal or rendering inoperative
by any person other than for purposes
of maintenance, repair or replacement
of any device or element of design
incorporated into any new vehicle for
the purpose of noise control prior to its
sale or delivery to the ultimate
purchaser or while it is in use.
• The use of the vehicle after such device
or element of design has been removed
or rendered inoperative by any person.
Among those acts, which the United States
Environmental Protection Agency may
presume to constitute tampering are the
acts listed below:
• Removal of hood blanket, fender apron
absorbers, fender apron barriers,
underbody noise shields or acoustically
absorptive material.
• Tampering or rendering inoperative the
engine speed governor, to allow engine
speed to exceed manufacturer ’s
specifications. The complexity of the diesel engine makes
it so the owner is discouraged from
attempting to perform maintenance other
than the services described in this Owner's
Manual.
If you experience difficulty starting the
engine, rough idling, excessive exhaust
smoke, a decrease in engine performance
or excess fuel consumption, perform the
following checks:
•
A plugged or disconnected air inlet
system or engine air filter element.
• Water in the fuel filter and water
separator.
• A clogged fuel filter.
• Contaminated fuel.
• Air in the fuel system, due to loose
connections.
• An open or pinched sensor hose.
• Check engine oil level.
• Wrong fuel or oil viscosity for the
climatic conditions.
If these checks do not help you correct the
engine performance problem you are
experiencing, have your vehicle checked
as soon as possible.
Noise Emissions Warranty, Prohibited
Tampering Acts and Maintenance
On January 1, 1978, Federal regulation
became effective governing the noise
emission on vehicles weighing over
10,000 lb (4,536 kg) Gross Vehicle Weight
Rating. The preceding statements
concerning prohibited tampering acts and
maintenance, and the noise warranty
found in the Warranty Guide, are
applicable to complete chassis cabs over
10,000 lb (4,536 kg) Gross Vehicle Weight
Rating.
110
F-650/750 (TBC) , enUSA, First Printing Fuel and Refueling
Page 150 of 382
Operation in Snow and Rain
Vehicle operation in heavy snowfall or
extreme rain conditions may feed
excessive amounts of snow or water into
the air intake system. This could plug the
air filter with snow and may cause the
engine to lose power and possibly shut
down.
We recommend the following actions after
operating your vehicle up to 199 mi
(320 km) in snowfall or extreme rain:
• Snow: At the earliest opportunity, open
the hood and clear all the snow and ice
from the air filter housing inlet (do not
remove the foam filter) and reset the
air filter restriction gauge.
Note: Removal of the foam filter degrades
your vehicle performance during snow and
hot weather conditions.
• Extreme rain: The air filter dries after
about 15– 30 minutes at highway
speeds. At the earliest opportunity,
open the hood and reset the air filter
restriction gauge.
DRIVING THROUGH WATER WARNING
Do not drive through flowing or deep
water as you may lose control of your
vehicle.
Note:
Driving through standing water can
cause vehicle damage.
Note: Engine damage can occur if water
enters the air filter.
Before driving through standing water,
check the depth. Never drive through water
that is higher than the bottom of the wheel
hubs. When driving through standing water, drive
very slowly and do not stop your vehicle.
Your brake performance and traction may
be limited. After driving through water and
as soon as it is safe to do so:
•
Lightly press the brake pedal to dry the
brakes and to check that they work.
• Check that the horn works.
• Check that the exterior lights work.
• Turn the steering wheel to check that
the steering power assist works.
Operation in Standing Water
Ingestion of water into the diesel engine
can result in immediate and severe
damage to the engine. If driving through
water, slow down to avoid splashing water
into the intake. If the engine stalls, and you
suspect ingestion of water into the engine,
do not try to restart the engine. Consult
your dealer for service immediately.
Your fuel tank vents to the atmosphere by
valves on top of the tank and through the
fuel cap. If water reaches the top of the
tank, the valves may pull water into the
fuel tank. Water in the fuel can cause
performance issues and damage the fuel
injection system.
147
F-650/750 (TBC) , enUSA, First Printing Driving HintsE176913
Page 154 of 382
Note:
Use only a 12-volt supply to start your
vehicle.
Note: Do not disconnect the battery of the
disabled vehicle as this could damage the
vehicle electrical system.
Park the booster vehicle close to the hood
of the disabled vehicle, making sure the
two vehicles do not touch.
Connecting the Jumper Cables WARNINGS
Do not attach the cables to fuel lines,
engine rocker covers, the intake
manifold or electrical components
as grounding points. Stay clear of moving
parts. To avoid reverse polarity
connections, make sure that you correctly
identify the positive (+) and negative (-)
terminals on both the disabled and booster
vehicles before connecting the cables. Do not attach the end of the positive
cable to the studs or L-shaped eyelet
located above the positive (+)
terminal of your vehicle ’s battery. High
current may flow through and cause
damage to the fuses. Do not connect the end of the
second cable to the negative (-)
terminal of the battery to be jumped.
A spark may cause an explosion of the
gases that surround the battery. Note:
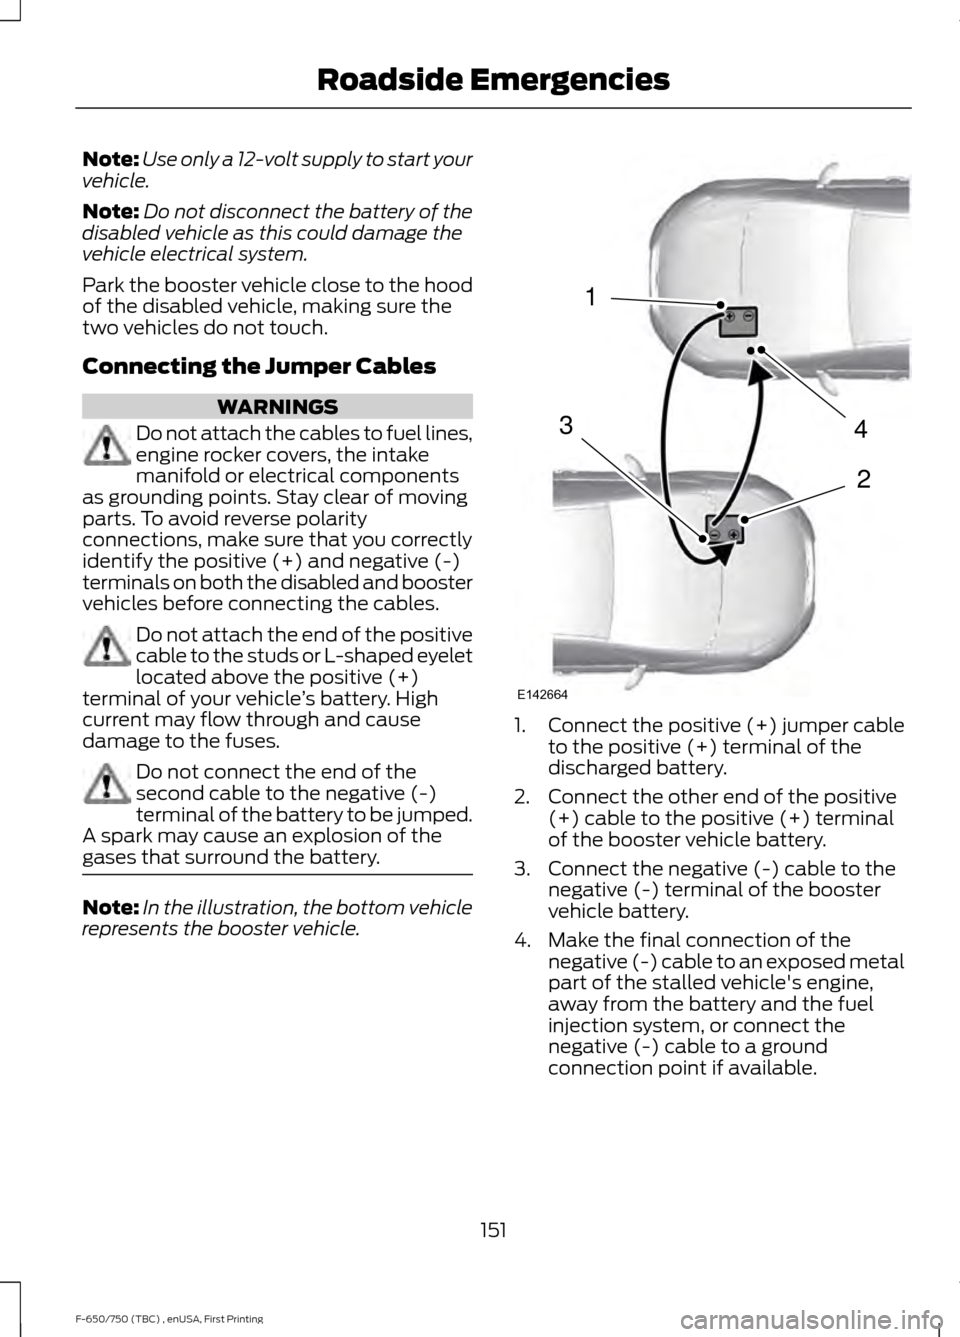
In the illustration, the bottom vehicle
represents the booster vehicle. 1.
Connect the positive (+) jumper cable
to the positive (+) terminal of the
discharged battery.
2. Connect the other end of the positive (+) cable to the positive (+) terminal
of the booster vehicle battery.
3. Connect the negative (-) cable to the negative (-) terminal of the booster
vehicle battery.
4. Make the final connection of the negative (-) cable to an exposed metal
part of the stalled vehicle's engine,
away from the battery and the fuel
injection system, or connect the
negative (-) cable to a ground
connection point if available.
151
F-650/750 (TBC) , enUSA, First Printing Roadside Emergencies4
2
1
3
E142664
Page 184 of 382
Quality service parts are available through
an authorized dealer. If dealer parts are not
used, make sure the replacement parts are
of equivalent quality.
Working with the Engine Off
1. Set the parking brake and shift to
neutral (N) or park (P).
2. Switch off the engine.
3. Block the wheels.
Working with the Engine On WARNING
To reduce the risk of vehicle damage
and/or personal burn injuries, do not
start your engine with the air cleaner
removed and do not remove it while the
engine is running. 1. Set the parking brake and shift to
neutral (N) or park (P).
2. Block the wheels
Supporting Your Vehicle for
Service WARNING
Do not use a jack when working
under a vehicle. It may give way,
causing the vehicle to fall and result
in property damage, personal injury or
death. Always use floor stands to support
the vehicle. Prepare your vehicle for service repairs by
doing the following:
1. Park your vehicle on a level, concrete
floor.
2. Set the parking brake and block the wheels to prevent your vehicle from
moving. 3. Select a jack with a rated capacity
sufficient to lift and hold up your
vehicle.
4. Raise your vehicle with the jack applied
to the axle(s). Do not use the bumper
as a lifting point.
5. Support your vehicle with floor stands under the axle(s). When servicing the
axle or the suspension, support your
vehicle with floor stands under the
frame side-members, preferably
between the axles.
OPENING AND CLOSING THE
HOOD WARNINGS
Always set the parking brake fully
before opening the hood. Failure to
follow this warning could result in
serious personal injury or death. Do not stand under the hood when
you raise or lower it. Failure to follow
this warning could result in serious
personal injury or death. If the engine is running while the
hood is open, stay clear of moving
engine components. Failure to follow
this warning could result in serious
personal injury or death. Opening the Hood
Before opening the hood, set the parking
brake fully, shift into park (P) or neutral
(N) and switch the ignition off.
181
F-650/750 (TBC) , enUSA, First Printing Maintenance
Page 185 of 382
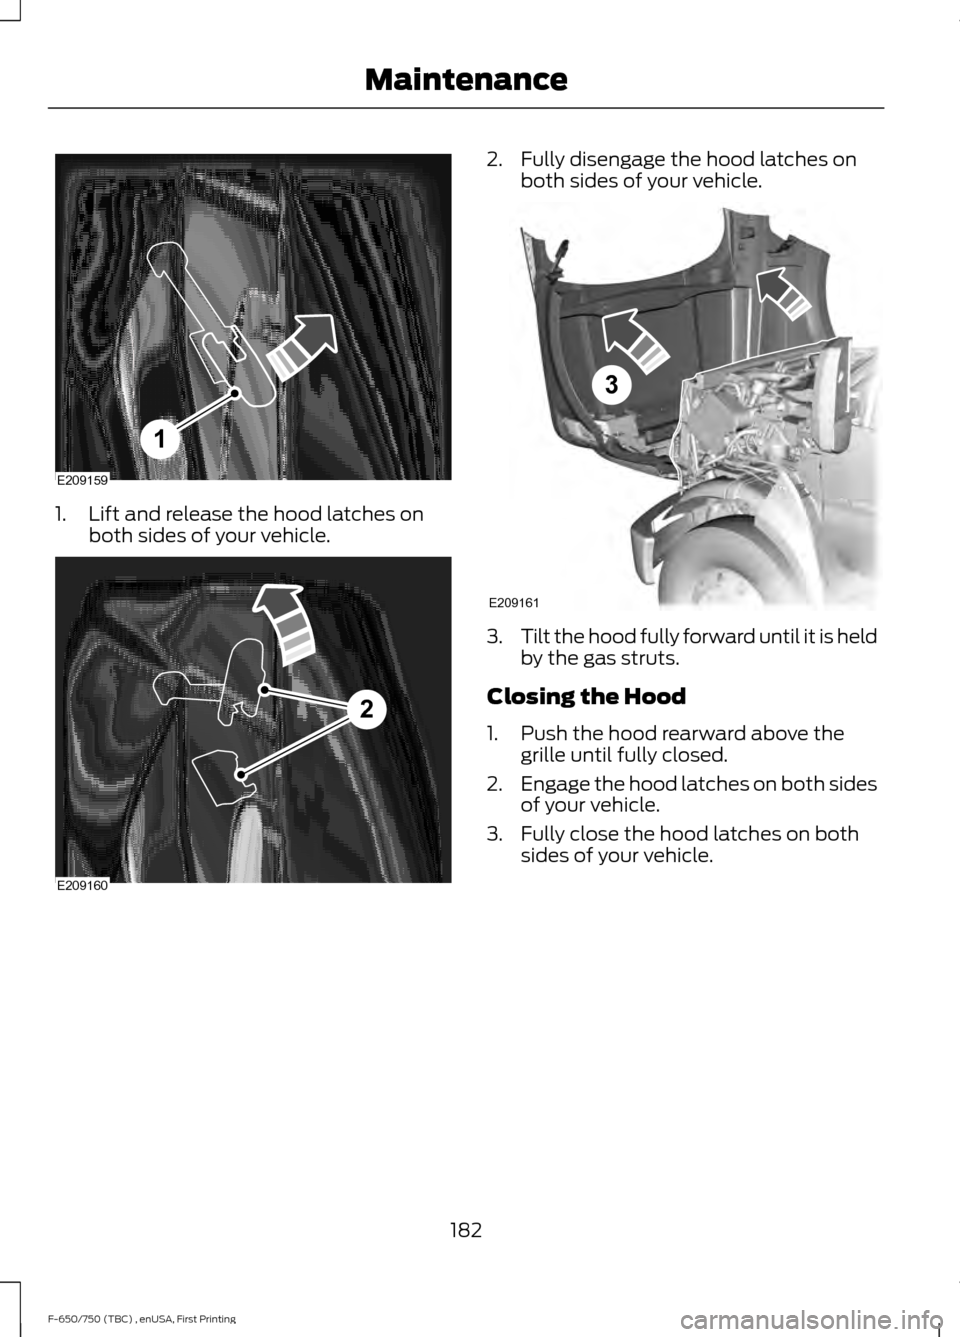
1. Lift and release the hood latches on
both sides of your vehicle. 2. Fully disengage the hood latches on
both sides of your vehicle. 3.
Tilt the hood fully forward until it is held
by the gas struts.
Closing the Hood
1. Push the hood rearward above the grille until fully closed.
2. Engage the hood latches on both sides
of your vehicle.
3. Fully close the hood latches on both sides of your vehicle.
182
F-650/750 (TBC) , enUSA, First Printing MaintenanceE209159
1 E209160
2 E209161
3