warning light FORD FIESTA 1989 Service Owner's Guide
[x] Cancel search | Manufacturer: FORD, Model Year: 1989, Model line: FIESTA, Model: FORD FIESTA 1989Pages: 296, PDF Size: 10.65 MB
Page 181 of 296
9Detach the automatic brake adjuster
cam in a similar manner to that described
in the previous paragraph, noting its
orientation.
10 Clean the adjuster strut and its associated
components.
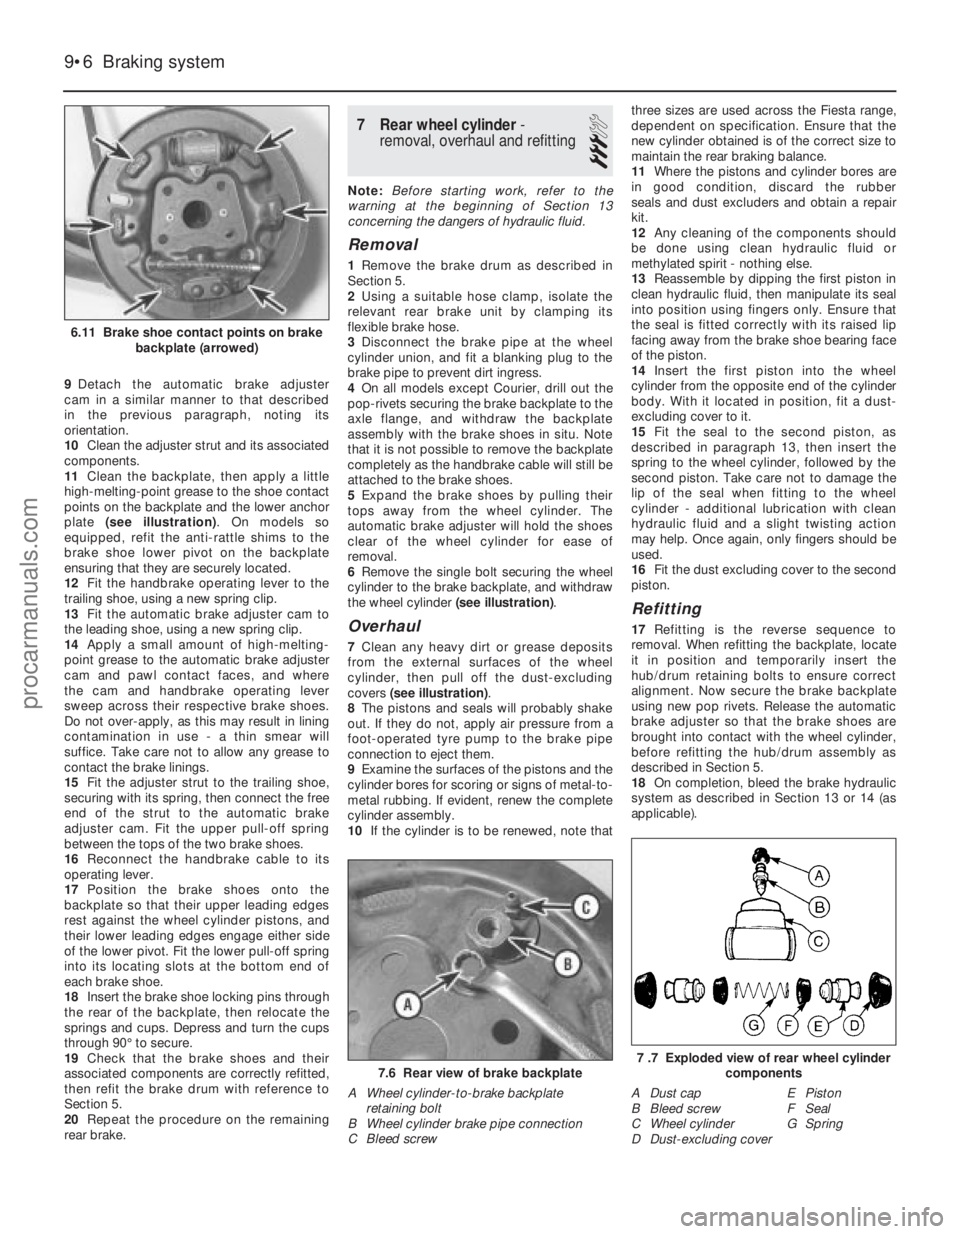
11 Clean the backplate, then apply a little
high-melting-point grease to the shoe contact
points on the backplate and the lower anchor
plate (see illustration) . On models so
equipped, refit the anti-rattle shims to the
brake shoe lower pivot on the backplate
ensuring that they are securely located.
12 Fit the handbrake operating lever to the
trailing shoe, using a new spring clip.
13 Fit the automatic brake adjuster cam to
the leading shoe, using a new spring clip.
14 Apply a small amount of high-melting-
point grease to the automatic brake adjuster
cam and pawl contact faces, and where
the cam and handbrake operating lever
sweep across their respective brake shoes.
Do not over-apply, as this may result in lining
contamination in use - a thin smear will
suffice. Take care not to allow any grease to
contact the brake linings.
15 Fit the adjuster strut to the trailing shoe,
securing with its spring, then connect the free
end of the strut to the automatic brake
adjuster cam. Fit the upper pull-off spring
between the tops of the two brake shoes.
16 Reconnect the handbrake cable to its
operating lever.
17 Position the brake shoes onto the
backplate so that their upper leading edges
rest against the wheel cylinder pistons, and
their lower leading edges engage either side
of the lower pivot. Fit the lower pull-off spring
into its locating slots at the bottom end of
each brake shoe.
18 Insert the brake shoe locking pins through
the rear of the backplate, then relocate the
springs and cups. Depress and turn the cups
through 90° to secure.
19 Check that the brake shoes and their
associated components are correctly refitted,
then refit the brake drum with reference to
Section 5.
20 Repeat the procedure on the remaining
rear brake.
7 Rear wheel cylinder -
removal, overhaul and refitting
3
Note: Before starting work, refer to the
warning at the beginning of Section 13
concerning the dangers of hydraulic fluid.
Removal
1 Remove the brake drum as described in
Section 5.
2 Using a suitable hose clamp, isolate the
relevant rear brake unit by clamping its
flexible brake hose.
3 Disconnect the brake pipe at the wheel
cylinder union, and fit a blanking plug to the
brake pipe to prevent dirt ingress.
4 On all models except Courier, drill out the
pop-rivets securing the brake backplate to the
axle flange, and withdraw the backplate
assembly with the brake shoes in situ. Note
that it is not possible to remove the backplate
completely as the handbrake cable will still be
attached to the brake shoes.
5 Expand the brake shoes by pulling their
tops away from the wheel cylinder. The
automatic brake adjuster will hold the shoes
clear of the wheel cylinder for ease of
removal.
6 Remove the single bolt securing the wheel
cylinder to the brake backplate, and withdraw
the wheel cylinder (see illustration).
Overhaul
7Clean any heavy dirt or grease deposits
from the external surfaces of the wheel
cylinder, then pull off the dust-excluding
covers (see illustration) .
8 The pistons and seals will probably shake
out. If they do not, apply air pressure from a
foot-operated tyre pump to the brake pipe
connection to eject them.
9 Examine the surfaces of the pistons and the
cylinder bores for scoring or signs of metal-to-
metal rubbing. If evident, renew the complete
cylinder assembly.
10 If the cylinder is to be renewed, note that three sizes are used across the Fiesta range,
dependent on specification. Ensure that the
new cylinder obtained is of the correct size to
maintain the rear braking balance.
11
Where the pistons and cylinder bores are
in good condition, discard the rubber
seals and dust excluders and obtain a repair
kit.
12 Any cleaning of the components should
be done using clean hydraulic fluid or
methylated spirit - nothing else.
13 Reassemble by dipping the first piston in
clean hydraulic fluid, then manipulate its seal
into position using fingers only. Ensure that
the seal is fitted correctly with its raised lip
facing away from the brake shoe bearing face
of the piston.
14 Insert the first piston into the wheel
cylinder from the opposite end of the cylinder
body. With it located in position, fit a dust-
excluding cover to it.
15 Fit the seal to the second piston, as
described in paragraph 13, then insert the
spring to the wheel cylinder, followed by the
second piston. Take care not to damage the
lip of the seal when fitting to the wheel
cylinder - additional lubrication with clean
hydraulic fluid and a slight twisting action
may help. Once again, only fingers should be
used.
16 Fit the dust excluding cover to the second
piston.
Refitting
17 Refitting is the reverse sequence to
removal. When refitting the backplate, locate
it in position and temporarily insert the
hub/drum retaining bolts to ensure correct
alignment. Now secure the brake backplate
using new pop rivets. Release the automatic
brake adjuster so that the brake shoes are
brought into contact with the wheel cylinder,
before refitting the hub/drum assembly as
described in Section 5.
18 On completion, bleed the brake hydraulic
system as described in Section 13 or 14 (as
applicable).
9•6 Braking system
7 .7 Exploded view of rear wheel cylinder
components
A Dust cap E Piston
B Bleed screw F Seal
C Wheel cylinder G Spring
D Dust-excluding cover7.6 Rear view of brake backplate
A Wheel cylinder-to-brake backplate retaining bolt
B Wheel cylinder brake pipe connection
C Bleed screw
6.11 Brake shoe contact points on brake backplate (arrowed)
1595Ford Fiesta Remakeprocarmanuals.com
http://vnx.su
Page 183 of 296
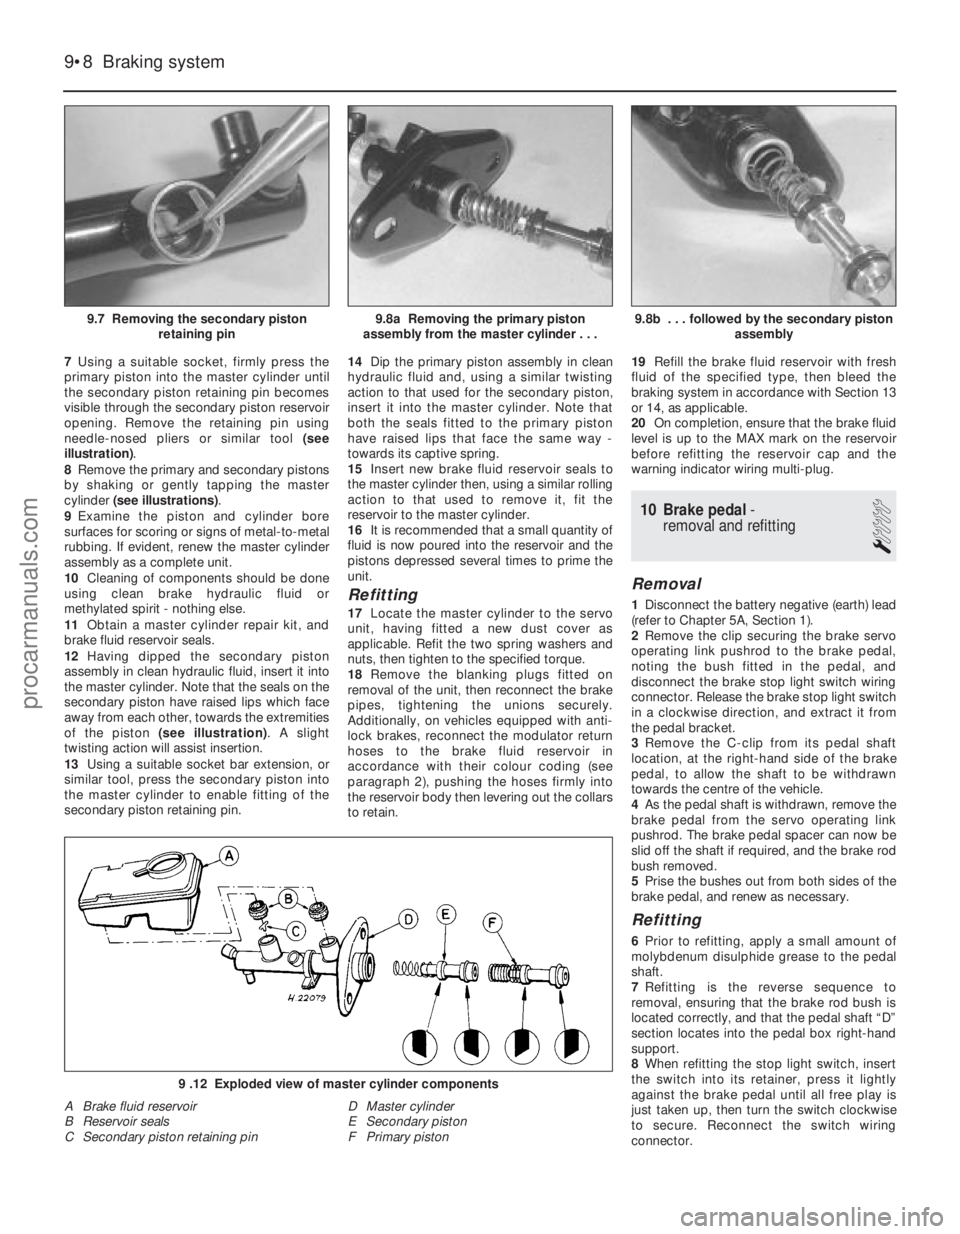
7Using a suitable socket, firmly press the
primary piston into the master cylinder until
the secondary piston retaining pin becomes
visible through the secondary piston reservoir
opening. Remove the retaining pin using
needle-nosed pliers or similar tool (see
illustration) .
8 Remove the primary and secondary pistons
by shaking or gently tapping the master
cylinder (see illustrations) .
9 Examine the piston and cylinder bore
surfaces for scoring or signs of metal-to-metal
rubbing. If evident, renew the master cylinder
assembly as a complete unit.
10 Cleaning of components should be done
using clean brake hydraulic fluid or
methylated spirit - nothing else.
11 Obtain a master cylinder repair kit, and
brake fluid reservoir seals.
12 Having dipped the secondary piston
assembly in clean hydraulic fluid, insert it into
the master cylinder. Note that the seals on the
secondary piston have raised lips which face
away from each other, towards the extremities
of the piston (see illustration) . A slight
twisting action will assist insertion.
13 Using a suitable socket bar extension, or
similar tool, press the secondary piston into
the master cylinder to enable fitting of the
secondary piston retaining pin. 14
Dip the primary piston assembly in clean
hydraulic fluid and, using a similar twisting
action to that used for the secondary piston,
insert it into the master cylinder. Note that
both the seals fitted to the primary piston
have raised lips that face the same way -
towards its captive spring.
15 Insert new brake fluid reservoir seals to
the master cylinder then, using a similar rolling
action to that used to remove it, fit the
reservoir to the master cylinder.
16 It is recommended that a small quantity of
fluid is now poured into the reservoir and the
pistons depressed several times to prime the
unit.
Refitting
17 Locate the master cylinder to the servo
unit, having fitted a new dust cover as
applicable. Refit the two spring washers and
nuts, then tighten to the specified torque.
18 Remove the blanking plugs fitted on
removal of the unit, then reconnect the brake
pipes, tightening the unions securely.
Additionally, on vehicles equipped with anti-
lock brakes, reconnect the modulator return
hoses to the brake fluid reservoir in
accordance with their colour coding (see
paragraph 2), pushing the hoses firmly into
the reservoir body then levering out the collars
to retain. 19
Refill the brake fluid reservoir with fresh
fluid of the specified type, then bleed the
braking system in accordance with Section 13
or 14, as applicable.
20 On completion, ensure that the brake fluid
level is up to the MAX mark on the reservoir
before refitting the reservoir cap and the
warning indicator wiring multi-plug.
10 Brake pedal -
removal and refitting
1
Removal
1 Disconnect the battery negative (earth) lead
(refer to Chapter 5A, Section 1).
2 Remove the clip securing the brake servo
operating link pushrod to the brake pedal,
noting the bush fitted in the pedal, and
disconnect the brake stop light switch wiring
connector. Release the brake stop light switch
in a clockwise direction, and extract it from
the pedal bracket.
3 Remove the C-clip from its pedal shaft
location, at the right-hand side of the brake
pedal, to allow the shaft to be withdrawn
towards the centre of the vehicle.
4 As the pedal shaft is withdrawn, remove the
brake pedal from the servo operating link
pushrod. The brake pedal spacer can now be
slid off the shaft if required, and the brake rod
bush removed.
5 Prise the bushes out from both sides of the
brake pedal, and renew as necessary.
Refitting
6 Prior to refitting, apply a small amount of
molybdenum disulphide grease to the pedal
shaft.
7 Refitting is the reverse sequence to
removal, ensuring that the brake rod bush is
located correctly, and that the pedal shaft “D”
section locates into the pedal box right-hand
support.
8 When refitting the stop light switch, insert
the switch into its retainer, press it lightly
against the brake pedal until all free play is
just taken up, then turn the switch clockwise
to secure. Reconnect the switch wiring
connector.
9•8 Braking system
9 .12 Exploded view of master cylinder components
A Brake fluid reservoir
B Reservoir seals
C Secondary piston retaining pin D Master cylinder
E Secondary piston
F Primary piston
9.8b . . . followed by the secondary piston
assembly9.8a Removing the primary piston
assembly from the master cylinder . . .9.7 Removing the secondary piston retaining pin
1595Ford Fiesta Remakeprocarmanuals.com
http://vnx.su
Page 185 of 296
13 Hydraulic system- bleeding
(conventional braking system)
3
Note: For vehicles equipped with an anti-lock
braking system, refer to Section 14. Warning: Hydraulic fluid is
poisonous; wash off
immediately and thoroughly in
the case of skin contact, and
seek immediate medical advice if any fluid
is swallowed or gets into the eyes. Certain
types of hydraulic fluid are inflammable,
and may ignite when allowed into contact
with hot components; when servicing any
hydraulic system, it is safest to assume
that the fluid IS inflammable, and to take
precautions against the risk of fire as
though it is petrol that is being handled.
Hydraulic fluid is also an effective paint
stripper, and will attack plastics; if any is
spilt, it should be washed off immediately,
using copious quantities of clean water.
Finally, it is hygroscopic (it absorbs
moisture from the air). The more moisture
is absorbed by the fluid, the lower its
boiling point becomes, leading to a
dangerous loss of braking under hard use.
Old fluid may be contaminated and unfit
for further use. When topping-up or
renewing the fluid, always use the
recommended type, and ensure that it
comes from a freshly-opened sealed
container.
1 The correct operation of any hydraulic
system is only possible after removing all air
from the components and circuit; and this is
achieved by bleeding the system.
2 During the bleeding procedure, add only
clean, unused hydraulic fluid of the
recommended type; never re-use fluid that
has already been bled from the system.
Ensure that sufficient fluid is available before
starting work.
3 If there is any possibility of incorrect fluid
being already in the system, the brake
components and circuit must be flushed
completely with uncontaminated, correct
fluid, and new seals should be fitted
throughout the system.
4 If hydraulic fluid has been lost from the
system, or air has entered because of a leak,
ensure that the fault is cured before
proceeding further.
5 Park the vehicle on level ground, and apply
the handbrake. Switch off the engine, then
(where applicable) depress the brake pedal
several times to dissipate the vacuum from
the servo unit. Note:When bleeding the
system, the vehicle must maintain a level
attitude, ie not tilted in any manner, to ensure
that air is not trapped within the pressure
control valves. During certain operations in
this manual, instructions are given to bleed the
brake hydraulic system with the front or the
rear of the vehicle raised. In such cases raise
the rest of the vehicle so that it maintains a level attitude, but only if it is safe to do so. If it
is not possible to achieve this safely, complete
the remainder of the operation and bleed the
brake hydraulic system with the vehicle on its
wheels.
6
Check that all pipes and hoses are secure,
unions tight and bleed screws closed.
Remove the dust caps (where applicable), and
clean any dirt from around the bleed screws.
7 Disconnect the wiring multi-plug from the
fluid level warning indicator in the master
cylinder reservoir filler cap, then remove the
filler cap. Note that the filler cap must not be
inverted. Top-up the reservoir with the
specified fluid to the “Maximum” level (see
“Weekly Checks” ). Remember to maintain the
fluid level at least above the “Minimum” level
line throughout the procedure, otherwise
there is a risk of further air entering the
system.
8 There are a number of one-man, do-it-
yourself brake bleeding kits currently available
from motor accessory shops. It is
recommended that one of these kits is used
whenever possible, as they greatly simplify
the bleeding operation, and also reduce the
risk of expelled air and fluid being drawn back
into the system. If such a kit is not available,
the basic (two-man) method must be used,
which is described in detail below.
9 If a kit is to be used, prepare the vehicle as
described previously, and follow the kit
manufacturer’s instructions, as the procedure
may vary slightly according to the type being
used; generally, they are as outlined below in
the relevant sub-section.
10 Whichever method is used, the same
sequence must be followed (paragraphs 11
and 12) to ensure the removal of all air from
the system.
Bleeding sequence
11 If the system has been only partially
disconnected, and suitable precautions were
taken to minimise fluid loss, it should be
necessary to bleed only that part of the
system (ie the primary or secondary circuit).
12 If the complete system is to be bled, then
it is suggested that you work in the following
sequence: a) Right-hand front wheel.
b) Left-hand rear wheel.
c) Left-hand front wheel.
d) Right-hand rear wheel.
Bleeding - basic (two-man)
method
13 Collect a clean glass jar, a suitable length
of plastic or rubber tubing which is a tight fit
over the bleed screw, and a ring spanner to fit
the screw. The help of an assistant will also be
required.
14 Remove the dust cap from the first screw
in the sequence (if not already done). Fit a
suitable spanner and tube to the screw, place
the other end of the tube in the jar, and pour in
sufficient fluid to cover the end of the tube.
15 Ensure that the master cylinder reservoir fluid level is maintained at least above the
“Minimum” level throughout the procedure.
16
Have the assistant fully depress the brake
pedal several times to build up pressure, then
maintain it down on the final downstroke.
17 While pedal pressure is maintained,
unscrew the bleed screw (approximately one
turn) and allow the compressed fluid and air to
flow into the jar. The assistant should maintain
pedal pressure, following the pedal down to
the floor if necessary, and should not
release the pedal until instructed to do so.
When the flow stops, tighten the bleed screw
again. Have the assistant release the pedal
slowly, and recheck the reservoir fluid level.
18 Repeat the steps given in paragraphs 16
and 17 until the fluid emerging from the bleed
screw is free from air bubbles. If the master
cylinder has been drained and refilled, and air
is being bled from the first screw in the
sequence, allow at least five seconds between
cycles for the master cylinder passages to refill.
19 When no more air bubbles appear, tighten
the bleed screw securely, remove the tube
and spanner, and refit the dust cap (where
applicable). Do not overtighten the bleed
screw.
20 Repeat the procedure on the remaining
screws in the sequence, until all air is
removed from the system and the brake pedal
feels firm again.
Bleeding - using a one-way
valve kit
21 As their name implies, these kits consist of
a length of tubing with a one-way valve fitted,
to prevent expelled air and fluid being drawn
back into the system; some kits include a
translucent container, which can be positioned
so that the air bubbles can be more easily
seen flowing from the end of the tube.
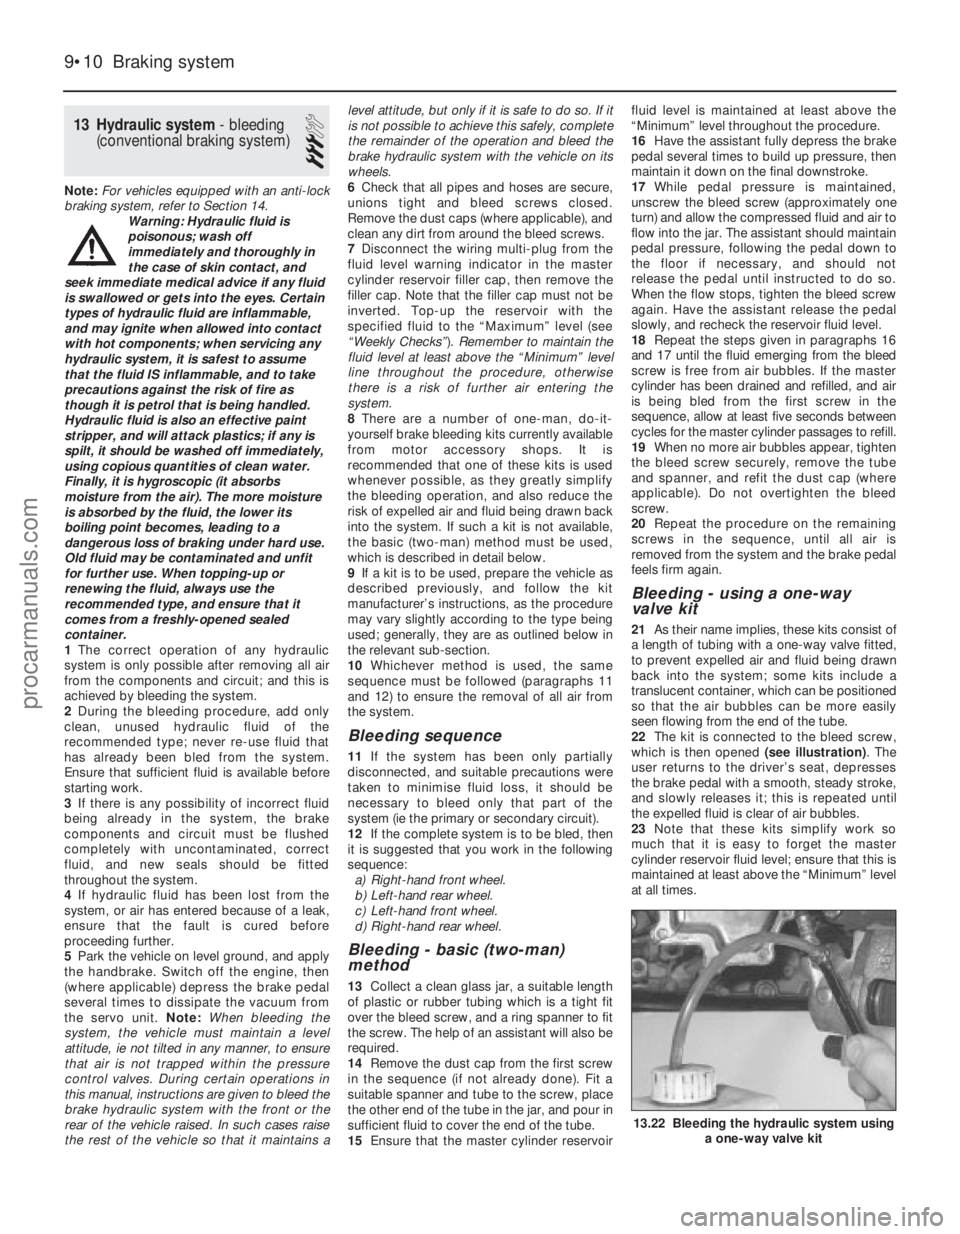
22 The kit is connected to the bleed screw,
which is then opened (see illustration). The
user returns to the driver’s seat, depresses
the brake pedal with a smooth, steady stroke,
and slowly releases it; this is repeated until
the expelled fluid is clear of air bubbles.
23 Note that these kits simplify work so
much that it is easy to forget the master
cylinder reservoir fluid level; ensure that this is
maintained at least above the “Minimum” level
at all times.
9•10 Braking system
13.22 Bleeding the hydraulic system using a one-way valve kit
1595Ford Fiesta Remakeprocarmanuals.com
http://vnx.su
Page 187 of 296
location. Slacken the other two nuts or
remove them, as necessary.
6Remove the four nuts securing the servo
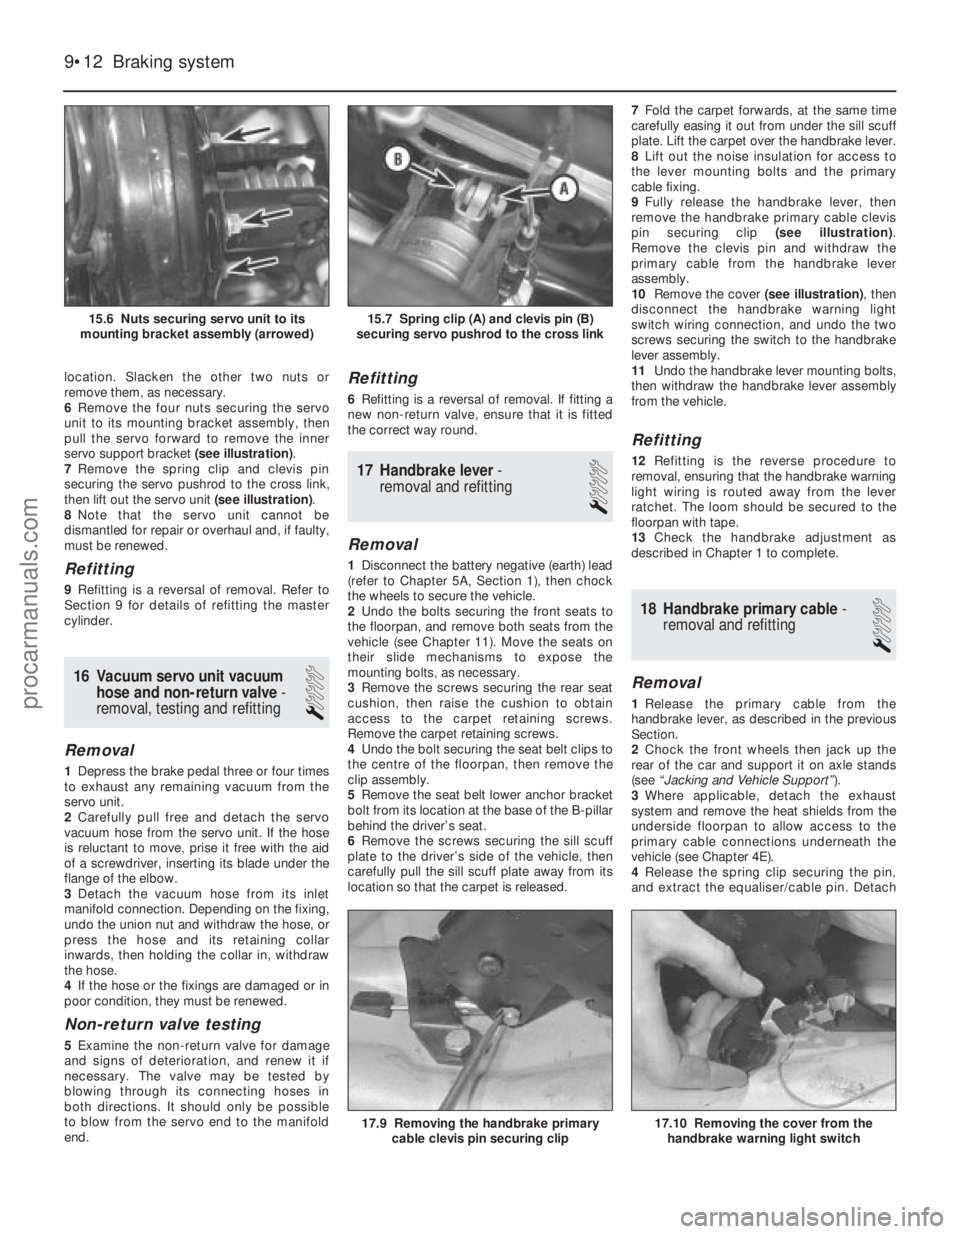
unit to its mounting bracket assembly, then
pull the servo forward to remove the inner
servo support bracket (see illustration).
7 Remove the spring clip and clevis pin
securing the servo pushrod to the cross link,
then lift out the servo unit (see illustration).
8 Note that the servo unit cannot be
dismantled for repair or overhaul and, if faulty,
must be renewed.
Refitting
9 Refitting is a reversal of removal. Refer to
Section 9 for details of refitting the master
cylinder.
16 Vacuum servo unit vacuum
hose and non-return valve -
removal, testing and refitting
1
Removal
1 Depress the brake pedal three or four times
to exhaust any remaining vacuum from the
servo unit.
2 Carefully pull free and detach the servo
vacuum hose from the servo unit. If the hose
is reluctant to move, prise it free with the aid
of a screwdriver, inserting its blade under the
flange of the elbow.
3 Detach the vacuum hose from its inlet
manifold connection. Depending on the fixing,
undo the union nut and withdraw the hose, or
press the hose and its retaining collar
inwards, then holding the collar in, withdraw
the hose.
4 If the hose or the fixings are damaged or in
poor condition, they must be renewed.
Non-return valve testing
5 Examine the non-return valve for damage
and signs of deterioration, and renew it if
necessary. The valve may be tested by
blowing through its connecting hoses in
both directions. It should only be possible
to blow from the servo end to the manifold
end.
Refitting
6 Refitting is a reversal of removal. If fitting a
new non-return valve, ensure that it is fitted
the correct way round.
17 Handbrake lever -
removal and refitting
1
Removal
1 Disconnect the battery negative (earth) lead
(refer to Chapter 5A, Section 1), then chock
the wheels to secure the vehicle.
2 Undo the bolts securing the front seats to
the floorpan, and remove both seats from the
vehicle (see Chapter 11). Move the seats on
their slide mechanisms to expose the
mounting bolts, as necessary.
3 Remove the screws securing the rear seat
cushion, then raise the cushion to obtain
access to the carpet retaining screws.
Remove the carpet retaining screws.
4 Undo the bolt securing the seat belt clips to
the centre of the floorpan, then remove the
clip assembly.
5 Remove the seat belt lower anchor bracket
bolt from its location at the base of the B-pillar
behind the driver’s seat.
6 Remove the screws securing the sill scuff
plate to the driver’s side of the vehicle, then
carefully pull the sill scuff plate away from its
location so that the carpet is released. 7
Fold the carpet forwards, at the same time
carefully easing it out from under the sill scuff
plate. Lift the carpet over the handbrake lever.
8 Lift out the noise insulation for access to
the lever mounting bolts and the primary
cable fixing.
9 Fully release the handbrake lever, then
remove the handbrake primary cable clevis
pin securing clip (see illustration).
Remove the clevis pin and withdraw the
primary cable from the handbrake lever
assembly.
10 Remove the cover (see illustration), then
disconnect the handbrake warning light
switch wiring connection, and undo the two
screws securing the switch to the handbrake
lever assembly.
11 Undo the handbrake lever mounting bolts,
then withdraw the handbrake lever assembly
from the vehicle.
Refitting
12 Refitting is the reverse procedure to
removal, ensuring that the handbrake warning
light wiring is routed away from the lever
ratchet. The loom should be secured to the
floorpan with tape.
13 Check the handbrake adjustment as
described in Chapter 1 to complete.
18 Handbrake primary cable -
removal and refitting
1
Removal
1 Release the primary cable from the
handbrake lever, as described in the previous
Section.
2 Chock the front wheels then jack up the
rear of the car and support it on axle stands
(see “Jacking and Vehicle Support” ).
3 Where applicable, detach the exhaust
system and remove the heat shields from the
underside floorpan to allow access to the
primary cable connections underneath the
vehicle (see Chapter 4E).
4 Release the spring clip securing the pin,
and extract the equaliser/cable pin. Detach
9•12 Braking system
17.10 Removing the cover from the
handbrake warning light switch17.9 Removing the handbrake primary cable clevis pin securing clip
15.7 Spring clip (A) and clevis pin (B)
securing servo pushrod to the cross link15.6 Nuts securing servo unit to its
mounting bracket assembly (arrowed)
1595Ford Fiesta Remakeprocarmanuals.com
http://vnx.su
Page 188 of 296
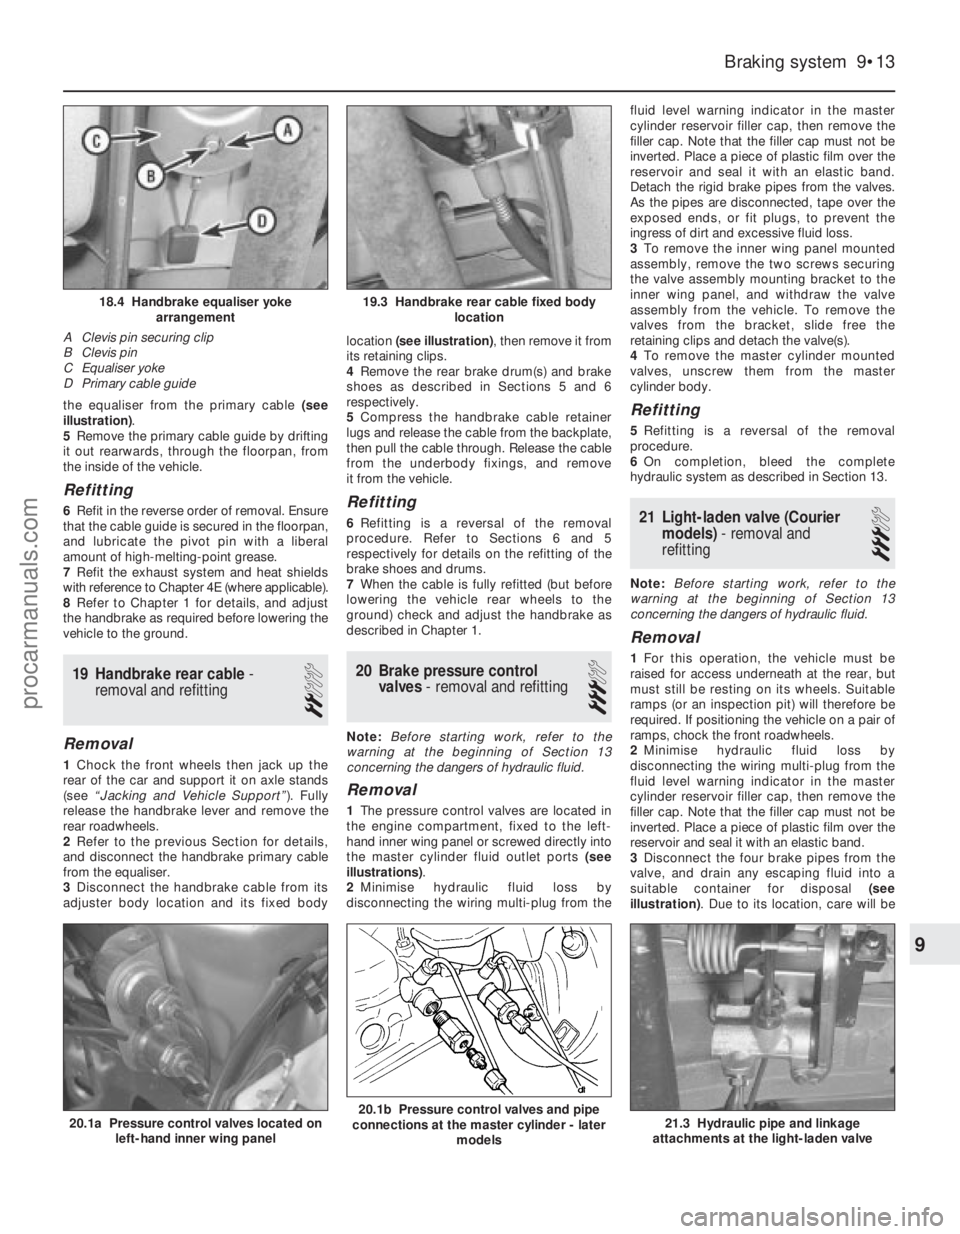
the equaliser from the primary cable (see
illustration) .
5 Remove the primary cable guide by drifting
it out rearwards, through the floorpan, from
the inside of the vehicle.
Refitting
6 Refit in the reverse order of removal. Ensure
that the cable guide is secured in the floorpan,
and lubricate the pivot pin with a liberal
amount of high-melting-point grease.
7 Refit the exhaust system and heat shields
with reference to Chapter 4E (where applicable).
8 Refer to Chapter 1 for details, and adjust
the handbrake as required before lowering the
vehicle to the ground.
19 Handbrake rear cable -
removal and refitting
2
Removal
1 Chock the front wheels then jack up the
rear of the car and support it on axle stands
(see “Jacking and Vehicle Support” ). Fully
release the handbrake lever and remove the
rear roadwheels.
2 Refer to the previous Section for details,
and disconnect the handbrake primary cable
from the equaliser.
3 Disconnect the handbrake cable from its
adjuster body location and its fixed body location
(see illustration) , then remove it from
its retaining clips.
4 Remove the rear brake drum(s) and brake
shoes as described in Sections 5 and 6
respectively.
5 Compress the handbrake cable retainer
lugs and release the cable from the backplate,
then pull the cable through. Release the cable
from the underbody fixings, and remove
it from the vehicle.
Refitting
6 Refitting is a reversal of the removal
procedure. Refer to Sections 6 and 5
respectively for details on the refitting of the
brake shoes and drums.
7 When the cable is fully refitted (but before
lowering the vehicle rear wheels to the
ground) check and adjust the handbrake as
described in Chapter 1.
20 Brake pressure control valves - removal and refitting
3
Note: Before starting work, refer to the
warning at the beginning of Section 13
concerning the dangers of hydraulic fluid.
Removal
1 The pressure control valves are located in
the engine compartment, fixed to the left-
hand inner wing panel or screwed directly into
the master cylinder fluid outlet ports (see
illustrations) .
2 Minimise hydraulic fluid loss by
disconnecting the wiring multi-plug from the fluid level warning indicator in the master
cylinder reservoir filler cap, then remove the
filler cap. Note that the filler cap must not be
inverted. Place a piece of plastic film over the
reservoir and seal it with an elastic band.
Detach the rigid brake pipes from the valves.
As the pipes are disconnected, tape over the
exposed ends, or fit plugs, to prevent the
ingress of dirt and excessive fluid loss.
3
To remove the inner wing panel mounted
assembly, remove the two screws securing
the valve assembly mounting bracket to the
inner wing panel, and withdraw the valve
assembly from the vehicle. To remove the
valves from the bracket, slide free the
retaining clips and detach the valve(s).
4 To remove the master cylinder mounted
valves, unscrew them from the master
cylinder body.
Refitting
5 Refitting is a reversal of the removal
procedure.
6 On completion, bleed the complete
hydraulic system as described in Section 13.
21 Light-laden valve (Courier models) - removal and
refitting
3
Note: Before starting work, refer to the
warning at the beginning of Section 13
concerning the dangers of hydraulic fluid.
Removal
1 For this operation, the vehicle must be
raised for access underneath at the rear, but
must still be resting on its wheels. Suitable
ramps (or an inspection pit) will therefore be
required. If positioning the vehicle on a pair of
ramps, chock the front roadwheels.
2 Minimise hydraulic fluid loss by
disconnecting the wiring multi-plug from the
fluid level warning indicator in the master
cylinder reservoir filler cap, then remove the
filler cap. Note that the filler cap must not be
inverted. Place a piece of plastic film over the
reservoir and seal it with an elastic band.
3 Disconnect the four brake pipes from the
valve, and drain any escaping fluid into a
suitable container for disposal (see
illustration) . Due to its location, care will be
Braking system 9•13
19.3 Handbrake rear cable fixed body
location18.4 Handbrake equaliser yokearrangement
A Clevis pin securing clip
B Clevis pin
C Equaliser yoke
D Primary cable guide
21.3 Hydraulic pipe and linkage
attachments at the light-laden valve20.1b Pressure control valves and pipe
connections at the master cylinder - later
models20.1a Pressure control valves located onleft-hand inner wing panel
9
1595Ford Fiesta Remakeprocarmanuals.com
http://vnx.su
Page 189 of 296
needed not to spill the fluid onto the hands -
wear suitable protective gloves. Plug or cap
the disconnected pipes and valve openings,
to prevent dirt ingress and further fluid loss.
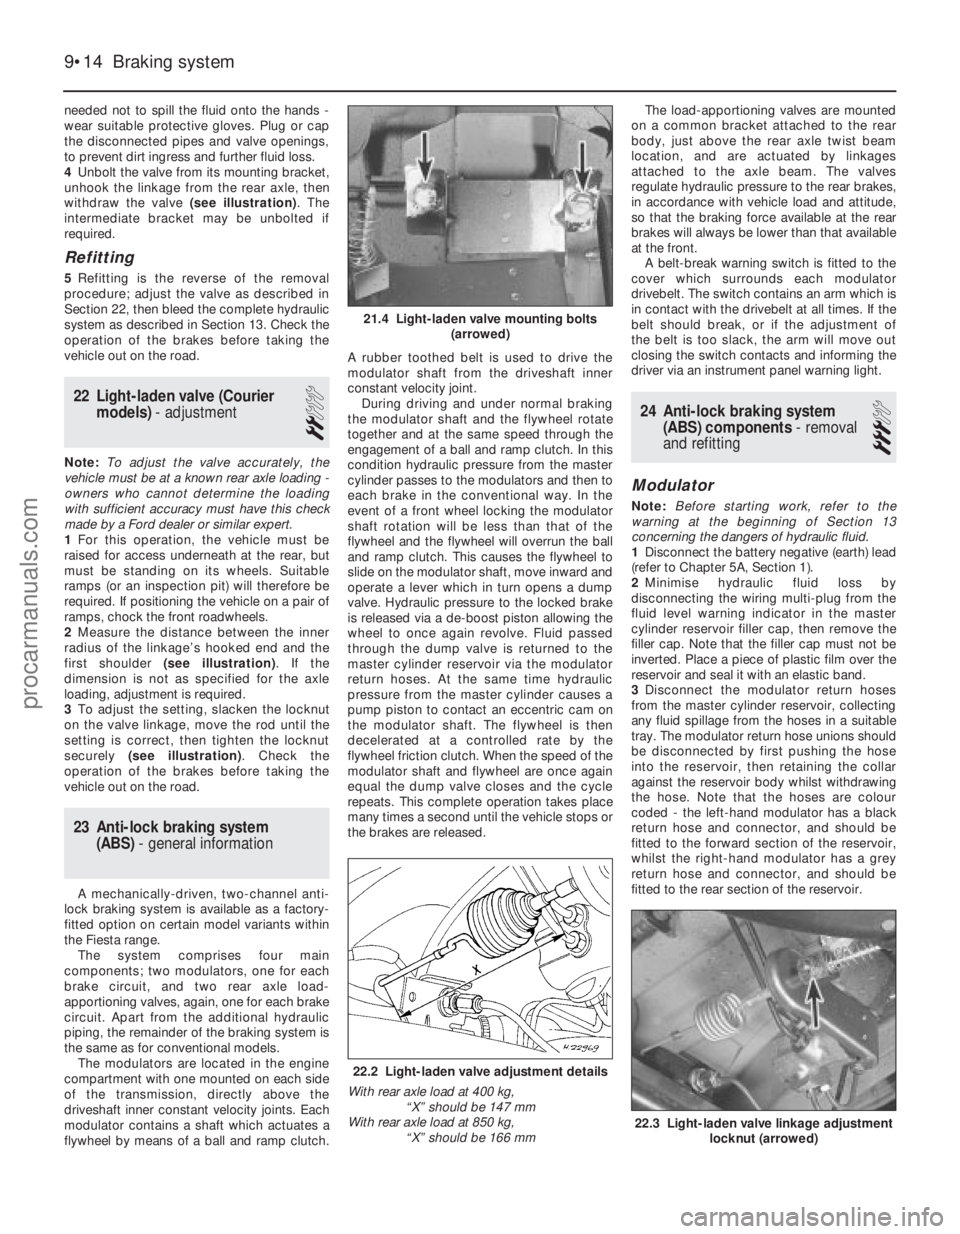
4Unbolt the valve from its mounting bracket,
unhook the linkage from the rear axle, then
withdraw the valve (see illustration). The
intermediate bracket may be unbolted if
required.
Refitting
5 Refitting is the reverse of the removal
procedure; adjust the valve as described in
Section 22, then bleed the complete hydraulic
system as described in Section 13. Check the
operation of the brakes before taking the
vehicle out on the road.
22 Light-laden valve (Courier models) - adjustment
2
Note:To adjust the valve accurately, the
vehicle must be at a known rear axle loading -
owners who cannot determine the loading
with sufficient accuracy must have this check
made by a Ford dealer or similar expert.
1 For this operation, the vehicle must be
raised for access underneath at the rear, but
must be standing on its wheels. Suitable
ramps (or an inspection pit) will therefore be
required. If positioning the vehicle on a pair of
ramps, chock the front roadwheels.
2 Measure the distance between the inner
radius of the linkage’s hooked end and the
first shoulder (see illustration) . If the
dimension is not as specified for the axle
loading, adjustment is required.
3 To adjust the setting, slacken the locknut
on the valve linkage, move the rod until the
setting is correct, then tighten the locknut
securely (see illustration) . Check the
operation of the brakes before taking the
vehicle out on the road.
23 Anti-lock braking system (ABS) - general information
A mechanically-driven, two-channel anti-
lock braking system is available as a factory-
fitted option on certain model variants within
the Fiesta range.
The system comprises four main
components; two modulators, one for each
brake circuit, and two rear axle load-
apportioning valves, again, one for each brake
circuit. Apart from the additional hydraulic
piping, the remainder of the braking system is
the same as for conventional models. The modulators are located in the engine
compartment with one mounted on each side
of the transmission, directly above the
driveshaft inner constant velocity joints. Each
modulator contains a shaft which actuates a
flywheel by means of a ball and ramp clutch. A rubber toothed belt is used to drive the
modulator shaft from the driveshaft inner
constant velocity joint.
During driving and under normal braking
the modulator shaft and the flywheel rotate
together and at the same speed through the
engagement of a ball and ramp clutch. In this
condition hydraulic pressure from the master
cylinder passes to the modulators and then to
each brake in the conventional way. In the
event of a front wheel locking the modulator
shaft rotation will be less than that of the
flywheel and the flywheel will overrun the ball
and ramp clutch. This causes the flywheel to
slide on the modulator shaft, move inward and
operate a lever which in turn opens a dump
valve. Hydraulic pressure to the locked brake
is released via a de-boost piston allowing the
wheel to once again revolve. Fluid passed
through the dump valve is returned to the
master cylinder reservoir via the modulator
return hoses. At the same time hydraulic
pressure from the master cylinder causes a
pump piston to contact an eccentric cam on
the modulator shaft. The flywheel is then
decelerated at a controlled rate by the
flywheel friction clutch. When the speed of the
modulator shaft and flywheel are once again
equal the dump valve closes and the cycle
repeats. This complete operation takes place
many times a second until the vehicle stops or
the brakes are released. The load-apportioning valves are mounted
on a common bracket attached to the rear
body, just above the rear axle twist beam
location, and are actuated by linkages
attached to the axle beam. The valves
regulate hydraulic pressure to the rear brakes,
in accordance with vehicle load and attitude,
so that the braking force available at the rear
brakes will always be lower than that available
at the front. A belt-break warning switch is fitted to the
cover which surrounds each modulator
drivebelt. The switch contains an arm which is
in contact with the drivebelt at all times. If the
belt should break, or if the adjustment of
the belt is too slack, the arm will move out
closing the switch contacts and informing the
driver via an instrument panel warning light.
24 Anti-lock braking system (ABS) components - removal
and refitting
3
Modulator
Note: Before starting work, refer to the
warning at the beginning of Section 13
concerning the dangers of hydraulic fluid.
1 Disconnect the battery negative (earth) lead
(refer to Chapter 5A, Section 1).
2 Minimise hydraulic fluid loss by
disconnecting the wiring multi-plug from the
fluid level warning indicator in the master
cylinder reservoir filler cap, then remove the
filler cap. Note that the filler cap must not be
inverted. Place a piece of plastic film over the
reservoir and seal it with an elastic band.
3 Disconnect the modulator return hoses
from the master cylinder reservoir, collecting
any fluid spillage from the hoses in a suitable
tray. The modulator return hose unions should
be disconnected by first pushing the hose
into the reservoir, then retaining the collar
against the reservoir body whilst withdrawing
the hose. Note that the hoses are colour
coded - the left-hand modulator has a black
return hose and connector, and should be
fitted to the forward section of the reservoir,
whilst the right-hand modulator has a grey
return hose and connector, and should be
fitted to the rear section of the reservoir.
9•14 Braking system
22.3 Light-laden valve linkage adjustment locknut (arrowed)
22.2 Light-laden valve adjustment details
With rear axle load at 400 kg, “X” should be 147 mm
With rear axle load at 850 kg,
“X” should be 166 mm
21.4 Light-laden valve mounting bolts (arrowed)
1595Ford Fiesta Remakeprocarmanuals.com
http://vnx.su
Page 191 of 296
39With the drivebelt tensioned correctly,
tighten the pivot and adjuster bolts to the
specified torque. Re-check the tension of the
drivebelt after tightening the bolts.
40 Reconnect the rigid brake pipes to the
modulator, tightening the unions to seal the
system.
41 Refit the modulator drivebelt cover and
secure with its two retaining bolts. Take care
not to damage the driveshaft CV joint gaiter as
the cover is eased into position.
42 Refit the belt-break switch to the
modulator drivebelt cover, taking care not to
damage the belt contact arm as it passes
through the cover.
43 Reconnect the modulator return hose by
pushing the hose firmly into its brake fluid
reservoir location, then lever out the collar to
retain it.
44 Refit the front suspension crossmember
and the one-piece undertray, as applicable.
45 Refit the roadwheels, then remove the
axle stands and lower the vehicle to the
ground. Tighten the wheel nuts to the
specified torque.
46 Top-up the brake fluid reservoir using
fresh fluid of the specified type (see “ Weekly
checks ”), then bleed the brake hydraulic
system in accordance with Section 14. Refit
the reservoir filler cap and the warning
indicator wiring multi-plug on completion.
47 Reconnect the battery negative lead.
Modulator drivebelt
48Disconnect the battery negative (earth)
lead (refer to Chapter 5A, Section 1).
49 Chock the rear wheels then jack up the
front of the car and support it on axle stands
(see “Jacking and Vehicle Support” ). Remove
the relevant front roadwheel.
50 Remove the one-piece undertray where
fitted, by turning its bayonet-type fasteners,
and on XR2i models, remove the front
suspension crossmember (see Chapter 10).
51 Remove the belt-break switch from the
relevant drivebelt cover, then remove the
drivebelt cover, as described in the previous
sub-Section.
52 Slacken the modulator pivot and adjuster
bolts to release drivebelt tension, then slip the
drivebelt from the modulator.
53 Remove the track rod end balljoint from
the steering arm on the spindle carrier (see
Chapter 10).
54 Disconnect the anti-roll bar connecting
link (where applicable) and release the brake
hose from their locations on the suspension
strut.
55 Remove the pinch bolt and nut securing
the lower suspension arm balljoint to the
spindle carrier, and separate the balljoint from
the spindle carrier assembly.
56 To release the driveshaft inner CV joint
from the differential, have an assistant pull the
spindle carrier away from the centre of the
vehicle whilst you insert a lever between the
inner CV joint and the transmission casing,
then firmly strike the lever with the flat of the hand, but be careful not to damage adjacent
components. Make provision for escaping
transmission oil, if possible plugging the
opening to prevent excessive loss. Do not
allow the CV joints to bend more than 20°
from the horizontal or internal damage may
occur. If both driveshafts are to be removed,
immobilise the differential by inserting an old
joint or suitable shaft, before the other
driveshaft is removed.
57
Slide the drivebelt off the driveshaft.
58 Remove the snap-ring from the groove in
the splines of the inner CV joint. This snap-
ring must be renewed every time the
driveshaft is withdrawn from the differential.
59 With the drivebelt removed, closely
examine the condition of the belt over its
entire length. Renew the belt if any cracks are
noticed in the fabric at the roots of the teeth, if
there is any abrasion of the fabric facing
material, or if there are any tears starting from
the edge of the belt.
60 If, since the drivebelts were last renewed,
a vehicle has covered more than 30 000 miles
(48 000 km) or a period of more than two
years has elapsed, the drivebelts should be
renewed as a matter of course.
61 Prior to refitting the drivebelt, thoroughly
clean its CV joint pulley location.
62 Fit the drivebelt over the driveshaft then,
with a new snap-ring fitted to the inner CV
joint splines, lubricate the splines with
transmission oil. Remove the temporary plug
and insert the inner CV joint to its
transmission casing location. Press against
the spindle carrier so that the snap-ring
engages fully to hold the CV joint splines in
the differential.
63 Refitting is now a reversal of the removal
procedure, tensioning the drivebelt as
described in the previous sub-Section. Ensure
that the pinch-bolt securing the lower
suspension arm balljoint to the spindle carrier
locates in the annular groove on the balljoint
spindle. Secure the track rod and balljoint,
using a new split pin. Tighten the suspension
components to their specified torque (see
Chapter 10).
64 Check the level of the transmission oil,
and top-up as required (see Chapter 1).
Modulator belt-break switch
65 Modulator belt-break switches are fitted
to each of the two drivebelt covers, and clip
into position. To remove, gently squeeze the
protruding lever on the switch towards the
main switch body and lift out, ensuring that
the belt contact arm does not catch on the
drivebelt cover.
25 Load-apportioning valve (ABS models) - adjustment
3
1Before attempting to adjust the load-
apportioning valves, the vehicle must be at its
kerb weight, ie with approximately half a tank
of fuel and carrying no load. Note that a
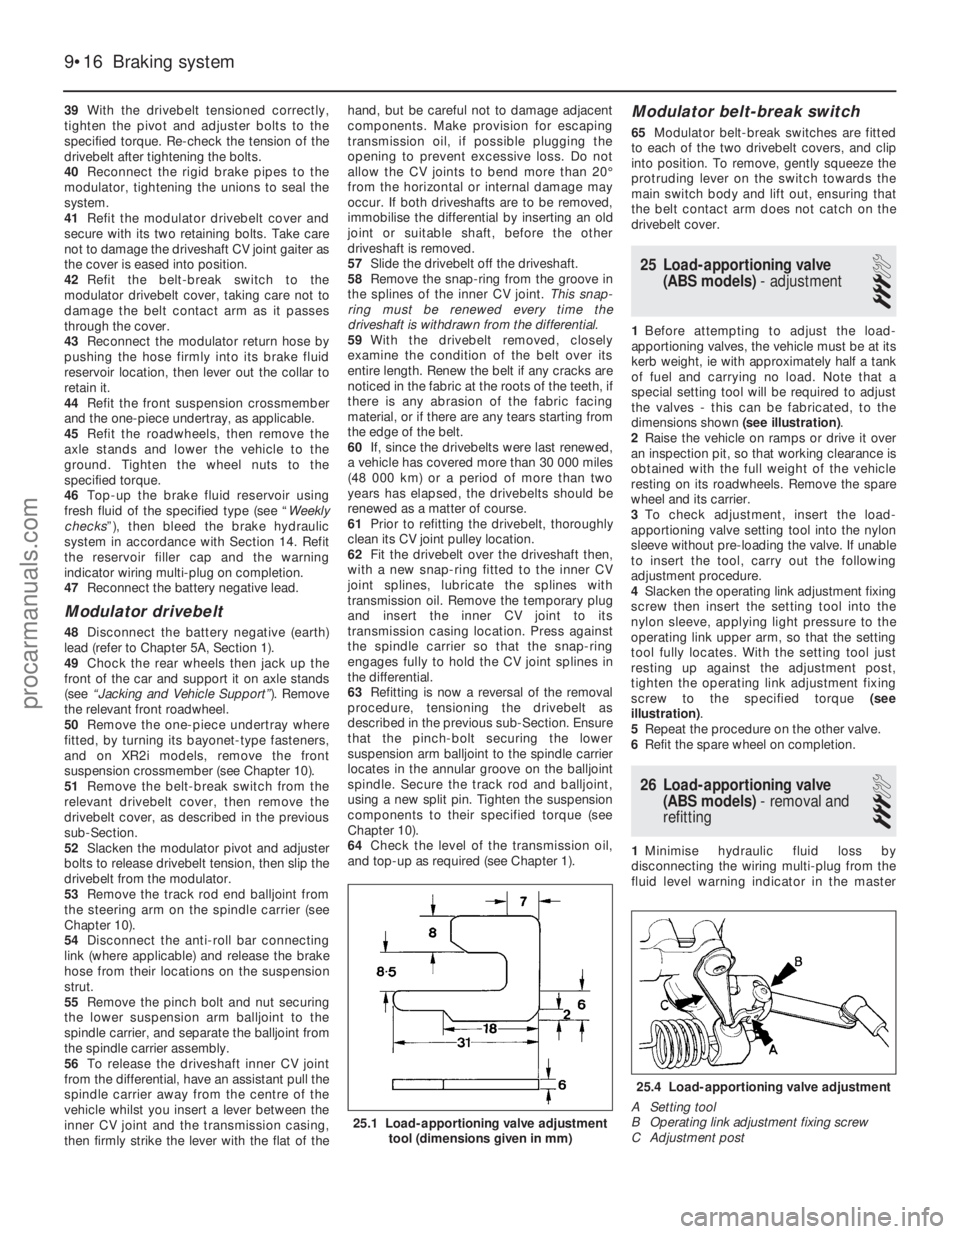
special setting tool will be required to adjust
the valves - this can be fabricated, to the
dimensions shown (see illustration).
2 Raise the vehicle on ramps or drive it over
an inspection pit, so that working clearance is
obtained with the full weight of the vehicle
resting on its roadwheels. Remove the spare
wheel and its carrier.
3 To check adjustment, insert the load-
apportioning valve setting tool into the nylon
sleeve without pre-loading the valve. If unable
to insert the tool, carry out the following
adjustment procedure.
4 Slacken the operating link adjustment fixing
screw then insert the setting tool into the
nylon sleeve, applying light pressure to the
operating link upper arm, so that the setting
tool fully locates. With the setting tool just
resting up against the adjustment post,
tighten the operating link adjustment fixing
screw to the specified torque (see
illustration) .
5 Repeat the procedure on the other valve.
6 Refit the spare wheel on completion.
26 Load-apportioning valve
(ABS models) - removal and
refitting
3
1 Minimise hydraulic fluid loss by
disconnecting the wiring multi-plug from the
fluid level warning indicator in the master
9•16 Braking system
25.4 Load-apportioning valve adjustment
A Setting tool
B Operating link adjustment fixing screw
C Adjustment post
25.1 Load-apportioning valve adjustment tool (dimensions given in mm)
1595Ford Fiesta Remakeprocarmanuals.com
http://vnx.su
Page 199 of 296
16Using a suitable punch, tap the outer
bearing outer race at diametrically-opposed
points and remove the bearing assembly from
the spindle carrier. Do not allow the bearing to
tilt during its withdrawal from the housing, or it
will jam and possibly damage the surface of
the bore. Any burrs left in a bearing bore will
prevent the new bearing from seating
correctly.
17 Turn the spindle carrier over and remove
the inner bearing assembly in the same way.
18 Thoroughly clean the bearing bore and
hub, then secure the spindle carrier in the vice
in an upright position.
19 Draw the new outer bearing assembly into
the spindle carrier using a length of metal tube
of diameter slightly less than the outer race.
Do not apply any pressure to the inner race.
Alternatively, a long threaded rod or bolt, a nut
and large flat washers may be used to draw
the bearing into position (see illustration 3.7).
Once the bearing has been installed, take care
not to dislodge the inner race and seal.
20 Using the same method as for the outer
bearing, draw in the new inner bearing
assembly from the other side of the spindle
carrier. Again, take care not to dislodge the
inner race and seal once the bearing is in
position.
21 Using the same tooling arrangement as
before, and with the metal tube or washers
contacting the inner bearing inner race, draw
the hub fully into the bearings. Alternatively, if
a press is available, support the hub face
down on the press bed and using a metal tube
in contact with the inner bearing inner race,
press the spindle carrier onto the hub.
22 Check that the hub spins freely in the
bearings, then refit the spindle carrier as
described in Section 2.4 Front suspension strut -
removal and refitting
3
Removal
1 Chock the rear wheels then jack up the
front of the car and support it on axle stands
(see “Jacking and Vehicle Support” ). Remove
the appropriate front roadwheel.
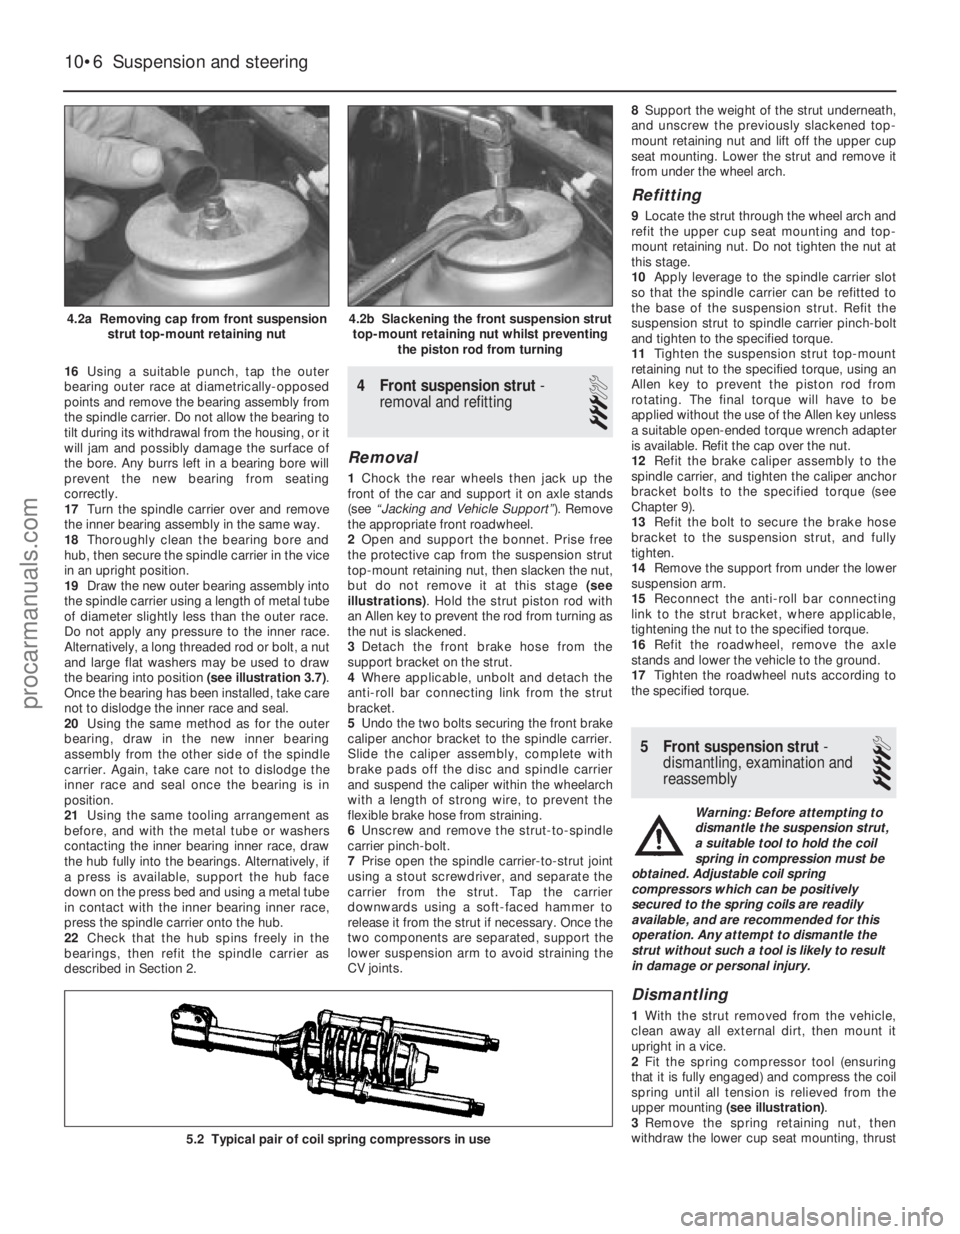
2 Open and support the bonnet. Prise free
the protective cap from the suspension strut
top-mount retaining nut, then slacken the nut,
but do not remove it at this stage (see
illustrations) . Hold the strut piston rod with
an Allen key to prevent the rod from turning as
the nut is slackened.
3 Detach the front brake hose from the
support bracket on the strut.
4 Where applicable, unbolt and detach the
anti-roll bar connecting link from the strut
bracket.
5 Undo the two bolts securing the front brake
caliper anchor bracket to the spindle carrier.
Slide the caliper assembly, complete with
brake pads off the disc and spindle carrier
and suspend the caliper within the wheelarch
with a length of strong wire, to prevent the
flexible brake hose from straining.
6 Unscrew and remove the strut-to-spindle
carrier pinch-bolt.
7 Prise open the spindle carrier-to-strut joint
using a stout screwdriver, and separate the
carrier from the strut. Tap the carrier
downwards using a soft-faced hammer to
release it from the strut if necessary. Once the
two components are separated, support the
lower suspension arm to avoid straining the
CV joints. 8
Support the weight of the strut underneath,
and unscrew the previously slackened top-
mount retaining nut and lift off the upper cup
seat mounting. Lower the strut and remove it
from under the wheel arch.
Refitting
9 Locate the strut through the wheel arch and
refit the upper cup seat mounting and top-
mount retaining nut. Do not tighten the nut at
this stage.
10 Apply leverage to the spindle carrier slot
so that the spindle carrier can be refitted to
the base of the suspension strut. Refit the
suspension strut to spindle carrier pinch-bolt
and tighten to the specified torque.
11 Tighten the suspension strut top-mount
retaining nut to the specified torque, using an
Allen key to prevent the piston rod from
rotating. The final torque will have to be
applied without the use of the Allen key unless
a suitable open-ended torque wrench adapter
is available. Refit the cap over the nut.
12 Refit the brake caliper assembly to the
spindle carrier, and tighten the caliper anchor
bracket bolts to the specified torque (see
Chapter 9).
13 Refit the bolt to secure the brake hose
bracket to the suspension strut, and fully
tighten.
14 Remove the support from under the lower
suspension arm.
15 Reconnect the anti-roll bar connecting
link to the strut bracket, where applicable,
tightening the nut to the specified torque.
16 Refit the roadwheel, remove the axle
stands and lower the vehicle to the ground.
17 Tighten the roadwheel nuts according to
the specified torque.
5 Front suspension strut -
dismantling, examination and
reassembly
4
Warning: Before attempting to
dismantle the suspension strut,
a suitable tool to hold the coil
spring in compression must be
obtained. Adjustable coil spring
compressors which can be positively
secured to the spring coils are readily
available, and are recommended for this
operation. Any attempt to dismantle the
strut without such a tool is likely to result
in damage or personal injury.
Dismantling
1 With the strut removed from the vehicle,
clean away all external dirt, then mount it
upright in a vice.
2 Fit the spring compressor tool (ensuring
that it is fully engaged) and compress the coil
spring until all tension is relieved from the
upper mounting (see illustration) .
3 Remove the spring retaining nut, then
withdraw the lower cup seat mounting, thrust
10•6 Suspension and steering
5.2 Typical pair of coil spring compressors in use
4.2b Slackening the front suspension strut
top-mount retaining nut whilst preventing the piston rod from turning4.2a Removing cap from front suspensionstrut top-mount retaining nut
1595Ford Fiesta Remakeprocarmanuals.com
http://vnx.su
Page 202 of 296
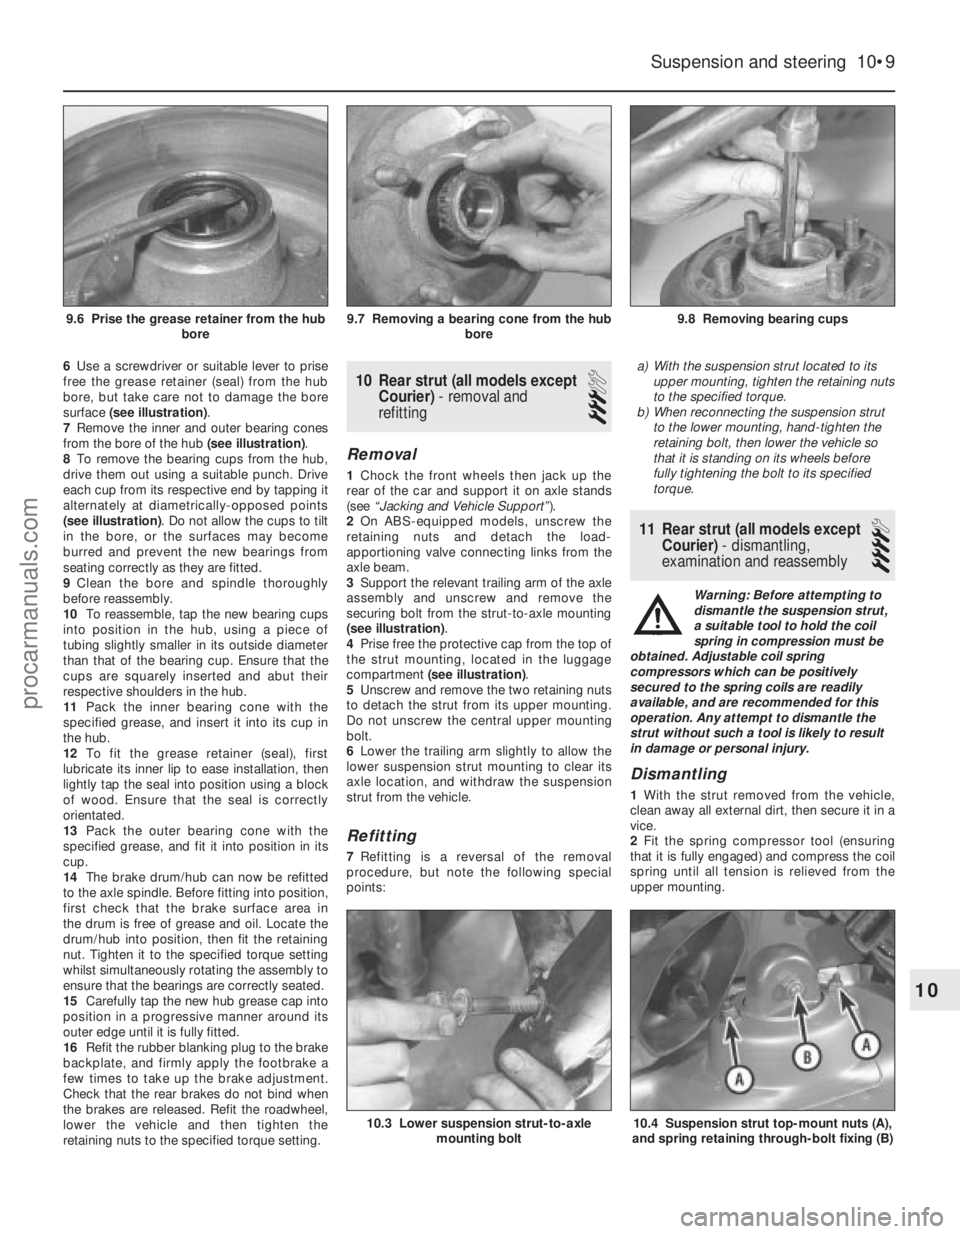
6Use a screwdriver or suitable lever to prise
free the grease retainer (seal) from the hub
bore, but take care not to damage the bore
surface (see illustration) .
7 Remove the inner and outer bearing cones
from the bore of the hub (see illustration).
8 To remove the bearing cups from the hub,
drive them out using a suitable punch. Drive
each cup from its respective end by tapping it
alternately at diametrically-opposed points
(see illustration) . Do not allow the cups to tilt
in the bore, or the surfaces may become
burred and prevent the new bearings from
seating correctly as they are fitted.
9 Clean the bore and spindle thoroughly
before reassembly.
10 To reassemble, tap the new bearing cups
into position in the hub, using a piece of
tubing slightly smaller in its outside diameter
than that of the bearing cup. Ensure that the
cups are squarely inserted and abut their
respective shoulders in the hub.
11 Pack the inner bearing cone with the
specified grease, and insert it into its cup in
the hub.
12 To fit the grease retainer (seal), first
lubricate its inner lip to ease installation, then
lightly tap the seal into position using a block
of wood. Ensure that the seal is correctly
orientated.
13 Pack the outer bearing cone with the
specified grease, and fit it into position in its
cup.
14 The brake drum/hub can now be refitted
to the axle spindle. Before fitting into position,
first check that the brake surface area in
the drum is free of grease and oil. Locate the
drum/hub into position, then fit the retaining
nut. Tighten it to the specified torque setting
whilst simultaneously rotating the assembly to
ensure that the bearings are correctly seated.
15 Carefully tap the new hub grease cap into
position in a progressive manner around its
outer edge until it is fully fitted.
16 Refit the rubber blanking plug to the brake
backplate, and firmly apply the footbrake a
few times to take up the brake adjustment.
Check that the rear brakes do not bind when
the brakes are released. Refit the roadwheel,
lower the vehicle and then tighten the
retaining nuts to the specified torque setting.10 Rear strut (all models except Courier) - removal and
refitting
3
Removal
1 Chock the front wheels then jack up the
rear of the car and support it on axle stands
(see “Jacking and Vehicle Support” ).
2 On ABS-equipped models, unscrew the
retaining nuts and detach the load-
apportioning valve connecting links from the
axle beam.
3 Support the relevant trailing arm of the axle
assembly and unscrew and remove the
securing bolt from the strut-to-axle mounting
(see illustration) .
4 Prise free the protective cap from the top of
the strut mounting, located in the luggage
compartment (see illustration) .
5 Unscrew and remove the two retaining nuts
to detach the strut from its upper mounting.
Do not unscrew the central upper mounting
bolt.
6 Lower the trailing arm slightly to allow the
lower suspension strut mounting to clear its
axle location, and withdraw the suspension
strut from the vehicle.
Refitting
7 Refitting is a reversal of the removal
procedure, but note the following special
points: a)
With the suspension strut located to its
upper mounting, tighten the retaining nuts
to the specified torque.
b) When reconnecting the suspension strut
to the lower mounting, hand-tighten the
retaining bolt, then lower the vehicle so
that it is standing on its wheels before
fully tightening the bolt to its specified
torque.
11 Rear strut (all models except
Courier) - dismantling,
examination and reassembly
4
Warning: Before attempting to
dismantle the suspension strut,
a suitable tool to hold the coil
spring in compression must be
obtained. Adjustable coil spring
compressors which can be positively
secured to the spring coils are readily
available, and are recommended for this
operation. Any attempt to dismantle the
strut without such a tool is likely to result
in damage or personal injury.
Dismantling
1 With the strut removed from the vehicle,
clean away all external dirt, then secure it in a
vice.
2 Fit the spring compressor tool (ensuring
that it is fully engaged) and compress the coil
spring until all tension is relieved from the
upper mounting.
Suspension and steering 10•9
9.8 Removing bearing cups9.7 Removing a bearing cone from the hub bore9.6 Prise the grease retainer from the hubbore
10.4 Suspension strut top-mount nuts (A),
and spring retaining through-bolt fixing (B)10.3 Lower suspension strut-to-axle mounting bolt
10
1595Ford Fiesta Remakeprocarmanuals.com
http://vnx.su
Page 205 of 296
mountings for signs of wear. Test the
operation of the unit, holding it in an upright
position, by moving the piston through a full
stroke, and then through short strokes of 50
to 100 mm. In both cases, the resistance felt
should be smooth and continuous. If the
resistance is jerky, or uneven, or if there is any
visible sign of wear or damage, the shock
absorber should be renewed. Note that if
either unit is to be renewed, it is good practice
to renew both together as a matched pair.
Refitting
4Locate the unit in position and refit the
mounting bolts and nut. Do not fully tighten
the mountings at this stage.
5 Lower the vehicle to the ground and rock it
to settle the suspension. Raise the vehicle
again, as necessary, until the shock absorber
is at an angle of 50° ± 5° to the horizontal.
With the shock absorber in this position,
tighten the upper and lower mountings to the
specified torque.
17 Rear suspension assembly (Courier models) -
removal and refitting
3
Removal
1 Chock the front wheels then jack up the
rear of the car and support it on axle stands
(see “Jacking and Vehicle Support” ). Remove
the rear roadwheels.
2 Refer to Chapter 9 for details, and
disconnect the handbrake cable equaliser
from the primary cable. Remove the
handbrake rear cable from its adjuster and its
fixed body locations. Release the exhaust
system mountings as necessary to allow the
handbrake cable to be withdrawn over the
rear of the exhaust.
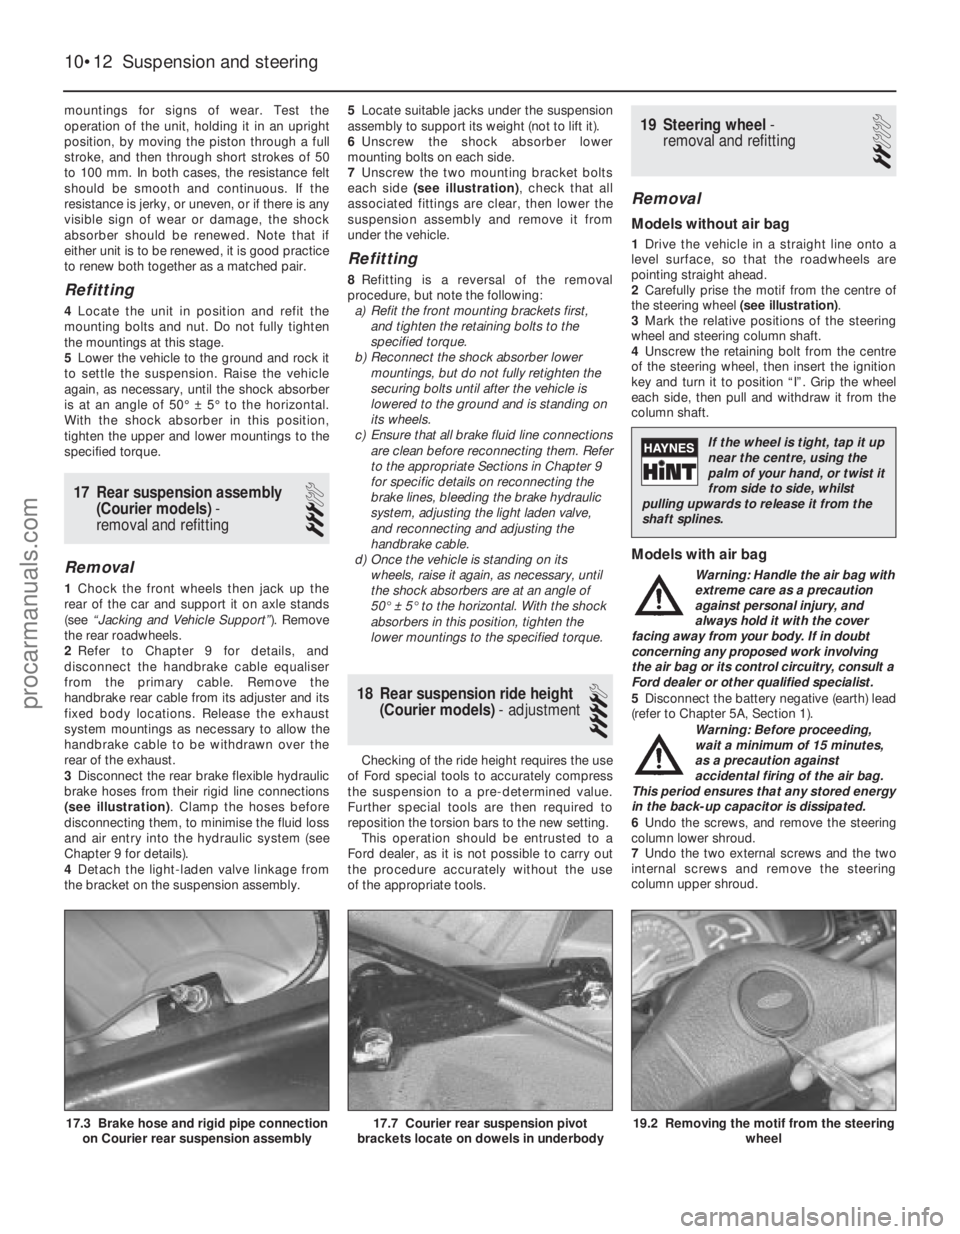
3 Disconnect the rear brake flexible hydraulic
brake hoses from their rigid line connections
(see illustration) . Clamp the hoses before
disconnecting them, to minimise the fluid loss
and air entry into the hydraulic system (see
Chapter 9 for details).
4 Detach the light-laden valve linkage from
the bracket on the suspension assembly. 5
Locate suitable jacks under the suspension
assembly to support its weight (not to lift it).
6 Unscrew the shock absorber lower
mounting bolts on each side.
7 Unscrew the two mounting bracket bolts
each side (see illustration) , check that all
associated fittings are clear, then lower the
suspension assembly and remove it from
under the vehicle.
Refitting
8 Refitting is a reversal of the removal
procedure, but note the following: a) Refit the front mounting brackets first,
and tighten the retaining bolts to the
specified torque.
b) Reconnect the shock absorber lower
mountings, but do not fully retighten the
securing bolts until after the vehicle is
lowered to the ground and is standing on
its wheels.
c) Ensure that all brake fluid line connections are clean before reconnecting them. Refer
to the appropriate Sections in Chapter 9
for specific details on reconnecting the
brake lines, bleeding the brake hydraulic
system, adjusting the light laden valve,
and reconnecting and adjusting the
handbrake cable.
d) Once the vehicle is standing on its
wheels, raise it again, as necessary, until
the shock absorbers are at an angle of
50° ± 5° to the horizontal. With the shock
absorbers in this position, tighten the
lower mountings to the specified torque.
18 Rear suspension ride height (Courier models) - adjustment
4
Checking of the ride height requires the use
of Ford special tools to accurately compress
the suspension to a pre-determined value.
Further special tools are then required to
reposition the torsion bars to the new setting.
This operation should be entrusted to a
Ford dealer, as it is not possible to carry out
the procedure accurately without the use
of the appropriate tools.
19 Steering wheel -
removal and refitting
2
Removal
Models without air bag
1 Drive the vehicle in a straight line onto a
level surface, so that the roadwheels are
pointing straight ahead.
2 Carefully prise the motif from the centre of
the steering wheel (see illustration).
3 Mark the relative positions of the steering
wheel and steering column shaft.
4 Unscrew the retaining bolt from the centre
of the steering wheel, then insert the ignition
key and turn it to position “I”. Grip the wheel
each side, then pull and withdraw it from the
column shaft.
Models with air bag
Warning: Handle the air bag with
extreme care as a precaution
against personal injury, and
always hold it with the cover
facing away from your body. If in doubt
concerning any proposed work involving
the air bag or its control circuitry, consult a
Ford dealer or other qualified specialist.
5 Disconnect the battery negative (earth) lead
(refer to Chapter 5A, Section 1).
Warning: Before proceeding,
wait a minimum of 15 minutes,
as a precaution against
accidental firing of the air bag.
This period ensures that any stored energy
in the back-up capacitor is dissipated.
6 Undo the screws, and remove the steering
column lower shroud.
7 Undo the two external screws and the two
internal screws and remove the steering
column upper shroud.
10•12 Suspension and steering
19.2 Removing the motif from the steering wheel17.7 Courier rear suspension pivot
brackets locate on dowels in underbody17.3 Brake hose and rigid pipe connection on Courier rear suspension assembly
1595Ford Fiesta Remake
If the wheel is tight, tap it up
near the centre, using the
palm of your hand, or twist it
from side to side, whilst
pulling upwards to release it from the
shaft splines.
procarmanuals.com
http://vnx.su