engine oil FORD FIESTA 1989 Service Workshop Manual
[x] Cancel search | Manufacturer: FORD, Model Year: 1989, Model line: FIESTA, Model: FORD FIESTA 1989Pages: 296, PDF Size: 10.65 MB
Page 66 of 296
the transmission are absolutely clean and
flat. Any shims found on removal of the
sump must be refitted in their original
locations.
b) Apply a thin film of suitable sealant (Ford
recommend Hylosil 102) to the junctions
of the cylinder block/crankcase with the
oil pump and the crankshaft left-hand oil
seal carrier. Without delay - the sump
bolts must be fully tightened within 10 to
20 minutes of applying the sealant - offer
up the sump and engine/transmission
lower adapter plate, and refit the bolts,
tightening them lightly at first.
c) Ensuring that the engine/transmission
lower adapter plate is correctly located,
firmly press the sump against the
transmission, and tighten the
transmission-to-sump (ie, engine) bolts to
the specified torque wrench setting.
d) Without disturbing the position of the
sump, and working in a diagonal
sequence from the centre outwards,
tighten the sump bolts to the specified
torque wrench setting.
e) Proceed to paragraph 14.
13 If the sump is being refitted with the
engine and transmission separated (in or out
of the vehicle), proceed as follows:
a) Apply a thin film of suitable sealant (Ford recommend Hylosil 102) to the junctions
of the cylinder block/crankcase with the
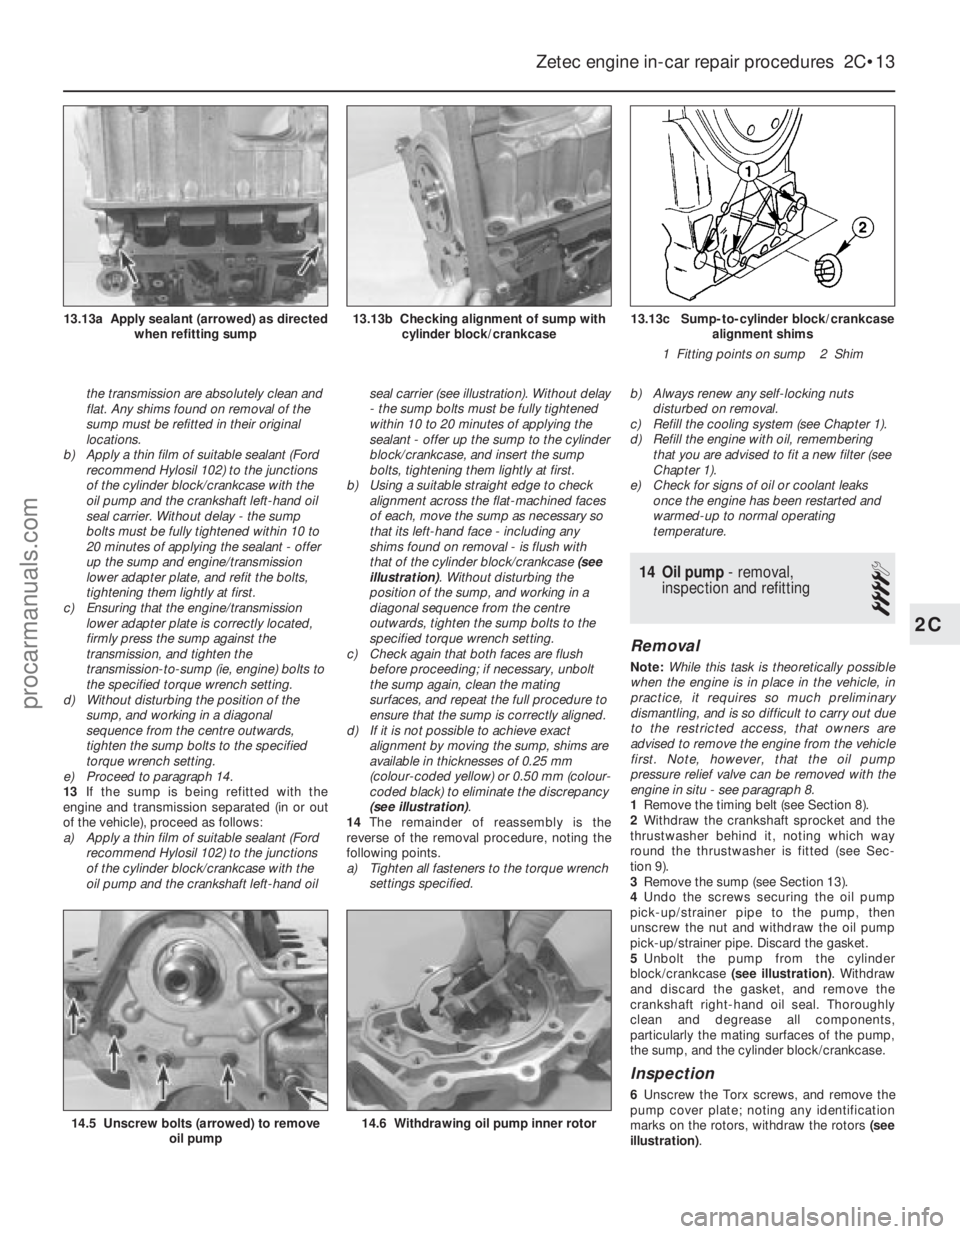
oil pump and the crankshaft left-hand oil seal carrier (see illustration). Without delay
- the sump bolts must be fully tightened
within 10 to 20 minutes of applying the
sealant - offer up the sump to the cylinder
block/crankcase, and insert the sump
bolts, tightening them lightly at first.
b) Using a suitable straight edge to check
alignment across the flat-machined faces
of each, move the sump as necessary so
that its left-hand face - including any
shims found on removal - is flush with
that of the cylinder block/crankcase (see
illustration) . Without disturbing the
position of the sump, and working in a
diagonal sequence from the centre
outwards, tighten the sump bolts to the
specified torque wrench setting.
c) Check again that both faces are flush
before proceeding; if necessary, unbolt
the sump again, clean the mating
surfaces, and repeat the full procedure to
ensure that the sump is correctly aligned.
d) If it is not possible to achieve exact
alignment by moving the sump, shims are
available in thicknesses of 0.25 mm
(colour-coded yellow) or 0.50 mm (colour-
coded black) to eliminate the discrepancy
(see illustration) .
14 The remainder of reassembly is the
reverse of the removal procedure, noting the
following points.
a) Tighten all fasteners to the torque wrench settings specified. b)
Always renew any self-locking nuts
disturbed on removal.
c) Refill the cooling system (see Chapter 1).
d) Refill the engine with oil, remembering
that you are advised to fit a new filter (see
Chapter 1).
e) Check for signs of oil or coolant leaks once the engine has been restarted and
warmed-up to normal operating
temperature.
14 Oil pump - removal,
inspection and refitting
4
Removal
Note: While this task is theoretically possible
when the engine is in place in the vehicle, in
practice, it requires so much preliminary
dismantling, and is so difficult to carry out due
to the restricted access, that owners are
advised to remove the engine from the vehicle
first. Note, however, that the oil pump
pressure relief valve can be removed with the
engine in situ - see paragraph 8.
1 Remove the timing belt (see Section 8).
2 Withdraw the crankshaft sprocket and the
thrustwasher behind it, noting which way
round the thrustwasher is fitted (see Sec-
tion 9).
3 Remove the sump (see Section 13).
4 Undo the screws securing the oil pump
pick-up/strainer pipe to the pump, then
unscrew the nut and withdraw the oil pump
pick-up/strainer pipe. Discard the gasket.
5 Unbolt the pump from the cylinder
block/crankcase (see illustration). Withdraw
and discard the gasket, and remove the
crankshaft right-hand oil seal. Thoroughly
clean and degrease all components,
particularly the mating surfaces of the pump,
the sump, and the cylinder block/crankcase.
Inspection
6 Unscrew the Torx screws, and remove the
pump cover plate; noting any identification
marks on the rotors, withdraw the rotors (see
illustration) .
Zetec engine in-car repair procedures 2C•13
13.13c Sump-to-cylinder block/crankcase
alignment shims
1 Fitting points on sump 2 Shim13.13b Checking alignment of sump with cylinder block/crankcase13.13a Apply sealant (arrowed) as directed when refitting sump
14.6 Withdrawing oil pump inner rotor14.5 Unscrew bolts (arrowed) to remove oil pump
2C
1595Ford Fiesta Remakeprocarmanuals.com
http://vnx.su
Page 67 of 296

7Inspect the rotors for obvious signs of wear
or damage, and renew if necessary; if either
rotor, the pump body, or its cover plate are
scored or damaged, the complete oil pump
assembly must be renewed.
8 The oil pressure relief valve can be
dismantled, if required, without disturbing the
pump. Chock the rear wheels then jack up the
front of the car and support it on axle stands
(see “Jacking and Vehicle Support” ). Remove
the front right-hand roadwheel and auxiliary
drivebelt cover (see Chapter 1) to provide
access to the valve.
9 Unscrew the threaded plug, and recover
the valve spring and plunger (see
illustrations) . If the plug’s sealing O-ring is
worn or damaged, a new one must be
obtained, to be fitted on reassembly.
10 Reassembly is the reverse of the dismantling procedure; ensure the spring and
valve are refitted the correct way round, and
tighten the threaded plug securely.
Refitting
11
The oil pump must be primed on
installation, by pouring clean engine oil into it,
and rotating its inner rotor a few turns.
12 Using grease to stick the new gasket in
place on the cylinder block/crankcase, and
rotating the pump’s inner rotor to align with
the flats on the crankshaft, refit the pump and
insert the bolts, tightening them lightly at first
(see illustration) .
13 Using a suitable straight edge and feeler
gauges, check that the pump is both centred
exactly around the crankshaft, and aligned
squarely so that its (sump) mating surface is
exactly the same amount - between 0.3 and
0.8 mm - below that of the cylinder
block/crankcase on each side of the
crankshaft (see illustration) . Being careful
not to disturb the gasket, move the pump into
the correct position, and tighten its bolts
to the specified torque wrench setting.
14 Check that the pump is correctly located;
if necessary, unbolt it again, and repeat the
full procedure to ensure that the pump is
correctly aligned.
15 Fit a new crankshaft right-hand oil seal
(see Section 15).
16 Using grease to stick the gasket in place
on the pump, refit the pick-up/strainer pipe,
tightening its screws and nut to their specified
torque wrench settings (see illustration).17
The remainder of reassembly is the
reverse of the removal procedure, referring to
the relevant text for details where required.15 Crankshaft oil seals -
renewal
4
Note: Don’t try to prise these seals out without
removing the oil pump or seal carrier - the
seals are too soft, and the amount of space
available is too small, for this to be possible
without considerable risk of damage to the seal
housing and/or the crankshaft journal. Follow
exactly the procedure given below.
Right-hand seal
1 Remove the oil pump (see Section 14).
2 Drive the oil seal out of the pump from
behind (see illustration) .
3 Clean the seal housing and crankshaft,
polishing off any burrs or raised edges, which
may have caused the seal to fail in the first
place.
4 Refit the oil pump (see Section 14). Grease
the lips and periphery of the new seal, to ease
installation.
5 To fit a new seal, Ford recommend the use
of their service tool 21-093A, with the
crankshaft pulley bolt, to draw the seal into
place; an alternative can be arranged using a
socket of suitable size, with a washer to
match the crankshaft pulley bolt (see
illustration) .
2C•14Zetec engine in-car repair procedures
15.5 Socket of correct size can be used to
replace Ford service tool, drawing new
seal into place as described15.2 Driving out crankshaft right-hand oil seal14.16 Use new gasket when refitting oilpick-up pipe to pump
14.13 Oil pump must be positioned accurately
14.12 Use new gasket when refitting oil pump14.9b . . . to withdraw oil pressure reliefvalve spring and plunger14.9a Unscrew threaded plug - seenthrough right-hand wheel arch . . .
1595Ford Fiesta Remakeprocarmanuals.com
http://vnx.su
Page 68 of 296
6If such tools are not available, press the
seal squarely into place by hand; tap it in until
it is flush with the pump housing, using a soft-
faced mallet and a socket with an outside
diameter only slightly smaller than the seal’s
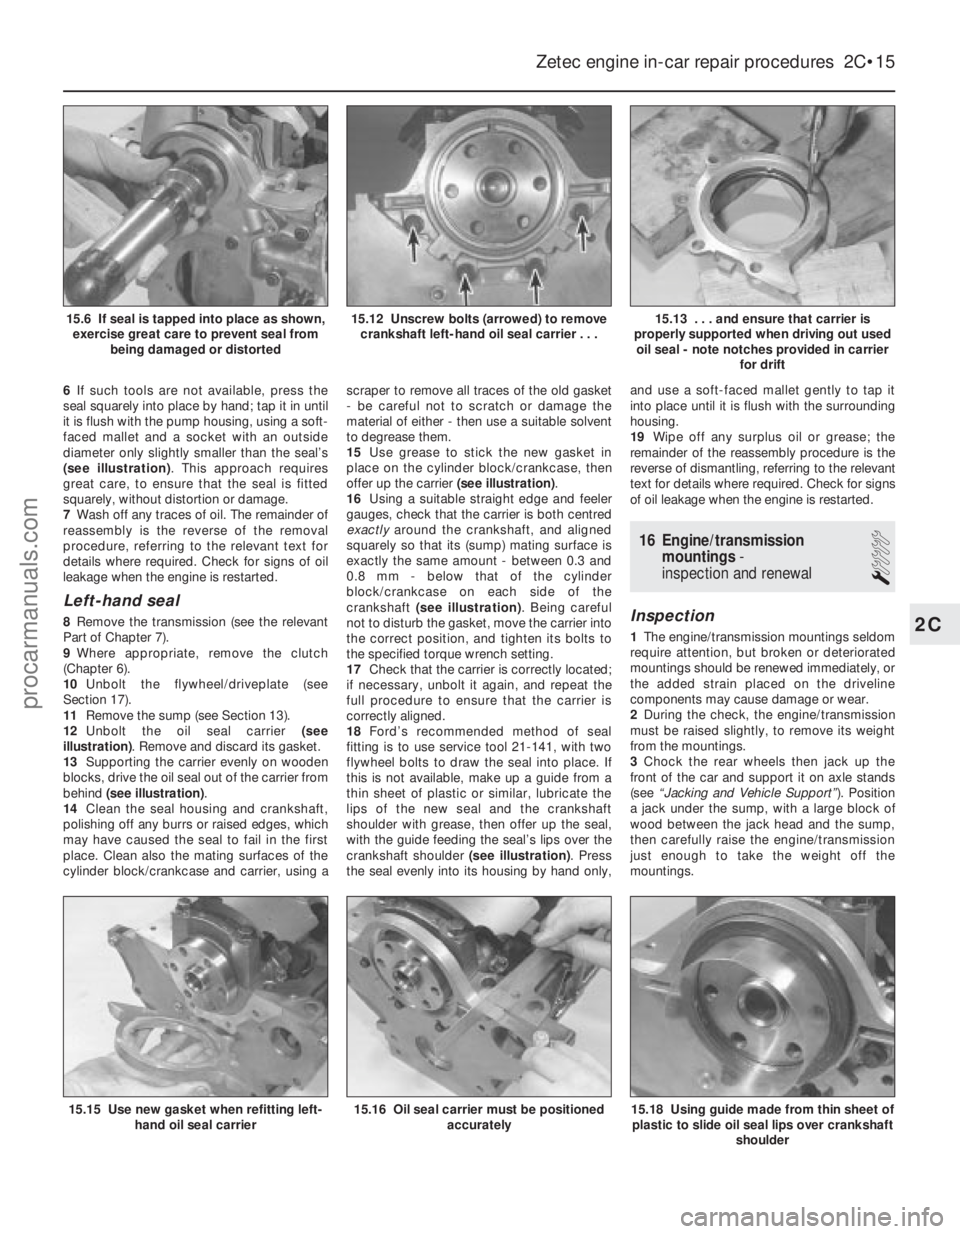
(see illustration) . This approach requires
great care, to ensure that the seal is fitted
squarely, without distortion or damage.
7 Wash off any traces of oil. The remainder of
reassembly is the reverse of the removal
procedure, referring to the relevant text for
details where required. Check for signs of oil
leakage when the engine is restarted.
Left-hand seal
8 Remove the transmission (see the relevant
Part of Chapter 7).
9 Where appropriate, remove the clutch
(Chapter 6).
10 Unbolt the flywheel/driveplate (see
Section 17).
11 Remove the sump (see Section 13).
12 Unbolt the oil seal carrier (see
illustration) . Remove and discard its gasket.
13 Supporting the carrier evenly on wooden
blocks, drive the oil seal out of the carrier from
behind (see illustration) .
14 Clean the seal housing and crankshaft,
polishing off any burrs or raised edges, which
may have caused the seal to fail in the first
place. Clean also the mating surfaces of the
cylinder block/crankcase and carrier, using a scraper to remove all traces of the old gasket
- be careful not to scratch or damage the
material of either - then use a suitable solvent
to degrease them.
15
Use grease to stick the new gasket in
place on the cylinder block/crankcase, then
offer up the carrier (see illustration).
16 Using a suitable straight edge and feeler
gauges, check that the carrier is both centred
exactly around the crankshaft, and aligned
squarely so that its (sump) mating surface is
exactly the same amount - between 0.3 and
0.8 mm - below that of the cylinder
block/crankcase on each side of the
crankshaft (see illustration) . Being careful
not to disturb the gasket, move the carrier into
the correct position, and tighten its bolts to
the specified torque wrench setting.
17 Check that the carrier is correctly located;
if necessary, unbolt it again, and repeat the
full procedure to ensure that the carrier is
correctly aligned.
18 Ford’s recommended method of seal
fitting is to use service tool 21-141, with two
flywheel bolts to draw the seal into place. If
this is not available, make up a guide from a
thin sheet of plastic or similar, lubricate the
lips of the new seal and the crankshaft
shoulder with grease, then offer up the seal,
with the guide feeding the seal’s lips over the
crankshaft shoulder (see illustration) . Press
the seal evenly into its housing by hand only, and use a soft-faced mallet gently to tap it
into place until it is flush with the surrounding
housing.
19
Wipe off any surplus oil or grease; the
remainder of the reassembly procedure is the
reverse of dismantling, referring to the relevant
text for details where required. Check for signs
of oil leakage when the engine is restarted.
16 Engine/transmission mountings -
inspection and renewal
1
Inspection
1 The engine/transmission mountings seldom
require attention, but broken or deteriorated
mountings should be renewed immediately, or
the added strain placed on the driveline
components may cause damage or wear.
2 During the check, the engine/transmission
must be raised slightly, to remove its weight
from the mountings.
3 Chock the rear wheels then jack up the
front of the car and support it on axle stands
(see “Jacking and Vehicle Support” ). Position
a jack under the sump, with a large block of
wood between the jack head and the sump,
then carefully raise the engine/transmission
just enough to take the weight off the
mountings.
Zetec engine in-car repair procedures 2C•15
15.13 . . . and ensure that carrier is
properly supported when driving out used oil seal - note notches provided in carrier for drift15.12 Unscrew bolts (arrowed) to removecrankshaft left-hand oil seal carrier . . .15.6 If seal is tapped into place as shown,exercise great care to prevent seal from being damaged or distorted
15.18 Using guide made from thin sheet ofplastic to slide oil seal lips over crankshaft
shoulder15.16 Oil seal carrier must be positionedaccurately15.15 Use new gasket when refitting left-hand oil seal carrier
2C
1595Ford Fiesta Remakeprocarmanuals.com
http://vnx.su
Page 69 of 296
4Check the mountings to see if the rubber is
cracked, hardened or separated from the
metal components. Sometimes, the rubber
will split right down the centre.
5 Check for relative movement between each
mounting’s brackets and the engine/
transmission or body (use a large screwdriver
or lever to attempt to move the mountings). If
movement is noted, lower the engine and
check-tighten the mounting fasteners.
Renewal
6 The engine mountings can be removed if
the weight of the engine/transmission is
supported by one of the following alternative
methods.
7 Either support the weight of the assembly
from underneath using a jack and a suitable
piece of wood between the jack saddle and
the sump or transmission (to prevent
damage), or from above by attaching a hoist
to the engine. A third method is to use a
suitable support bar with end pieces which
will engage in the water channel each side of
the bonnet lid aperture. Using an adjustable
hook and chain connected to the engine, the
weight of the engine and transmission can
then be taken from the mountings.
Engine front right-hand mounting
8 This mounting consists of a two-piece
bracket bolted to the inner wing panel,
connected by the bonded-rubber mounting
itself to a (Y-shaped) bracket, bolted (via the
alternator mounting bracket) to the cylinder
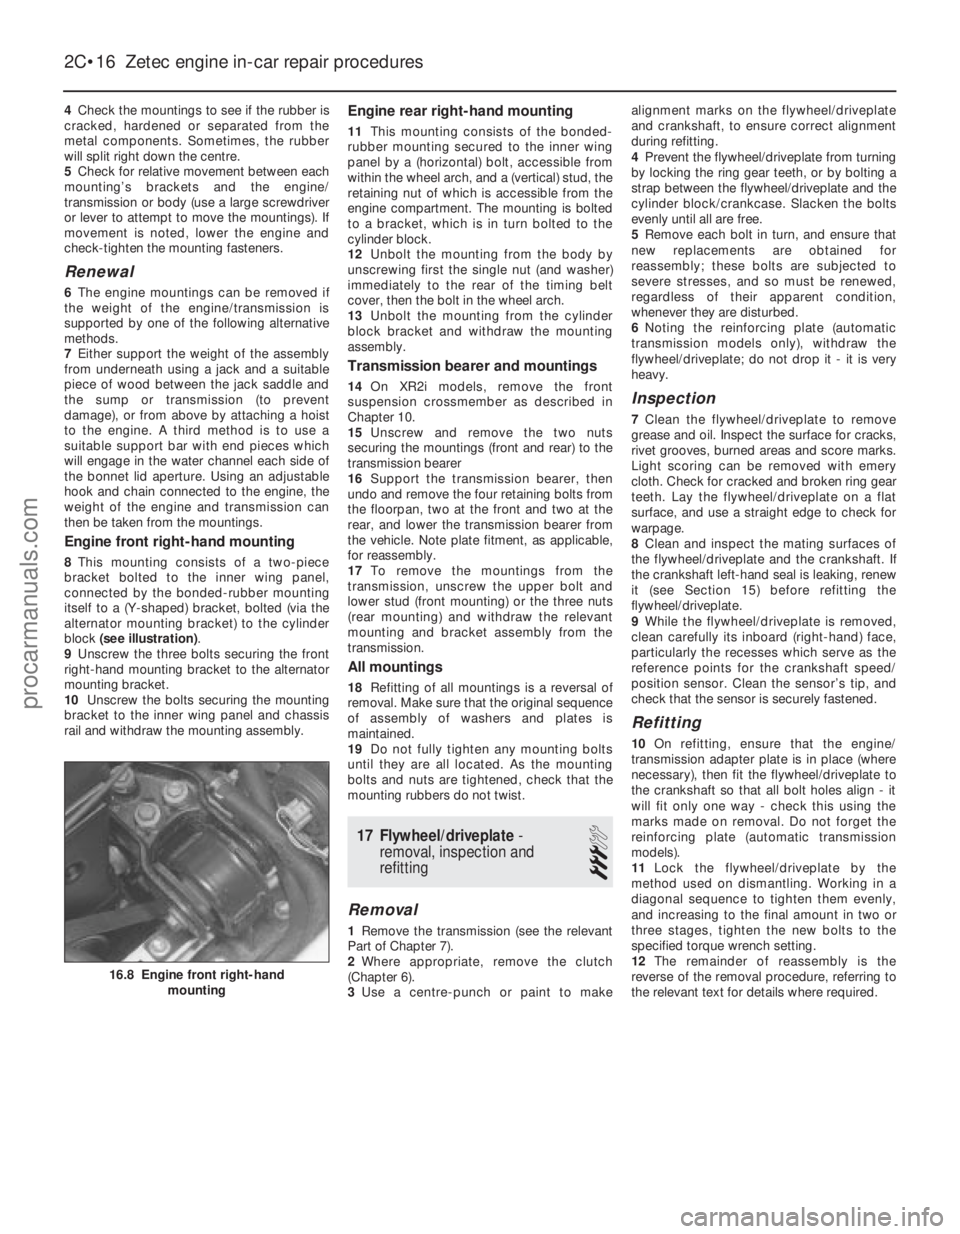
block (see illustration) .
9 Unscrew the three bolts securing the front
right-hand mounting bracket to the alternator
mounting bracket.
10 Unscrew the bolts securing the mounting
bracket to the inner wing panel and chassis
rail and withdraw the mounting assembly.
Engine rear right-hand mounting
11 This mounting consists of the bonded-
rubber mounting secured to the inner wing
panel by a (horizontal) bolt, accessible from
within the wheel arch, and a (vertical) stud, the
retaining nut of which is accessible from the
engine compartment. The mounting is bolted
to a bracket, which is in turn bolted to the
cylinder block.
12 Unbolt the mounting from the body by
unscrewing first the single nut (and washer)
immediately to the rear of the timing belt
cover, then the bolt in the wheel arch.
13 Unbolt the mounting from the cylinder
block bracket and withdraw the mounting
assembly.
Transmission bearer and mountings
14 On XR2i models, remove the front
suspension crossmember as described in
Chapter 10.
15 Unscrew and remove the two nuts
securing the mountings (front and rear) to the
transmission bearer
16 Support the transmission bearer, then
undo and remove the four retaining bolts from
the floorpan, two at the front and two at the
rear, and lower the transmission bearer from
the vehicle. Note plate fitment, as applicable,
for reassembly.
17 To remove the mountings from the
transmission, unscrew the upper bolt and
lower stud (front mounting) or the three nuts
(rear mounting) and withdraw the relevant
mounting and bracket assembly from the
transmission.
All mountings
18 Refitting of all mountings is a reversal of
removal. Make sure that the original sequence
of assembly of washers and plates is
maintained.
19 Do not fully tighten any mounting bolts
until they are all located. As the mounting
bolts and nuts are tightened, check that the
mounting rubbers do not twist.
17 Flywheel/driveplate -
removal, inspection and
refitting
3
Removal
1 Remove the transmission (see the relevant
Part of Chapter 7).
2 Where appropriate, remove the clutch
(Chapter 6).
3 Use a centre-punch or paint to make alignment marks on the flywheel/driveplate
and crankshaft, to ensure correct alignment
during refitting.
4
Prevent the flywheel/driveplate from turning
by locking the ring gear teeth, or by bolting a
strap between the flywheel/driveplate and the
cylinder block/crankcase. Slacken the bolts
evenly until all are free.
5 Remove each bolt in turn, and ensure that
new replacements are obtained for
reassembly; these bolts are subjected to
severe stresses, and so must be renewed,
regardless of their apparent condition,
whenever they are disturbed.
6 Noting the reinforcing plate (automatic
transmission models only), withdraw the
flywheel/driveplate; do not drop it - it is very
heavy.
Inspection
7 Clean the flywheel/driveplate to remove
grease and oil. Inspect the surface for cracks,
rivet grooves, burned areas and score marks.
Light scoring can be removed with emery
cloth. Check for cracked and broken ring gear
teeth. Lay the flywheel/driveplate on a flat
surface, and use a straight edge to check for
warpage.
8 Clean and inspect the mating surfaces of
the flywheel/driveplate and the crankshaft. If
the crankshaft left-hand seal is leaking, renew
it (see Section 15) before refitting the
flywheel/driveplate.
9 While the flywheel/driveplate is removed,
clean carefully its inboard (right-hand) face,
particularly the recesses which serve as the
reference points for the crankshaft speed/
position sensor. Clean the sensor’s tip, and
check that the sensor is securely fastened.
Refitting
10 On refitting, ensure that the engine/
transmission adapter plate is in place (where
necessary), then fit the flywheel/driveplate to
the crankshaft so that all bolt holes align - it
will fit only one way - check this using the
marks made on removal. Do not forget the
reinforcing plate (automatic transmission
models).
11 Lock the flywheel/driveplate by the
method used on dismantling. Working in a
diagonal sequence to tighten them evenly,
and increasing to the final amount in two or
three stages, tighten the new bolts to the
specified torque wrench setting.
12 The remainder of reassembly is the
reverse of the removal procedure, referring to
the relevant text for details where required.
2C•16 Zetec engine in-car repair procedures
16.8 Engine front right-hand mounting
1595Ford Fiesta Remakeprocarmanuals.com
http://vnx.su
Page 71 of 296
Pistons and piston rings
Piston diameter:1.0 and 1.1 litre engines:
Standard class 1 (or A) . . . . . . . . . . . . . . . . . . . . . . . . . . . . . . . . . . 68.65 to 68.66 mm
Standard class 2 (or B) . . . . . . . . . . . . . . . . . . . . . . . . . . . . . . . . . . 68.66 to 68.67 mm
Standard class 3 (or C) . . . . . . . . . . . . . . . . . . . . . . . . . . . . . . . . . . 68.67 to 68.68 mm
Standard (service) . . . . . . . . . . . . . . . . . . . . . . . . . . . . . . . . . . . .\
. . 68.67 to 68.70 mm
Oversize 0.5 mm . . . . . . . . . . . . . . . . . . . . . . . . . . . . . . . . . . . .\
. . . 69.16 to 69.19 mm
Oversize 1.0 mm . . . . . . . . . . . . . . . . . . . . . . . . . . . . . . . . . . . .\
. . . 69.66 to 69.69 mm
1.3 litre engines:
Standard class 1 . . . . . . . . . . . . . . . . . . . . . . . . . . . . . . . . . . . .\
. . . 73.91 to 73.92 mm
Standard class 2 . . . . . . . . . . . . . . . . . . . . . . . . . . . . . . . . . . . .\
. . . 73.92 to 73.93 mm
Standard class 3 . . . . . . . . . . . . . . . . . . . . . . . . . . . . . . . . . . . .\
. . . 73.93 to 73.94 mm
Oversize 0.5 mm . . . . . . . . . . . . . . . . . . . . . . . . . . . . . . . . . . . .\
. . . 74.46 to 74.49 mm
Oversize 1.0 mm . . . . . . . . . . . . . . . . . . . . . . . . . . . . . . . . . . . .\
. . . 74.96 to 74.99 mm
Piston-to-cylinder bore clearance . . . . . . . . . . . . . . . . . . . . . . . . . . . . . 0.015 to 0.050 mm
Piston ring end gap - installed: Top compression ring . . . . . . . . . . . . . . . . . . . . . . . . . . . . . . . . . . . .\
. 0.25 to 0.45 mmSecond compression ring: 1.0 and 1.1 litre engines . . . . . . . . . . . . . . . . . . . . . . . . . . . . . . . . . 0.25 to 0.45 mm
1.3 litre engines . . . . . . . . . . . . . . . . . . . . . . . . . . . . . . . . . . . .\
. . . . 0.45 to 0.75 mm
Oil control ring . . . . . . . . . . . . . . . . . . . . . . . . . . . . . . . . . . . .\
. . . . . . 0.20 to 0.40 mm
Piston ring-to-groove clearance: Compression rings . . . . . . . . . . . . . . . . . . . . . . . . . . . . . . . . . . . .\
. . . 0.20 mm (maximum)
Oil control ring . . . . . . . . . . . . . . . . . . . . . . . . . . . . . . . . . . . .\
. . . . . . 0.10 mm (maximum)
Ring gap position: Top compression ring . . . . . . . . . . . . . . . . . . . . . . . . . . . . . . . . . . . .\
. Offset 180º from oil control ring gap
Second compression ring . . . . . . . . . . . . . . . . . . . . . . . . . . . . . . . . . . Offset 90º from oil control ring gap
Oil control ring . . . . . . . . . . . . . . . . . . . . . . . . . . . . . . . . . . . .\
. . . . . . Aligned with gudgeon pin
Gudgeon pin
Length: 1.0 and 1.1 litre engines . . . . . . . . . . . . . . . . . . . . . . . . . . . . . . . . . . . 58.6 to 59.4 mm
1.3 litre engines . . . . . . . . . . . . . . . . . . . . . . . . . . . . . . . . . . . .\
. . . . . . 63.3 to 64.6 mm
Diameter:
White colour code . . . . . . . . . . . . . . . . . . . . . . . . . . . . . . . . . . . .\
. . . . 18.026 to 18.029 mm
Red colour code . . . . . . . . . . . . . . . . . . . . . . . . . . . . . . . . . . . .\
. . . . . 18.029 to 18.032 mm
Blue colour code . . . . . . . . . . . . . . . . . . . . . . . . . . . . . . . . . . . .\
. . . . . 18.032 to 18.035 mm
Yellow colour code . . . . . . . . . . . . . . . . . . . . . . . . . . . . . . . . . . . .\
. . . 18.035 to 18.038 mm
Clearance in piston . . . . . . . . . . . . . . . . . . . . . . . . . . . . . . . . . . . .\
. . . . . 0.008 to 0.014 mm
Interference fit in connecting rod . . . . . . . . . . . . . . . . . . . . . . . . . . . . . . 0.016 to 0.048 mm
Crankshaft and bearings
Main bearing journal diameter: 1.0 and 1.1 litre engines:
Standard . . . . . . . . . . . . . . . . . . . . . . . . . . . . . . . . . . . .\
. . . . . . . . . 56.990 to 57.000 mm
Standard (with yellow line) . . . . . . . . . . . . . . . . . . . . . . . . . . . . . . . 56.980 to 56.990 mm
0.254 mm undersize (with green line) . . . . . . . . . . . . . . . . . . . . . . . 56.726 to 56.746 mm
0.508 mm undersize (service) . . . . . . . . . . . . . . . . . . . . . . . . . . . . . 56.472 to 56.492 mm
0.762 mm undersize (service) . . . . . . . . . . . . . . . . . . . . . . . . . . . . . 56.218 to 56.238 mm
1.3 litre engines: Standard . . . . . . . . . . . . . . . . . . . . . . . . . . . . . . . . . . . .\
. . . . . . . . . 56.980 to 57.000 mm
0.254 mm undersize (with green line) . . . . . . . . . . . . . . . . . . . . . . . 56.726 to 56.746 mm
0.508 mm undersize (service) . . . . . . . . . . . . . . . . . . . . . . . . . . . . . 56.472 to 56.492 mm
0.762 mm undersize (service) . . . . . . . . . . . . . . . . . . . . . . . . . . . . . 56.218 to 56.238 mm
Main bearing journal-to-shell running clearance:
1.0 and 1.1 litre engines . . . . . . . . . . . . . . . . . . . . . . . . . . . . . . . . . . . 0.009 to 0.046 mm
1.3 litre engines . . . . . . . . . . . . . . . . . . . . . . . . . . . . . . . . . . . .\
. . . . . . 0.009 to 0.056 mm
Crankpin (big-end) bearing journal diameter:
Standard . . . . . . . . . . . . . . . . . . . . . . . . . . . . . . . . . . . .\
. . . . . . . . . . . 40.99 to 41.01 mm
0.254 mm undersize . . . . . . . . . . . . . . . . . . . . . . . . . . . . . . . . . . . .\
. . 40.74 to 40.76 mm
0.508 mm undersize . . . . . . . . . . . . . . . . . . . . . . . . . . . . . . . . . . . .\
. . 40.49 to 40.51 mm
0.762 mm undersize . . . . . . . . . . . . . . . . . . . . . . . . . . . . . . . . . . . .\
. . 40.24 to 40.26 mm
Crankpin (big-end) bearing journal-to-shell running clearance . . . . . . . 0.006 to 0.060 mm
Crankshaft endfloat . . . . . . . . . . . . . . . . . . . . . . . . . . . . . . . . . . . .\
. . . . 0.100 to 0.250 mm
Thrustwasher thickness: Standard . . . . . . . . . . . . . . . . . . . . . . . . . . . . . . . . . . . .\
. . . . . . . . . . . 2.80 to 2.85 mm
Oversize . . . . . . . . . . . . . . . . . . . . . . . . . . . . . . . . . . . .\
. . . . . . . . . . . 2.99 to 3.04 mm
2D•2 Engine removal and overhaul procedures
1595Ford Fiesta Remakeprocarmanuals.com
http://vnx.su
Page 73 of 296
:1.4 litre engine:
Standard 1 . . . . . . . . . . . . . . . . . . . . . . . . . . . . . . . . . . . .\
. . . . . . . 77.190 to 77.200 mm
Standard")
Pistons and piston ringsPiston diameter (production):1.4 litre engine:
Standard 1 . . . . . . . . . . . . . . . . . . . . . . . . . . . . . . . . . . . .\
. . . . . . . 77.190 to 77.200 mm
Standard 2 . . . . . . . . . . . . . . . . . . . . . . . . . . . . . . . . . . . .\
. . . . . . . 77.200 to 77.210 mm
Standard 3 . . . . . . . . . . . . . . . . . . . . . . . . . . . . . . . . . . . .\
. . . . . . . 77.210 to 77.220 mm
Standard 4 . . . . . . . . . . . . . . . . . . . . . . . . . . . . . . . . . . . .\
. . . . . . . 77.220 to 77.230 mm
Oversize A . . . . . . . . . . . . . . . . . . . . . . . . . . . . . . . . . . . .\
. . . . . . . . 77.480 to 77.490 mm
Oversize B . . . . . . . . . . . . . . . . . . . . . . . . . . . . . . . . . . . .\
. . . . . . . . 77.490 to 77.500 mm
Oversize C . . . . . . . . . . . . . . . . . . . . . . . . . . . . . . . . . . . .\
. . . . . . . . 77.500 to 77.510 mm
1.6 litre carburettor engine and turbocharged engine:
Standard 1 . . . . . . . . . . . . . . . . . . . . . . . . . . . . . . . . . . . .\
. . . . . . . 79.910 to 79.920 mm
Standard 2 . . . . . . . . . . . . . . . . . . . . . . . . . . . . . . . . . . . .\
. . . . . . . 79.920 to 79.930 mm
Standard 3 . . . . . . . . . . . . . . . . . . . . . . . . . . . . . . . . . . . .\
. . . . . . . 79.930 to 79.940 mm
Standard 4 . . . . . . . . . . . . . . . . . . . . . . . . . . . . . . . . . . . .\
. . . . . . . 79.940 to 79.950 mm
Oversize A . . . . . . . . . . . . . . . . . . . . . . . . . . . . . . . . . . . .\
. . . . . . . . 80.200 to 80.210 mm
Oversize B . . . . . . . . . . . . . . . . . . . . . . . . . . . . . . . . . . . .\
. . . . . . . . 80.210 to 80.220 mm
Oversize C . . . . . . . . . . . . . . . . . . . . . . . . . . . . . . . . . . . .\
. . . . . . . . 80.220 to 80.230 mm
1.6 litre EFi (non-turbo) fuel injection engine: Standard 1 . . . . . . . . . . . . . . . . . . . . . . . . . . . . . . . . . . . .\
. . . . . . . 79.915 to 79.925 mm
Standard 2 . . . . . . . . . . . . . . . . . . . . . . . . . . . . . . . . . . . .\
. . . . . . . 79.925 to 79.935 mm
Standard 3 . . . . . . . . . . . . . . . . . . . . . . . . . . . . . . . . . . . .\
. . . . . . . 79.935 to 79.945 mm
Standard 4 . . . . . . . . . . . . . . . . . . . . . . . . . . . . . . . . . . . .\
. . . . . . . 79.945 to 79.955 mm
Oversize A . . . . . . . . . . . . . . . . . . . . . . . . . . . . . . . . . . . .\
. . . . . . . . 80.205 to 80.215 mm
Oversize B . . . . . . . . . . . . . . . . . . . . . . . . . . . . . . . . . . . .\
. . . . . . . . 80.215 to 80.225 mm
Oversize C . . . . . . . . . . . . . . . . . . . . . . . . . . . . . . . . . . . .\
. . . . . . . . 80.225 to 80.235 mm
Piston-to-cylinder bore clearance: 1.4 litre engine . . . . . . . . . . . . . . . . . . . . . . . . . . . . . . . . . . . .\
. . . . . . 0.020 to 0.040 mm
1.6 litre carburettor engine and turbocharged engine . . . . . . . . . . . . 0.020 to 0.040 mm
1.6 litre EFi (non-turbo) fuel injection engine . . . . . . . . . . . . . . . . . . . 0.015 to 0.035 mm
Piston ring end gaps - installed:
Compression rings . . . . . . . . . . . . . . . . . . . . . . . . . . . . . . . . . . . .\
. . . 0.30 to 0.50 mm
Oil control rings:1.4 litre engine . . . . . . . . . . . . . . . . . . . . . . . . . . . . . . . . . . . .\
. . . . . 0.40 to 1.40 mm
1.6 litre carburettor engine and turbocharged engine . . . . . . . . . . 0.40 to 1.40 mm
1.6 litre EFi (non-turbo) fuel injection engine . . . . . . . . . . . . . . . . . 0.25 to 0.40 mm
Gudgeon pins
Length:1.4 litre engine . . . . . . . . . . . . . . . . . . . . . . . . . . . . . . . . . . . .\
. . . . . . 63.000 to 63.800 mm
1.6 litre carburettor engine . . . . . . . . . . . . . . . . . . . . . . . . . . . . . . . . . 66.200 to 67.000 mm
1.6 litre EFi (non-turbo) fuel injection engine . . . . . . . . . . . . . . . . . . . 63.000 to 63.800 mm
1.6 litre turbocharged engine . . . . . . . . . . . . . . . . . . . . . . . . . . . . . . . 63.600 to 64.400 mm
Diameter: White colour code . . . . . . . . . . . . . . . . . . . . . . . . . . . . . . . . . . . .\
. . . . 20.622 to 20.625 mm
Red colour code . . . . . . . . . . . . . . . . . . . . . . . . . . . . . . . . . . . .\
. . . . . 20.625 to 20.628 mm
Blue colour code . . . . . . . . . . . . . . . . . . . . . . . . . . . . . . . . . . . .\
. . . . . 20.628 to 20.631 mm
Yellow colour code . . . . . . . . . . . . . . . . . . . . . . . . . . . . . . . . . . . .\
. . . 20.631 to 20.634 mm
Clearance in piston . . . . . . . . . . . . . . . . . . . . . . . . . . . . . . . . . . . .\
. . . . . 0.005 to 0.011 mm
Interference fit in connecting rod . . . . . . . . . . . . . . . . . . . . . . . . . . . . . . 0.013 to 0.045 mm
Crankshaft and bearings
Main bearing journal diameter:
Standard . . . . . . . . . . . . . . . . . . . . . . . . . . . . . . . . . . . .\
. . . . . . . . . . . 57.98 to 58.00 mm
0.25 mm undersize . . . . . . . . . . . . . . . . . . . . . . . . . . . . . . . . . . . .\
. . . 57.73 to 57.75 mm
0.50 mm undersize . . . . . . . . . . . . . . . . . . . . . . . . . . . . . . . . . . . .\
. . . 57.48 to 57.50 mm
0.75 mm undersize . . . . . . . . . . . . . . . . . . . . . . . . . . . . . . . . . . . .\
. . . 57.23 to 57.25 mm
Main bearing journal-to-shell running clearance . . . . . . . . . . . . . . . . . . 0.011 to 0.058 mm
Crankpin (big-end) bearing journal diameter: Standard . . . . . . . . . . . . . . . . . . . . . . . . . . . . . . . . . . . .\
. . . . . . . . . . . 47.89 to 47.91 mm
0.25 mm undersize . . . . . . . . . . . . . . . . . . . . . . . . . . . . . . . . . . . .\
. . . 47.64 to 47.66 mm
0.50 mm undersize . . . . . . . . . . . . . . . . . . . . . . . . . . . . . . . . . . . .\
. . . 47.39 to 47.41 mm
0.75 mm undersize . . . . . . . . . . . . . . . . . . . . . . . . . . . . . . . . . . . .\
. . . 47.14 to 47.16 mm
1.00 mm undersize . . . . . . . . . . . . . . . . . . . . . . . . . . . . . . . . . . . .\
. . . 46.89 to 46.91 mm
Crankpin (big-end) bearing journal-to-shell running clearance . . . . . . . 0.006 to 0.060 mm
Crankshaft endfloat . . . . . . . . . . . . . . . . . . . . . . . . . . . . . . . . . . . .\
. . . . 0.09 to 0.30 mm
Thrustwasher thickness: Standard . . . . . . . . . . . . . . . . . . . . . . . . . . . . . . . . . . . .\
. . . . . . . . . . . 2.301 to 2.351 mm
Oversize . . . . . . . . . . . . . . . . . . . . . . . . . . . . . . . . . . . .\
. . . . . . . . . . . 2.491 to 2.541 mm
2D•4 Engine removal and overhaul procedures
1595Ford Fiesta Remakeprocarmanuals.com
http://vnx.su
Page 74 of 296
 bearing caps . . . . . . . . . . . . . .")
Torque wrench settingsNmlbf ft
Main bearing caps . . . . . . . . . . . . . . . . . . . . . . . . . . . . . . . . . . . .\
. . . . . 9570
Crankpin (big-end) bearing caps . . . . . . . . . . . . . . . . . . . . . . . . . . . . . . 3324
Engine-to-transmission bolts . . . . . . . . . . . . . . . . . . . . . . . . . . . . . . . . . 4130
Note: Refer to Part B of this Chapter for remaining torque wrench settings.
Zetec engines
Cylinder head
Maximum permissible gasket surface distortion . . . . . . . . . . . . . . . . . . 0.10 mm
Valve seat included angle . . . . . . . . . . . . . . . . . . . . . . . . . . . . . . . . . . . .\
90º
Valve guide bore . . . . . . . . . . . . . . . . . . . . . . . . . . . . . . . . . . . .\
. . . . . . . 6.060 to 6.091 mm
Valves - generalInlet Exhaust
Valve length . . . . . . . . . . . . . . . . . . . . . . . . . . . . . . . . . . . .\
. . . . . . . . . . 96.870 to 97.330 mm 96.470 to 96.930 mm
Valve head diameter: 1.6 litre engine . . . . . . . . . . . . . . . . . . . . . . . . . . . . . . . . . . . .\
. . . . . . 26.0 mm 24.5 mm
1.8 litre engine . . . . . . . . . . . . . . . . . . . . . . . . . . . . . . . . . . . .\
. . . . . . 32.0 mm 28.0 mm
Valve stem diameter . . . . . . . . . . . . . . . . . . . . . . . . . . . . . . . . . . . .\
. . . . 6.028 to 6.043 mm 6.010 to 6.025 mm
Valve stem-to-guide clearance . . . . . . . . . . . . . . . . . . . . . . . . . . . . . . . . 0.017 to 0.064 mm 0.035 to 0.081 mm
Cylinder block
Cylinder bore diameter: 1.6 litre engine: Class 1 . . . . . . . . . . . . . . . . . . . . . . . . . . . . . . . . . . . .\
. . . . . . . . . . 76.000 to 76.010 mm
Class 2 . . . . . . . . . . . . . . . . . . . . . . . . . . . . . . . . . . . .\
. . . . . . . . . . 76.010 to 76.020 mm
Class 3 . . . . . . . . . . . . . . . . . . . . . . . . . . . . . . . . . . . .\
. . . . . . . . . . 76.020 to 76.030 mm
1.8 litre engine:
Class 1 . . . . . . . . . . . . . . . . . . . . . . . . . . . . . . . . . . . .\
. . . . . . . . . . 80.600 to 80.610 mm
Class 2 . . . . . . . . . . . . . . . . . . . . . . . . . . . . . . . . . . . .\
. . . . . . . . . . 80.610 to 80.620 mm
Class 3 . . . . . . . . . . . . . . . . . . . . . . . . . . . . . . . . . . . .\
. . . . . . . . . . 80.620 to 80.630 mm
Pistons and piston rings
Piston diameter1.6 litre engine: Class 1 . . . . . . . . . . . . . . . . . . . . . . . . . . . . . . . . . . . .\
. . . . . . . . . . 75.975 to 75.985 mm
Class 2 . . . . . . . . . . . . . . . . . . . . . . . . . . . . . . . . . . . .\
. . . . . . . . . . 75.985 to 75.995 mm
Class 3 . . . . . . . . . . . . . . . . . . . . . . . . . . . . . . . . . . . .\
. . . . . . . . . . 75.995 to 76.005 mm
1.8 litre engine:
Class 1 . . . . . . . . . . . . . . . . . . . . . . . . . . . . . . . . . . . .\
. . . . . . . . . . 80.570 to 80.580 mm
Class 2 . . . . . . . . . . . . . . . . . . . . . . . . . . . . . . . . . . . .\
. . . . . . . . . . 80.580 to 80.590 mm
Class 3 . . . . . . . . . . . . . . . . . . . . . . . . . . . . . . . . . . . .\
. . . . . . . . . . 80.590 to 80.600 mm
Oversizes - all engines . . . . . . . . . . . . . . . . . . . . . . . . . . . . . . . . . . . .\
None available
Piston-to-cylinder bore clearance . . . . . . . . . . . . . . . . . . . . . . . . . . . . . Not specified
Piston ring end gaps - installed: Compression rings . . . . . . . . . . . . . . . . . . . . . . . . . . . . . . . . . . . .\
. . . 0.30 to 0.50 mm
Oil control ring: 1.6 litre engine . . . . . . . . . . . . . . . . . . . . . . . . . . . . . . . . . . . .\
. . . . . 0.25 to 1.00 mm
1.8 litre engine . . . . . . . . . . . . . . . . . . . . . . . . . . . . . . . . . . . .\
. . . . . 0.38 to 1.14 mm
Gudgeon pin
Diameter:
White colour code/piston crown marked “A” . . . . . . . . . . . . . . . . . . . 20.622 to 20.625 mm
Red colour code/piston crown marked “B” . . . . . . . . . . . . . . . . . . . . 20.625 to 20.628 mm
Blue colour code/piston crown marked “C” . . . . . . . . . . . . . . . . . . . . 20.628 to 20.631 mm
Clearance in piston . . . . . . . . . . . . . . . . . . . . . . . . . . . . . . . . . . . .\
. . . . . 0.010 to 0.016 mm
Interference fit in connecting rod . . . . . . . . . . . . . . . . . . . . . . . . . . . . . . 0.011 to 0.042 mm
Crankshaft and bearings
Main bearing journal standard diameter . . . . . . . . . . . . . . . . . . . . . . . . . 57.980 to 58.000 mm Main bearing journal-to-shell running clearance . . . . . . . . . . . . . . . . . . 0.011 to 0.058 mm
Main bearing shell undersizes available . . . . . . . . . . . . . . . . . . . . . . . . . 0.02 mm, 0.25 mmCrankpin (big-end) bearing journal standard diameter . . . . . . . . . . . . . . 46.890 to 46.910 mm
Crankpin (big-end) bearing journal-to-shell running clearance . . . . . . . 0.016 to 0.070 mm
Big-end bearing shell undersizes available . . . . . . . . . . . . . . . . . . . . . . 0.02 mm, 0.25 mm
Crankshaft endfloat . . . . . . . . . . . . . . . . . . . . . . . . . . . . . . . . . . . .\
. . . . 0.090 to 0.310 mm
Engine removal and overhaul procedures 2D•5
2D
1595Ford Fiesta Remakeprocarmanuals.com
http://vnx.su
Page 75 of 296
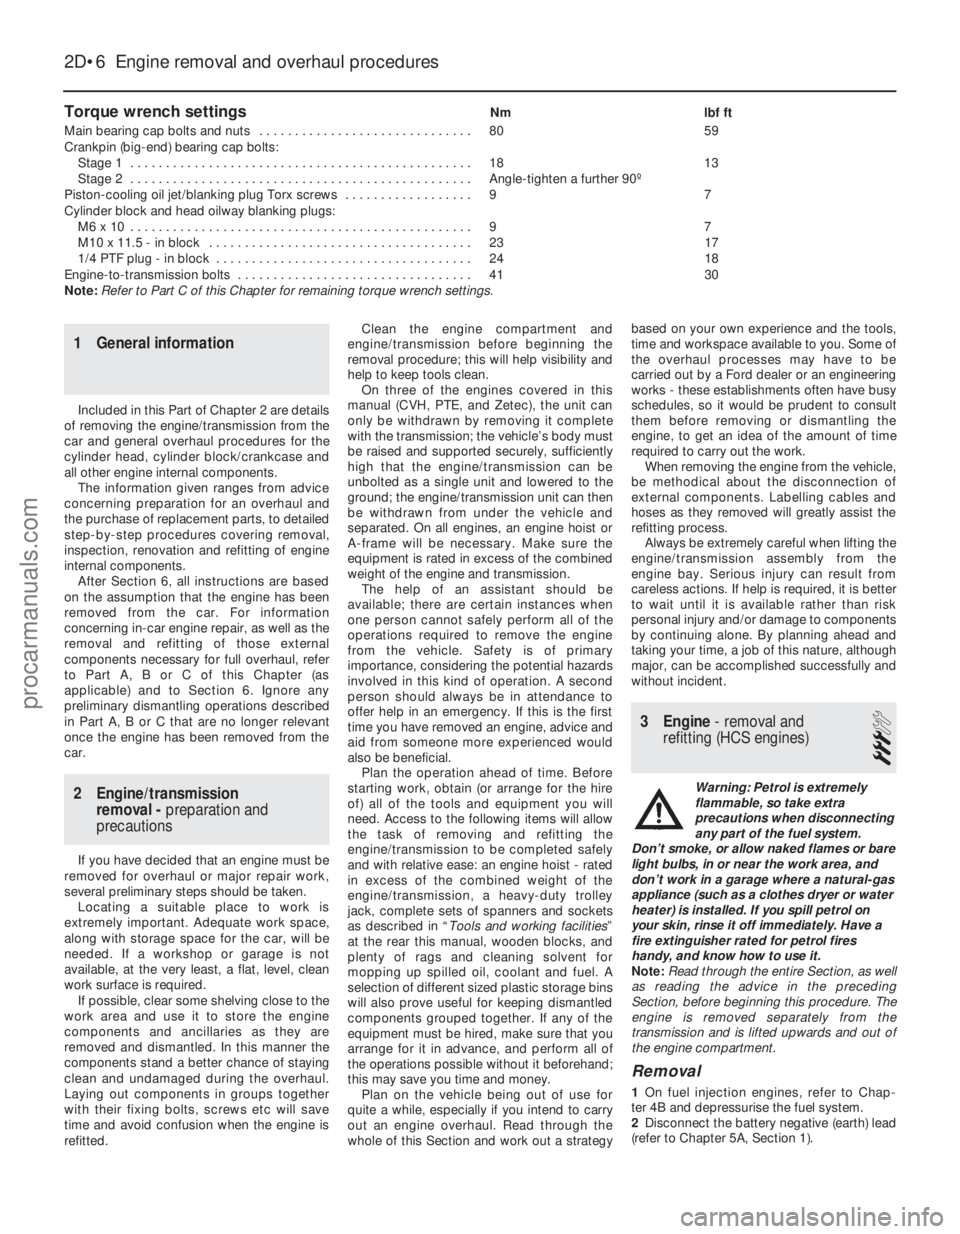
Torque wrench settingsNmlbf ft
Main bearing cap bolts and nuts . . . . . . . . . . . . . . . . . . . . . . . . . . . . . . 8059
Crankpin (big-end) bearing cap bolts: Stage 1 . . . . . . . . . . . . . . . . . . . . . . . . . . . . . . . . . . . .\
. . . . . . . . . . . . 1813
Stage 2 . . . . . . . . . . . . . . . . . . . . . . . . . . . . . . . . . . . .\
. . . . . . . . . . . . Angle-tighten a further 90º
Piston-cooling oil jet/blanking plug Torx screws . . . . . . . . . . . . . . . . . . 9 7
Cylinder block and head oilway blanking plugs:
M6 x 10 . . . . . . . . . . . . . . . . . . . . . . . . . . . . . . . . . . . .\
. . . . . . . . . . . . 9 7
M10 x 11.5 - in block . . . . . . . . . . . . . . . . . . . . . . . . . . . . . . . . . . . .\
. 2317
1/4 PTF plug - in block . . . . . . . . . . . . . . . . . . . . . . . . . . . . . . . . . . . .\
2418
Engine-to-transmission bolts . . . . . . . . . . . . . . . . . . . . . . . . . . . . . . . . . 4130
Note: Refer to Part C of this Chapter for remaining torque wrench settings.
2D•6 Engine removal and overhaul procedures
1595Ford Fiesta Remake
1 General information
Included in this Part of Chapter 2 are details
of removing the engine/transmission from the
car and general overhaul procedures for the
cylinder head, cylinder block/crankcase and
all other engine internal components.
The information given ranges from advice
concerning preparation for an overhaul and
the purchase of replacement parts, to detailed
step-by-step procedures covering removal,
inspection, renovation and refitting of engine
internal components.
After Section 6, all instructions are based
on the assumption that the engine has been
removed from the car. For information
concerning in-car engine repair, as well as the
removal and refitting of those external
components necessary for full overhaul, refer
to Part A, B or C of this Chapter (as
applicable) and to Section 6. Ignore any
preliminary dismantling operations described
in Part A, B or C that are no longer relevant
once the engine has been removed from the
car.
2 Engine/transmission removal - preparation and
precautions
If you have decided that an engine must be
removed for overhaul or major repair work,
several preliminary steps should be taken.
Locating a suitable place to work is
extremely important. Adequate work space,
along with storage space for the car, will be
needed. If a workshop or garage is not
available, at the very least, a flat, level, clean
work surface is required. If possible, clear some shelving close to the
work area and use it to store the engine
components and ancillaries as they are
removed and dismantled. In this manner the
components stand a better chance of staying
clean and undamaged during the overhaul.
Laying out components in groups together
with their fixing bolts, screws etc will save
time and avoid confusion when the engine is
refitted. Clean the engine compartment and
engine/transmission before beginning the
removal procedure; this will help visibility and
help to keep tools clean. On three of the engines covered in this
manual (CVH, PTE, and Zetec), the unit can
only be withdrawn by removing it complete
with the transmission; the vehicle’s body must
be raised and supported securely, sufficiently
high that the engine/transmission can be
unbolted as a single unit and lowered to the
ground; the engine/transmission unit can then
be withdrawn from under the vehicle and
separated. On all engines, an engine hoist or
A- frame will be necessary. Make sure the
equipment is rated in excess of the combined
weight of the engine and transmission. The help of an assistant should be
available; there are certain instances when
one person cannot safely perform all of the
operations required to remove the engine
from the vehicle. Safety is of primary
importance, considering the potential hazards
involved in this kind of operation. A second
person should always be in attendance to
offer help in an emergency. If this is the first
time you have removed an engine, advice and
aid from someone more experienced would
also be beneficial. Plan the operation ahead of time. Before
starting work, obtain (or arrange for the hire
of) all of the tools and equipment you will
need. Access to the following items will allow
the task of removing and refitting the
engine/transmission to be completed safely
and with relative ease: an engine hoist - rated
in excess of the combined weight of the
engine/transmission, a heavy-duty trolley
jack, complete sets of spanners and sockets
as described in “ Tools and working facilities ”
at the rear this manual, wooden blocks, and
plenty of rags and cleaning solvent for
mopping up spilled oil, coolant and fuel. A
selection of different sized plastic storage bins
will also prove useful for keeping dismantled
components grouped together. If any of the
equipment must be hired, make sure that you
arrange for it in advance, and perform all of
the operations possible without it beforehand;
this may save you time and money. Plan on the vehicle being out of use for
quite a while, especially if you intend to carry
out an engine overhaul. Read through the
whole of this Section and work out a strategy based on your own experience and the tools,
time and workspace available to you. Some of
the overhaul processes may have to be
carried out by a Ford dealer or an engineering
works - these establishments often have busy
schedules, so it would be prudent to consult
them before removing or dismantling the
engine, to get an idea of the amount of time
required to carry out the work.
When removing the engine from the vehicle,
be methodical about the disconnection of
external components. Labelling cables and
hoses as they removed will greatly assist the
refitting process.
Always be extremely careful when lifting the
engine/transmission assembly from the
engine bay. Serious injury can result from
careless actions. If help is required, it is better
to wait until it is available rather than risk
personal injury and/or damage to components
by continuing alone. By planning ahead and
taking your time, a job of this nature, although
major, can be accomplished successfully and
without incident.
3 Engine - removal and
refitting (HCS engines)
3
Warning: Petrol is extremely
flammable, so take extra
precautions when disconnecting
any part of the fuel system.
Don’t smoke, or allow naked flames or bare
light bulbs, in or near the work area, and
don’t work in a garage where a natural-gas
appliance (such as a clothes dryer or water
heater) is installed. If you spill petrol on
your skin, rinse it off immediately. Have a
fire extinguisher rated for petrol fires
handy, and know how to use it.
Note: Read through the entire Section, as well
as reading the advice in the preceding
Section, before beginning this procedure. The
engine is removed separately from the
transmission and is lifted upwards and out of
the engine compartment.
Removal
1 On fuel injection engines, refer to Chap-
ter 4B and depressurise the fuel system.
2 Disconnect the battery negative (earth) lead
(refer to Chapter 5A, Section 1).
procarmanuals.com
http://vnx.su
Page 76 of 296
3Referring to Chapter 1 for details, drain the
coolant and engine oil. Refit the drain plug to
the sump on completion.
4 Remove the bonnet as described in
Chapter 11.
5 Remove the air cleaner assembly as
described in the relevant Part of Chapter 4.
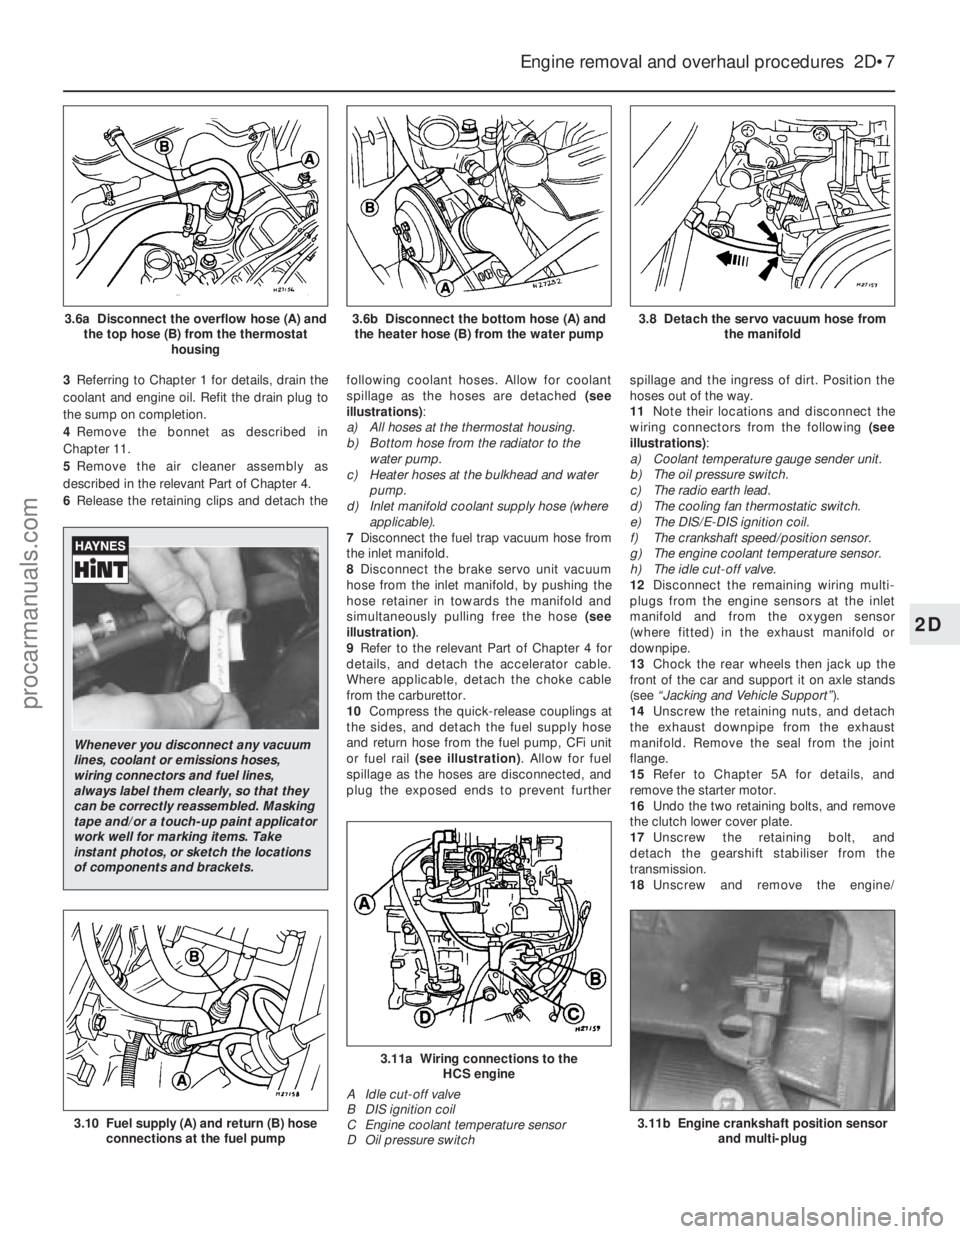
6 Release the retaining clips and detach the following coolant hoses. Allow for coolant
spillage as the hoses are detached
(see
illustrations) :
a) All hoses at the thermostat housing.
b) Bottom hose from the radiator to the
water pump.
c) Heater hoses at the bulkhead and water
pump.
d) Inlet manifold coolant supply hose (where
applicable).
7 Disconnect the fuel trap vacuum hose from
the inlet manifold.
8 Disconnect the brake servo unit vacuum
hose from the inlet manifold, by pushing the
hose retainer in towards the manifold and
simultaneously pulling free the hose (see
illustration) .
9 Refer to the relevant Part of Chapter 4 for
details, and detach the accelerator cable.
Where applicable, detach the choke cable
from the carburettor.
10 Compress the quick-release couplings at
the sides, and detach the fuel supply hose
and return hose from the fuel pump, CFi unit
or fuel rail (see illustration) . Allow for fuel
spillage as the hoses are disconnected, and
plug the exposed ends to prevent further spillage and the ingress of dirt. Position the
hoses out of the way.
11
Note their locations and disconnect the
wiring connectors from the following (see
illustrations) :
a) Coolant temperature gauge sender unit.
b) The oil pressure switch.
c) The radio earth lead.
d) The cooling fan thermostatic switch.
e) The DIS/E-DIS ignition coil.
f) The crankshaft speed/position sensor.
g) The engine coolant temperature sensor.
h) The idle cut-off valve.
12 Disconnect the remaining wiring multi-
plugs from the engine sensors at the inlet
manifold and from the oxygen sensor
(where fitted) in the exhaust manifold or
downpipe.
13 Chock the rear wheels then jack up the
front of the car and support it on axle stands
(see “Jacking and Vehicle Support” ).
14 Unscrew the retaining nuts, and detach
the exhaust downpipe from the exhaust
manifold. Remove the seal from the joint
flange.
15 Refer to Chapter 5A for details, and
remove the starter motor.
16 Undo the two retaining bolts, and remove
the clutch lower cover plate.
17 Unscrew the retaining bolt, and
detach the gearshift stabiliser from the
transmission.
18 Unscrew and remove the engine/
Engine removal and overhaul procedures 2D•7
3.8 Detach the servo vacuum hose from
the manifold3.6b Disconnect the bottom hose (A) andthe heater hose (B) from the water pump3.6a Disconnect the overflow hose (A) and the top hose (B) from the thermostat housing
3.11b Engine crankshaft position sensorand multi-plug
3.11a Wiring connections to the HCS engine
A Idle cut-off valve
B DIS ignition coil
C Engine coolant temperature sensor
D Oil pressure switch
3.10 Fuel supply (A) and return (B) hose connections at the fuel pump
2D
1595Ford Fiesta Remake
Whenever you disconnect any vacuum
lines, coolant or emissions hoses,
wiring connectors and fuel lines,
always label them clearly, so that they
can be correctly reassembled. Masking
tape and/or a touch-up paint applicator
work well for marking items. Take
instant photos, or sketch the locations
of components and brackets.
procarmanuals.com
http://vnx.su
Page 77 of 296
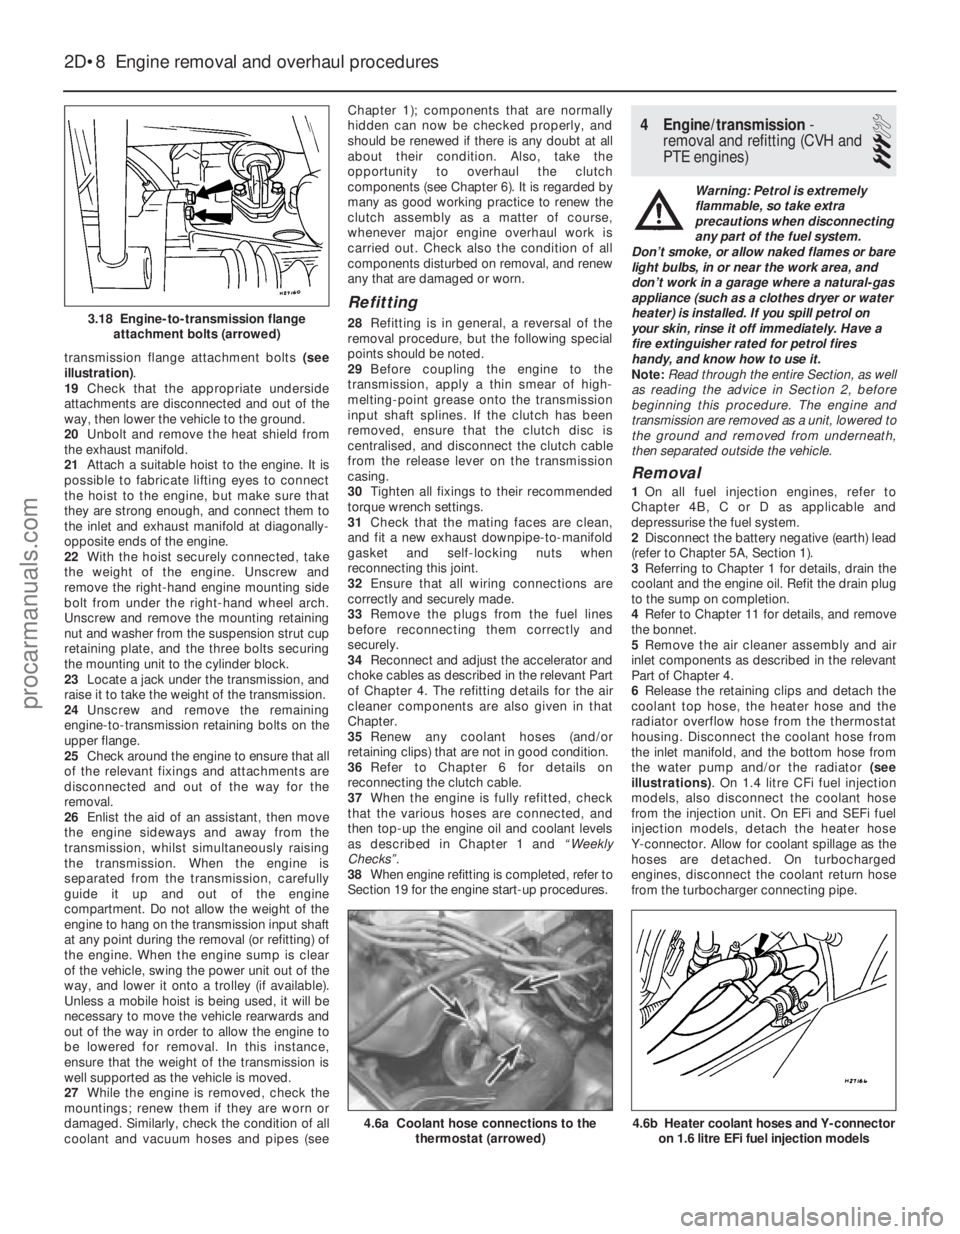
transmission flange attachment bolts (see
illustration) .
19 Check that the appropriate underside
attachments are disconnected and out of the
way, then lower the vehicle to the ground.
20 Unbolt and remove the heat shield from
the exhaust manifold.
21 Attach a suitable hoist to the engine. It is
possible to fabricate lifting eyes to connect
the hoist to the engine, but make sure that
they are strong enough, and connect them to
the inlet and exhaust manifold at diagonally-
opposite ends of the engine.
22 With the hoist securely connected, take
the weight of the engine. Unscrew and
remove the right-hand engine mounting side
bolt from under the right-hand wheel arch.
Unscrew and remove the mounting retaining
nut and washer from the suspension strut cup
retaining plate, and the three bolts securing
the mounting unit to the cylinder block.
23 Locate a jack under the transmission, and
raise it to take the weight of the transmission.
24 Unscrew and remove the remaining
engine-to-transmission retaining bolts on the
upper flange.
25 Check around the engine to ensure that all
of the relevant fixings and attachments are
disconnected and out of the way for the
removal.
26 Enlist the aid of an assistant, then move
the engine sideways and away from the
transmission, whilst simultaneously raising
the transmission. When the engine is
separated from the transmission, carefully
guide it up and out of the engine
compartment. Do not allow the weight of the
engine to hang on the transmission input shaft
at any point during the removal (or refitting) of
the engine. When the engine sump is clear
of the vehicle, swing the power unit out of the
way, and lower it onto a trolley (if available).
Unless a mobile hoist is being used, it will be
necessary to move the vehicle rearwards and
out of the way in order to allow the engine to
be lowered for removal. In this instance,
ensure that the weight of the transmission is
well supported as the vehicle is moved.
27 While the engine is removed, check the
mountings; renew them if they are worn or
damaged. Similarly, check the condition of all
coolant and vacuum hoses and pipes (see Chapter 1); components that are normally
hidden can now be checked properly, and
should be renewed if there is any doubt at all
about their condition. Also, take the
opportunity to overhaul the clutch
components (see Chapter 6). It is regarded by
many as good working practice to renew the
clutch assembly as a matter of course,
whenever major engine overhaul work is
carried out. Check also the condition of all
components disturbed on removal, and renew
any that are damaged or worn.
Refitting
28
Refitting is in general, a reversal of the
removal procedure, but the following special
points should be noted.
29 Before coupling the engine to the
transmission, apply a thin smear of high-
melting-point grease onto the transmission
input shaft splines. If the clutch has been
removed, ensure that the clutch disc is
centralised, and disconnect the clutch cable
from the release lever on the transmission
casing.
30 Tighten all fixings to their recommended
torque wrench settings.
31 Check that the mating faces are clean,
and fit a new exhaust downpipe-to-manifold
gasket and self-locking nuts when
reconnecting this joint.
32 Ensure that all wiring connections are
correctly and securely made.
33 Remove the plugs from the fuel lines
before reconnecting them correctly and
securely.
34 Reconnect and adjust the accelerator and
choke cables as described in the relevant Part
of Chapter 4. The refitting details for the air
cleaner components are also given in that
Chapter.
35 Renew any coolant hoses (and/or
retaining clips) that are not in good condition.
36 Refer to Chapter 6 for details on
reconnecting the clutch cable.
37 When the engine is fully refitted, check
that the various hoses are connected, and
then top-up the engine oil and coolant levels
as described in Chapter 1 and “Weekly
Checks”.
38 When engine refitting is completed, refer to
Section 19 for the engine start-up procedures.
4 Engine/transmission -
removal and refitting (CVH and
PTE engines)
3
Warning: Petrol is extremely
flammable, so take extra
precautions when disconnecting
any part of the fuel system.
Don’t smoke, or allow naked flames or bare
light bulbs, in or near the work area, and
don’t work in a garage where a natural-gas
appliance (such as a clothes dryer or water
heater) is installed. If you spill petrol on
your skin, rinse it off immediately. Have a
fire extinguisher rated for petrol fires
handy, and know how to use it.
Note: Read through the entire Section, as well
as reading the advice in Section 2, before
beginning this procedure. The engine and
transmission are removed as a unit, lowered to
the ground and removed from underneath,
then separated outside the vehicle.
Removal
1 On all fuel injection engines, refer to
Chapter 4B, C or D as applicable and
depressurise the fuel system.
2 Disconnect the battery negative (earth) lead
(refer to Chapter 5A, Section 1).
3 Referring to Chapter 1 for details, drain the
coolant and the engine oil. Refit the drain plug
to the sump on completion.
4 Refer to Chapter 11 for details, and remove
the bonnet.
5 Remove the air cleaner assembly and air
inlet components as described in the relevant
Part of Chapter 4.
6 Release the retaining clips and detach the
coolant top hose, the heater hose and the
radiator overflow hose from the thermostat
housing. Disconnect the coolant hose from
the inlet manifold, and the bottom hose from
the water pump and/or the radiator (see
illustrations) . On 1.4 litre CFi fuel injection
models, also disconnect the coolant hose
from the injection unit. On EFi and SEFi fuel
injection models, detach the heater hose
Y-connector. Allow for coolant spillage as the
hoses are detached. On turbocharged
engines, disconnect the coolant return hose
from the turbocharger connecting pipe.
2D•8 Engine removal and overhaul procedures
4.6b Heater coolant hoses and Y-connector on 1.6 litre EFi fuel injection models4.6a Coolant hose connections to the thermostat (arrowed)
3.18 Engine-to-transmission flangeattachment bolts (arrowed)
1595Ford Fiesta Remakeprocarmanuals.com
http://vnx.su