table FORD FIESTA 2007 Workshop Manual
[x] Cancel search | Manufacturer: FORD, Model Year: 2007, Model line: FIESTA, Model: FORD FIESTA 2007Pages: 1226, PDF Size: 61.26 MB
Page 923 of 1226
303-1 3-5 Evaporative Emissions 303-1 3-5
REMOVAL
AND INSTALLATION
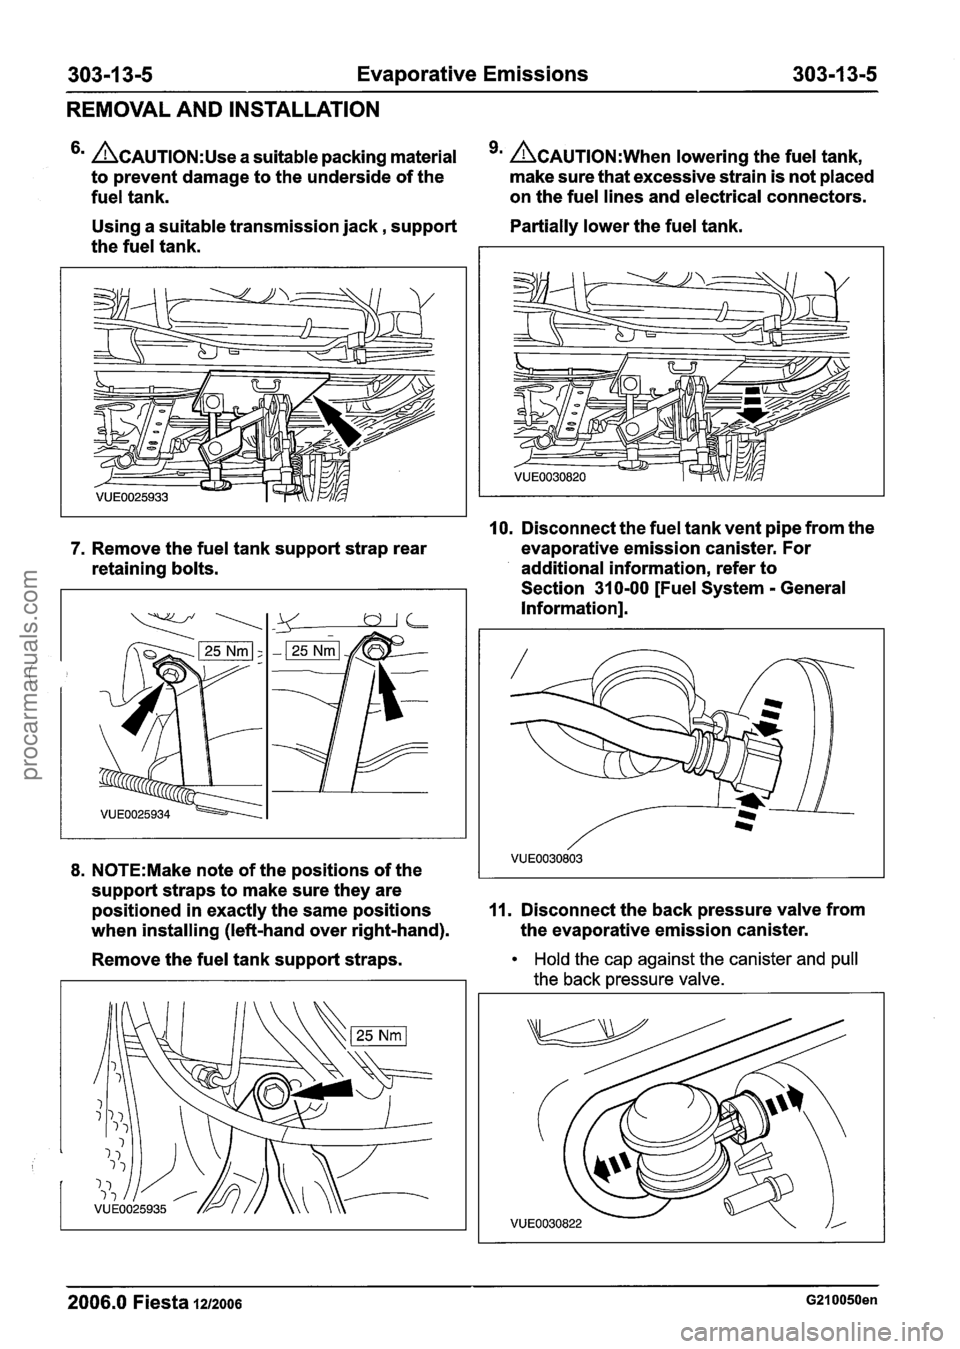
ACAUTION:U~~ a suitable packing material 9m ACAUTION:W~~~ lowering the fuel tank,
to prevent damage to the underside of the make
sure that excessive strain is not placed
fuel tank. on
the fuel lines and electrical connectors.
Using a suitable transmission jack, support Partially lower
the fuel tank.
the fuel tank.
10. Disconnect the fuel tank vent pipe from the
7. Remove the fuel tank support strap rear evaporative
emission canister. For
retaining bolts. additional information,
refer to
Section 31 0-00 [Fuel System
- General
Information].
8. N0TE:Make note of the positions of the
support straps to make sure they are
positioned in exactly the same positions
11. Disconnect the back pressure valve from
when installing (left-hand over right-hand). the
evaporative emission canister.
Remove the fuel tank support straps.
Hold the cap against the canister and pull
the back pressure valve.
2006.0 Fiesta 1212006 G210050en
procarmanuals.com
Page 939 of 1226
303-1 4-1 5 Electronic Engine Controls 303-1 4-1 5
DIAGNOSIS AND TESTING
Monitors
The purpose of the monitors is to continuously
check the operation of the emission related sensors
and actuators. It then establishes if they are
operating within specified tolerances. All monitors
carry out their functions in such a way as to be
unnoticeable by the driver of the vehicle. Each one
is carried out under specific conditions of load,
speed and engine temperature. The Comprehensive Component Monitor, Combustion
Misfire Monitor and
AirIFuel Ratio Monitor operate
continuously. The remaining monitors are only
invoked under certain operating conditions. On
diesel variants, all of the monitors operate under
normal driving conditions: There are no monitors
which intervene and cause special operating
modes to enable the monitors to work. Some diesel
monitors are non-continuous. This means that in
a drive cycle, monitoring is done as and when
suitable driving conditions exist and potential faults
are accumulated and compared with acceptance
criteria. Examples of this type are the turbocharger
boost pressure and exhaust gas recirculation
(EGR) monitors on vehicles with common rail fuel
injection.
( Comprehensive Component Monitor (CCM)
When the CCM detects a component operating out
of tolerance, it sets a Diagnostic Trouble Code
(DTC), which is stored in the EEPROM. If the same
concern is confirmed during the next trip the MIL
will be switched on. The CCM monitors many
components, sub-systems and signals. The
following is a list of those that can effect emissions
depending on application:
Electronic Ignition (El) System.
Crankshaft Position (CKP) Sensor.
Ignition Coil.
Electronic Throttle Control Unit.
Camshaft Position (CMP) Sensor.
Air Conditioning
(AIC) Clutch.
Idle Air Control (IAC) Valve.
Mass Air Flow (MAF) Sensor.
Manifold Absolute Pressure (MAP) Sensor.
Intake Air Temperature (IAT) Sensor.
Engine Coolant Temperature (ECT) Sensor.
Cylinder Head Temperature (CHT) Sensor.
Heated Oxygen Sensor
(H02S).
Catalyst Monitor Sensor.
Charge Air Temperature Sensor.
Knock Sensor (KS).
Throttle Position (TP) Sensor.
Vehicle Speed Sensor (VSS).
Boost Pressure Sensor.
Cam-Crank Phasing Sensor.
EEPROM.
High Pressure Fuel Injection Pump.
Exhaust Gas Recirculation (EGR) Valve Monitor.
Fuel Injectors.
Turbocharger.
Combustion Noise Monitor.
Barometric Pressure (BARO) Sensor.
Combustion Misfire Monitor (All except vehicles
with diesel engine)
The combustion misfire monitor operates independently of the others, and can detect misfires
caused by the ignition system, fuel system or
mechanical engine components. As each cylinder
fires, a characteristic crankshaft acceleration is
produced. The monitor detects irregularities in the
acceleration pattern using the crankshaft position (CKP) sensor, thus detecting the misfire. It can
also detect which cylinder has misfired.
Combustion misfires can be categorized as follows:
Type
A: These can cause catalytic converter
damage due to excessive internal temperatures.
If a certain number of misfires occur over a
pre-determined number of engine revolutions, the
MIL will be switched on to alert the driver of the
concern.
Type B: These can lead to an increase in emissions
to a point above the EOBD threshold. If the misfire
is detected during a second trip, over a,
pre-determined number of engine revolutions, the
MIL will be switched on. If the misfire does not
occur over the next three trips, the MIL will be
extinguished
AirIFuel Ratio (AFR) Monitor (All except vehicles
with diesel engine)
The H02S fitted before the catalytic converter
(upstream) measures the oxygen content of the
exhaust gas and the variations in it. This then
enables the PCM to adjust the opening times of
the fuel injectors to maintain the correct AFR. This
is known as Short Term Fuel Trim (STFT). If the
same variation is registered a pre-determined
number of times, a permanent correction factor is
applied. This is known as Long Term Fuel Trim
(LTFT), which is stored in the EEPROM. When the
correction factors exceed pre-determined limits a
DTC will be set in the EEPROM. If a concern is
2006.0 Fiesta 1212006 G384566en
procarmanuals.com
Page 948 of 1226
303-1 4-24 Electronic Engine Controls 303-1 4-24
Powertrain Control Module (PCM) - 2.OL Duratec-HE (M14),
Vehicles With: PCM Security Shield c
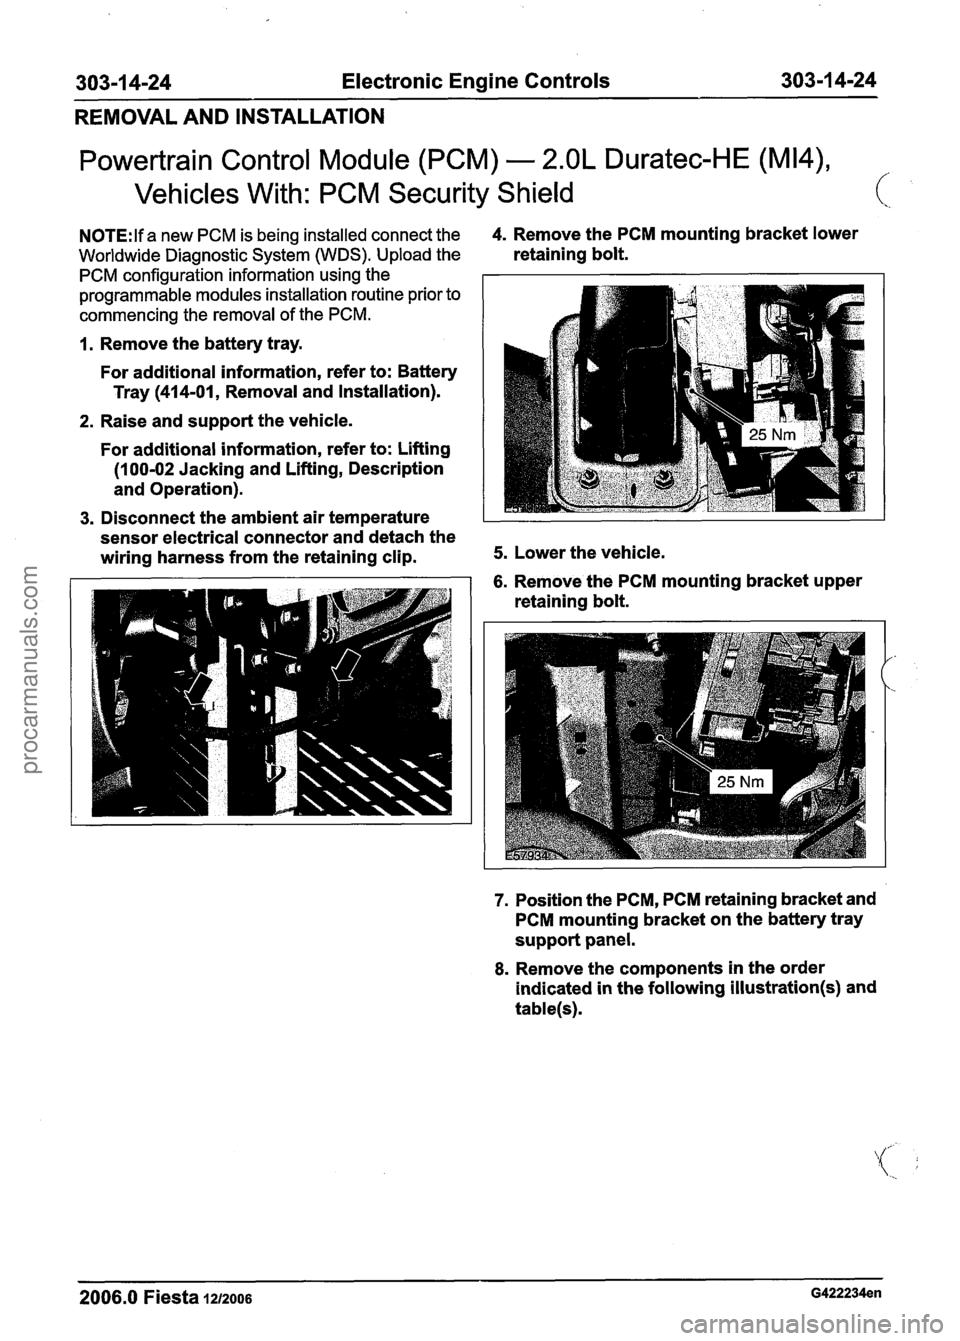
N0TE:lf a new PCM is being installed connect the 4. Remove the PCM mounting bracket lower
Worldwide Diagnostic System (WDS). Upload the retaining bolt.
PCM configuration information using the
programmable modules installation routine prior to
commencing the removal of the PCM.
1. Remove the battery tray.
For additional information, refer to: Battery
Tray
(414-01, Removal and Installation).
2. Raise and support the vehicle.
For additional information, refer to: Lifting
(1 00-02 Jacking and Lifting, Description
and Operation).
3. Disconnect the ambient air temperature
sensor electrical connector and detach the
wiring harness from the retaining clip.
5. Lower the vehicle.
6. Remove the PCM mounting bracket upper
retaining bolt.
7. Position the PCM, PCM retaining bracket and
PCM mounting bracket on the battery tray
support panel.
8. Remove the components in the order
indicated in the following
illustration(s) and
table(s).
2006.0 Fiesta 1212006 G422234en
procarmanuals.com
Page 951 of 1226
303-1 4-27 Electronic Engine Controls 303-1 4-27
REMOVAL AND INSTALLATION
Powertrain Control Module (PCM) - 2.OL Duratec-HE (M14),
Vehicles Without: PCM Security Shield
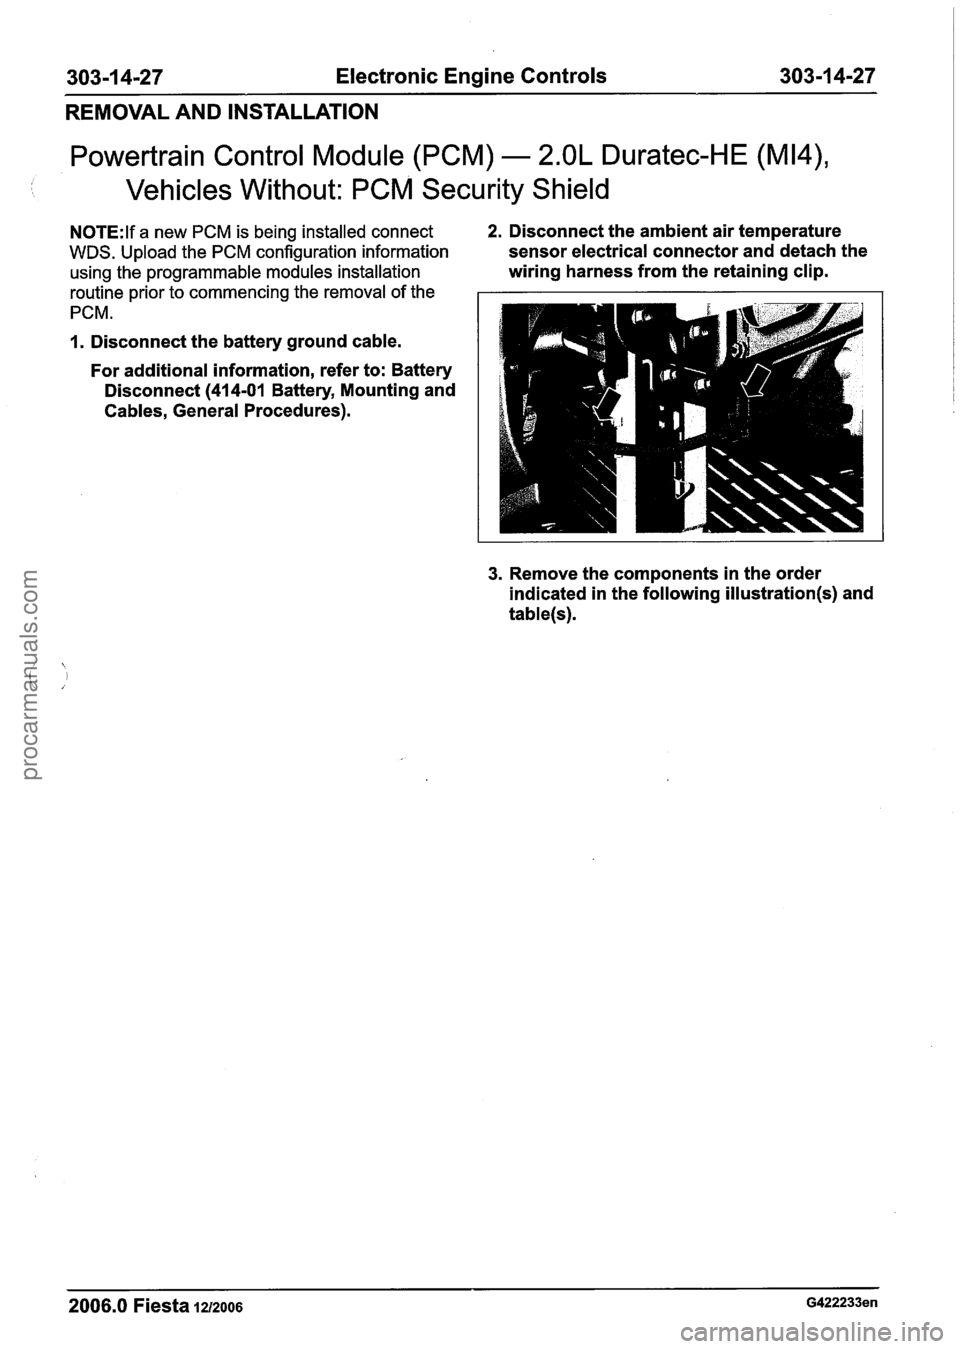
N0TE:lf a new PCM is being installed connect 2. Disconnect the ambient air temperature
WDS. Upload the PCM configuration information sensor electrical connector and detach the
using the programmable modules installation wiring harness from the retaining clip.
routine prior to commencing the removal of the
PCM.
1. Disconnect the battery ground cable.
For additional information, refer to: Battery
Disconnect
(414-01 Battery, Mounting and
Cables, General Procedures).
3. Remove the components in the order
indicated in the following
illustration(s) and
table(s).
2006.0 Fiesta 1212006 G422233en
procarmanuals.com
Page 959 of 1226
303-1 4-35 Electronic Engine Controls 303-1 4-35
REMOVAL AND INSTALLATION
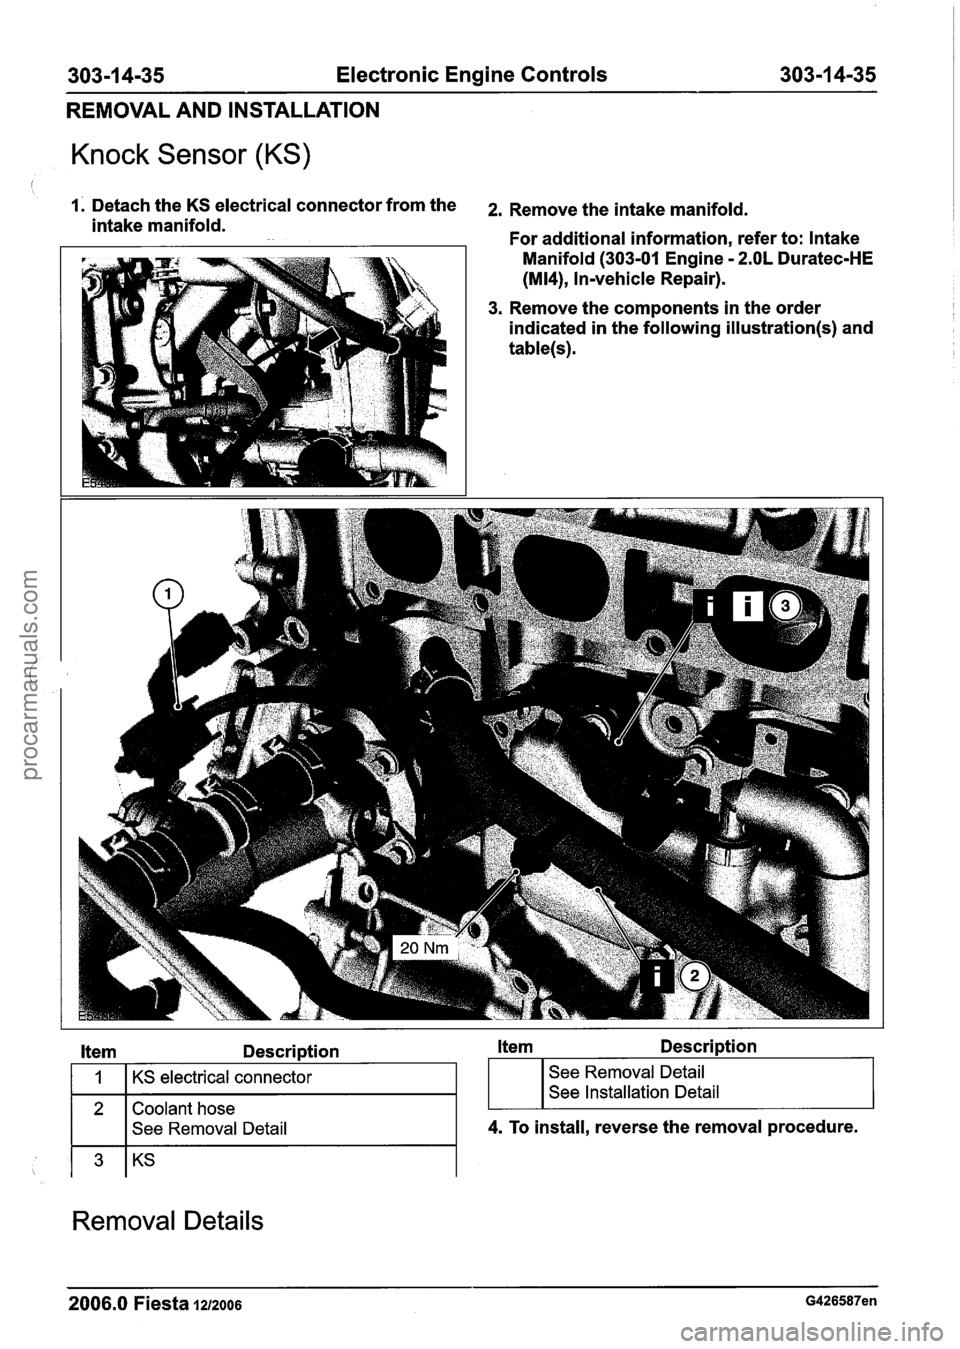
Knock Sensor (KS)
1. Detach the KS electrical connector from the 2, Remove the intake manifold. intake manifold.
For additional information, refer to: Intake
1 Manifold (303-01 Engine - 2.OL Duratec-HE
(M14), Invehicle Repair).
3. Remove the components in the order
indicated in the following
illustration(s) and
table(s).
Item Description Item Description
2 Coolant hose
I I See Removal Detail
1
I I
4. To install, reverse the removal procedure.
KS electrical connector
Removal Details
; I I
See Removal Detail
See Installation Detail
2006.0 Fiesta 1212006 G426587en
procarmanuals.com
Page 1003 of 1226
Automatic Transmission/Transaxle -
Vehicles With: 4-Speed Automatic
307-01 -43 Transmission (AW81-40) 307-01 -43
DESCRIPTION AND OPERATION
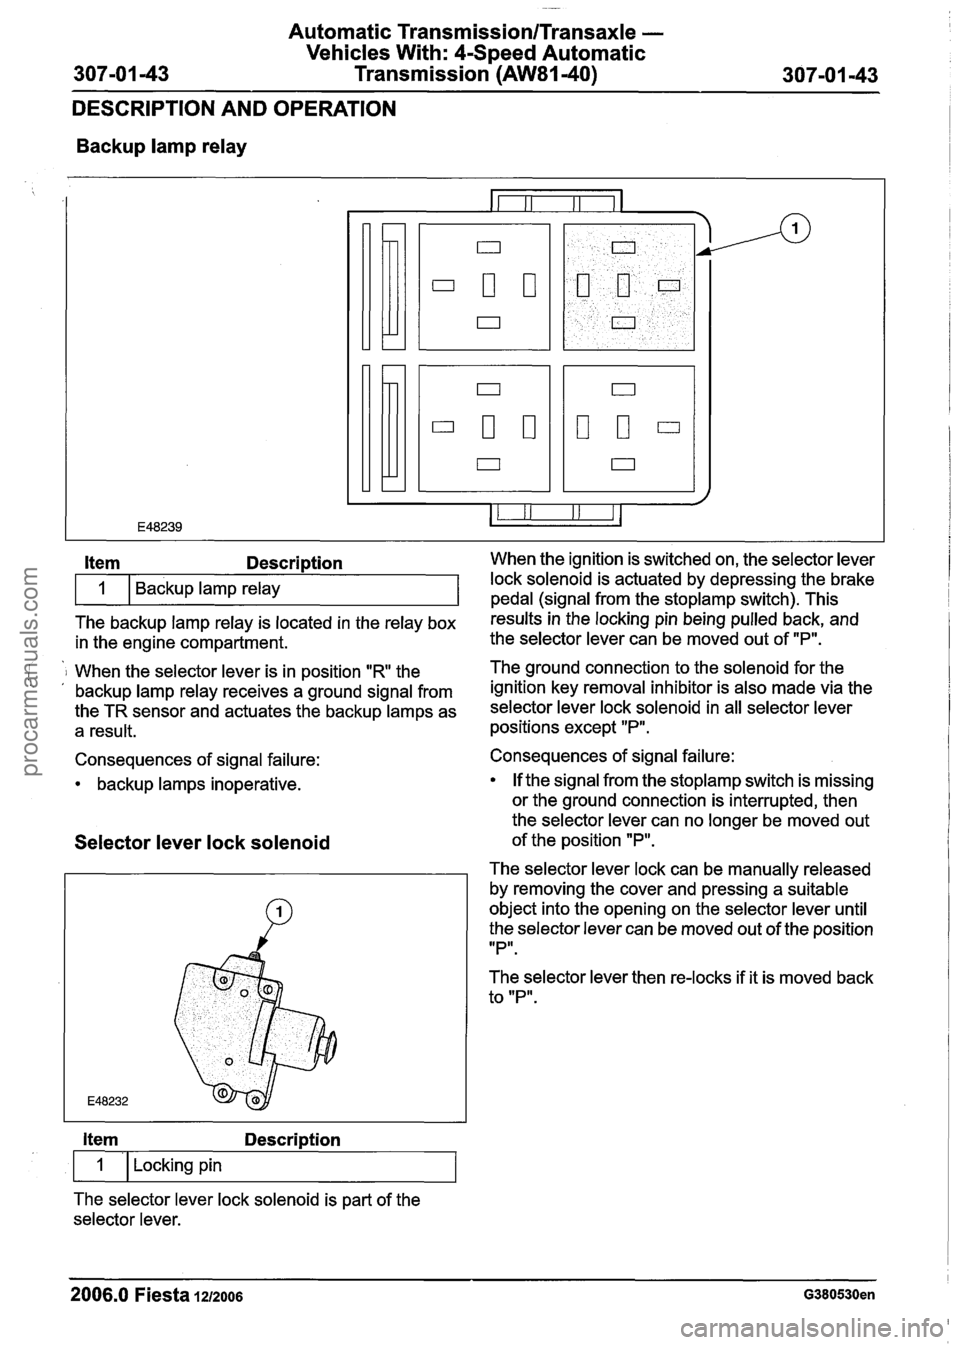
Backup lamp relay
The backup lamp relay is located in the relay box results inthe locking pin being pulled back, and
in the engine compartment. the
selector lever can be moved out of "P".
Item Description When the ignition is switched on, the selector lever
i 1 When the selector lever is in position "R the The ground connection to the solenoid for
the . , backup lamp relay receives a ground signal from ignition key removal inhibitor is also made via the
the TR sensor and actuates the backup lamps as selector lever lock solenoid in all selector lever
a result. positions except "P".
1
Consequences of signal failure:
backup lamps inoperative. Backup lamp relay
Selector
lever lock solenoid
lock solenoid is actuated by depressing the brake
pedal (sianal from the stoplamp switch). This
Item Description
1 I Locking pin
The selector lever lock solenoid is part of the
selector lever. Consequences of signal failure:
If the signal from the
stoplamp switch is missing
or the ground connection is interrupted, then
the selector lever can no longer be moved out
of the position
"P".
The selector lever lock can be manually released
by removing the cover and pressing a suitable
object into the opening on the selector lever until
the selector lever can be moved out of the position
IIPlr.
The selector lever then re-locks if it is moved back
to "P".
2006.0 Fiesta 1212006 G380530en
procarmanuals.com
Page 1009 of 1226
Automatic Transmission/Transaxle -
Vehicles With: 4-Speed Automatic
307-01 49 Transmission (AW81-40) 307-01 -49
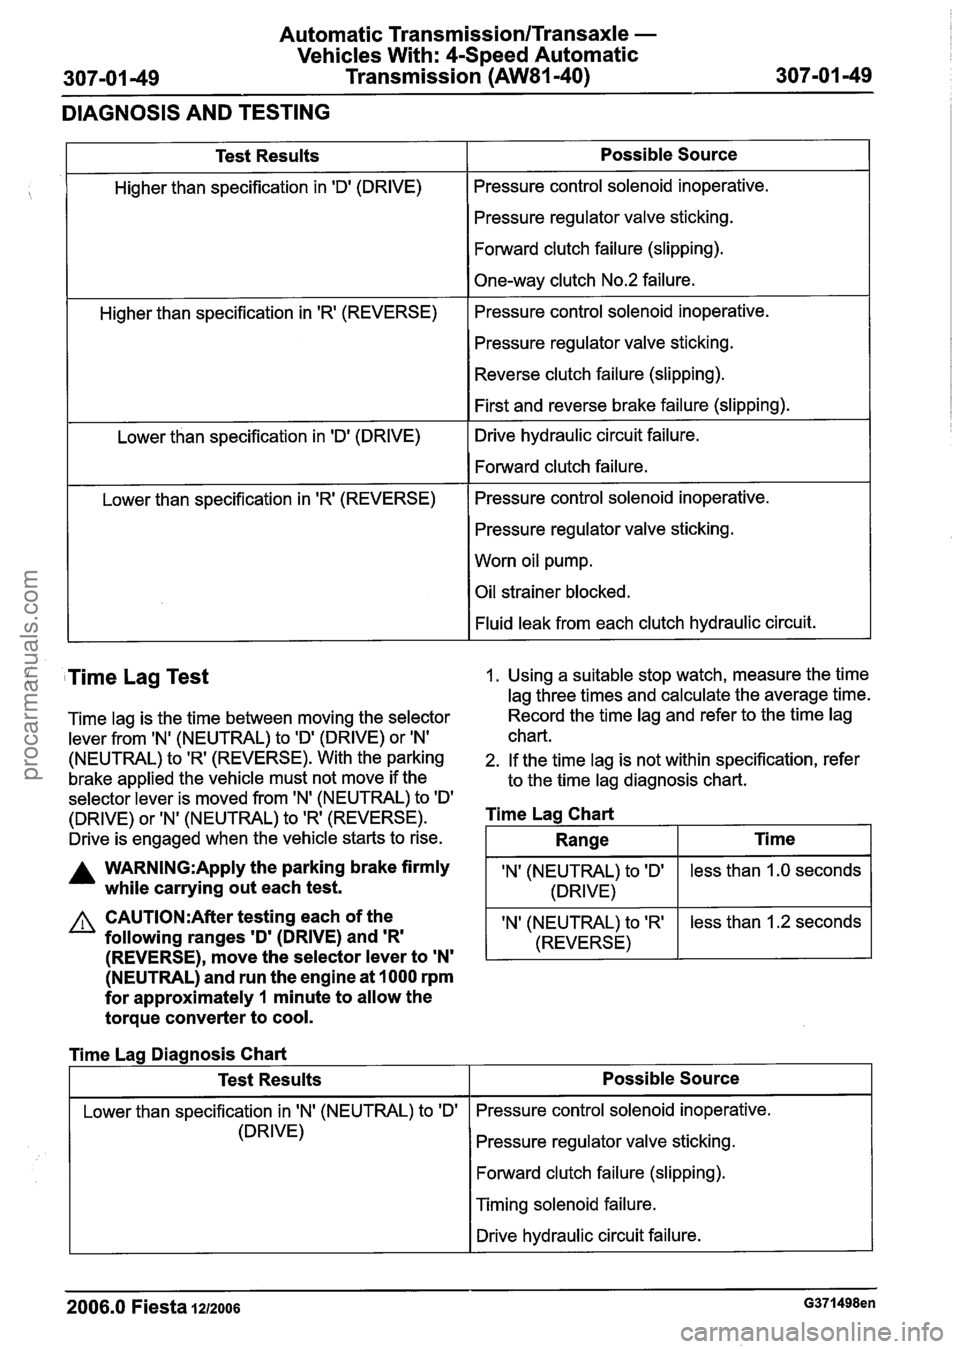
DIAGNOSIS AND TESTING
Test Results
Higher than specification in 'Dl (DRIVE)
Higher than specification in
'R' (REVERSE)
Lower than specification in 'D' (DRIVE)
Lower than specification in
'R' (REVERSE)
Possible Source
Pressure control solenoid inoperative.
Pressure regulator valve sticking.
Forward clutch failure (slipping).
One-way clutch No.2 failure.
Pressure control solenoid inoperative.
Pressure regulator valve sticking.
Reverse clutch failure (slipping).
First and reverse brake failure (slipping).
Drive hydraulic circuit failure.
Forward clutch failure.
Pressure control solenoid inoperative.
Pressure regulator valve sticking.
Worn oil pump.
Oil strainer blocked.
Fluid leak from each clutch hydraulic circuit.
( Time Lag Test 1. Using a suitable stop watch, measure the time
lag three times and calculate the average time.
Time lag is the time between moving the selector Record the
time lag and refer to the time lag
lever from
IN' (NEUTRAL) to ID' (DRIVE) or IN' chart.
(NEUTRAL) to 'R' (REVERSE). With the parking 2. If the time lag is not within specification, refer
brake applied the vehicle must not move if the
to the time lag diagnosis chart.
selector lever is moved from 'N' (NEUTRAL) to
ID'
(DRIVE) or 'N' (NEUTRAL) to 'R' (REVERSE). Time Lag Chart
Drive is engaged when the vehicle starts to rise.
A WARN1NG:Apply the parking brake firmly IN' (NEUTRAL) to ID' while carrying out each test. 1 (DRIVE)
(NEUTRAL) and run the engine at 1000 rpm
for approximately
1 minute to allow the
torque converter to cool.
less than 1.0 seconds
CAUTI0N:After testing each of the
following ranges
'D' (DRIVE) and 'R'
Range
I Lower than specification in IN' (NEUTRAL) to 'Dl I Pressure control solenoid inoperative.
Ti me
(REVERSE), move the selector lever to 'N'
'N' (NEUTRAL) to 'R'
(REVERSE)
Time Lag Diagnosis Chart
(DRIVE) less
than 1.2 seconds
Test Results
Pressure regulator valve sticking.
Forward clutch failure (slipping).
Possible Source
I Timing solenoid failure.
I I Drive hydraulic circuit failure. I
2006.0 Fiesta IZIZOO~ G371498en
procarmanuals.com
Page 1013 of 1226
Automatic Transmission/Transaxle -
Vehicles With: 4-Speed Automatic
307-01 -53 Transmission (AW81-40)
307-01 -53
GENERAL PROCEDURES
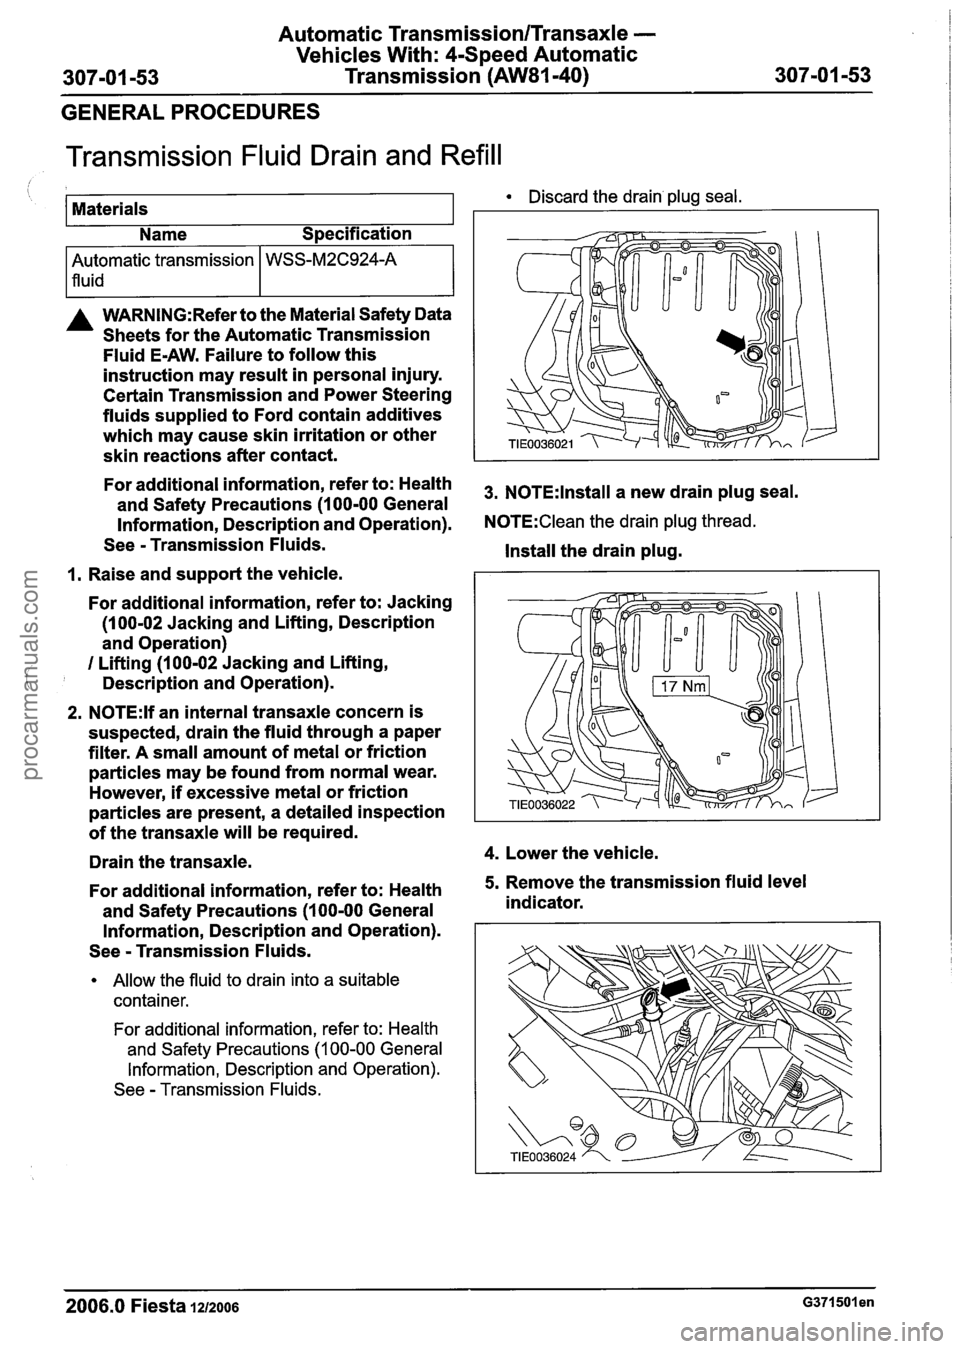
Transmission Fluid Drain and Refill
I I Name Specification
Discard the drain plug seal.
1 Materials
--
A WARNING:Refer to the Material Safety Data
Sheets for the Automatic Transmission
Fluid
E-AW. Failure to follow this
instruction may result in personal injury.
Certain Transmission and Power Steering
fluids supplied to Ford contain additives
which may cause skin irritation or other
skin reactions after contact.
I I
Automatic transmission
lfluid-
For additional information, refer to: Health 3, NOTE:lnstall a new drain plug seal. and Safety Precautions (1 00-00 General
Information, Description and Operation).
N0TE:Clean the drain plug thread.
See - Transmission Fluids.
Install the drain plug.
1. Raise and support the vehicle.
WSS-M2C924-A
For additional information, refer to: Jacking
(1 00-02 Jacking and Lifting, Description
and Operation)
I Lifting (100-02 Jacking and Lifting,
Description and Operation).
2. N0TE:lf an internal transaxle concern is
suspected, drain the fluid through a paper
filter. A small amount of metal or friction
particles may be found from normal wear.
However,
if excessive metal or friction
particles are present, a detailed inspection
of the transaxle will be required.
Drain the transaxle.
4. Lower the vehicle.
For additional information, refer to: Health
5. Remove the transmission fluid level
and Safety Precautions
(1 00-00 General indicator.
Information, Description and Operation).
See
- Transmission Fluids.
Allow the fluid to drain into a suitable
container.
For additional information, refer to: Health
and Safety Precautions
(1 00-00 General
Information, Description and Operation).
See
- Transmission Fluids.
2006.0 Fiesta 1212006 ~371501 en
procarmanuals.com
Page 1018 of 1226
Automatic Transmission/Transaxle -
Vehicles With: 4-Speed Automatic
307-01 -58 Transmission
(AW81-40) 307-01 -58
IN-VEHICLE REPAIR
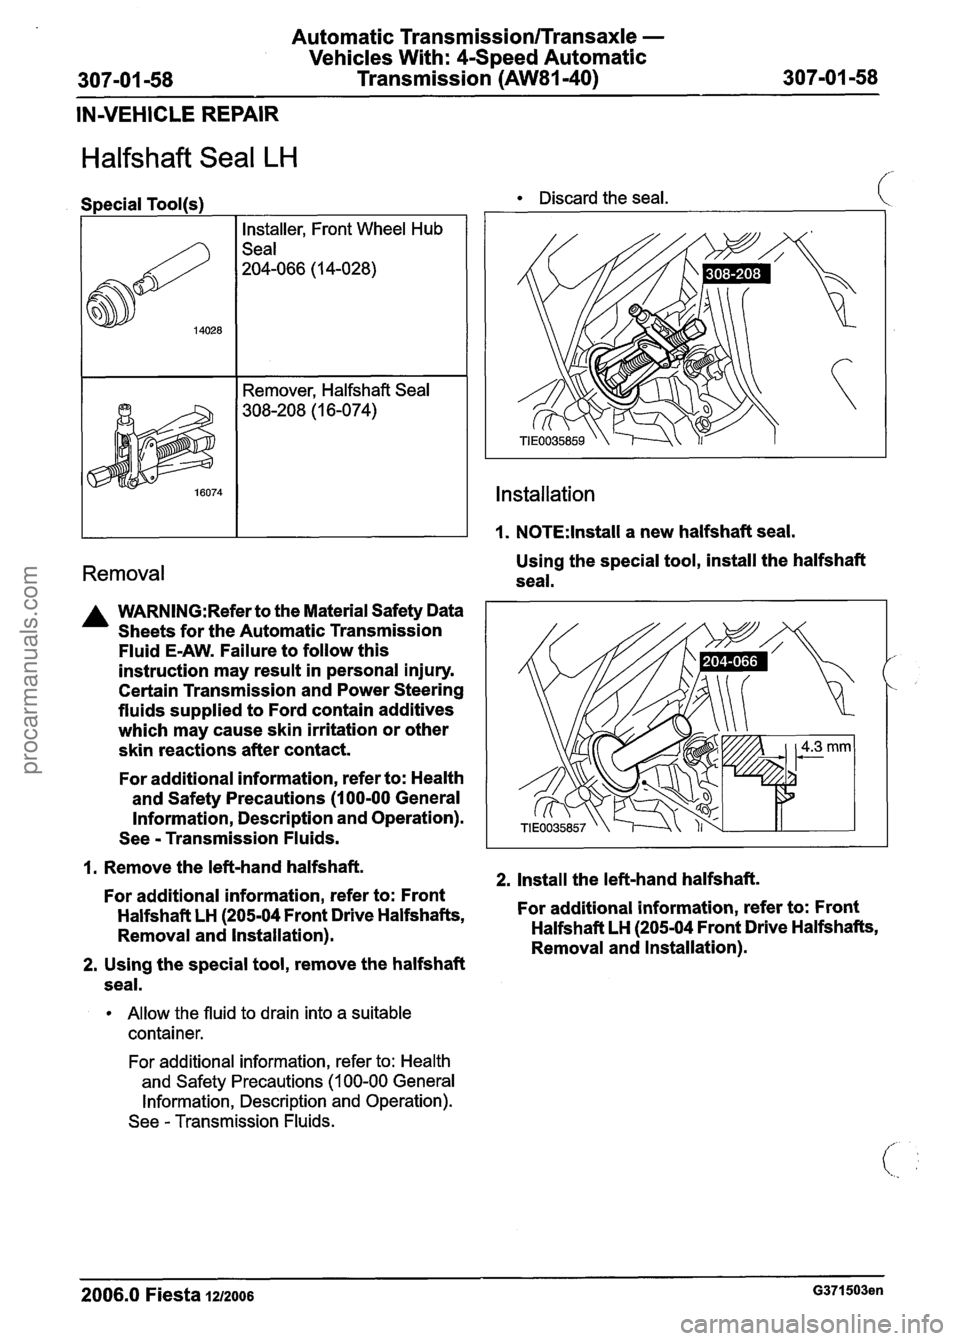
Halfshaft Seal LH
I. 1.NOTE:lnstall a new halfshaft seal.
Special
Tool(s) Discard
the seal.
Removal
Installer, Front Wheel Hub
Seal
204-066 (1 4-028)
Remover, Halfshaft Seal
308-208 (1 6-074)
A WARN1NG:Refer to the Material Safety Data
Sheets for the Automatic Transmission
Fluid
E-AW. Failure to follow this
instruction may result in personal injury.
Certain Transmission and Power Steering
fluids supplied to Ford contain additives
which may cause skin irritation or other
skin reactions after contact.
Installation
For additional information, refer to: Health
and Safety Precautions
(1 00-00 General
Information, Description and Operation).
See
- Transmission Fluids. Using the
special tool, install the halfshaft
seal.
1. Remove the left-hand halfshaft.
2. Install the left-hand halfshaft.
For additional information, refer to: Front
Halfshaft LH
(205-04 Front Drive Halfshafts, For additional
information, refer to: Front
Removal and lnstallation). Halfshaft
LH (205-04 Front Drive Halfshafts,
Removal and lnstallation).
2. Using the special tool, remove the halfshaft
seal.
Allow the fluid to drain into a suitable
container.
For additional information, refer to: Health
and Safety Precautions
(1 00-00 General
Information, Description and Operation).
See
- Transmission Fluids.
-
2006.0 Fiesta 1212006 G371503en
procarmanuals.com
Page 1019 of 1226
Automatic Transmission/Transaxle -
Vehicles With: 4-Speed Automatic
307-01 -59 Transmission (AW81-40) 307101 -59
IN-VEHICLE REPAIR
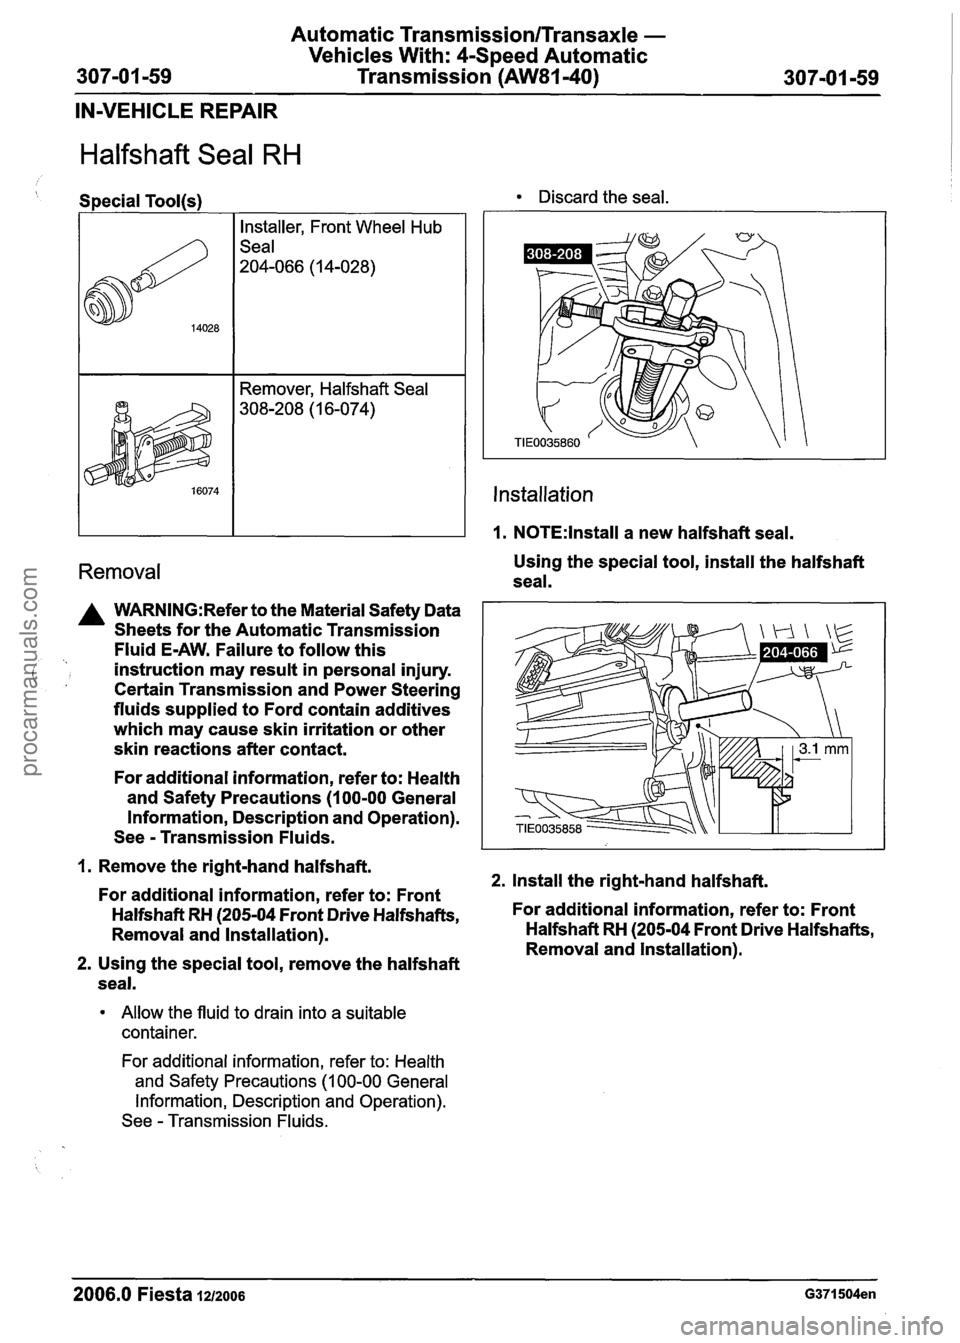
Halfshaft Seal RH
Special Tool@) Discard the seal.
Installer, Front Wheel Hub
Seal
204-066
(1 4-028)
A WARNING:Refer to the Material Safety Data
Sheets for the Automatic Transmission
Fluid E-AW. Failure to follow this
( instruction may result in personal injury. ' , Certain Transmission and Power Steering
fluids supplied to Ford contain additives
which may cause skin irritation or other
skin reactions after contact.
For additional information, refer to: Health
and Safety Precautions (100-00 General
Information, Description and Operation).
See
- Transmission Fluids.
Remover, Halfshaft Seal
308-208
(1 6-074)
1. Remove the right-hand halfshaft. 2. Install the right-hand halfshaft.
For additional information, refer to: Front
Halfshaft
RH (205-04 Front Drive Halfshafts, For
additional information, refer to: Front
Removal and Installation). Halfshaft
RH (205-04 Front Drive Halfshafts,
Removal and lnstallation).
2. Using the special tool, remove the halfshaft
seal.
lnstallation
1. N0TE:lnstall a new halfshaft seal.
Allow the fluid to drain into a suitable
container.
Removal Using the special tool, install the halfshaft
seal.
For additional information, refer to: Health
and Safety Precautions
(1 00-00 General
Information, Description and Operation).
See
- Transmission Fluids.
2006.0 Fiesta 1212006 G371504en
procarmanuals.com