303-01A FORD FIESTA 2007 User Guide
[x] Cancel search | Manufacturer: FORD, Model Year: 2007, Model line: FIESTA, Model: FORD FIESTA 2007Pages: 1226, PDF Size: 61.26 MB
Page 554 of 1226
Engine - 1.25L Duratec-1 6V (Sigma)ll.4L
303-01A-78 Duratec-1 6V (Sigma)/l .6L Duratec-1 6V (Sigma) 303=01 A178
REMOVAL
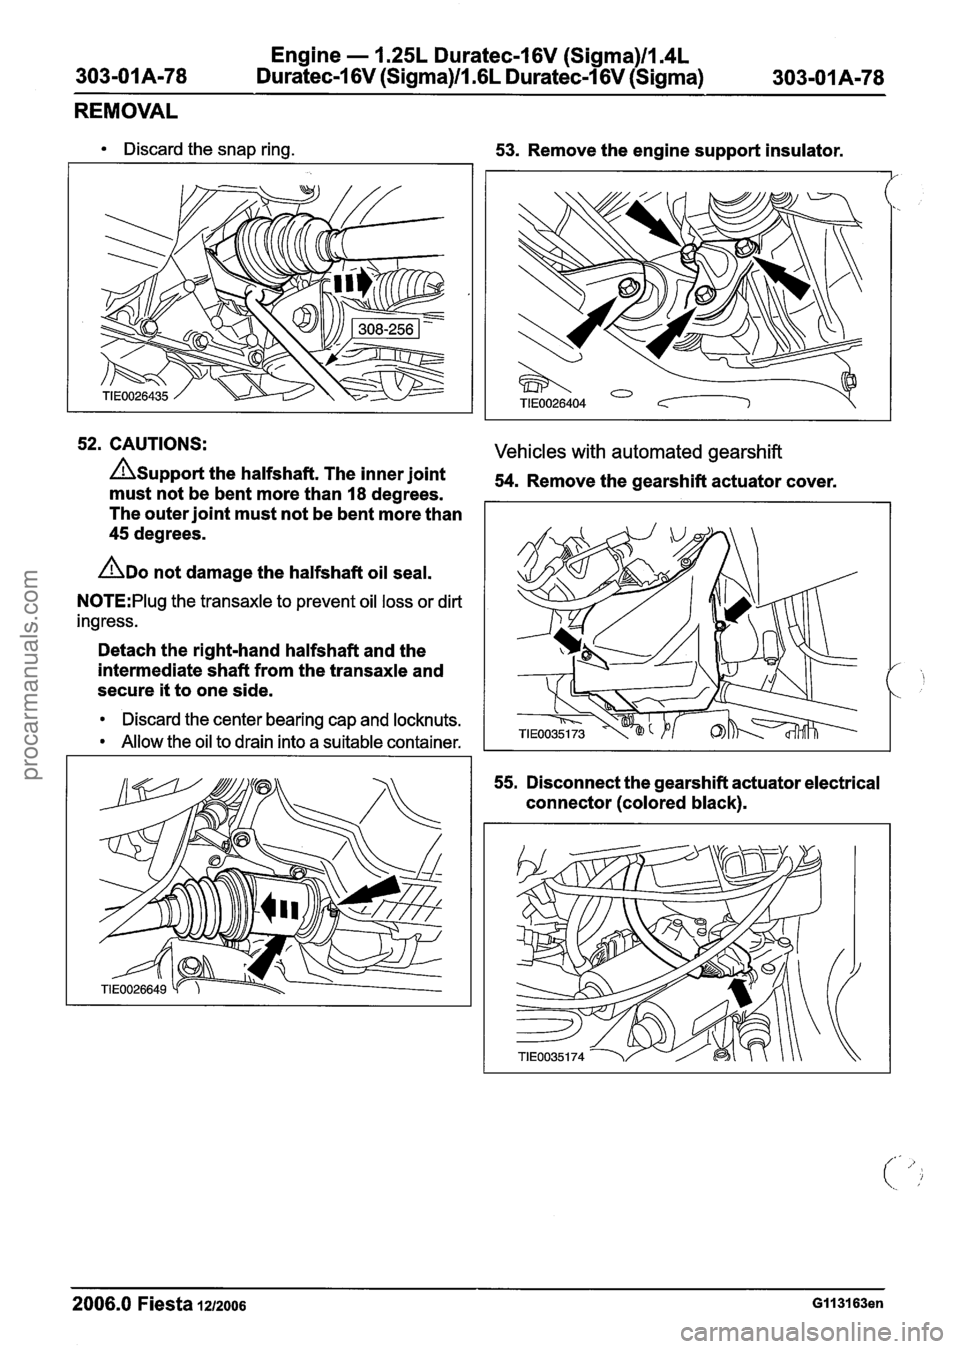
Discard the snap ring.
53. Remove the engine support insulator.
52. CAUTIONS: Vehicles with automated gearshift
AUPPO~~ the halfshaft. The inner joint 54. Remove the gearshift actuator cover. must not be bent more than 18 degrees.
The outer joint must not be bent more than
45 degrees.
ADO not damage the halfshaft oil seal.
N0TE:Plug the transaxle to prevent oil loss or dirt
ingress.
Detach the right-hand halfshaft and the
intermediate shaft from the transaxle and
secure
it to one side.
Discard the center bearing cap and locknuts.
Allow the oil to drain into a suitable container.
55.
Disconnect the gearshift actuator electrical
connector (colored black).
2006.0 Fiesta 1212006 GII 31 63en
procarmanuals.com
Page 555 of 1226
Engine - 1.25L Duratec-I 6V (Sigma)llm4L
303-01A-79 Duratec-1 6V (Sigma)/l .6L Duratec-1 6V (Sigma) 303-01 A-79
REMOVAL
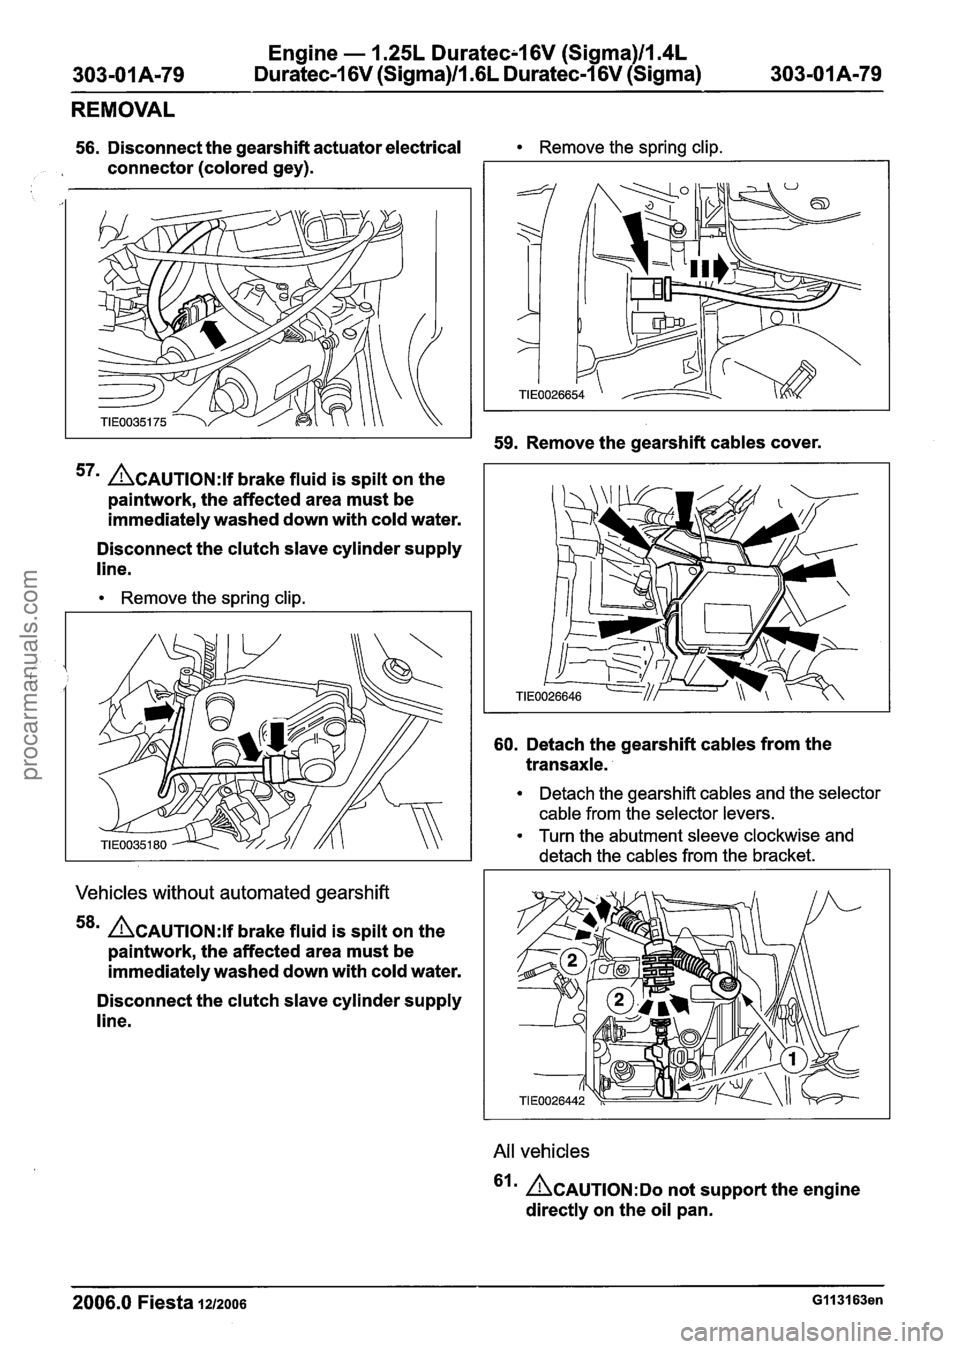
56. Disconnect the gearshift actuator electrical Remove the spring clip.
, connector (colored gey).
59. Remove the gearshift cables cover.
57m ACAUTION:I brake fluid is spilt on the
paintwork, the affected area must be
immediately washed down with cold water.
Disconnect the clutch slave cylinder supply
line.
Remove the spring clip.
Vehicles without automated gearshift
58' ACAUTION:~ brake fluid is spilt on the
paintwork, the affected area must be
immediately washed down with cold water.
Disconnect the clutch slave cylinder supply
line.
60. Detach the gearshift cables from the
transaxle.
Detach the gearshift cables and the selector
cable from the selector levers.
Turn the abutment sleeve clockwise and
detach the cables from the bracket.
All vehicles
'Irn ~CAUTION:DO not support the engine
directly on the oil pan.
2006.0 Fiesta 12/2oo6 G113163en
procarmanuals.com
Page 576 of 1226
Engine - I .25L Duratec-1 6V (Sigma)ll.4L
303-01A-100 Duratec-1 6V (Sigma)ll .6L Duratec-1 6V (Sigma)
303-01 A-I 00
DISASSEMBLY
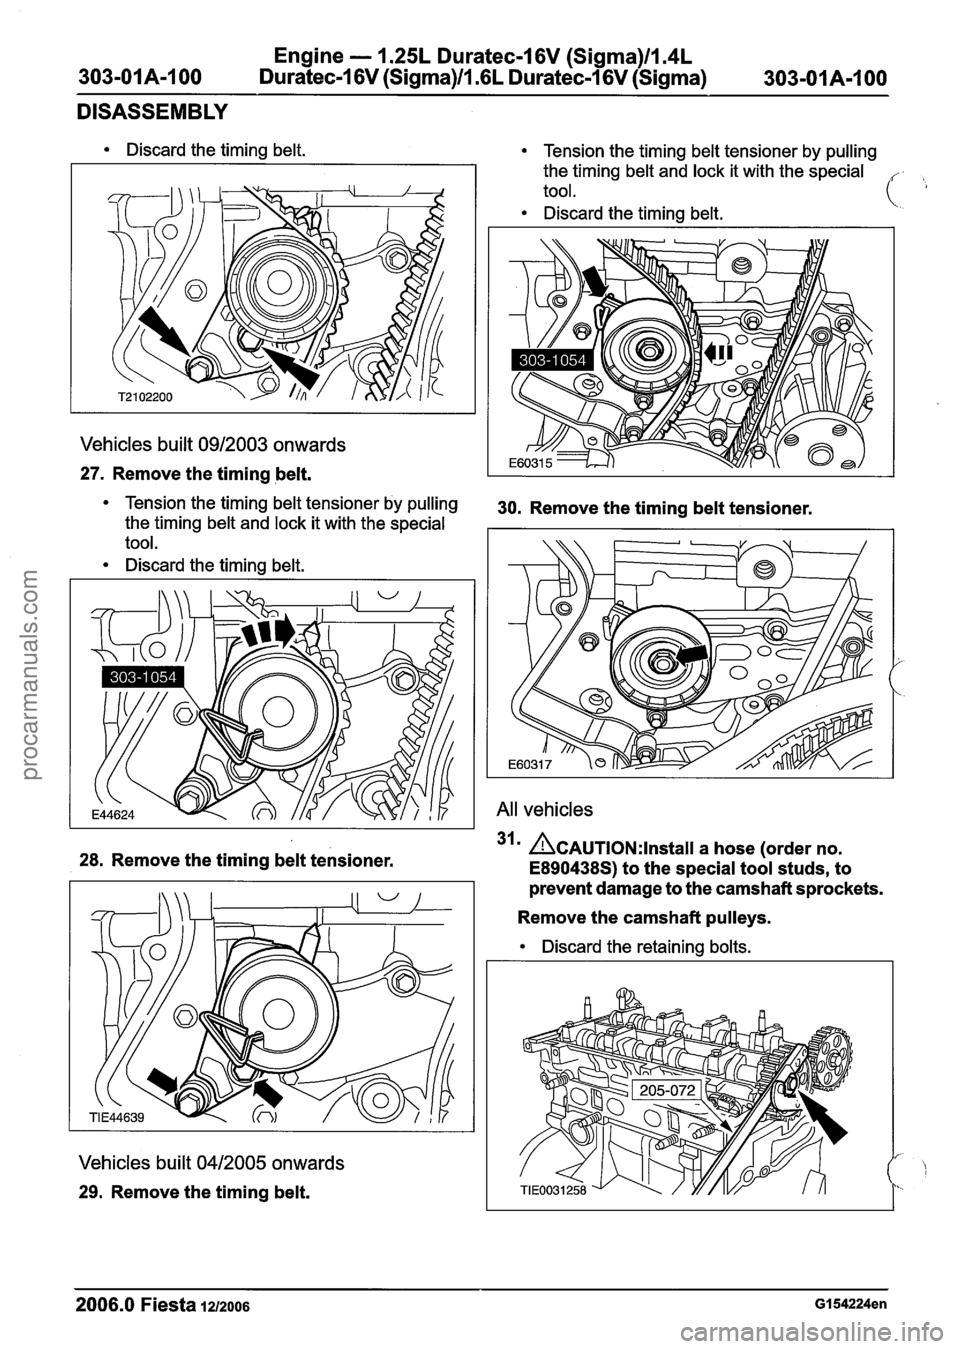
Discard the timing belt.
Vehicles built 0912003 onwards
27. Remove the timing belt.
Tension the timing belt tensioner by pulling
the timing belt and lock it with the special
tool.
Discard the timing belt. r-: 'Ii
Tension the timing belt tensioner by pulling 30. Remove the timing belt tensioner. the timing belt and lock it with the special
tool.
Discard the timing belt.
28. Remove the timing belt tensioner.
Vehicles built 0412005 onwards
29. Remove the timing belt.
All vehicles
31m &~~~l~~:lnstall a hose (order no.
E890438S) to the special tool studs, to
prevent damage to the camshaft sprockets.
Remove the camshaft pulleys.
Discard the retaining bolts.
2006.0 Fiesta 1212006 GI 54224en
procarmanuals.com
Page 577 of 1226

Engine - 1.25L Duratec-1 6V (Sigma)llI4L
Duratec-1 6V (Sigma)lI.GL Duratec-1 6V (Sigma) 303-01A-101
DISASSEMBLY
32. Remove the crankshaft timing belt pulley. 35. Disconnect the positive crankcase
ventilation (PCV) hose from the PCV cover.
33. Remove the timing belt rear cover.
34m ACAUTION: ~ee~ the camshaft bearing
caps and the camshafts in order for
installation.
36. Detach the oil level indicator and tube from
the intake manifold.
Detach the knock sensor (KS) electrical
connector from the oil level indicator tube.
Remove the camshafts. 37. Remove the intake manifold lower bolt.
Slacken each camshaft bearing cap retaining
bolt in the sequence shown by one turn until
the camshaft is released.
Remove the camshaft bearing caps.
Remove and discard the camshaft seals.
38.
CAUTIONS:
A~~ace the cylinder head on a suitable
soft surface.
A~emove the cylinder head bolts in the
sequence shown.
2006.0 Fiesta 1212006 G 1 54224en
procarmanuals.com
Page 579 of 1226
Engine - 1.25L Duratec-1 6V (Sigma)llm4L
303-01 A-I 03 Duratec-1 6V (Sigma)/l .6L Duratec-1 6V (Sigma) 303-01A-I 03
DISASSEMBLY
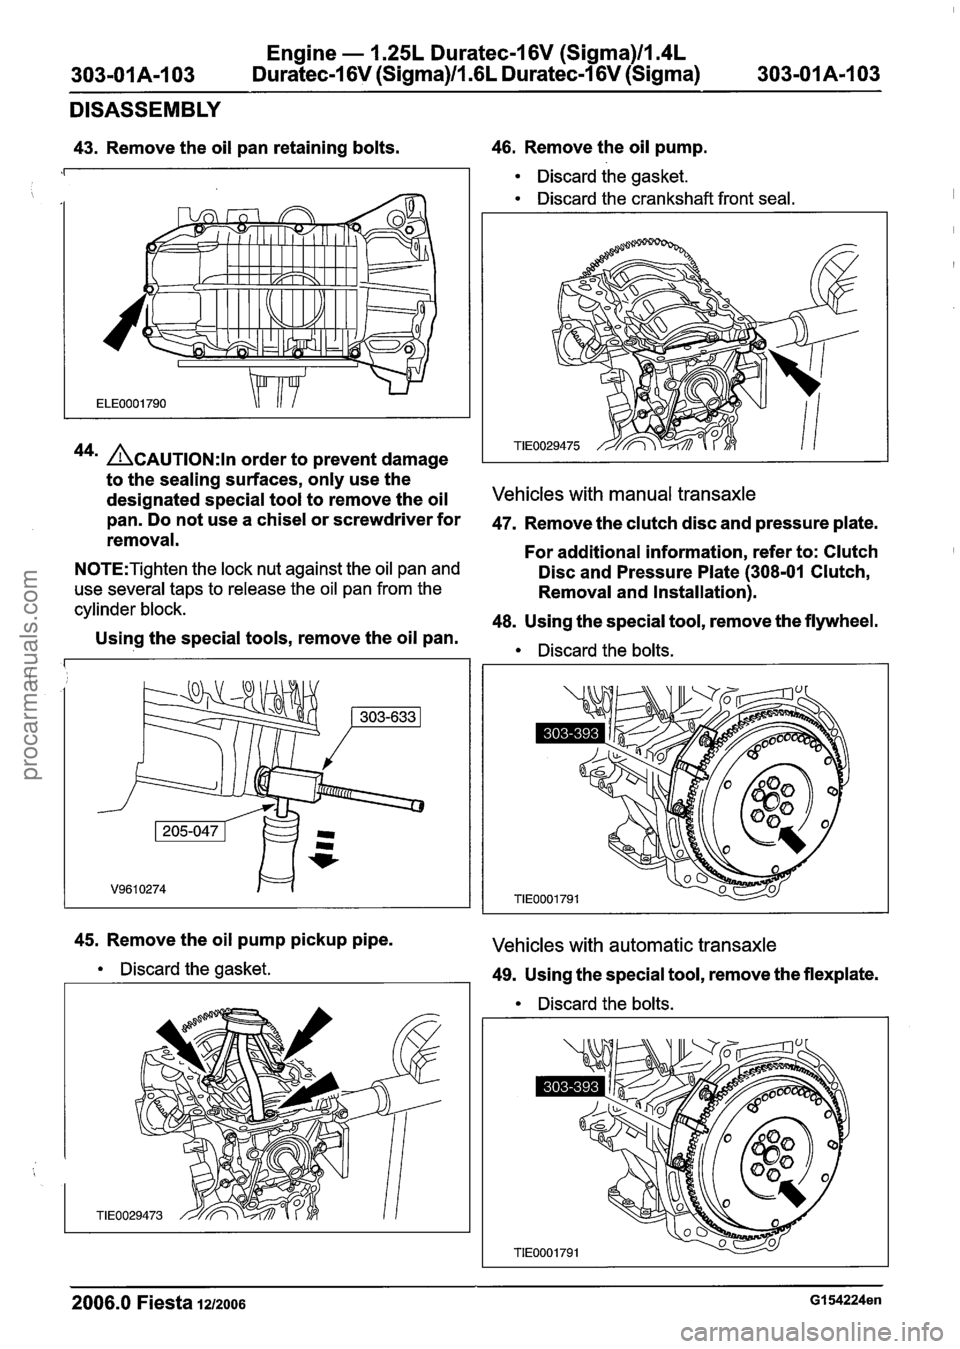
43. Remove the oil pan retaining bolts. 46. Remove the oil pump.
Discard the gasket.
Discard the crankshaft front seal.
44m ACAUTION:~~ order to prevent damage
to the sealing surfaces, only use the
designated special tool to remove the oil
Vehicles with manual transaxle
PanmDonotuseachiselorscrewdriverfor 47. Removetheclutchdiscandpressureplate.
removal. For additional information, refer to: Clutch
N0TE:Tighten the lock nut against the oil pan and Disc and Pressure Plate (308-01 Clutch,
use several taps to release the oil pan from the Removal and Installation).
cylinder block. 48. Using the special tool, remove the flywheel.
Using the special tools, remove the oil pan.
Discard the bolts.
45. Remove the oil pump pickup pipe. Vehicles with automatic transaxle
Discard the gasket. 49. Using the special tool, remove the flexplate.
2006.0 Fiesta 1212006 GI 54224en
procarmanuals.com
Page 584 of 1226
Engine - 1.25L Duratec-1 6V (Sigma)ll.4L
303-OIA-1 08 Duratec-1 6V (Sigma)/l .6L Duratec-1 6V (Sigma) 303-01A-I 08 --
ASSEMBLY
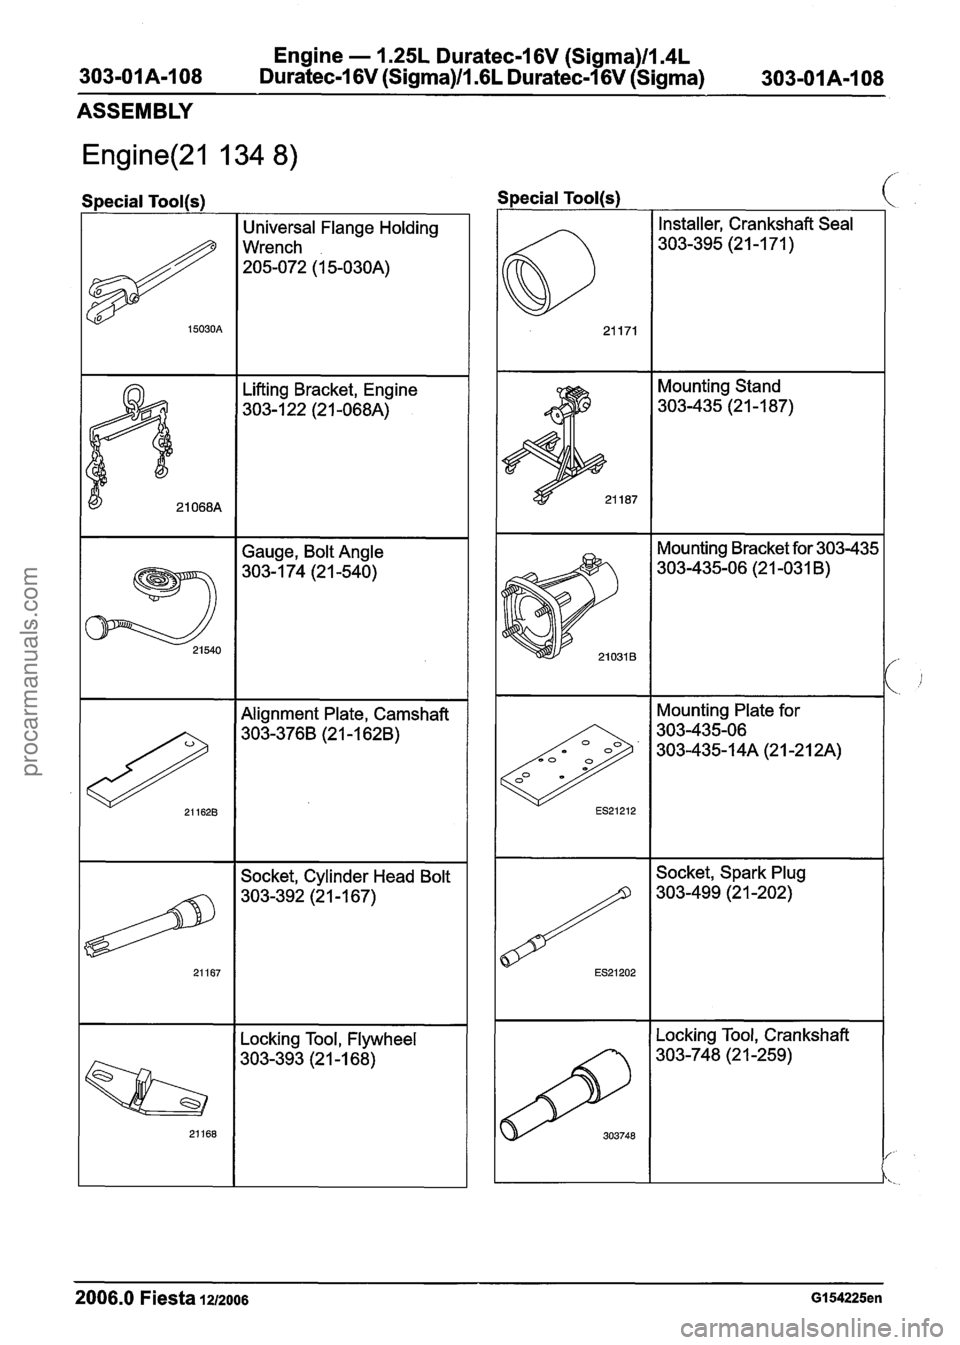
Special Tool(s)
I Universal Flange Holding
Wrench
205-072 (1 5-030A)
Lifting Bracket, Engine
303-1 22 (2 1 -068A)
21 068A
I 1 Alignment Plate, Camshaft I
21 540
Socket, Cylinder Head Bolt
Gauge,
Bolt Angle
303- 1 74 (2 1 -540)
I I Locking Tool, Flywheel I
Special Tool(s)
Installer, Crankshaft Seal
303-395 (21 -1 71 )
Mounting Stand
303-435 (2 1 -1 87)
Mounting Bracket for 303-435
303-435-06 (21 -031
B)
c
Mounting Plate for
2006.0 Fiesta 1212006 GI 54225en
..
ES21202
Socket, Spark Plug
303-499 (21 -202)
procarmanuals.com
Page 586 of 1226
Engine - 1.25L Dura
303-01A-11 0 Duratec-16V (Sigma)ll.(
:ec-16V (Sigma)llm4L
L Duratec-16V (Sigma)
303-01 A-I 10
ASSEMBLY
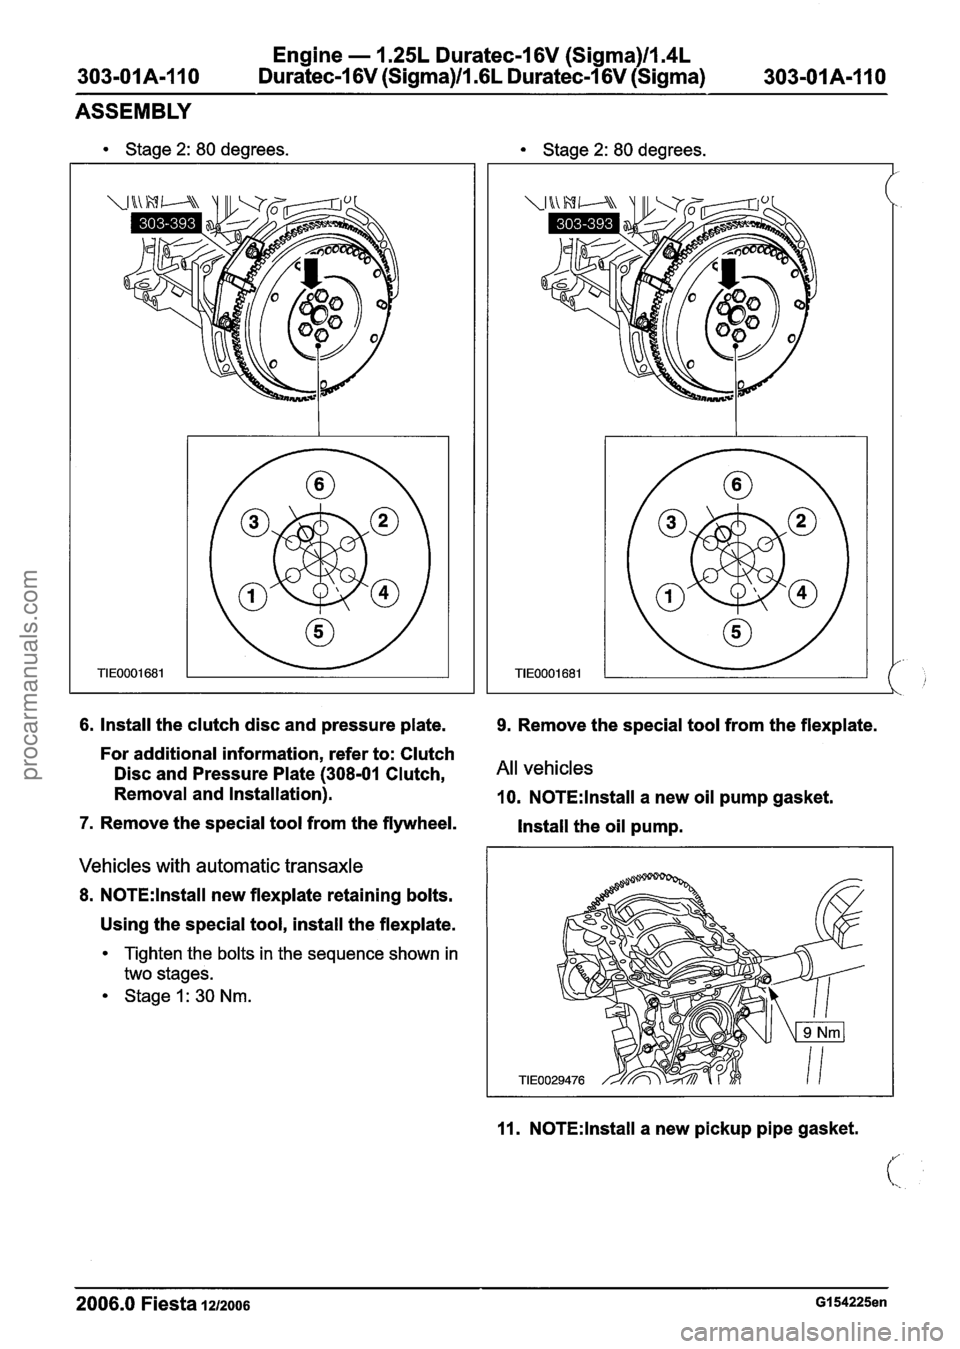
Stage 2: 80 degrees. Stage 2: 80 degrees.
6. Install the clutch disc and pressure plate. 9. Remove the special tool from the flexplate.
For additional information, refer to: Clutch
Disc and Pressure Plate
(308-01 Clutch, All vehicles
Removal and Installation). 10. N0TE:lnstall a new oil pump gasket.
7. Remove the special tool from the flywheel.
Install the oil pump.
Vehicles with automatic transaxle
8. N0TE:lnstall new flexplate retaining bolts.
Using the special tool, install the flexplate.
Tighten the bolts in the sequence shown in
two stages.
Stage1:30Nm.
11. N0TE:lnstall a new pickup pipe gasket.
2006.0 Fiesta 1212006 GI 54225en
procarmanuals.com
Page 589 of 1226
Engine - 1.25L Duratec-1 6V (Sigma)ll.4L
303-01A-I13 Duratec-1 6V (Sigma)/l .6L Duratec-1 6V (Sigma)
303-01 A-I 13
ASSEMBLY
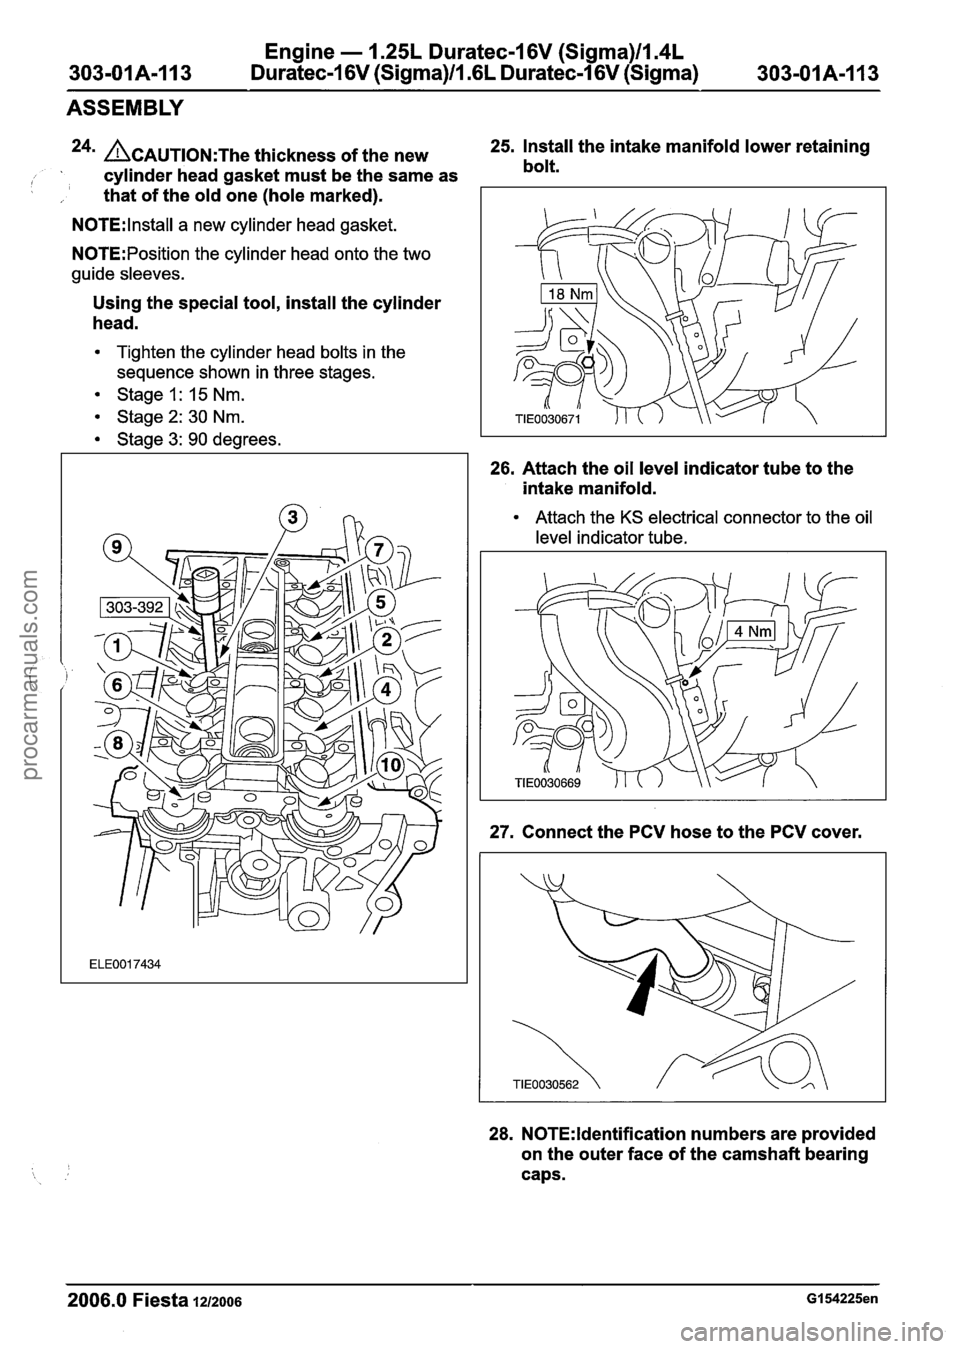
24n ACAUTION:T~~ thickness of the new 25.
Install the intake manifold lower retaining
, cylinder head gasket must be the same as bolt.
I , that
of the old one (hole marked).
N0TE:lnstall a new cylinder head gasket.
N0TE:Position the cylinder head onto the two
guide sleeves.
Using the special tool, install the cylinder
head.
Tighten the cylinder head bolts in the
sequence shown in three stages.
Stage 1: 15 Nm.
Stage2: 30 Nm.
Stage 3: 90 degrees.
26. Attach the oil level indicator tube to the
intake manifold.
Attach the KS electrical connector to the oil
level indicator tube.
27. Connect the PCV hose to the PCV cover.
28. N0TE:ldentification numbers are provided
on the outer face of the camshaft bearing
caps.
2006.0 Fiesta 1212006 GI 54225en
procarmanuals.com
Page 591 of 1226
Engine - 1.25L Dura
303-01A-115 Duratec-1 6V (Sigma)ll.(
tec-16V (Sigma)ll.4L
iL Duratec-1 6V (Sigma) 303-01A-I15
ASSEMBLY
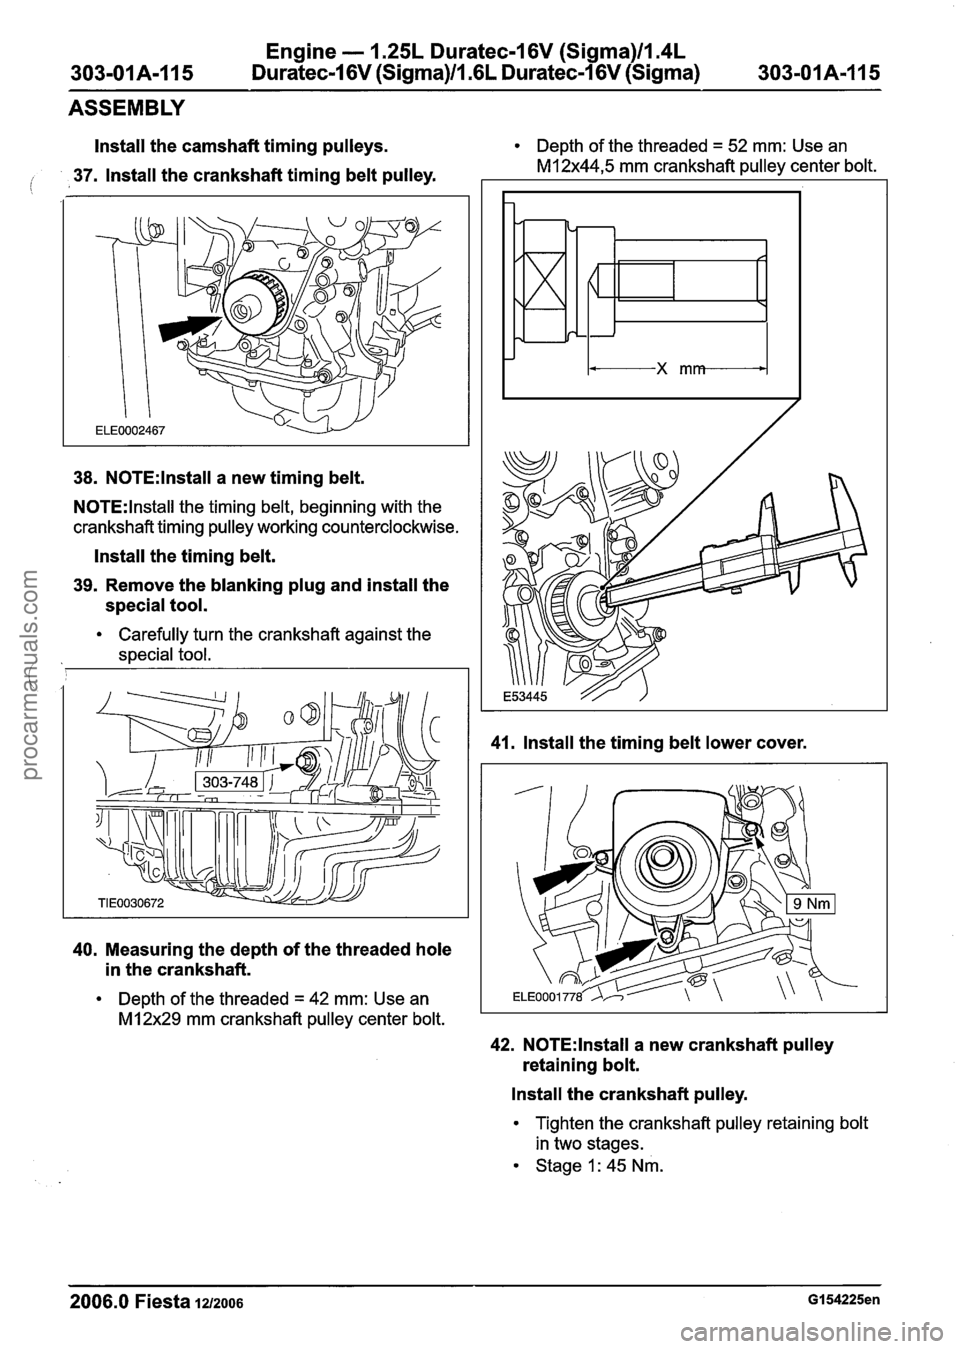
Install the camshaft timing pulleys.
io 37. Install the crankshaft timing belt pulley.
38. N0TE:lnstall a new timing belt.
N0TE:lnstall the timing belt, beginning with the
crankshaft timing pulley working counterclockwise.
Install the timing belt.
39. Remove the blanking plug and install the
special tool.
Carefully turn the crankshaft against the
,I special tool.
40. Measuring the depth of the threaded hole
in the crankshaft.
Depth of the threaded = 42 mm: Use an
MI 2x29 mm crankshaft pulley center bolt. Depth
of the threaded
= 52 mm: Use an
M12x44,5 mm crankshaft pulley center bolt.
41. Install the timing belt lower cover.
42. N0TE:lnstall a new crankshaft pulley
retaining bolt.
Install the crankshaft pulley.
Tighten the crankshaft pulley retaining bolt
in two stages.
Stage 1: 45 Nm.
2006.0 Fiesta 1212006 GI 54225en
procarmanuals.com
Page 599 of 1226
Engine - 1.25L Duratec-1 6V (Sigma)ll.4L
303-01A-123 Duratec-1 6V (Sigma)/l .6L Duratec-1 6V (Sigma) 303-01 A-I 23
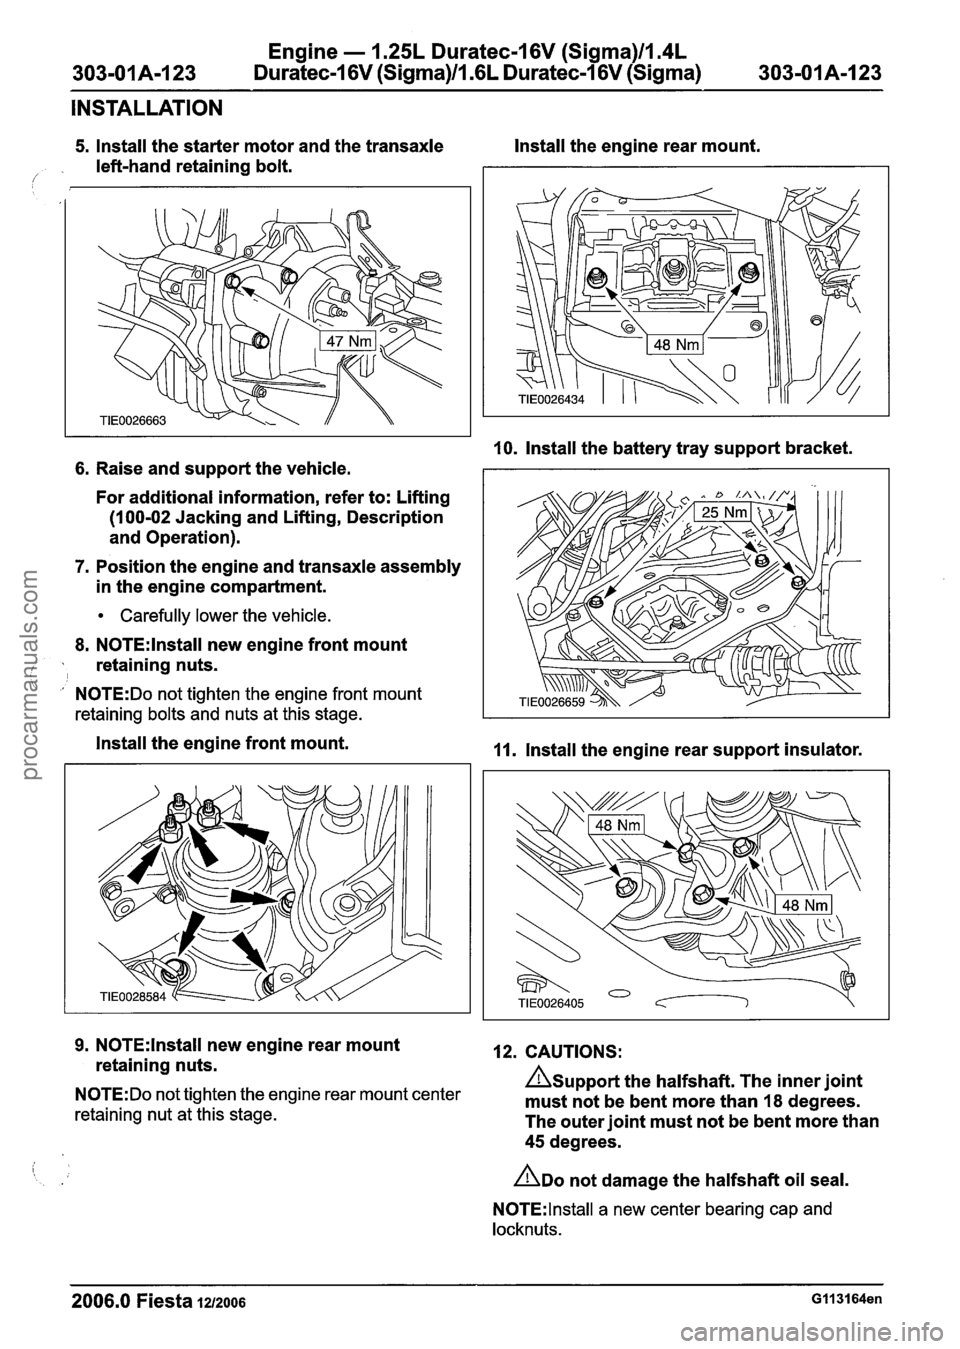
INSTALLATION
5. Install the starter motor and the transaxle Install the engine rear mount.
left-hand retaining bolt.
/'
10. lnstall the battery tray support bracket.
6. Raise and support the vehicle.
For additional information, refer to: Lifting
(1 00-02 Jacking and Lifting, Description
and Operation).
7. Position the engine and transaxle assembly
in the engine compartment.
Carefully lower the vehicle.
8.
N0TE:lnstall new engine front mount
, retaining nuts. ' I ' N0TE:Do not tighten the engine front mount
retaining bolts and nuts at this stage.
Install the engine front mount. 11. Install the engine rear support insulator.
9.
N0TE:lnstall new engine rear mount 12. CAUTIONS:
retaining nuts.
Asupport the halfshaft. The inner joint N0TE:Do not tighten the engine rear mount center must not be bent more than 18 degrees. retaining nut at this stage. The outer joint must not be bent more than
45 degrees.
ADO not damage the halfshaft oil seal.
N0TE:lnstall a new center bearing cap and
locknuts.
2006.0 Fiesta 1212006 GII 31 64en
procarmanuals.com