ignition FORD FIESTA 2015 6.G Quick Reference Guide
[x] Cancel search | Manufacturer: FORD, Model Year: 2015, Model line: FIESTA, Model: FORD FIESTA 2015 6.GPages: 10, PDF Size: 2.85 MB
Page 3 of 10
instrument panel
1
7
3
6
5
8
9
2
4
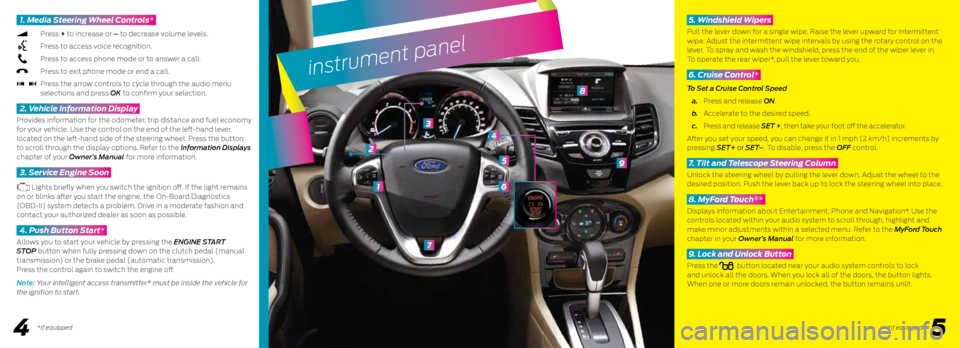
1. Media Steering Wheel Controls*
Press + to increase or – to decrease volume levels.
Press to access voice recognition.
Press to access phone mode or to answer a call.
Press to exit phone mode or end a call.
Press the arrow controls to cycle through the audio menu
selections and press OK to confirm your selection.
2. Vehicle Information Display
Provides information for the odometer, trip distance and fuel economy
for your vehicle. Use the control on the end of the left-hand lever,
located on the left-hand side of the steering wheel. Press the button
to scroll through the display options. Refer to the Information Displays
chapter of your Owner’s Manual for more information.
3. Service Engine Soon
Lights briefly when you switch the ignition off. If the light remains
on or blinks after you start the engine, the On-Board Diagnostics
(OBD-II) system detects a problem. Drive in a moderate fashion and
contact your authorized dealer as soon as possible.
4. Push Button Start*
Allows you to start your vehicle by pressing the ENGINE START
STOP button when fully pressing down on the clutch pedal (manual
transmission) or the brake pedal (automatic transmission).
Press the control again to switch the engine off.
Note: Your intelligent access transmitter* must be inside the vehicle for
the ignition to start.
*if equipped5
4
*if equipped
5. Windshield Wipers
Pull the lever down for a single wipe. Raise the lever upward for intermittent
wipe. Adjust the intermittent wipe intervals by using the rotary control on the
lever. To spray and wash the windshield, press the end of the wiper lever in.
To operate the rear wiper*, pull the lever toward you.
6. Cruise Control*
To Set a Cruise Control Speed
a. Press and release ON.
b. Accelerate to the desired speed.
c. Press and release SET +, then take your foot off the accelerator.
After you set your speed, you can change it in 1 mph (2 km/h) increments by
pressing SET+ or SET–. To disable, press the OFF control.
7. Tilt and Telescope Steering Column
Unlock the steering wheel by pulling the lever down. Adjust the wheel to the
desired position. Push the lever back up to lock the steering wheel into place.
8. MyFord Touch *
Displays information about Entertainment, Phone and Navigation*. Use the
controls located within your audio system to scroll through, highlight and
make minor adjustments within a selected menu. Refer to the MyFord Touch
chapter in your Owner’s Manual for more information.
9. Lock and Unlock Button
Press thebutton located near your audio system controls to lock
and unlock all the doors. When you lock all of the doors, the button lights.
When one or more doors remain unlocked, the button remains unlit.
®
Page 4 of 10
SYNC
®*
GETTING STARTED
WITH YOUR SYNC SYSTEM
SYNC is a hands-free, voice recognition system used
for entertainment, information and communication.
SYNC. Say the Word.
Before You Get Started
1. Set up your owner account at SyncMyRide.com (U.S.) or
SyncMyRide.ca (Canada). Register by following the on-screen
instructions. After registering, you can see what services you
may be eligible for.
2. SYNC uses a wireless connection called
Bluetooth® to
communicate with your phone. Switch Bluetooth mode on
in your phone’s menu options. This lets your phone find SYNC.
If you need more details on setting up your phone with SYNC,
visit SyncMyRide.com (U.S.) or SyncMyRide.ca (Canada), or
your phone manufacturer’s website.
6 7
Note: The system may prompt you to:
• Set your phone as the primary
or favorite (the primary phone
receives messages and voicemail).
• Download your phone book
(a requirement to use the full
set of voice commands).
• Switch on 911 Assist
®.
Tips
• Make sure you accept the request
from SYNC to access your phone.
• To pair subsequent phones,
please refer to Pairing Subsequent
Phones in the SYNC chapter of
your Owner’s Manual.
• If you experience pairing problems,
try performing a clean pairing by:
1) deleting your phone from SYNC;
2) deleting the SYNC connection
from your phone; and 3) repeating
the Pairing Your Phone with
SYNC process.
Using Your Phone with SYNC
Note: You must download your phone
book to make phone calls with voice
commands by name.
Making a Phone Call
Use SYNC to make a phone call
to anyone in your phone book by
pressing the voice button
and
when prompted, say any of the
following voice commands:
Call
Call
Call
Call
For example, you could say Call Jake
Smith at home. SYNC repeats the
command back to you and dials
the number.
Note: You can also make phone calls
by giving the voice command Dial,
then verbally say the phone number.
Answering Incoming Calls
Whenever you have an incoming call,
the name and number of the person
calling appears in your display. Press
the phone button
to answer an
incoming call. You can hang up at
any time by pressing and holding the
phone button
.
Do Not Disturb Mode
This feature blocks incoming calls
and text messages and saves them
for later. You still have access to
outgoing calls when this feature is
active. Say the voice command Do
not disturb on to enable and Do not
disturb off to disable.
Note: Using the display, you can
choose from privacy mode (listen
and talk through your phone) or open
mode (listen and talk through your
vehicle's speakers and microphone).
*if equipped
Pairing Your Phone
with SYNC
In order to use many of the features of
SYNC, such as making a phone call or
receiving a text, you must first connect
or pair your phone with SYNC.
To Pair Your Phone for the First Time
1. Make sure your vehicle is in park
(P) and you switch on your ignition
and radio.
2. Press the phone button, when the
display indicates No Phone Found,
press OK.
3. When Find SYNC appears in the
display, press OK.
4. Put your phone into Bluetooth
discovery mode. See your device's
manual, if necessary.
5. When prompted on your phone’s
display, enter the PIN provided by
SYNC into your phone. The display
indicates when the pairing
is successful.
Page 5 of 10
89
Before You Get Started
• Pair your phone to SYNC before using MyFord Touch
(see Getting Started with Your SYNC System in this guide
for instructions).
• With the navigation* feature, make sure to insert your SD
card* into the media port (located in the center console) or
your navigation* cannot work.
• The touchscreen is sensitive, so make sure you press the
desired icon accurately.
• If you press the wrong icon and enter the wrong screen,
you can always press the home
icon to access your
home screen.
SYNC AppLink™:
Voice Access to Your Mobile Apps
The available SYNC AppLink* allows you voice access to select
mobile applications that you already have or can download to
your Android
TM, BlackBerry® or iPhone®.
Current apps include Pandora
® Internet Radio, Stitcher Smart
RadioTM, OpenBeak (BlackBerry-exclusive), iHeartRadio,
Slacker, NPR News and SYNC Destinations with even
more releases on the way. Visit SyncMyRide.com (U.S.) or
SyncMyRide.ca (Canada) for more details.
Using SYNC AppLink
1. Make sure that you have an active account online for the
app you want and make sure you set it up the way you
like it. Some apps work automatically with no set-up.
2. Download or update to the latest mobile app through your
smartphone’s marketplace.
3. Switch the ignition on.
4. Pair the phone to your vehicle. If you already paired your
phone to the vehicle, it connects to SYNC automatically
when you enter.
5. If you are an iPhone owner, you must also connect the
Apple
®-provided USB cable and start the application you
want to use on your phone through SYNC. Android and
BlackBerry connect wirelessly using SYNC AppLink.
6. Now you’re ready to voice-access the app by pressing the
voice button and saying Mobile Apps, and then the name
of the app you want.
Note: AppLink is not currently available in Canada.
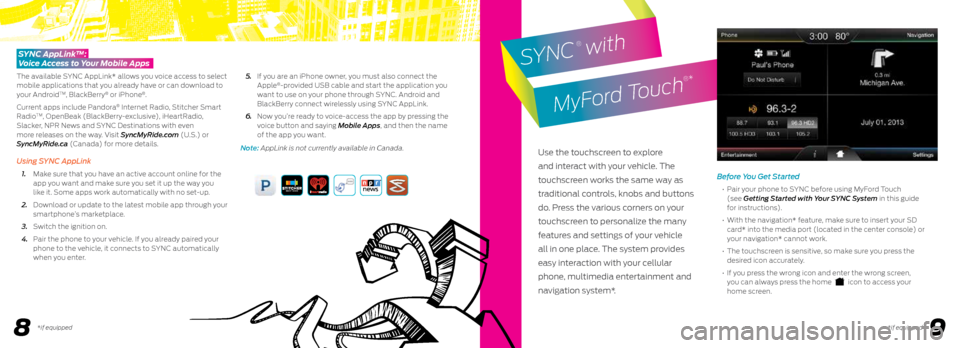
Use the touchscreen to explore
and interact with your vehicle. The
touchscreen works the same way as
traditional controls, knobs and buttons
do. Press the various corners on your
touchscreen to personalize the many
features and settings of your vehicle
all in one place. The system provides
easy interaction with your cellular
phone, multimedia entertainment and
navigation system*.
SYNC
® with
MyFord Touch
®*
*if equipped *if equipped
Page 8 of 10
function
1415*if equipped*if equipped
Seatback
recline
control
Height
adjustment
control
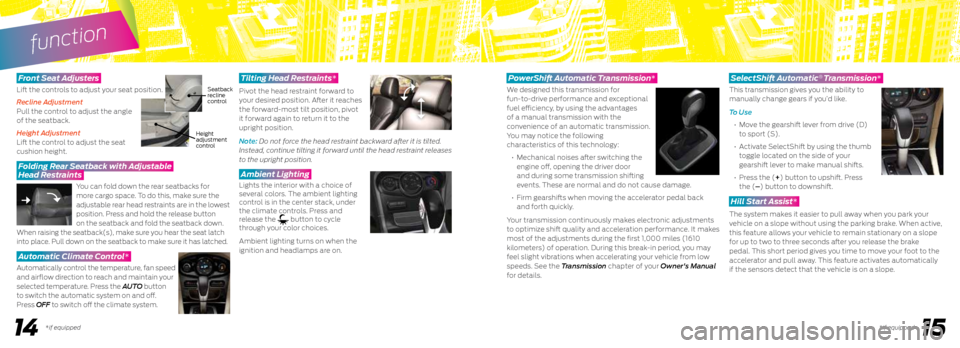
Front S eat Adjusters
Lift the controls to adjust your seat position.
Recline Adjustment
Pull the control to adjust the angle
of the seatback.
Height Adjustment
Lift the control to adjust the seat
cushion height.
Folding Rear Seatback with Adjustable
Head Restraints
You can fold down the rear seatbacks for
more cargo space. To do this, make sure the
adjustable rear head restraints are in the lowest
position. Press and hold the release button
on the seatback and fold the seatback down.
When raising the seatback(s), make sure you hear the seat latch
into place. Pull down on the seatback to make sure it has latched.
Automatic Climate Control*
Automatically control the temperature, fan speed
and airflow direction to reach and maintain your
selected temperature. Press the AUTO button
to switch the automatic system on and off.
Press OFF to switch off the climate system.
Tilting Head Restraints*
Pivot the head restraint forward to
your desired position. After it reaches
the forward-most tilt position, pivot
it forward again to return it to the
upright position.
Note: Do not force the head restraint backward after it is tilted.
Instead, continue tilting it forward until the head restraint releases
to the upright position.
Ambient Lighting
Lights the interior with a choice of
several colors. The ambient lighting
control is in the center stack, under
the climate controls. Press and
release the
button to cycle
through your color choices.
Ambient lighting turns on when the
ignition and headlamps are on.
PowerShift Automatic Transmission*
We designed this transmission for
fun-to-drive performance and exceptional
fuel efficiency, by using the advantages
of a manual transmission with the
convenience of an automatic transmission.
You may notice the following
characteristics of this technology:
• Mechanical noises after switching the
engine off, opening the driver door
and during some transmission shifting
events. These are normal and do not cause damage.
• Firm gearshifts when moving the accelerator pedal back
and forth quickly.
Your transmission continuously makes electronic adjustments
to optimize shift quality and acceleration performance. It makes
most of the adjustments during the first 1,000 miles (1610
kilometers) of operation. During this break-in period, you may
feel slight vibrations when accelerating your vehicle from low
speeds. See the Transmission chapter of your Owner's Manual
for details.
SelectShift Automatic Transmission*
This transmission gives you the ability to
manually change gears if you’d like.
To Use
• Move the gearshift lever from drive (D)
to sport (S).
• Activate SelectShift by using the thumb
toggle located on the side of your
gearshift lever to make manual shifts.
• Press the (+) button to upshift. Press
the (–) button to downshift.
Hill Start Assist*
The system makes it easier to pull away when you park your
vehicle on a slope without using the parking brake. When active,
this feature allows your vehicle to remain stationary on a slope
for up to two to three seconds after you release the brake
pedal. This short period gives you time to move your foot to the
accelerator and pull away. This feature activates automatically
if the sensors detect that the vehicle is on a slope.
®
Page 9 of 10
16*if equipped17
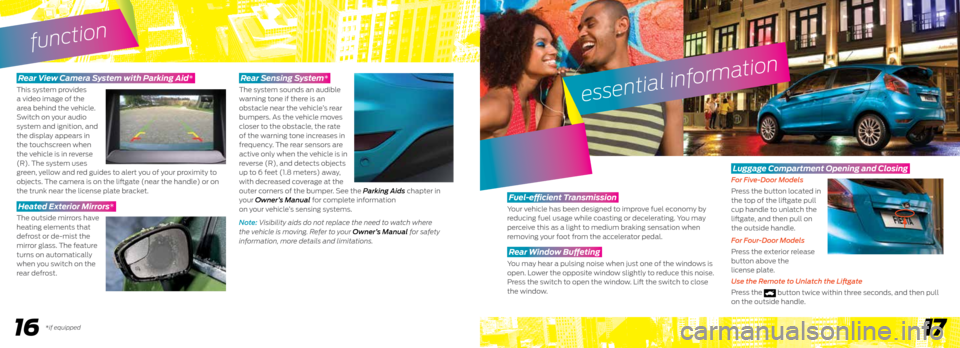
Rear View Camera System with Parking Aid*
This system provides
a video image of the
area behind the vehicle.
Switch on your audio
system and ignition, and
the display appears in
the touchscreen when
the vehicle is in reverse
(R). The system uses
green, yellow and red guides to alert you of your proximity to
objects. The camera is on the liftgate (near the handle) or on
the trunk near the license plate bracket.
Heated Exterior Mirrors*
The outside mirrors have
heating elements that
defrost or de-mist the
mirror glass. The feature
turns on automatically
when you switch on the
rear defrost.
Rear Sensing System*
The system sounds an audible
warning tone if there is an
obstacle near the vehicle’s rear
bumpers. As the vehicle moves
closer to the obstacle, the rate
of the warning tone increases in
frequency. The rear sensors are
active only when the vehicle is in
reverse (R), and detects objects
up to 6 feet (1.8 meters) away,
with decreased coverage at the
outer corners of the bumper. See the Parking Aids chapter in
your Owner’s Manual for complete information
on your vehicle’s sensing systems.
Note: Visibility aids do not replace the need to watch where
the vehicle is moving. Refer to your Owner’s Manual for safety
information, more details and limitations.
function
essential information
Fuel-efficient Transmission
Your vehicle has been designed to improve fuel economy by
reducing fuel usage while coasting or decelerating. You may
perceive this as a light to medium braking sensation when
removing your foot from the accelerator pedal.
Rear Window Buffeting
You may hear a pulsing noise when just one of the windows is
open. Lower the opposite window slightly to reduce this noise.
Press the switch to open the window. Lift the switch to close
the window.
Luggage Compartment Opening and Closing
For Five-Door Models
Press the button located in
the top of the liftgate pull
cup handle to unlatch the
liftgate, and then pull on
the outside handle.
For Four-Door Models
Press the exterior release
button above the
license plate.
Use the Remote to Unlatch the Liftgate
Press the
button twice within three seconds, and then pull
on the outside handle.
Page 10 of 10
19
essential information
18
Fuel Tank Capacity
and Fuel Info
Your vehicle has a 12.4 gallon
(47L) fuel tank capacity.
Use only “Regular” unleaded
gasoline with an octane rating
of 87 or higher.
Do not use E85 fuels because
your vehicle was not designed
to run on fuels with more
than 15% ethanol.
Location of Spare
Tire and Tools
Your spare tire and tools are
located beneath the carpeted
floor panel in the rear of
your vehicle.
• The spare tire is designed
for emergency use only
and should be replaced as
soon as possible.
• For complete details on
changing your tire, see the
Wheels and Tires chapter
in your Owner’s Manual.
Tire Pressure
Monitoring System
Your vehicle displays a low
tire pressure warning light
in your instrument cluster
when one or more of your
tires are significantly under-
inflated. If this happens stop
and check your tires as soon
as possible. Inflate them to
the proper pressure. Refer to
the Wheels and Tires chapter
of your Owner’s Manual for
more information.
Roadside Assistance
Your new Ford vehicle
comes with the assurance
and support of 24-hour
emergency roadside
assistance. To receive
roadside assistance in
the United States,
call 1-800-241-3673.
In Canada, call
1 -800-665-2006.
T owing Y our Vehicle
Towing your vehicle behind an RV or any other vehicle may be
limited. Refer to Towing the Vehicle on Four Wheels section in
the Towing chapter of your Owner’s Manual.
Easy Fuel System
To Use
• Put your vehicle into park (P)
and switch off the ignition.
• Open the fuel-filler door.
• Insert the nozzle.
• Begin fueling.
• Wait 5-10 seconds between the time the refueling nozzle
shuts off until you remove the nozzle from the vehicle to
allow residual fuel in the nozzle to drain into the tank.
• When using a portable fuel container, slowly insert the fuel
funnel (located in the spare tire compartment) and pour the
fuel into the funnel.
Note: Do not use aftermarket funnels as they do not work with
the Easy Fuel system and may cause damage. Properly clean
the funnel after each use.
®