tow FORD FLEX 2014 1.G Repair Manual
[x] Cancel search | Manufacturer: FORD, Model Year: 2014, Model line: FLEX, Model: FORD FLEX 2014 1.GPages: 554, PDF Size: 8.04 MB
Page 287 of 554
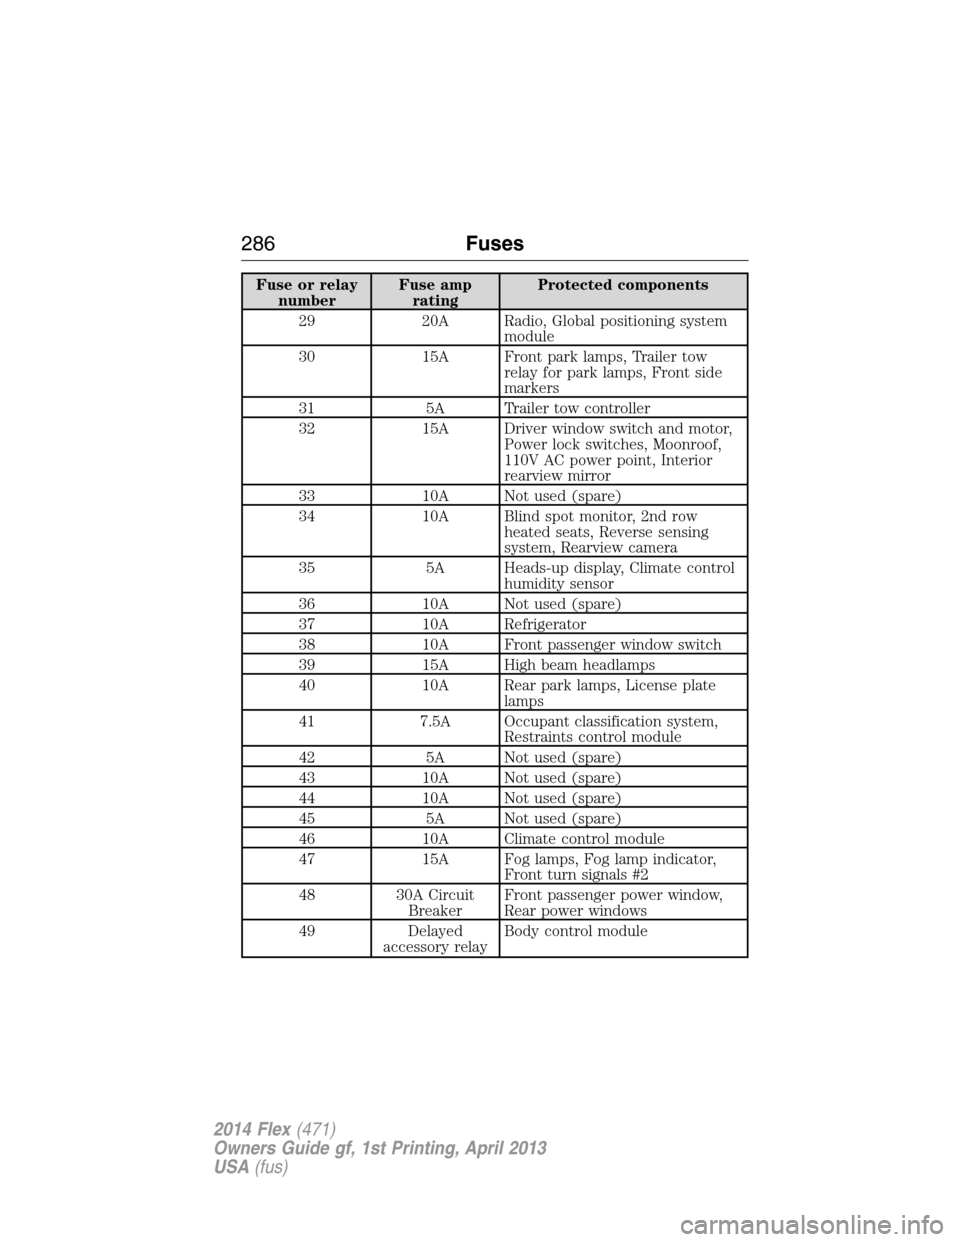
Fuse or relay
numberFuse amp
ratingProtected components
29 20A Radio, Global positioning system
module
30 15A Front park lamps, Trailer tow
relay for park lamps, Front side
markers
31 5A Trailer tow controller
32 15A Driver window switch and motor,
Power lock switches, Moonroof,
110V AC power point, Interior
rearview mirror
33 10A Not used (spare)
34 10A Blind spot monitor, 2nd row
heated seats, Reverse sensing
system, Rearview camera
35 5A Heads-up display, Climate control
humidity sensor
36 10A Not used (spare)
37 10A Refrigerator
38 10A Front passenger window switch
39 15A High beam headlamps
40 10A Rear park lamps, License plate
lamps
41 7.5A Occupant classification system,
Restraints control module
42 5A Not used (spare)
43 10A Not used (spare)
44 10A Not used (spare)
45 5A Not used (spare)
46 10A Climate control module
47 15A Fog lamps, Fog lamp indicator,
Front turn signals #2
48 30A Circuit
BreakerFront passenger power window,
Rear power windows
49 Delayed
accessory relayBody control module
286Fuses
2014 Flex(471)
Owners Guide gf, 1st Printing, April 2013
USA(fus)
Page 296 of 554
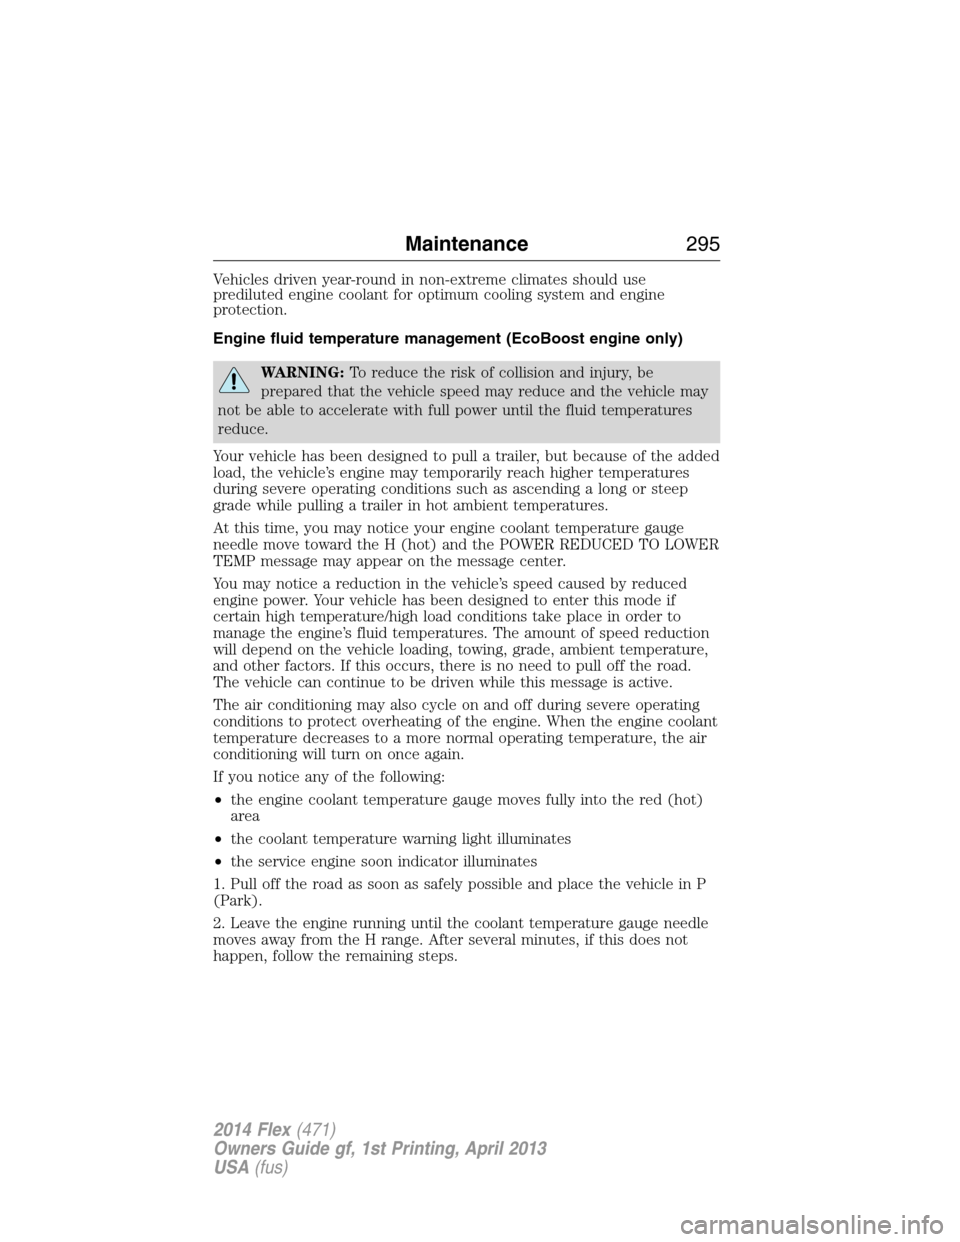
Vehicles driven year-round in non-extreme climates should use
prediluted engine coolant for optimum cooling system and engine
protection.
Engine fluid temperature management (EcoBoost engine only)
WARNING:To reduce the risk of collision and injury, be
prepared that the vehicle speed may reduce and the vehicle may
not be able to accelerate with full power until the fluid temperatures
reduce.
Your vehicle has been designed to pull a trailer, but because of the added
load, the vehicle’s engine may temporarily reach higher temperatures
during severe operating conditions such as ascending a long or steep
grade while pulling a trailer in hot ambient temperatures.
At this time, you may notice your engine coolant temperature gauge
needle move toward the H (hot) and the POWER REDUCED TO LOWER
TEMP message may appear on the message center.
You may notice a reduction in the vehicle’s speed caused by reduced
engine power. Your vehicle has been designed to enter this mode if
certain high temperature/high load conditions take place in order to
manage the engine’s fluid temperatures. The amount of speed reduction
will depend on the vehicle loading, towing, grade, ambient temperature,
and other factors. If this occurs, there is no need to pull off the road.
The vehicle can continue to be driven while this message is active.
The air conditioning may also cycle on and off during severe operating
conditions to protect overheating of the engine. When the engine coolant
temperature decreases to a more normal operating temperature, the air
conditioning will turn on once again.
If you notice any of the following:
•the engine coolant temperature gauge moves fully into the red (hot)
area
•the coolant temperature warning light illuminates
•the service engine soon indicator illuminates
1. Pull off the road as soon as safely possible and place the vehicle in P
(Park).
2. Leave the engine running until the coolant temperature gauge needle
moves away from the H range. After several minutes, if this does not
happen, follow the remaining steps.
Maintenance295
2014 Flex(471)
Owners Guide gf, 1st Printing, April 2013
USA(fus)
Page 306 of 554
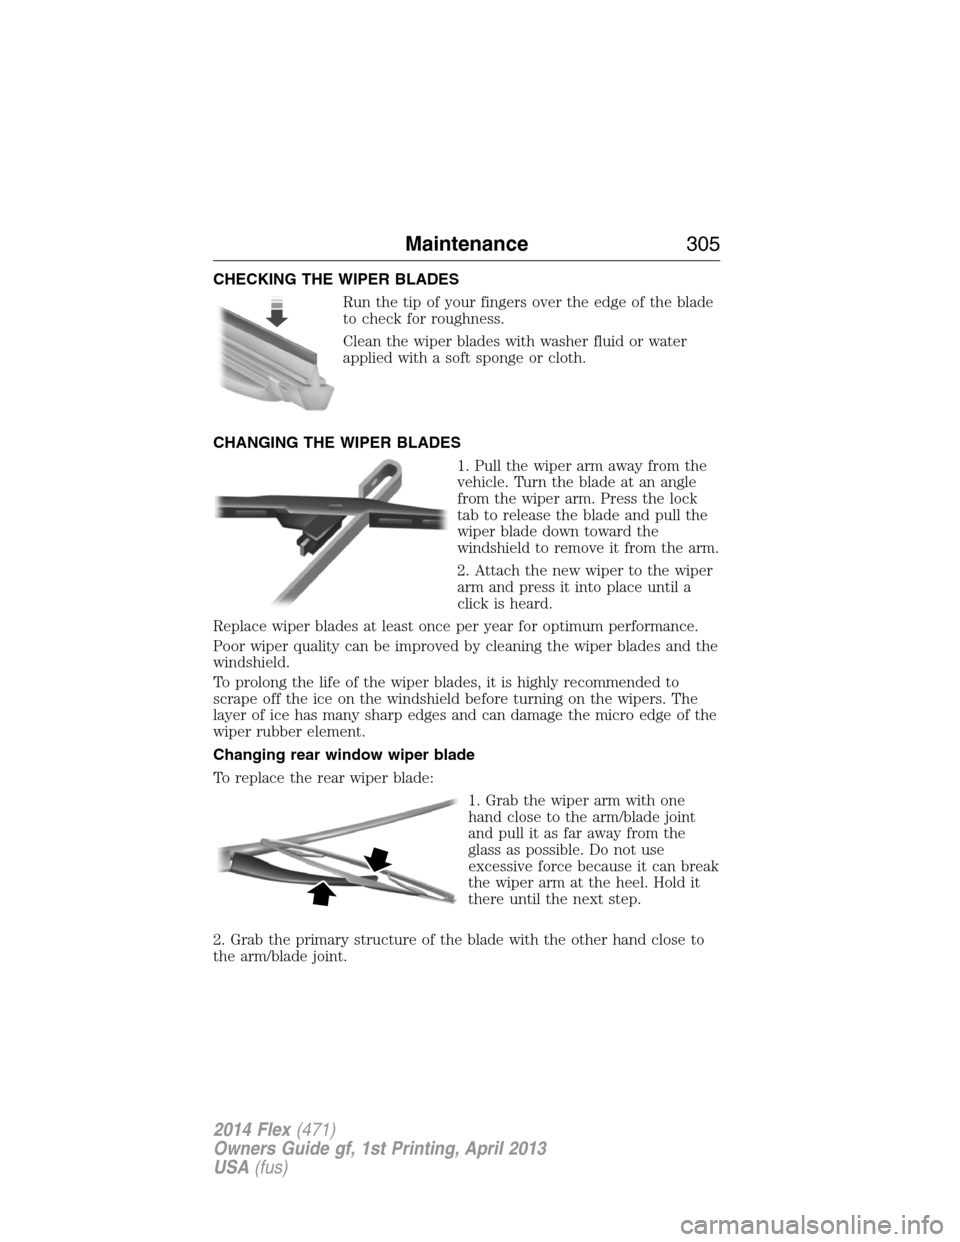
CHECKING THE WIPER BLADES
Run the tip of your fingers over the edge of the blade
to check for roughness.
Clean the wiper blades with washer fluid or water
applied with a soft sponge or cloth.
CHANGING THE WIPER BLADES
1. Pull the wiper arm away from the
vehicle. Turn the blade at an angle
from the wiper arm. Press the lock
tab to release the blade and pull the
wiper blade down toward the
windshield to remove it from the arm.
2. Attach the new wiper to the wiper
arm and press it into place until a
click is heard.
Replace wiper blades at least once per year for optimum performance.
Poor wiper quality can be improved by cleaning the wiper blades and the
windshield.
To prolong the life of the wiper blades, it is highly recommended to
scrape off the ice on the windshield before turning on the wipers. The
layer of ice has many sharp edges and can damage the micro edge of the
wiper rubber element.
Changing rear window wiper blade
To replace the rear wiper blade:
1. Grab the wiper arm with one
hand close to the arm/blade joint
and pull it as far away from the
glass as possible. Do not use
excessive force because it can break
the wiper arm at the heel. Hold it
there until the next step.
2. Grab the primary structure of the blade with the other hand close to
the arm/blade joint.
Maintenance305
2014 Flex(471)
Owners Guide gf, 1st Printing, April 2013
USA(fus)
Page 309 of 554
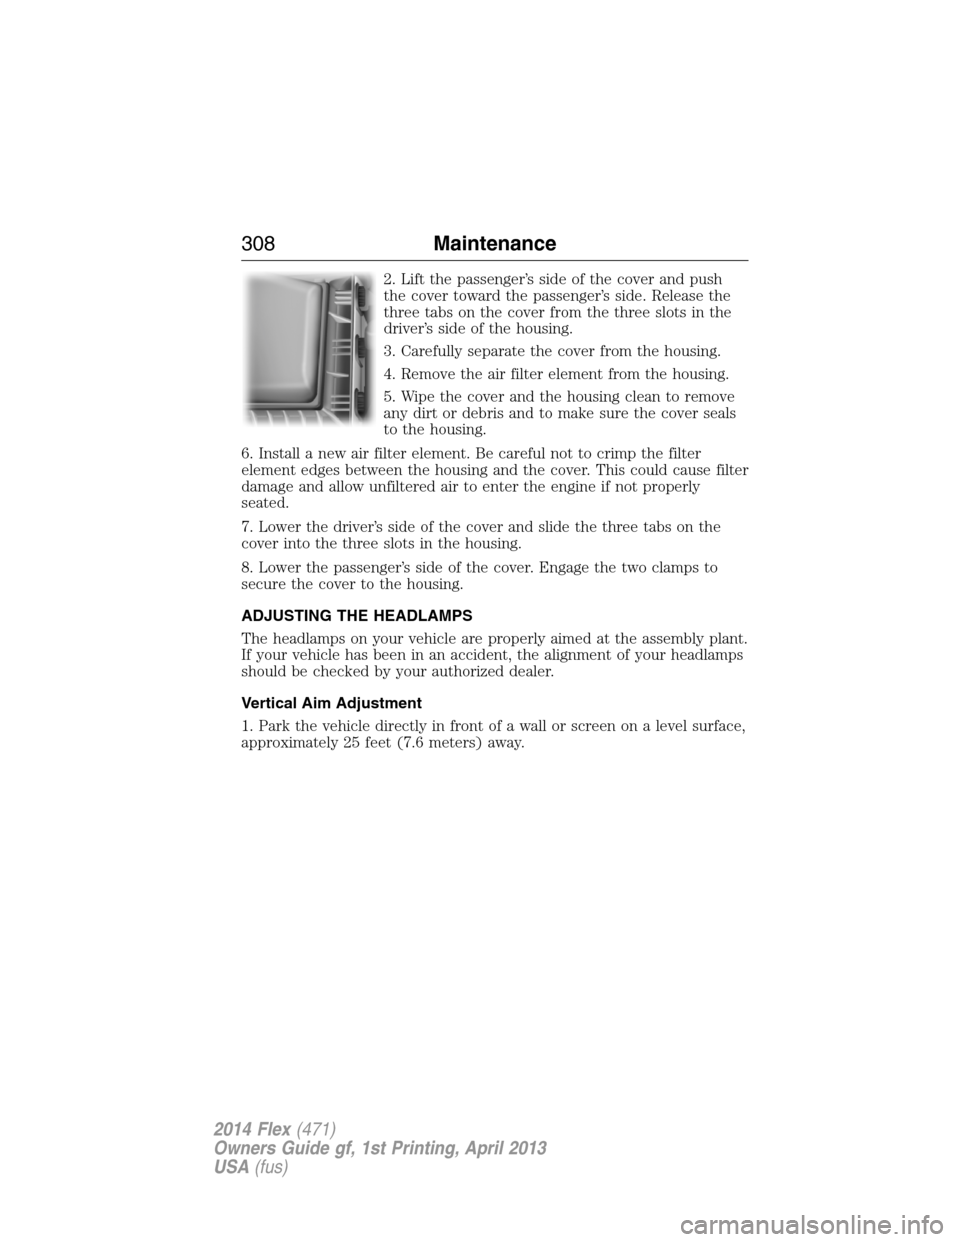
2. Lift the passenger’s side of the cover and push
the cover toward the passenger’s side. Release the
three tabs on the cover from the three slots in the
driver’s side of the housing.
3. Carefully separate the cover from the housing.
4. Remove the air filter element from the housing.
5. Wipe the cover and the housing clean to remove
any dirt or debris and to make sure the cover seals
to the housing.
6. Install a new air filter element. Be careful not to crimp the filter
element edges between the housing and the cover. This could cause filter
damage and allow unfiltered air to enter the engine if not properly
seated.
7. Lower the driver’s side of the cover and slide the three tabs on the
cover into the three slots in the housing.
8. Lower the passenger’s side of the cover. Engage the two clamps to
secure the cover to the housing.
ADJUSTING THE HEADLAMPS
The headlamps on your vehicle are properly aimed at the assembly plant.
If your vehicle has been in an accident, the alignment of your headlamps
should be checked by your authorized dealer.
Vertical Aim Adjustment
1. Park the vehicle directly in front of a wall or screen on a level surface,
approximately 25 feet (7.6 meters) away.
308Maintenance
2014 Flex(471)
Owners Guide gf, 1st Printing, April 2013
USA(fus)
Page 317 of 554
•Dry the vehicle with a chamois or soft terry cloth towel in order to
eliminate water spotting.
•Immediately remove items such as gasoline, diesel fuel, bird droppings
and insect deposits because they can cause damage to the vehicle’s
paintwork and trim over time. Use Motorcraft® Bug and Tar Remover.
•Note:Suntan lotions and insect repellents can damage any painted
surface; if these substances come in contact with your vehicle, wash it
off as soon as possible.
•Remove any exterior accessories before entering a car wash.
Exterior Chrome
Note:Never use abrasive materials such as steel wool or plastic pads as
they can scratch the chrome surface.
Note:Do not use chrome cleaner, metal cleaner or polish on wheels and
wheel covers.
•Wash the vehicle first, using cool or lukewarm water and a neutral pH
shampoo, such as Motorcraft® Detail Wash.
•Use Motorcraft® Custom Bright Metal Cleaner. Apply the product as
you would a wax to clean bumpers and other chrome parts; allow the
cleaner to dry for a few minutes, then wipe off the haze with a clean,
dry rag.
•Do not apply cleaning product to hot surfaces and do not leave
cleaning product on chrome surfaces for a period of time exceeding
that which is recommended.
•Note:Using other non-recommended cleaners can result in severe
and permanent cosmetic damage.
Underbody
Flush the complete underside of your vehicle frequently. Keep body and
door drain holes free from packed dirt.
Cleaning Plastic Exterior Parts
Use only approved products to clean plastic parts.
•For routine cleaning, use Motorcraft® Detail Wash.
•If tar or grease spots are present, use Motorcraft® Bug and Tar
Remover.
316Vehicle Care
2014 Flex(471)
Owners Guide gf, 1st Printing, April 2013
USA(fus)
Page 341 of 554
If you feel a sudden vibration or ride disturbance while driving, or you
suspect your tire or vehicle has been damaged, immediately reduce your
speed. Drive with caution until you can safely pull off the road. Stop and
inspect the tires for damage. If a tire is under-inflated or damaged,
deflate it, remove the wheel and replace it with your spare tire and
wheel. If you cannot detect a cause, have the vehicle towed to the
nearest repair facility or tire dealer to have the vehicle inspected.
Tire and Wheel Alignment
A bad jolt from hitting a curb or pothole can cause the front end of your
vehicle to become misaligned or cause damage to your tires. If your
vehicle seems to pull to one side when you are driving, the wheels may
be out of alignment. Have an authorized dealer check the wheel
alignment periodically.
Wheel misalignment in the front or the rear can cause uneven and rapid
treadwear of your tires and should be corrected by an authorized dealer.
Front-wheel drive vehicles and those with an independent rear
suspension may require alignment of all four wheels.
The tires should also be balanced periodically. An unbalanced tire and
wheel assembly may result in irregular tire wear.
Tire Rotation
Note:If your tires show uneven wear ask an authorized dealer to check
for and correct any wheel misalignment, tire imbalance or mechanical
problem involved before tire rotation.
Note:Your vehicle may be equipped with a dissimilar spare tire and
wheel assembly. A dissimilar spare tire and wheel assembly is defined as
a spare tire or wheel that is different in brand, size or appearance from
the road tires and wheels. If you have a dissimilar spare tire and wheel
assembly, it is intended for temporary use only and should not be used
in a tire rotation.
Note:After having your tires rotated, inflation pressure must be checked
and adjusted to the vehicle requirements.
Rotating your tires at the recommended interval (as indicated in your
scheduled maintenance information) will help your tires wear more
evenly, providing better tire performance and longer tire life.
340Wheels and Tires
2014 Flex(471)
Owners Guide gf, 1st Printing, April 2013
USA(fus)
Page 349 of 554
2.Full-size dissimilar spare with label on wheel:This spare tire has
a label on the wheel that states: THIS TIRE AND WHEEL FOR
TEMPORARY USE ONLY
When driving with one of the dissimilar spare tires listed above, do not:
•exceed 50 mph (80 km/h).
•load the vehicle beyond maximum vehicle load rating listed on the
Safety Compliance Label.
•tow a trailer.
•use snow chains on the end of the vehicle with the dissimilar spare
tire.
•use more than one dissimilar spare tire at a time.
•use commercial car washing equipment.
•try to repair the dissimilar spare tire.
Use of one of the dissimilar spare tires listed above at any one wheel
location can lead to impairment of the following:
•Handling, stability and braking performance
•Comfort and noise
•Ground clearance and parking at curbs
•Winter weather driving capability
•Wet weather driving capability
3.Full-size dissimilar spare without label on wheel
When driving with the full-size dissimilar spare tire and wheel assembly,
do not:
•exceed 70 mph (113 km/h).
•use more than one dissimilar spare tire/wheel at a time.
•use commercial car washing equipment.
•use snow chains on the end of the vehicle with the dissimilar spare
tire and wheel.
The usage of a full-size dissimilar spare tire and wheel assembly can lead
to impairment of the following:
•Handling, stability and braking performance
•Comfort and noise
•Ground clearance and parking at curbs
348Wheels and Tires
2014 Flex(471)
Owners Guide gf, 1st Printing, April 2013
USA(fus)
Page 350 of 554
•Winter weather driving capability
•Wet weather driving capability
•All-Wheel driving capability
•Load leveling adjustment
When driving with the full-size dissimilar spare tire and wheel assembly,
additional caution should be given to:
•towing a trailer.
•driving vehicles equipped with a camper body.
•driving vehicles with a load on the cargo rack.
Drive cautiously when using a full-size dissimilar spare tire and wheel
assembly and seek service as soon as possible.
Tire Change Procedure
WARNING:When one of the front wheels is off the ground, the
transmission alone will not prevent the vehicle from moving or
slipping off the jack, even if the transmission selector lever is in
positionP.
WARNING:To help prevent the vehicle from moving when you
change a tire, be sure to place the transmission selector lever in
positionP,set the parking brake and block (in both directions) the
wheel that is diagonally opposite (other side and end of the vehicle) to
the tire being changed.
WARNING:Never get underneath a vehicle that is supported
only by a jack. If the vehicle slips off the jack, you or someone
else could be seriously injured.
WARNING:Do not attempt to change a tire on the side of the
vehicle close to moving traffic. Pull far enough off the road to
avoid the danger of being hit when operating the jack or changing the
wheel.
Wheels and Tires349
2014 Flex(471)
Owners Guide gf, 1st Printing, April 2013
USA(fus)
Page 351 of 554
WARNING:Always use the jack provided as original equipment
with your vehicle. If using a jack other than the one provided as
original equipment with your vehicle, make sure the jack capacity is
adequate for the vehicle weight, including any vehicle cargo or
modifications.
Note:Passengers should not remain in the vehicle when the vehicle is
being jacked.
1. Park on a level surface, set the parking brake and activate hazard
flashers.
2. Place the transmission selector lever in positionPand turn the engine
off.
If the third row seat is stowed in the floor, you will need to unstow it to
access the spare tire and jack.
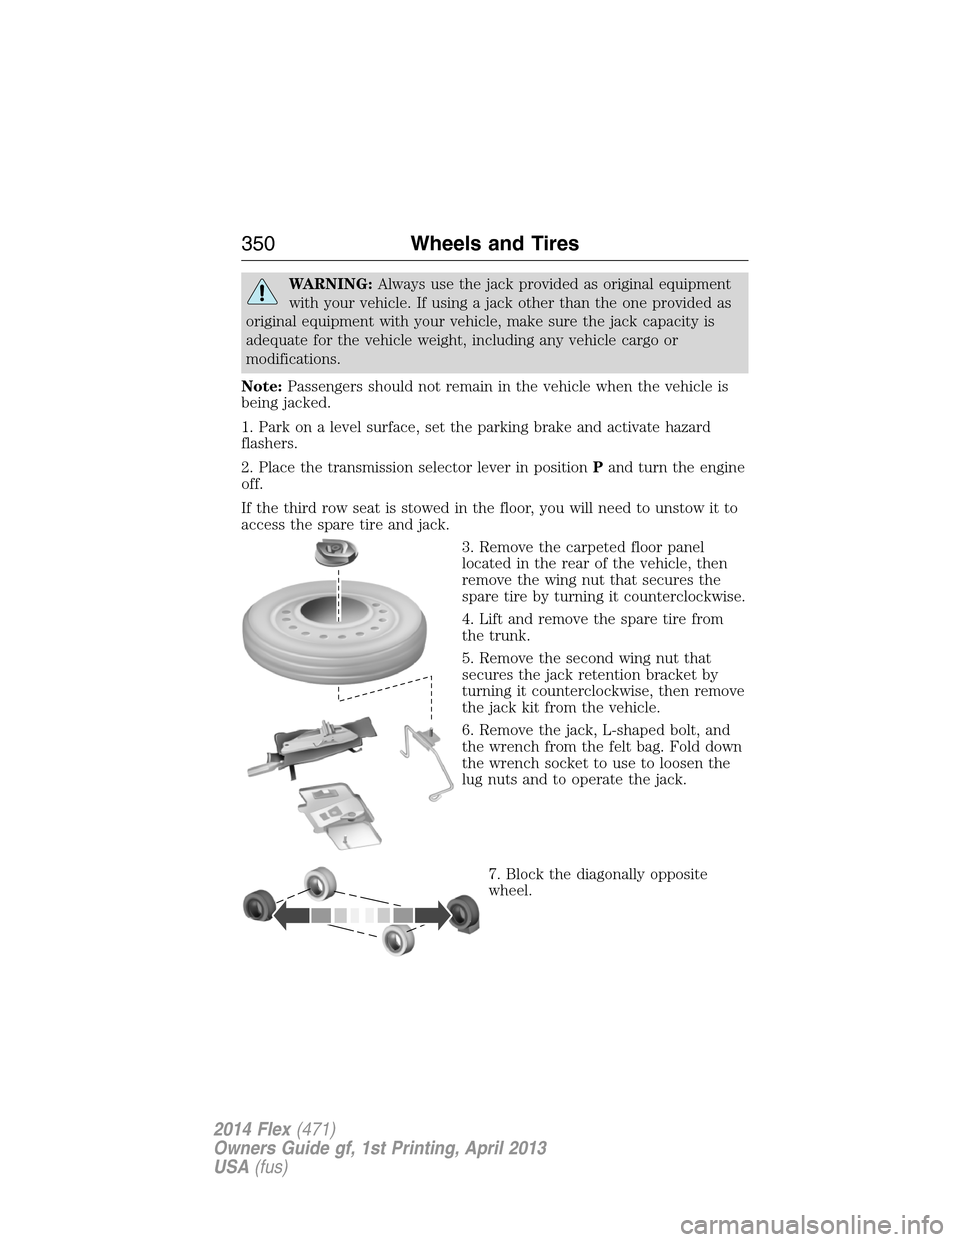
3. Remove the carpeted floor panel
located in the rear of the vehicle, then
remove the wing nut that secures the
spare tire by turning it counterclockwise.
4. Lift and remove the spare tire from
the trunk.
5. Remove the second wing nut that
secures the jack retention bracket by
turning it counterclockwise, then remove
the jack kit from the vehicle.
6. Remove the jack, L-shaped bolt, and
the wrench from the felt bag. Fold down
the wrench socket to use to loosen the
lug nuts and to operate the jack.
7. Block the diagonally opposite
wheel.
350Wheels and Tires
2014 Flex(471)
Owners Guide gf, 1st Printing, April 2013
USA(fus)
Page 353 of 554
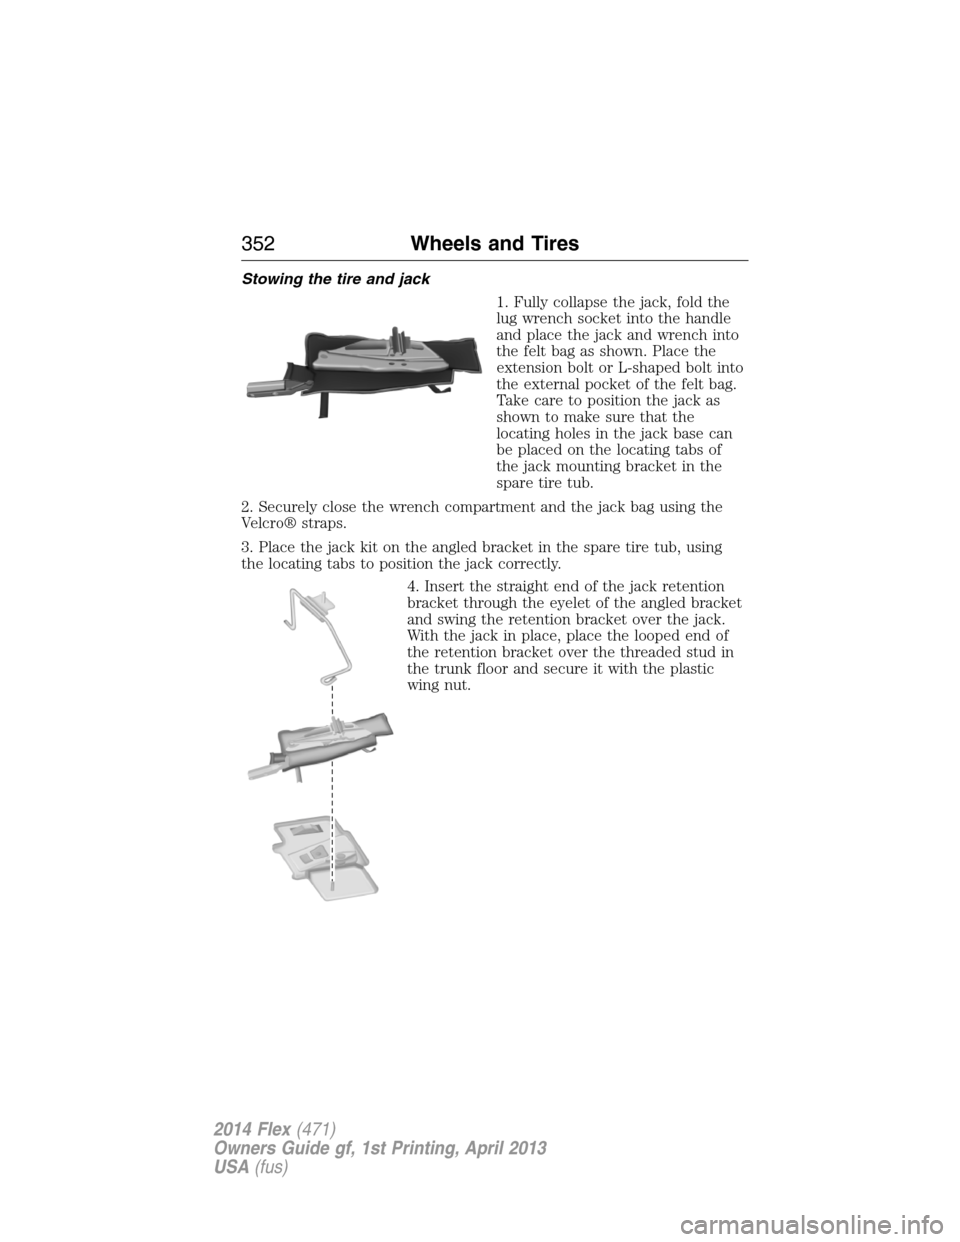
Stowing the tire and jack
1. Fully collapse the jack, fold the
lug wrench socket into the handle
and place the jack and wrench into
the felt bag as shown. Place the
extension bolt or L-shaped bolt into
the external pocket of the felt bag.
Take care to position the jack as
shown to make sure that the
locating holes in the jack base can
be placed on the locating tabs of
the jack mounting bracket in the
spare tire tub.
2. Securely close the wrench compartment and the jack bag using the
Velcro® straps.
3. Place the jack kit on the angled bracket in the spare tire tub, using
the locating tabs to position the jack correctly.
4. Insert the straight end of the jack retention
bracket through the eyelet of the angled bracket
and swing the retention bracket over the jack.
With the jack in place, place the looped end of
the retention bracket over the threaded stud in
the trunk floor and secure it with the plastic
wing nut.
352Wheels and Tires
2014 Flex(471)
Owners Guide gf, 1st Printing, April 2013
USA(fus)