warning FORD FLEX 2019 Owners Manual
[x] Cancel search | Manufacturer: FORD, Model Year: 2019, Model line: FLEX, Model: FORD FLEX 2019Pages: 513, PDF Size: 39.3 MB
Page 293 of 513
Please note that the TPMS is not a
substitute for proper tire maintenance, and
it is the driver
’s responsibility to maintain
correct tire pressure, even if under-inflation
has not reached the level to trigger
illumination of the TPMS low tire pressure
telltale.
Your vehicle has also been equipped with
a TPMS malfunction indicator to indicate
when the system is not operating properly.
The TPMS malfunction indicator is
combined with the low tire pressure
telltale. When the system detects a
malfunction, the telltale will flash for
approximately one minute and then remain
continuously illuminated. This sequence
will continue upon subsequent vehicle
start-ups as long as the malfunction exists.
When the malfunction indicator is
illuminated, the system may not be able
to detect or signal low tire pressure as
intended. TPMS malfunctions may occur
for a variety of reasons, including the
installation of replacement or alternate
tires or wheels on the vehicle that prevent
the TPMS from functioning properly.
Always check the TPMS malfunction
telltale after replacing one or more tires or
wheels on your vehicle to ensure that the
replacement or alternate tires and wheels
allow the TPMS to continue to function
properly.
This device complies with Part 15 of the
FCC Rules and with License exempt RSS
Standards of Industry Canada. Operation
is subject to the following two conditions:
1. This device may not cause harmful interference, and
2. This device must accept any interference received, including
interference that may cause undesired
operation. Note:
Changes or modifications not
expressively approved by the party
responsible for compliance could void the
user's authority to operate the equipment.
The term "IC:" before the radio certification
number only signifies that Industry Canada
technical specifications were met.
Changing Tires With a Tire
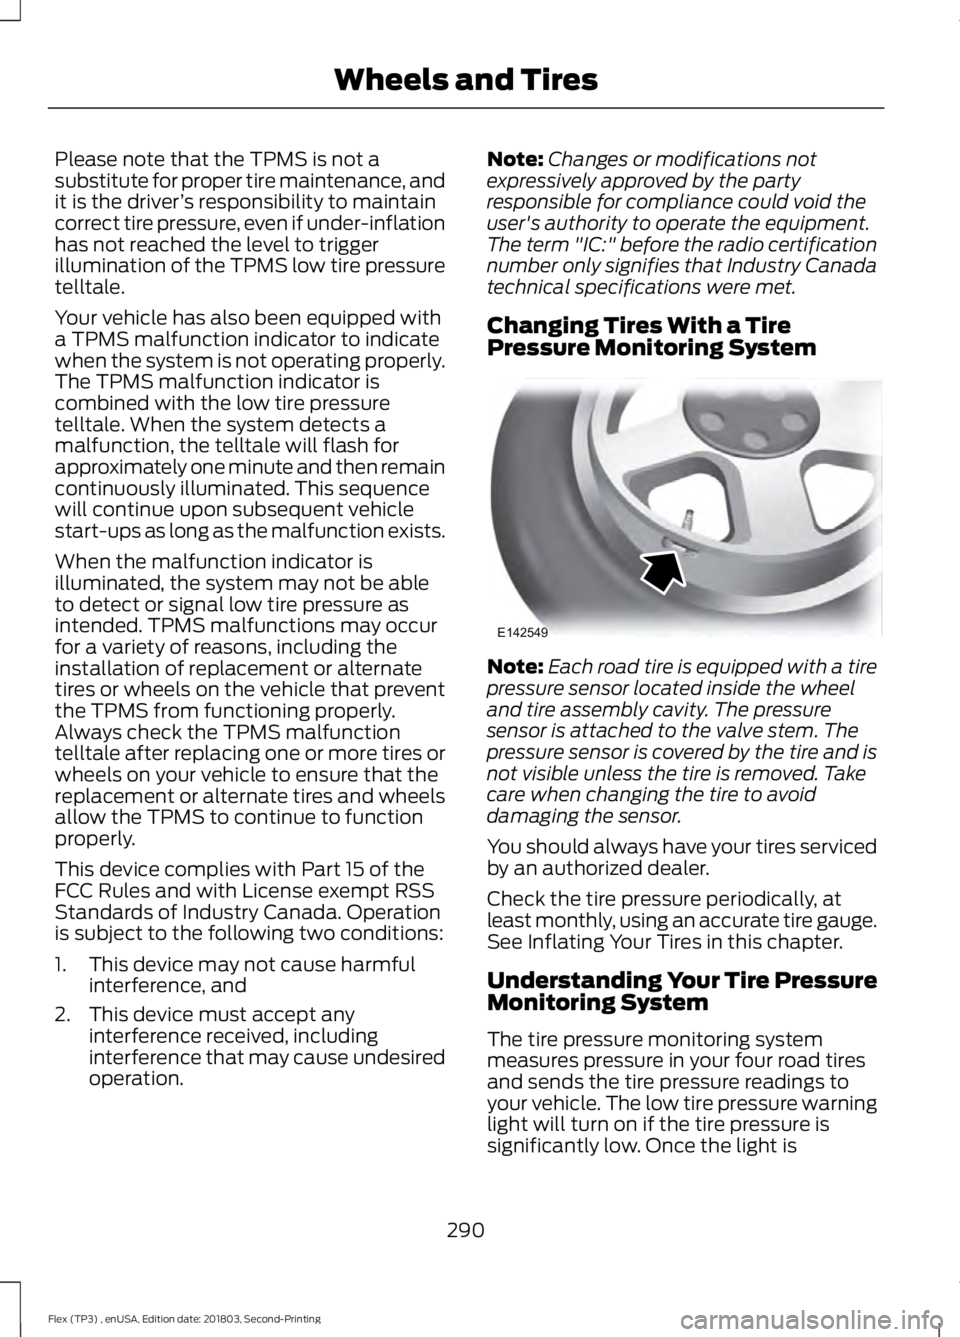
Pressure Monitoring System Note:
Each road tire is equipped with a tire
pressure sensor located inside the wheel
and tire assembly cavity. The pressure
sensor is attached to the valve stem. The
pressure sensor is covered by the tire and is
not visible unless the tire is removed. Take
care when changing the tire to avoid
damaging the sensor.
You should always have your tires serviced
by an authorized dealer.
Check the tire pressure periodically, at
least monthly, using an accurate tire gauge.
See Inflating Your Tires in this chapter.
Understanding Your Tire Pressure
Monitoring System
The tire pressure monitoring system
measures pressure in your four road tires
and sends the tire pressure readings to
your vehicle. The low tire pressure warning
light will turn on if the tire pressure is
significantly low. Once the light is
290
Flex (TP3) , enUSA, Edition date: 201803, Second-Printing Wheels and TiresE142549
Page 295 of 513
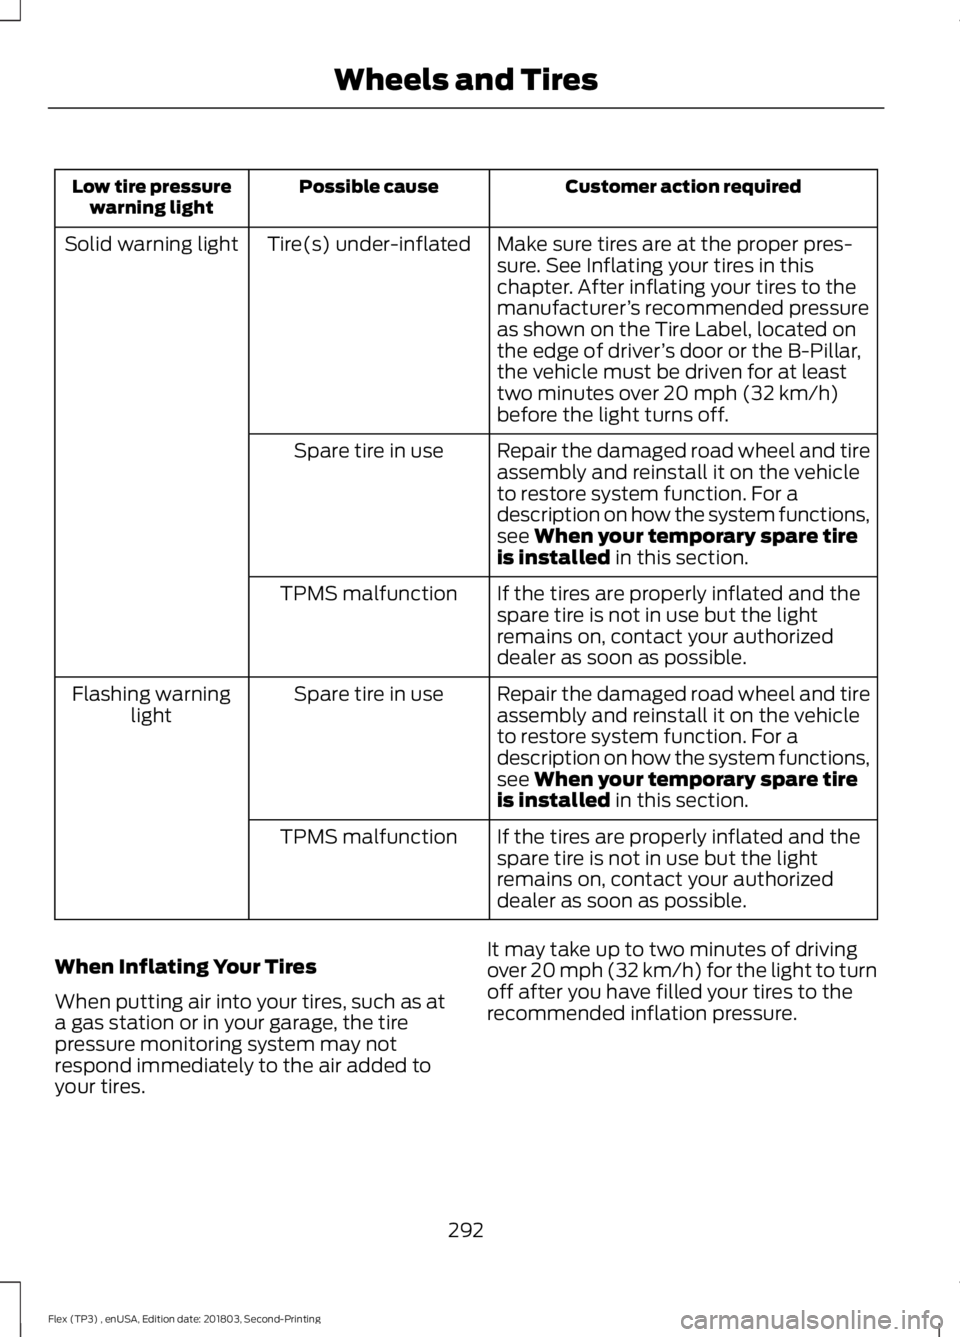
Customer action required
Possible cause
Low tire pressure
warning light
Make sure tires are at the proper pres-
sure. See Inflating your tires in this
chapter. After inflating your tires to the
manufacturer’s recommended pressure
as shown on the Tire Label, located on
the edge of driver ’s door or the B-Pillar,
the vehicle must be driven for at least
two minutes over 20 mph (32 km/h)
before the light turns off.
Tire(s) under-inflated
Solid warning light
Repair the damaged road wheel and tire
assembly and reinstall it on the vehicle
to restore system function. For a
description on how the system functions,
see
When your temporary spare tire
is installed in this section.
Spare tire in use
If the tires are properly inflated and the
spare tire is not in use but the light
remains on, contact your authorized
dealer as soon as possible.
TPMS malfunction
Repair the damaged road wheel and tire
assembly and reinstall it on the vehicle
to restore system function. For a
description on how the system functions,
see
When your temporary spare tire
is installed in this section.
Spare tire in use
Flashing warning
light
If the tires are properly inflated and the
spare tire is not in use but the light
remains on, contact your authorized
dealer as soon as possible.
TPMS malfunction
When Inflating Your Tires
When putting air into your tires, such as at
a gas station or in your garage, the tire
pressure monitoring system may not
respond immediately to the air added to
your tires. It may take up to two minutes of driving
over 20 mph (32 km/h) for the light to turn
off after you have filled your tires to the
recommended inflation pressure.
292
Flex (TP3) , enUSA, Edition date: 201803, Second-Printing Wheels and Tires
Page 296 of 513
How Temperature Affects Your Tire
Pressure
The tire pressure monitoring system
monitors tire pressure in each pneumatic
tire. While driving in a normal manner, a
typical passenger tire inflation pressure
may increase about 2
–4 psi (14– 28 kPa)
from a cold start situation. If the vehicle is
stationary overnight with the outside
temperature significantly lower than the
daytime temperature, the tire pressure may
decrease about 3 psi (21 kPa) for a drop of
30°F (17°C) in ambient temperature. This
lower pressure value may be detected by
the tire pressure monitoring system as
being significantly lower than the
recommended inflation pressure and
activate the system warning light for low
tire pressure. If the low tire pressure
warning light is on, visually check each tire
to verify that no tire is flat. If one or more
tires are flat, repair as necessary. Check
the air pressure in the road tires. If any tire
is under-inflated, carefully drive the vehicle
to the nearest location where air can be
added to the tires. Inflate all the tires to
the recommended inflation pressure.
CHANGING A ROAD WHEEL WARNING:
The use of tire sealant
may damage your tire pressure monitoring
system and should only be used in
roadside emergencies. If you must use a
sealant, the Ford Tire Mobility Kit sealant
should be used. The tire pressure
monitoring system sensor and valve stem
on the wheel must be replaced by an
authorized dealer after use of the sealant. WARNING:
See
Tire Pressure
Monitoring System (page 289). If the tire
pressure monitor sensor becomes
damaged, it will no longer function. Note:
The tire pressure monitoring system
indicator light will illuminate when the spare
tire is in use. To restore the full function of
the monitoring system, all road wheels
equipped with tire pressure monitoring
sensors must be mounted on the vehicle.
If you get a flat tire while driving, do not
apply the brake heavily. Instead, gradually
decrease your speed. Hold the steering
wheel firmly and slowly move to a safe
place on the side of the road.
Have a flat serviced by an authorized
dealer in order to prevent damage to the
tire pressure monitoring system sensors.
See
Tire Pressure Monitoring System
(page 289). Replace the spare tire with a
road tire as soon as possible. During
repairing or replacing of the flat tire, have
the authorized dealer inspect the tire
pressure monitoring system sensor for
damage.
Dissimilar Spare Wheel and Tire
Assembly Information WARNING:
Failure to follow these
guidelines could result in an increased risk
of loss of vehicle control, injury or death.
If you have a dissimilar spare wheel and
tire, then it is intended for temporary use
only. This means that if you need to use it,
you should replace it as soon as possible
with a road wheel and tire assembly that
is the same size and type as the road tires
and wheels that were originally provided
by Ford. If the dissimilar spare tire or wheel
is damaged, it should be replaced rather
than repaired.
A dissimilar spare wheel and tire assembly
is defined as a spare wheel and tire
assembly that is different in brand, size or
appearance from the road tires and wheels
and can be one of three types:
293
Flex (TP3) , enUSA, Edition date: 201803, Second-Printing Wheels and Tires
Page 297 of 513
1.
T-type mini-spare: This spare tire
begins with the letter T for tire size and
may have Temporary Use Only molded in
the sidewall.
2. Full-size dissimilar spare with label
on wheel:
This spare tire has a label on
the wheel that states: THIS WHEEL AND
TIRE ASSEMBLY FOR TEMPORARY USE
ONLY.
When driving with one of the dissimilar
spare tires listed above, do not:
• Exceed
50 mph (80 km/h).
• Load the vehicle beyond maximum
vehicle load rating listed on the Safety
Compliance Label.
• Tow a trailer.
• Use snow chains on the end of the
vehicle with the dissimilar spare tire.
• Use more than one dissimilar spare tire
at a time.
• Use commercial car washing
equipment.
• Try to repair the dissimilar spare tire.
Use of one of the dissimilar spare tires
listed above at any one wheel location can
lead to impairment of the following:
• Handling, stability and braking
performance.
• Comfort and noise.
• Ground clearance and parking at curbs.
• Winter weather driving capability.
• Wet weather driving capability.
• All-wheel driving capability.
3. Full-size dissimilar spare without
label on wheel
When driving with the full-size dissimilar
spare wheel and tire assembly, do not:
• Exceed
70 mph (113 km/h).
• Use more than one dissimilar spare
wheel and tire assembly at a time. •
Use commercial car washing
equipment.
• Use snow chains on the end of the
vehicle with the dissimilar spare wheel
and tire assembly.
The usage of a full-size dissimilar spare
wheel and tire assembly can lead to
impairment of the following:
• Handling, stability and braking
performance.
• Comfort and noise.
• Ground clearance and parking at curbs.
• Winter weather driving capability.
• Wet weather driving capability.
• All-wheel driving capability.
When driving with the full-size dissimilar
spare wheel and tire assembly additional
caution should be given to:
• Towing a trailer.
• Driving vehicles equipped with a
camper body.
• Driving vehicles with a load on the
cargo rack.
Drive cautiously when using a full-size
dissimilar spare wheel and tire assembly
and seek service as soon as possible.
Tire Change Procedure WARNING:
When one of the front
wheels is off the ground, the transmission
alone will not prevent your vehicle from
moving or slipping off the jack, even if the
transmission is in park (P) or neutral (N).
294
Flex (TP3) , enUSA, Edition date: 201803, Second-Printing Wheels and Tires
Page 298 of 513
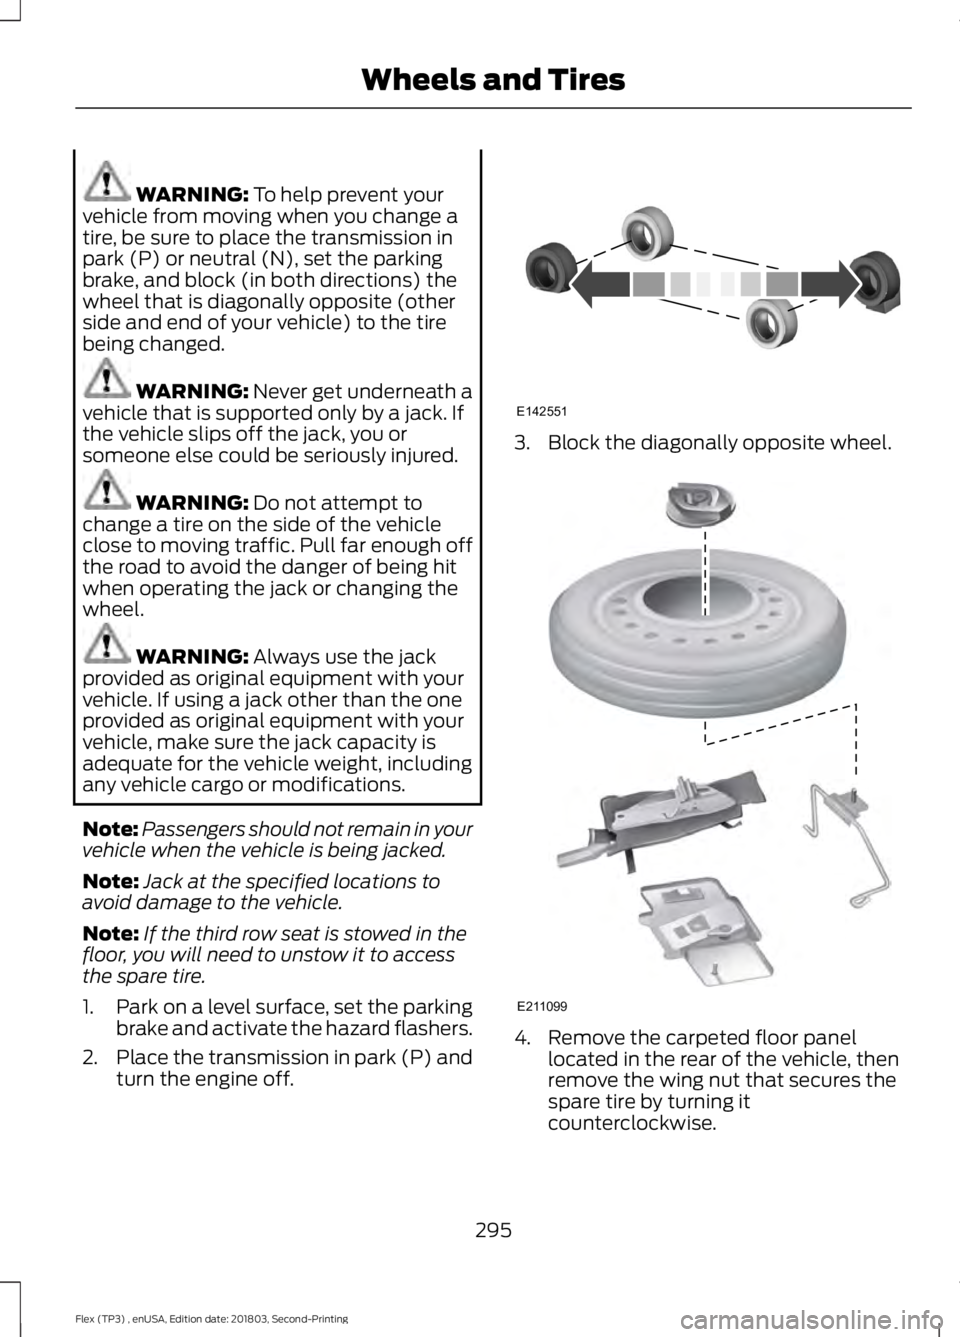
WARNING: To help prevent your
vehicle from moving when you change a
tire, be sure to place the transmission in
park (P) or neutral (N), set the parking
brake, and block (in both directions) the
wheel that is diagonally opposite (other
side and end of your vehicle) to the tire
being changed. WARNING:
Never get underneath a
vehicle that is supported only by a jack. If
the vehicle slips off the jack, you or
someone else could be seriously injured. WARNING:
Do not attempt to
change a tire on the side of the vehicle
close to moving traffic. Pull far enough off
the road to avoid the danger of being hit
when operating the jack or changing the
wheel. WARNING:
Always use the jack
provided as original equipment with your
vehicle. If using a jack other than the one
provided as original equipment with your
vehicle, make sure the jack capacity is
adequate for the vehicle weight, including
any vehicle cargo or modifications.
Note: Passengers should not remain in your
vehicle when the vehicle is being jacked.
Note: Jack at the specified locations to
avoid damage to the vehicle.
Note: If the third row seat is stowed in the
floor, you will need to unstow it to access
the spare tire.
1. Park on a level surface, set the parking
brake and activate the hazard flashers.
2. Place the transmission in park (P) and
turn the engine off. 3. Block the diagonally opposite wheel.
4. Remove the carpeted floor panel
located in the rear of the vehicle, then
remove the wing nut that secures the
spare tire by turning it
counterclockwise.
295
Flex (TP3) , enUSA, Edition date: 201803, Second-Printing Wheels and TiresE142551 E211099
Page 299 of 513
5.
Lift and remove the spare tire from the
trunk.
6. Remove the second wing nut that secures the jack retention bracket by
turning it counterclockwise. Then
remove the jack kit from the vehicle.
7. Remove the jack, L-shaped bolt, and the wrench from the felt bag. Fold
down the wrench socket to use to
loosen the lug nuts and to operate the
jack.
8. Remove the wheel cover with the lug wrench tip and loosen each wheel lug
nut one-half turn counterclockwise,
but do not remove them until the wheel
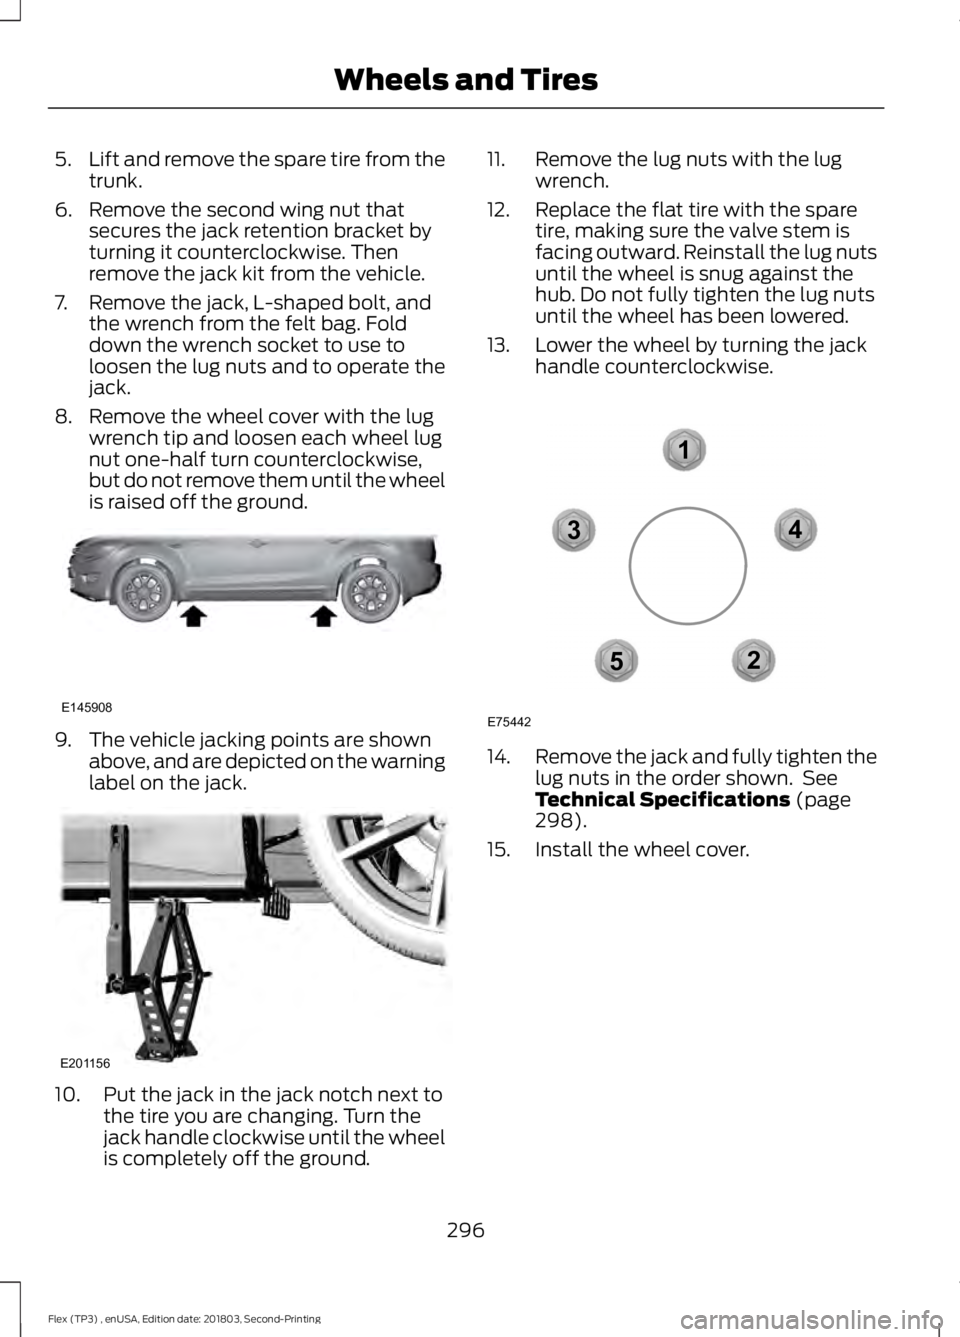
is raised off the ground. 9. The vehicle jacking points are shown
above, and are depicted on the warning
label on the jack. 10. Put the jack in the jack notch next to
the tire you are changing. Turn the
jack handle clockwise until the wheel
is completely off the ground. 11. Remove the lug nuts with the lug
wrench.
12. Replace the flat tire with the spare tire, making sure the valve stem is
facing outward. Reinstall the lug nuts
until the wheel is snug against the
hub. Do not fully tighten the lug nuts
until the wheel has been lowered.
13. Lower the wheel by turning the jack handle counterclockwise. 14.
Remove the jack and fully tighten the
lug nuts in the order shown. See
Technical Specifications (page
298).
15. Install the wheel cover.
296
Flex (TP3) , enUSA, Edition date: 201803, Second-Printing Wheels and TiresE145908 E201156 12
3
4
5
E75442
Page 301 of 513
4. Insert the straight end of the jack
retention bracket through the eyelet of
the angled bracket and swing the
retention bracket over the jack. With
the jack in place, place the looped end of the retention bracket over the
threaded stud in the trunk floor and
secure it with the plastic wing nut.
TECHNICAL SPECIFICATIONS
Wheel Lug Nut Torque Specifications WARNING: When you install a wheel, always remove any corrosion, dirt or foreign
materials present on the mounting surfaces of the wheel or the surface of the wheel hub,
brake drum or brake disc that contacts the wheel. Make sure to secure any fasteners that
attach the rotor to the hub so they do not interfere with the mounting surfaces of the
wheel. Installing wheels without correct metal-to-metal contact at the wheel mounting
surfaces can cause the wheel nuts to loosen and the wheel to come off while your vehicle
is in motion, resulting in loss of vehicle control, personal injury or death. lb.ft (Nm) *
Bolt size
100 lb.ft (135 Nm)
1/2 x 20
*Torque specifications are for nut and bolt threads free of dirt and rust. Use only Ford
recommended replacement fasteners.
Retighten the lug nuts to the specified torque within 100 miles (160 kilometers) after any
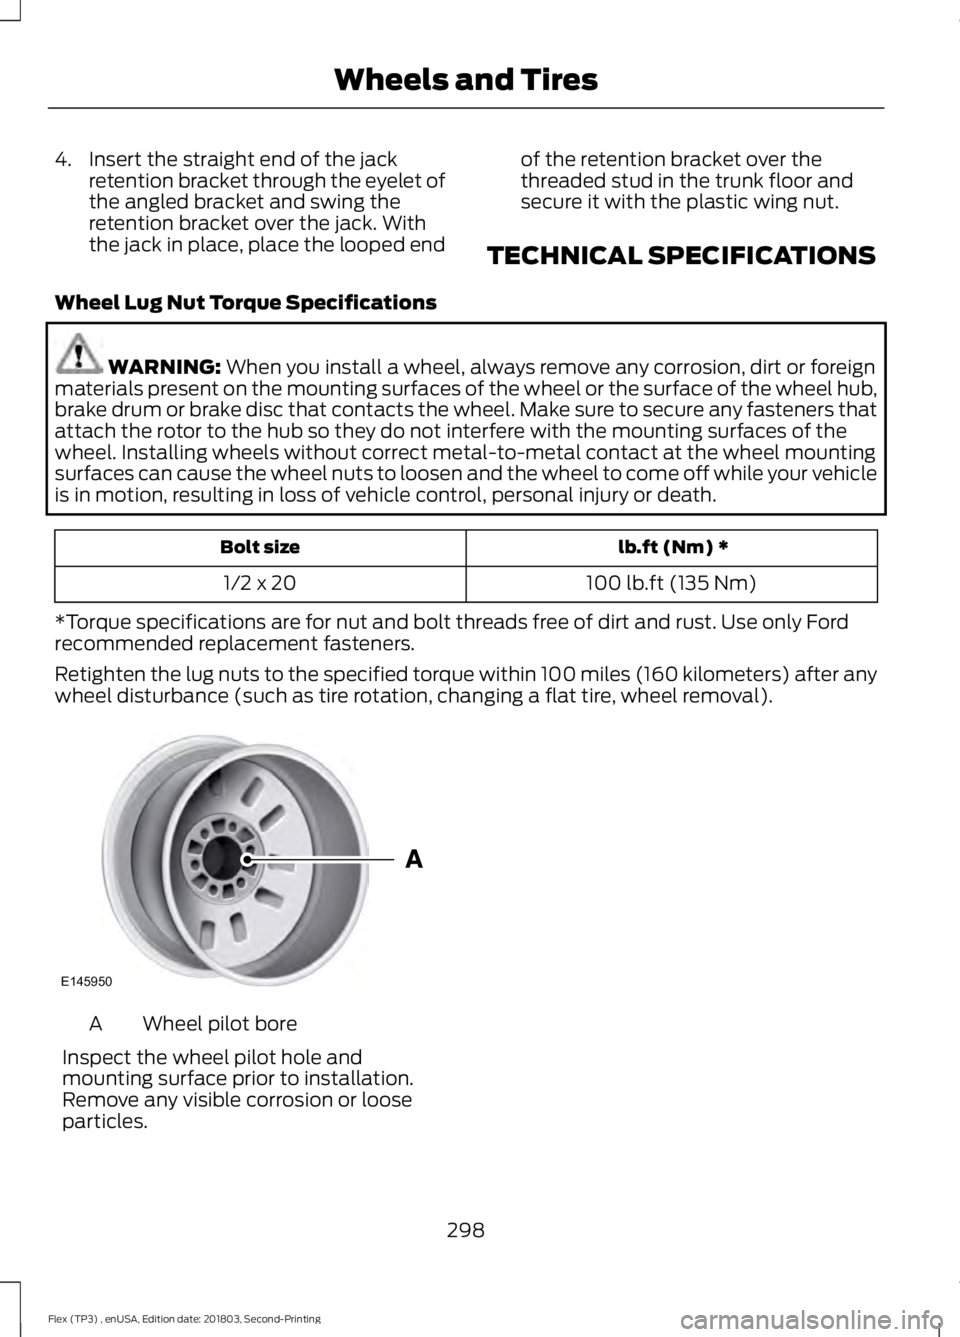
wheel disturbance (such as tire rotation, changing a flat tire, wheel removal). Wheel pilot bore
A
Inspect the wheel pilot hole and
mounting surface prior to installation.
Remove any visible corrosion or loose
particles.
298
Flex (TP3) , enUSA, Edition date: 201803, Second-Printing Wheels and TiresE145950
Page 308 of 513

CAPACITIES AND SPECIFICATIONS - 3.5L DURATEC
Capacities
WARNING: The air conditioning refrigerant system contains refrigerant under high
pressure. Only qualified personnel should service the air conditioning refrigerant system.
Opening the air conditioning refrigerant system can cause personal injury. Capacity
Item
6.0 qt (5.7 L)
Engine oil
13.2 qt (12.5 L)
Engine coolant
Between MIN/MAX on brake fluid reservoir
Brake fluid
10.9 qt (10.3 L)1
Automatic transmission fluid
2.43 pt (1.15 L)
Rear axle fluid (All Wheel Drive)
17.9 fl oz (0.53 L)
Power Transfer Unit (PTU) fluid (All Wheel
Drive)
Fill as required
Windshield washer fluid
18.6 gal (70.4 L)
Fuel tank
2.31 lb (1.05 kg)
A/C refrigerant
8.96 fl oz (265 ml)
A/C refrigerant compressor oil
1 Approximate dry fill capacity. Actual amount may vary during fluid changes.
305
Flex (TP3) , enUSA, Edition date: 201803, Second-Printing Capacities and Specifications
Page 312 of 513
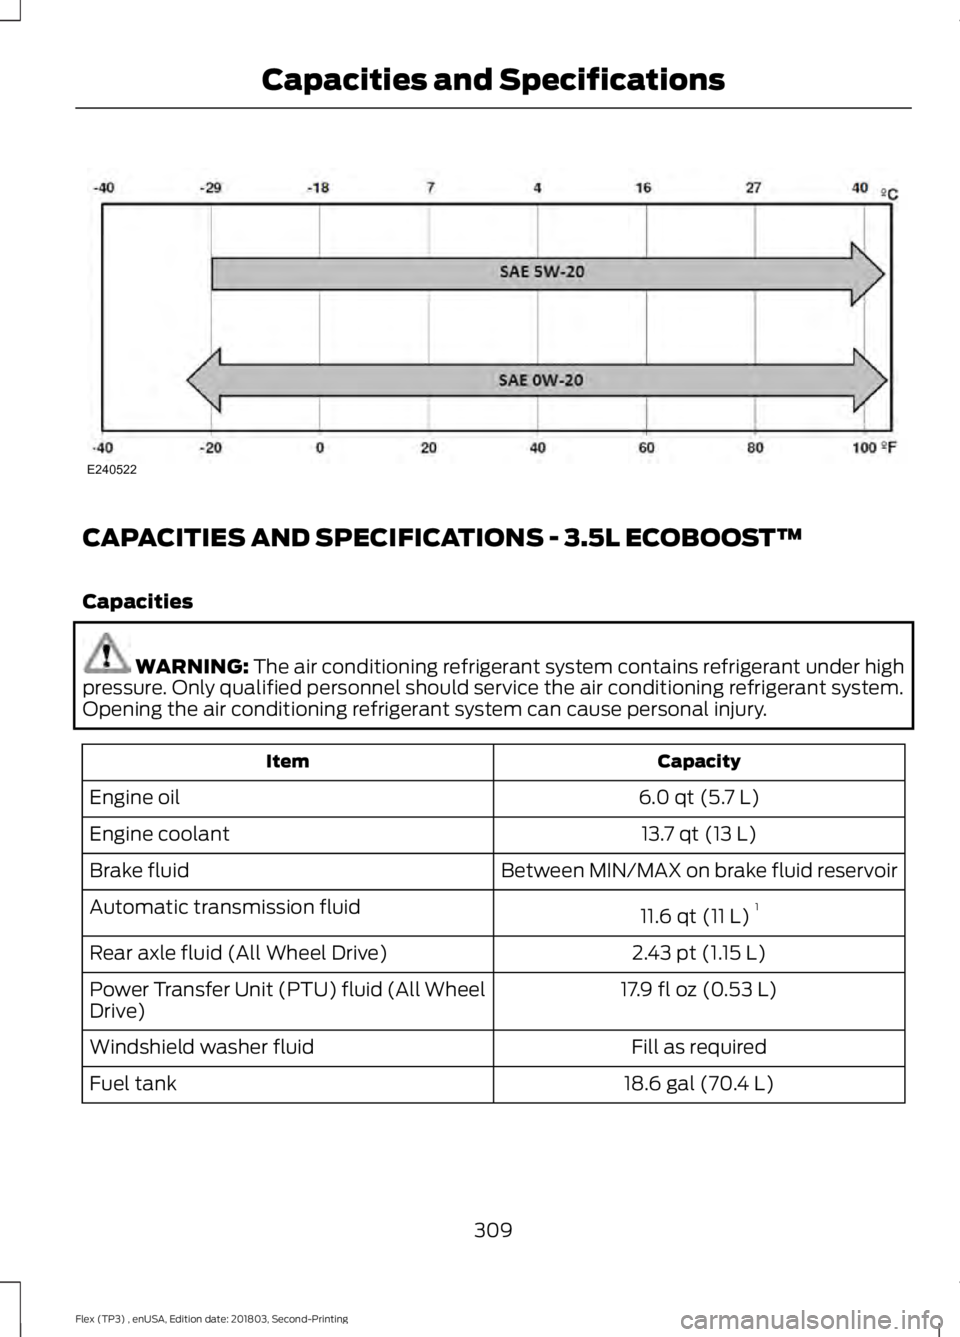
CAPACITIES AND SPECIFICATIONS - 3.5L ECOBOOST™
Capacities
WARNING: The air conditioning refrigerant system contains refrigerant under high
pressure. Only qualified personnel should service the air conditioning refrigerant system.
Opening the air conditioning refrigerant system can cause personal injury. Capacity
Item
6.0 qt (5.7 L)
Engine oil
13.7 qt (13 L)
Engine coolant
Between MIN/MAX on brake fluid reservoir
Brake fluid
11.6 qt (11 L)1
Automatic transmission fluid
2.43 pt (1.15 L)
Rear axle fluid (All Wheel Drive)
17.9 fl oz (0.53 L)
Power Transfer Unit (PTU) fluid (All Wheel
Drive)
Fill as required
Windshield washer fluid
18.6 gal (70.4 L)
Fuel tank
309
Flex (TP3) , enUSA, Edition date: 201803, Second-Printing Capacities and SpecificationsE240522
Page 318 of 513
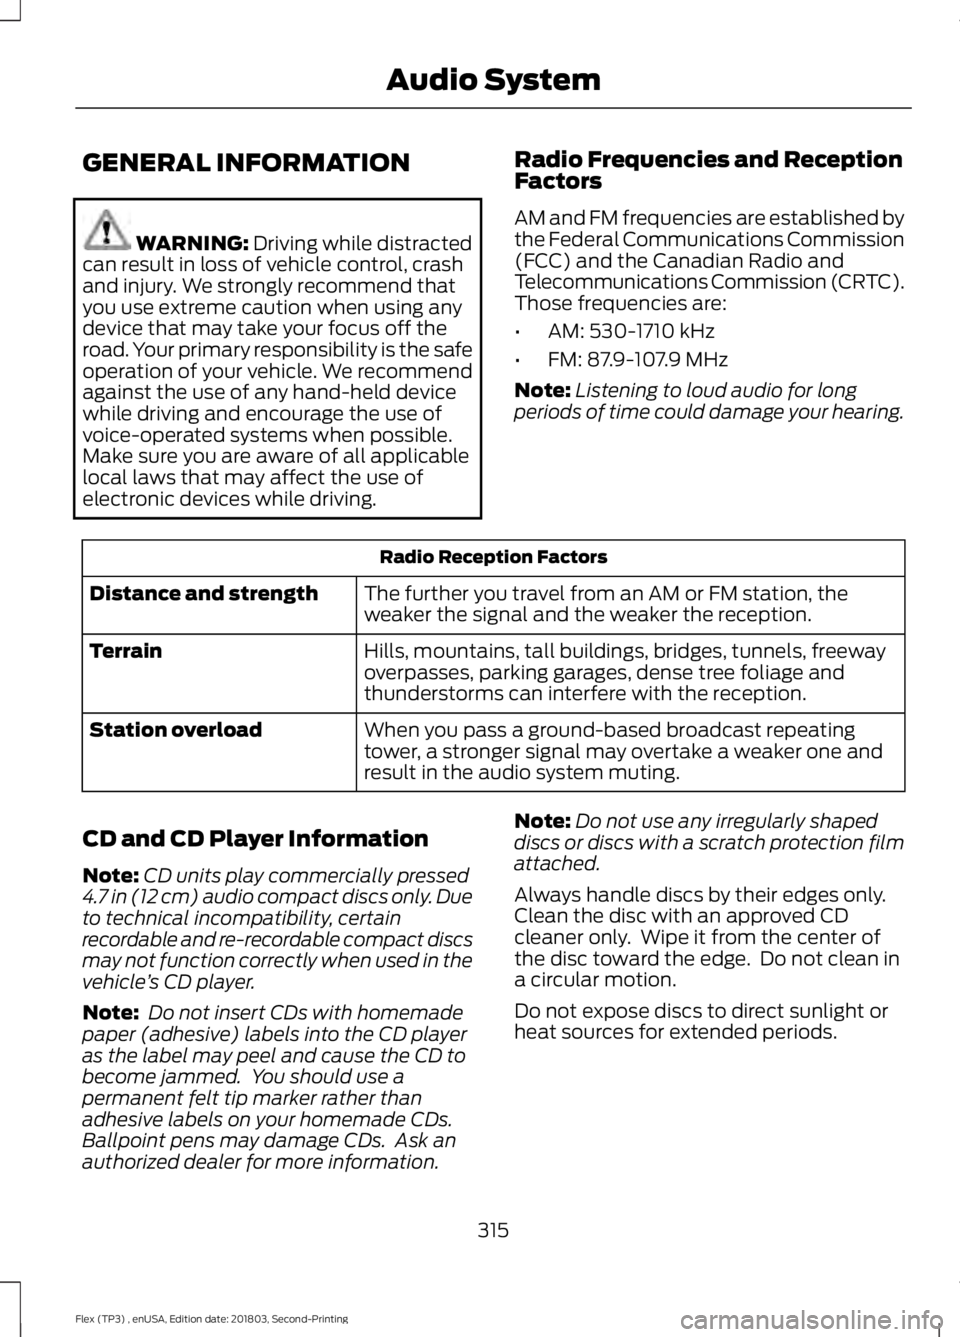
GENERAL INFORMATION
WARNING: Driving while distracted
can result in loss of vehicle control, crash
and injury. We strongly recommend that
you use extreme caution when using any
device that may take your focus off the
road. Your primary responsibility is the safe
operation of your vehicle. We recommend
against the use of any hand-held device
while driving and encourage the use of
voice-operated systems when possible.
Make sure you are aware of all applicable
local laws that may affect the use of
electronic devices while driving. Radio Frequencies and Reception
Factors
AM and FM frequencies are established by
the Federal Communications Commission
(FCC) and the Canadian Radio and
Telecommunications Commission (CRTC).
Those frequencies are:
•
AM: 530-1710 kHz
• FM: 87.9-107.9 MHz
Note: Listening to loud audio for long
periods of time could damage your hearing. Radio Reception Factors
The further you travel from an AM or FM station, the
weaker the signal and the weaker the reception.
Distance and strength
Hills, mountains, tall buildings, bridges, tunnels, freeway
overpasses, parking garages, dense tree foliage and
thunderstorms can interfere with the reception.
Terrain
When you pass a ground-based broadcast repeating
tower, a stronger signal may overtake a weaker one and
result in the audio system muting.
Station overload
CD and CD Player Information
Note: CD units play commercially pressed
4.7 in (12 cm) audio compact discs only. Due
to technical incompatibility, certain
recordable and re-recordable compact discs
may not function correctly when used in the
vehicle ’s CD player.
Note: Do not insert CDs with homemade
paper (adhesive) labels into the CD player
as the label may peel and cause the CD to
become jammed. You should use a
permanent felt tip marker rather than
adhesive labels on your homemade CDs.
Ballpoint pens may damage CDs. Ask an
authorized dealer for more information. Note:
Do not use any irregularly shaped
discs or discs with a scratch protection film
attached.
Always handle discs by their edges only.
Clean the disc with an approved CD
cleaner only. Wipe it from the center of
the disc toward the edge. Do not clean in
a circular motion.
Do not expose discs to direct sunlight or
heat sources for extended periods.
315
Flex (TP3) , enUSA, Edition date: 201803, Second-Printing Audio System