engine FORD FLEX 2019 Repair Manual
[x] Cancel search | Manufacturer: FORD, Model Year: 2019, Model line: FLEX, Model: FORD FLEX 2019Pages: 513, PDF Size: 39.3 MB
Page 219 of 513
BREAKING-IN
You need to break in new tires for
approximately 300 mi (480 km). During
this time, your vehicle may exhibit some
unusual driving characteristics.
Avoid driving too fast during the first
1,000 mi (1,600 km)
. Vary your speed
frequently and change up through the
gears early. Do not labor the engine.
Do not tow during the first
1,000 mi
(1,600 km).
ECONOMICAL DRIVING
Your fuel economy is affected by several
things, such as how you drive, the
conditions you drive under, and how you
maintain your vehicle.
You may improve your fuel economy by
keeping these things in mind:
• Accelerate and slow down in a smooth,
moderate fashion.
• Drive at steady speeds without
stopping.
• Anticipate stops; slowing down may
eliminate the need to stop.
• Combine errands and minimize
stop-and-go driving.
• Close the windows for high-speed
driving.
• Drive at reasonable speeds (traveling
at 55 mph [88 km/h] uses 15% less
fuel than traveling at 65 mph [105
km/h]).
• Keep the tires properly inflated and use
only the recommended size.
• Use the recommended engine oil.
• Perform all regularly scheduled
maintenance. Avoid these actions; they reduce your fuel
economy:
•
Sudden accelerations or hard
accelerations.
• Revving the engine before turning it off.
• Idle for periods longer than one minute.
• Warm up your vehicle on cold
mornings.
• Use the air conditioner or front
defroster.
• Use the speed control in hilly terrain.
• Rest your foot on the brake pedal while
driving.
• Drive a heavily loaded vehicle or tow a
trailer.
• Carry unnecessary weight
(approximately 1 mpg [0.4 km/L] is
lost for every 400 lb [180 kilogram] of
weight carried).
• Driving with the wheels out of
alignment.
Conditions
• Heavily loading a vehicle or towing a
trailer may reduce fuel economy at any
speed.
• Adding certain accessories to your
vehicle (for example bug deflectors,
rollbars, light bars, running boards, ski
racks or luggage racks) may reduce
fuel economy.
• To maximize the fuel economy, drive
with the tonneau cover installed (if
equipped).
• Using fuel blended with alcohol may
lower fuel economy.
• Fuel economy may decrease with lower
temperatures during the first
5–10 mi
(12 –16 km) of driving.
• Driving on flat terrain offers improved
fuel economy as compared to driving
on hilly terrain.
216
Flex (TP3) , enUSA, Edition date: 201803, Second-Printing Driving Hints
Page 220 of 513
•
Transmissions give their best fuel
economy when operated in the top
cruise gear and with steady pressure
on the gas pedal.
• Four-wheel-drive operation (if
equipped) is less fuel efficient than
two-wheel-drive operation.
• Close the windows for high-speed
driving.
DRIVING THROUGH WATER WARNING: Do not drive through
flowing or deep water as you may lose
control of your vehicle.
Note: Driving through standing water can
cause vehicle damage.
Note: Engine damage can occur if water
enters the air filter.
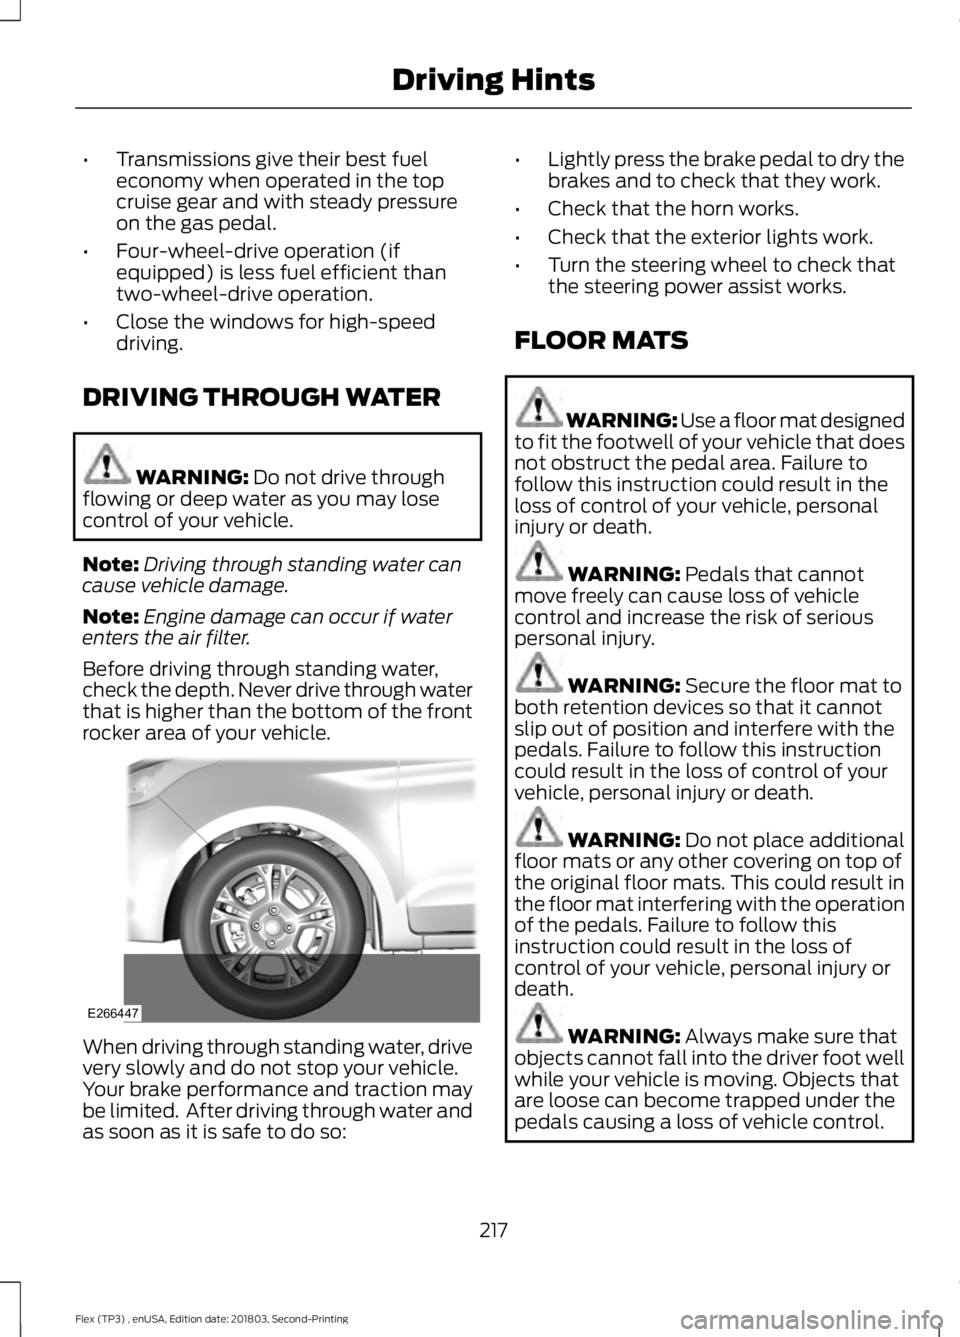
Before driving through standing water,
check the depth. Never drive through water
that is higher than the bottom of the front
rocker area of your vehicle. When driving through standing water, drive
very slowly and do not stop your vehicle.
Your brake performance and traction may
be limited. After driving through water and
as soon as it is safe to do so: •
Lightly press the brake pedal to dry the
brakes and to check that they work.
• Check that the horn works.
• Check that the exterior lights work.
• Turn the steering wheel to check that
the steering power assist works.
FLOOR MATS WARNING: Use a floor mat designed
to fit the footwell of your vehicle that does
not obstruct the pedal area. Failure to
follow this instruction could result in the
loss of control of your vehicle, personal
injury or death. WARNING:
Pedals that cannot
move freely can cause loss of vehicle
control and increase the risk of serious
personal injury. WARNING:
Secure the floor mat to
both retention devices so that it cannot
slip out of position and interfere with the
pedals. Failure to follow this instruction
could result in the loss of control of your
vehicle, personal injury or death. WARNING:
Do not place additional
floor mats or any other covering on top of
the original floor mats. This could result in
the floor mat interfering with the operation
of the pedals. Failure to follow this
instruction could result in the loss of
control of your vehicle, personal injury or
death. WARNING:
Always make sure that
objects cannot fall into the driver foot well
while your vehicle is moving. Objects that
are loose can become trapped under the
pedals causing a loss of vehicle control.
217
Flex (TP3) , enUSA, Edition date: 201803, Second-Printing Driving HintsE266447
Page 223 of 513
Vehicles Sold in Canada: Getting
Roadside Assistance
To fully assist you should you have a
vehicle concern, Ford Motor Company of
Canada, Limited offers a complimentary
roadside assistance program. This program
is eligible within Canada or the continental
United States.
The service is available 24 hours a day,
seven days a week.
This program is separate from the New
Vehicle Limited Warranty, but the coverage
is concurrent with the powertrain coverage
period of your vehicle. Canadian roadside
coverage and benefits may differ from the
U.S. coverage.
If you require more information, please call
us in Canada at 1-800-665-2006, or visit
our website at www.ford.ca.
Vehicles Sold in Canada: Using
Roadside Assistance
Complete the roadside assistance
identification card and place it in your
wallet for quick reference.
In Canada, this card is found in the
Warranty Guide in the glove compartment
of your vehicle.
Vehicles Sold in Canada: Roadside
Assistance Program Coverage
The service is available 24 hours a day,
seven days a week.
Canadian roadside coverage and benefits
may differ from the U.S. coverage.
If you require more information, please
refer to the coverage section of your
warranty guide, call us in Canada at
1-800-665-2006, or visit our website at
www.ford.ca.
HAZARD FLASHERS
Note:
The hazard flashers operate when
the ignition is in any position, or if the key is
not in the ignition. If used when the vehicle
is not running, the battery loses charge. As
a result, there may be insufficient power to
restart your vehicle. The flasher control is on the
instrument panel. Use your
hazard flashers when your
vehicle is creating a safety hazard for other
motorists.
• Press the flasher control and all front
and rear direction indicators flash.
• Press the button again to switch them
off.
FUEL SHUTOFF WARNING: If your vehicle has been
involved in a crash, have the fuel system
checked. Failure to follow this instruction
could result in fire, personal injury or death.
Note: When you try to restart your vehicle
after a fuel shutoff, the vehicle makes sure
that various systems are safe to restart.
Once the vehicle determines the systems
are safe, then the vehicle allows you to
restart.
Note: In the event that your vehicle does
not restart after your third attempt, contact
a qualified technician.
The fuel pump shutoff stops the flow of
fuel to the engine in the event of a
moderate to severe crash. Not every
impact causes a shutoff.
Should your vehicle shut off after a crash,
you may restart your vehicle.
220
Flex (TP3) , enUSA, Edition date: 201803, Second-Printing Roadside Emergencies
Page 224 of 513
If your vehicle has a key system:
1. Switch off the ignition.
2. Switch to start position.
3. Switch off the ignition.
4.
Switch on the ignition to re-enable the
fuel pump.
5. If the vehicle does not start, repeat steps 1 through 4.
If your vehicle has a push button start
system:
1. Press START/STOP to switch off your
vehicle.
2. Press the brake pedal and START/STOP
to switch on your
vehicle.
3. Remove your foot from the brake pedal
and press
START/STOP to switch off
your vehicle.
4. You can attempt to start the vehicle by pressing the brake pedal and
START/STOP
, or press START/STOP
without pressing the brake pedal.
5. If the vehicle does not start, repeat steps 1 through 4.
JUMP STARTING THE VEHICLE WARNING:
Batteries normally
produce explosive gases which can cause
personal injury. Therefore, do not allow
flames, sparks or lighted substances to
come near the battery. When working near
the battery, always shield your face and
protect your eyes. Always provide correct
ventilation. WARNING:
Keep batteries out of
reach of children. Batteries contain sulfuric
acid. Avoid contact with skin, eyes or
clothing. Shield your eyes when working
near the battery to protect against possible
splashing of acid solution. In case of acid
contact with skin or eyes, flush
immediately with water for a minimum of
15 minutes and get prompt medical
attention. If acid is swallowed, call a
physician immediately. WARNING:
Use only adequately
sized cables with insulated clamps.
Preparing Your Vehicle
Do not attempt to push-start your
automatic transmission vehicle.
Note: Attempting to push-start a vehicle
with an automatic transmission may cause
transmission damage.
Note: Use only a 12-volt supply to start your
vehicle.
Note: Do not disconnect the battery of the
disabled vehicle as this could damage the
vehicle electrical system.
Park the booster vehicle close to the hood
of the disabled vehicle, making sure the
two vehicles do not touch.
Connecting the Jumper Cables WARNING: Do not attach the cables
to fuel lines, engine rocker covers, the
intake manifold or electrical components
as grounding points. Stay clear of moving
parts. To avoid reverse polarity
connections, make sure that you correctly
identify the positive (+) and negative (-)
terminals on both the disabled and booster
vehicles before connecting the cables.
221
Flex (TP3) , enUSA, Edition date: 201803, Second-Printing Roadside Emergencies
Page 225 of 513
WARNING: Do not attach the end
of the positive cable to the studs or
L-shaped eyelet located above the positive
(+) terminal of your vehicle ’s battery. High
current may flow through and cause
damage to the fuses. WARNING:
Do not connect the end
of the second cable to the negative (-)
terminal of the battery to be jumped. A
spark may cause an explosion of the gases
that surround the battery.
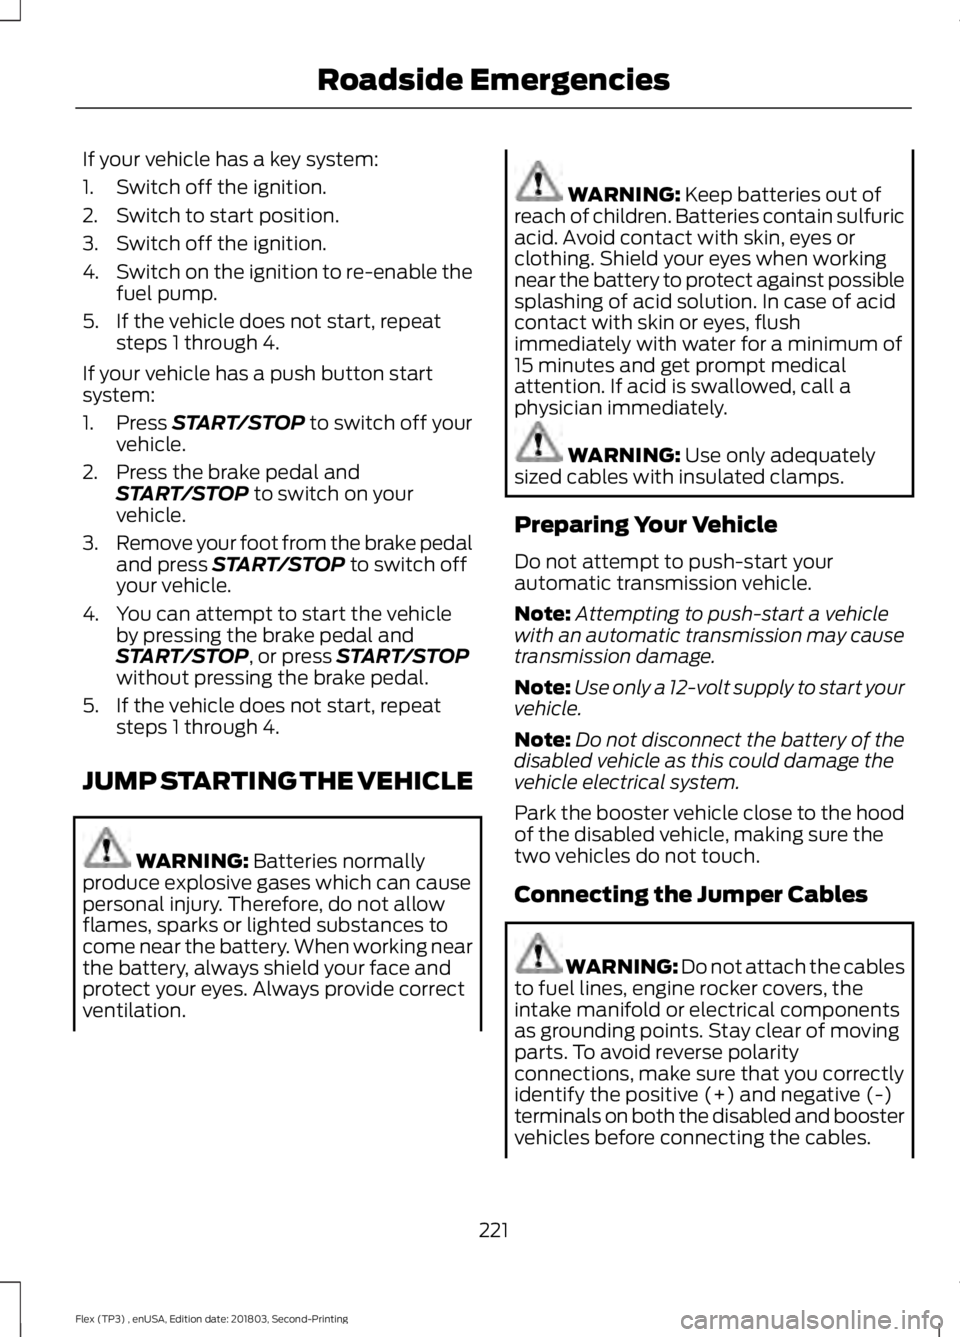
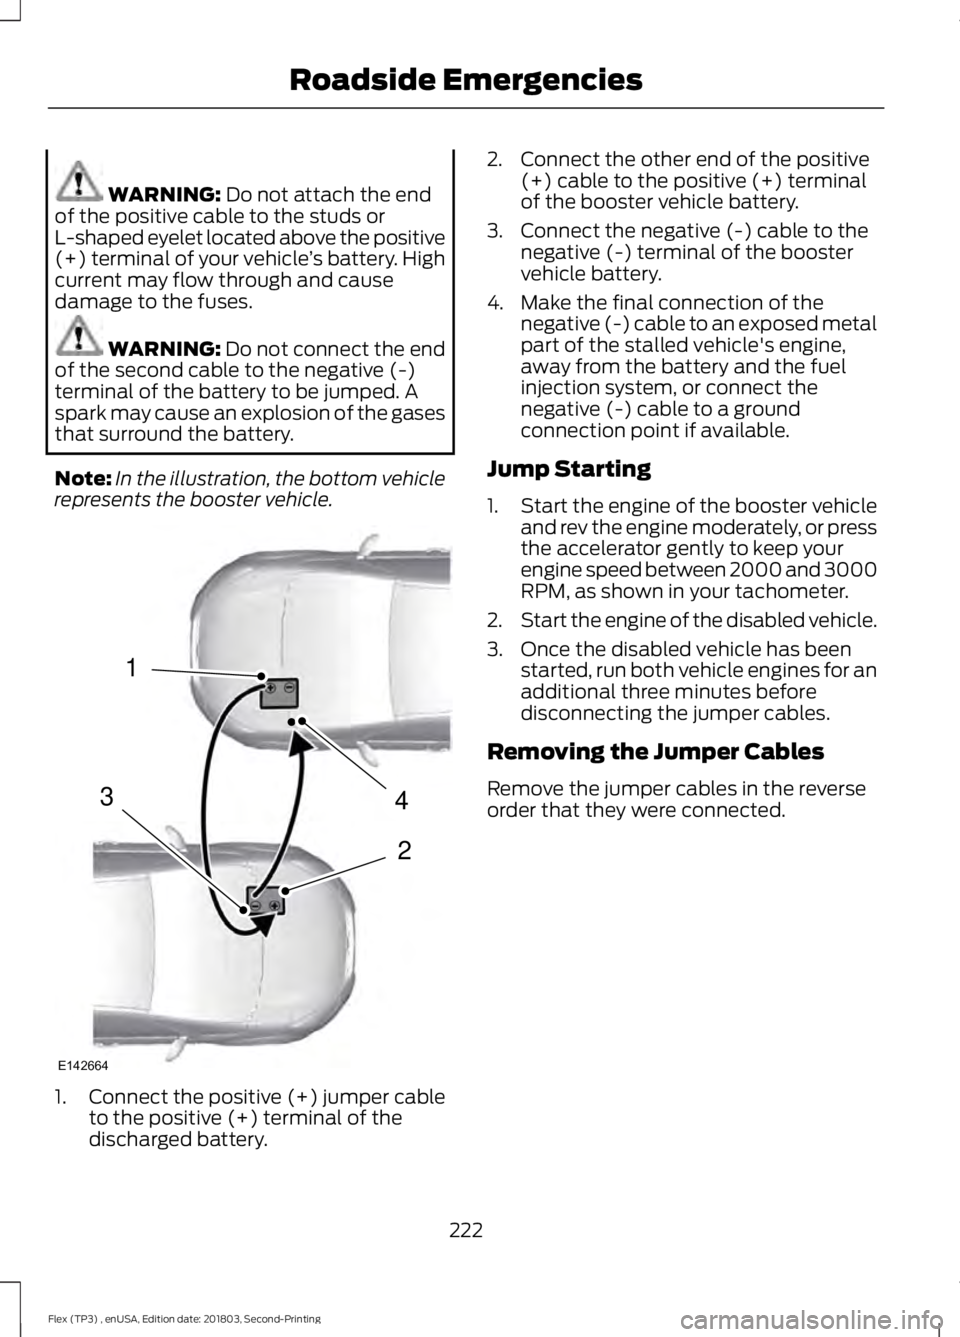
Note: In the illustration, the bottom vehicle
represents the booster vehicle. 1.
Connect the positive (+) jumper cable
to the positive (+) terminal of the
discharged battery. 2. Connect the other end of the positive
(+) cable to the positive (+) terminal
of the booster vehicle battery.
3. Connect the negative (-) cable to the negative (-) terminal of the booster
vehicle battery.
4. Make the final connection of the negative (-) cable to an exposed metal
part of the stalled vehicle's engine,
away from the battery and the fuel
injection system, or connect the
negative (-) cable to a ground
connection point if available.
Jump Starting
1. Start the engine of the booster vehicle
and rev the engine moderately, or press
the accelerator gently to keep your
engine speed between 2000 and 3000
RPM, as shown in your tachometer.
2. Start the engine of the disabled vehicle.
3. Once the disabled vehicle has been started, run both vehicle engines for an
additional three minutes before
disconnecting the jumper cables.
Removing the Jumper Cables
Remove the jumper cables in the reverse
order that they were connected.
222
Flex (TP3) , enUSA, Edition date: 201803, Second-Printing Roadside Emergencies4
2
1
3
E142664
Page 226 of 513
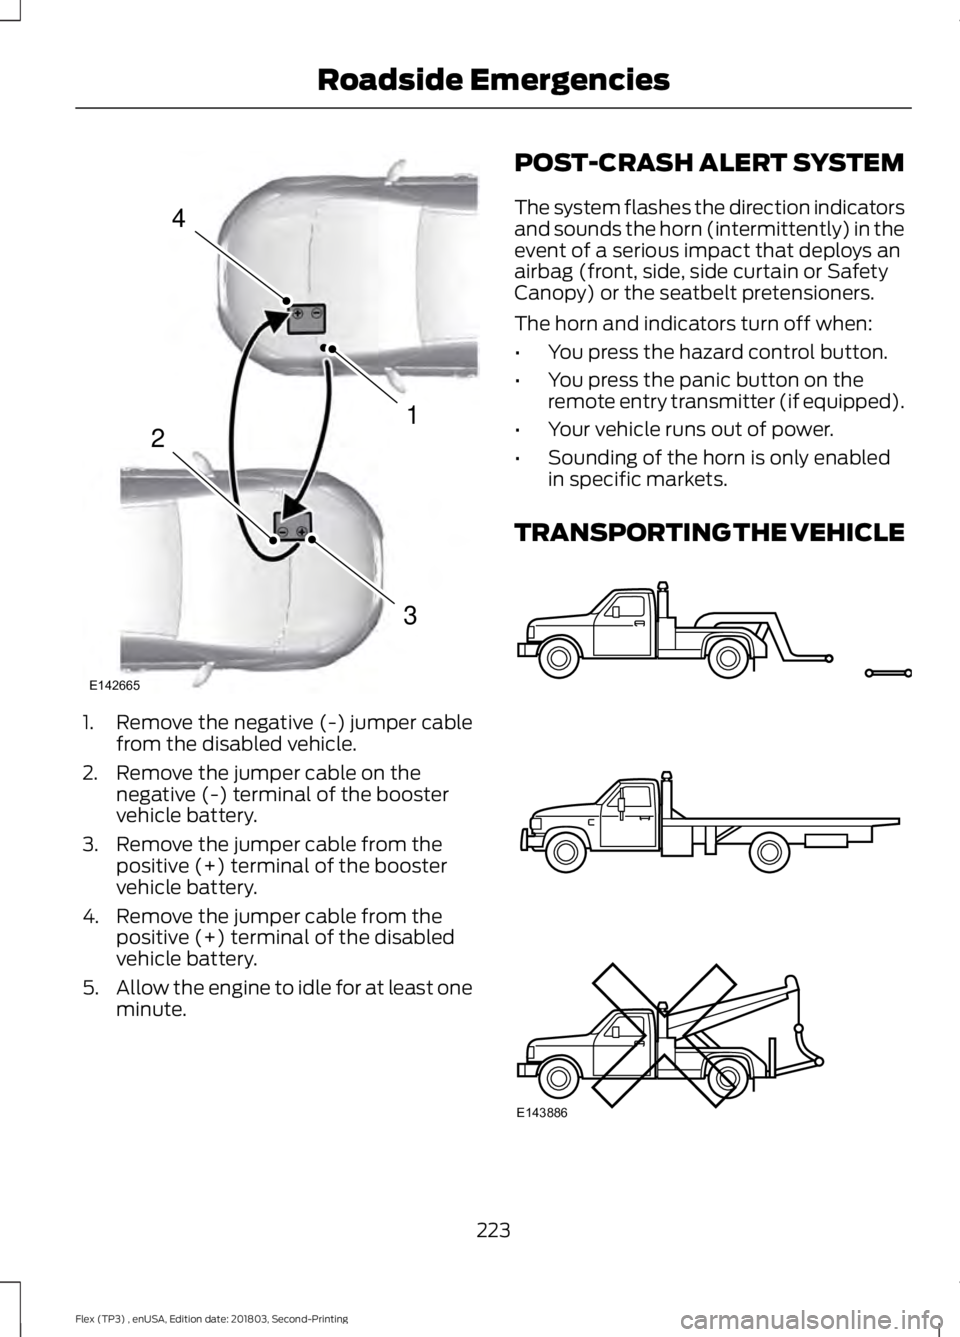
1. Remove the negative (-) jumper cable
from the disabled vehicle.
2. Remove the jumper cable on the negative (-) terminal of the booster
vehicle battery.
3. Remove the jumper cable from the positive (+) terminal of the booster
vehicle battery.
4. Remove the jumper cable from the positive (+) terminal of the disabled
vehicle battery.
5. Allow the engine to idle for at least one
minute. POST-CRASH ALERT SYSTEM
The system flashes the direction indicators
and sounds the horn (intermittently) in the
event of a serious impact that deploys an
airbag (front, side, side curtain or Safety
Canopy) or the seatbelt pretensioners.
The horn and indicators turn off when:
•
You press the hazard control button.
• You press the panic button on the
remote entry transmitter (if equipped).
• Your vehicle runs out of power.
• Sounding of the horn is only enabled
in specific markets.
TRANSPORTING THE VEHICLE 223
Flex (TP3) , enUSA, Edition date: 201803, Second-Printing Roadside Emergencies4
1
3
2
E142665 E143886
Page 231 of 513
UTILIZING THE
MEDIATION/ARBITRATION
PROGRAM (CANADA ONLY)
For vehicles delivered to authorized
Canadian dealers. In those cases where
you continue to feel that the efforts by Ford
of Canada and the authorized dealer to
resolve a factory-related vehicle service
concern have been unsatisfactory, Ford of
Canada participates in an impartial third
party mediation/arbitration program
administered by the Canadian Motor
Vehicle Arbitration Plan (CAMVAP).
The CAMVAP program is a straight forward
and relatively speedy alternative to resolve
a disagreement when all other efforts to
produce a settlement have failed. This
procedure is without cost to you and is
designed to eliminate the need for lengthy
and expensive legal proceedings.
In the CAMVAP program, impartial
third-party arbitrators conduct hearings at
mutually convenient times and places in
an informal environment. These impartial
arbitrators review the positions of the
parties, make decisions and, when
appropriate, render awards to resolve
disputes. CAMVAP decisions are fast, fair,
and final as the arbitrator
’s award is
binding on both you and Ford of Canada.
CAMVAP services are available in all
Canadian territories and provinces. For
more information, without charge or
obligation, call your CAMVAP Provincial
Administrator directly at 1-800-207-0685
or visit www.camvap.ca. GETTING ASSISTANCE
OUTSIDE THE U.S. AND
CANADA
Before exporting your vehicle to a foreign
country, contact the appropriate foreign
embassy or consulate. These officials can
inform you of local vehicle registration
regulations and where to find unleaded
fuel or petrol/gas engines or the proper
sulfur fuel for diesel engines.
If you cannot find the proper fuel
recommended for your vehicle, contact
our Customer Relationship Center.
The use of improper fuels in your vehicle
without proper conversion may damage
the effectiveness of your emission control
system and may cause engine knocking or
serious engine damage. Ford Motor
Company or Ford of Canada is not
responsible for any damage caused by use
of improper fuel. Using improper fuels may
also result in difficulty importing your
vehicle back into the United States.
If your vehicle must be serviced while you
are traveling or living in Asia-Pacific Region,
Sub-Saharan Africa, U.S. Virgin Islands
and/or Puerto Rico, Central America, the
Caribbean, and Israel and the Middle East,
contact the nearest authorized dealer. If
the authorized dealer cannot help you,
contact the corresponding Ford Customer
Assistance Center:
FORD MOTOR COMPANY
Customer Relationship Centers in:
228
Flex (TP3) , enUSA, Edition date: 201803, Second-Printing Customer Assistance
Page 235 of 513
FUSE SPECIFICATION CHART
Power Distribution Box
WARNING: Always disconnect the
battery before servicing high current fuses. WARNING:
To reduce risk of
electrical shock, always replace the cover
to the power distribution box before
reconnecting the battery or refilling fluid
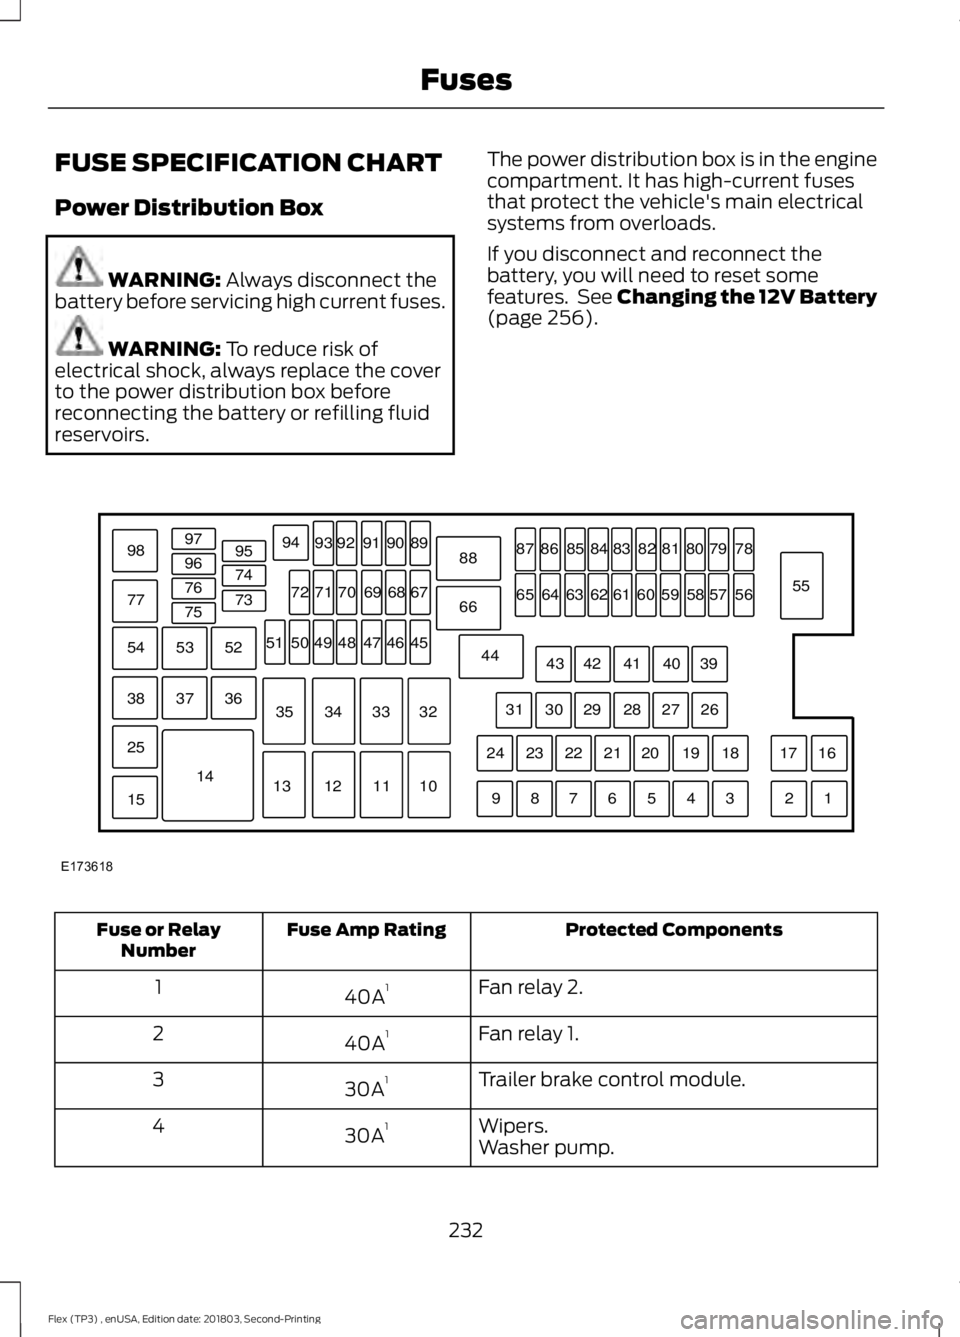
reservoirs. The power distribution box is in the engine
compartment. It has high-current fuses
that protect the vehicle's main electrical
systems from overloads.
If you disconnect and reconnect the
battery, you will need to reset some
features. See Changing the 12V Battery
(page
256). Protected Components
Fuse Amp Rating
Fuse or Relay
Number
Fan relay 2.
40A 1
1
Fan relay 1.
40A 1
2
Trailer brake control module.
30A 1
3
Wipers.
30A 1
4
Washer pump.
232
Flex (TP3) , enUSA, Edition date: 201803, Second-Printing FusesE173618
97
98
77 96
95
94
9392 919089
88
66
44 78
56
39 26 18 16
17
3 1
2
4
5
6
7
8
9 19
20
21
22
23
24 27
28
29
30
31 40
41
42
43 55
57
58
59
60
61
62
63
64
65 79
80
81
82
83
84
85
86
87
67
45
32
10
11
12
13 33
34
35 46
47
48
49
50
51 68
69
70
71
72
74
73
76
75
53
37 36
54
38
25
15
1452
Page 237 of 513
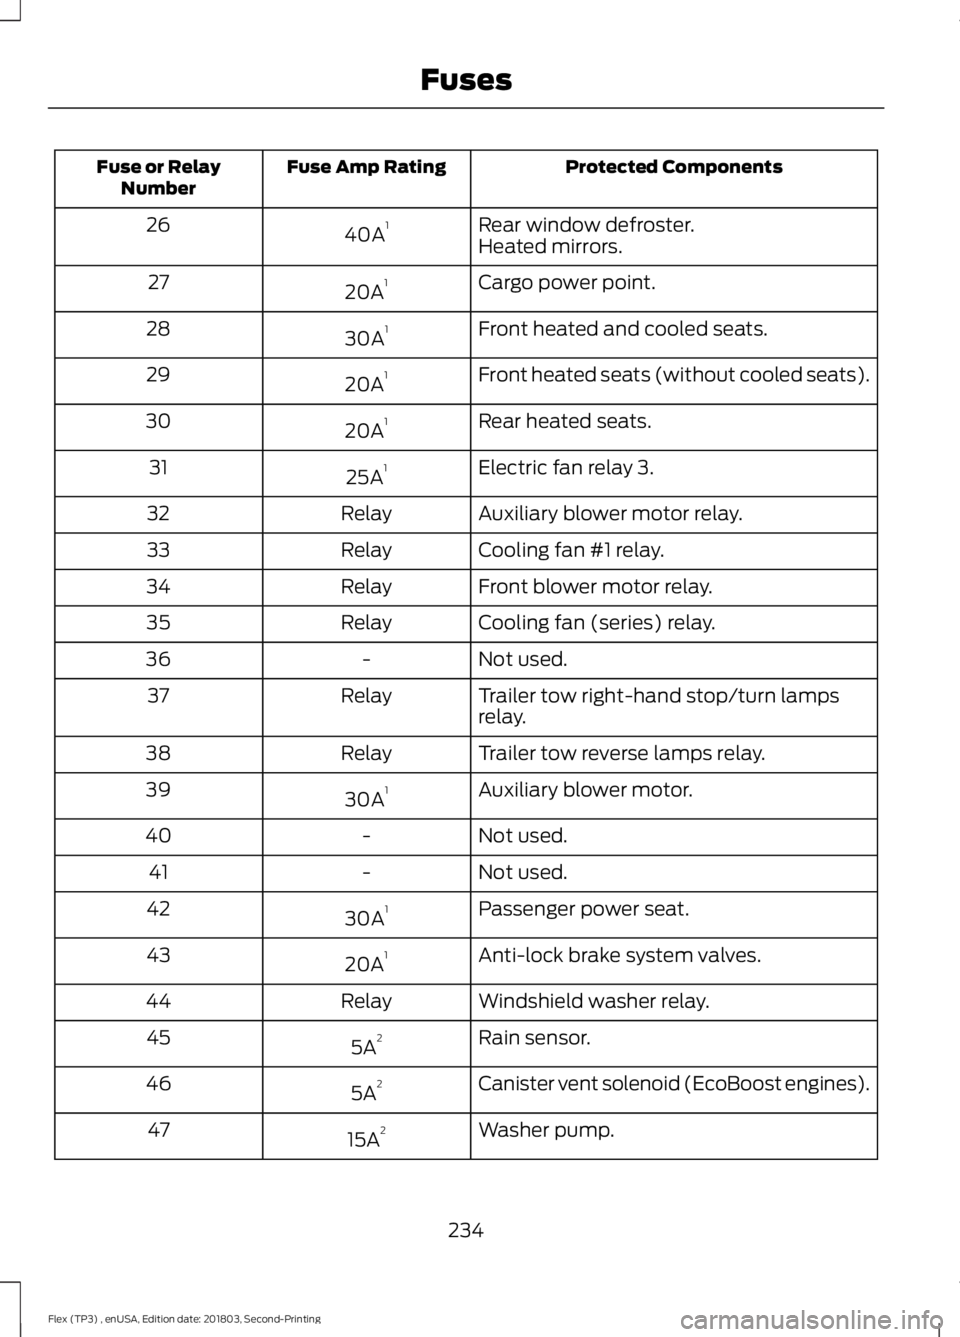
Protected Components
Fuse Amp Rating
Fuse or Relay
Number
Rear window defroster.
40A 1
26
Heated mirrors.
Cargo power point.
20A 1
27
Front heated and cooled seats.
30A 1
28
Front heated seats (without cooled seats).
20A 1
29
Rear heated seats.
20A 1
30
Electric fan relay 3.
25A 1
31
Auxiliary blower motor relay.
Relay
32
Cooling fan #1 relay.
Relay
33
Front blower motor relay.
Relay
34
Cooling fan (series) relay.
Relay
35
Not used.
-
36
Trailer tow right-hand stop/turn lamps
relay.
Relay
37
Trailer tow reverse lamps relay.
Relay
38
Auxiliary blower motor.
30A 1
39
Not used.
-
40
Not used.
-
41
Passenger power seat.
30A 1
42
Anti-lock brake system valves.
20A 1
43
Windshield washer relay.
Relay
44
Rain sensor.
5A 2
45
Canister vent solenoid (EcoBoost engines).
5A 2
46
Washer pump.
15A 2
47
234
Flex (TP3) , enUSA, Edition date: 201803, Second-Printing Fuses
Page 240 of 513
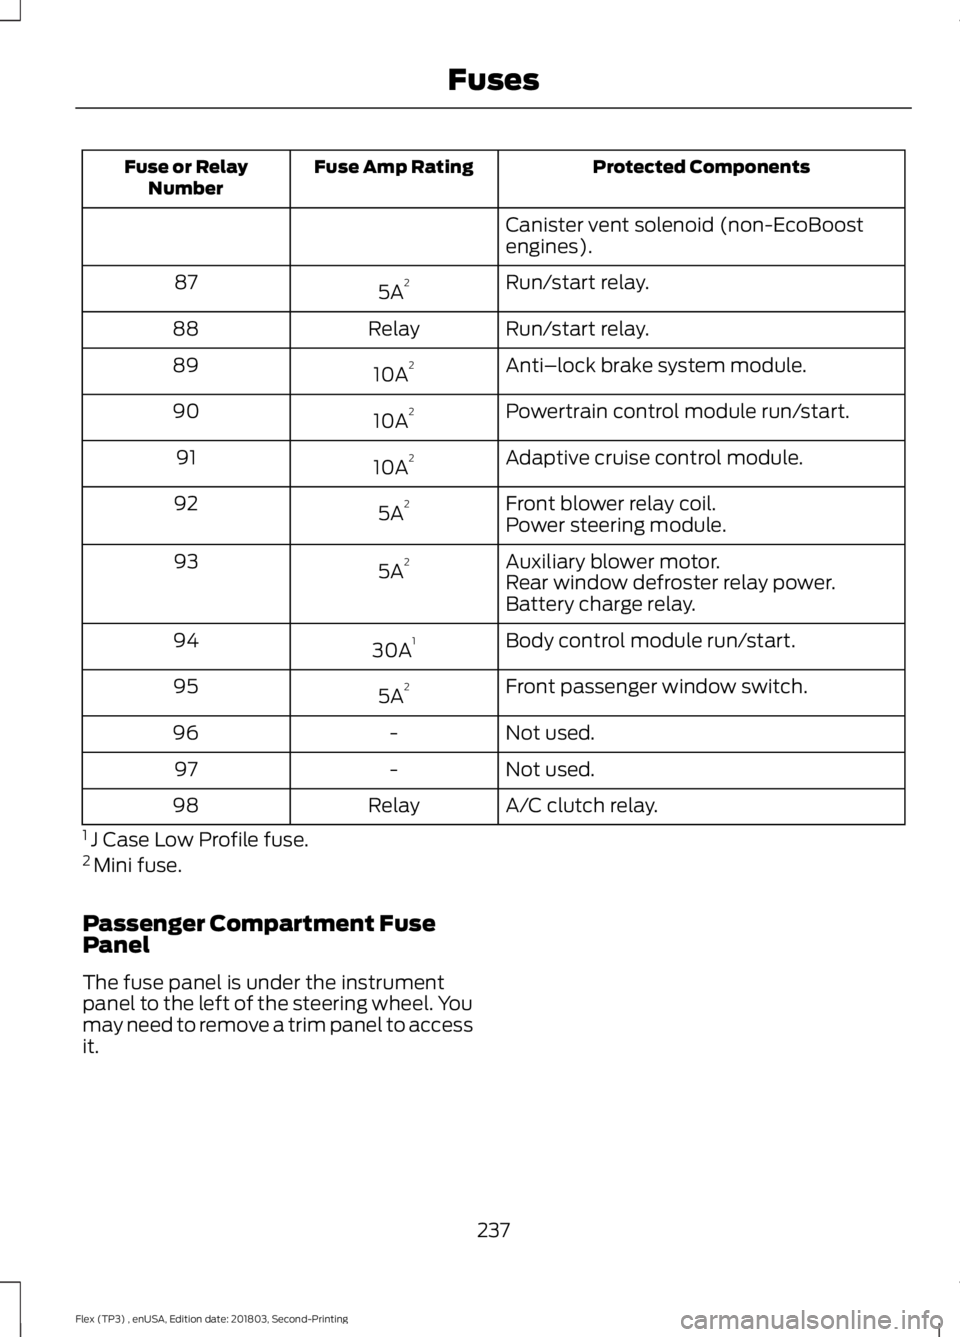
Protected Components
Fuse Amp Rating
Fuse or Relay
Number
Canister vent solenoid (non-EcoBoost
engines).
Run/start relay.
5A 2
87
Run/start relay.
Relay
88
Anti–lock brake system module.
10A 2
89
Powertrain control module run/start.
10A 2
90
Adaptive cruise control module.
10A 2
91
Front blower relay coil.
5A 2
92
Power steering module.
Auxiliary blower motor.
5A 2
93
Rear window defroster relay power.
Battery charge relay.
Body control module run/start.
30A 1
94
Front passenger window switch.
5A 2
95
Not used.
-
96
Not used.
-
97
A/C clutch relay.
Relay
98
1 J Case Low Profile fuse.
2 Mini fuse.
Passenger Compartment Fuse
Panel
The fuse panel is under the instrument
panel to the left of the steering wheel. You
may need to remove a trim panel to access
it.
237
Flex (TP3) , enUSA, Edition date: 201803, Second-Printing Fuses