high beam FORD FOCUS 2003 1.G Owners Manual
[x] Cancel search | Manufacturer: FORD, Model Year: 2003, Model line: FOCUS, Model: FORD FOCUS 2003 1.GPages: 216, PDF Size: 4.15 MB
Page 14 of 216
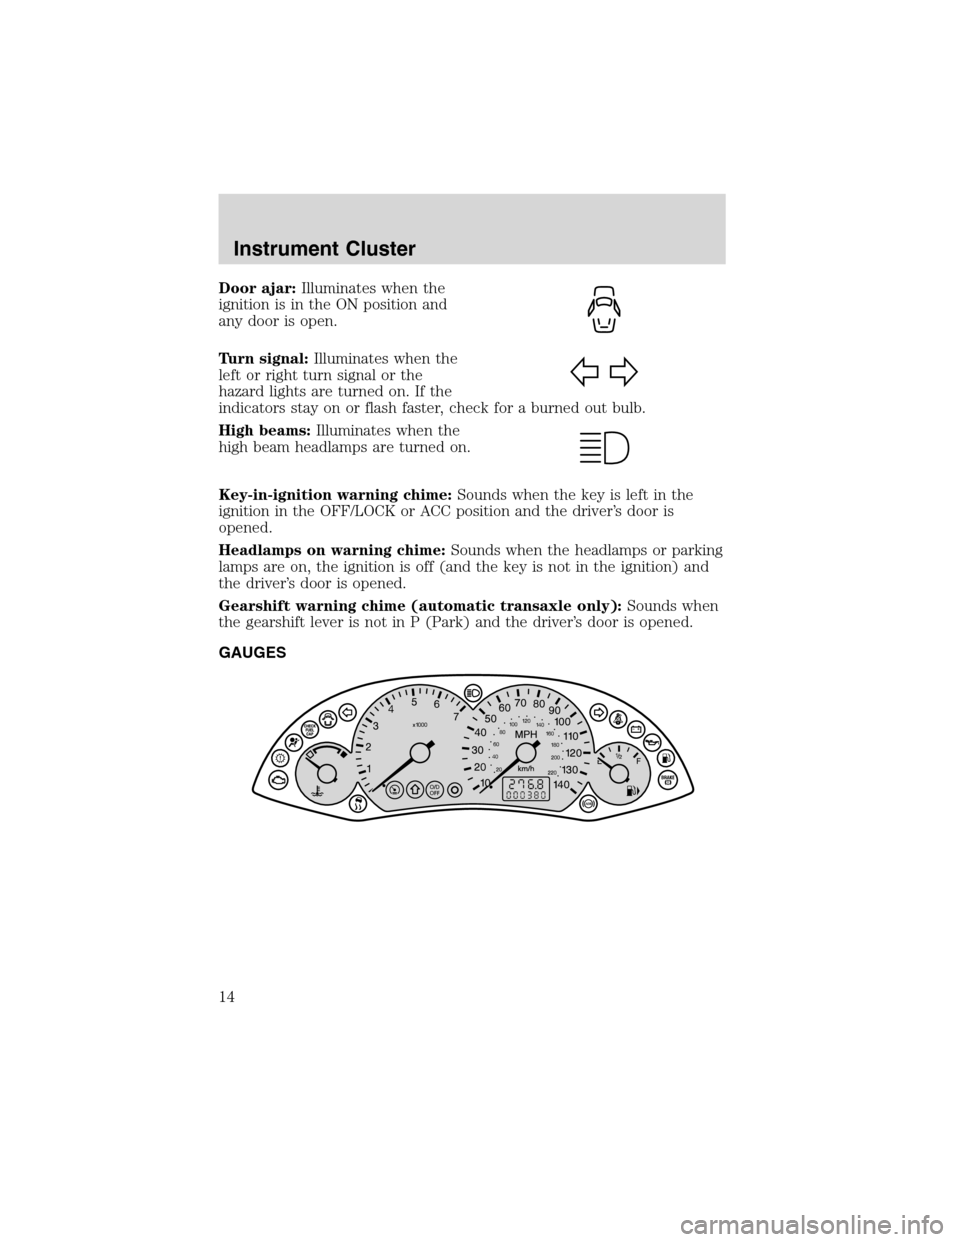
Door ajar:Illuminates when the
ignition is in the ON position and
any door is open.
Turn signal:Illuminates when the
left or right turn signal or the
hazard lights are turned on. If the
indicators stay on or flash faster, check for a burned out bulb.
High beams:Illuminates when the
high beam headlamps are turned on.
Key-in-ignition warning chime:Sounds when the key is left in the
ignition in the OFF/LOCK or ACC position and the driver’s door is
opened.
Headlamps on warning chime:Sounds when the headlamps or parking
lamps are on, the ignition is off (and the key is not in the ignition) and
the driver’s door is opened.
Gearshift warning chime (automatic transaxle only):Sounds when
the gearshift lever is not in P (Park) and the driver’s door is opened.
GAUGES
Instrument Cluster
14
Page 38 of 216
Lights
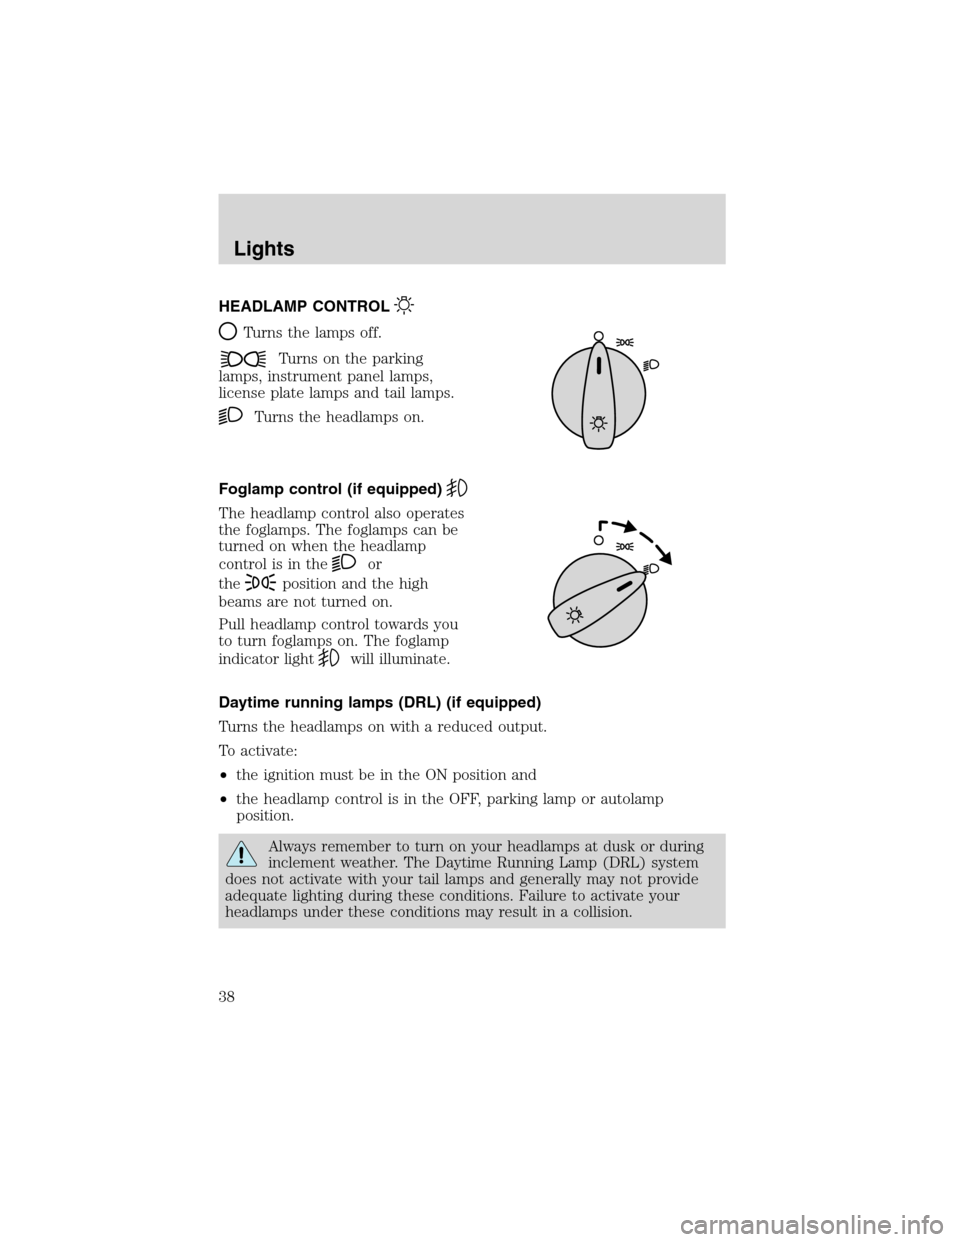
HEADLAMP CONTROL
Turns the lamps off.
Turns on the parking
lamps, instrument panel lamps,
license plate lamps and tail lamps.
Turns the headlamps on.
Foglamp control (if equipped)
The headlamp control also operates
the foglamps. The foglamps can be
turned on when the headlamp
control is in the
or
the
position and the high
beams are not turned on.
Pull headlamp control towards you
to turn foglamps on. The foglamp
indicator light
will illuminate.
Daytime running lamps (DRL) (if equipped)
Turns the headlamps on with a reduced output.
To activate:
•the ignition must be in the ON position and
•the headlamp control is in the OFF, parking lamp or autolamp
position.
Always remember to turn on your headlamps at dusk or during
inclement weather. The Daytime Running Lamp (DRL) system
does not activate with your tail lamps and generally may not provide
adequate lighting during these conditions. Failure to activate your
headlamps under these conditions may result in a collision.
Lights
38
Page 39 of 216
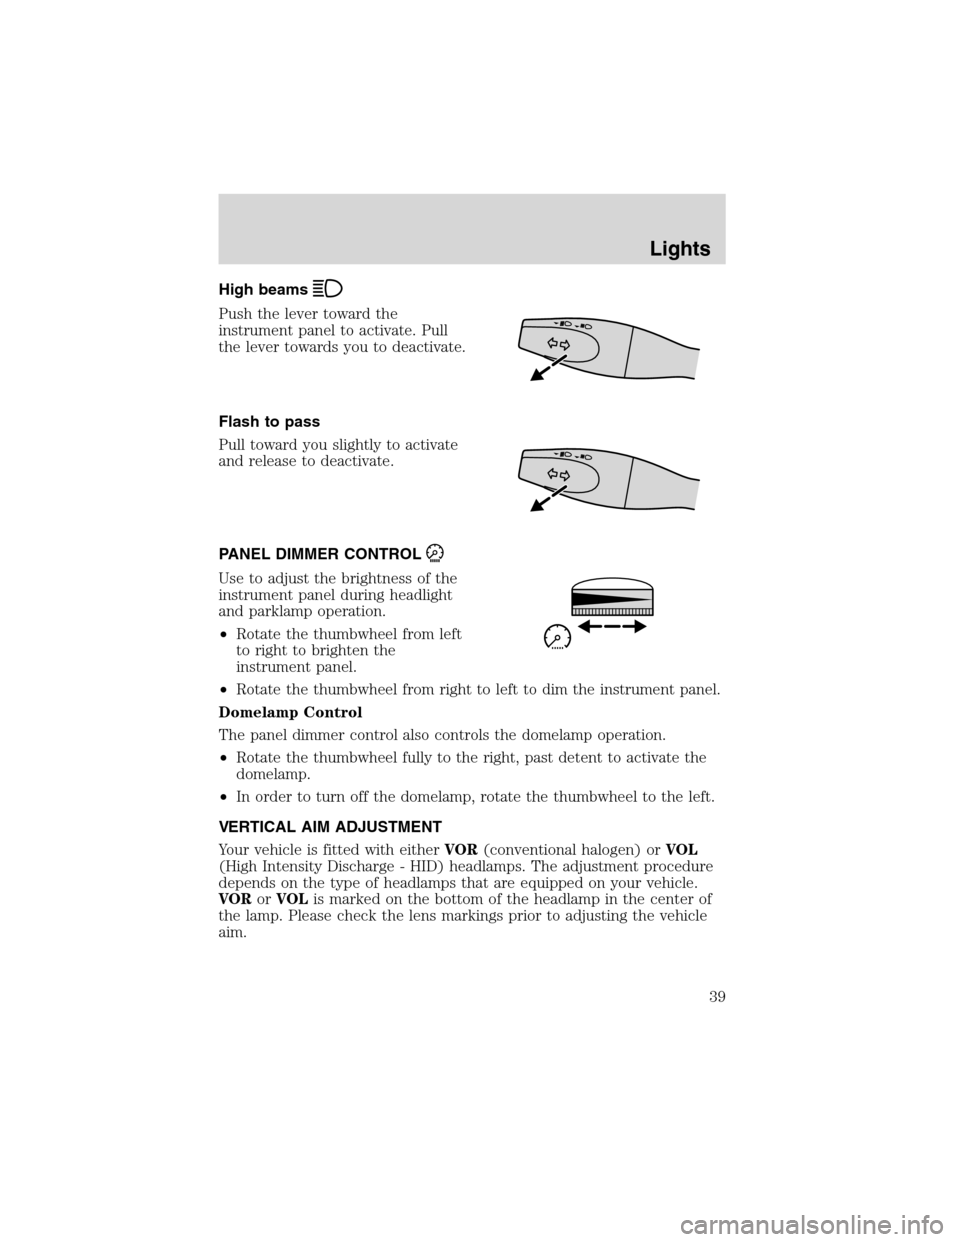
High beams
Push the lever toward the
instrument panel to activate. Pull
the lever towards you to deactivate.
Flash to pass
Pull toward you slightly to activate
and release to deactivate.
PANEL DIMMER CONTROL
Use to adjust the brightness of the
instrument panel during headlight
and parklamp operation.
•Rotate the thumbwheel from left
to right to brighten the
instrument panel.
•Rotate the thumbwheel from right to left to dim the instrument panel.
Domelamp Control
The panel dimmer control also controls the domelamp operation.
•Rotate the thumbwheel fully to the right, past detent to activate the
domelamp.
•In order to turn off the domelamp, rotate the thumbwheel to the left.
VERTICAL AIM ADJUSTMENT
Your vehicle is fitted with eitherVOR(conventional halogen) orVOL
(High Intensity Discharge - HID) headlamps. The adjustment procedure
depends on the type of headlamps that are equipped on your vehicle.
VORorVOLis marked on the bottom of the headlamp in the center of
the lamp. Please check the lens markings prior to adjusting the vehicle
aim.
Lights
39
Page 40 of 216
VOR
1. Park the vehicle on a level surface approximately 7.6 meters (25 feet)
from the vertical wall or the screen directly in front of it.
2. Measure the height of the headlamp bulb center from the ground and
mark a 2.5 meters (8 foot) horizontal reference line on the vertical wall
or screen at this height. (A piece of masking tape works well.)
3. Turn on the low beam headlamps to illuminate the wall or screen and
open the hood.
4. On the wall or screen you will observe an area of high intensity light.
The top of the high intensity area should touch the horizontal reference
line. If not, the beam will need to be adjusted.
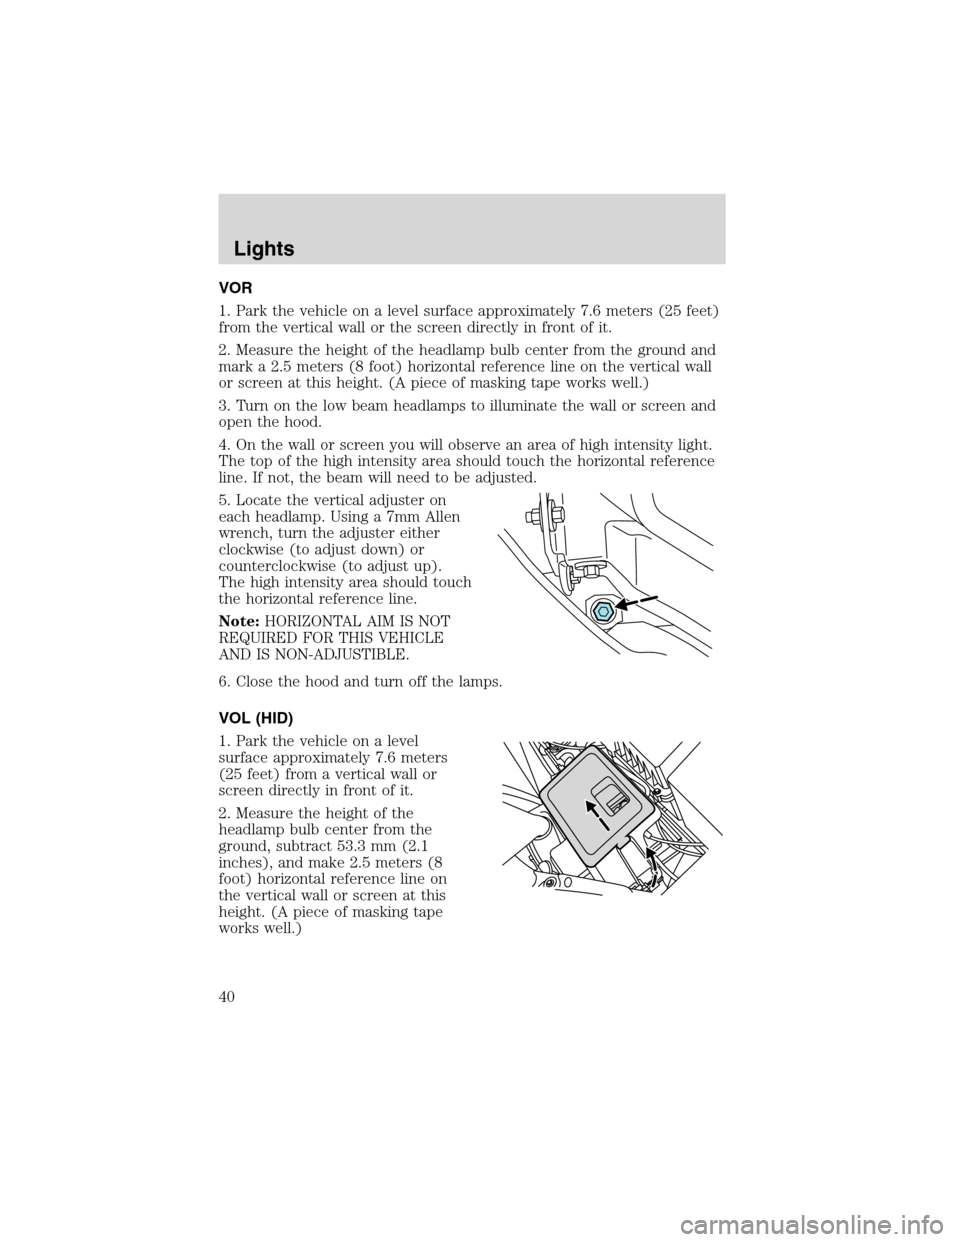
5. Locate the vertical adjuster on
each headlamp. Using a 7mm Allen
wrench, turn the adjuster either
clockwise (to adjust down) or
counterclockwise (to adjust up).
The high intensity area should touch
the horizontal reference line.
Note:HORIZONTAL AIM IS NOT
REQUIRED FOR THIS VEHICLE
AND IS NON-ADJUSTIBLE.
6. Close the hood and turn off the lamps.
VOL (HID)
1. Park the vehicle on a level
surface approximately 7.6 meters
(25 feet) from a vertical wall or
screen directly in front of it.
2. Measure the height of the
headlamp bulb center from the
ground, subtract 53.3 mm (2.1
inches), and make 2.5 meters (8
foot) horizontal reference line on
the vertical wall or screen at this
height. (A piece of masking tape
works well.)
Lights
40
Page 41 of 216
3. Open the hood.
4. Remove the battery cover.
5. Remove the headlamp bulb cover by releasing the four snap hooks
(two top and two bottom).
Note:On the left headlamp, pull the bulb cover approximately 1 inch
rearward and then slide it out until the vertical aiming adjuster is
accessible.
6. Turn on the low beam to illuminate the wall or screen. On the wall or
screen you will observe an area of high intensity light. If the left side of
each light pattern is not at the reference line, the beam needs to be
adjusted.
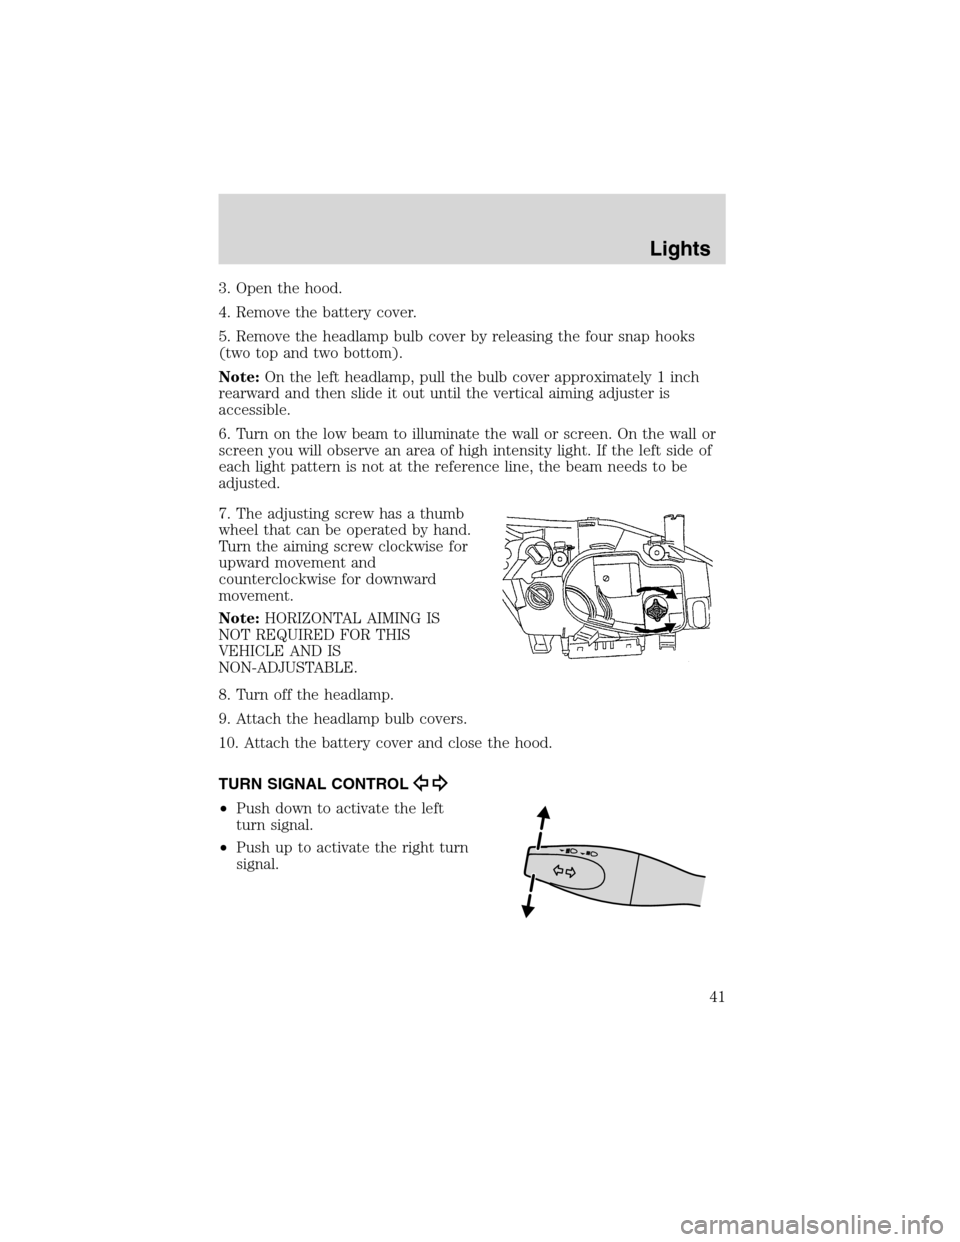
7. The adjusting screw has a thumb
wheel that can be operated by hand.
Turn the aiming screw clockwise for
upward movement and
counterclockwise for downward
movement.
Note:HORIZONTAL AIMING IS
NOT REQUIRED FOR THIS
VEHICLE AND IS
NON-ADJUSTABLE.
8. Turn off the headlamp.
9. Attach the headlamp bulb covers.
10. Attach the battery cover and close the hood.
TURN SIGNAL CONTROL
•Push down to activate the left
turn signal.
•Push up to activate the right turn
signal.
Lights
41
Page 43 of 216
Using the right bulbs
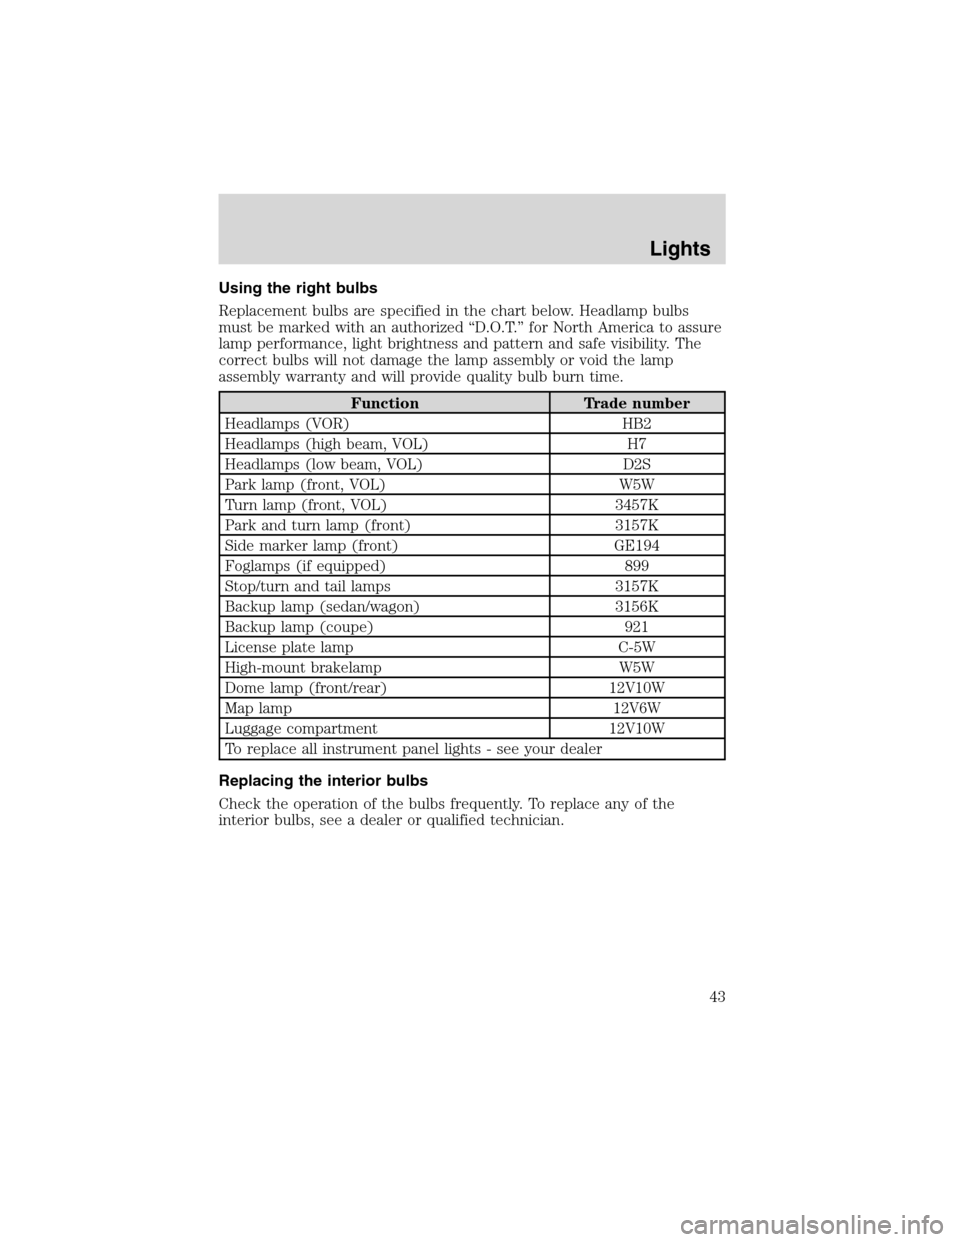
Replacement bulbs are specified in the chart below. Headlamp bulbs
must be marked with an authorized“D.O.T.”for North America to assure
lamp performance, light brightness and pattern and safe visibility. The
correct bulbs will not damage the lamp assembly or void the lamp
assembly warranty and will provide quality bulb burn time.
Function Trade number
Headlamps (VOR) HB2
Headlamps (high beam, VOL) H7
Headlamps (low beam, VOL) D2S
Park lamp (front, VOL) W5W
Turn lamp (front, VOL) 3457K
Park and turn lamp (front) 3157K
Side marker lamp (front) GE194
Foglamps (if equipped) 899
Stop/turn and tail lamps 3157K
Backup lamp (sedan/wagon) 3156K
Backup lamp (coupe) 921
License plate lamp C-5W
High-mount brakelamp W5W
Dome lamp (front/rear) 12V10W
Map lamp 12V6W
Luggage compartment 12V10W
To replace all instrument panel lights - see your dealer
Replacing the interior bulbs
Check the operation of the bulbs frequently. To replace any of the
interior bulbs, see a dealer or qualified technician.
Lights
43
Page 44 of 216
Replacing headlamp bulbs
Make sure the headlamp switch is in the OFF position.
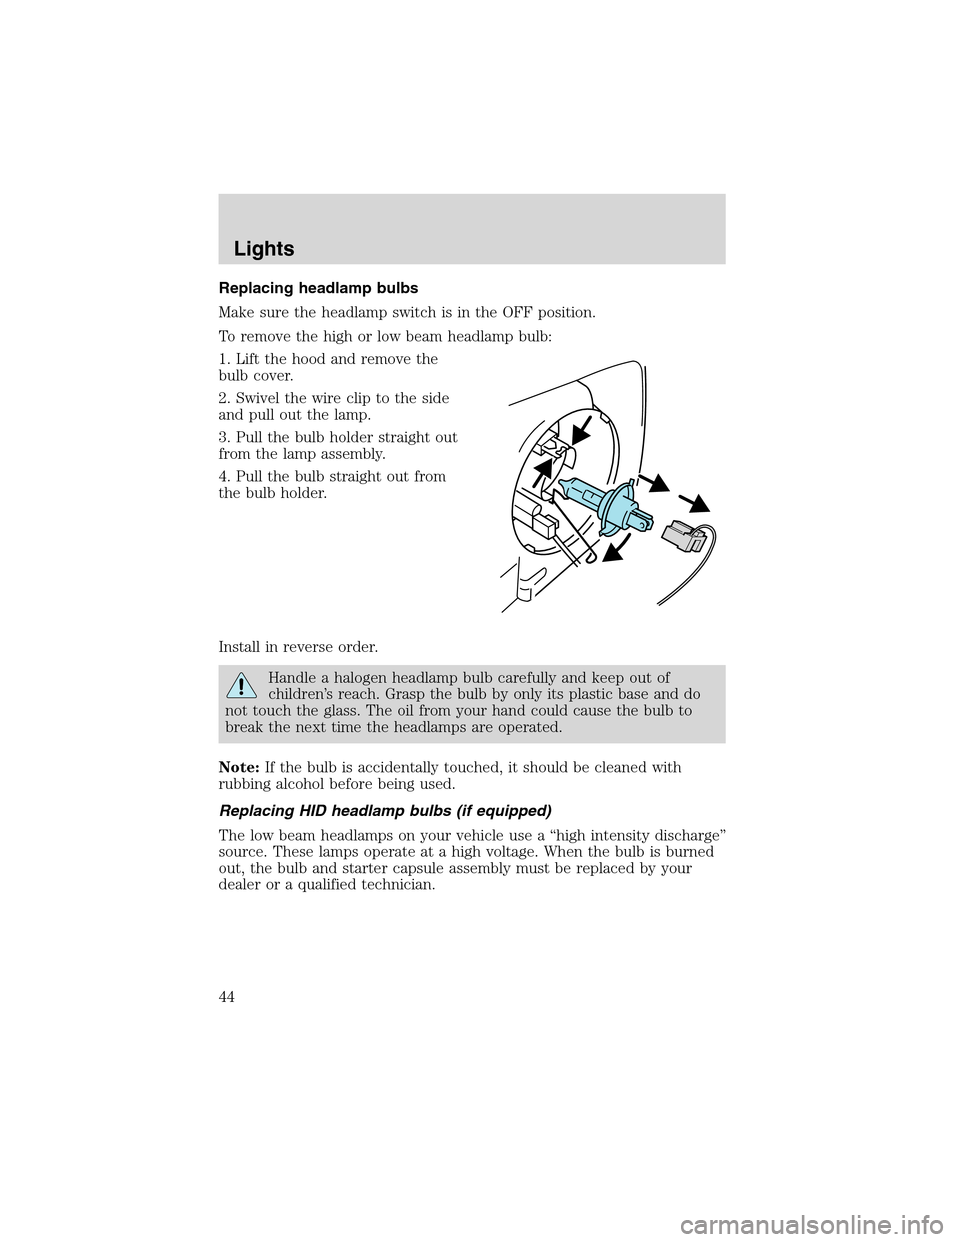
To remove the high or low beam headlamp bulb:
1. Lift the hood and remove the
bulb cover.
2. Swivel the wire clip to the side
and pull out the lamp.
3. Pull the bulb holder straight out
from the lamp assembly.
4. Pull the bulb straight out from
the bulb holder.
Install in reverse order.
Handle a halogen headlamp bulb carefully and keep out of
children’s reach. Grasp the bulb by only its plastic base and do
not touch the glass. The oil from your hand could cause the bulb to
break the next time the headlamps are operated.
Note:If the bulb is accidentally touched, it should be cleaned with
rubbing alcohol before being used.
Replacing HID headlamp bulbs (if equipped)
The low beam headlamps on your vehicle use a“high intensity discharge”
source. These lamps operate at a high voltage. When the bulb is burned
out, the bulb and starter capsule assembly must be replaced by your
dealer or a qualified technician.
Lights
44
Page 133 of 216
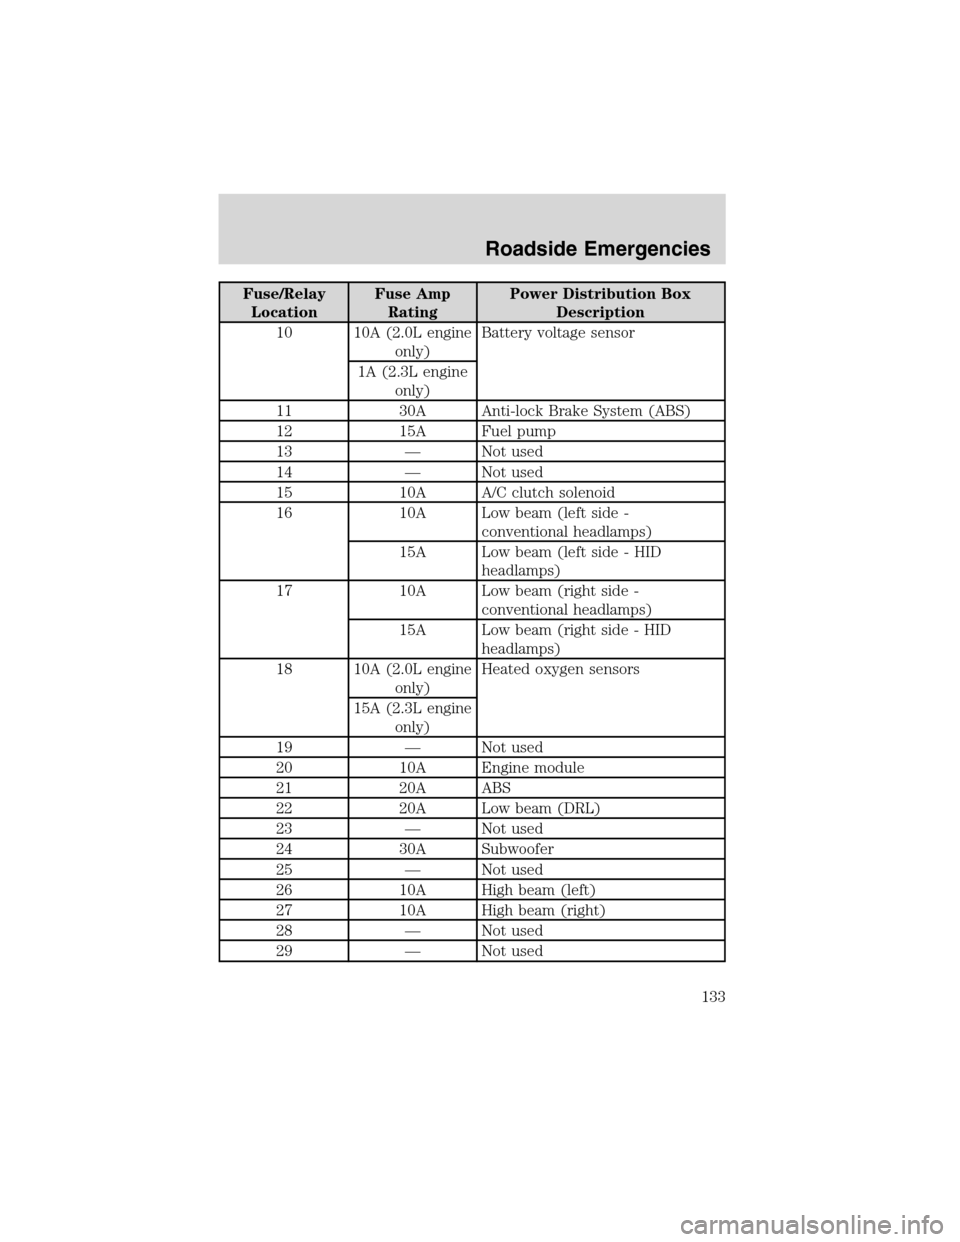
Fuse/Relay
LocationFuse Amp
RatingPower Distribution Box
Description
10 10A (2.0L engine
only)Battery voltage sensor
1A (2.3L engine
only)
11 30A Anti-lock Brake System (ABS)
12 15A Fuel pump
13—Not used
14—Not used
15 10A A/C clutch solenoid
16 10A Low beam (left side -
conventional headlamps)
15A Low beam (left side - HID
headlamps)
17 10A Low beam (right side -
conventional headlamps)
15A Low beam (right side - HID
headlamps)
18 10A (2.0L engine
only)Heated oxygen sensors
15A (2.3L engine
only)
19—Not used
20 10A Engine module
21 20A ABS
22 20A Low beam (DRL)
23—Not used
24 30A Subwoofer
25—Not used
26 10A High beam (left)
27 10A High beam (right)
28—Not used
29—Not used
Roadside Emergencies
133
Page 134 of 216
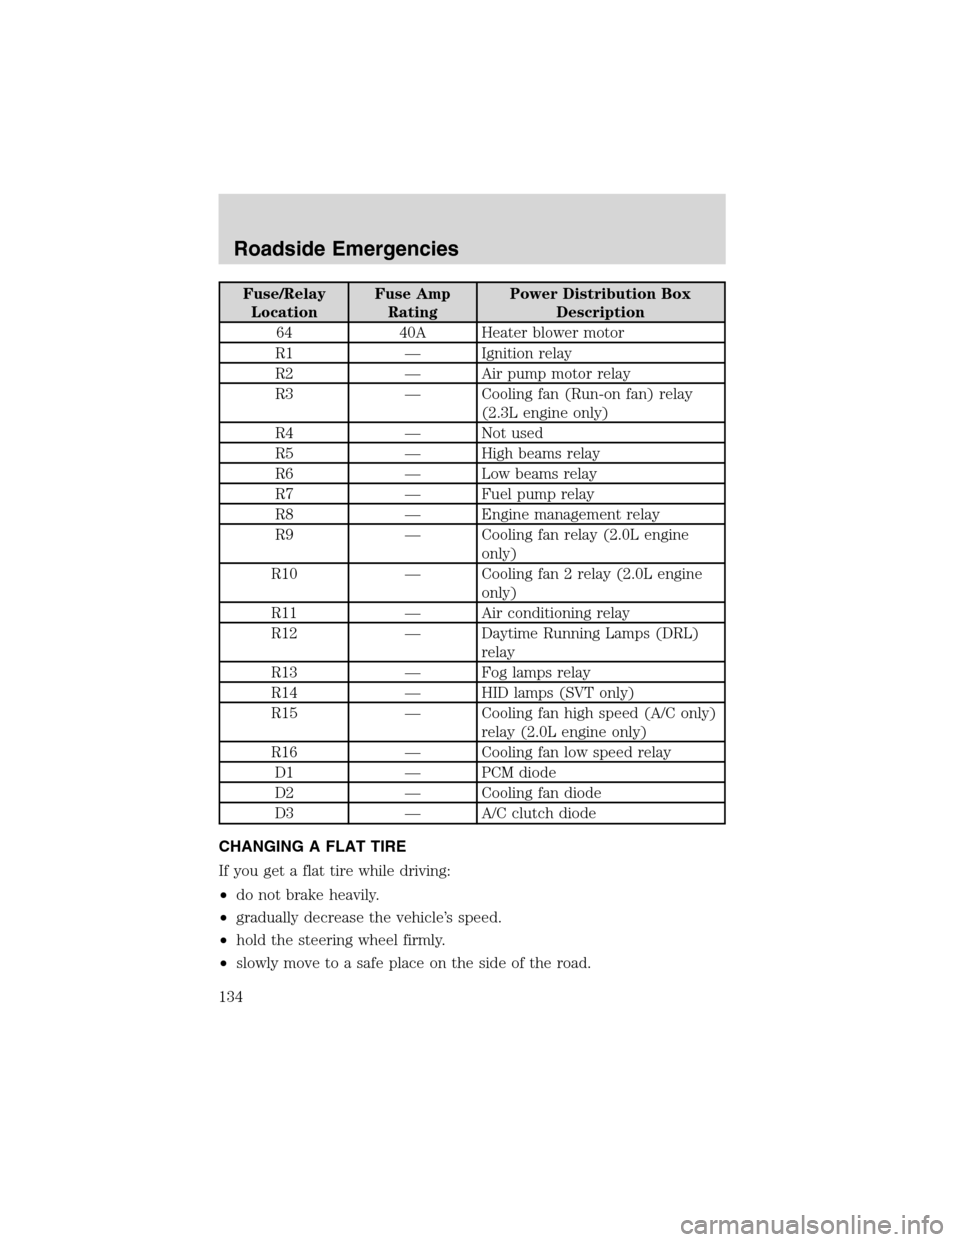
Fuse/Relay
LocationFuse Amp
RatingPower Distribution Box
Description
64 40A Heater blower motor
R1—Ignition relay
R2—Air pump motor relay
R3—Cooling fan (Run-on fan) relay
(2.3L engine only)
R4—Not used
R5—High beams relay
R6—Low beams relay
R7—Fuel pump relay
R8—Engine management relay
R9—Cooling fan relay (2.0L engine
only)
R10—Cooling fan 2 relay (2.0L engine
only)
R11—Air conditioning relay
R12—Daytime Running Lamps (DRL)
relay
R13—Fog lamps relay
R14—HID lamps (SVT only)
R15—Cooling fan high speed (A/C only)
relay (2.0L engine only)
R16—Cooling fan low speed relay
D1—PCM diode
D2—Cooling fan diode
D3—A/C clutch diode
CHANGING A FLAT TIRE
If you get a flat tire while driving:
•do not brake heavily.
•gradually decrease the vehicle’s speed.
•hold the steering wheel firmly.
•slowly move to a safe place on the side of the road.
Roadside Emergencies
134
Page 210 of 216
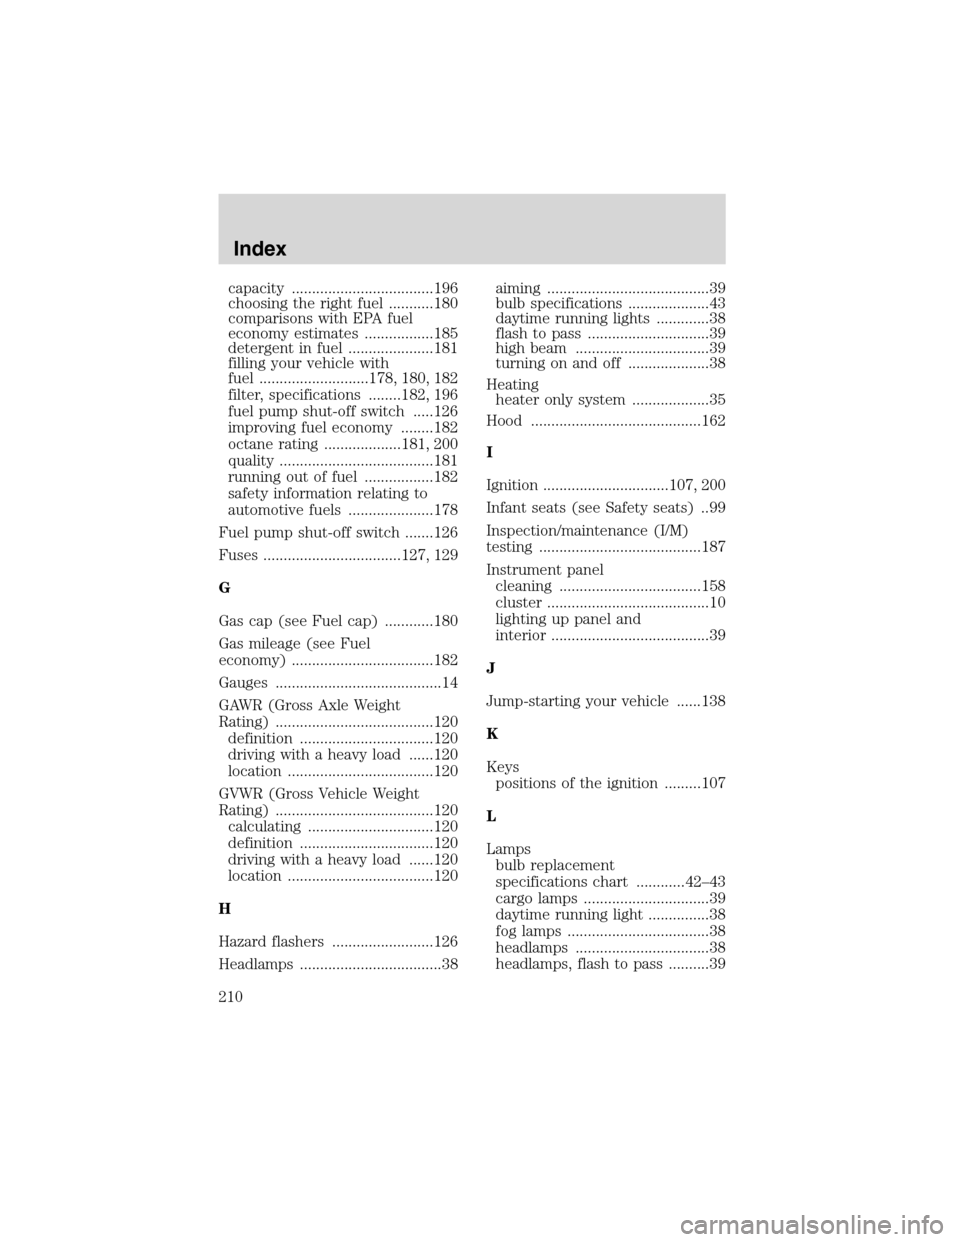
capacity ...................................196
choosing the right fuel ...........180
comparisons with EPA fuel
economy estimates .................185
detergent in fuel .....................181
filling your vehicle with
fuel ...........................178, 180, 182
filter, specifications ........182, 196
fuel pump shut-off switch .....126
improving fuel economy ........182
octane rating ...................181, 200
quality ......................................181
running out of fuel .................182
safety information relating to
automotive fuels .....................178
Fuel pump shut-off switch .......126
Fuses ..................................127, 129
G
Gas cap (see Fuel cap) ............180
Gas mileage (see Fuel
economy) ...................................182
Gauges .........................................14
GAWR (Gross Axle Weight
Rating) .......................................120
definition .................................120
driving with a heavy load ......120
location ....................................120
GVWR (Gross Vehicle Weight
Rating) .......................................120
calculating ...............................120
definition .................................120
driving with a heavy load ......120
location ....................................120
H
Hazard flashers .........................126
Headlamps ...................................38aiming ........................................39
bulb specifications ....................43
daytime running lights .............38
flash to pass ..............................39
high beam .................................39
turning on and off ....................38
Heating
heater only system ...................35
Hood ..........................................162
I
Ignition ...............................107, 200
Infant seats (see Safety seats) ..99
Inspection/maintenance (I/M)
testing ........................................187
Instrument panel
cleaning ...................................158
cluster ........................................10
lighting up panel and
interior .......................................39
J
Jump-starting your vehicle ......138
K
Keys
positions of the ignition .........107
L
Lamps
bulb replacement
specifications chart ............42–43
cargo lamps ...............................39
daytime running light ...............38
fog lamps ...................................38
headlamps .................................38
headlamps, flash to pass ..........39
Index
210