FORD FOCUS 2015 3.G Owners Manual
Manufacturer: FORD, Model Year: 2015, Model line: FOCUS, Model: FORD FOCUS 2015 3.GPages: 453, PDF Size: 5.32 MB
Page 161 of 453
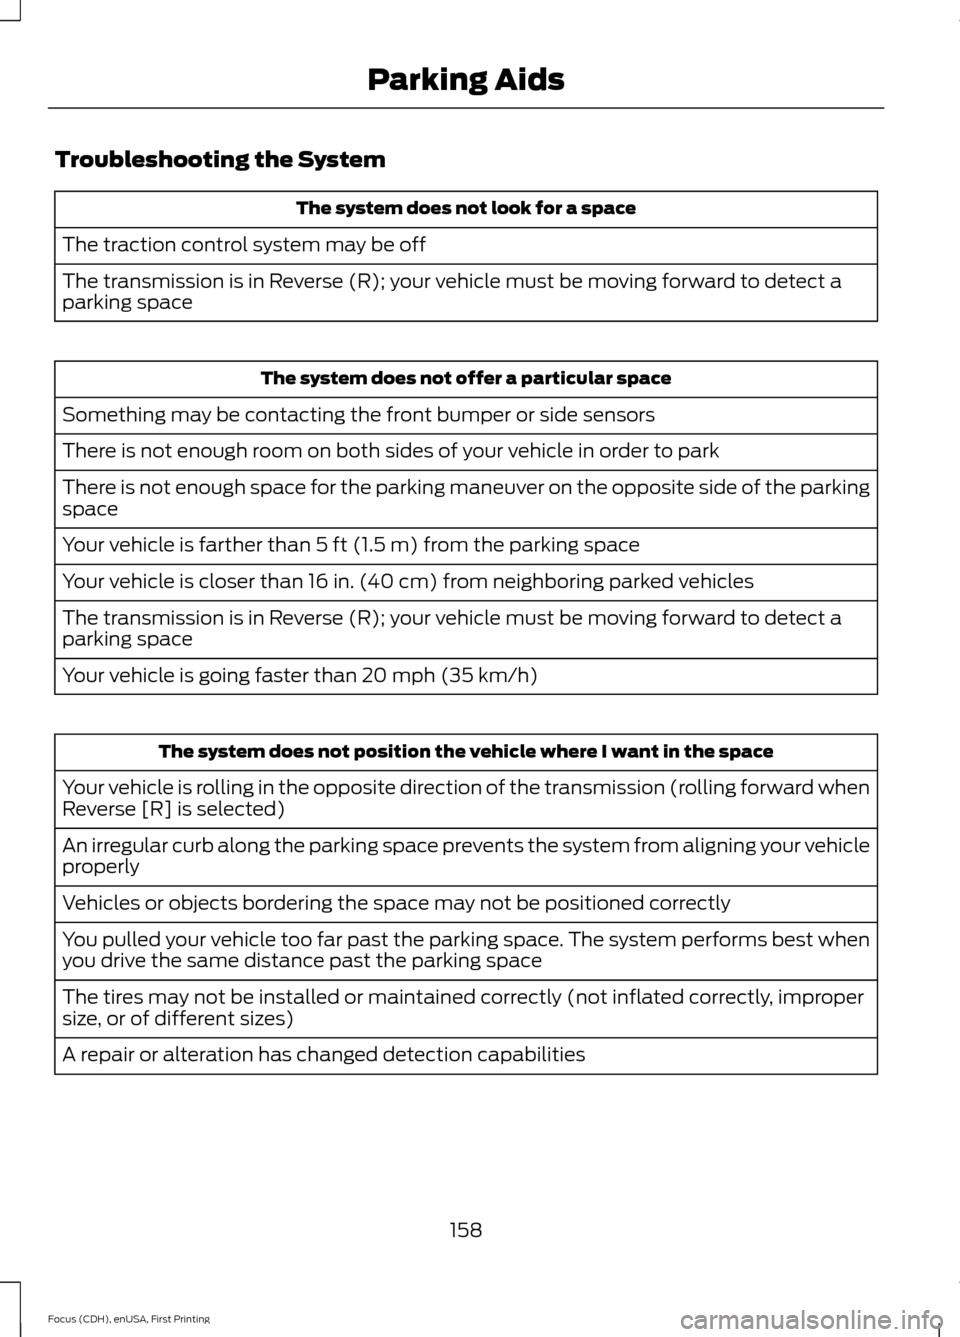
Troubleshooting the System
The system does not look for a space
The traction control system may be off
The transmission is in Reverse (R); your vehicle must be moving forward to detect a
parking space The system does not offer a particular space
Something may be contacting the front bumper or side sensors
There is not enough room on both sides of your vehicle in order to park
There is not enough space for the parking maneuver on the opposite side of the parking
space
Your vehicle is farther than 5 ft (1.5 m) from the parking space
Your vehicle is closer than 16 in. (40 cm) from neighboring parked vehicles
The transmission is in Reverse (R); your vehicle must be moving forward to detect a
parking space
Your vehicle is going faster than 20 mph (35 km/h) The system does not position the vehicle where I want in the space
Your vehicle is rolling in the opposite direction of the transmission (rolling forward when
Reverse [R] is selected)
An irregular curb along the parking space prevents the system from aligning your vehicle
properly
Vehicles or objects bordering the space may not be positioned correctly
You pulled your vehicle too far past the parking space. The system performs best when
you drive the same distance past the parking space
The tires may not be installed or maintained correctly (not inflated correctly, improper
size, or of different sizes)
A repair or alteration has changed detection capabilities
158
Focus (CDH), enUSA, First Printing Parking Aids
Page 162 of 453
The system does not position the vehicle where I want in the space
A parked vehicle has a high attachment (salt sprayer, snowplow, moving truck bed,
etc.)
The parking space length or position of parked objects changed after your vehicle passed
The temperature around your vehicle changes quickly (driving from a heated garage
into the cold, or after leaving a car wash)
REAR VIEW CAMERA WARNINGS
The rear view camera system is a
reverse aid supplement device that
still requires the driver to use it in
conjunction with the interior and exterior
mirrors for maximum coverage. Objects that are close to either
corner of the bumper or under the
bumper, might not be seen on the
screen due to the limited coverage of the
camera system. Back up as slow as possible since
higher speeds might limit your
reaction time to stop your vehicle.
Use caution when using the rear
video camera and the luggage
compartment door is ajar. If the
luggage compartment door is ajar, the
camera will be out of position and the
video image may be incorrect. All
guidelines disappear when the luggage
compartment door is ajar. Use caution when turning camera
features on or off. Make sure your
vehicle is not moving.
The rear view camera system provides a
video image of the area behind your
vehicle. During operation, lines appear in the
display which represent your vehicle
’s path
and proximity to objects behind your
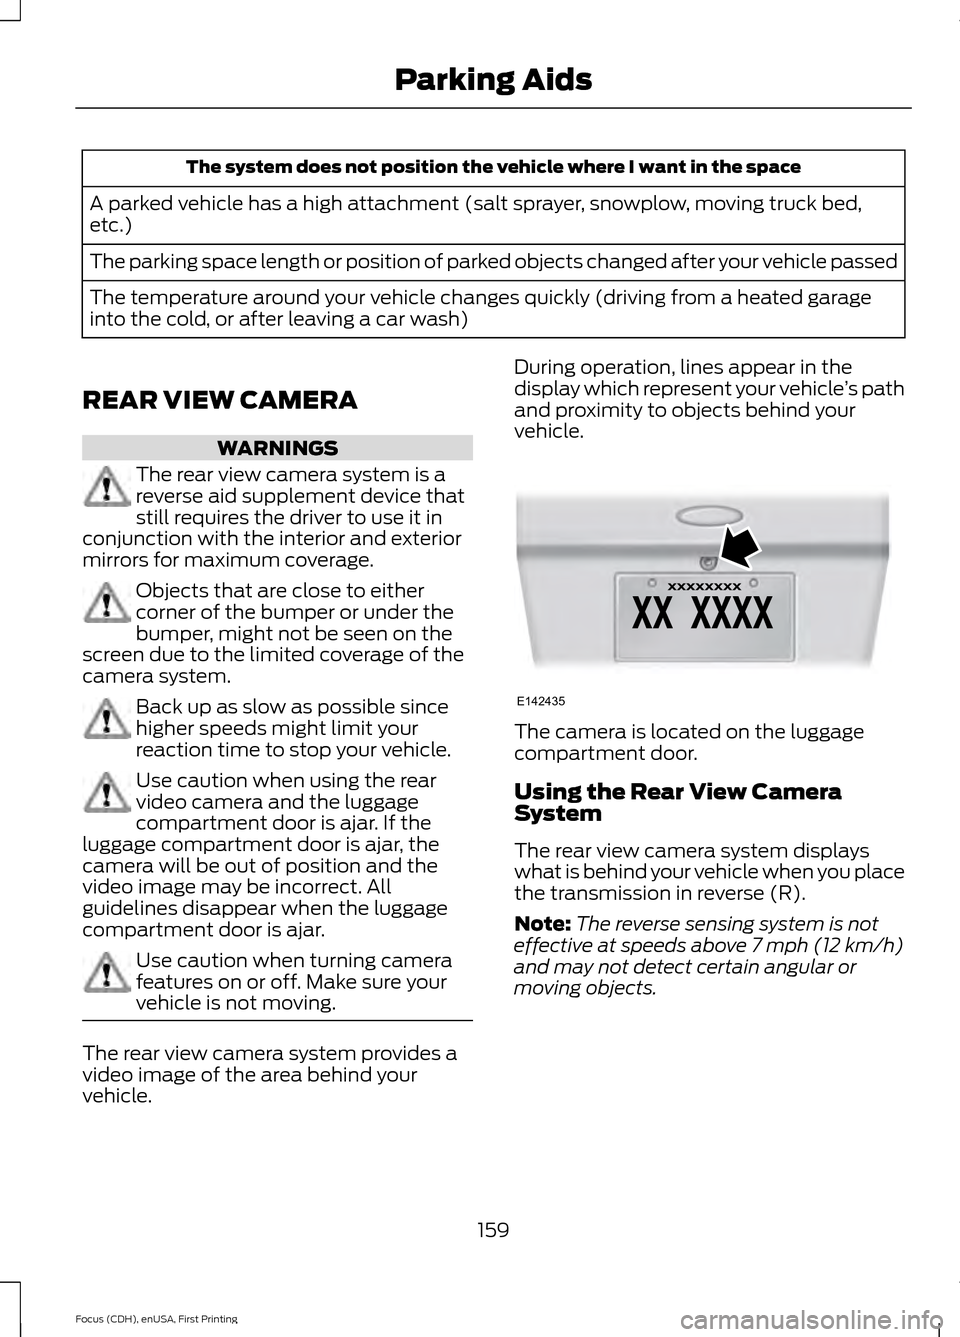
vehicle. The camera is located on the luggage
compartment door.
Using the Rear View Camera
System
The rear view camera system displays
what is behind your vehicle when you place
the transmission in reverse (R).
Note:
The reverse sensing system is not
effective at speeds above 7 mph (12 km/h)
and may not detect certain angular or
moving objects.
159
Focus (CDH), enUSA, First Printing Parking AidsE142435
Page 163 of 453
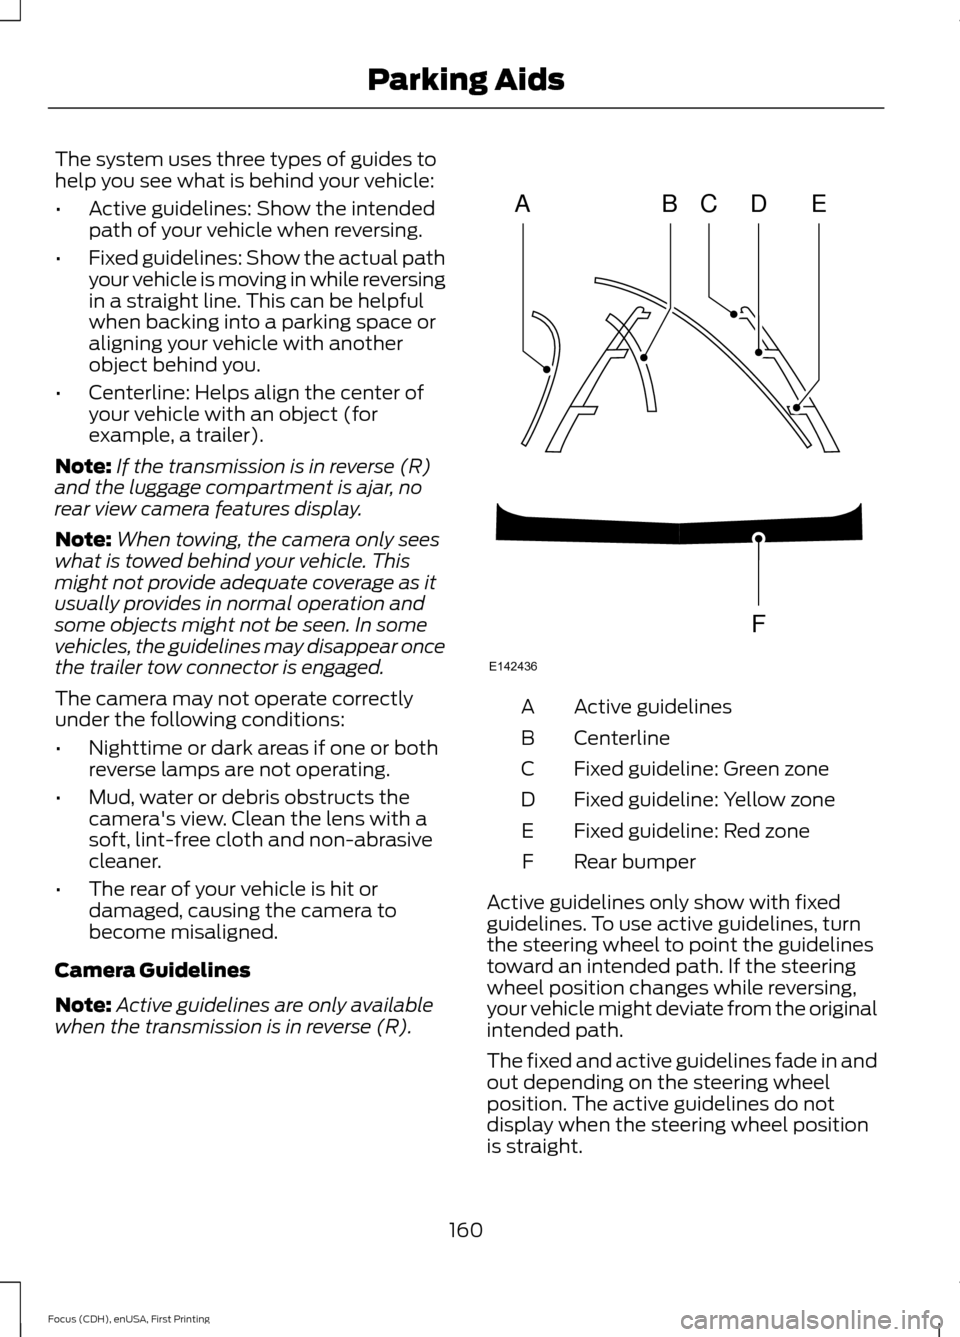
The system uses three types of guides to
help you see what is behind your vehicle:
•
Active guidelines: Show the intended
path of your vehicle when reversing.
• Fixed guidelines: Show the actual path
your vehicle is moving in while reversing
in a straight line. This can be helpful
when backing into a parking space or
aligning your vehicle with another
object behind you.
• Centerline: Helps align the center of
your vehicle with an object (for
example, a trailer).
Note: If the transmission is in reverse (R)
and the luggage compartment is ajar, no
rear view camera features display.
Note: When towing, the camera only sees
what is towed behind your vehicle. This
might not provide adequate coverage as it
usually provides in normal operation and
some objects might not be seen. In some
vehicles, the guidelines may disappear once
the trailer tow connector is engaged.
The camera may not operate correctly
under the following conditions:
• Nighttime or dark areas if one or both
reverse lamps are not operating.
• Mud, water or debris obstructs the
camera's view. Clean the lens with a
soft, lint-free cloth and non-abrasive
cleaner.
• The rear of your vehicle is hit or
damaged, causing the camera to
become misaligned.
Camera Guidelines
Note: Active guidelines are only available
when the transmission is in reverse (R). Active guidelines
A
Centerline
B
Fixed guideline: Green zone
C
Fixed guideline: Yellow zone
D
Fixed guideline: Red zone
E
Rear bumper
F
Active guidelines only show with fixed
guidelines. To use active guidelines, turn
the steering wheel to point the guidelines
toward an intended path. If the steering
wheel position changes while reversing,
your vehicle might deviate from the original
intended path.
The fixed and active guidelines fade in and
out depending on the steering wheel
position. The active guidelines do not
display when the steering wheel position
is straight.
160
Focus (CDH), enUSA, First Printing Parking AidsABCD
F
E
E142436
Page 164 of 453
Always use caution while reversing.
Objects in the red zone are closest to your
vehicle and objects in the green zone are
farther away. Objects are getting closer to
your vehicle as they move from the green
zone to the yellow or red zones. Use the
side view mirrors and rear view mirror to
get better coverage on both sides and rear
of your vehicle.
Manual Zoom
WARNING
When manual zoom is on, the full
area behind your vehicle may not
show. Be aware of your surroundings
when using the manual zoom feature. Note:
Manual zoom is only available when
the transmission is in reverse (R).
Note: When you enable manual zoom, only
the centerline is shown.
Selectable settings for this feature are
Zoom in (+) and Zoom out (-). Press the
symbol in the camera screen to change the
view. The default setting is Zoom OFF.
This allows you to get a closer view of an
object behind your vehicle. The zoomed
image keeps the bumper in the image to
provide a reference. The zoom is only
active while the transmission is in reverse
(R).
Camera System Settings
To access any of the rear view camera
system settings, make the following
selections in the multifunctional display
when the transmission is not in reverse (R):
• With Touch Screen: Settings > Vehicle
> Camera Settings
• Without Touch Screen: Menu > Camera
Settings Enhanced Park Aids or Park Pilot (If
Equipped)
Selectable settings for this feature are ON
and OFF.
The system uses red, yellow and green
highlights that appear on top of the video
image when any of the sensing systems
detect an object.
Rear Camera Delay
Selectable settings for this feature are ON
and OFF.
The default setting for the rear camera
delay is OFF.
When shifting the transmission out of
reverse (R) and into any gear other than
park (P), the camera image remains in the
display until:
•
Your vehicle speed sufficiently
increases.
• You shift your vehicle into park (P).
• 10 seconds of time elapse.
161
Focus (CDH), enUSA, First Printing Parking Aids
Page 165 of 453
PRINCIPLE OF OPERATION
Cruise control lets you maintain a set
speed without keeping your foot on the
accelerator pedal. You can use cruise
control when your vehicle speed is greater
than 20 mph (30 km/h).
USING CRUISE CONTROL WARNINGS
Do not use cruise control on winding
roads, in heavy traffic or, when the
road surface is slippery. This could
result in loss of vehicle control, serious
injury or death. When you are going downhill, your
vehicle speed may increase above
the set speed. The system will not
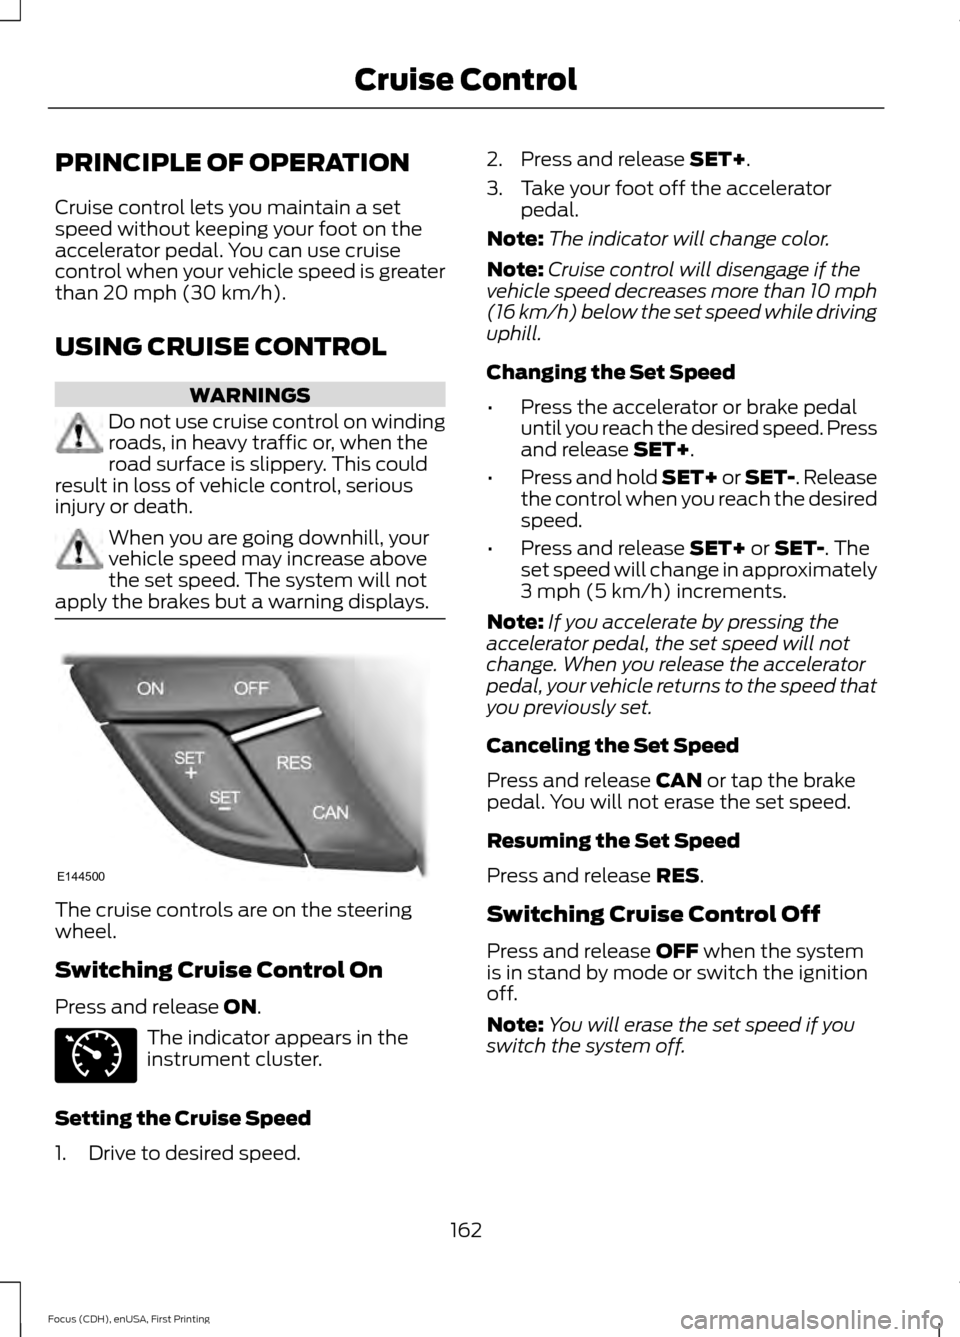
apply the brakes but a warning displays. The cruise controls are on the steering
wheel.
Switching Cruise Control On
Press and release
ON.
The indicator appears in the
instrument cluster.
Setting the Cruise Speed
1. Drive to desired speed. 2. Press and release
SET+.
3. Take your foot off the accelerator pedal.
Note: The indicator will change color.
Note: Cruise control will disengage if the
vehicle speed decreases more than 10 mph
(16 km/h) below the set speed while driving
uphill.
Changing the Set Speed
• Press the accelerator or brake pedal
until you reach the desired speed. Press
and release
SET+.
• Press and hold SET+ or SET-. Release
the control when you reach the desired
speed.
• Press and release
SET+ or SET-. The
set speed will change in approximately
3 mph (5 km/h)
increments.
Note: If you accelerate by pressing the
accelerator pedal, the set speed will not
change. When you release the accelerator
pedal, your vehicle returns to the speed that
you previously set.
Canceling the Set Speed
Press and release
CAN or tap the brake
pedal. You will not erase the set speed.
Resuming the Set Speed
Press and release
RES.
Switching Cruise Control Off
Press and release
OFF when the system
is in stand by mode or switch the ignition
off.
Note: You will erase the set speed if you
switch the system off.
162
Focus (CDH), enUSA, First Printing Cruise ControlE144500 E71340
Page 166 of 453
LANE KEEPING SYSTEM (If
Equipped) WARNINGS
The system does not relieve you of
your responsibility to drive with due
care and attention.
At all times you are responsible for
controlling your vehicle, supervising
the system and intervening if
required. If the sensor becomes blocked the
system may not function.
In cold and severe weather
conditions the system may not
function. Rain, snow, spray can all
limit sensor performance. Large contrasts in lighting can limit
sensor performance.
The system will not operate if the
sensor cannot track the road lane
markings.
Do not carry out windshield repairs
in the immediate area surrounding
the sensor.
Note:
The system works above
40 mph
(64 km/h).
Note: The system works as long as the
camera can detect one lane marking.
Note: The system may not function if the
camera is blocked or there is damage to the
windshield.
Note: When Aid mode is on and the system
detects no steering activity for a short
period, the system will alert you to put your
hands on the steering wheel. The system
may detect a light grip or touch on the
steering wheel as hands off driving. The system notifies you to stay in your lane
through the steering system and the
instrument cluster display when the front
camera detects an unintentional drift out
of your lane is likely to occur. The system
automatically detects and tracks the road
lane markings using a camera mounted
behind the interior rear view mirror.
Switching the System On and Off
Note:
The system on or off setting is stored
until it is manually changed, unless a MyKey
is detected. If the system detects a MyKey
it defaults to on and the mode is set to Alert.
Note: If a MyKey is detected, pressing the
button will not affect the on or off status of
the system. You can only change the Mode
and Intensity settings. Press the button located on the
left steering wheel stalk to
switch the system on or off.
System Settings
The system has optional setting menus
available. To view or adjust the settings,
See General Information (page 96). The
system stores the last-known selection for
each of these settings. You do not need to
readjust your settings each time you turn
on the system.
Mode: This setting allows you to select
which of the system features you can
enable.
163
Focus (CDH), enUSA, First Printing Driving AidsE144813
Page 167 of 453
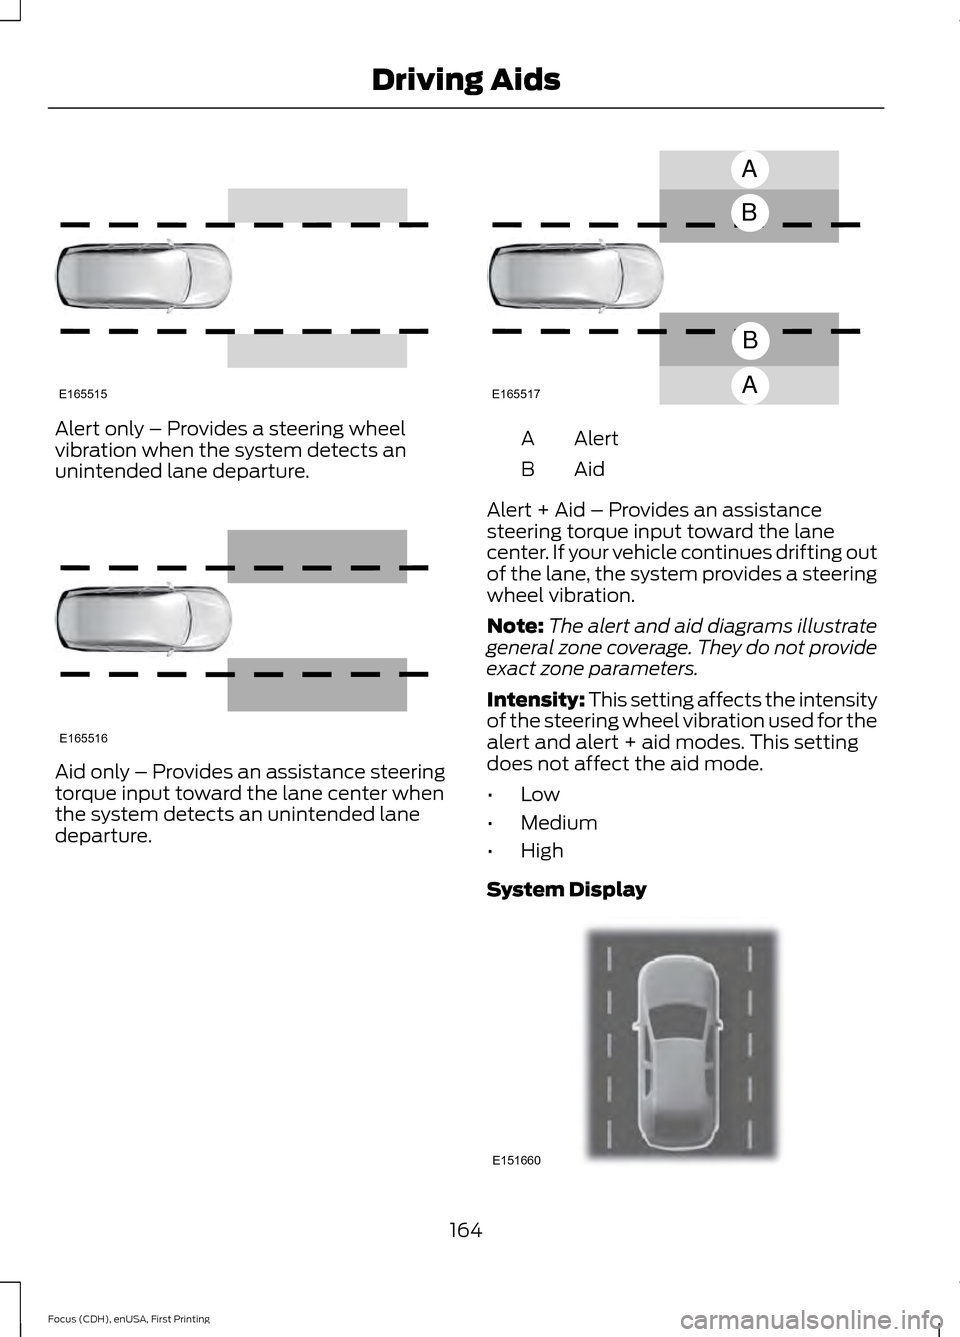
Alert only – Provides a steering wheel
vibration when the system detects an
unintended lane departure.
Aid only – Provides an assistance steering
torque input toward the lane center when
the system detects an unintended lane
departure. Alert
A
AidB
Alert + Aid – Provides an assistance
steering torque input toward the lane
center. If your vehicle continues drifting out
of the lane, the system provides a steering
wheel vibration.
Note: The alert and aid diagrams illustrate
general zone coverage. They do not provide
exact zone parameters.
Intensity: This setting affects the intensity
of the steering wheel vibration used for the
alert and alert + aid modes. This setting
does not affect the aid mode.
• Low
• Medium
• High
System Display 164
Focus (CDH), enUSA, First Printing Driving AidsE165515 E165516 A
B
A
B
E165517 E151660
Page 168 of 453
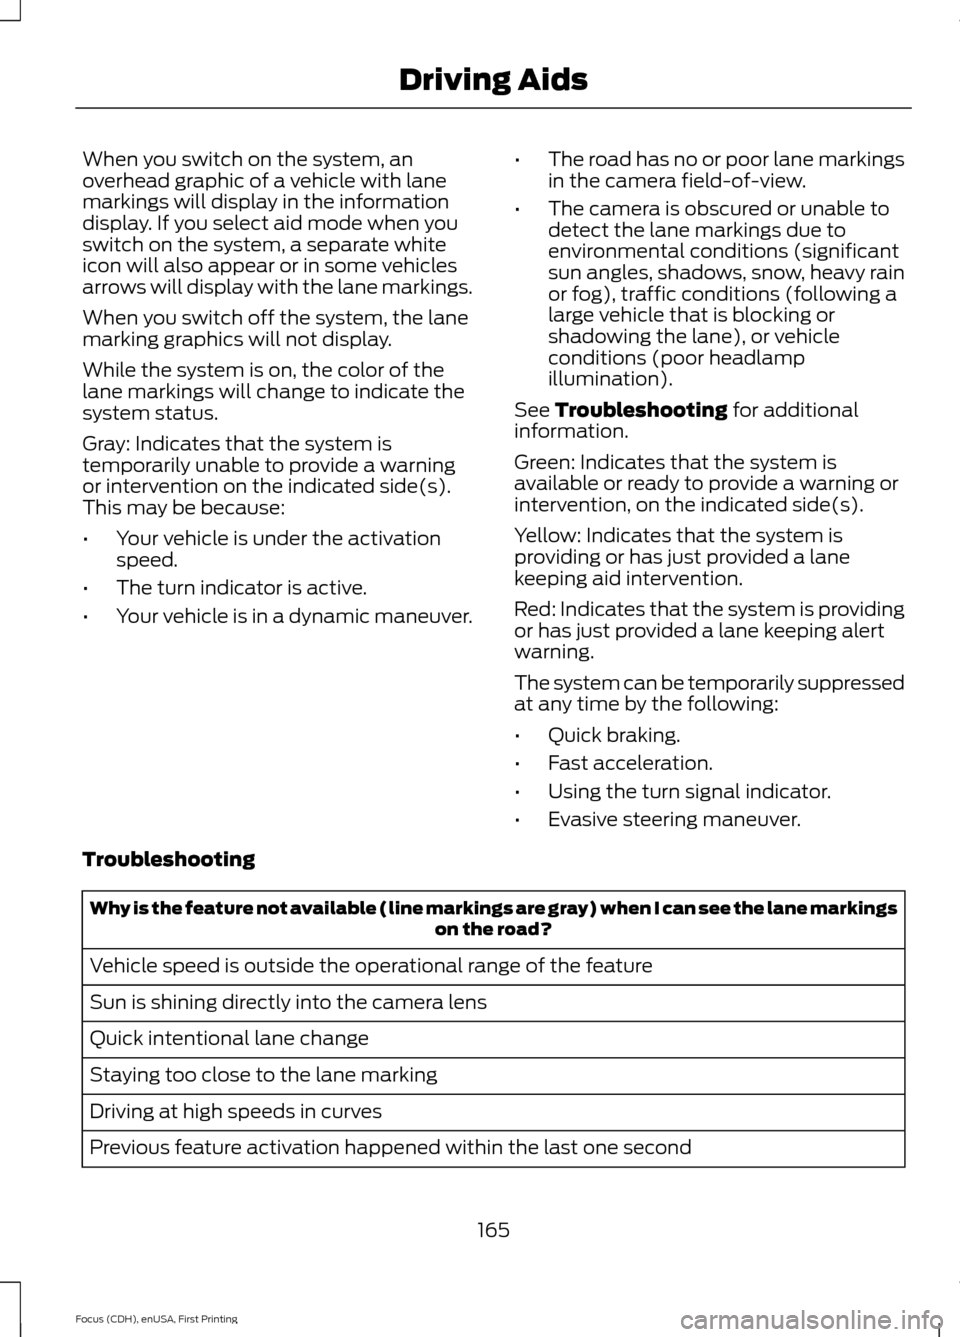
When you switch on the system, an
overhead graphic of a vehicle with lane
markings will display in the information
display. If you select aid mode when you
switch on the system, a separate white
icon will also appear or in some vehicles
arrows will display with the lane markings.
When you switch off the system, the lane
marking graphics will not display.
While the system is on, the color of the
lane markings will change to indicate the
system status.
Gray: Indicates that the system is
temporarily unable to provide a warning
or intervention on the indicated side(s).
This may be because:
•
Your vehicle is under the activation
speed.
• The turn indicator is active.
• Your vehicle is in a dynamic maneuver. •
The road has no or poor lane markings
in the camera field-of-view.
• The camera is obscured or unable to
detect the lane markings due to
environmental conditions (significant
sun angles, shadows, snow, heavy rain
or fog), traffic conditions (following a
large vehicle that is blocking or
shadowing the lane), or vehicle
conditions (poor headlamp
illumination).
See Troubleshooting for additional
information.
Green: Indicates that the system is
available or ready to provide a warning or
intervention, on the indicated side(s).
Yellow: Indicates that the system is
providing or has just provided a lane
keeping aid intervention.
Red: Indicates that the system is providing
or has just provided a lane keeping alert
warning.
The system can be temporarily suppressed
at any time by the following:
• Quick braking.
• Fast acceleration.
• Using the turn signal indicator.
• Evasive steering maneuver.
Troubleshooting Why is the feature not available (line markings are gray) when I can see the lane markings
on the road?
Vehicle speed is outside the operational range of the feature
Sun is shining directly into the camera lens
Quick intentional lane change
Staying too close to the lane marking
Driving at high speeds in curves
Previous feature activation happened within the last one second
165
Focus (CDH), enUSA, First Printing Driving Aids
Page 169 of 453
Why is the feature not available (line markings are gray) when I can see the lane markings
on the road?
Ambiguous lane markings (mainly in construction zones)
Rapid transition from light to dark or vice versa
Sudden offset in lane markings
ABS or AdvanceTrac activation
Camera blockage due to dirt, grime, fog, frost or water on the windshield
Driving too close to the vehicle in front of you
Transitioning between no lane markings to lane markings or vice versa
Standing water on the road
Faint lane markings (partial yellow lane markings on concrete roads)
Lane width too narrow or too wide
Camera not calibrated after a windshield replacement
Driving on tight roads or on uneven roads Why does the vehicle not come back into the middle of the lane always, as expected, in
the Aid or Aid + Alert mode?
High cross winds
Large road crown
Rough roads, grooves, shoulder drop-offs
Heavy uneven loading of the vehicle or improper tire inflation pressure
If the tires have been exchanged (including snow tires), or the suspension has been
modified
166
Focus (CDH), enUSA, First Printing Driving Aids
Page 170 of 453
BLIND SPOT INFORMATION
SYSTEM (If Equipped)
Blind Spot Information System
(BLIS ™) with Cross Traffic Alert
(If Equipped) WARNING
To help avoid injuries, NEVER use the
Blind Spot Information System as a
replacement for using the interior
and exterior mirrors and looking over your
shoulder before changing lanes. The Blind
Spot Information System is not a
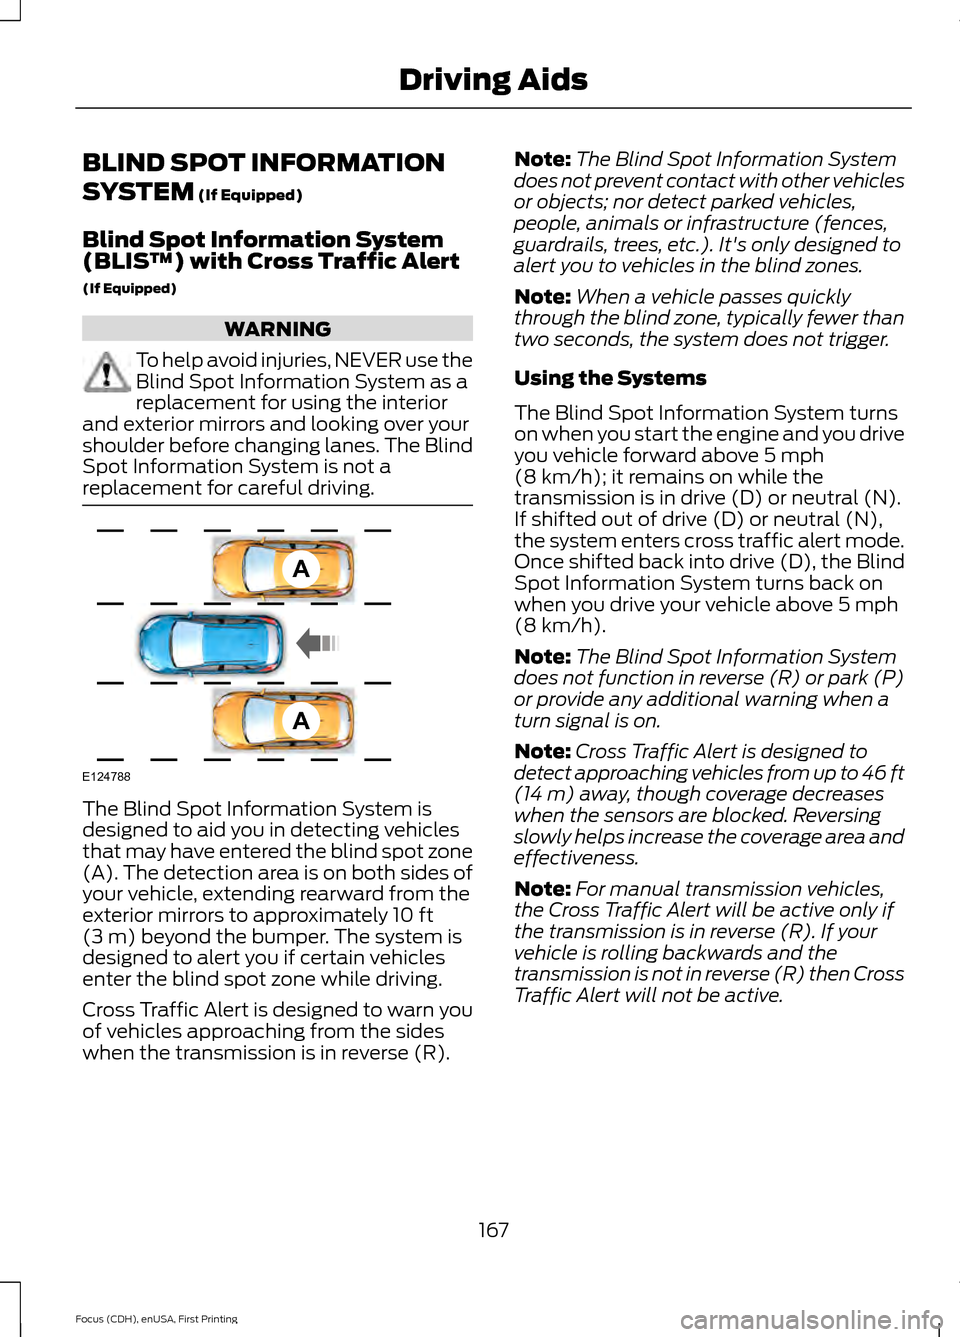
replacement for careful driving. The Blind Spot Information System is
designed to aid you in detecting vehicles
that may have entered the blind spot zone
(A). The detection area is on both sides of
your vehicle, extending rearward from the
exterior mirrors to approximately
10 ft
(3 m) beyond the bumper. The system is
designed to alert you if certain vehicles
enter the blind spot zone while driving.
Cross Traffic Alert is designed to warn you
of vehicles approaching from the sides
when the transmission is in reverse (R). Note:
The Blind Spot Information System
does not prevent contact with other vehicles
or objects; nor detect parked vehicles,
people, animals or infrastructure (fences,
guardrails, trees, etc.). It's only designed to
alert you to vehicles in the blind zones.
Note: When a vehicle passes quickly
through the blind zone, typically fewer than
two seconds, the system does not trigger.
Using the Systems
The Blind Spot Information System turns
on when you start the engine and you drive
you vehicle forward above
5 mph
(8 km/h); it remains on while the
transmission is in drive (D) or neutral (N).
If shifted out of drive (D) or neutral (N),
the system enters cross traffic alert mode.
Once shifted back into drive (D), the Blind
Spot Information System turns back on
when you drive your vehicle above
5 mph
(8 km/h).
Note: The Blind Spot Information System
does not function in reverse (R) or park (P)
or provide any additional warning when a
turn signal is on.
Note: Cross Traffic Alert is designed to
detect approaching vehicles from up to 46 ft
(14 m)
away, though coverage decreases
when the sensors are blocked. Reversing
slowly helps increase the coverage area and
effectiveness.
Note: For manual transmission vehicles,
the Cross Traffic Alert will be active only if
the transmission is in reverse (R). If your
vehicle is rolling backwards and the
transmission is not in reverse (R) then Cross
Traffic Alert will not be active.
167
Focus (CDH), enUSA, First Printing Driving AidsA
A
E124788