tow FORD FOCUS 2015 3.G Quick Reference Guide
[x] Cancel search | Manufacturer: FORD, Model Year: 2015, Model line: FOCUS, Model: FORD FOCUS 2015 3.GPages: 10, PDF Size: 1.63 MB
Page 3 of 10

INSTRUMENT PANEL
12
3
4
6
9
5
8
4 • 5*if equipped
*if equipped
7
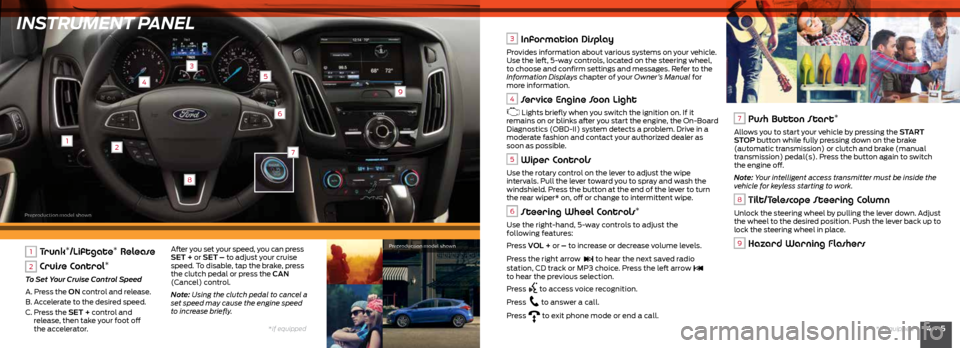
1 Trunk*/Liftgate* Release
2 Cruise Control*
To Set Your Cruise Control Speed
A. Press the ON control and release.
B. Accelerate to the desired speed.
C. Press the SET + control and
release, then take your foot off
the accelerator.
3 Information Display
Provides information about various systems on your vehicle.
Use the left, 5-way controls, located on the steering wheel,
to choose and confirm settings and messages. Refer to the
Information Displays chapter of your Owner’s Manual for
more information.
4 Service Engine Soon Light
Lights briefly when you switch the ignition on. If it
remains on or blinks after you start the engine, the On-Board
Diagnostics (OBD-II) system detects a problem. Drive in a
moderate fashion and contact your authorized dealer as
soon as possible.
5 Wiper Controls
Use the rotary control on the lever to adjust the wipe
intervals. Pull the lever toward you to spray and wash the
windshield. Press the button at the end of the lever to turn
the rear wiper* on, off or change to intermittent wipe.
6 Steering Wheel Controls*
Use the right-hand, 5-way controls to adjust the
following features:
Press VOL + or – to increase or decrease volume levels.
Press the right arrow
to hear the next saved radio
station, CD track or MP3 choice. Press the left arrow to hear the previous selection.
Press
to access voice recognition.
Press
to answer a call.
Press
to exit phone mode or end a call.
7 Push Button Start*
Allows you to start your vehicle by pressing the START
STOP button while fully pressing down on the brake
(automatic transmission) or clutch and brake (manual
transmission) pedal(s). Press the button again to switch
the engine off.
Note: Your intelligent access transmitter must be inside the
vehicle for keyless starting to work.
8 Tilt/Telescope Steering Column
Unlock the steering wheel by pulling the lever down. Adjust
the wheel to the desired position. Push the lever back up to
lock the steering wheel in place.
9 Hazard Warning FlashersAfter you set your speed, you can press
SET + or SET – to adjust your cruise
speed. To disable, tap the brake, press
the clutch pedal or press the CAN
(Cancel) control.
Note: Using the clutch pedal to cancel a
set speed may cause the engine speed
to increase briefly. Preproduction model shown
Preproduction model shown
Page 5 of 10

8 • 9*if equipped
*if equipped
SYNC® WITH MYFORD TOUCH®*
A REVOLUTIONARY WAY TO CONNECT WITH YOUR VEHICLE.
General Tips
• Press the home icon
at any time
to return to your home screen.
• For additional support, refer to
your Owner’s Manual, visit the
website or call the toll-free number.
See the inside front cover of this
guide for details.
Before You Get Started
• Pair your phone with SYNC before using
MyFord Touch. See the Getting Started
with Your SYNC System section for
instructions on how to do this.
• Make sure to insert your navigation
SD card* into the media port or your
navigation features cannot work.
Getting Started, Understanding SYNC
with MyFord Touch
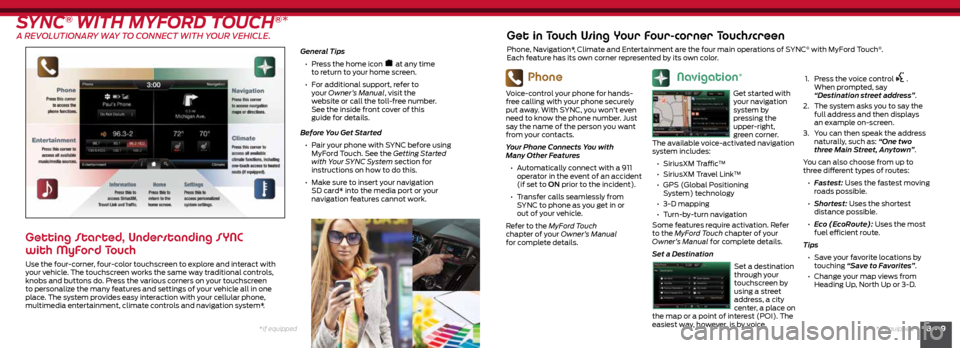
Use the four-corner, four-color touchscreen to explore and interact with
your vehicle. The touchscreen works the same way traditional controls,
knobs and buttons do. Press the various corners on your touchscreen
to personalize the many features and settings of your vehicle all in one
place. The system provides easy interaction with your cellular phone,
multimedia entertainment, climate controls and navigation system*.
Phone
Voice-control your phone for hands-
free calling with your phone securely
put away. With SYNC, you won’t even
need to know the phone number. Just
say the name of the person you want
from your contacts.
Your Phone Connects You with
Many Other Features
• Automatically connect with a 911
operator in the event of an accident
(if set to ON prior to the incident).
• Transfer calls seamlessly from
SYNC to phone as you get in or
out of your vehicle.
Refer to the MyFord Touch
chapter of your Owner’s Manual
for complete details.
Get in Touch Using Your Four-corner Touchscreen
Phone, Navigation*, Climate and Entertainment are the four main operations of SYNC® with MyFord Touch®.
Each feature has its own corner represented by its own color.
Navigation*
Get started with
your navigation
system by
pressing the
upper-right,
green corner.
The available voice-activated navigation
system includes:
• SiriusXM Traffic™
• SiriusXM Travel Link™
• GPS (Global Positioning
System) technology
• 3-D mapping
• Turn-by-turn navigation
Some features require activation. Refer
to the MyFord Touch chapter of your
Owner’s Manual for complete details.
Set a Destination
Set a destination
through your
touchscreen by
using a street
address, a city
center, a place on
the map or a point of interest (POI). The
easiest way, however, is by voice.
1.
Press the voice control .
When prompted, say
“Destination street address”.
2. The system asks you to say the
full address and then displays
an example on-screen.
3. You can then speak the address
naturally, such as: “One two
three Main Street, Anytown”.
You can also choose from up to
three different types of routes:
• Fastest: Uses the fastest moving
roads possible.
• Shortest: Uses the shortest
distance possible.
• Eco (EcoRoute): Uses the most
fuel efficient route.
Tips • Save your favorite locations by
touching “Save to Favorites”.
• Change your map views from
Heading Up, North Up or 3-D.
Page 7 of 10

Preproduction model shown
PowerShift Six-speed Automatic Transmission*
We designed this transmission for fun-to-drive
performance and exceptional fuel efficiency, by using
the advantages of a manual transmission with the
convenience of an automatic transmission.
You may notice the following characteristics of
this technology:
• Although the gears shift automatically, the shifting
feel and sound experienced from the PowerShift
transmission are similar to those of a manual transmission, which
is normal.
• The PowerShift transmission continuously makes electronic
adjustments to optimize shift quality. During the initial break-in
period, you may feel slight vibrations when accelerating your vehicle
from low speeds.
See the Transmission chapter of your Owner’s Manual for more details.
FUNCTION
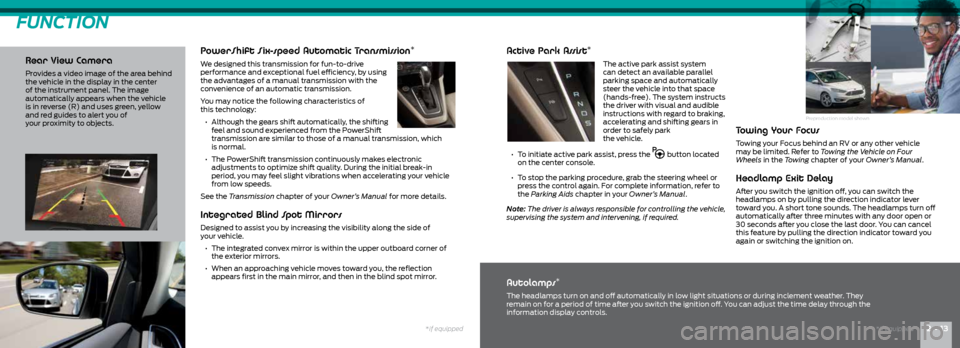
Rear View Camera
Provides a video image of the area behind
the vehicle in the display in the center
of the instrument panel. The image
automatically appears when the vehicle
is in reverse (R) and uses green, yellow
and red guides to alert you of
your proximity to objects.
Integrated Blind Spot Mirrors
Designed to assist you by increasing the visibility along the side of
your vehicle.
• The integrated convex mirror is within the upper outboard corner of
the exterior mirrors.
• When an approaching vehicle moves toward you, the reflection
appears first in the main mirror, and then in the blind spot mirror.
Active Park Assist*
The active park assist system
can detect an available parallel
parking space and automatically
steer the vehicle into that space
(hands-free). The system instructs
the driver with visual and audible
instructions with regard to braking,
accelerating and shifting gears in
order to safely park
the vehicle.
• To initiate active park assist, press the
button located
on the center console.
• To stop the parking procedure, grab the steering wheel or
press the control again. For complete information, refer to
the Parking Aids chapter in your Owner’s Manual.
Note: The driver is always responsible for controlling the vehicle,
supervising the system and intervening, if required.
Towing Your Focus
Towing your Focus behind an RV or any other vehicle
may be limited. Refer to Towing the Vehicle on Four
Wheels in the Towing chapter of your Owner’s Manual.
Headlamp Exit Delay
After you switch the ignition off, you can switch the
headlamps on by pulling the direction indicator lever
toward you. A short tone sounds. The headlamps turn off
automatically after three minutes with any door open or
30 seconds after you close the last door. You can cancel
this feature by pulling the direction indicator toward you
again or switching the ignition on.
Autolamps*
The headlamps turn on and off automatically in low light situations or during inclement weather. They
remain on for a period of time after you switch the ignition off. You can adjust the time delay through the
information display controls.
*if equipped12 • 13*if equipped
Page 9 of 10

16 • 17*if equipped
Auxiliary Power Points
The power points are on the center
console or in the center console,
depending on your vehicle style. You
can use the power point to power
your smaller electrical devices that
require up to 180 watts. Run the
vehicle for full-capacity
use of the power point.
To prevent the battery
from discharging:
• Do not use the power point
longer than necessary when the
vehicle is not running.
• Do not leave devices plugged in
overnight or when the vehicle is
parked for extended periods.
Rear Window Buffeting
You may hear a pulsing noise when just one of the windows is open.
Lower an opposite window slightly to reduce this noise.
• Press the control to open the window.
• Lift the control to close the window.
Folding the Rear Seats
Your rear seatback can fold down for more versatile cargo storage
and transport. Your vehicle may have split seatbacks* that must be
folded individually.
To lower the seatback(s), do the following:
• Remove the outboard head restraint(s).
• Press the unlock buttons located on the
top outboard sides of each seatback.
• Push the seatback forward.
Note: Make sure you stow the safety belt in
the belt stowage clip to prevent it from getting
caught in the seat latch.
• In vehicles with split-folding seatbacks,
you can flip the seat cushions forward
before folding the seatback for additional
cargo space.
• When raising the seatback(s), make sure
you hear the seat latch into place and that
no red portion is visible on the release
button on both sides.
COMFORT CONTINUED
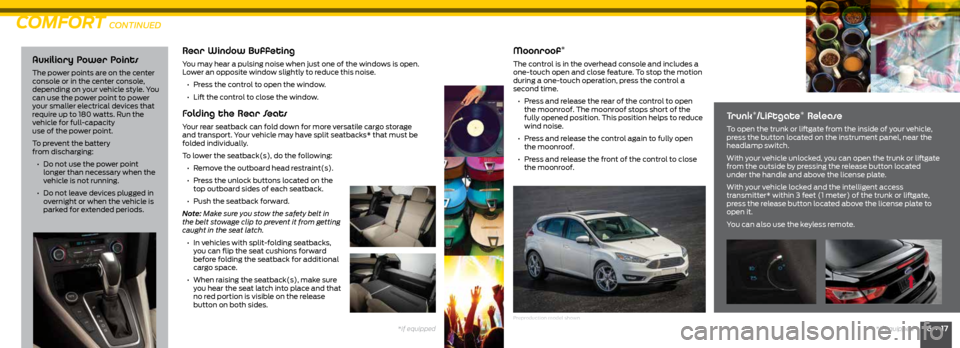
Moonroof*
The control is in the overhead console and includes a
one-touch open and close feature. To stop the motion
during a one-touch operation, press the control a
second time.
• Press and release the rear of the control to open
the moonroof. The moonroof stops short of the
fully opened position. This position helps to reduce
wind noise.
• Press and release the control again to fully open
the moonroof.
• Press and release the front of the control to close
the moonroof.
Trunk*/Liftgate* Release
To open the trunk or liftgate from the inside of your vehicle,
press the button located on the instrument panel, near the
headlamp switch.
With your vehicle unlocked, you can open the trunk or liftgate
from the outside by pressing the release button located
under the handle and above the license plate.
With your vehicle locked and the intelligent access
transmitter* within 3 feet (1 meter) of the trunk or liftgate,
press the release button located above the license plate to
open it.
You can also use the keyless remote.
Preproduction model shown
*if equipped