FORD FOCUS 2016 3.G Owners Manual
Manufacturer: FORD, Model Year: 2016, Model line: FOCUS, Model: FORD FOCUS 2016 3.GPages: 385, PDF Size: 5.23 MB
Page 111 of 385
Side Window Defogging in Cold Weather
Vehicle with automatic climate control
Vehicle with manual climate control
Press the defrost button.
Select the windshield air vents using the
air distribution buttons.
1
Adjust the temperature control to the
desired setting. Use 72°F (22°C) as a
starting point, then adjust the setting as
necessary.
Press the A/C button.
2
Adjust the temperature control to the
desired setting.
3
Adjust the fan speed to the highest
setting.
4
HEATED WINDOWS AND
MIRRORS
Heated Rear Window
Note: Make sure the vehicle is running
before operating the heated windows. Press the button to clear the
heated rear window of thin ice
and fog. The heated rear
window will automatically turn off after a
short period of time.
Note: Do not use razor blades or other
sharp objects to clean or remove decals
from the inside of the heated rear window.
The vehicle warranty does not cover
damage caused to the heated rear window
grid lines.
Heated Exterior Mirrors When you switch the heated rear
window on, the heated exterior
mirrors will automatically turn
on.
Note: Do not remove ice from the mirrors
with a scraper or adjust the mirror glass
when it is frozen in place. Note:
Do not clean the mirror housing or
glass with harsh abrasives, fuel or other
petroleum-based cleaning products.
CABIN AIR FILTER
Your vehicle is equipped with a cabin air
filter, which gives you and your passengers
the following benefits:
• It improves your driving comfort by
reducing particle concentration.
• It improves the interior compartment
cleanliness.
• It protects the climate control
components from particle deposits.
You can locate the cabin air filter behind
the glove box.
Note: Make sure you have a cabin air filter
installed at all times. This prevents foreign
objects from entering the system. Running
the system without a filter in place could
result in degradation or damage to the
system.
Replace the filter at regular intervals. See
Scheduled Maintenance
(page 336).
108
Focus (CDH) Canada/United States of America, enUSA, First Printing Climate ControlE72507 E72507
Page 112 of 385
For additional cabin air filter information,
or to replace the filter, see an authorized
dealer.
REMOTE START
The climate control system adjusts the
cabin temperature during remote start.
You cannot adjust the system during
remote start operation. Switch on the
ignition to return the system to its previous
settings. You can now make adjustments.
You need to switch on certain
vehicle-dependent features, such as:
•
Heated seats.
• Heated mirrors.
• Heated rear window.
• Heated steering wheel.
You can adjust the settings using the
information display controls. See
Information Displays (page 91).
Automatic Settings
You can set the climate control to operate
in AUTO mode through the information
display setting: Remote Start > Climate
Control > Heater-A/C > Auto. The climate
control system automatically sets the
interior temperature to 72°F (22°C).
In hot weather, the system is set to 72°F
(22°C). Cooled seats are set to high (if
available, and selected to AUTO in the
information display).
In cold weather, the system is set to 72°F
(22°C). The rear defroster and heated
mirrors automatically turn on. Last Settings
You can set the climate control to operate
using the last climate control settings
through the information display setting:
Remote Start > Climate Control >
Heater
–A/C > Last Settings. The climate
control system automatically uses the
settings last selected before you turned
off the vehicle.
Heated and Cooled Devices
Heated devices typically switch on during
cold weather, and cooled devices during
hot weather.
109
Focus (CDH) Canada/United States of America, enUSA, First Printing Climate Control
Page 113 of 385
SITTING IN THE CORRECT
POSITION
WARNINGS
Do not recline the seat backrest too
far as this can cause the occupant
to slide under the safety belt,
resulting in serious injury in the event of a
crash. Sitting improperly, out of position or
with the seat backrest reclined too
far, can result in serious injury or
death in the event of a crash. Always sit
upright against your seat backrest, with
your feet on the floor. Do not place objects higher than the
seat backrest to reduce the risk of
serious injury in the event of a crash
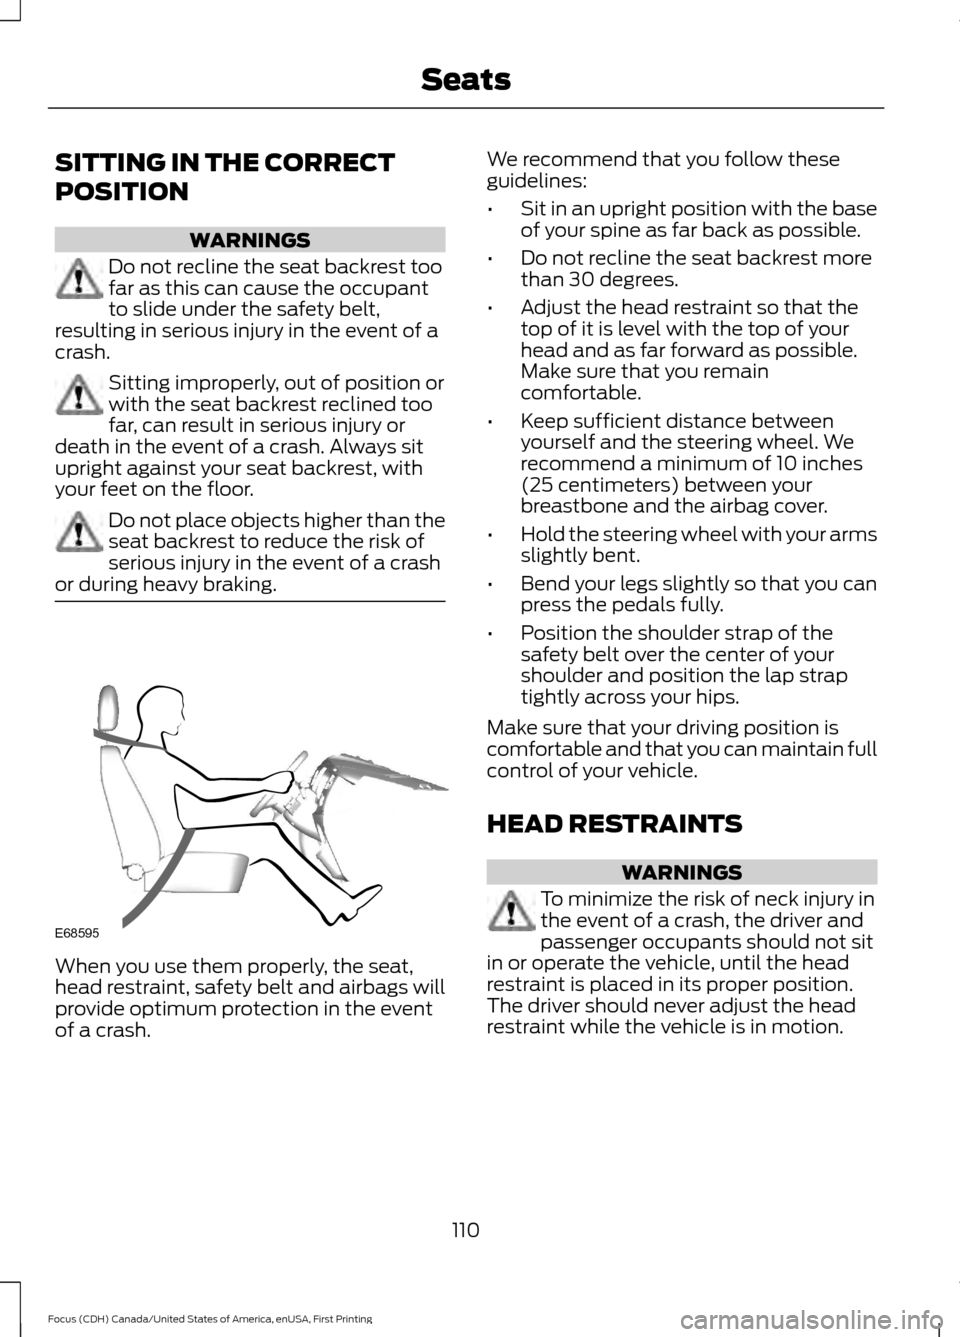
or during heavy braking. When you use them properly, the seat,
head restraint, safety belt and airbags will
provide optimum protection in the event
of a crash. We recommend that you follow these
guidelines:
•
Sit in an upright position with the base
of your spine as far back as possible.
• Do not recline the seat backrest more
than 30 degrees.
• Adjust the head restraint so that the
top of it is level with the top of your
head and as far forward as possible.
Make sure that you remain
comfortable.
• Keep sufficient distance between
yourself and the steering wheel. We
recommend a minimum of 10 inches
(25 centimeters) between your
breastbone and the airbag cover.
• Hold the steering wheel with your arms
slightly bent.
• Bend your legs slightly so that you can
press the pedals fully.
• Position the shoulder strap of the
safety belt over the center of your
shoulder and position the lap strap
tightly across your hips.
Make sure that your driving position is
comfortable and that you can maintain full
control of your vehicle.
HEAD RESTRAINTS WARNINGS
To minimize the risk of neck injury in
the event of a crash, the driver and
passenger occupants should not sit
in or operate the vehicle, until the head
restraint is placed in its proper position.
The driver should never adjust the head
restraint while the vehicle is in motion.
110
Focus (CDH) Canada/United States of America, enUSA, First Printing SeatsE68595
Page 114 of 385
WARNINGS
The adjustable head restraint is a
safety device. Whenever possible, it
should be installed and properly
adjusted when the seat is occupied. Failure
to adjust the head restraint properly could
reduce its effectiveness during certain
impacts. Install the head restraint properly to
help minimize the risk of neck injury
in the event of a crash.
Note:
Adjust the seatback to an upright
driving position before adjusting the head
restraint. Adjust the head restraint so that
the top of it is level with the top of your head
and as far forward as possible. Make sure
that you remain comfortable. If you are
extremely tall, adjust the head restraint to
its highest position.
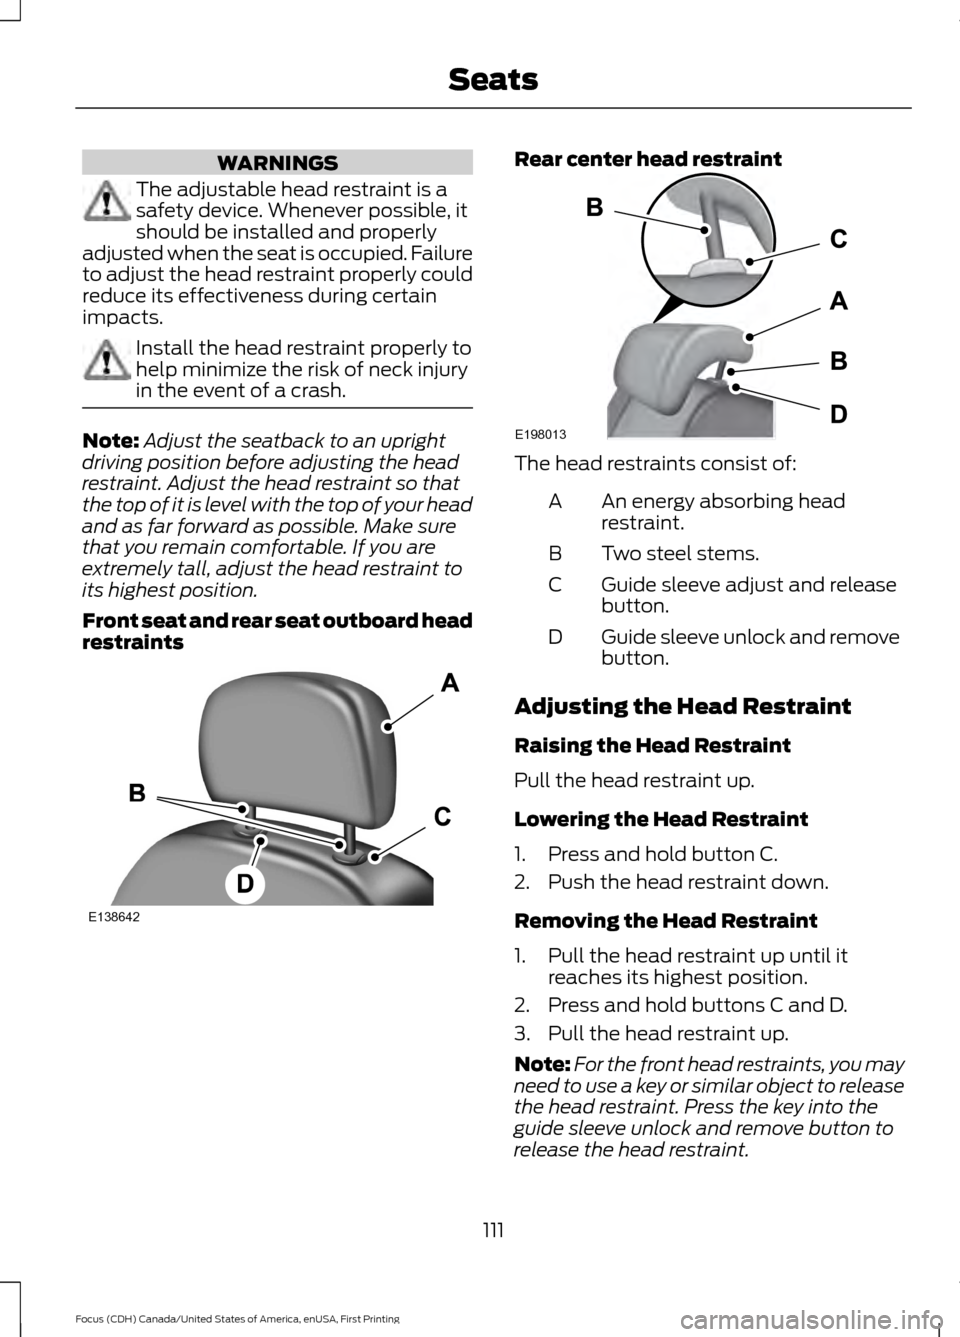
Front seat and rear seat outboard head
restraints Rear center head restraint
The head restraints consist of:
An energy absorbing head
restraint.
A
Two steel stems.
B
Guide sleeve adjust and release
button.
C
Guide sleeve unlock and remove
button.
D
Adjusting the Head Restraint
Raising the Head Restraint
Pull the head restraint up.
Lowering the Head Restraint
1. Press and hold button C.
2. Push the head restraint down.
Removing the Head Restraint
1. Pull the head restraint up until it reaches its highest position.
2. Press and hold buttons C and D.
3. Pull the head restraint up.
Note: For the front head restraints, you may
need to use a key or similar object to release
the head restraint. Press the key into the
guide sleeve unlock and remove button to
release the head restraint.
111
Focus (CDH) Canada/United States of America, enUSA, First Printing SeatsE138642 E198013
Page 115 of 385

Installing the Head Restraint
Align the steel stems into the guide sleeves
and push the head restraint down until it
locks.
Tilting Head Restraints (If Equipped)
The front head restraints tilt for extra
comfort. To tilt the head restraint, do the
following: 1. Adjust the seatback to an upright
driving or riding position.
2. Pivot the head restraint forward toward
your head to the desired position.
After the head restraint reaches the
forward-most tilt position, pivoting it
forward again will then release it to the
rearward, un-tilted position.
MANUAL SEATS WARNINGS
Do not adjust the driver seat or
seatback when your vehicle is
moving. Adjusting your seatback
while your vehicle is in motion may cause
loss of control of your vehicle. WARNINGS
Rock the seat backward and forward
after releasing the lever to make sure
that it is fully engaged.
The manual front seats may consist of:
A bar to move the seat backward
and forward.
A
A lever to adjust the height of the
seat.
B
A lever to adjust the angle of the
seatback.
C
POWER SEATS WARNINGS
Do not adjust the driver seat or
seatback when your vehicle is
moving. Adjusting your seatback
while your vehicle is in motion may cause
loss of control of your vehicle. Reclining the seatback can cause an
occupant to slide under the seat's
safety belt, resulting in severe
personal injuries in the event of a crash. 112
Focus (CDH) Canada/United States of America, enUSA, First Printing SeatsE144727 E197725
Page 116 of 385

Power Lumbar (If Equipped)
REAR SEATS
Folding the Seatback
Note:
Before lowering the seatback(s),
remove the outboard head restraints. See
Head Restraints
(page 110).
Note: Your vehicle may have split
seatbacks that must be folded individually. 1. Press the unlock buttons down.
2. Push the seatback forward.
113
Focus (CDH) Canada/United States of America, enUSA, First Printing SeatsE194195 E187688 E156656
2
11
Page 117 of 385
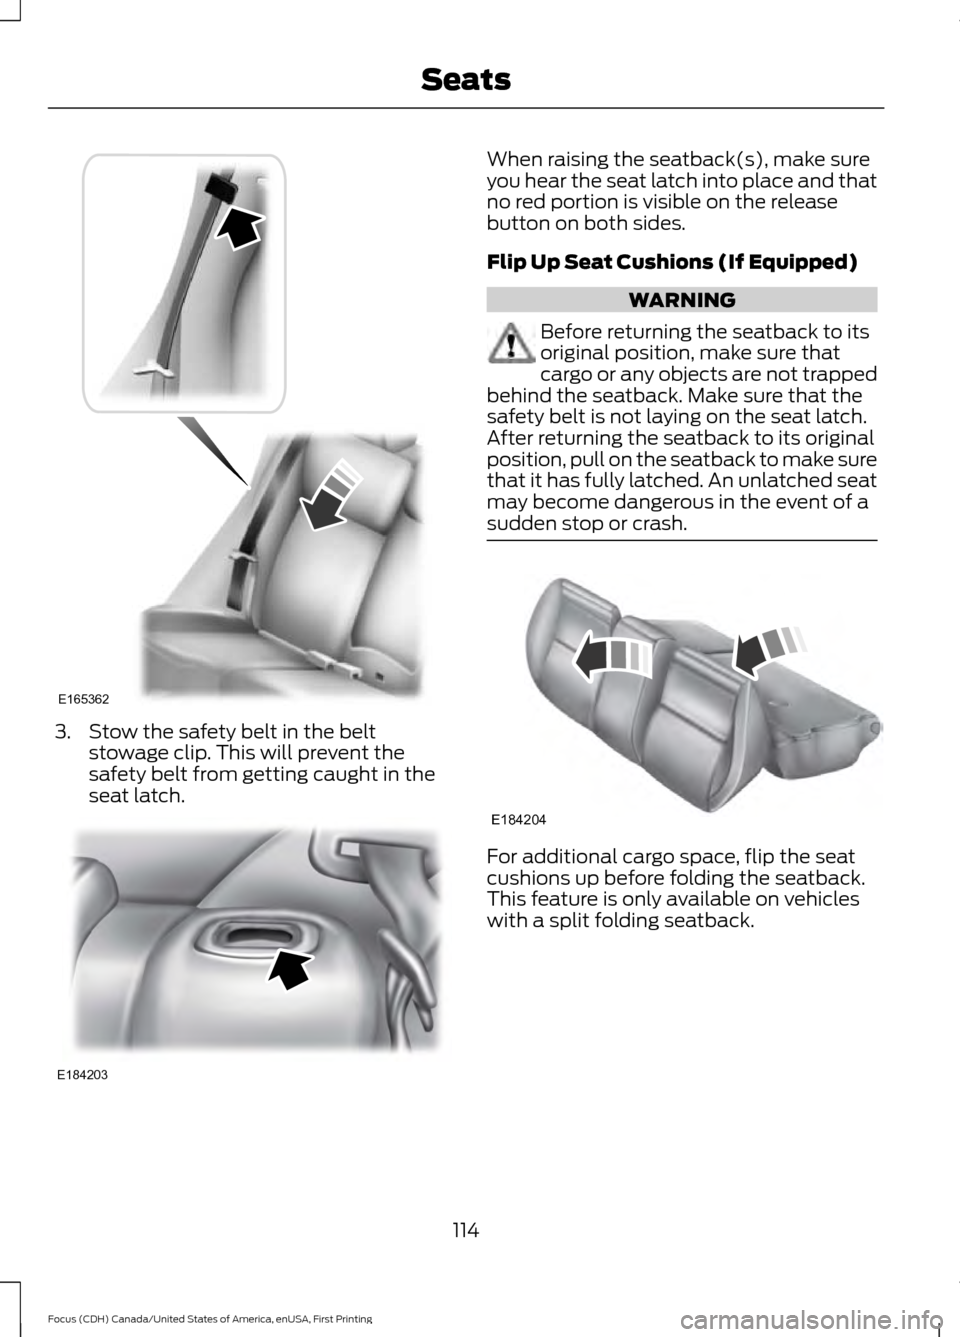
3. Stow the safety belt in the belt
stowage clip. This will prevent the
safety belt from getting caught in the
seat latch. When raising the seatback(s), make sure
you hear the seat latch into place and that
no red portion is visible on the release
button on both sides.
Flip Up Seat Cushions (If Equipped)
WARNING
Before returning the seatback to its
original position, make sure that
cargo or any objects are not trapped
behind the seatback. Make sure that the
safety belt is not laying on the seat latch.
After returning the seatback to its original
position, pull on the seatback to make sure
that it has fully latched. An unlatched seat
may become dangerous in the event of a
sudden stop or crash. For additional cargo space, flip the seat
cushions up before folding the seatback.
This feature is only available on vehicles
with a split folding seatback.
114
Focus (CDH) Canada/United States of America, enUSA, First Printing SeatsE165362 E184203 E184204
Page 118 of 385
HEATED SEATS (If Equipped)
WARNING
People who are unable to feel pain
to their skin because of advanced
age, chronic illness, diabetes, spinal
cord injury, medication, alcohol use,
exhaustion or other physical conditions,
must exercise care when using the heated
seat. The heated seat may cause burns
even at low temperatures, especially if
used for long periods of time. Do not place
anything on the seat that insulates against
heat, such as a blanket or cushion. This
may cause the heated seat to overheat.
Do not puncture the seat with pins, needles
or other pointed objects. This may damage
the heating element which may cause the
heated seat to overheat. An overheated
seat may cause serious personal injury. Do not do the following:
•
Place heavy objects on the seat.
• Operate the heated seat if water or any
other liquid is spilled on the seat. Allow
the seat to dry thoroughly.
• Operate the heated seats unless the
engine is running. Doing so can cause
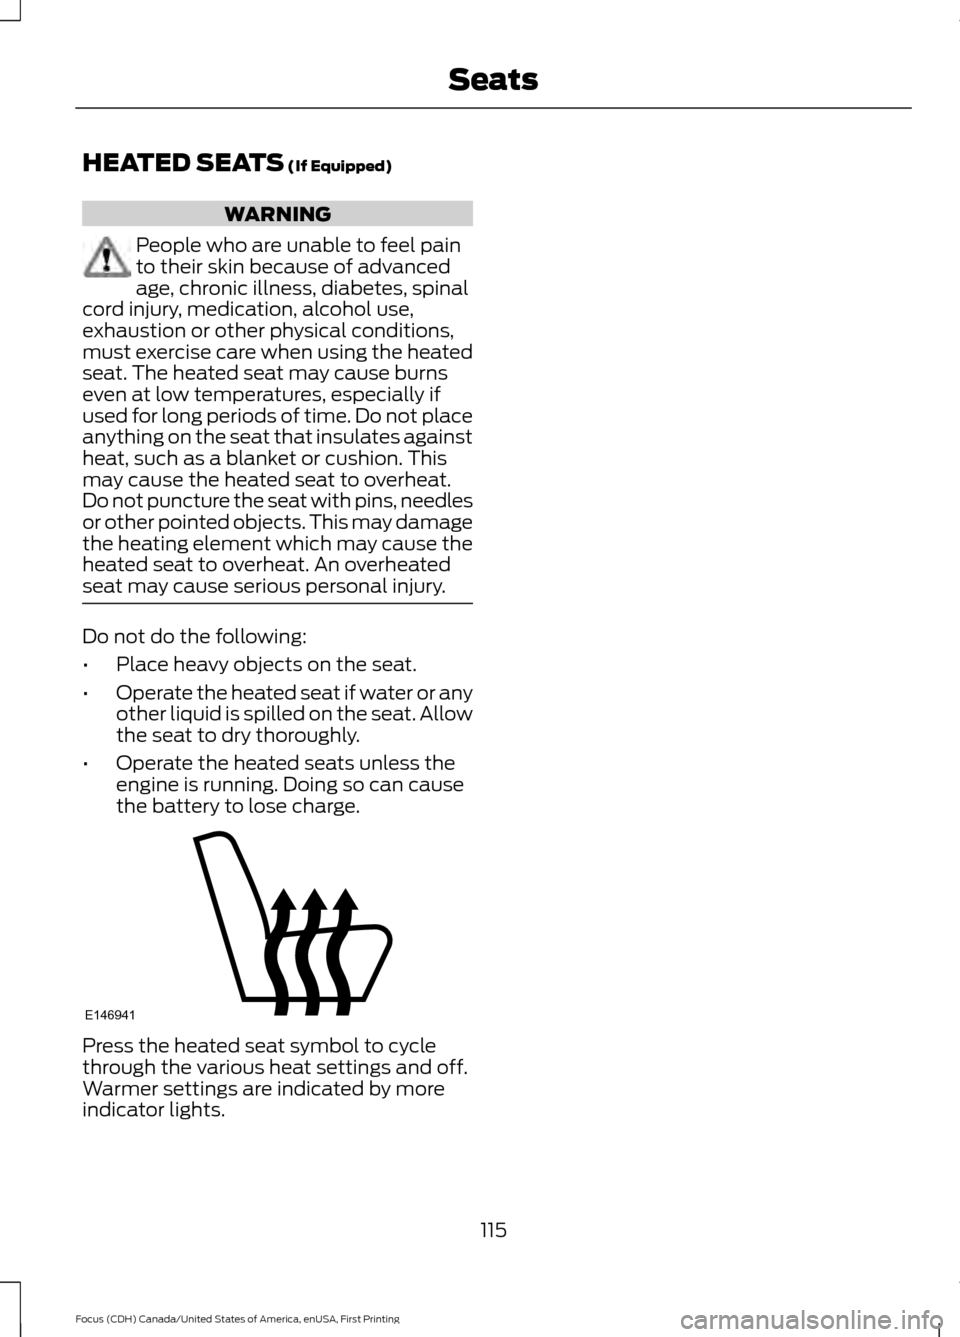
the battery to lose charge. Press the heated seat symbol to cycle
through the various heat settings and off.
Warmer settings are indicated by more
indicator lights.
115
Focus (CDH) Canada/United States of America, enUSA, First Printing SeatsE146941
Page 119 of 385
12 Volt DC Power Point
WARNING
Do not plug optional electrical
accessories into the cigar lighter
socket. Incorrect use of the lighter
can cause damage not covered by your
warranty, and can result in fire or serious
injury. Note:
After starting your vehicle, you can
use the socket to power 12-volt appliances
with a maximum current rating of 20 amps.
After you switch your vehicle off, the power
supply works only for a maximum of 30
minutes.
Note: Do not insert objects other than an
accessory plug into the power point. This
damages the outlet and can blow the fuse.
Note: Do not hang any type of accessory or
accessory bracket from the plug.
Note: Do not use the power point over the
vehicle capacity of 12 volt DC 180 watt or a
fuse may blow.
Note: Do not use the power point for
operating a cigar lighter element.
Note: Incorrect use of the power point can
cause damage not covered by your
warranty.
Note: Always keep the power point caps
closed when not in use.
Run the vehicle for full capacity use of the
power point.
To prevent the battery from running out of
charge:
• Do not use the power point longer than
necessary after switching the vehicle
off.
• Do not leave devices plugged in
overnight or when your vehicle is in park
(P) for extended periods. Location
You may find power points in the following
locations:
•
On the center console
• In the center console.
116
Focus (CDH) Canada/United States of America, enUSA, First Printing Auxiliary Power Points
Page 120 of 385
CENTER CONSOLE
Stow items in the cupholder carefully as
items may become loose during hard
braking, acceleration or crashes, including
hot drinks which may spill.
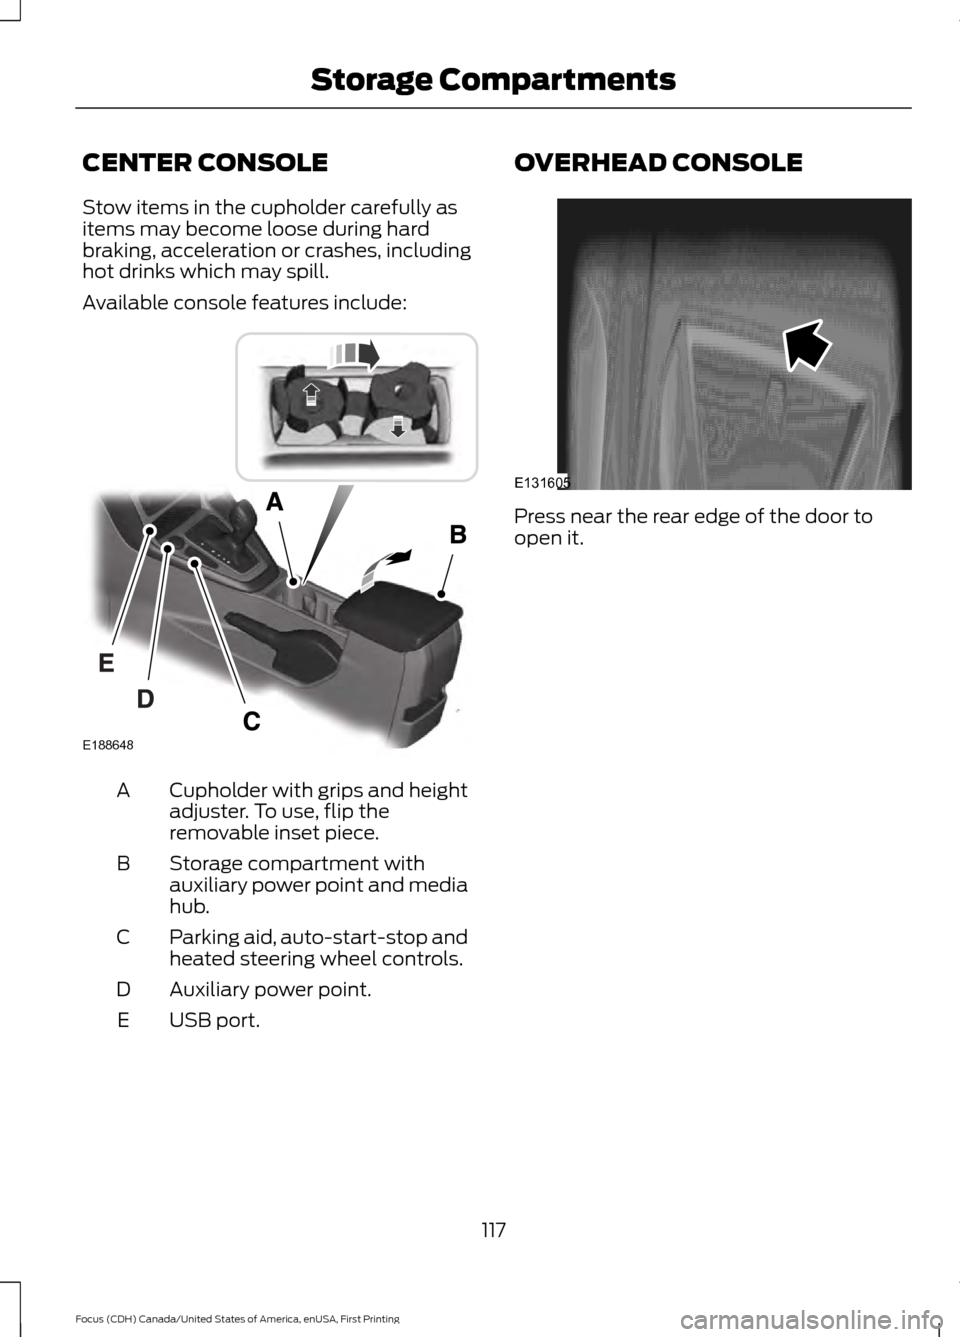
Available console features include:
Cupholder with grips and height
adjuster. To use, flip the
removable inset piece.
A
Storage compartment with
auxiliary power point and media
hub.
B
Parking aid, auto-start-stop and
heated steering wheel controls.
C
Auxiliary power point.
D
USB port.
E OVERHEAD CONSOLE
Press near the rear edge of the door to
open it.
117
Focus (CDH) Canada/United States of America, enUSA, First Printing Storage CompartmentsE188648 E131605