turn signal FORD FUSION (AMERICAS) 2016 2.G Owners Manual
[x] Cancel search | Manufacturer: FORD, Model Year: 2016, Model line: FUSION (AMERICAS), Model: FORD FUSION (AMERICAS) 2016 2.GPages: 518, PDF Size: 5.72 MB
Page 63 of 518
LOCKING AND UNLOCKING
You can use the power door lock control
or the remote control to lock and unlock
the vehicle.
Power Door Locks
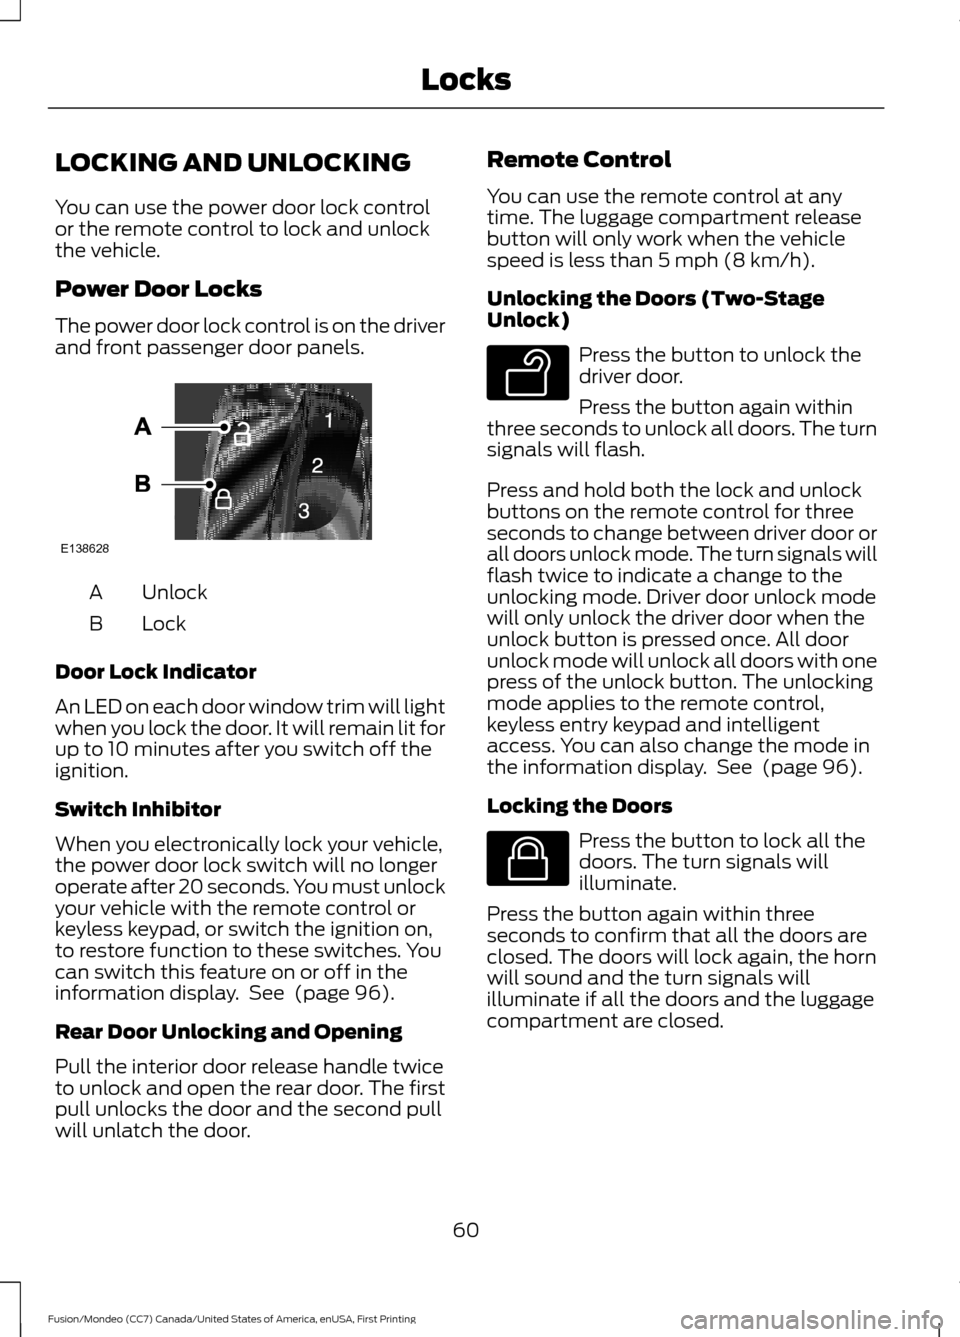
The power door lock control is on the driver
and front passenger door panels.
Unlock
A
Lock
B
Door Lock Indicator
An LED on each door window trim will light
when you lock the door. It will remain lit for
up to 10 minutes after you switch off the
ignition.
Switch Inhibitor
When you electronically lock your vehicle,
the power door lock switch will no longer
operate after 20 seconds. You must unlock
your vehicle with the remote control or
keyless keypad, or switch the ignition on,
to restore function to these switches. You
can switch this feature on or off in the
information display. See (page 96).
Rear Door Unlocking and Opening
Pull the interior door release handle twice
to unlock and open the rear door. The first
pull unlocks the door and the second pull
will unlatch the door. Remote Control
You can use the remote control at any
time. The luggage compartment release
button will only work when the vehicle
speed is less than 5 mph (8 km/h).
Unlocking the Doors (Two-Stage
Unlock)
Press the button to unlock the
driver door.
Press the button again within
three seconds to unlock all doors. The turn
signals will flash.
Press and hold both the lock and unlock
buttons on the remote control for three
seconds to change between driver door or
all doors unlock mode. The turn signals will
flash twice to indicate a change to the
unlocking mode. Driver door unlock mode
will only unlock the driver door when the
unlock button is pressed once. All door
unlock mode will unlock all doors with one
press of the unlock button. The unlocking
mode applies to the remote control,
keyless entry keypad and intelligent
access. You can also change the mode in
the information display. See
(page 96).
Locking the Doors Press the button to lock all the
doors. The turn signals will
illuminate.
Press the button again within three
seconds to confirm that all the doors are
closed. The doors will lock again, the horn
will sound and the turn signals will
illuminate if all the doors and the luggage
compartment are closed.
60
Fusion/Mondeo (CC7) Canada/United States of America, enUSA, First Printing LocksE138628 E138629 E138623
Page 89 of 518
Signal Indicator Mirrors (If Equipped)
The outer portion of the appropriate mirror
housing will blink when you switch on the
turn signal.
Puddle Lamps
(If Equipped)
The lamps on the bottom part of the mirror
housing light when you use your
transmitter to unlock the doors or when
you open a door.
Integrated Blind Spot Mirrors WARNING
Objects in the blind spot mirror are
closer than they appear.
Blind spot mirrors have an integrated
convex mirror built into the upper outboard
corner of the exterior mirrors. They can
increase your visibility along the side of
your vehicle.
Check the main mirror first before a lane
change, then check the blind spot mirror.
If the blind spot mirror does not show any
vehicles in its viewing area and the traffic
in the adjacent lane is at a safe distance,
signal that you intend to change lanes.
Glance over your shoulder to verify traffic
is clear and carefully change lanes.
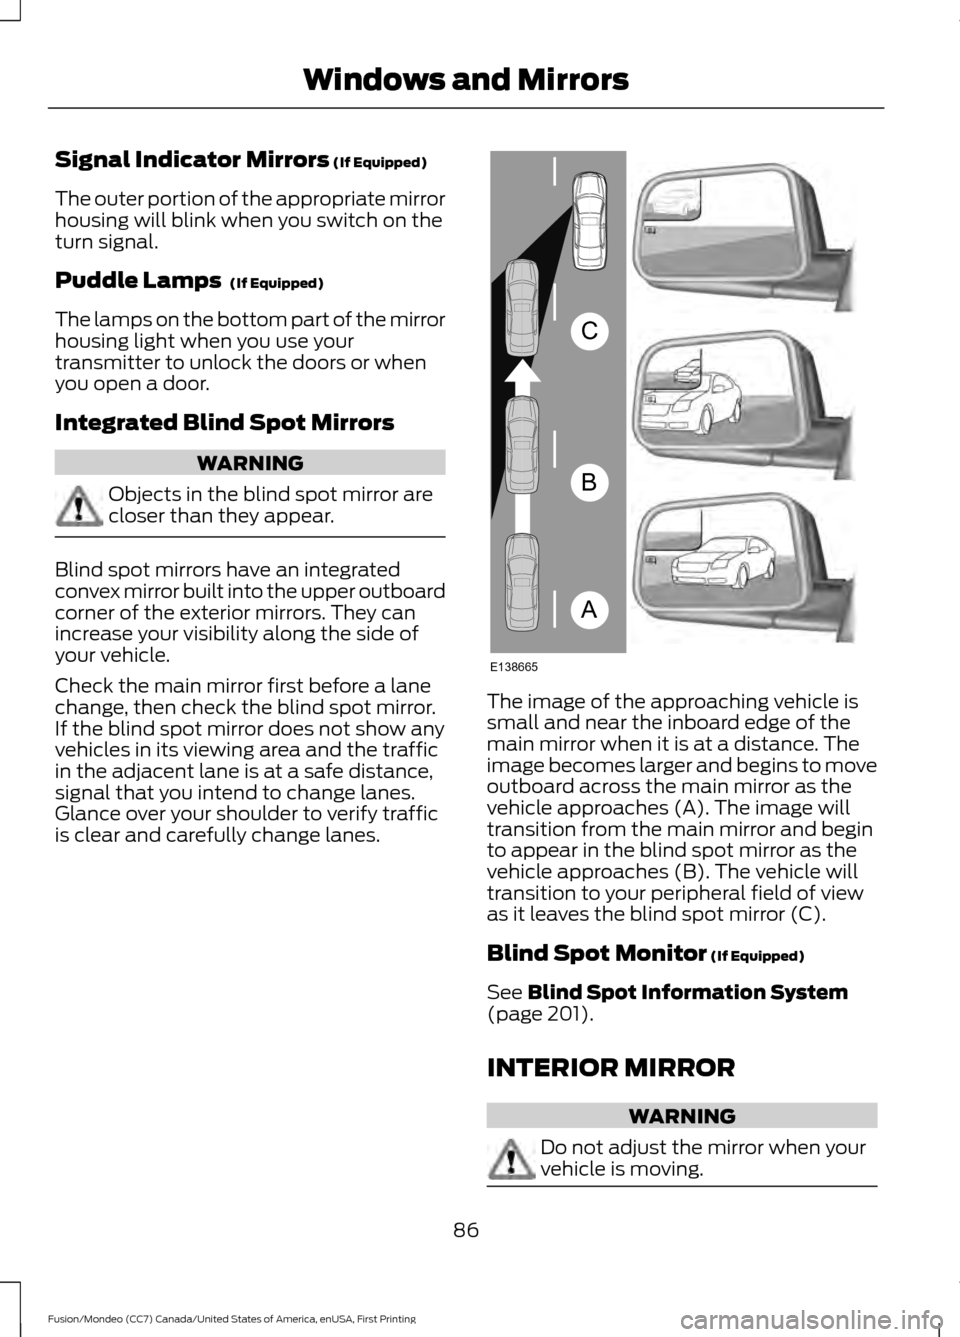
The image of the approaching vehicle is
small and near the inboard edge of the
main mirror when it is at a distance. The
image becomes larger and begins to move
outboard across the main mirror as the
vehicle approaches (A). The image will
transition from the main mirror and begin
to appear in the blind spot mirror as the
vehicle approaches (B). The vehicle will
transition to your peripheral field of view
as it leaves the blind spot mirror (C).
Blind Spot Monitor
(If Equipped)
See
Blind Spot Information System
(page 201).
INTERIOR MIRROR WARNING
Do not adjust the mirror when your
vehicle is moving.
86
Fusion/Mondeo (CC7) Canada/United States of America, enUSA, First Printing Windows and MirrorsA
B
C
E138665
Page 95 of 518
Note:
Some warning indicators appear in
the information display and function the
same as a warning lamp but do not display
when you start your vehicle.
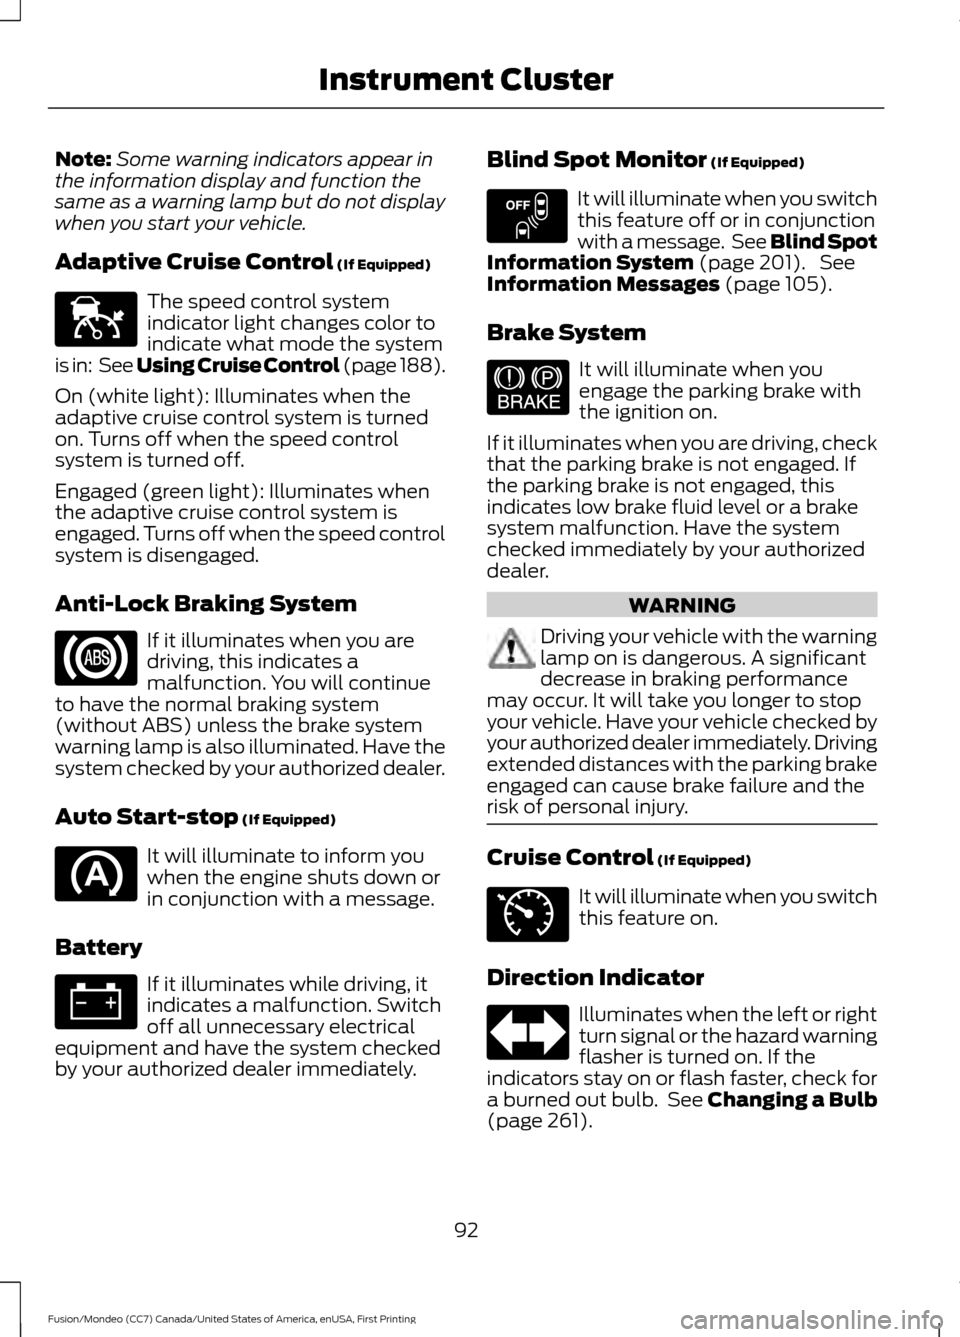
Adaptive Cruise Control (If Equipped) The speed control system
indicator light changes color to
indicate what mode the system
is in: See Using Cruise Control (page 188).
On (white light): Illuminates when the
adaptive cruise control system is turned
on. Turns off when the speed control
system is turned off.
Engaged (green light): Illuminates when
the adaptive cruise control system is
engaged. Turns off when the speed control
system is disengaged.
Anti-Lock Braking System If it illuminates when you are
driving, this indicates a
malfunction. You will continue
to have the normal braking system
(without ABS) unless the brake system
warning lamp is also illuminated. Have the
system checked by your authorized dealer.
Auto Start-stop
(If Equipped) It will illuminate to inform you
when the engine shuts down or
in conjunction with a message.
Battery If it illuminates while driving, it
indicates a malfunction. Switch
off all unnecessary electrical
equipment and have the system checked
by your authorized dealer immediately. Blind Spot Monitor
(If Equipped) It will illuminate when you switch
this feature off or in conjunction
with a message. See Blind Spot
Information System
(page 201). See
Information Messages (page 105).
Brake System It will illuminate when you
engage the parking brake with
the ignition on.
If it illuminates when you are driving, check
that the parking brake is not engaged. If
the parking brake is not engaged, this
indicates low brake fluid level or a brake
system malfunction. Have the system
checked immediately by your authorized
dealer. WARNING
Driving your vehicle with the warning
lamp on is dangerous. A significant
decrease in braking performance
may occur. It will take you longer to stop
your vehicle. Have your vehicle checked by
your authorized dealer immediately. Driving
extended distances with the parking brake
engaged can cause brake failure and the
risk of personal injury. Cruise Control
(If Equipped)
It will illuminate when you switch
this feature on.
Direction Indicator Illuminates when the left or right
turn signal or the hazard warning
flasher is turned on. If the
indicators stay on or flash faster, check for
a burned out bulb. See
Changing a Bulb
(page 261).
92
Fusion/Mondeo (CC7) Canada/United States of America, enUSA, First Printing Instrument ClusterE144524 E151262 E144522 E71340
Page 142 of 518
HomeLink Wireless Control
System (If Equipped)
WARNING
Do not use the system with any
garage door opener that does not
have the safety stop and reverse
feature as required by U.S. Federal Safety
Standards (this includes any garage door
opener manufactured before April 1, 1982).
A garage door opener which cannot detect
an object, signaling the door to stop and
reverse, does not meet current federal
safety standards. Using a garage door
opener without these features increases
the risk of serious injury or death. Note:
Make sure that the garage door and
security device are free from obstruction
when you are programming. Do not program
the system with the vehicle in the garage.
Note: Make sure you keep the original
remote control transmitter for use in other
vehicles as well as for future system
programming.
Note: We recommend that upon the sale
or lease termination of your vehicle, you
erase the programmed function buttons for
security reasons. See Erasing the function
button codes later in this section.
Note: You can program a maximum of
three devices. To change or replace any of
the three devices after it has been initially
programmed, you must first erase the
current settings. See Erasing the function
button codes later in this section. The universal garage door opener replaces
the common hand-held garage door
opener with a three-button transmitter
that is integrated into the driver
’s sun visor.
The system includes two primary features,
a garage door opener and a platform for
remote activation of devices within the
home. As well as being programmed for
garage doors, the system transmitter can
be programmed to operate entry gate
operators, security systems, entry door
locks and home or office lighting.
Additional system information can be
found online at www.homelink.com or by
calling the toll-free help line on
1-800-355-3515.
In-vehicle programming
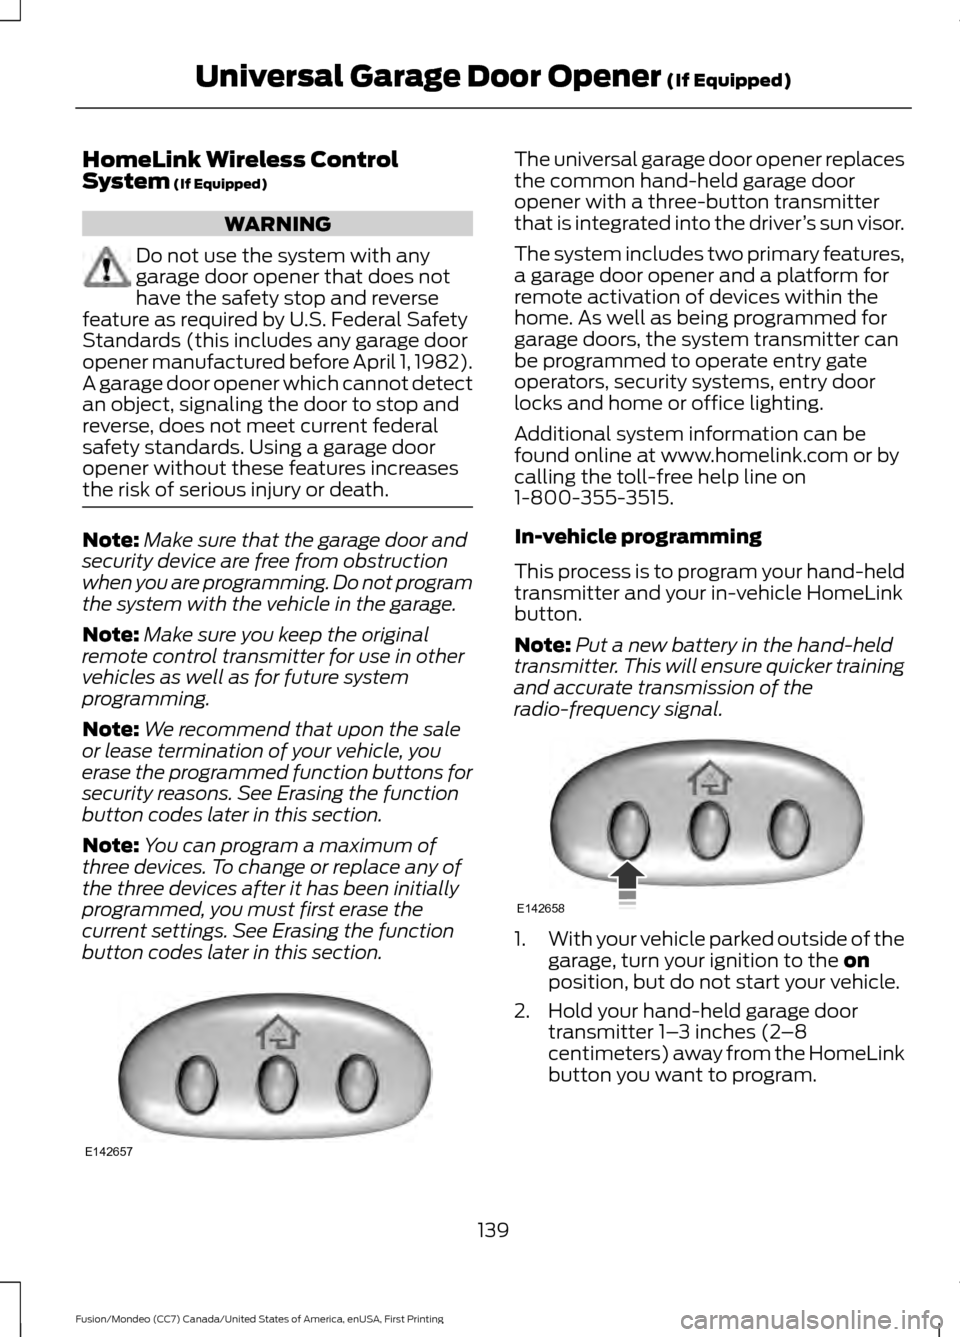
This process is to program your hand-held
transmitter and your in-vehicle HomeLink
button.
Note: Put a new battery in the hand-held
transmitter. This will ensure quicker training
and accurate transmission of the
radio-frequency signal. 1.
With your vehicle parked outside of the
garage, turn your ignition to the
on
position, but do not start your vehicle.
2. Hold your hand-held garage door transmitter 1– 3 inches (2–8
centimeters) away from the HomeLink
button you want to program.
139
Fusion/Mondeo (CC7) Canada/United States of America, enUSA, First Printing Universal Garage Door Opener
(If Equipped)E142657 E142658
Page 143 of 518
3. Using both hands, simultaneously,
press and hold the desired HomeLink
button and the hand-held transmitter
button. DO NOT release either one until
the HomeLink indicator light flashes
slowly and then rapidly. When the
indicator light flashes rapidly, both
buttons may be released. The rapid
flashing indicates successful training.
4. Press and hold the HomeLink button you programmed for five seconds, then
release. You may need to do this twice
to activate the door. If your garage door
does not operate, watch the HomeLink
indicator light.
If the indicator light stays on, the
programming is complete. See
Programming your garage door motor
later in this section.
If the indicator light flashes rapidly for 2
seconds and then turns to a constant light,
the HomeLink button is not programmed
yet. Do the following:
Press and hold the HomeLink button while
you press and release the hand-held
transmitter button every 2 seconds. The
HomeLink indicator light will flash slowly
and then rapidly once the HomeLink
function button recognizes and accepts
the hand-held transmitter ’s radio
frequency signal.
After programming the HomeLink button,
begin programming your garage door
opener motor.
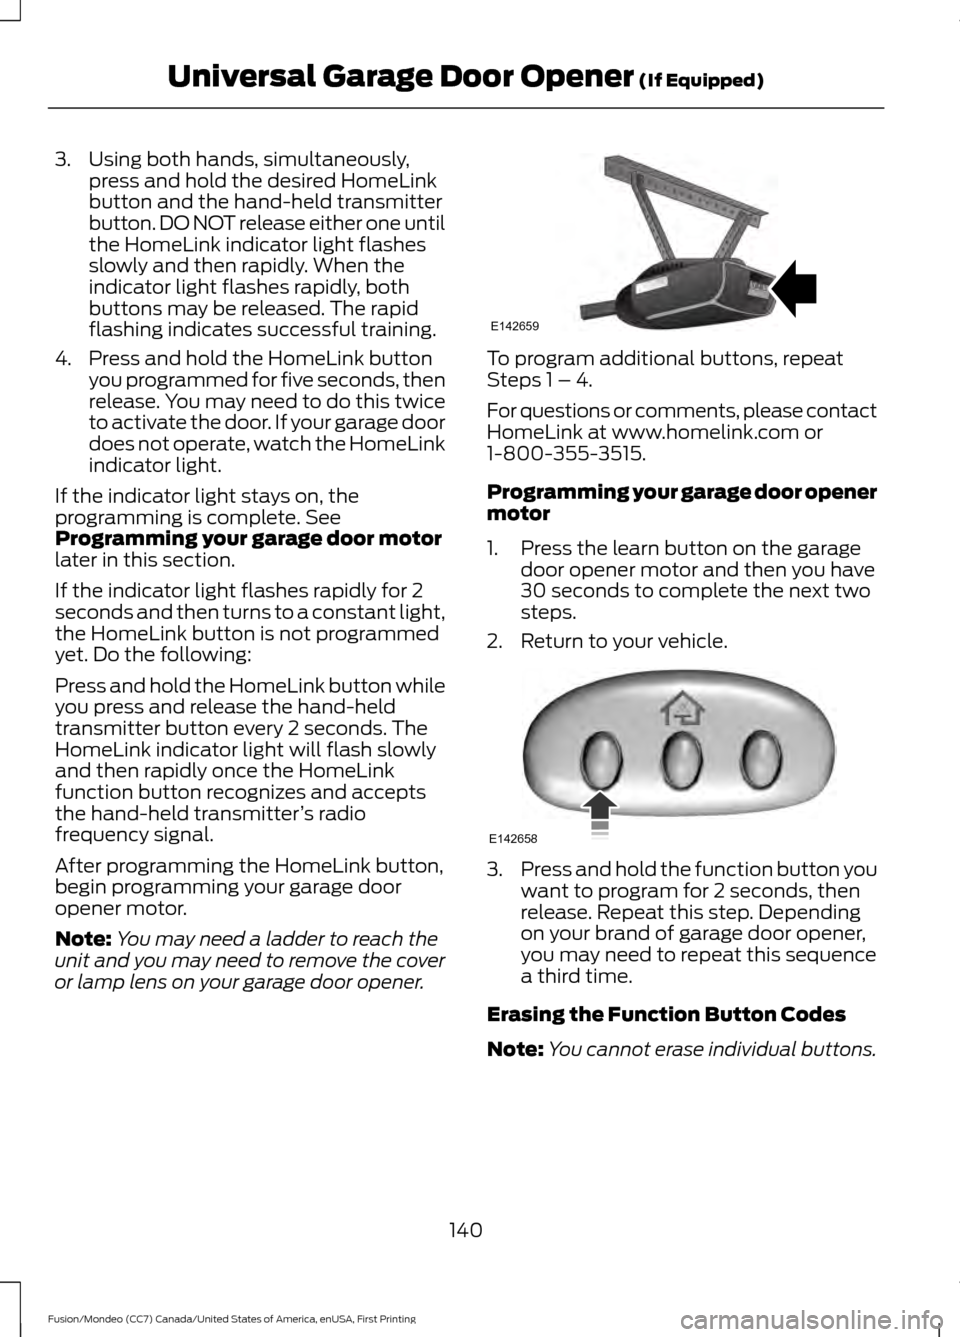
Note: You may need a ladder to reach the
unit and you may need to remove the cover
or lamp lens on your garage door opener. To program additional buttons, repeat
Steps 1 – 4.
For questions or comments, please contact
HomeLink at www.homelink.com or
1-800-355-3515.
Programming your garage door opener
motor
1. Press the learn button on the garage
door opener motor and then you have
30 seconds to complete the next two
steps.
2. Return to your vehicle. 3.
Press and hold the function button you
want to program for 2 seconds, then
release. Repeat this step. Depending
on your brand of garage door opener,
you may need to repeat this sequence
a third time.
Erasing the Function Button Codes
Note: You cannot erase individual buttons.
140
Fusion/Mondeo (CC7) Canada/United States of America, enUSA, First Printing Universal Garage Door Opener (If Equipped)E142659 E142658
Page 202 of 518
System Display
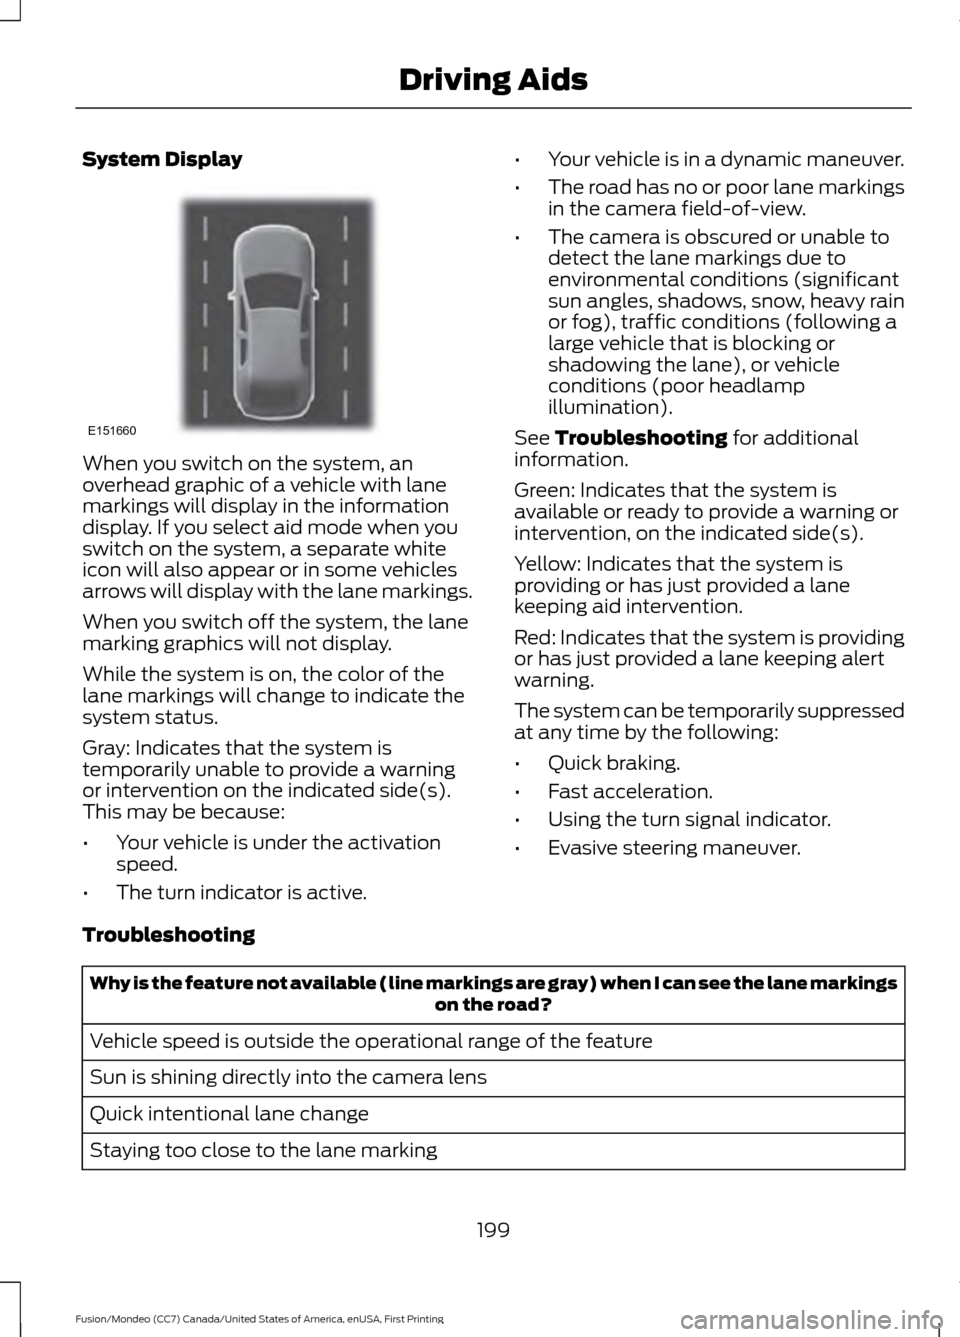
When you switch on the system, an
overhead graphic of a vehicle with lane
markings will display in the information
display. If you select aid mode when you
switch on the system, a separate white
icon will also appear or in some vehicles
arrows will display with the lane markings.
When you switch off the system, the lane
marking graphics will not display.
While the system is on, the color of the
lane markings will change to indicate the
system status.
Gray: Indicates that the system is
temporarily unable to provide a warning
or intervention on the indicated side(s).
This may be because:
•
Your vehicle is under the activation
speed.
• The turn indicator is active. •
Your vehicle is in a dynamic maneuver.
• The road has no or poor lane markings
in the camera field-of-view.
• The camera is obscured or unable to
detect the lane markings due to
environmental conditions (significant
sun angles, shadows, snow, heavy rain
or fog), traffic conditions (following a
large vehicle that is blocking or
shadowing the lane), or vehicle
conditions (poor headlamp
illumination).
See Troubleshooting for additional
information.
Green: Indicates that the system is
available or ready to provide a warning or
intervention, on the indicated side(s).
Yellow: Indicates that the system is
providing or has just provided a lane
keeping aid intervention.
Red: Indicates that the system is providing
or has just provided a lane keeping alert
warning.
The system can be temporarily suppressed
at any time by the following:
• Quick braking.
• Fast acceleration.
• Using the turn signal indicator.
• Evasive steering maneuver.
Troubleshooting Why is the feature not available (line markings are gray) when I can see the lane markings
on the road?
Vehicle speed is outside the operational range of the feature
Sun is shining directly into the camera lens
Quick intentional lane change
Staying too close to the lane marking
199
Fusion/Mondeo (CC7) Canada/United States of America, enUSA, First Printing Driving AidsE151660
Page 204 of 518
BLIND SPOT INFORMATION
SYSTEM
Blind Spot Information System
(BLIS
™) with Cross Traffic Alert
(If Equipped) WARNING
To help avoid injuries, NEVER use the
Blind Spot Information System as a
replacement for using the interior
and exterior mirrors and looking over your
shoulder before changing lanes. The Blind
Spot Information System is not a
replacement for careful driving. The Blind Spot Information System is
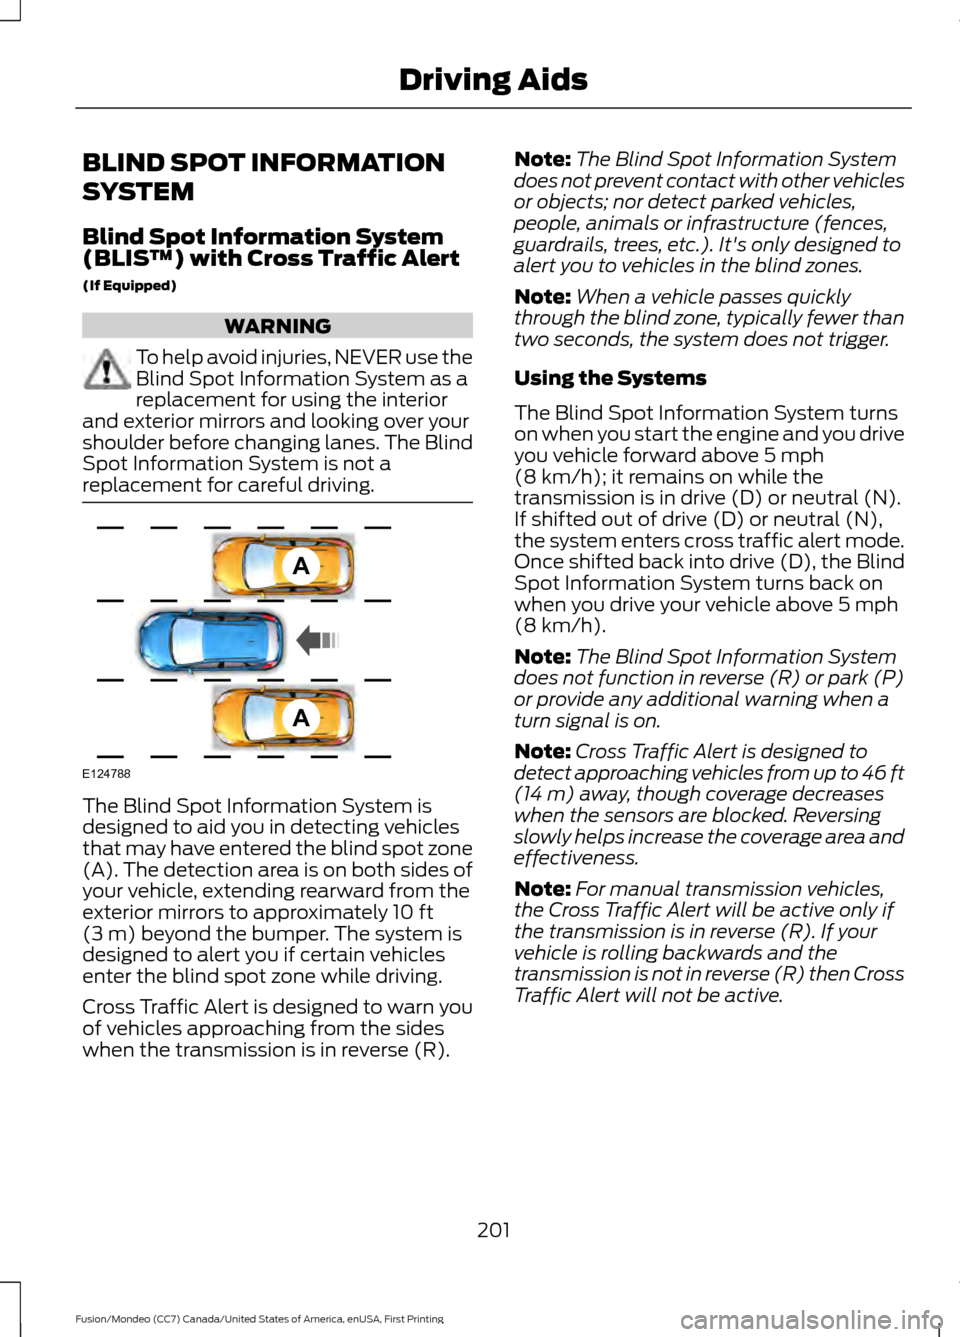
designed to aid you in detecting vehicles
that may have entered the blind spot zone
(A). The detection area is on both sides of
your vehicle, extending rearward from the
exterior mirrors to approximately 10 ft
(3 m) beyond the bumper. The system is
designed to alert you if certain vehicles
enter the blind spot zone while driving.
Cross Traffic Alert is designed to warn you
of vehicles approaching from the sides
when the transmission is in reverse (R). Note:
The Blind Spot Information System
does not prevent contact with other vehicles
or objects; nor detect parked vehicles,
people, animals or infrastructure (fences,
guardrails, trees, etc.). It's only designed to
alert you to vehicles in the blind zones.
Note: When a vehicle passes quickly
through the blind zone, typically fewer than
two seconds, the system does not trigger.
Using the Systems
The Blind Spot Information System turns
on when you start the engine and you drive
you vehicle forward above
5 mph
(8 km/h); it remains on while the
transmission is in drive (D) or neutral (N).
If shifted out of drive (D) or neutral (N),
the system enters cross traffic alert mode.
Once shifted back into drive (D), the Blind
Spot Information System turns back on
when you drive your vehicle above
5 mph
(8 km/h).
Note: The Blind Spot Information System
does not function in reverse (R) or park (P)
or provide any additional warning when a
turn signal is on.
Note: Cross Traffic Alert is designed to
detect approaching vehicles from up to 46 ft
(14 m)
away, though coverage decreases
when the sensors are blocked. Reversing
slowly helps increase the coverage area and
effectiveness.
Note: For manual transmission vehicles,
the Cross Traffic Alert will be active only if
the transmission is in reverse (R). If your
vehicle is rolling backwards and the
transmission is not in reverse (R) then Cross
Traffic Alert will not be active.
201
Fusion/Mondeo (CC7) Canada/United States of America, enUSA, First Printing Driving AidsA
A
E124788
Page 222 of 518
ESSENTIAL TOWING CHECKS
Follow these guidelines for safe towing:
•
Do not tow a trailer until you drive your
vehicle at least 1000 miles (1600
kilometers).
• Consult your local motor vehicle laws
for towing a trailer.
• See the instructions included with
towing accessories for the proper
installation and adjustment
specifications.
• Service your vehicle more frequently if
you tow a trailer. See your scheduled
maintenance information.
• If you use a rental trailer, follow the
instructions the rental agency gives
you.
You can find information on load
specification terms found on the tire label
and Safety Compliance label as well as
instructions on calculating your vehicle's
load in the Load Carrying chapter. See
Load Limit (page 209).
Remember to account for the trailer
tongue weight as part of your vehicle load
when calculating the total vehicle weight.
Hitches
Do not use a hitch that either clamps onto
the bumper or attaches to the axle.
Distribute the trailer load so 10-15% of the
total trailer weight is on the tongue.
Safety Chains
Note: Never attach safety chains to the
bumper.
Always connect the safety chains to the
hook retainers of your vehicle hitch.
To connect the safety chains, cross them
under the trailer tongue and allow enough
slack for turning tight corners. Do not allow
the chains to drag on the ground. Trailer Brakes WARNING
Do not connect a trailer's hydraulic
brake system directly to your
vehicle's brake system. Your vehicle
may not have enough braking power and
your chances of having a collision greatly
increase. Electric brakes and manual, automatic or
surge-type trailer brakes are safe if you
install them properly and adjust them to
the manufacturer's specifications. The
trailer brakes must meet local and federal
regulations.
The rating for the tow vehicle's braking
system operation is at the gross vehicle
weight rating, not the gross combined
weight rating.
Trailer Lamps
WARNING
Never connect any trailer lamp wiring
to the vehicle's tail lamp wiring; this
may damage the electrical system
resulting in fire. Contact your authorized
dealer as soon as possible for assistance
in proper trailer tow wiring installation.
Additional electrical equipment may be
required. Trailer lamps are required on most towed
vehicles. Make sure all running lights, brake
lights, turn signals and hazard lights are
working.
Before Towing a Trailer
Practice turning, stopping and backing up
to get the feel of your vehicle-trailer
combination before starting on a trip.
When turning, make wider turns so the
trailer wheels clear curbs and other
obstacles.
219
Fusion/Mondeo (CC7) Canada/United States of America, enUSA, First Printing Towing
Page 233 of 518
3. Remove the jumper cable from the
positive (+) terminal of the booster
vehicle battery.
4. Remove the jumper cable from the positive (+) terminal of the disabled
vehicle battery.
5. Allow the engine to idle for at least one
minute.
POST-CRASH ALERT SYSTEM
The system flashes the turn signal lamps
and sounds the horn (intermittently) in the
event of a serious impact that deploys an
airbag (front, side, side curtain or Safety
Canopy) or the safety belt pretensioners.
The horn and lamps will turn off when:
• The hazard control button is pressed
• The panic button (if equipped) is
pressed on the remote entry
transmitter
• Your vehicle runs out of power
SPINOUT DETECTION
If your vehicle detects a spinout and it
comes to a stop, the hazard warning
flashers turn on. A spinout detected
message appears in the information
display. The message may not appear if
your vehicle runs out of power.
After your vehicle's hazard warning
flashers turn on, you can switch them off
by:
• Pressing the hazard warning flasher
button.
• Pressing the remote control unlock
button.
• Pressing the remote control panic
button.
• Switching the ignition on and off twice.
230
Fusion/Mondeo (CC7) Canada/United States of America, enUSA, First Printing Roadside Emergencies
Page 339 of 518
The multicast indicator appears in FM
mode (only) if the current station is
broadcasting multiple digital broadcasts.
The highlighted numbers signify available
digital channels where new or different
content is available. HD1 signifies the main
programming status and is available in
analog and digital broadcasts. Other
multicast stations (HD2 through HD7) are
only available digitally.
When HD Radio broadcasts are active, you
can access the following functions:
•
Scan allows you to hear a brief
sampling of all available stations. This
feature still works when HD Radio
reception is on, although it does not
scan for HD2-HD7 channels. You may
see the HD logo appear if the station
has a digital broadcast.
• Memory presets
allow you to save an
active channel as a memory preset.
Touch and hold a memory preset slot
until the sound returns. There is a brief
mute while the radio saves the station.
Sound returns when finished. When
switching to an HD2 or HD3 memory
preset, the sound mutes before the
digital audio plays, because the system
has to reacquire the digital signal.
Note: As with any saved radio station, you
cannot access the saved station if your
vehicle is outside the station ’s reception
area.
HD Radio Reception and Station Troubleshooting Potential reception issues
If you are listening to a multicast station and you are on
the fringe of the reception area, the station may mute due
to weak signal strength.
Reception area
If you are listening to HD1, the system switches back to
the analog broadcast until the digital broadcast is available
again. However, if you are listening to any of the possible
HD2-HD7 multicast channels, the station mutes and stays
muted unless it is able to connect to the digital signal
again.
When the system first receives a station (aside from HD2-
HD7 multicast stations), it first plays the station in the
analog version. Once the receiver verifies the station is an
HD Radio station, it shifts to the digital version. Depending
on the station quality, you may hear a slight sound change
when the station changes from analog to digital. Blending
is the shift from analog to digital sound or digital back to
analog sound.
Station blending
336
Fusion/Mondeo (CC7) Canada/United States of America, enUSA, First Printing Audio System