battery FORD FUSION (AMERICAS) 2017 2.G Owner's Manual
[x] Cancel search | Manufacturer: FORD, Model Year: 2017, Model line: FUSION (AMERICAS), Model: FORD FUSION (AMERICAS) 2017 2.GPages: 528, PDF Size: 7.53 MB
Page 155 of 528
•
You press the accelerator and the
brake pedal at the same time.
• The driver safety belt becomes
unfastened or the driver door is ajar.
• The transmission is moved from drive
(D).
• Your vehicle is moving.
• The interior compartment does not
meet customer comfort when air
conditioning or heat is on.
• Fogging of the windows could occur
and the air conditioning is on.
• The battery is not within optimal
operating conditions.
• The maximum engine off time is
exceeded.
• When you press the Auto StartStop
button while the engine is stopped
automatically.
• The heated windshield is turned on.
Any of the following conditions may result
in an automatic restart of the engine:
• The blower fan speed is increased or
the climate control temperature is
changed.
• An electrical accessory is turned on or
plugged in. Disabling Auto StartStop Press the Auto StartStop button located
on the center console to switch the system
off. The button will illuminate. The system
will only be deactivated for the current
ignition cycle. Press the button again to
restore Auto StartStop function.
If your vehicle is in an Auto StartStop state
and you shift the transmission to reverse
while the brake is not depressed, a
message telling you to press the brake will
appear. You must press the brake pedal
within 10 seconds, or a shift to park and a
manual restart will be required.
Note:
If the Shift to P, Restart Engine
message appears and the amber Auto
StartStop indicator light is flashing,
automatic restart is not available. The
vehicle must be restarted manually. See
Information Displays (page 93).
152
Fusion (CC7) Canada/United States of America, enUSA, First Printing Unique Driving CharacteristicsE221544
Page 165 of 528
If the service engine soon indicator remains
on, have your vehicle serviced at the first
available opportunity. Although some
malfunctions detected by the OBD-II may
not have symptoms that are apparent,
continued driving with the service engine
soon indicator on can result in increased
emissions, lower fuel economy, reduced
engine and transmission smoothness and
lead to more costly repairs.
Readiness for Inspection and
Maintenance (I/M) Testing
Some state and provincial and local
governments may have
Inspection/Maintenance (I/M) programs
to inspect the emission control equipment
on your vehicle. Failure to pass this
inspection could prevent you from getting
a vehicle registration.
If the service engine soon
indicator is on or the bulb does
not work, your vehicle may need
service. See On-Board Diagnostics.
Your vehicle may not pass the I/M test if
the service engine soon indicator is on or
not working properly (bulb is burned out),
or if the OBD-II system has determined
that some of the emission control systems
have not been properly checked. In this
case, the vehicle is not ready for I/M
testing.
If the vehicle ’s engine or transmission has
just been serviced, or the battery has
recently run down or been replaced, the
OBD-II system may indicate that the
vehicle is not ready for I/M testing. To
determine if the vehicle is ready for I/M
testing, turn the ignition key to the on
position for 15 seconds without cranking
the engine. If the service engine soon
indicator blinks eight times, it means that
the vehicle is not ready for I/M testing; if
the service engine soon indicator stays on
solid, it means that your vehicle is ready
for I/M testing. The OBD-II system checks the emission
control system during normal driving. A
complete check may take several days.
If the vehicle is not ready for I/M testing,
you can perform the following driving cycle
consisting of mixed city and highway
driving:
1. 15 minutes of steady driving on an
expressway or highway followed by 20
minutes of stop-and-go driving with at
least four 30-second idle periods.
2. Allow your vehicle to sit for at least eight hours with the ignition off. Then,
start the vehicle and complete the
above driving cycle. The vehicle must
warm up to its normal operating
temperature. Once started, do not turn
off the vehicle until the above driving
cycle is complete.
If the vehicle is still not ready for I/M
testing, you need to repeat the above
driving cycle.
162
Fusion (CC7) Canada/United States of America, enUSA, First Printing Fuel and Refueling
Page 167 of 528
Reverse (R)
With the selector in reverse (R), your
vehicle moves backward. Always come to
a complete stop before shifting into and
out of reverse (R).
Neutral (N)
With the selector in neutral (N), your
vehicle can be started and is free to roll.
Hold the brake pedal down while in this
position.
Stay in Neutral Mode
Note:
Always put your vehicle in Stay in
Neutral mode when entering an automatic
car wash. Failure to do this could result in
vehicle damage not covered by warranty.
Stay in Neutral mode allows your vehicle
to stay in neutral when you exit your
vehicle. Your vehicle must be stationary to
enter this mode.
To enter Stay in Neutral mode:
• Move the transmission selector to
neutral (N).
• A message will appear in your
information display screen prompting
you to press the sport (S) button.
• Press the sport (S) button again to
enter Stay in Neutral mode.
To exit Stay in Neutral mode, select a
different gear.
A message will appear in your information
display screen when your vehicle has
entered Stay in Neutral mode.
Drive (D)
Drive (D) is the normal driving position for
the best fuel economy. The overdrive
function allows automatic upshifts and
downshifts through gears one through six. Grade Assist
Press the grade assist button to activate
grade assist. The grade assist lamp will
appear in the instrument cluster. Press the
button again to switch the system off.
Grade assist:
•
Provides additional grade braking with
a combination of engine motoring and
high-voltage battery charging to help
maintain vehicle speed when
descending a grade.
• As your vehicle determines the amount
of engine motoring and high-voltage
battery charging, you may notice the
engine speed increasing and
decreasing to help maintain your
vehicle speed when descending a
grade.
• The grade assist lamp in the instrument
cluster is illuminated.
164
Fusion (CC7) Canada/United States of America, enUSA, First Printing TransmissionE224429
Page 169 of 528
The instrument cluster displays your
currently selected gear. If a gear is
requested but not available due to vehicle
conditions (low speed, too high engine
speed for requested gear selection), the
current gear will flash three times.
Note:
At full accelerator pedal travel, the
transmission automatically downshifts for
maximum performance.
Note: In low traction conditions, you can
pull away in second gear using SelectShift.
To perform this operation, select drive (D)
or sport (S) mode and press the + toggle (if
equipped) or pull the + paddle (if equipped)
until 2 is displayed on the cluster. Your
vehicle is now ready to move in 2nd gear.
Brake-Shift Interlock Override WARNINGS
Do not drive your vehicle until you
verify that the brake lamps are
working.
When doing this procedure, you need
to take the transmission out of park
(P) which means your vehicle can
roll freely. To avoid unwanted vehicle
movement, always fully set the parking
brake prior to doing this procedure. Use
wheels chocks if appropriate. If the parking brake is fully released,
but the brake warning lamp remains
illuminated, the brakes may not be
working properly. Have your vehicle
checked as soon as possible. Note:
See your authorized dealer as soon
as possible if this procedure is used.
Note: For some markets this feature is
disabled. Note:
This feature will only function if your
12-volt battery has power. If vehicle battery
voltage is not sufficient, an external 12-volt
power source (for example, jumper cables,
battery charger or jump pack) may be
required to function the interlock override
switch.
Use the brake-shift interlock override to
move your transmission from the park
position in the event of an electrical
malfunction. If your vehicle has a dead
battery, an external power source will be
required.
1. Apply the parking brake and turn your ignition off before performing this
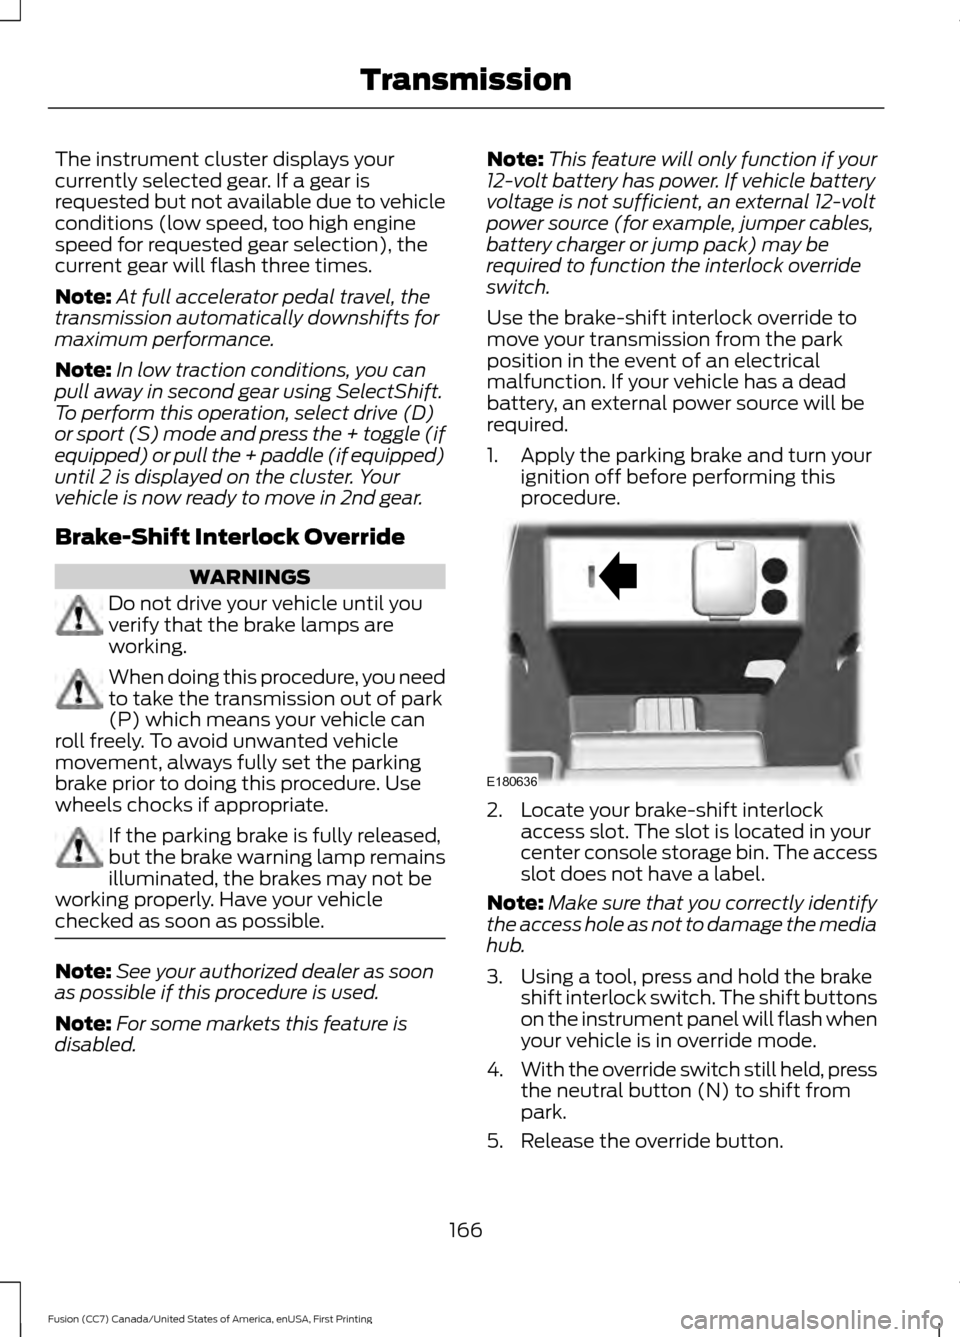
procedure. 2. Locate your brake-shift interlock
access slot. The slot is located in your
center console storage bin. The access
slot does not have a label.
Note: Make sure that you correctly identify
the access hole as not to damage the media
hub.
3. Using a tool, press and hold the brake shift interlock switch. The shift buttons
on the instrument panel will flash when
your vehicle is in override mode.
4. With the override switch still held, press
the neutral button (N) to shift from
park.
5. Release the override button.
166
Fusion (CC7) Canada/United States of America, enUSA, First Printing TransmissionE180636
Page 179 of 528
Note:
The electric parking brake drive away
release makes starting on a hill easier. This
feature will release the parking brake
automatically when the vehicle has
sufficient drive force to move up the hill. To
assure drive away release when starting
uphill, press the accelerator pedal quickly.
Driving with a Trailer
Depending on the slope and the weight of
the trailer, your vehicle and trailer may roll
backwards slightly when you start on a
slope.
To prevent this from happening, do the
following:
1. Pull the switch up and hold it in this position.
2. Drive your vehicle, then release the switch when you notice that the engine
has developed sufficient driving force.
Battery With No Charge WARNING
You will not be able to apply or
release the electric parking brake if
the battery is low or has no charge.
If the battery is low or has no charge, use
jumper cables and a booster battery.
HILL START ASSIST
WARNINGS
The system does not replace the
parking brake. When you leave your
vehicle, always apply the parking
brake and shift the transmission into park
(P) (automatic transmission) or first gear
(1) (manual transmission). You must remain in your vehicle once
you have activated the system. WARNINGS
During all times, you are responsible
for controlling your vehicle,
supervising the system and
intervening, if required. If the engine is revved excessively, or
if a malfunction is detected, the
system will be deactivated.
The system makes it easier to pull away
when your vehicle is on a slope without the
need to use the parking brake.
When the system is active, your vehicle will
remain stationary on the slope for two to
three seconds after you release the brake
pedal. This allows you time to move your
foot from the brake to the accelerator
pedal. The brakes release automatically
when the engine has sufficient torque to
prevent your vehicle from rolling down the
grade. This is an advantage when pulling
away on a slope, for example from a car
park ramp, traffic lights or when reversing
uphill into a parking space.
The system will activate automatically on
any slope that will cause significant vehicle
rollback. For vehicles with a manual
transmission, you can switch this feature
off using the information display. See
Information Displays (page 93). The
system will remain on or off depending on
how it was last set.
Note: There is no warning lamp to indicate
the system is either on or off.
Note: If your vehicle is equipped with Auto
Hold, Hill Start Assist will not be available
while Auto Hold is active.
Using Hill Start Assist
1. Bring your vehicle to a complete standstill. Keep the brake pedal
pressed and select an uphill gear (for
example, first (1) when facing uphill or
reverse (R) when facing downhill).
176
Fusion (CC7) Canada/United States of America, enUSA, First Printing Brakes
Page 216 of 528
Extreme continuous steering may increase
the effort required for you to steer your
vehicle. This increased effort prevents
overheating and permanent damage to
the steering system. You do not lose the
ability to steer your vehicle manually.
Typical steering and driving maneuvers
allow the system to cool and return to
normal operation.
Steering Tips
If the steering wanders or pulls, check for:
•
Correct tire pressures.
• Uneven tire wear.
• Loose or worn suspension
components.
• Loose or worn steering components.
• Improper vehicle alignment.
Note: A high crown in the road or high
crosswinds may also make the steering
seem to wander or pull.
Adaptive Learning
The electronic power steering system
adaptive learning helps correct road
irregularities and improves overall handling
and steering feel. It communicates with
the brake system to help operate
advanced stability control and accident
avoidance systems. Additionally, whenever
the battery is disconnected or a new
battery installed, you must drive your
vehicle a short distance before the system
relearns the strategy and reactivates all
systems. PRE-COLLISION ASSIST WARNINGS
At all times, you are responsible for
controlling your vehicle, supervising
the system and intervening, if
required. Failure to take care may result in
the loss of control of your vehicle, serious
personal injury or death. The system does not detect cyclists,
animals, pedestrians at night or
vehicles that are driving in a different
direction. Failure to take care may result in
the loss of control of your vehicle, serious
personal injury or death. The system does not operate during
hard acceleration or steering. Failure
to take care may lead to a crash or
personal injury. The system may fail or operate with
reduced function during cold and
severe weather conditions. Snow,
ice, rain, spray and fog can adversely affect
the system. Keep the front camera and
radar free of snow and ice. Failure to take
care may result in the loss of control of
your vehicle, serious personal injury or
death. In situations where the vehicle
camera has limited detection
capability, this may reduce system
performance. These situations include but
are not limited to direct or low sunlight,
vehicles at night without tail lights,
unconventional vehicle types, pedestrians
with complex backgrounds, running
pedestrians, partly obscured pedestrians,
or pedestrians that the system cannot
distinguish from a group. Failure to take
care may result in the loss of control of
your vehicle, serious personal injury or
death.
213
Fusion (CC7) Canada/United States of America, enUSA, First Printing Driving Aids
Page 234 of 528
ROADSIDE ASSISTANCE
Vehicles Sold in the United States:
Getting Roadside Assistance
To fully assist you should you have a
vehicle concern, Ford Motor Company
offers a complimentary roadside
assistance program. This program is
separate from the New Vehicle Limited
Warranty. The service is available:
•
24 hours a day, seven days a week.
• For the coverage period listed on the
Roadside Assistance Card included in
your Owner's Manual portfolio.
Roadside Assistance covers:
• A flat tire change with a good spare, if
provided with the vehicle (except
vehicles supplied with a tire inflation
kit).
• Battery jump start.
• Lock-out assistance (key replacement
cost is the customer's responsibility).
• Fuel delivery — independent service
contractors, if not prohibited by state,
local or municipal law, shall deliver up
to 2 gal (7.6 L) of gasoline or 5 gal
(18.9 L) of diesel fuel to a disabled
vehicle. Roadside Assistance limits fuel
delivery service to two no-charge
occurrences within a 12-month period.
• Winch out — available within
100 ft
(30.5 m) of a paved or county
maintained road, no recoveries.
• Towing — independent service
contractors, if not prohibited by state,
local or municipal law, shall tow Ford
eligible vehicles to an authorized dealer
within
35 mi (56 km) of the
disablement location or to the nearest authorized dealer. If a member
requests a tow to an authorized dealer
that is more than
35 mi (56 km) from
the disablement location, the member
shall be responsible for any mileage
costs in excess of
35 mi (56 km).
Roadside Assistance includes up to $200
for a towed trailer if the disabled eligible
vehicle requires service at the nearest
authorized dealer. If the towing vehicle is
operational but the trailer is not, then the
trailer does not qualify for any roadside
services.
Vehicles Sold in the United States:
Using Roadside Assistance
Complete the roadside assistance
identification card and place it in your
wallet for quick reference. This card is in
the owner's information portfolio in the
glove compartment.
United States Ford vehicle customers who
require Roadside Assistance, call
1-800-241-3673.
If you need to arrange roadside assistance
for yourself, Ford Motor Company
reimburses a reasonable amount for
towing to the nearest dealership within
35 mi (56 km)
. To obtain reimbursement
information, United States Ford vehicle
customers call 1-800-241-3673.
Customers need to submit their original
receipts.
Vehicles Sold in Canada: Getting
Roadside Assistance
To fully assist you should you have a
vehicle concern, Ford Motor Company of
Canada, Limited offers a complimentary
roadside assistance program. This program
is eligible within Canada or the continental
United States.
231
Fusion (CC7) Canada/United States of America, enUSA, First Printing Roadside Emergencies
Page 235 of 528
This program is separate from the New
Vehicle Limited Warranty, but the coverage
is concurrent with the powertrain coverage
period of your vehicle.
Canadian customers who require roadside
assistance, call 1-800-665-2006.
Vehicles Sold in Canada: Using
Roadside Assistance
Complete the roadside assistance
identification card and place it in your
wallet for quick reference.
In Canada, this card is found in the
Warranty Guide in the glove compartment
of your vehicle.
Vehicles Sold in Canada: Roadside
Assistance Program Coverage
The service is available 24 hours a day,
seven days a week.
Canadian roadside coverage and benefits
may differ from the U.S. coverage.
For complete program coverage details
you may contact your dealer, you can call
us in Canada at 1-800-665-2006, or visit
our website at www.ford.ca.
HAZARD WARNING FLASHERS
Note:
If used when the vehicle is not
running, the battery will lose charge. There
may be insufficient power to restart your
vehicle. The hazard warning button is
located on the instrument panel.
Use it when your vehicle is
creating a safety hazard for other
motorists.
• Press the button to turn on the hazard
warning function, and the front and
rear direction indicators will flash.
• Press the button again to turn them
off. FUEL SHUTOFF WARNING
Failure to inspect and, if necessary,
repair fuel leaks after a collision may
increase the risk of fire and serious
injury. Ford Motor Company recommends
that the fuel system be inspected by an
authorized dealer after any collision. In the event of a moderate to severe
collision, this vehicle includes a fuel pump
shutoff feature that stops the flow of fuel
to the engine. Not every impact will cause
a shutoff.
Should your vehicle shut off after a
collision, you may restart your vehicle. For
vehicles equipped with a key system:
1. Switch off the ignition.
2. Switch on the ignition.
3. Repeat Steps 1 and 2 to re-enable the
fuel pump.
For vehicles equipped with a push button
start system:
1. Press the START/STOP button to
switch off the ignition.
2. Press the brake pedal and press the START/STOP
button to switch on the
ignition.
3. Remove your foot from the brake pedal
and press the
START/STOP button
to switch off the ignition.
4. You can either attempt to start the engine by pressing the brake pedal and
the
START/STOP button, or switch
on the ignition only by pressing the
START/STOP
button without
pressing the brake pedal. Both ways
re-enable the fuel system.
232
Fusion (CC7) Canada/United States of America, enUSA, First Printing Roadside Emergencies
Page 236 of 528
Note:
When you try to restart your vehicle
after a fuel shutoff, the vehicle makes sure
that various systems are safe to restart.
Once your vehicle determines that the
systems are safe, then the vehicle will allow
you to restart.
Note: In the event that your vehicle does
not restart after your third attempt, contact
an authorized dealer.
JUMP STARTING THE VEHICLE WARNINGS
Batteries normally produce explosive
gases which can cause personal
injury. Therefore, do not allow
flames, sparks or lighted substances to
come near the battery. When working near
the battery, always shield your face and
protect your eyes. Always provide correct
ventilation. Keep batteries out of reach of
children. Batteries contain sulfuric
acid. Avoid contact with skin, eyes or
clothing. Shield your eyes when working
near the battery to protect against possible
splashing of acid solution. In case of acid
contact with skin or eyes, flush
immediately with water for a minimum of
15 minutes and get prompt medical
attention. If acid is swallowed, call a
physician immediately. Use only adequately sized cables
with insulated clamps.
Preparing Your Vehicle
Do not attempt to push-start your
automatic transmission vehicle.
Note:
Attempting to push-start a vehicle
with an automatic transmission may cause
transmission damage.
Note: Use only a 12-volt supply to start your
vehicle. Note:
Do not disconnect the battery of the
disabled vehicle as this could damage the
vehicle electrical system.
Park the booster vehicle close to the hood
of the disabled vehicle, making sure the
two vehicles do not touch.
Connecting the Jumper Cables WARNINGS
Do not attach the cables to fuel lines,
engine rocker covers, the intake
manifold or electrical components
as grounding points. Stay clear of moving
parts. To avoid reverse polarity
connections, make sure that you correctly
identify the positive (+) and negative (-)
terminals on both the disabled and booster
vehicles before connecting the cables. Do not attach the end of the positive
cable to the studs or L-shaped eyelet
located above the positive (+)
terminal of your vehicle ’s battery. High
current may flow through and cause
damage to the fuses. Do not connect the end of the
second cable to the negative (-)
terminal of the battery to be jumped.
A spark may cause an explosion of the
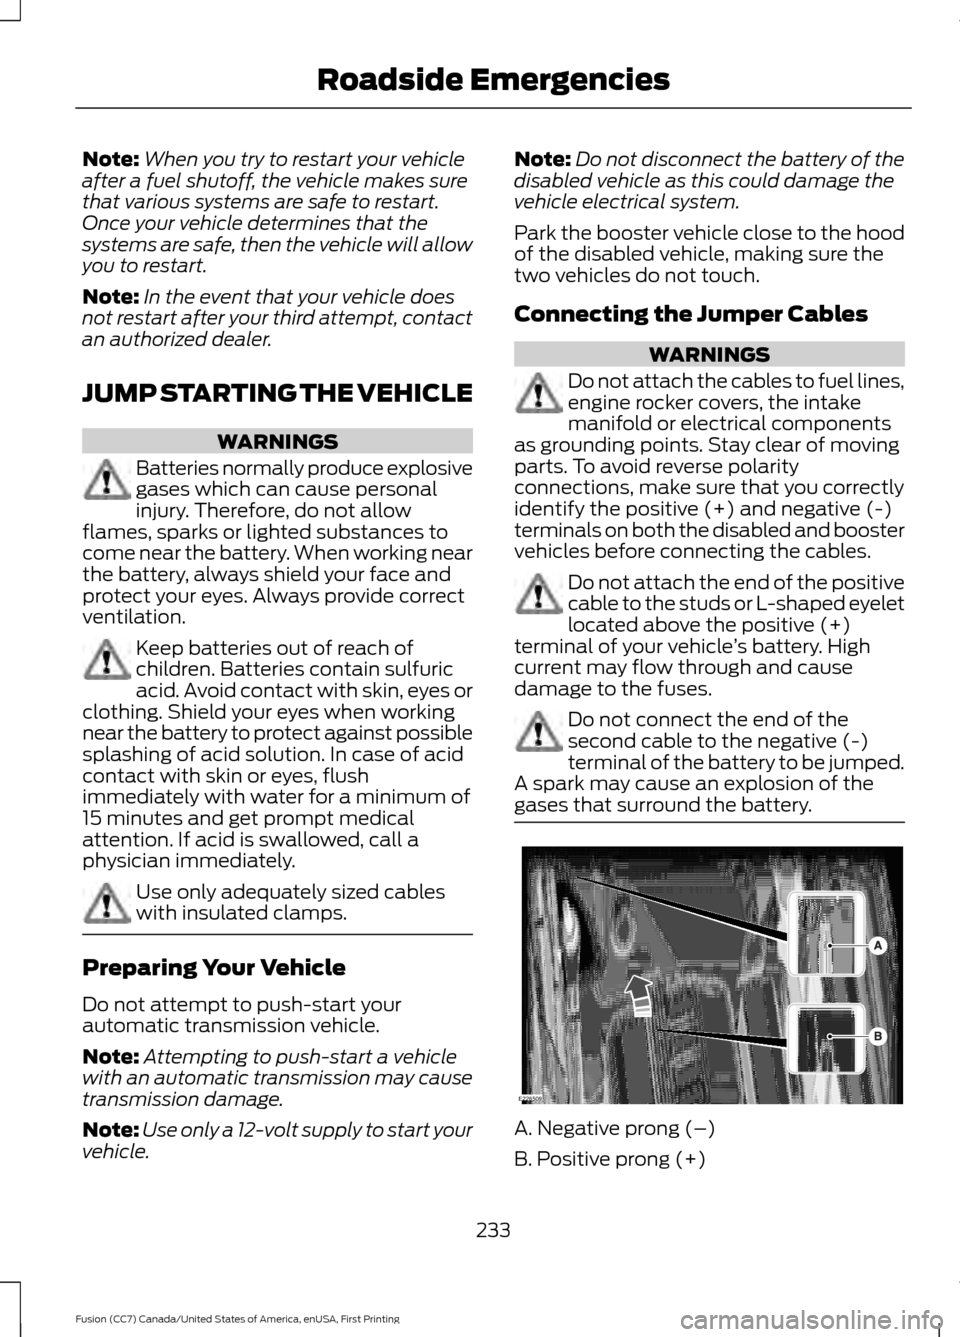
gases that surround the battery. A. Negative prong (–)
B. Positive prong (+)
233
Fusion (CC7) Canada/United States of America, enUSA, First Printing Roadside EmergenciesE226509
Page 237 of 528
Note:
Remove the red cap from the positive
prong (B) on your vehicle before connecting
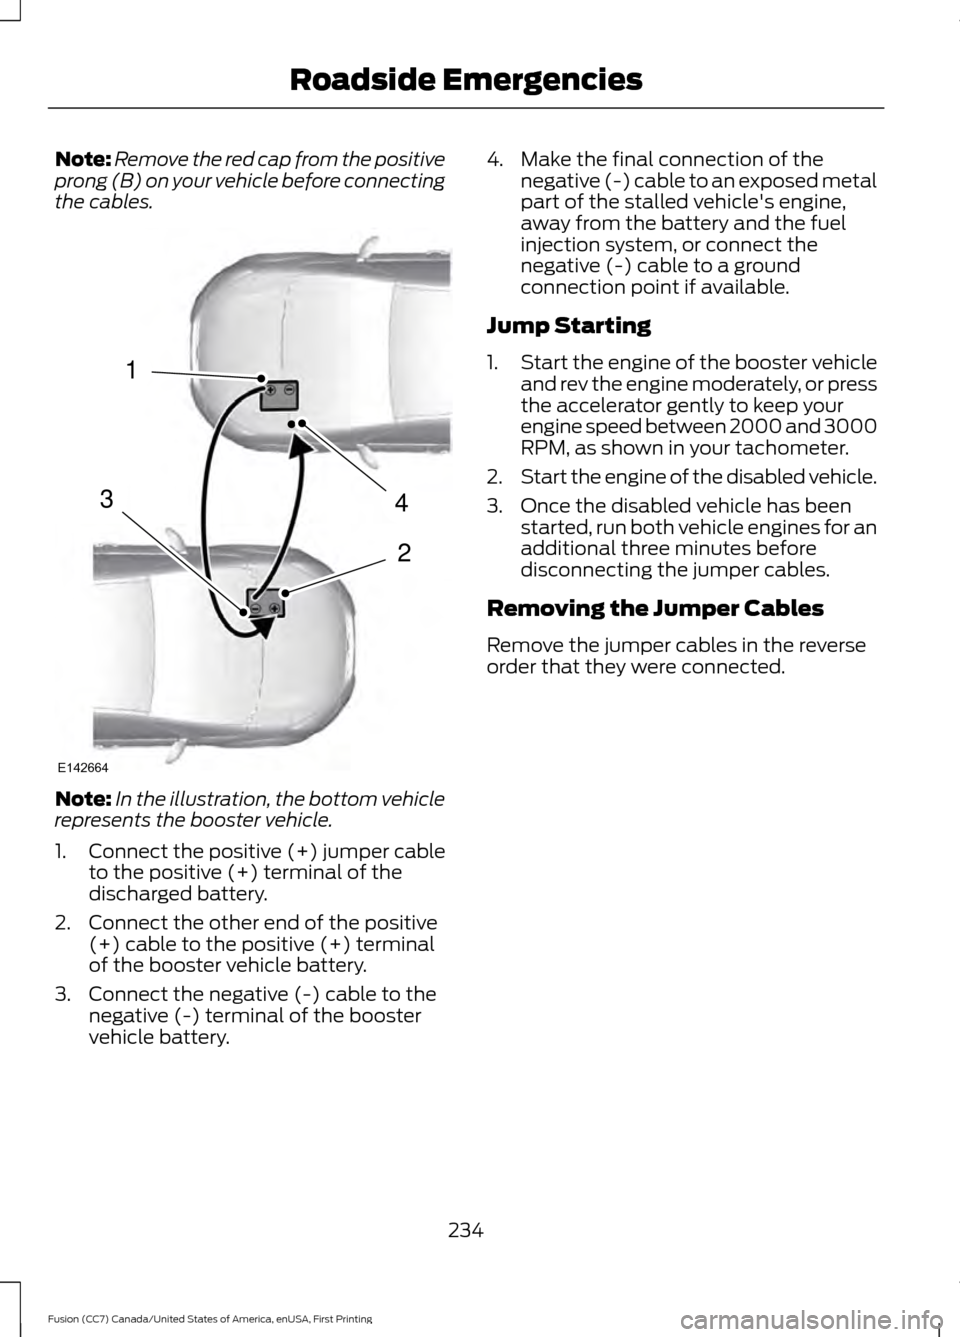
the cables. Note:
In the illustration, the bottom vehicle
represents the booster vehicle.
1. Connect the positive (+) jumper cable
to the positive (+) terminal of the
discharged battery.
2. Connect the other end of the positive (+) cable to the positive (+) terminal
of the booster vehicle battery.
3. Connect the negative (-) cable to the negative (-) terminal of the booster
vehicle battery. 4. Make the final connection of the
negative (-) cable to an exposed metal
part of the stalled vehicle's engine,
away from the battery and the fuel
injection system, or connect the
negative (-) cable to a ground
connection point if available.
Jump Starting
1. Start the engine of the booster vehicle
and rev the engine moderately, or press
the accelerator gently to keep your
engine speed between 2000 and 3000
RPM, as shown in your tachometer.
2. Start the engine of the disabled vehicle.
3. Once the disabled vehicle has been started, run both vehicle engines for an
additional three minutes before
disconnecting the jumper cables.
Removing the Jumper Cables
Remove the jumper cables in the reverse
order that they were connected.
234
Fusion (CC7) Canada/United States of America, enUSA, First Printing Roadside Emergencies4
2
1
3
E142664