stop start FORD FUSION ENERGI 2019 Owner's Manual
[x] Cancel search | Manufacturer: FORD, Model Year: 2019, Model line: FUSION ENERGI, Model: FORD FUSION ENERGI 2019Pages: 541, PDF Size: 7.19 MB
Page 168 of 541
Your vehicle may not pass the I/M test if
the service engine soon indicator is on or
not working properly (bulb is burned out),
or if the OBD-II system has determined
that some of the emission control systems
have not been properly checked. In this
case, the vehicle is not ready for I/M
testing.
If the vehicle
’s engine or transmission has
just been serviced, or the battery has
recently run down or been replaced, the
OBD-II system may indicate that the
vehicle is not ready for I/M testing. To
determine if the vehicle is ready for I/M
testing, turn the ignition key to the on
position for 15 seconds without cranking
the engine. If the service engine soon
indicator blinks eight times, it means that
the vehicle is not ready for I/M testing; if
the service engine soon indicator stays on
solid, it means that your vehicle is ready
for I/M testing.
The OBD-II system checks the emission
control system during normal driving. A
complete check may take several days.
If the vehicle is not ready for I/M testing,
you can perform the following driving cycle
consisting of mixed city and highway
driving:
1. 15 minutes of steady driving on an expressway or highway followed by 20
minutes of stop-and-go driving with at
least four 30-second idle periods.
2. Allow your vehicle to sit for at least eight hours with the ignition off. Then,
start the vehicle and complete the
above driving cycle. The vehicle must
warm up to its normal operating
temperature. Once started, do not turn
off the vehicle until the above driving
cycle is complete.
If the vehicle is still not ready for I/M
testing, you need to repeat the above
driving cycle.
165
Fusion Energi (CC7) Hybrid Electric Vehicle (HEV)/Plug-In Hybrid Electric Vehicle (PHEV), Canada/United States of America, enUSA, Edition date: 201805, First-Printing Engine Emission Control
Page 175 of 541
Note:
If the system detects a vehicle
charging system fault at any point in a
charge cycle, the entire light ring will flash
continuously for one minute and then turn
off. If this happens, unplug the charging
coupler and then plug it back into the charge
port receptacle. If the problem persists,
contact an authorized dealer.
You can modify the lighting ring. Refer to
the Charge Port Light Ring Settings. See
SYNC™ 3 (page 370).
Disconnecting the Charging Coupler
Note: Do not pull the wall plug from the
wall while your vehicle is charging. Doing so
may damage the outlet and the cord.
1. Remove the lock from the charging coupler button.
2. Press the button on the charging coupler.
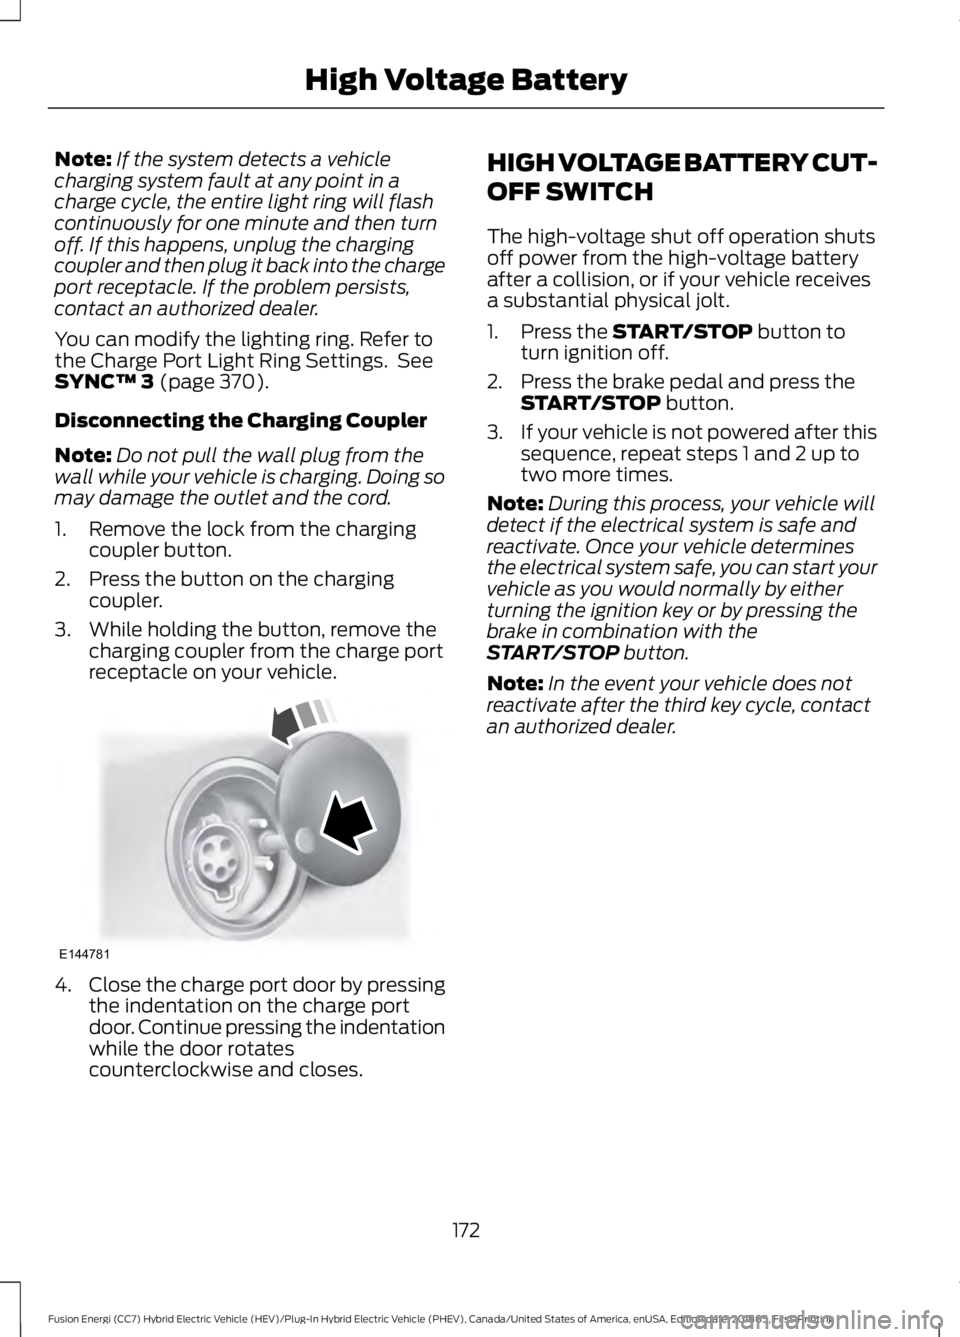
3. While holding the button, remove the charging coupler from the charge port
receptacle on your vehicle. 4.
Close the charge port door by pressing
the indentation on the charge port
door. Continue pressing the indentation
while the door rotates
counterclockwise and closes. HIGH VOLTAGE BATTERY CUT-
OFF SWITCH
The high-voltage shut off operation shuts
off power from the high-voltage battery
after a collision, or if your vehicle receives
a substantial physical jolt.
1. Press the
START/STOP button to
turn ignition off.
2. Press the brake pedal and press the START/STOP
button.
3. If your vehicle is not powered after this
sequence, repeat steps 1 and 2 up to
two more times.
Note: During this process, your vehicle will
detect if the electrical system is safe and
reactivate. Once your vehicle determines
the electrical system safe, you can start your
vehicle as you would normally by either
turning the ignition key or by pressing the
brake in combination with the
START/STOP
button.
Note: In the event your vehicle does not
reactivate after the third key cycle, contact
an authorized dealer.
172
Fusion Energi (CC7) Hybrid Electric Vehicle (HEV)/Plug-In Hybrid Electric Vehicle (PHEV), Canada/United States of America, enUSA, Edition date: 201805, First-Printing High Voltage BatteryE144781
Page 177 of 541
Your vehicle has a feature that
automatically shifts your vehicle into park
(P) when any of the following conditions
occur:
•
You turn the vehicle off.
• You open the driver's door with your
seatbelt unlatched.
• Your seatbelt is unlatched when the
driver's door is open.
If you turn your vehicle off when moving,
your vehicle first shifts into neutral (N) until
it slows down enough to shift into park (P)
automatically.
Note: If you have waited an extended
period of time (2-15 minutes) before starting
your vehicle, unlatching your seatbelt causes
this feature to activate, even with the
driver's door closed.
Note: This feature may not work properly
if the door ajar switch is malfunctioning. If
your door ajar indicator does not illuminate
when you open the driver ’s door or the
indicator illuminates with the driver ’s door
closed, see your authorized dealer.
Reverse (R)
With the transmission selector in reverse
(R), your vehicle moves backward. Always
come to a complete stop before shifting
into and out of reverse (R).
Neutral (N)
With the transmission selector in neutral
(N), your vehicle can be started and is free
to roll. Hold the brake pedal down when in
this position.
Stay in Neutral Mode
Note: Always put your vehicle in Stay in
Neutral mode when entering an automatic
car wash. Failure to do this could result in
vehicle damage not covered by warranty. Note:
When entering an automatic car
wash, always shift to Neutral (N). If you are
exiting the vehicle before the car wash, Stay
in Neutral Mode is available.
Stay in Neutral mode allows your vehicle
to stay in neutral when you exit your
vehicle. Your vehicle must be stationary to
enter this mode.
To enter Stay in Neutral mode:
1. Switch your vehicle on but do not start
the engine. See Keyless Starting
(page 143).
2. Place your foot on the brake pedal and
rotate the transmission selector to
neutral (N).
Note: When in neutral (N), a message
appears in the display screen informing you
how to access Stay in Neutral mode.
3. Press either the low (L) or sport (S) button in the middle of the
transmission selector to enter Stay in
Neutral mode.
A message appears in the display screen
confirming your vehicle is in Stay in Neutral
mode. The neutral (N) indicator light on
the transmission selector also flashes.
To exit Stay in Neutral mode, place your
foot on the brake pedal and rotate the
transmission selector to park (P).
Drive (D)
Drive (D) is the normal driving position for
the best fuel economy.
Grade Assist Press the grade assist button to
activate grade assist. The grade
assist lamp appears in the
instrument cluster. Press the button again
to switch it off.
174
Fusion Energi (CC7) Hybrid Electric Vehicle (HEV)/Plug-In Hybrid Electric Vehicle (PHEV), Canada/United States of America, enUSA, Edition date: 201805, First-Printing TransmissionE144523
Page 180 of 541
GENERAL INFORMATION
Note:
Occasional brake noise is normal. If
a metal-to-metal, continuous grinding or
continuous squeal sound is present, the
brake linings may be worn-out and an
authorized dealer should check them. If the
vehicle has continuous vibration or shudder
in the steering wheel while braking, an
authorized dealer should check your vehicle.
Note: Brake dust may accumulate on the
wheels, even under normal driving
conditions. Some dust is inevitable as the
brakes wear and does not contribute to
brake noise. See Cleaning the Wheels
(page 279). See
Warning Lamps and
Indicators (page 93).
Wet brakes result in reduced braking
efficiency. Gently press the brake pedal a
few times when driving from a car wash or
standing water to dry the brakes.
Brake Over Accelerator
In the event the accelerator pedal
becomes stuck or entrapped, apply steady
and firm pressure to the brake pedal to
slow the vehicle and reduce engine power.
If you experience this condition, apply the
brakes and bring your vehicle to a safe
stop. Switch the engine off, move the
transmission to park (P) and apply the
parking brake. Inspect the accelerator
pedal and the area around it for any items
or debris that may be obstructing its
movement.If none are found and the
condition persists, have your vehicle towed
to the nearest authorized dealer. Emergency Brake Assist
Emergency brake assist detects when you
brake heavily by measuring the rate at
which you press the brake pedal. It
provides maximum braking efficiency as
long as you press the pedal. Emergency
brake assist can reduce stopping distances
in critical situations.
Anti-lock Brake System
This system helps you maintain steering
control during emergency stops by keeping
the brakes from locking.
This lamp momentarily
illuminates when you switch the
ignition on. If the light does not
illuminate during start up, remains on or
flashes, the anti-lock braking system may
be disabled. Have the system checked by
an authorized dealer. If the anti-lock brake
system is disabled, normal braking is still
effective. If the brake warning lamp
illuminates with the parking
brake released, have your brake
system serviced immediately.
It also illuminates momentarily when you
switch the ignition on to confirm the lamp
is functional. If it does not illuminate when
you switch the ignition on, or begins to
flash at any time, have the system checked
by an authorized dealer.
HINTS ON DRIVING WITH
ANTI-LOCK BRAKES
The anti-lock braking system does not
eliminate the risks when:
• You drive too closely to the vehicle in
front of you.
• Your vehicle is hydroplaning.
177
Fusion Energi (CC7) Hybrid Electric Vehicle (HEV)/Plug-In Hybrid Electric Vehicle (PHEV), Canada/United States of America, enUSA, Edition date: 201805, First-Printing BrakesE138644 E138644
Page 233 of 541
Vehicles Sold in Canada: Getting
Roadside Assistance
To fully assist you should you have a
vehicle concern, Ford Motor Company of
Canada, Limited offers a complimentary
roadside assistance program. This
program is eligible within Canada or the
continental United States.
This program is separate from the New
Vehicle Limited Warranty, but the coverage
is concurrent with the powertrain coverage
period of your vehicle.
Canadian customers who require roadside
assistance, call 1-800-665-2006.
Vehicles Sold in Canada: Using
Roadside Assistance
Complete the roadside assistance
identification card and place it in your
wallet for quick reference.
In Canada, this card is found in the
Warranty Guide in the glove compartment
of your vehicle.
Vehicles Sold in Canada: Roadside
Assistance Program Coverage
The service is available 24 hours a day,
seven days a week.
Canadian roadside coverage and benefits
may differ from the U.S. coverage.
If you require more information, please
refer to the coverage section of your
warranty guide, call us in Canada at
1-800-665-2006, or visit our website at
www.ford.ca.
HAZARD FLASHERS
Note:
The hazard flashers operate when
the ignition is in any position, or if the key is
not in the ignition. If used when the vehicle
is not running, the battery loses charge. As
a result, there may be insufficient power to
restart your vehicle. The flasher control is on the
instrument panel. Use your
hazard flashers when your
vehicle is creating a safety hazard for other
motorists.
• Press the flasher control and all front
and rear direction indicators flash.
• Press the button again to switch them
off.
FUEL SHUTOFF WARNING: If your vehicle has been
involved in a crash, have the fuel system
checked. Failure to follow this instruction
could result in fire, personal injury or death.
Note: When you try to restart your vehicle
after a fuel shutoff, the vehicle makes sure
that various systems are safe to restart.
Once the vehicle determines the systems
are safe, then the vehicle allows you to
restart.
Note: In the event that your vehicle does
not restart after your third attempt, contact
a qualified technician.
The fuel pump shutoff stops the flow of
fuel to the engine in the event of a
moderate to severe crash. Not every
impact causes a shutoff.
Should your vehicle shut off after a crash,
you may restart your vehicle.
230
Fusion Energi (CC7) Hybrid Electric Vehicle (HEV)/Plug-In Hybrid Electric Vehicle (PHEV), Canada/United States of America, enUSA, Edition date: 201805, First-Printing Roadside Emergencies
Page 234 of 541
1. Press START/STOP to switch off your
vehicle.
2. Press the brake pedal and START/STOP
to switch on your
vehicle.
3. Check the information display for the Ready to Drive light as the gasoline
engine may not start, but the electric
motor may be running. If you do not see
the Ready to Drive light, repeat Steps
1 and 2 up to two more times.
JUMP STARTING THE VEHICLE WARNING:
Batteries normally
produce explosive gases which can cause
personal injury. Therefore, do not allow
flames, sparks or lighted substances to
come near the battery. When working near
the battery, always shield your face and
protect your eyes. Always provide correct
ventilation. WARNING:
Keep batteries out of
reach of children. Batteries contain sulfuric
acid. Avoid contact with skin, eyes or
clothing. Shield your eyes when working
near the battery to protect against possible
splashing of acid solution. In case of acid
contact with skin or eyes, flush
immediately with water for a minimum of
15 minutes and get prompt medical
attention. If acid is swallowed, call a
physician immediately. WARNING:
Use only adequately
sized cables with insulated clamps.
Preparing Your Vehicle
Do not attempt to push-start your
automatic transmission vehicle. Note:
Attempting to push-start a vehicle
with an automatic transmission may cause
transmission damage.
Note: Use only a 12-volt supply to start your
vehicle.
Note: Do not disconnect the battery of the
disabled vehicle as this could damage the
vehicle electrical system.
Park the booster vehicle close to the hood
of the disabled vehicle, making sure the
two vehicles do not touch.
Connecting the Jumper Cables WARNING:
Do not connect the end
of the second cable to the negative (-)
terminal of the battery to be jumped. A
spark may cause an explosion of the gases
that surround the battery. WARNING:
Do not use fuel lines,
engine valve covers, windshield wiper
arms, the intake manifold, or hood latch
as ground points.
Note: Your vehicle has two battery prongs
that are accessible from under the hood,
even though the actual battery is located in
the trunk. You can jump start your vehicle
the same way conventional vehicles can be
using these prongs.
Note: Do not attach the end of the positive
cable to the studs or L-shaped eyelet
located above the positive (+) terminal of
your vehicle ’s battery. High current may flow
through and cause damage to the fuses.
Note: To avoid reverse polarity connections,
make sure that you correctly identify the
positive (+) and negative (-) terminals on
both the disabled and booster vehicles
before connecting the cables.
231
Fusion Energi (CC7) Hybrid Electric Vehicle (HEV)/Plug-In Hybrid Electric Vehicle (PHEV), Canada/United States of America, enUSA, Edition date: 201805, First-Printing Roadside Emergencies
Page 255 of 541
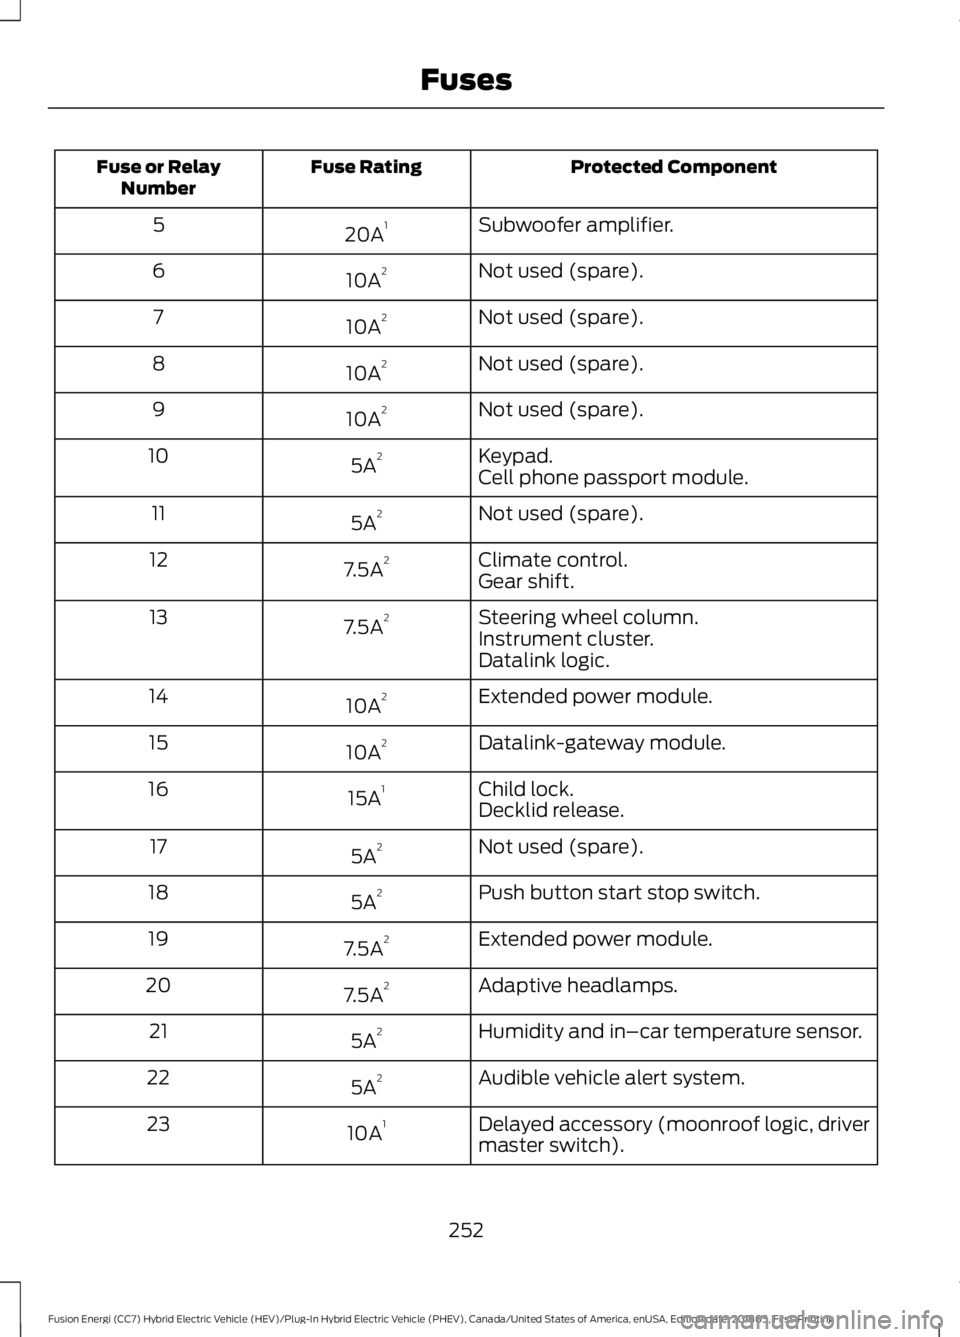
Protected Component
Fuse Rating
Fuse or Relay
Number
Subwoofer amplifier.
20A 1
5
Not used (spare).
10A 2
6
Not used (spare).
10A 2
7
Not used (spare).
10A 2
8
Not used (spare).
10A 2
9
Keypad.
5A 2
10
Cell phone passport module.
Not used (spare).
5A 2
11
Climate control.
7.5A 2
12
Gear shift.
Steering wheel column.
7.5A 2
13
Instrument cluster.
Datalink logic.
Extended power module.
10A 2
14
Datalink-gateway module.
10A 2
15
Child lock.
15A 1
16
Decklid release.
Not used (spare).
5A 2
17
Push button start stop switch.
5A 2
18
Extended power module.
7.5A 2
19
Adaptive headlamps.
7.5A 2
20
Humidity and in–car temperature sensor.
5A 2
21
Audible vehicle alert system.
5A 2
22
Delayed accessory (moonroof logic, driver
master switch).
10A 1
23
252
Fusion Energi (CC7) Hybrid Electric Vehicle (HEV)/Plug-In Hybrid Electric Vehicle (PHEV), Canada/United States of America, enUSA, Edition date: 201805, First-Printing Fuses
Page 288 of 541
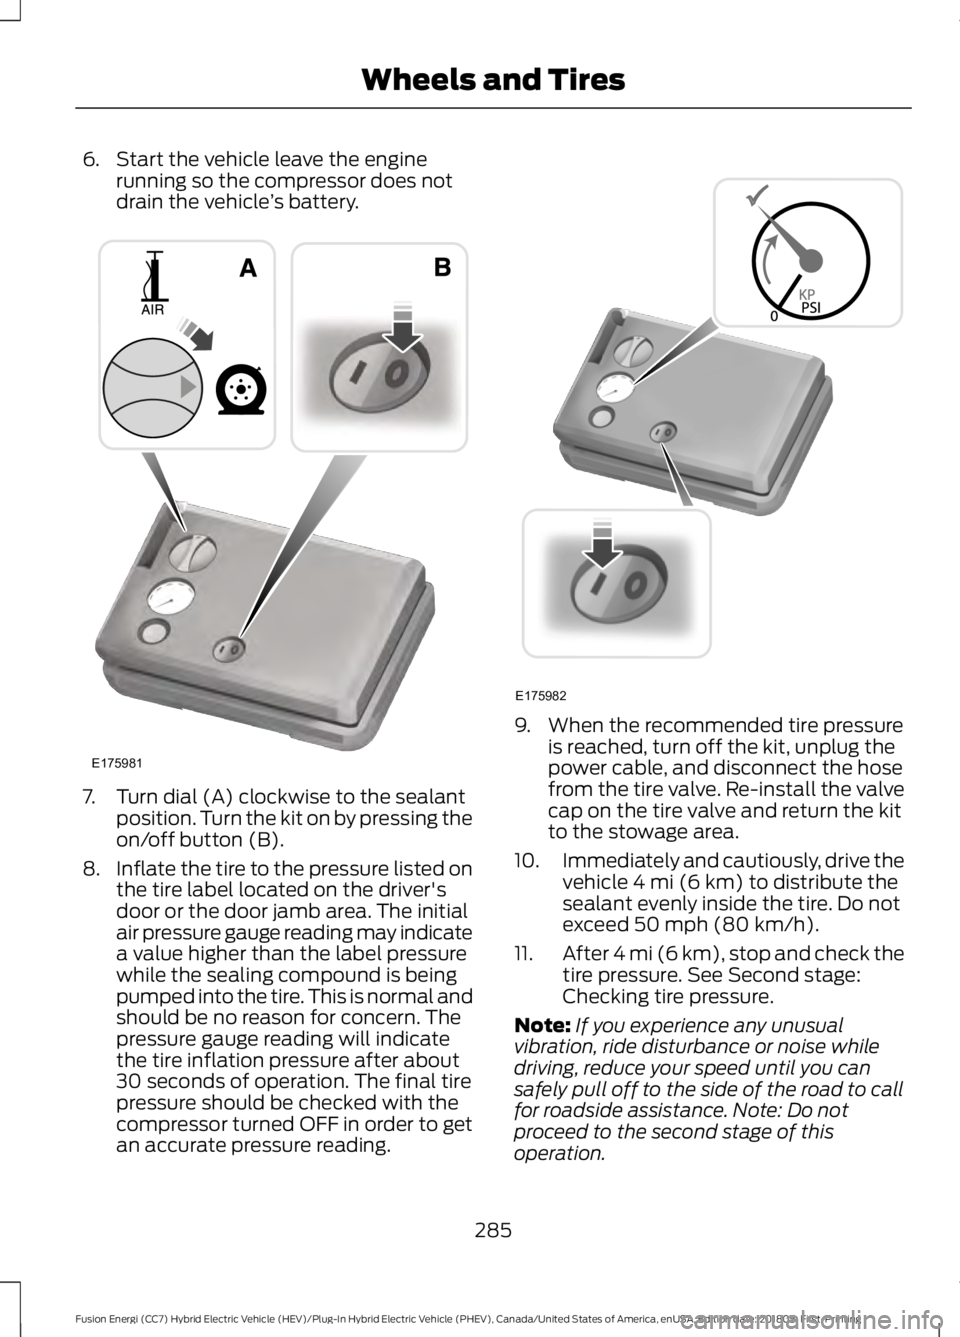
6. Start the vehicle leave the engine
running so the compressor does not
drain the vehicle ’s battery. 7. Turn dial (A) clockwise to the sealant
position. Turn the kit on by pressing the
on/off button (B).
8. Inflate the tire to the pressure listed on
the tire label located on the driver's
door or the door jamb area. The initial
air pressure gauge reading may indicate
a value higher than the label pressure
while the sealing compound is being
pumped into the tire. This is normal and
should be no reason for concern. The
pressure gauge reading will indicate
the tire inflation pressure after about
30 seconds of operation. The final tire
pressure should be checked with the
compressor turned OFF in order to get
an accurate pressure reading. 9. When the recommended tire pressure
is reached, turn off the kit, unplug the
power cable, and disconnect the hose
from the tire valve. Re-install the valve
cap on the tire valve and return the kit
to the stowage area.
10. Immediately and cautiously, drive the
vehicle 4 mi (6 km) to distribute the
sealant evenly inside the tire. Do not
exceed
50 mph (80 km/h).
11. After 4 mi (6 km), stop and check the
tire pressure. See Second stage:
Checking tire pressure.
Note: If you experience any unusual
vibration, ride disturbance or noise while
driving, reduce your speed until you can
safely pull off to the side of the road to call
for roadside assistance. Note: Do not
proceed to the second stage of this
operation.
285
Fusion Energi (CC7) Hybrid Electric Vehicle (HEV)/Plug-In Hybrid Electric Vehicle (PHEV), Canada/United States of America, enUSA, Edition date: 201805, First-Printing Wheels and TiresE175981 E175982
Page 304 of 541
It is recommended that the two
front tires or two rear tires
generally be replaced as a pair.
The tire pressure sensors mounted
in the wheels (originally installed
on your vehicle) are not designed
to be used in aftermarket wheels.
The use of wheels or tires not
recommended by Ford Motor
Company may affect the
operation of your tire pressure
monitoring system.
If the tire pressure monitoring
system indicator is flashing, the
system is malfunctioning. Your
replacement tire might be
incompatible with your tire
pressure monitoring system, or
some component of the system
may be damaged.
Safety Practices
WARNING: If your vehicle is
stuck in snow, mud or sand, do not
rapidly spin the tires; spinning the
tires can tear the tire and cause
an explosion. A tire can explode in
as little as three to five seconds. WARNING:
Do not spin the
wheels at over 34 mph (55 km/h).
The tires may fail and injure a
passenger or bystander.
Driving habits have a great deal
to do with your tire mileage and
safety.
*Observe posted speed limits *Avoid fast starts, stops and turns
*Avoid potholes and objects on
the road
*Do not run over curbs or hit the
tire against a curb when parking
Highway Hazards
No matter how carefully you drive
there
’s always the possibility that
you may eventually have a flat tire
on the highway. Drive slowly to the
closest safe area out of traffic.
This may further damage the flat
tire, but your safety is more
important.
If you feel a sudden vibration or
ride disturbance while driving, or
you suspect your tire or vehicle
has been damaged, immediately
reduce your speed. Drive with
caution until you can safely pull
off the road. Stop and inspect the
tires for damage. If you cannot
detect a cause, have the vehicle
towed to the nearest repair facility
or tire dealer to have the vehicle
inspected.
Tire and Wheel Alignment
A bad jolt from hitting a curb or
pothole can cause the front end
of your vehicle to become
misaligned or cause damage to
your tires. If your vehicle seems to
pull to one side when you’re
driving, the wheels may be out of
alignment. Have an authorized
dealer check the wheel alignment
periodically.
301
Fusion Energi (CC7) Hybrid Electric Vehicle (HEV)/Plug-In Hybrid Electric Vehicle (PHEV), Canada/United States of America, enUSA, Edition date: 201805, First-Printing Wheels and Tires
Page 307 of 541
Note:
If the tire pressure monitoring system
sensor becomes damaged, it may not
function. Each tire, including the spare (if
provided), should be checked
monthly when cold and inflated
to the inflation pressure recommended by
the vehicle manufacturer on the vehicle
placard or tire inflation pressure label. (If
your vehicle has tires of a different size
than the size indicated on the vehicle
placard or tire inflation pressure label, you
should determine the proper tire inflation
pressure for those tires).
As an added safety feature, your vehicle
has been equipped with a Tire Pressure
Monitoring System (TPMS) that
illuminates a low tire pressure telltale
when one or more of your tires is
significantly under-inflated. Accordingly,
when the low tire pressure telltale
illuminates, you should stop and check
your tires as soon as possible, and inflate
them to the proper pressure. Driving on a
significantly under-inflated tire causes the
tire to overheat and can lead to tire failure.
Under-inflation also reduces fuel efficiency
and tire tread life, and may affect the
vehicle ’s handling and stopping ability.
Please note that the TPMS is not a
substitute for proper tire maintenance, and
it is the driver ’s responsibility to maintain
correct tire pressure, even if under-inflation
has not reached the level to trigger
illumination of the TPMS low tire pressure
telltale. Your vehicle has also been equipped with
a TPMS malfunction indicator to indicate
when the system is not operating properly.
The TPMS malfunction indicator is
combined with the low tire pressure
telltale. When the system detects a
malfunction, the telltale will flash for
approximately one minute and then remain
continuously illuminated. This sequence
will continue upon subsequent vehicle
start-ups as long as the malfunction exists.
When the malfunction indicator is
illuminated, the system may not be able
to detect or signal low tire pressure as
intended. TPMS malfunctions may occur
for a variety of reasons, including the
installation of replacement or alternate
tires or wheels on the vehicle that prevent
the TPMS from functioning properly.
Always check the TPMS malfunction
telltale after replacing one or more tires or
wheels on your vehicle to ensure that the
replacement or alternate tires and wheels
allow the TPMS to continue to function
properly.
This device complies with Part 15 of the
FCC Rules and with License exempt RSS
Standards of Industry Canada. Operation
is subject to the following two conditions:
1. This device may not cause harmful
interference, and
2. This device must accept any interference received, including
interference that may cause undesired
operation.
Note: Changes or modifications not
expressively approved by the party
responsible for compliance could void the
user's authority to operate the equipment.
The term "IC:" before the radio certification
number only signifies that Industry Canada
technical specifications were met.
304
Fusion Energi (CC7) Hybrid Electric Vehicle (HEV)/Plug-In Hybrid Electric Vehicle (PHEV), Canada/United States of America, enUSA, Edition date: 201805, First-Printing Wheels and Tires