audio FORD FUSION HYBRID 2014 Owners Manual
[x] Cancel search | Manufacturer: FORD, Model Year: 2014, Model line: FUSION HYBRID, Model: FORD FUSION HYBRID 2014Pages: 473, PDF Size: 5.93 MB
Page 4 of 473
Introduction About This Manual...........................................7
Symbols Glossary.............................................7
Data Recording..................................................9
California Proposition 65..............................11
Perchlorate.........................................................11
Ford Credit..........................................................11
Replacement Parts
Recommendation ........................................11
Special Notices................................................12
Mobile Communications
Equipment .....................................................12
Export Unique Options..................................12
Child SafetyGeneral Information.......................................13
Child Seat Positioning...................................14
Booster Seats...................................................16
Installing Child Seats.....................................18
Child Safety Locks..........................................23
Safety Belts Principle of Operation...................................25
Fastening the Safety Belts..........................26
Safety Belt Height Adjustment................30
Safety Belt Warning Lamp and Indicator
Chime .............................................................30
Safety Belt Minder..........................................31
Child Restraint and Safety Belt
Maintenance ................................................32
Personal Safety System™Personal Safety System™..........................34
Supplementary Restraints
SystemPrinciple of Operation..................................35
Driver and Passenger Airbags...................36
Knee Airbag.......................................................37
Front Passenger Sensing System.............37 Side Airbags.....................................................40
Side Curtain Airbags......................................41
Crash Sensors and Airbag Indicator........42
Airbag Disposal...............................................43
Keys and Remote Controls General Information on Radio
Frequencies..................................................44
Remote Control..............................................44
Replacing a Lost Key or Remote
Control ...........................................................49
MyKey™ Principle of Operation..................................50
Creating a MyKey.............................................51
Clearing All MyKeys........................................51
Checking MyKey System Status................51
Using MyKey With Remote Start
Systems.........................................................52
MyKey Troubleshooting...............................52
Locks Locking and Unlocking.................................54
Keyless Entry....................................................57
Interior Luggage Compartment
Release..........................................................60
Security Passive Anti-Theft System..........................61
Anti-Theft Alarm............................................63
Steering Wheel Adjusting the Steering Wheel...................64
Audio Control..................................................64
Voice Control...................................................65
Cruise Control..................................................65
Information Display Control.......................65
Heated Steering Wheel...............................66
1Table of Contents
Page 7 of 473
Hazard Warning Flashers..........................225
Fuel Shutoff...................................................225
Jump-Starting the Vehicle........................225
Collision, Damage or Fire Event.............228
Post-Crash Alert System..........................230
Fuses Changing a Fuse............................................231
Fuse Specification Chart............................231
Maintenance General Information....................................241
Opening and Closing the Hood...............241
Under Hood Overview - 2.0L Hybrid.....242
Engine Oil Dipstick - 2.0L Hybrid...........244
Engine Oil Check..........................................244
Oil Change Indicator Reset......................245
Engine Coolant Check...............................245
Automatic Transmission Fluid
Check...........................................................249
Brake Fluid Check........................................249
Power Steering Fluid Check....................249
Fuel Filter........................................................249
Washer Fluid Check....................................249
Changing the 12V Battery.........................249
Checking the Wiper Blades.......................251
Changing the Wiper Blades......................251
Changing the Engine Air Filter.................252
Adjusting the Headlamps.........................253
Removing a Headlamp..............................254
Changing a Bulb...........................................255
Bulb Specification Chart..........................258
Vehicle Care General Information...................................260
Cleaning Products......................................260
Cleaning the Exterior.................................260
Repairing Minor Paint Damage...............261
Waxing ..............................................................261 Cleaning the Engine....................................262
Cleaning the Windows and Wiper
Blades..........................................................262
Cleaning the Interior...................................262
Cleaning the Instrument Panel and
Instrument Cluster Lens.......................263
Cleaning Leather Seats.............................264
Cleaning the Alloy Wheels.......................264
Vehicle Storage............................................265
Wheels and Tires Temporary Mobility Kit...............................267
Tire Care...........................................................273
Tire Pressure Monitoring System..........288
Using Snow Chains......................................291
Technical Specifications...........................292
Capacities and Specific-
ations Engine Specifications................................293
Motorcraft Parts..........................................294
Vehicle Identification Number................295
Vehicle Certification Label.......................295
Transmission Code Designation............296
Technical Specifications...........................297
Audio System General Information...................................299
Audio unit - Vehicles With:
AM/FM/CD/SYNC/Satellite
Radio...........................................................300
Audio unit - Vehicles With: Premium
AM/FM/CD ................................................302
Audio unit - Vehicles With: Sony
AM/FM/CD ................................................304
Digital Audio..................................................307
Satellite Radio...............................................310
Auxiliary Input Jack.......................................312
USB Port...........................................................313
Media Hub.......................................................313
4Table of Contents
Page 53 of 473
PRINCIPLE OF OPERATION MyKey allows you to program keys with
restricted driving modes to promote good
driving habits. All but one of the keys
programmed to the vehicle can be
activated with these restricted modes.
Any keys that have not been programmed
are referred to as administrator keys or
admin keys. These can be used to:
• create a MyKey
• program configurable MyKey settings
• clear all MyKey features.
When you have programmed a MyKey, you
can access the following information using
the information display:
• How many admin keys and MyKeys are
programmed to your vehicle.
• The total distance your vehicle has
traveled using a MyKey.
Note: All MyKeys are programmed to the
same settings. You cannot program them
individually.
Note: For vehicles with intelligent access
with push-button start, when both a MyKey
and an admin intelligent access key fob are
present, the admin fob will be recognized
by the vehicle while switching the ignition
on to start the vehicle.
Non-configurable Settings The following settings cannot be changed
by an admin key user: • Belt-Minder. You cannot disable this
feature. The audio system will mute
when the front seat occupants’ safety
belts are not fastened.
• Early low fuel. The low-fuel warning
activates earlier, giving the MyKey user
more time to refuel.
• Driver assist features, if equipped on
your vehicle, are forced on: parking aid,
blind spot information system (BLIS)
with cross traffic alert, lane departure
warning and forward collision warning
system.
Configurable Settings With an admin key, you can configure
certain MyKey settings when you first
create a MyKey and before you recycle the
key or restart the vehicle. You can also
change the settings afterward with an
admin key.
• A vehicle speed limit can be set.
Warnings will be shown in the display
followed by an audible tone when your
vehicle reaches the set speed. You
cannot override the set speed by fully
depressing the accelerator pedal or by
setting cruise control.
• Vehicle speed minders of 45, 55 or 65
mph (75, 90 or 105 km/h). Once you
select a speed, it will be shown in the
display, followed by an audible tone
when the preselected vehicle speed is
exceeded.
• Audio system maximum volume of
45%. A message will be shown in the
display when you attempt to exceed
the limited volume. Also, the
speed-sensitive or compensated
automatic volume control will be
disabled.
• Always on setting. When this is
selected, you will not be able to turn
off Advance Trac (if your vehicle is
equipped with this feature).
50MyKey™
Page 67 of 473
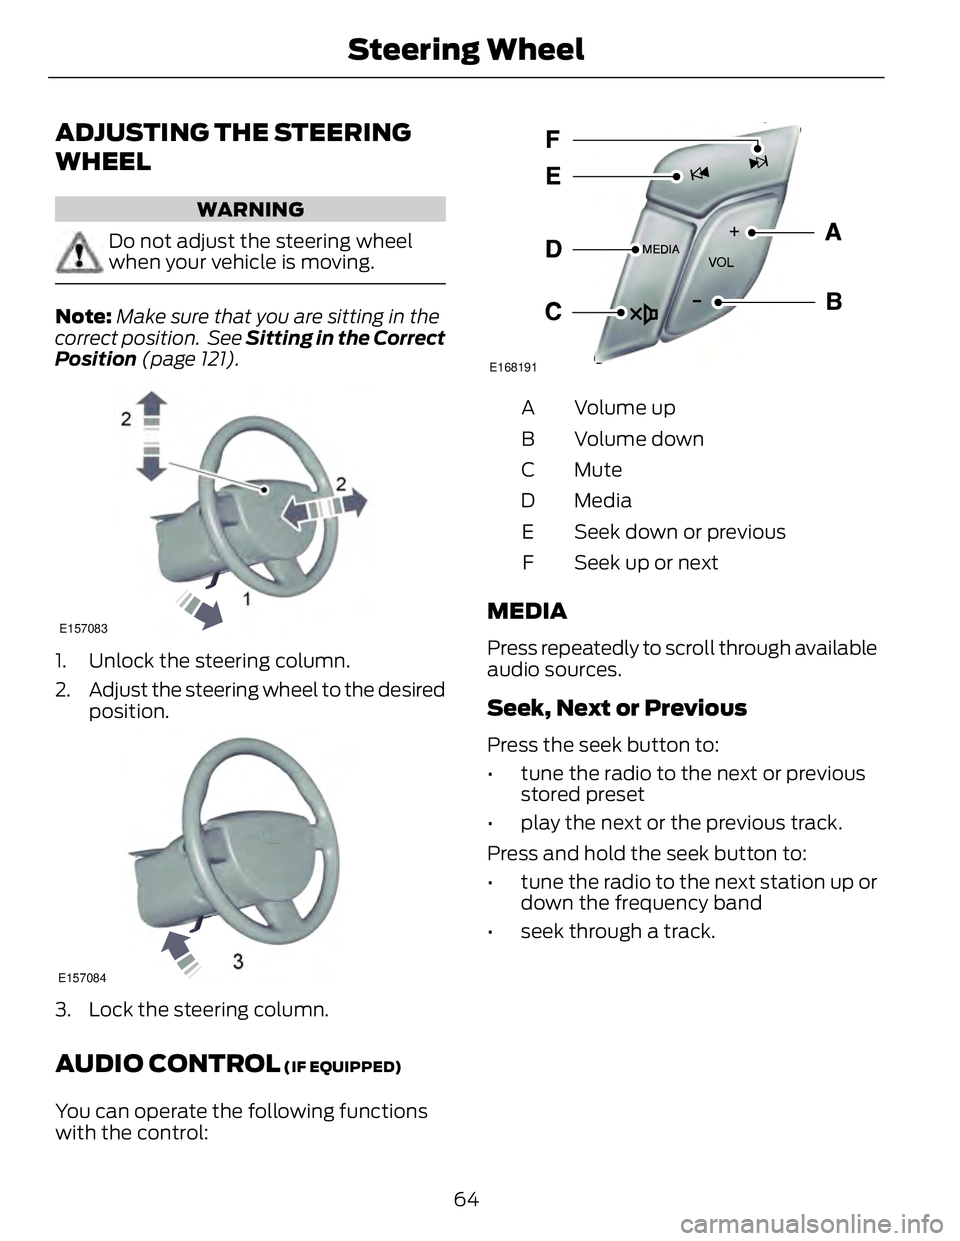
ADJUSTING THE STEERING
WHEEL WARNING
Do not adjust the steering wheel
when your vehicle is moving.
Note: Make sure that you are sitting in the
correct position. See Sitting in the Correct
Position (page 121).
2
2
1E157083
1. Unlock the steering column.
2. Adjust the steering wheel to the desired
position.
E157084
3. Lock the steering column.
AUDIO CONTROL (IF EQUIPPED)
You can operate the following functions
with the control: E168191
Volume upA
Volume downB
MuteC
MediaD
Seek down or previousE
Seek up or nextF
MEDIA Press repeatedly to scroll through available
audio sources.
Seek, Next or Previous Press the seek button to:
• tune the radio to the next or previous
stored preset
• play the next or the previous track.
Press and hold the seek button to:
• tune the radio to the next station up or
down the frequency band
• seek through a track.
64Steering Wheel
Page 69 of 473
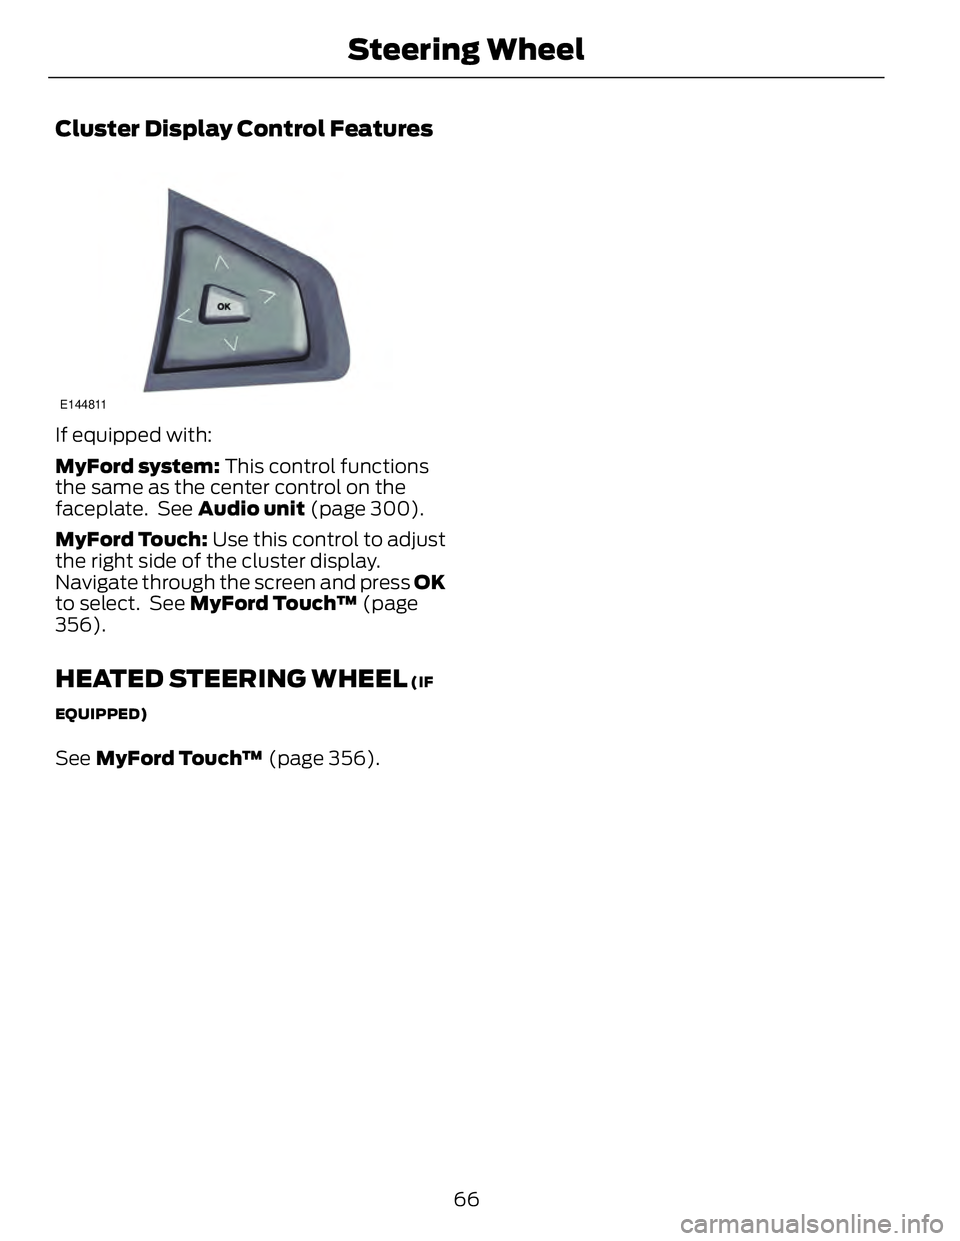
Cluster Display Control Features E144811
If equipped with:
MyFord system: This control functions
the same as the center control on the
faceplate. See Audio unit (page 300).
MyFord Touch: Use this control to adjust
the right side of the cluster display.
Navigate through the screen and press OK
to select. See MyFord Touch™ (page
356).
HEATED STEERING WHEEL (IF
EQUIPPED)
See MyFord Touch™ (page 356).
66Steering Wheel
Page 110 of 473
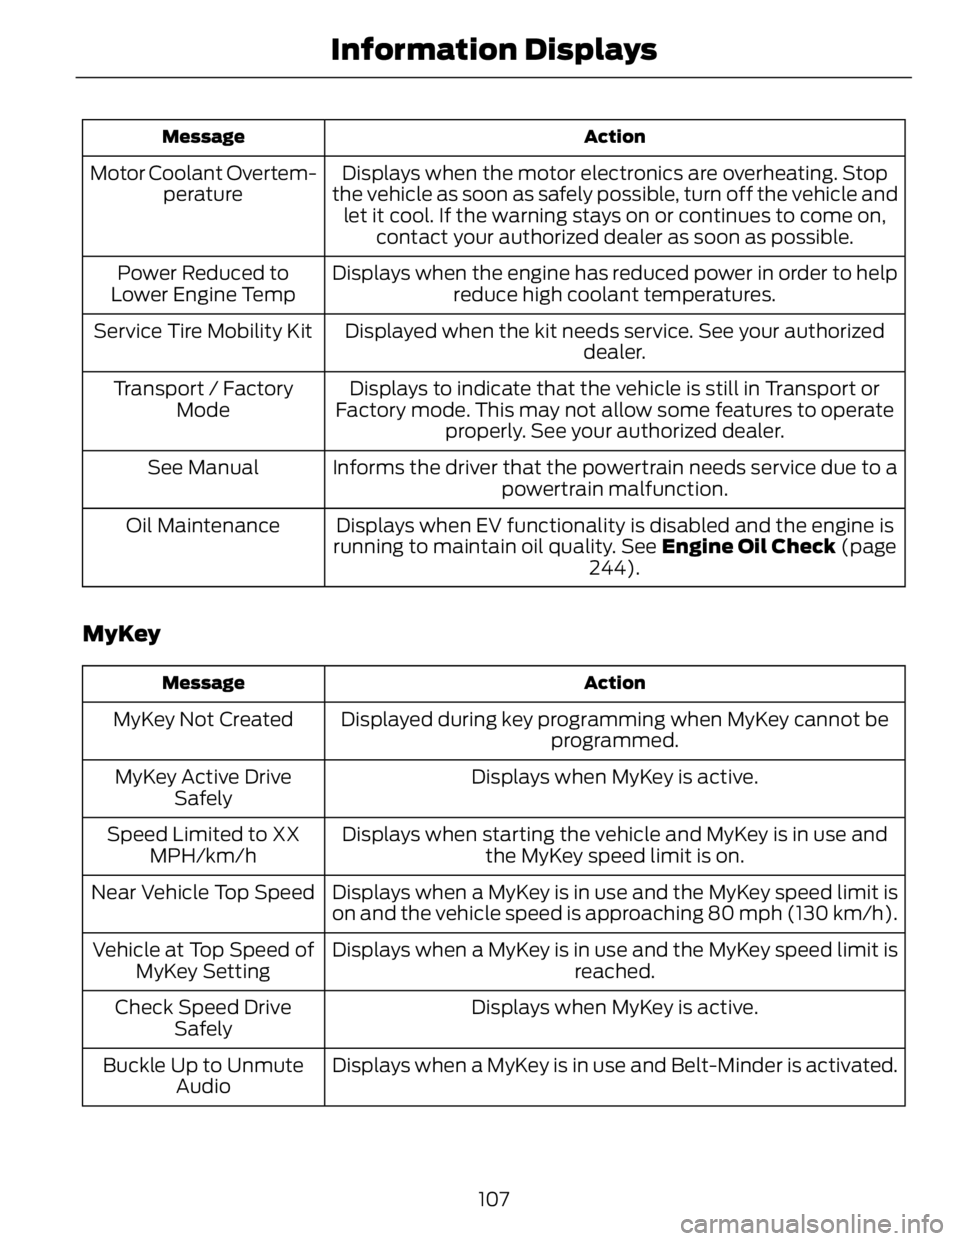
ActionMessage
Displays when the motor electronics are overheating. Stop
the vehicle as soon as safely possible, turn off the vehicle and
let it cool. If the warning stays on or continues to come on,
contact your authorized dealer as soon as possible.Motor Coolant Overtem-
perature
Displays when the engine has reduced power in order to help
reduce high coolant temperatures.Power Reduced to
Lower Engine Temp
Displayed when the kit needs service. See your authorized
dealer.Service Tire Mobility Kit
Displays to indicate that the vehicle is still in Transport or
Factory mode. This may not allow some features to operate
properly. See your authorized dealer.Transport / Factory
Mode
Informs the driver that the powertrain needs service due to a
powertrain malfunction.See Manual
Displays when EV functionality is disabled and the engine is
running to maintain oil quality. See Engine Oil Check (page
244).Oil Maintenance
MyKey ActionMessage
Displayed during key programming when MyKey cannot be
programmed.MyKey Not Created
Displays when MyKey is active.MyKey Active Drive
Safely
Displays when starting the vehicle and MyKey is in use and
the MyKey speed limit is on.Speed Limited to XX
MPH/km/h
Displays when a MyKey is in use and the MyKey speed limit is
on and the vehicle speed is approaching 80 mph (130 km/h).Near Vehicle Top Speed
Displays when a MyKey is in use and the MyKey speed limit is
reached.Vehicle at Top Speed of
MyKey Setting
Displays when MyKey is active.Check Speed Drive
Safely
Displays when a MyKey is in use and Belt-Minder is activated.Buckle Up to Unmute
Audio
107Information Displays
Page 254 of 473
Because your vehicle’s engine is
electronically-controlled by a computer,
some engine control settings are
maintained by power from the low-voltage
battery. Some engine computer settings,
like the idle trim and fuel trim strategy,
optimize the driveability and performance
of the engine. The clock and radio station
presets are also maintained in memory by
power from the low-voltage battery. These
settings are erased when a technician
disconnects and connects the low-voltage
battery.
Complete the following procedure in order
to restore the settings:
1. With the vehicle at a complete stop,
set the parking brake.
2. Shift the transmission into P (Park)
3. Turn off all accessories.
4. Step on the brake pedal and start the
vehicle.
5. Run the engine until it reaches normal
operating temperature. While the
engine is warming up, complete the
following: Reset the clock. See Audio
System (page 299). Reset the power
windows bounce-back feature. See
Windows and Mirrors (page 74).
Reset the radio station presets. See
Audio System (page 299).
6. Allow the engine to idle for at least one
minute. If the engine turns off, step on
the accelerator to start the engine.
7. While the engine is running, step on the
brake pedal and shift the transmission
to N.
8. Allow the engine to run for at least one
minute by pressing on the accelerator
pedal.
9. Drive the vehicle at least 10 miles (16
kilometers) to completely relearn the
idle and fuel trim strategy. Note: If you do not allow the engine to
relearn the idle and fuel trim strategy, the
idle quality of your vehicle may be adversely
affected until the engine computer
eventually relearns the idle trim and fuel
trim strategy.
Note: Always dispose of automotive
batteries in a responsible manner. Follow
your local authorized standards for disposal.
Call your local authorized recycling center
to find out more about recycling automotive
batteries.
Note: It is recommended that the negative
battery cable terminal be disconnected from
the battery if you plan to store your vehicle
for an extended period of time.
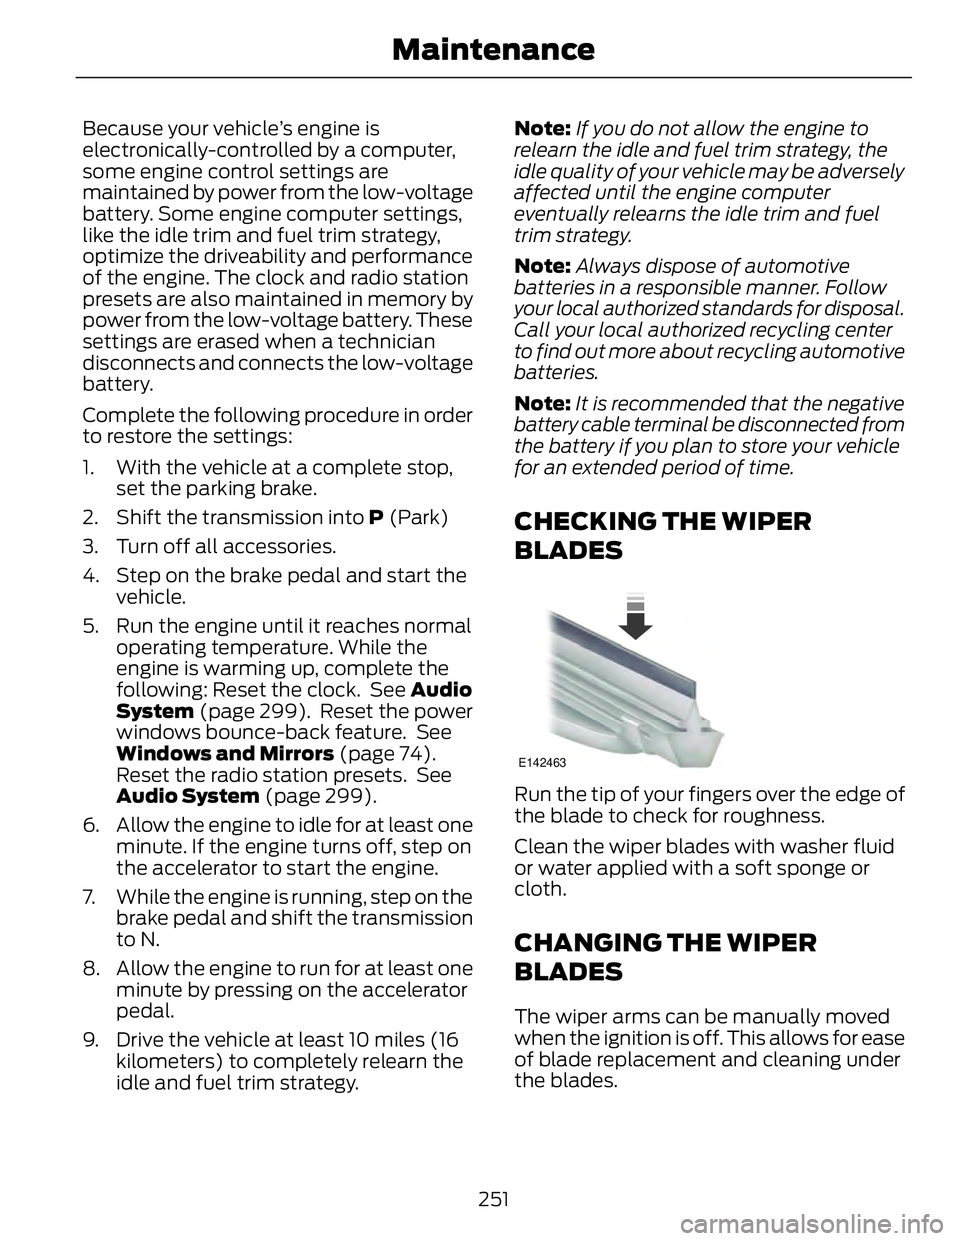
CHECKING THE WIPER
BLADES E142463
Run the tip of your fingers over the edge of
the blade to check for roughness.
Clean the wiper blades with washer fluid
or water applied with a soft sponge or
cloth.
CHANGING THE WIPER
BLADES The wiper arms can be manually moved
when the ignition is off. This allows for ease
of blade replacement and cleaning under
the blades.
251Maintenance
Page 302 of 473
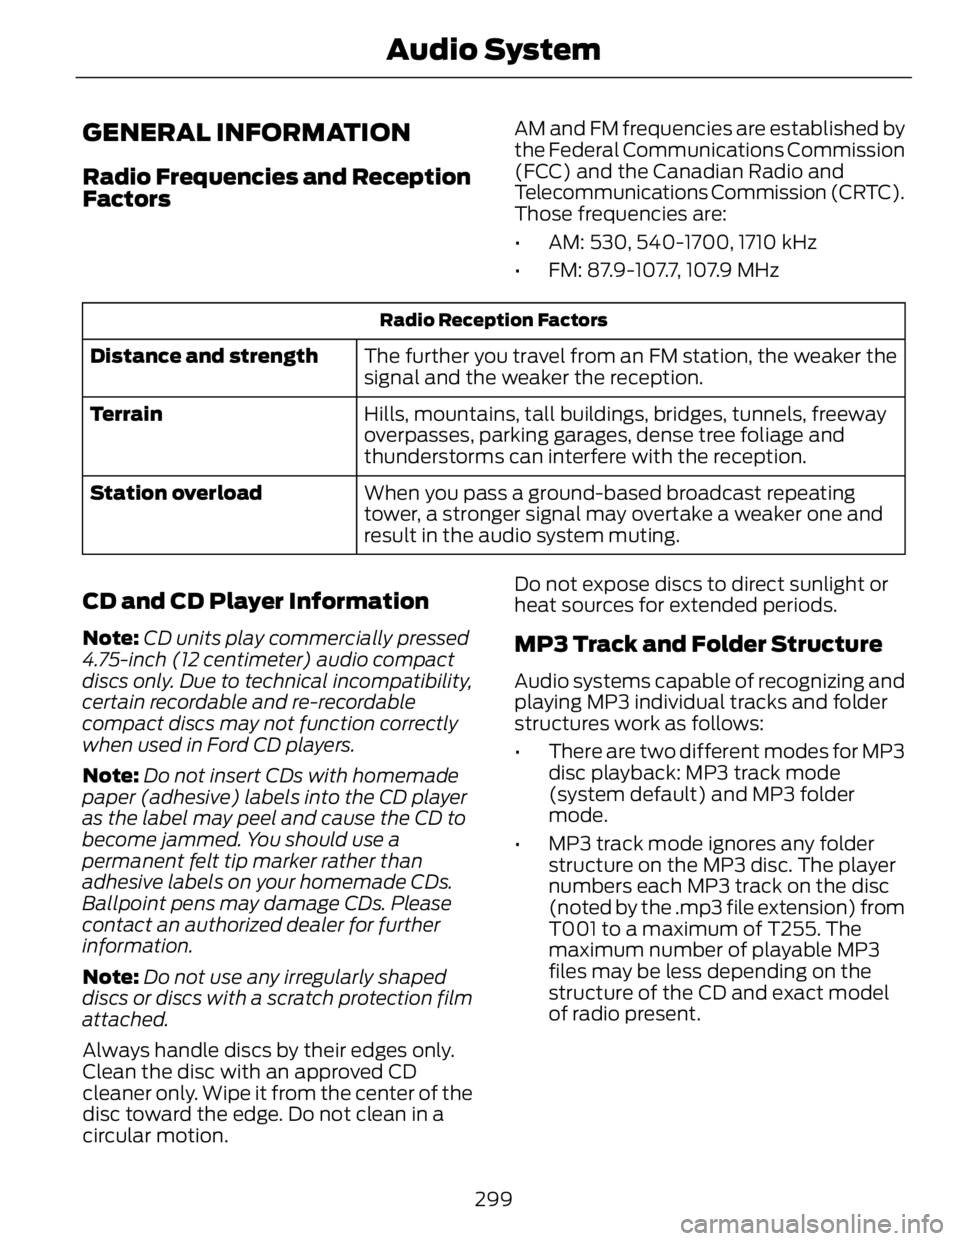
GENERAL INFORMATION Radio Frequencies and Reception
Factors AM and FM frequencies are established by
the Federal Communications Commission
(FCC) and the Canadian Radio and
Telecommunications Commission (CRTC).
Those frequencies are:
• AM: 530, 540-1700, 1710 kHz
• FM: 87.9-107.7, 107.9 MHzRadio Reception Factors
The further you travel from an FM station, the weaker the
signal and the weaker the reception.Distance and strength
Hills, mountains, tall buildings, bridges, tunnels, freeway
overpasses, parking garages, dense tree foliage and
thunderstorms can interfere with the reception.Terrain
When you pass a ground-based broadcast repeating
tower, a stronger signal may overtake a weaker one and
result in the audio system muting.Station overload
CD and CD Player Information Note: CD units play commercially pressed
4.75-inch (12 centimeter) audio compact
discs only. Due to technical incompatibility,
certain recordable and re-recordable
compact discs may not function correctly
when used in Ford CD players.
Note: Do not insert CDs with homemade
paper (adhesive) labels into the CD player
as the label may peel and cause the CD to
become jammed. You should use a
permanent felt tip marker rather than
adhesive labels on your homemade CDs.
Ballpoint pens may damage CDs. Please
contact an authorized dealer for further
information.
Note: Do not use any irregularly shaped
discs or discs with a scratch protection film
attached.
Always handle discs by their edges only.
Clean the disc with an approved CD
cleaner only. Wipe it from the center of the
disc toward the edge. Do not clean in a
circular motion. Do not expose discs to direct sunlight or
heat sources for extended periods.
MP3 Track and Folder Structure Audio systems capable of recognizing and
playing MP3 individual tracks and folder
structures work as follows:
• There are two different modes for MP3
disc playback: MP3 track mode
(system default) and MP3 folder
mode.
• MP3 track mode ignores any folder
structure on the MP3 disc. The player
numbers each MP3 track on the disc
(noted by the .mp3 file extension) from
T001 to a maximum of T255. The
maximum number of playable MP3
files may be less depending on the
structure of the CD and exact model
of radio present.
299Audio System
Page 303 of 473
• MP3 folder mode represents a folder
structure consisting of one level of
folders. The CD player numbers all MP3
tracks on the disc (noted by the .mp3
file extension) and all folders
containing MP3 files, from F001
(folder) T001 (track) to F253 T255.
• Creating discs with only one level of
folders helps with navigation through
the disc files.
If you are burning your own MP3 discs, it is
important to understand how the system
reads the structures you create. While
various files may be present, (files with
extensions other than mp3), only files with
the .mp3 extension are played; other files
are ignored by the system. This enables
you to use the same MP3 disc for a variety
of tasks on your work computer, home
computer and your in-vehicle system.
In track mode, the system displays and
plays the structure as if it were only one
level deep (all .mp3 files play, regardless
of being in a specific folder). In folder
mode, the system only plays the .mp3 files
in the current folder. AUDIO UNIT - VEHICLES WITH:
AM/FM/CD/SYNC/SATELLITE
RADIO WARNING
Driving while distracted can result in
loss of vehicle control, crash and
injury. We strongly recommend that
you use extreme caution when using any
device that may take your focus off the
road. Your primary responsibility is the safe
operation of your vehicle. We recommend
against the use of any hand-held device
while driving and encourage the use of
voice-operated systems when possible.
Make sure you are aware of all applicable
local laws that may affect the use of
electronic devices while driving.
Note: Depending on your vehicle option
package, your system may look different
from what you see here.
Note: Some features, such as SIRIUS
satellite radio, may not be available in your
location. Check with an authorized dealer.
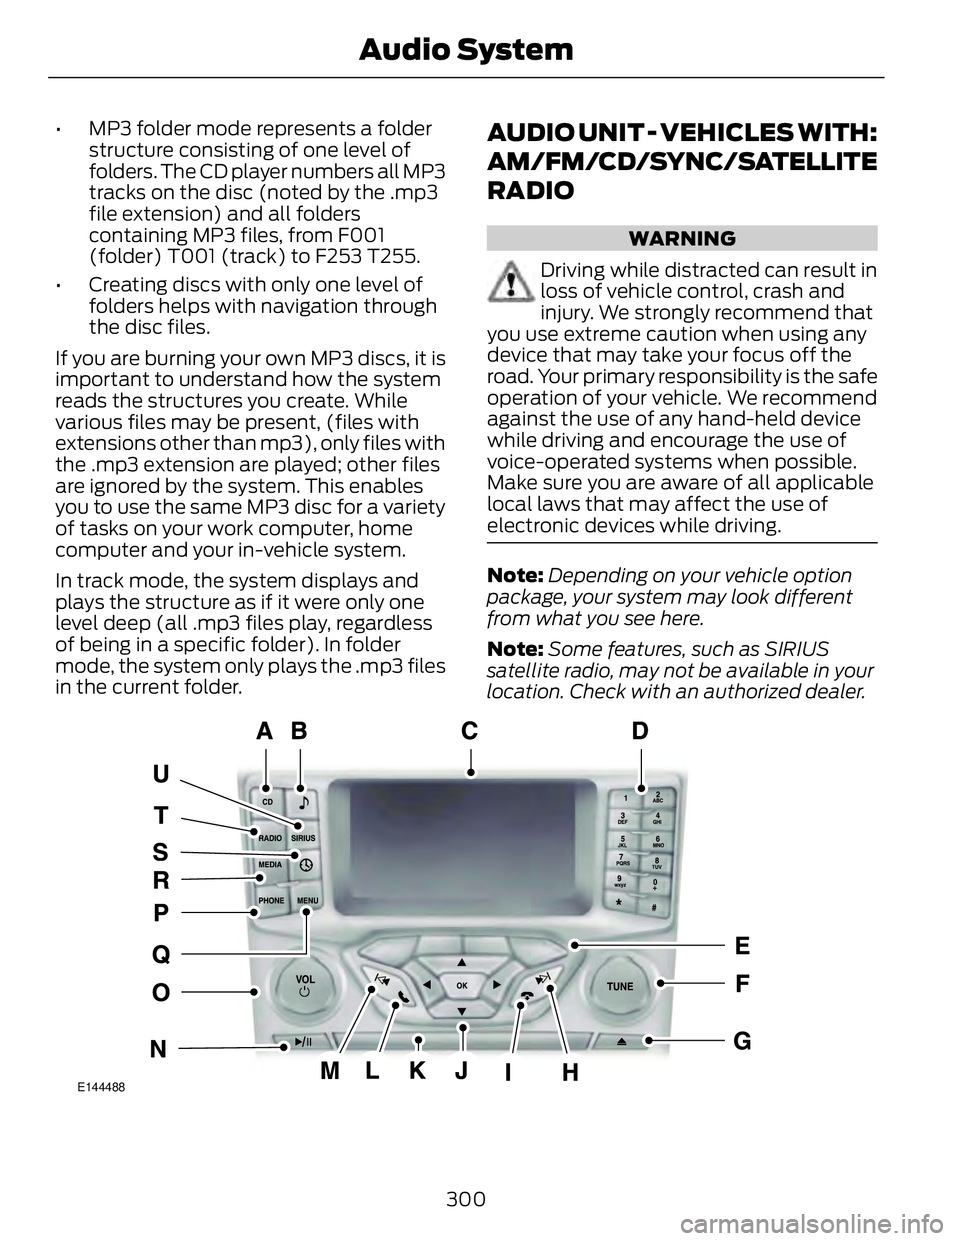
E144488
300Audio System
Page 304 of 473
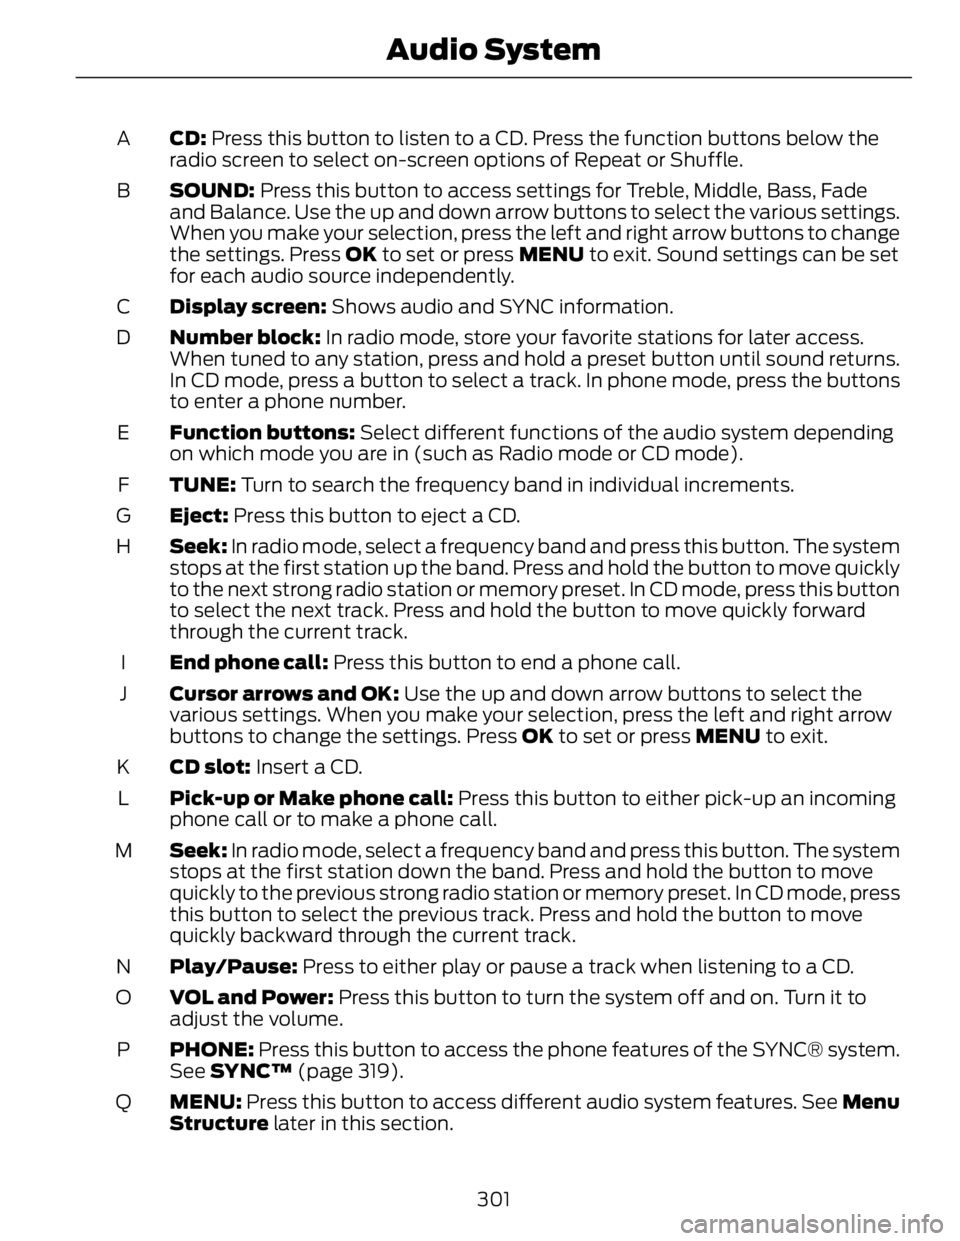
CD: Press this button to listen to a CD. Press the function buttons below the
radio screen to select on-screen options of Repeat or Shuffle.A
SOUND: Press this button to access settings for Treble, Middle, Bass, Fade
and Balance. Use the up and down arrow buttons to select the various settings.
When you make your selection, press the left and right arrow buttons to change
the settings. Press OK to set or press MENU to exit. Sound settings can be set
for each audio source independently.B
Display screen: Shows audio and SYNC information.C
Number block: In radio mode, store your favorite stations for later access.
When tuned to any station, press and hold a preset button until sound returns.
In CD mode, press a button to select a track. In phone mode, press the buttons
to enter a phone number.D
Function buttons: Select different functions of the audio system depending
on which mode you are in (such as Radio mode or CD mode).E
TUNE: Turn to search the frequency band in individual increments.F
Eject: Press this button to eject a CD.G
Seek: In radio mode, select a frequency band and press this button. The system
stops at the first station up the band. Press and hold the button to move quickly
to the next strong radio station or memory preset. In CD mode, press this button
to select the next track. Press and hold the button to move quickly forward
through the current track.H
End phone call: Press this button to end a phone call.I
Cursor arrows and OK: Use the up and down arrow buttons to select the
various settings. When you make your selection, press the left and right arrow
buttons to change the settings. Press OK to set or press MENU to exit.J
CD slot: Insert a CD.K
Pick-up or Make phone call: Press this button to either pick-up an incoming
phone call or to make a phone call.L
Seek: In radio mode, select a frequency band and press this button. The system
stops at the first station down the band. Press and hold the button to move
quickly to the previous strong radio station or memory preset. In CD mode, press
this button to select the previous track. Press and hold the button to move
quickly backward through the current track.M
Play/Pause: Press to either play or pause a track when listening to a CD.N
VOL and Power: Press this button to turn the system off and on. Turn it to
adjust the volume.O
PHONE: Press this button to access the phone features of the SYNC® system.
See SYNC™ (page 319).P
MENU: Press this button to access different audio system features. See Menu
Structure later in this section.Q
301Audio System