fuel pressure FORD FUSION HYBRID 2014 Owners Manual
[x] Cancel search | Manufacturer: FORD, Model Year: 2014, Model line: FUSION HYBRID, Model: FORD FUSION HYBRID 2014Pages: 473, PDF Size: 5.93 MB
Page 7 of 473
Hazard Warning Flashers..........................225
Fuel Shutoff...................................................225
Jump-Starting the Vehicle........................225
Collision, Damage or Fire Event.............228
Post-Crash Alert System..........................230
Fuses Changing a Fuse............................................231
Fuse Specification Chart............................231
Maintenance General Information....................................241
Opening and Closing the Hood...............241
Under Hood Overview - 2.0L Hybrid.....242
Engine Oil Dipstick - 2.0L Hybrid...........244
Engine Oil Check..........................................244
Oil Change Indicator Reset......................245
Engine Coolant Check...............................245
Automatic Transmission Fluid
Check...........................................................249
Brake Fluid Check........................................249
Power Steering Fluid Check....................249
Fuel Filter........................................................249
Washer Fluid Check....................................249
Changing the 12V Battery.........................249
Checking the Wiper Blades.......................251
Changing the Wiper Blades......................251
Changing the Engine Air Filter.................252
Adjusting the Headlamps.........................253
Removing a Headlamp..............................254
Changing a Bulb...........................................255
Bulb Specification Chart..........................258
Vehicle Care General Information...................................260
Cleaning Products......................................260
Cleaning the Exterior.................................260
Repairing Minor Paint Damage...............261
Waxing ..............................................................261 Cleaning the Engine....................................262
Cleaning the Windows and Wiper
Blades..........................................................262
Cleaning the Interior...................................262
Cleaning the Instrument Panel and
Instrument Cluster Lens.......................263
Cleaning Leather Seats.............................264
Cleaning the Alloy Wheels.......................264
Vehicle Storage............................................265
Wheels and Tires Temporary Mobility Kit...............................267
Tire Care...........................................................273
Tire Pressure Monitoring System..........288
Using Snow Chains......................................291
Technical Specifications...........................292
Capacities and Specific-
ations Engine Specifications................................293
Motorcraft Parts..........................................294
Vehicle Identification Number................295
Vehicle Certification Label.......................295
Transmission Code Designation............296
Technical Specifications...........................297
Audio System General Information...................................299
Audio unit - Vehicles With:
AM/FM/CD/SYNC/Satellite
Radio...........................................................300
Audio unit - Vehicles With: Premium
AM/FM/CD ................................................302
Audio unit - Vehicles With: Sony
AM/FM/CD ................................................304
Digital Audio..................................................307
Satellite Radio...............................................310
Auxiliary Input Jack.......................................312
USB Port...........................................................313
Media Hub.......................................................313
4Table of Contents
Page 87 of 473
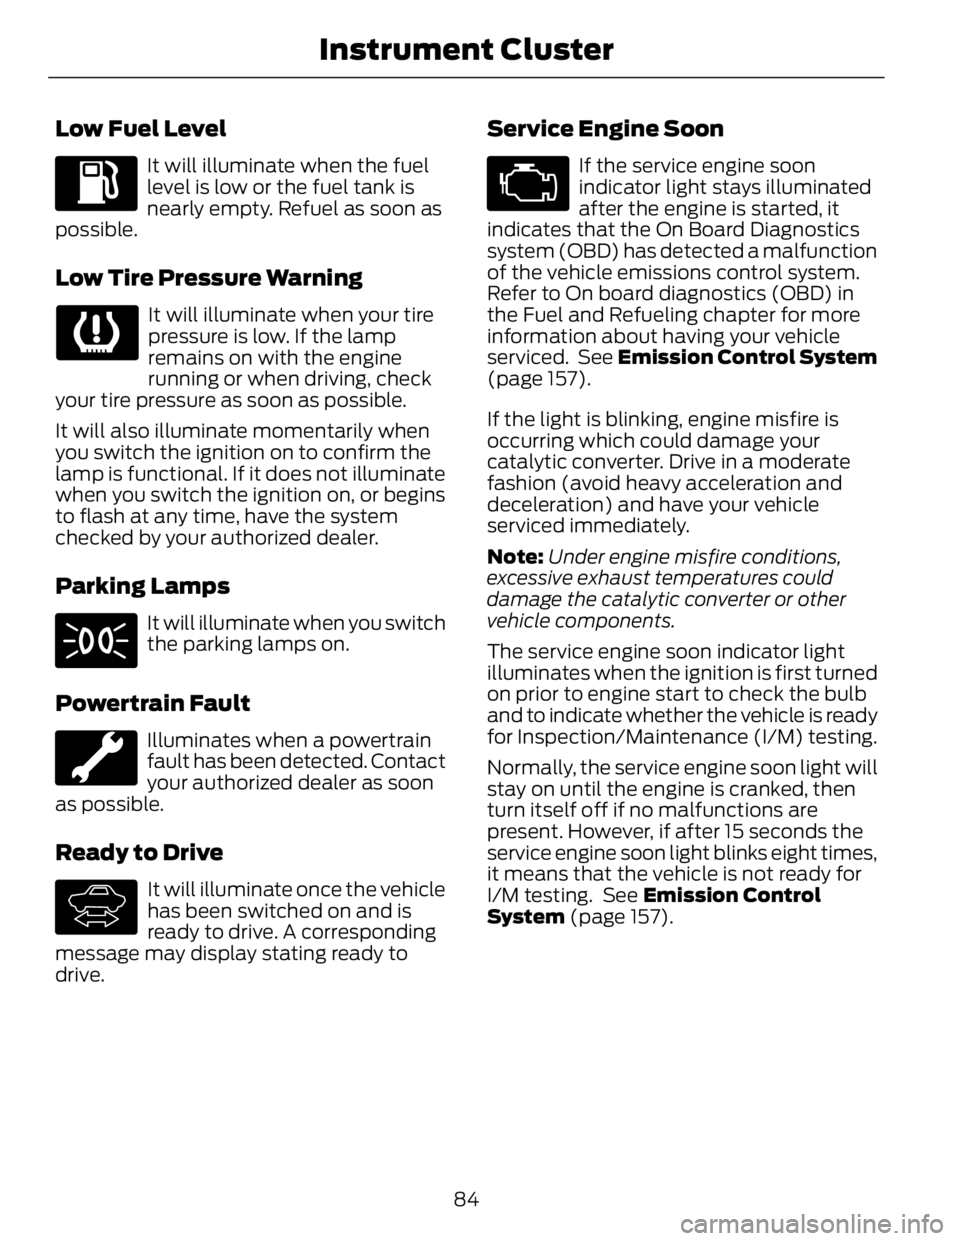
Low Fuel Level It will illuminate when the fuel
level is low or the fuel tank is
nearly empty. Refuel as soon as
possible.
Low Tire Pressure Warning It will illuminate when your tire
pressure is low. If the lamp
remains on with the engine
running or when driving, check
your tire pressure as soon as possible.
It will also illuminate momentarily when
you switch the ignition on to confirm the
lamp is functional. If it does not illuminate
when you switch the ignition on, or begins
to flash at any time, have the system
checked by your authorized dealer.
Parking Lamps It will illuminate when you switch
the parking lamps on.
Powertrain Fault Illuminates when a powertrain
fault has been detected. Contact
your authorized dealer as soon
as possible.
Ready to Drive E144692
It will illuminate once the vehicle
has been switched on and is
ready to drive. A corresponding
message may display stating ready to
drive. Service Engine Soon If the service engine soon
indicator light stays illuminated
after the engine is started, it
indicates that the On Board Diagnostics
system (OBD) has detected a malfunction
of the vehicle emissions control system.
Refer to On board diagnostics (OBD) in
the Fuel and Refueling chapter for more
information about having your vehicle
serviced. See Emission Control System
(page 157).
If the light is blinking, engine misfire is
occurring which could damage your
catalytic converter. Drive in a moderate
fashion (avoid heavy acceleration and
deceleration) and have your vehicle
serviced immediately.
Note: Under engine misfire conditions,
excessive exhaust temperatures could
damage the catalytic converter or other
vehicle components.
The service engine soon indicator light
illuminates when the ignition is first turned
on prior to engine start to check the bulb
and to indicate whether the vehicle is ready
for Inspection/Maintenance (I/M) testing.
Normally, the service engine soon light will
stay on until the engine is cranked, then
turn itself off if no malfunctions are
present. However, if after 15 seconds the
service engine soon light blinks eight times,
it means that the vehicle is not ready for
I/M testing. See Emission Control
System (page 157).
84Instrument Cluster
Page 151 of 473
SAFETY PRECAUTIONS WARNINGS
Do not overfill the fuel tank. The
pressure in an overfilled tank may
cause leakage and lead to fuel spray
and fire.
The fuel system may be under
pressure. If you hear a hissing sound
near the fuel filler door (Easy Fuel
capless fuel system), do not refuel until
the sound stops. Otherwise, fuel may spray
out, which could cause serious personal
injury.
Automotive fuels can cause serious
injury or death if misused or
mishandled.
The flow of fuel through a fuel pump
nozzle can produce static electricity,
which can cause a fire if fuel is
pumped into an ungrounded fuel container.
Fuel ethanol and gasoline may
contain benzene, which is a
cancer-causing agent.
When refueling always shut the
engine off and never allow sparks or
open flames near the filler neck.
Never smoke or use a cell phone while
refueling. Fuel vapor is extremely
hazardous under certain conditions. Avoid
inhaling excess fumes.
Observe the following guidelines when
handling automotive fuel:
• Extinguish all smoking materials and
any open flames before refueling your
vehicle.
• Always turn off the vehicle before
refueling. • Automotive fuels can be harmful or
fatal if swallowed. Fuel such as
gasoline is highly toxic and if
swallowed can cause death or
permanent injury. If fuel is swallowed,
call a physician immediately, even if no
symptoms are immediately apparent.
The toxic effects of fuel may not be
visible for hours.
• Avoid inhaling fuel vapors. Inhaling too
much fuel vapor of any kind can lead
to eye and respiratory tract irritation.
In severe cases, excessive or prolonged
breathing of fuel vapor can cause
serious illness and permanent injury.
• Avoid getting fuel liquid in your eyes. If
fuel is splashed in the eyes, remove
contact lenses (if worn), flush with
water for 15 minutes and seek medical
attention. Failure to seek proper
medical attention could lead to
permanent injury.
• Fuels can also be harmful if absorbed
through the skin. If fuel is splashed on
the skin, clothing or both, promptly
remove contaminated clothing and
wash skin thoroughly with soap and
water. Repeated or prolonged skin
contact with fuel liquid or vapor causes
skin irritation.
• Be particularly careful if you are taking
“Antabuse” or other forms of disulfiram
for the treatment of alcoholism.
Breathing gasoline vapors, or skin
contact could cause an adverse
reaction. In sensitive individuals, serious
personal injury or sickness may result.
If fuel is splashed on the skin, promptly
wash skin thoroughly with soap and
water. Consult a physician immediately
if you experience an adverse reaction.
148Fuel and Refueling
Page 153 of 473
WARNINGS
Do not smoke if you are near fuel or
refueling your vehicle.
Keep sparks, flames and smoking
materials away from fuel.
Stay outside your vehicle and do not
leave the fuel pump unattended
when refueling your vehicle. This is
against the law in some places.
Keep children away from the fuel
pump; never let children pump fuel.
Do not use personal electronic
devices while refueling.
Use the following guidelines to avoid
electrostatic charge build-up when filling
an ungrounded fuel container:
• Place approved fuel container on the
ground.
• Do not fill a fuel container while it is in
your vehicle (including the cargo area).
• Keep the fuel pump nozzle in contact
with the fuel container while filling.
• Do not use a device that would hold
the fuel pump handle in the fill position.
Easy Fuel™ Capless Fuel System
(Non-Energi Vehicles) WARNING
The fuel system may be under
pressure. If you hear a hissing sound
near the fuel filler door, do not refuel
until the sound stops. Otherwise, fuel may
spray out, which could cause serious
personal injury.
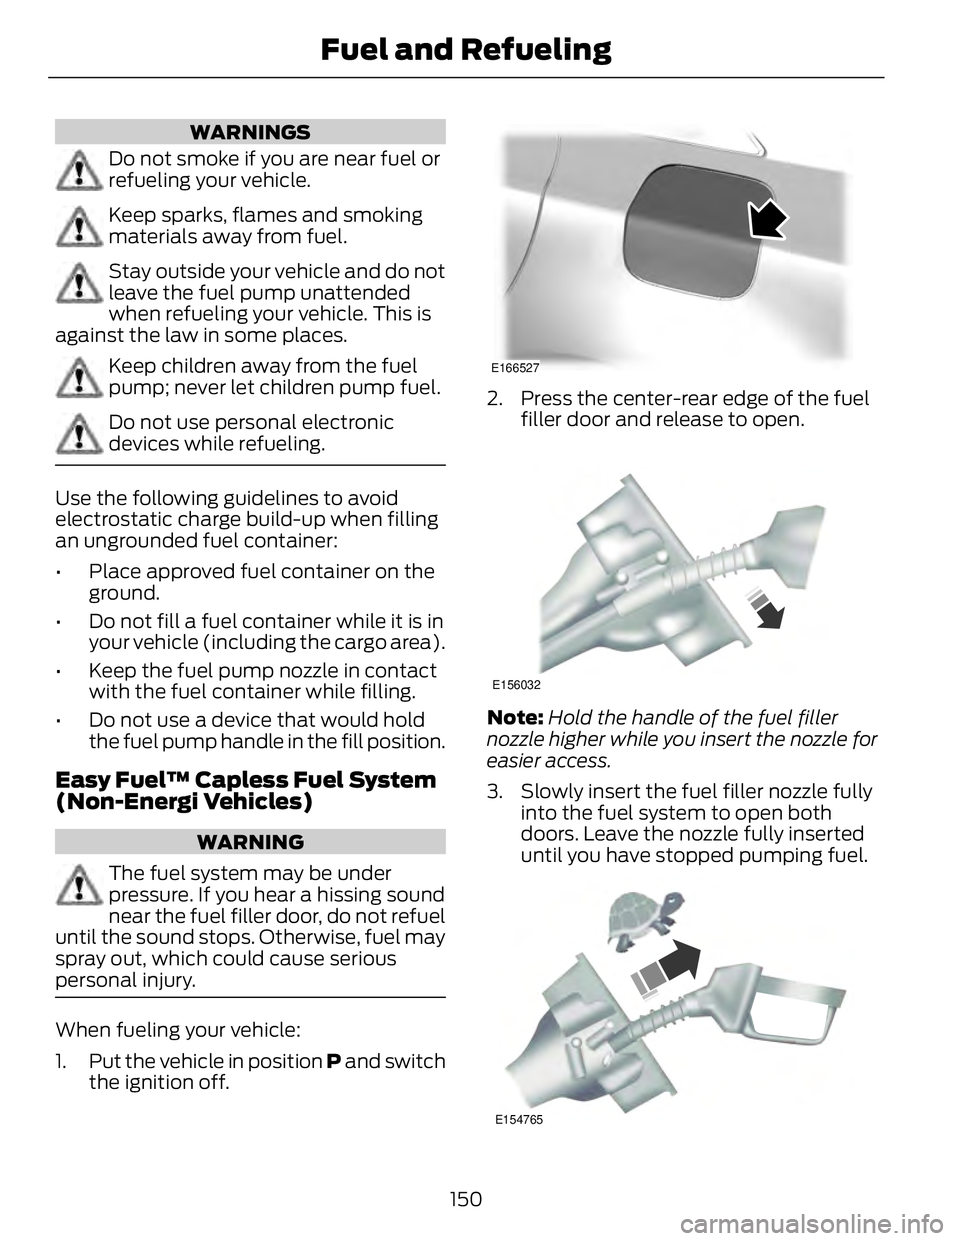
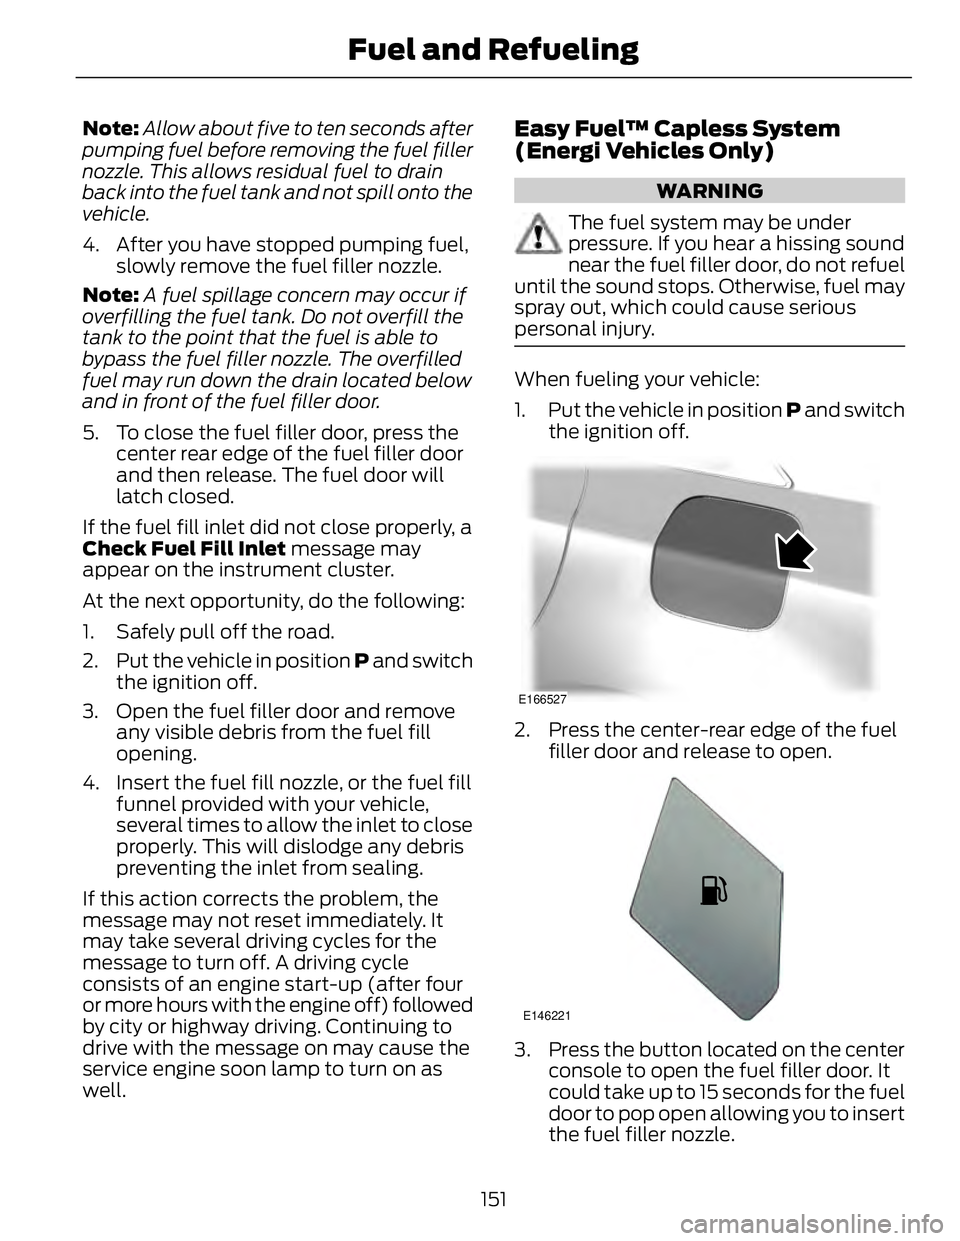
When fueling your vehicle:
1. Put the vehicle in position P and switch
the ignition off. E166527
2. Press the center-rear edge of the fuel
filler door and release to open. E156032
Note: Hold the handle of the fuel filler
nozzle higher while you insert the nozzle for
easier access.
3. Slowly insert the fuel filler nozzle fully
into the fuel system to open both
doors. Leave the nozzle fully inserted
until you have stopped pumping fuel.
E154765
150Fuel and Refueling
Page 154 of 473
Note: Allow about five to ten seconds after
pumping fuel before removing the fuel filler
nozzle. This allows residual fuel to drain
back into the fuel tank and not spill onto the
vehicle.
4. After you have stopped pumping fuel,
slowly remove the fuel filler nozzle.
Note: A fuel spillage concern may occur if
overfilling the fuel tank. Do not overfill the
tank to the point that the fuel is able to
bypass the fuel filler nozzle. The overfilled
fuel may run down the drain located below
and in front of the fuel filler door.
5. To close the fuel filler door, press the
center rear edge of the fuel filler door
and then release. The fuel door will
latch closed.
If the fuel fill inlet did not close properly, a
Check Fuel Fill Inlet message may
appear on the instrument cluster.
At the next opportunity, do the following:
1. Safely pull off the road.
2. Put the vehicle in position P and switch
the ignition off.
3. Open the fuel filler door and remove
any visible debris from the fuel fill
opening.
4. Insert the fuel fill nozzle, or the fuel fill
funnel provided with your vehicle,
several times to allow the inlet to close
properly. This will dislodge any debris
preventing the inlet from sealing.
If this action corrects the problem, the
message may not reset immediately. It
may take several driving cycles for the
message to turn off. A driving cycle
consists of an engine start-up (after four
or more hours with the engine off) followed
by city or highway driving. Continuing to
drive with the message on may cause the
service engine soon lamp to turn on as
well. Easy Fuel™ Capless System
(Energi Vehicles Only) WARNING
The fuel system may be under
pressure. If you hear a hissing sound
near the fuel filler door, do not refuel
until the sound stops. Otherwise, fuel may
spray out, which could cause serious
personal injury.
When fueling your vehicle:
1. Put the vehicle in position P and switch
the ignition off. E166527
2. Press the center-rear edge of the fuel
filler door and release to open.
E146221
3. Press the button located on the center
console to open the fuel filler door. It
could take up to 15 seconds for the fuel
door to pop open allowing you to insert
the fuel filler nozzle.
151Fuel and Refueling
Page 155 of 473
E156032
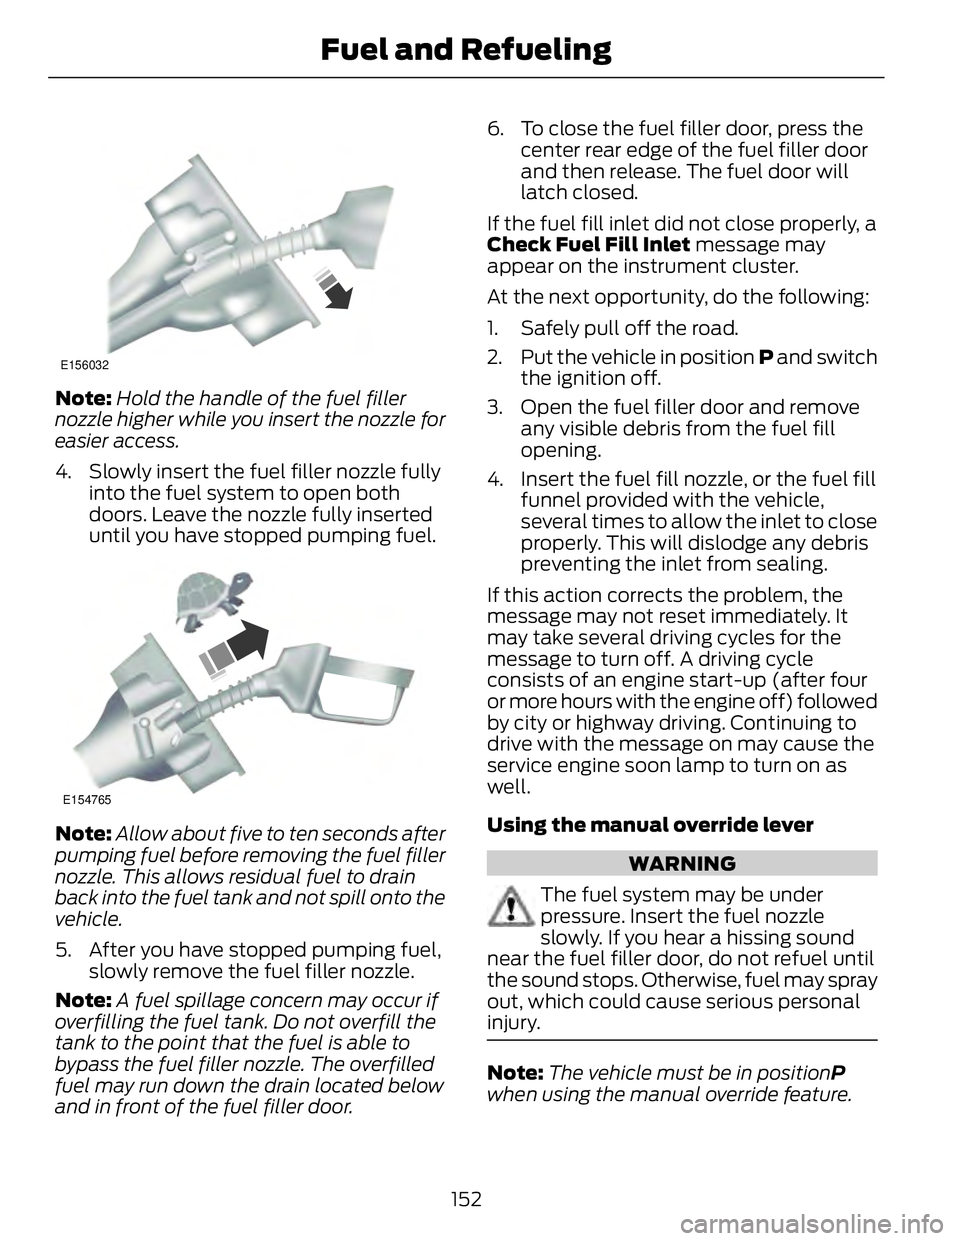
Note: Hold the handle of the fuel filler
nozzle higher while you insert the nozzle for
easier access.
4. Slowly insert the fuel filler nozzle fully
into the fuel system to open both
doors. Leave the nozzle fully inserted
until you have stopped pumping fuel. E154765
Note: Allow about five to ten seconds after
pumping fuel before removing the fuel filler
nozzle. This allows residual fuel to drain
back into the fuel tank and not spill onto the
vehicle.
5. After you have stopped pumping fuel,
slowly remove the fuel filler nozzle.
Note: A fuel spillage concern may occur if
overfilling the fuel tank. Do not overfill the
tank to the point that the fuel is able to
bypass the fuel filler nozzle. The overfilled
fuel may run down the drain located below
and in front of the fuel filler door. 6. To close the fuel filler door, press the
center rear edge of the fuel filler door
and then release. The fuel door will
latch closed.
If the fuel fill inlet did not close properly, a
Check Fuel Fill Inlet message may
appear on the instrument cluster.
At the next opportunity, do the following:
1. Safely pull off the road.
2. Put the vehicle in position P and switch
the ignition off.
3. Open the fuel filler door and remove
any visible debris from the fuel fill
opening.
4. Insert the fuel fill nozzle, or the fuel fill
funnel provided with the vehicle,
several times to allow the inlet to close
properly. This will dislodge any debris
preventing the inlet from sealing.
If this action corrects the problem, the
message may not reset immediately. It
may take several driving cycles for the
message to turn off. A driving cycle
consists of an engine start-up (after four
or more hours with the engine off) followed
by city or highway driving. Continuing to
drive with the message on may cause the
service engine soon lamp to turn on as
well.
Using the manual override lever
WARNING
The fuel system may be under
pressure. Insert the fuel nozzle
slowly. If you hear a hissing sound
near the fuel filler door, do not refuel until
the sound stops. Otherwise, fuel may spray
out, which could cause serious personal
injury.
Note: The vehicle must be in position P
when using the manual override feature.
152Fuel and Refueling
Page 172 of 473
GENERAL INFORMATION Note: Occasional brake noise is normal. If
a metal-to-metal, continuous grinding or
continuous squeal sound is present, the
brake linings may be worn-out. Have the
system checked by an authorized dealer. If
the vehicle has continuous vibration or
shudder in the steering wheel while braking,
have it checked by an authorized dealer.
Note: Brake dust may accumulate on the
wheels, even under normal driving
conditions. Some dust is inevitable as the
brakes wear and does not contribute to
brake noise. See Cleaning the Alloy
Wheels (page 264).E144522
See Warning Lamps and
Indicators (page 81).
Wet brakes result in reduced braking
efficiency. Gently press the brake pedal a
few times when driving from a car wash or
standing water to dry the brakes.
Brake Over Accelerator In the event the accelerator pedal
becomes stuck or entrapped, apply steady
and firm pressure to the brake pedal to
slow the vehicle and reduce engine power.
If you experience this condition, apply the
brakes and bring your vehicle to a safe
stop. Move the transmission selector lever
to position P, switch the engine off and
apply the parking brake. Inspect the
accelerator pedal for any interference. If
none are found and the condition persists,
have your vehicle towed to the nearest
authorized dealer. Brake Assist Brake assist detects when you brake
heavily by measuring the rate at which you
press the brake pedal. It provides
maximum braking efficiency as long as you
press the pedal. Brake assist can reduce
stopping distances in critical situations.
Anti-lock Brake System This system helps you maintain steering
control during emergency stops by keeping
the brakes from locking.
This lamp momentarily
illuminates when you turn the
ignition on. If the light does not
illuminate during start up, remains on or
flashes, the anti-lock braking system may
be disabled. Have the system checked by
an authorized dealer. E144522
If the system is disabled, normal
braking is still effective. If the
brake warning lamp illuminates
when you release the parking brake, have
your system checked by an authorized
dealer.
Regenerative Braking System This feature is used to simulate the engine
braking of an internal combustion engine
and assist the standard brake system while
recovering some of the energy of motion
and storing it in the battery to improve fuel
economy. The standard brake system is
designed to fully stop the car if
regenerative braking is not available.
During regenerative braking, the motor is
spun as a generator to create electrical
current. This recharges the battery and
slows the vehicle. In effect, once the
accelerator pedal is released, the motor
changes from an energy user to an energy
producer.
169Brakes
Page 263 of 473
GENERAL INFORMATION Your Ford or Lincoln authorized dealer has
many quality products available to clean
your vehicle and protect its finishes.
CLEANING PRODUCTS For best results, use the following products
or products of equivalent quality:
Motorcraft Bug and Tar Remover (ZC-42)
Motorcraft Custom Bright Metal Cleaner
(ZC-15)
Motorcraft Detail Wash (ZC-3-A)
Motorcraft Dusting Cloth (ZC-24)
Motorcraft Engine Shampoo and
Degreaser (U.S. only) (ZC-20)
Motorcraft Engine Shampoo (Canada
only) (CXC-66-A)
Motorcraft Multi-Purpose Cleaner (Canada
only) (CXC-101)
Motorcraft Premium Glass Cleaner
(Canada only) (CXC-100)
Motorcraft Premium Quality Windshield
Washer Fluid (Canada only) [CXC-37-(A,
B, D or F)]
Motorcraft Premium Windshield Wash
Concentrates (U.S. only) (ZC-32-A1 or
ZC-32-B1)
Motorcraft Professional Strength Carpet
& Upholstery Cleaner (ZC-54)
Motorcraft Spot and Stain Remover (U.S.
only) (ZC-14)
Motorcraft Ultra-Clear Spray Glass Cleaner
(ZC-23)
Motorcraft Vinyl Cleaner (Canada only)
(CXC-93)
Motorcraft Wheel and Tire Cleaner
(ZC-37-A) CLEANING THE EXTERIOR Wash your vehicle regularly with cool or
lukewarm water and a neutral pH
shampoo, such as Motorcraft® Detail
Wash.
• Never use strong household detergents
or soap, such as dish washing or
laundry liquid. These products can
discolor and spot painted surfaces.
• Never wash a vehicle that is “hot to the
touch” or during exposure to strong,
direct sunlight.
• Dry your vehicle with a chamois or soft
terry cloth towel in order to eliminate
water spotting.
• Immediately remove items such as
gasoline, diesel fuel, bird droppings and
insect deposits because they can cause
damage to your vehicle’s paintwork
and trim over time. Use Motorcraft Bug
and Tar Remover.
• Remove any exterior accessories, such
as antennas, before entering a car
wash.
Note: Suntan lotions and insect repellents
can damage any painted surface; if these
substances come in contact with your
vehicle, wash off as soon as possible.
Stripes or Graphics (if equipped) Do not use a commercial or high-pressure
wand on the surface or edge of stripes and
graphics. This can cause damage to the
film and cause the edge of the film to peel
away from the vehicle surface.
Exterior Chrome
Note: Never use abrasive materials such as
steel wool or plastic pads as they can
scratch the chrome surface.
Note: Do not use chrome cleaner, metal
cleaner or polish on wheels and wheel
covers
260Vehicle Care
Page 265 of 473
CLEANING THE ENGINE Engines are more efficient when they are
clean because grease and dirt buildup keep
the engine warmer than normal.
When washing:
• Take care when using a power washer
to clean the engine. The high-pressure
fluid could penetrate the sealed parts
and cause damage.
• Do not spray a hot engine with cold
water to avoid cracking the engine
block or other engine components.
• Spray Motorcraft® Engine Shampoo
and Degreaser on all parts that require
cleaning and pressure rinse clean. In
Canada, use Motorcraft® Engine
Shampoo.
• Never wash or rinse the engine while it
is hot or running; water in the running
engine may cause internal damage.
• Never wash or rinse any ignition coil,
spark plug wire or spark plug well, or
the area in and around these locations.
• Cover the battery, power distribution
box, and air filter assembly to prevent
water damage when cleaning the
engine.
CLEANING THE WINDOWS AND
WIPER BLADES Clean your windows and wiper blades
regularly. If the wipers do not wipe
properly, substances on the vehicle’s glass
or the wiper blades may cause squeaking
or chatter noise from the blades, and
streaking and smearing of the windshield. To clean these items, follow these tips:
• You can clean the windows with a
non-abrasive cleaner such as
Motorcraft Ultra-Clear Spray Glass
Cleaner.
• You can clean the wiper blades with
isopropyl rubbing-alcohol or Motorcraft
Premium Windshield Wash
Concentrates in the U.S., or Premium
Quality Windshield Washer Fluid in
Canada. Be sure to replace wiper
blades when they appear worn or do
not function properly.
• Do not use abrasives, as they may
cause scratches.
• Do not use fuel, kerosene, or paint
thinner to clean any parts.
If you cannot remove those streaks after
cleaning with the glass cleaner or if the
wipers chatter and move in a jerky motion,
clean the outer surface of the windshield
and the wiper blades using a sponge or
soft cloth with a neutral detergent or
mild-abrasive cleaning solution. After
cleaning, rinse the windshield and wiper
blades with clean water. The windshield
is clean if beads do not form when you
rinse the windshield with water.
Note: Do not use sharp objects, such as a
razorblade, to clean the inside of the rear
window or to remove decals, as this may
cause damage to the rear window
defroster’s heated grid lines.
CLEANING THE INTERIOR WARNINGS
Do not use cleaning solvents, bleach
or dye on the vehicle’s safety belts,
as these actions may weaken the
belt webbing.
262Vehicle Care
Page 291 of 473
TIRE PR ESSURE MONITORING
SYSTEM WARNING
The tire pressure monitoring system
is not a substitute for manually
checking tire pressure. The tire
pressure should be checked periodically
(at least monthly) using a tire gauge, see
Inflating your tires in this chapter. Failure
to properly maintain your tire pressure
could increase the risk of tire failure, loss
of control, vehicle rollover and personal
injury.
Each tire, including the spare (if
provided), should be checked
monthly when cold and inflated
to the inflation pressure
recommended by the vehicle manufacturer
on the vehicle placard or tire inflation
pressure label. (If your vehicle has tires of
a different size than the size indicated on
the vehicle placard or tire inflation pressure
label, you should determine the proper tire
inflation pressure for those tires.)
As an added safety feature, your vehicle
has been equipped with a Tire Pressure
Monitoring System (TPMS) that
illuminates a low tire pressure telltale
when one or more of your tires is
significantly under-inflated. Accordingly,
when the low tire pressure telltale
illuminates, you should stop and check
your tires as soon as possible, and inflate
them to the proper pressure. Driving on a
significantly under-inflated tire causes the
tire to overheat and can lead to tire failure.
Under-inflation also reduces fuel efficiency
and tire tread life, and may affect the
vehicle’s handling and stopping ability. Please note that the TPMS is not a
substitute for proper tire maintenance, and
it is the driver’s responsibility to maintain
correct tire pressure, even if under-inflation
has not reached the level to trigger
illumination of the TPMS low tire pressure
telltale.
Your vehicle has also been equipped with
a TPMS malfunction indicator to indicate
when the system is not operating properly.
The TPMS malfunction indicator is
combined with the low tire pressure
telltale. When the system detects a
malfunction, the telltale will flash for
approximately one minute and then remain
continuously illuminated. This sequence
will continue upon subsequent vehicle
start-ups as long as the malfunction exists.
When the malfunction indicator is
illuminated, the system may not be able
to detect or signal low tire pressure as
intended. TPMS malfunctions may occur
for a variety of reasons, including the
installation of replacement or alternate
tires or wheels on the vehicle that prevent
the TPMS from functioning properly.
Always check the TPMS malfunction
telltale after replacing one or more tires or
wheels on your vehicle to ensure that the
replacement or alternate tires and wheels
allow the TPMS to continue to function
properly.
The tire pressure monitoring system
complies with part 15 of the FCC rules and
with RSS-210 of Industry Canada.
Operation is subject to the following two
conditions: (1) This device may not cause
harmful interference, and (2) This device
must accept any interference received,
including interference that may cause
undesired operation.
288Wheels and Tires