low beam FORD FUSION HYBRID 2014 Owners Manual
[x] Cancel search | Manufacturer: FORD, Model Year: 2014, Model line: FUSION HYBRID, Model: FORD FUSION HYBRID 2014Pages: 473, PDF Size: 5.93 MB
Page 70 of 473
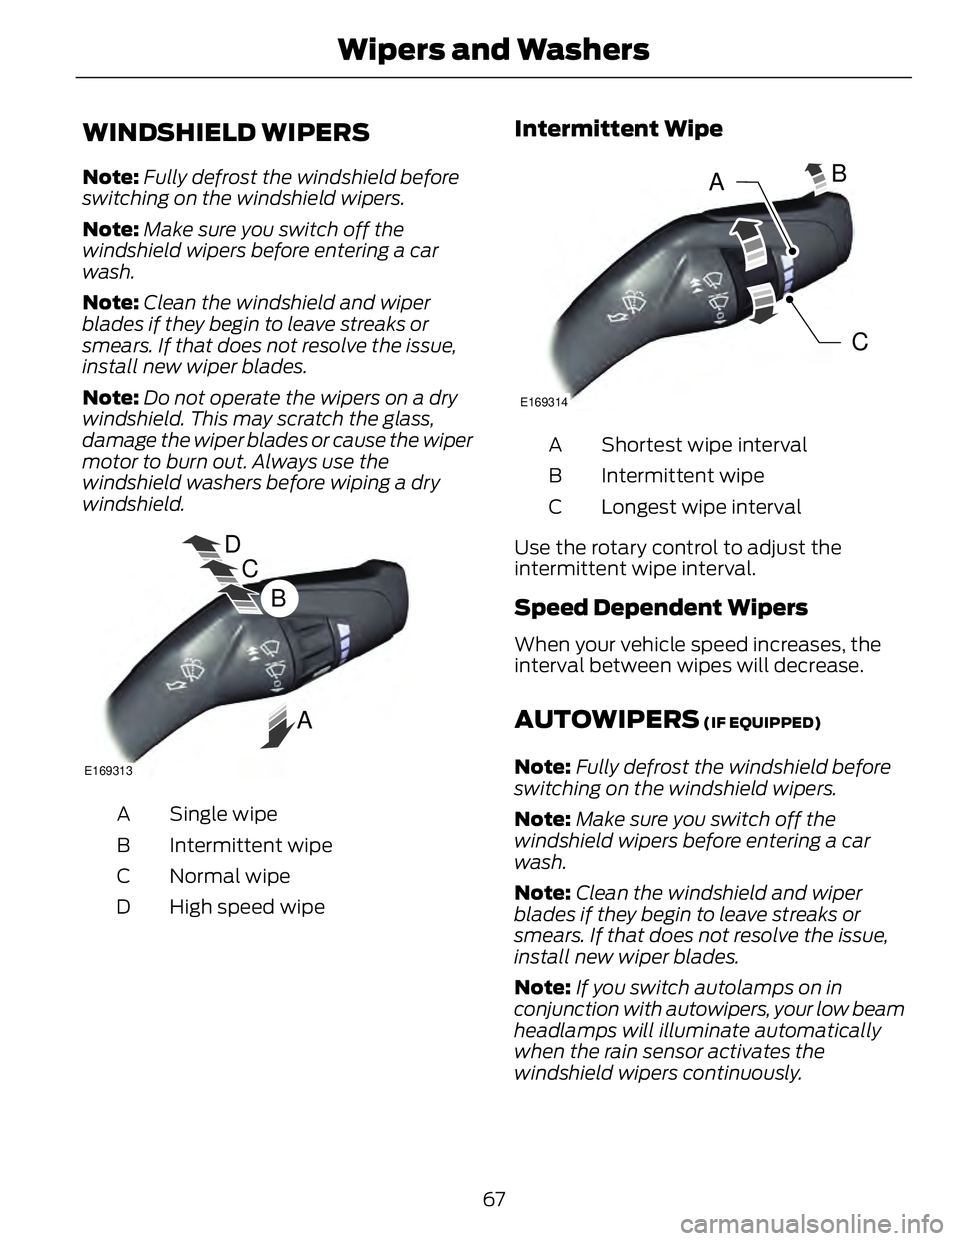
WINDSHIELD WIPERS Note: Fully defrost the windshield before
switching on the windshield wipers.
Note: Make sure you switch off the
windshield wipers before entering a car
wash.
Note: Clean the windshield and wiper
blades if they begin to leave streaks or
smears. If that does not resolve the issue,
install new wiper blades.
Note: Do not operate the wipers on a dry
windshield. This may scratch the glass,
damage the wiper blades or cause the wiper
motor to burn out. Always use the
windshield washers before wiping a dry
windshield.
D
C
BE169313
ASingle wipeA
Intermittent wipeB
Normal wipeC
High speed wipeD Intermittent Wipe
CB
A E169314
Shortest wipe intervalA
Intermittent wipeB
Longest wipe intervalC
Use the rotary control to adjust the
intermittent wipe interval.
Speed Dependent Wipers When your vehicle speed increases, the
interval between wipes will decrease.
AUTOWIPERS (IF EQUIPPED)
Note: Fully defrost the windshield before
switching on the windshield wipers.
Note: Make sure you switch off the
windshield wipers before entering a car
wash.
Note: Clean the windshield and wiper
blades if they begin to leave streaks or
smears. If that does not resolve the issue,
install new wiper blades.
Note: If you switch autolamps on in
conjunction with autowipers, your low beam
headlamps will illuminate automatically
when the rain sensor activates the
windshield wipers continuously.
67Wipers and Washers
Page 72 of 473
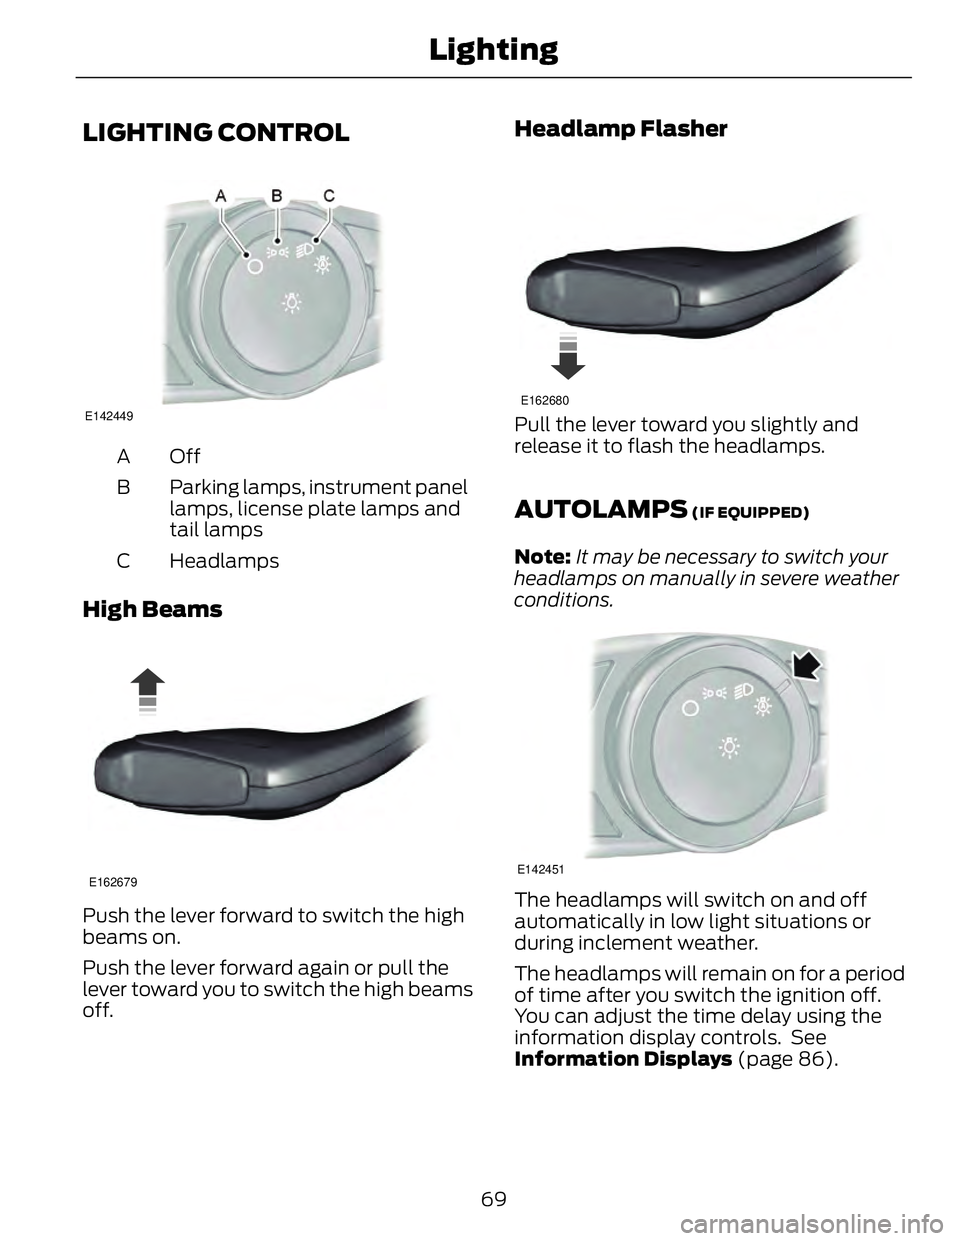
LIGHTING CONTROL E142449
OffA
Parking lamps, instrument panel
lamps, license plate lamps and
tail lampsB
HeadlampsC
High Beams E162679
Push the lever forward to switch the high
beams on.
Push the lever forward again or pull the
lever toward you to switch the high beams
off. Headlamp Flasher E162680
Pull the lever toward you slightly and
release it to flash the headlamps.
AUTOLAMPS (IF EQUIPPED)
Note: It may be necessary to switch your
headlamps on manually in severe weather
conditions.
E142451
The headlamps will switch on and off
automatically in low light situations or
during inclement weather.
The headlamps will remain on for a period
of time after you switch the ignition off.
You can adjust the time delay using the
information display controls. See
Information Displays (page 86).
69Lighting
Page 73 of 473
Note: If you switch autolamps on in
conjunction with autowipers, low beam
headlamps will illuminate automatically
when the rain sensor activates the
windshield wipers continuously.
INSTRUMENT LIGHTING
DIMMER Note: If you disconnect the battery or it
becomes discharged, the illuminated
components will switch to the maximum
setting.
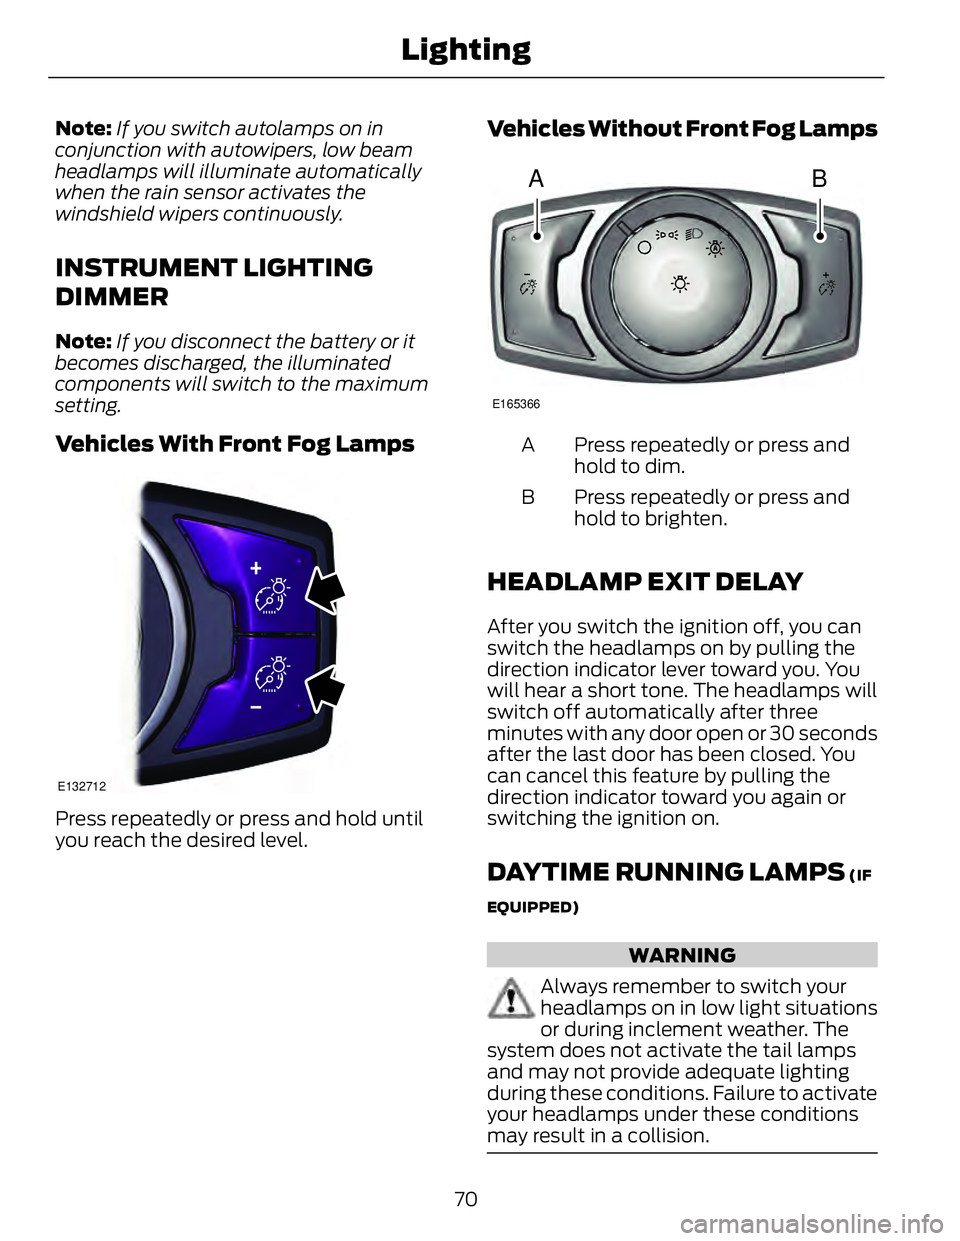
Vehicles With Front Fog Lamps E132712
Press repeatedly or press and hold until
you reach the desired level. Vehicles Without Front Fog Lamps
A B E165366
Press repeatedly or press and
hold to dim.A
Press repeatedly or press and
hold to brighten.B
HEADLAMP EXIT DELAY After you switch the ignition off, you can
switch the headlamps on by pulling the
direction indicator lever toward you. You
will hear a short tone. The headlamps will
switch off automatically after three
minutes with any door open or 30 seconds
after the last door has been closed. You
can cancel this feature by pulling the
direction indicator toward you again or
switching the ignition on.
DAYTIME RUNNING LAMPS (IF
EQUIPPED)
WARNING
Always remember to switch your
headlamps on in low light situations
or during inclement weather. The
system does not activate the tail lamps
and may not provide adequate lighting
during these conditions. Failure to activate
your headlamps under these conditions
may result in a collision.
70Lighting
Page 74 of 473
The system switches the low beam
headlamps on at a reduced intensity in
daylight conditions.
To switch the system on, switch the
ignition on, and switch the lighting control
to the off, autolamp or parking lamp
position.
AUTOMATIC HIGH BEAM
CONTROL (IF EQUIPPED)
The system will automatically turn on your
high beams if it is dark enough and no other
traffic is present. When it detects the
headlights of an approaching vehicle, the
tail lamps of the preceding vehicle or street
lighting, the system will turn off the high
beams before they distract other drivers.
The low beams remain on.
Note: If it appears that automatic control
of the high beams is not functioning
properly, check the windshield in front of
the camera for a blockage. A clear view of
the road is required for proper system
operation. Have any windshield damage in
the area of the camera’s field-of-view
repaired.
Note: If the system detects a blockage such
as bird droppings, bug splatter, snow or ice,
and you do not observe changes, the system
will go into low beam mode until you clear
the blockage. A message may also appear
in the instrument cluster display noting the
front camera is blocked.
Note: Typical road dust, dirt and water
spots will not affect the performance of the
automatic high beam system . However, in
cold or inclement weather conditions, you
will notice a decrease in the availability of
the high beam system, especially at start
up. If you want to change the beam state
independently of the system, you may
switch the high beams on or off using the
multifunction switch. Automatic control will
resume when conditions are correct. Note: Modification of the vehicle ride height
such as using much larger tires, may
degrade feature performance.
A camera sensor, centrally mounted
behind the windshield of your vehicle,
continuously monitors conditions to decide
when to switch the high beams off and on.
Once the system is active, the high beams
will switch on if:
• the ambient light level is low enough
• there is no traffic in front of the vehicle
• the vehicle speed is greater than
25 mph (40 km/h)
The high beams will switch off if:
• the system detects the headlamps of
an approaching vehicle or the tail
lamps of a preceding vehicle.
• vehicle speed falls below 16 mph
(25 km/h)
• the ambient light level is high enough
that high beams are not required
• the system detects severe rain, snow
or fog
• the camera is blocked
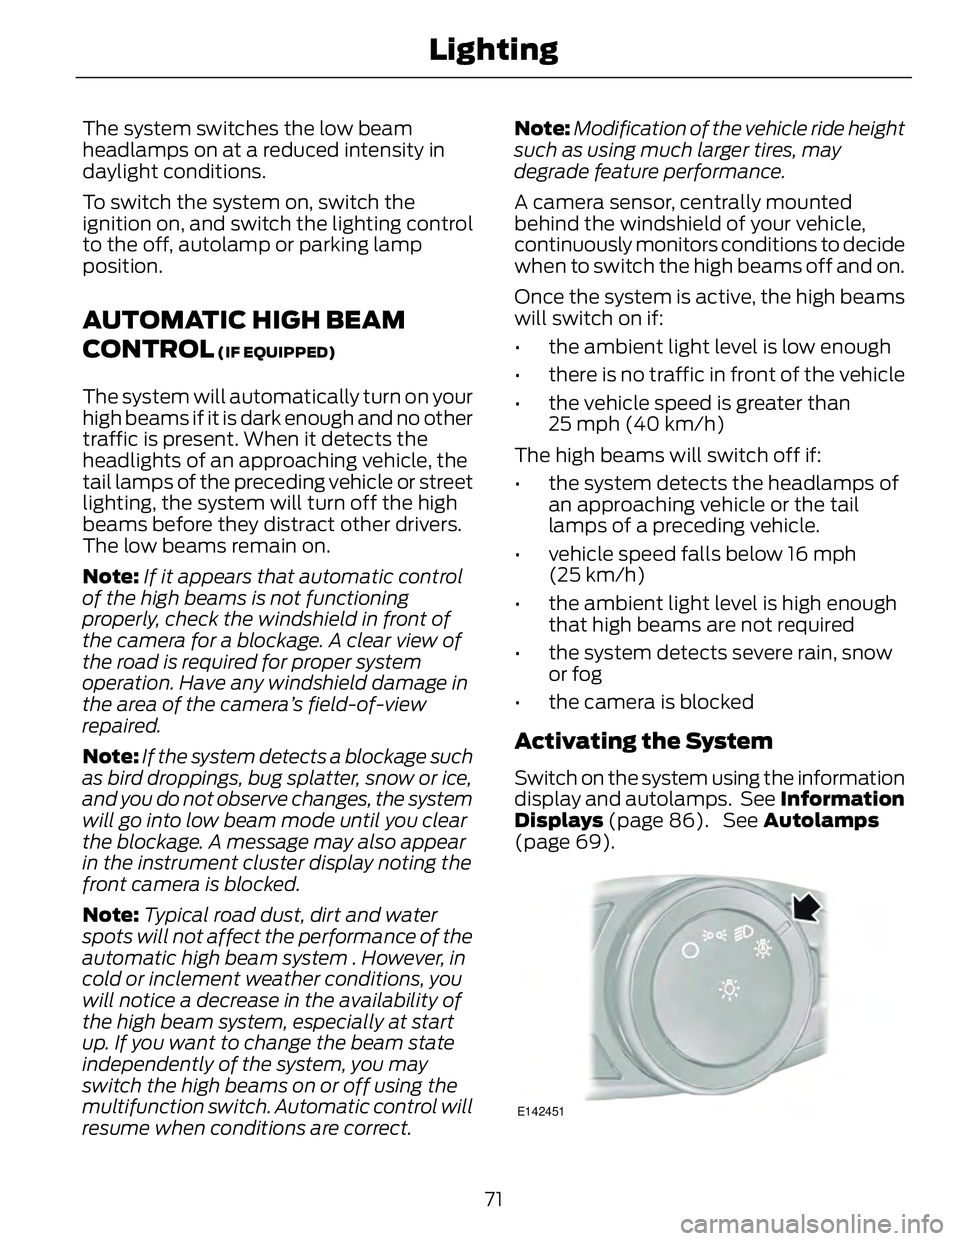
Activating the System Switch on the system using the information
display and autolamps. See Information
Displays (page 86). See Autolamps
(page 69).
E142451
71Lighting
Page 75 of 473
Switch the lighting control to the
autolamps position.
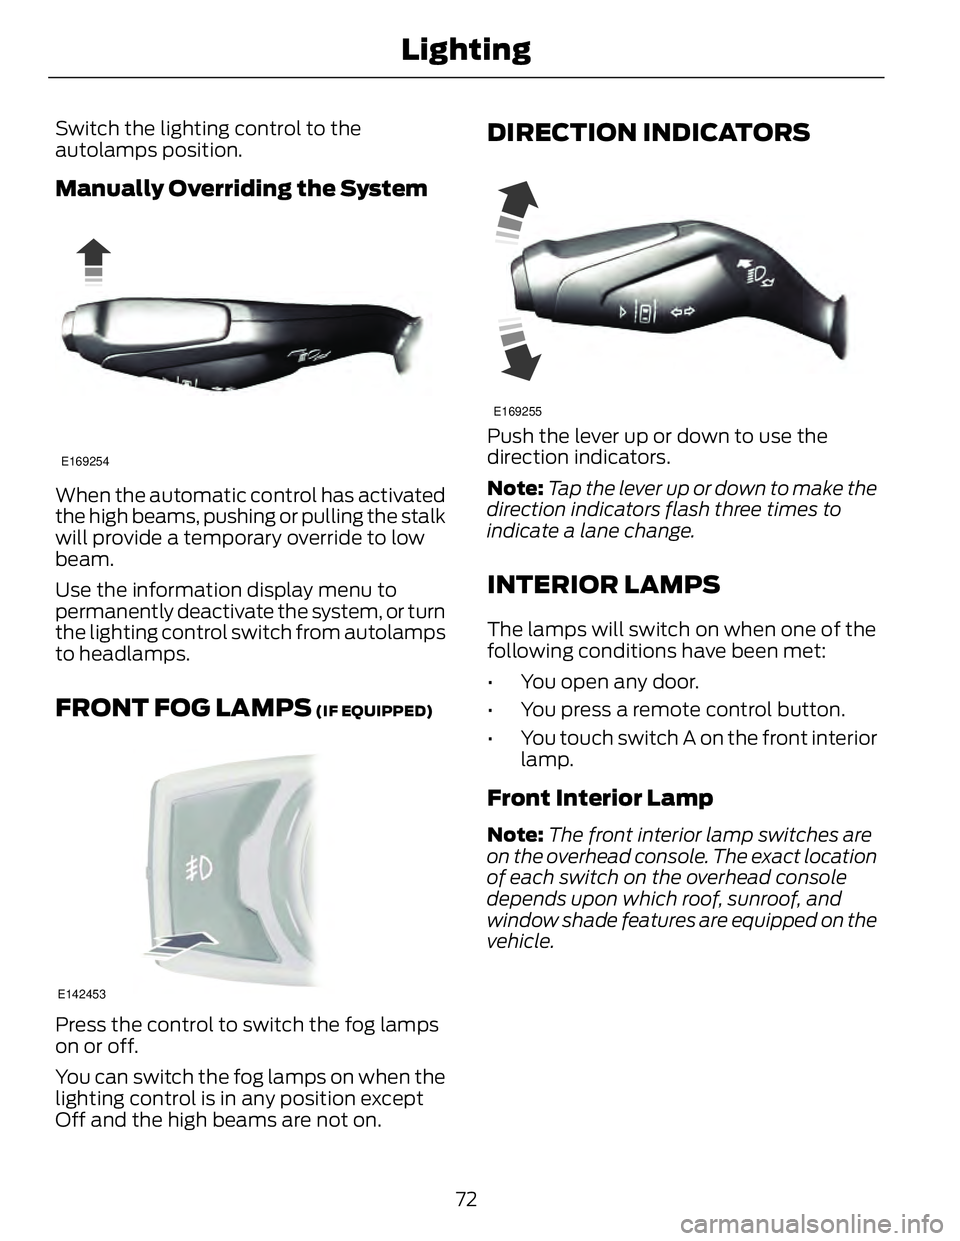
Manually Overriding the System E169254
When the automatic control has activated
the high beams, pushing or pulling the stalk
will provide a temporary override to low
beam.
Use the information display menu to
permanently deactivate the system, or turn
the lighting control switch from autolamps
to headlamps.
FRONT FOG LAMPS (IF EQUIPPED)
E142453
Press the control to switch the fog lamps
on or off.
You can switch the fog lamps on when the
lighting control is in any position except
Off and the high beams are not on. DIRECTION INDICATORS E169255
Push the lever up or down to use the
direction indicators.
Note: Tap the lever up or down to make the
direction indicators flash three times to
indicate a lane change.
INTERIOR LAMPS The lamps will switch on when one of the
following conditions have been met:
• You open any door.
• You press a remote control button.
• You touch switch A on the front interior
lamp.
Front Interior Lamp Note: The front interior lamp switches are
on the overhead console. The exact location
of each switch on the overhead console
depends upon which roof, sunroof, and
window shade features are equipped on the
vehicle.
72Lighting
Page 99 of 473
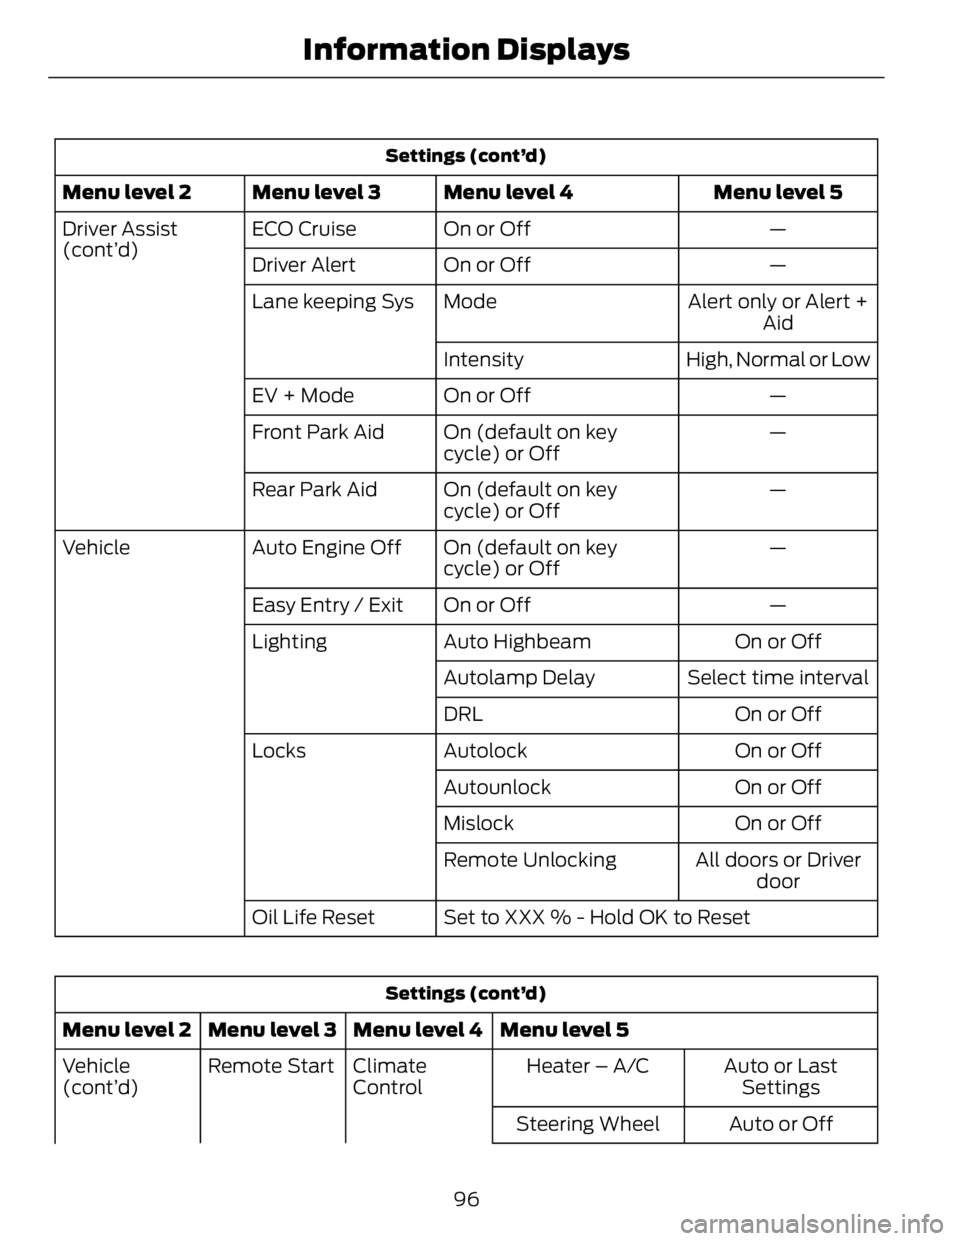
Settings (cont’d)
Menu level 5Menu level 4Menu level 3Menu level 2
—On or OffECO CruiseDriver Assist
(cont’d)
—On or OffDriver Alert
Alert only or Alert +
AidModeLane keeping Sys
High, Normal or LowIntensity
—On or OffEV + Mode
—On (default on key
cycle) or OffFront Park Aid
—On (default on key
cycle) or OffRear Park Aid
—On (default on key
cycle) or OffAuto Engine OffVehicle
—On or OffEasy Entry / Exit
On or OffAuto HighbeamLighting
Select time intervalAutolamp Delay
On or OffDRL
On or OffAutolockLocks
On or OffAutounlock
On or OffMislock
All doors or Driver
doorRemote Unlocking
Set to XXX % - Hold OK to ResetOil Life Reset
Settings (cont’d)
Menu level 5Menu level 4Menu level 3Menu level 2
Auto or Last
SettingsHeater – A/CClimate
ControlRemote StartVehicle
(cont’d)
Auto or OffSteering Wheel
96Information Displays
Page 256 of 473

ADJUSTING THE HEADLAMPS Vertical Aim Adjustment The headlamps on your vehicle are
properly aimed at the assembly plant. If
your vehicle has been in an accident, the
alignment of your headlamps should be
checked by your authorized dealer.
Headlamp Aiming Target E142592
8 feet (2.4 meters)A
Center height of lamp to groundB
25 feet (7.6 meters)C
Horizontal reference lineD
Vertical Aim Adjustment Procedure
1. Park the vehicle directly in front of a
wall or screen on a level surface,
approximately 25 feet (7.6 meters)
away.
2. Measure the height of the headlamp
bulb center from the ground and mark
an 8 foot (2.4 meter) horizontal
reference line on the vertical wall or
screen at this height.
Note: To see a clearer light pattern for
adjusting, you may want to block the light
from one headlamp while adjusting the
other. 3. Turn on the low beam headlamps to
illuminate the wall or screen and open
the hood. E142465
4. On the wall or screen you will observe
a flat zone of high intensity light
located at the top of the right hand
portion of the beam pattern. If the top
edge of the high intensity light zone is
not at the horizontal reference line, the
headlamp will need to be adjusted.
E145594
5. Locate the vertical adjuster on each
headlamp. Using a Phillips #2
screwdriver, turn the adjuster either
clockwise or counterclockwise in order
to adjust the vertical aim of the
headlamp. The horizontal edge of the
brighter light should touch the
horizontal reference line.
6. Close the hood and turn off the lamps.
253Maintenance
Page 259 of 473
Examples of unacceptable moisture
(usually caused by a lamp water leak) are:
• Water puddle inside the lamp.
• Large water droplets, drip marks or
streaks present on the interior of the
lens.
Take your vehicle to an authorized dealer
for service if any of the above conditions
of unacceptable moisture are present.
Replacing the Headlamp Bulbs WARNING
Handle a halogen headlamp bulb
carefully and keep out of children’s
reach. Grasp the bulb by only its
plastic base and do not touch the glass.
The oil from your hand could cause the
bulb to break the next time the headlamps
are operated.
Note: If the bulb is accidentally touched, it
should be cleaned with rubbing alcohol
before being used.
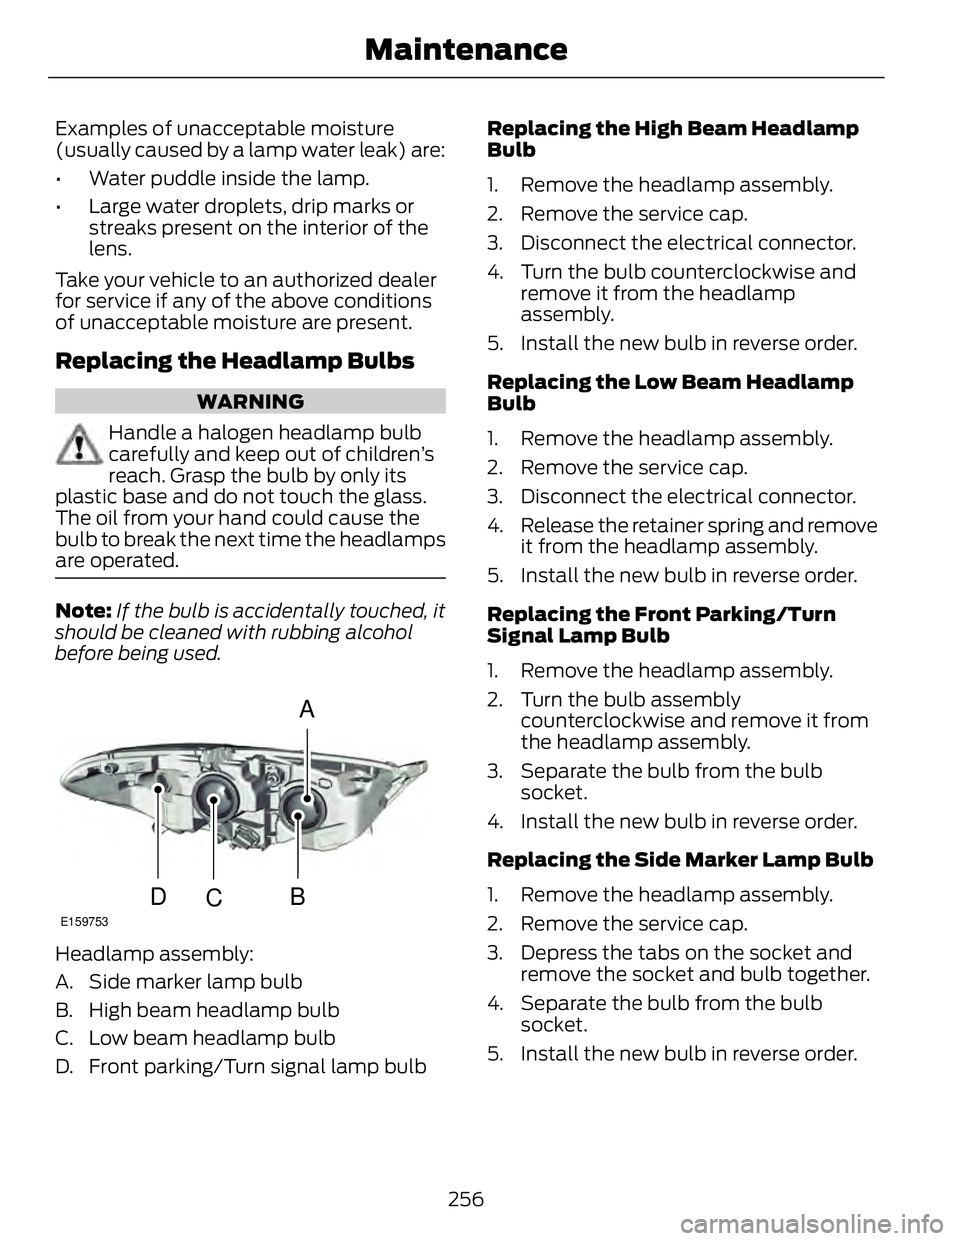
A
B
CDE159753
Headlamp assembly:
A. Side marker lamp bulb
B. High beam headlamp bulb
C. Low beam headlamp bulb
D. Front parking/Turn signal lamp bulb Replacing the High Beam Headlamp
Bulb
1. Remove the headlamp assembly.
2. Remove the service cap.
3. Disconnect the electrical connector.
4. Turn the bulb counterclockwise and
remove it from the headlamp
assembly.
5. Install the new bulb in reverse order.
Replacing the Low Beam Headlamp
Bulb
1. Remove the headlamp assembly.
2. Remove the service cap.
3. Disconnect the electrical connector.
4. Release the retainer spring and remove
it from the headlamp assembly.
5. Install the new bulb in reverse order.
Replacing the Front Parking/Turn
Signal Lamp Bulb
1. Remove the headlamp assembly.
2. Turn the bulb assembly
counterclockwise and remove it from
the headlamp assembly.
3. Separate the bulb from the bulb
socket.
4. Install the new bulb in reverse order.
Replacing the Side Marker Lamp Bulb
1. Remove the headlamp assembly.
2. Remove the service cap.
3. Depress the tabs on the socket and
remove the socket and bulb together.
4. Separate the bulb from the bulb
socket.
5. Install the new bulb in reverse order.
256Maintenance
Page 261 of 473
Replacing the License Plate Lamp
Bulb
3 2
1E72789
1. Carefully release the spring clip. 2. Remove the lamp.
3. Remove the bulb.
Install the new bulb in reverse order.
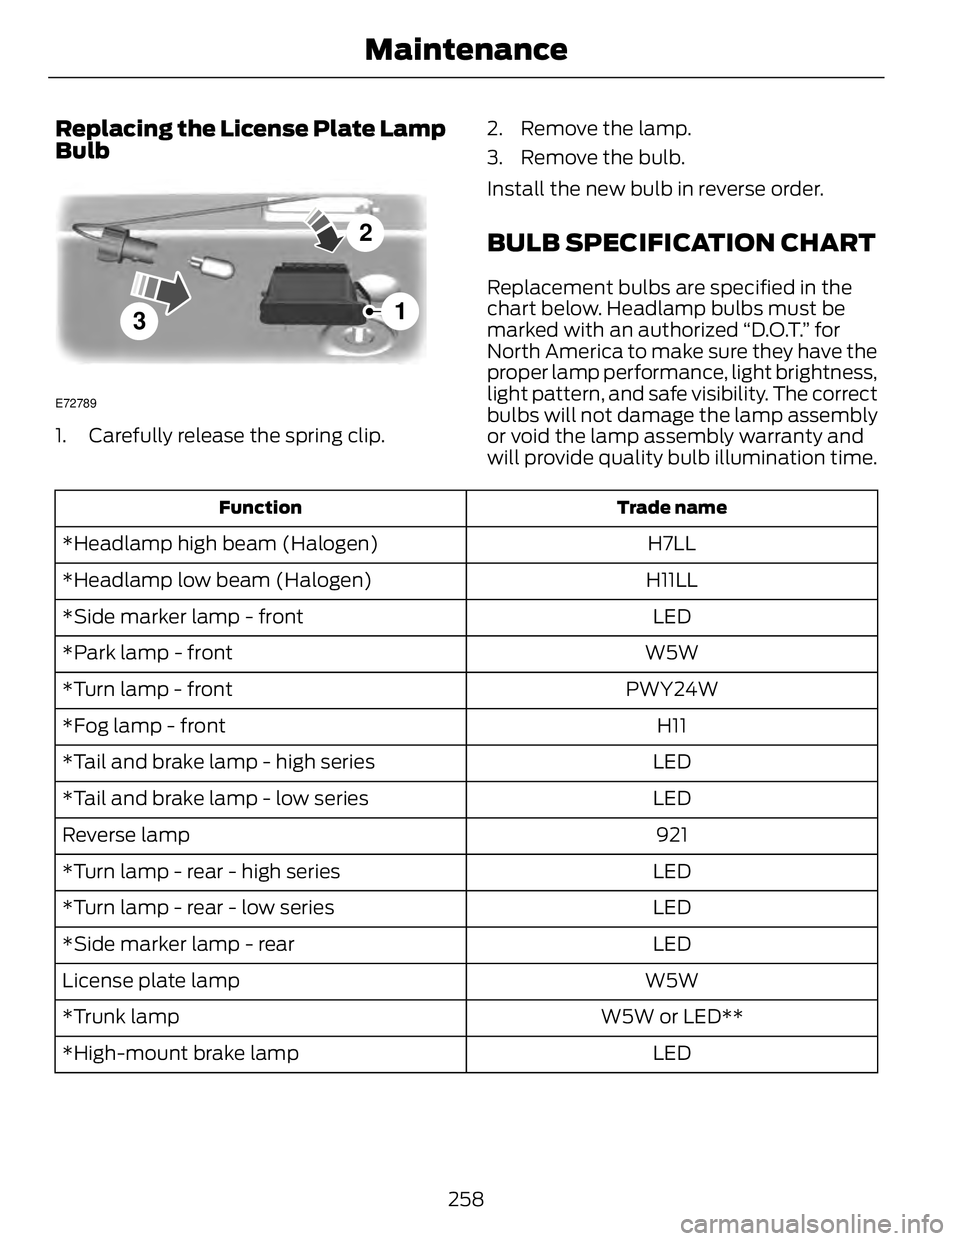
BULB SPECIFICATION CHART Replacement bulbs are specified in the
chart below. Headlamp bulbs must be
marked with an authorized “D.O.T.” for
North America to make sure they have the
proper lamp performance, light brightness,
light pattern, and safe visibility. The correct
bulbs will not damage the lamp assembly
or void the lamp assembly warranty and
will provide quality bulb illumination time. Trade nameFunction
H7LL*Headlamp high beam (Halogen)
H11LL*Headlamp low beam (Halogen)
LED*Side marker lamp - front
W5W*Park lamp - front
PWY24W*Turn lamp - front
H11*Fog lamp - front
LED*Tail and brake lamp - high series
LED*Tail and brake lamp - low series
921Reverse lamp
LED*Turn lamp - rear - high series
LED*Turn lamp - rear - low series
LED*Side marker lamp - rear
W5WLicense plate lamp
W5W or LED***Trunk lamp
LED*High-mount brake lamp
258Maintenance
Page 468 of 473
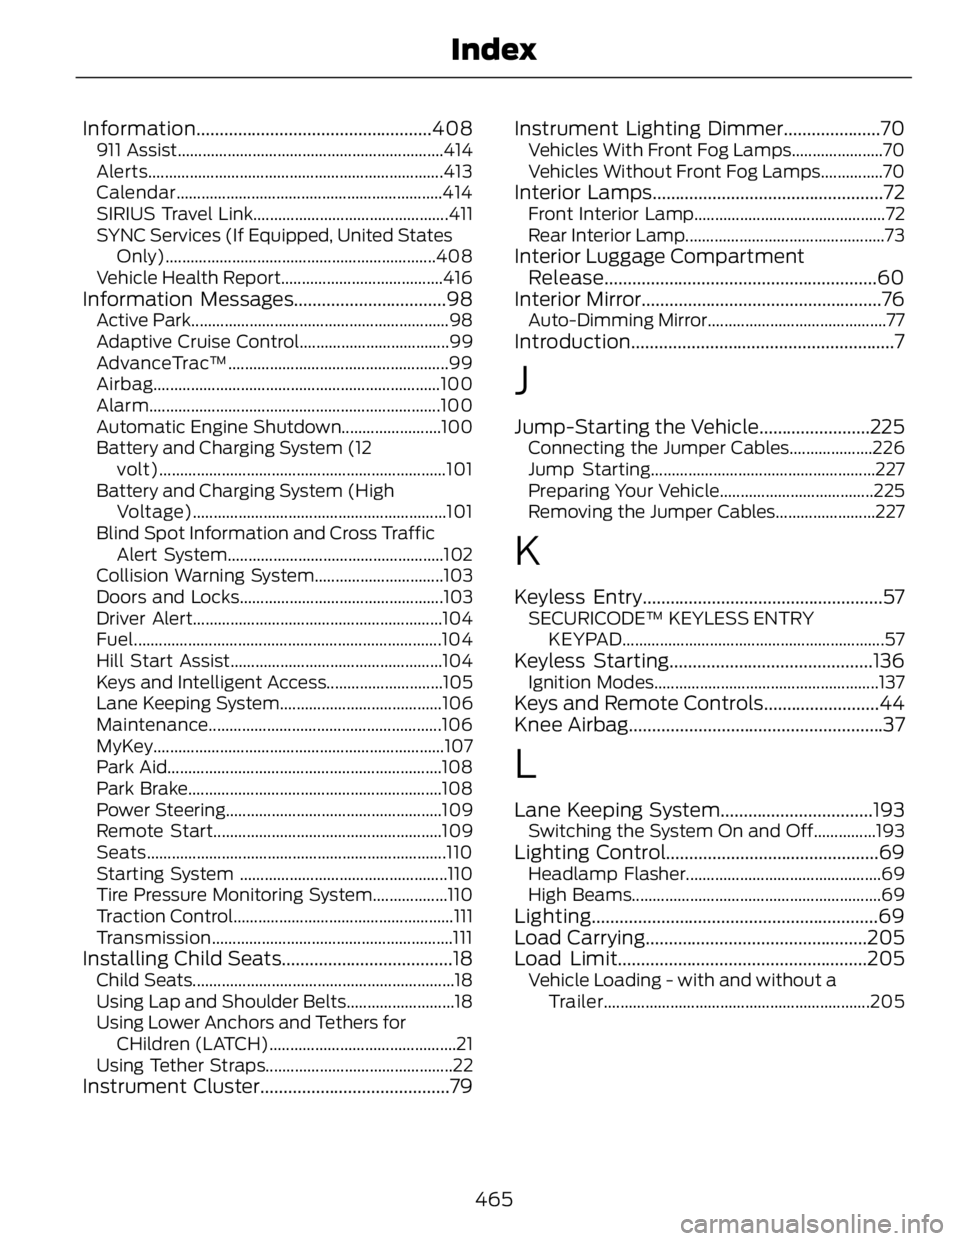
Information ...................................................408911 Assist................................................................414
Alerts.......................................................................413
Calendar ................................................................414
SIRIUS Travel Link...............................................411
SYNC Services (If Equipped, United States
Only).................................................................408
Vehicle Health Report.......................................416
Information Messages.................................98 Active Park..............................................................98
Adaptive Cruise Control....................................99
AdvanceTrac™.....................................................99
Airbag .....................................................................100
Alarm......................................................................100
Automatic Engine Shutdown........................100
Battery and Charging System (12
volt).....................................................................101
Battery and Charging System (High
Voltage).............................................................101
Blind Spot Information and Cross Traffic
Alert System....................................................102
Collision Warning System...............................103
Doors and Locks.................................................103
Driver Alert............................................................104
Fuel ..........................................................................104
Hill Start Assist...................................................104
Keys and Intelligent Access............................105
Lane Keeping System.......................................106
Maintenance ........................................................ 106
MyKey......................................................................107
Park Aid..................................................................108
Park Brake.............................................................108
Power Steering....................................................109
Remote Start.......................................................109
Seats........................................................................110
Starting System ..................................................110
Tire Pressure Monitoring System..................110
Traction Control.....................................................111
Transmission ..........................................................111
Installing Child Seats.....................................18 Child Seats...............................................................18
Using Lap and Shoulder Belts..........................18
Using Lower Anchors and Tethers for
CHildren (LATCH).............................................21
Using Tether Straps.............................................22
Instrument Cluster.........................................79 Instrument Lighting Dimmer.....................70 Vehicles With Front Fog Lamps......................70
Vehicles Without Front Fog Lamps...............70
Interior Lamps..................................................72 Front Interior Lamp..............................................72
Rear Interior Lamp................................................73
Interior Luggage Compartment
Release...........................................................60
Interior Mirror....................................................76 Auto-Dimming Mirror...........................................77
Introduction .........................................................7
J Jump-Starting the Vehicle........................225 Connecting the Jumper Cables....................226
Jump Starting......................................................227
Preparing Your Vehicle.....................................225
Removing the Jumper Cables........................227
K Keyless Entry....................................................57 SECURICODE™ KEYLESS ENTRY
KEYPAD ...............................................................57
Keyless Starting............................................136 Ignition Modes......................................................137
Keys and Remote Controls.........................44
Knee Airbag.......................................................37
L Lane Keeping System.................................193 Switching the System On and Off...............193
Lighting Control..............................................69 Headlamp Flasher...............................................69
High Beams............................................................69
Lighting ..............................................................69
Load Carrying................................................205
Load Limit......................................................205 Vehicle Loading - with and without a
Trailer................................................................205
465Index