tow FORD FUSION HYBRID 2014 Owners Manual
[x] Cancel search | Manufacturer: FORD, Model Year: 2014, Model line: FUSION HYBRID, Model: FORD FUSION HYBRID 2014Pages: 473, PDF Size: 5.93 MB
Page 5 of 473
Wipers and Washers Windshield Wipers.........................................67
Autowiper s........................................................67
Windshield Washers.....................................68
Lighting Lighting Control..............................................69
Autolamps........................................................69
Instrument Lighting Dimmer.....................70
Headlamp Exit Delay....................................70
Daytime Running Lamps.............................70
Automatic High Beam Control...................71
Front Fog Lamps.............................................72
Direction Indicators........................................72
Interior Lamps..................................................72
Ambient Lighting............................................73
Windows and Mirrors Power Windows..............................................74
Global Opening and Closing......................75
Exterior Mirrors.................................................75
Interior Mirror....................................................76
Sun Visors..........................................................77
Moonroof............................................................77
Instrument Cluster Gauges................................................................79
Warning Lamps and Indicators..................81
Audible Warnings and Indicators.............85
Information Displays General Information.....................................86
Information Messages.................................98
Climate Control Automatic Climate Control........................113
Automatic Climate Control........................114
Automatic Climate Control.......................116 Hints on Controlling the Interior
Climate..........................................................118
Heated Windows and Mirrors...................119
Cabin Air Filter................................................119
Remote Start.................................................120
Seats Sitting in the Correct Position...................121
Head Restraints..............................................121
Manual Seats.................................................123
Power Seats....................................................123
Memory Function.........................................124
Rear Seats.......................................................126
Heated Seats..................................................127
Ventilated Seats............................................127
Rear Seat Armrest........................................127
Universal Ga rage Door
Opener Universal Garage Door Opener...............129
Auxiliary Power Points Auxiliary Power Points................................133
Storage C ompartmentsCenter Console..............................................135
Overhead Console........................................135
Starting and Stopping the
Engine General Information....................................136
Ignition Switch...............................................136
Keyless Starting............................................136
Starting a Gasoline Engine........................137
Engine Block Heater....................................140
Unique Driving Character-
istics
Hybrid Electric Vehicle................................142
2Table of Contents
Page 6 of 473
Fuel and Refueling Safety Precautions......................................148
Fuel Quality....................................................149
Refueling .........................................................149
Running Out of Fuel.....................................153
Fuel Consumption.......................................156
Emission Control System...........................157
High Voltage Battery General Information....................................160
Charging the High Voltage Battery.........161
High Voltage Battery Cut-Off
Switch...........................................................164
Transmission Automatic Transmission...........................166
Brakes General Information....................................169
Hints on Driving With Anti-Lock
Brakes...........................................................170
Electric Parking Brake.................................170
Hill Start Assist...............................................172
Traction Control Principle of Operation.................................174
Using Traction Control................................174
Stability Control Principle of Operation.................................175
Using Stability Control................................175
Parking Aids Parking Aid......................................................176
Active Park Assist.........................................178
Rear View Camera........................................181
Cruise Control
Principle of Operation.................................185
Using Cruise Control....................................185 Using Adaptive Cruise Control................186
Driving Aids Driver Alert......................................................192
Lane Keeping System.................................193
Blind Spot Monitor.......................................197
Steering ............................................................ 201
Collision Warning System........................202
Load Carrying Load Limit......................................................205
Towing Towing a Trailer..............................................213
Transporting the Vehicle............................213
Towing the Vehicle on Four Wheels......213
Driving Hints Breaking-In ...................................................... 215
Economical Driving......................................215
Driving Through Water................................215
Floor Mats........................................................216
Customer Assistance Getting the Services You Need................218
In California (U.S. Only).............................219
The Better Business Bureau (BBB) Auto
Line Program (U.S. Only).....................220
Utilizing the Mediation/Arbitration
Program (Canada Only).......................220
Getting Assistance Outside the U.S. and
Canada.........................................................221
Ordering Additional Owner's
Literature.....................................................222
Reporting Safety Defects (U.S.
Only).............................................................222
Reporting Safety Defects (Canada
Only).............................................................223
Roadside Emergencies
Roadside Assistance..................................224
3Table of Contents
Page 10 of 473
ABOUT THIS MANUAL Thank you for choosing Ford. We
recommend that you take some time to
get to know your vehicle by reading this
manual. The more that you know about it,
the greater the safety and pleasure you
will get from driving it.
WARNING
Driving while distracted can result in
loss of vehicle control, crash and
injury. We strongly recommend that
you use extreme caution when using any
device that may take your focus off the
road. Your primary responsibility is the safe
operation of your vehicle. We recommend
against the use of any handheld device
while driving and encourage the use of
voice-operated systems when possible.
Make sure you are aware of all applicable
local laws that may affect the use of
electronic devices while driving.
Note: This manual describes product
features and options available throughout
the range of available models, sometimes
even before they are generally available. It
may describe options not fitted to your
vehicle.
Note: Some of the illustrations in this
manual may be used for different models,
so may appear different to you on your
vehicle. However, the essential information
in the illustrations is always correct.
Note: Always use and operate your vehicle
in line with all applicable laws and
regulations.
Note: Pass on this manual when selling
your vehicle. It is an integral part of the
vehicle.
This manual may qualify the location of a
component as left-hand side or right-hand
side. The side is determined when facing
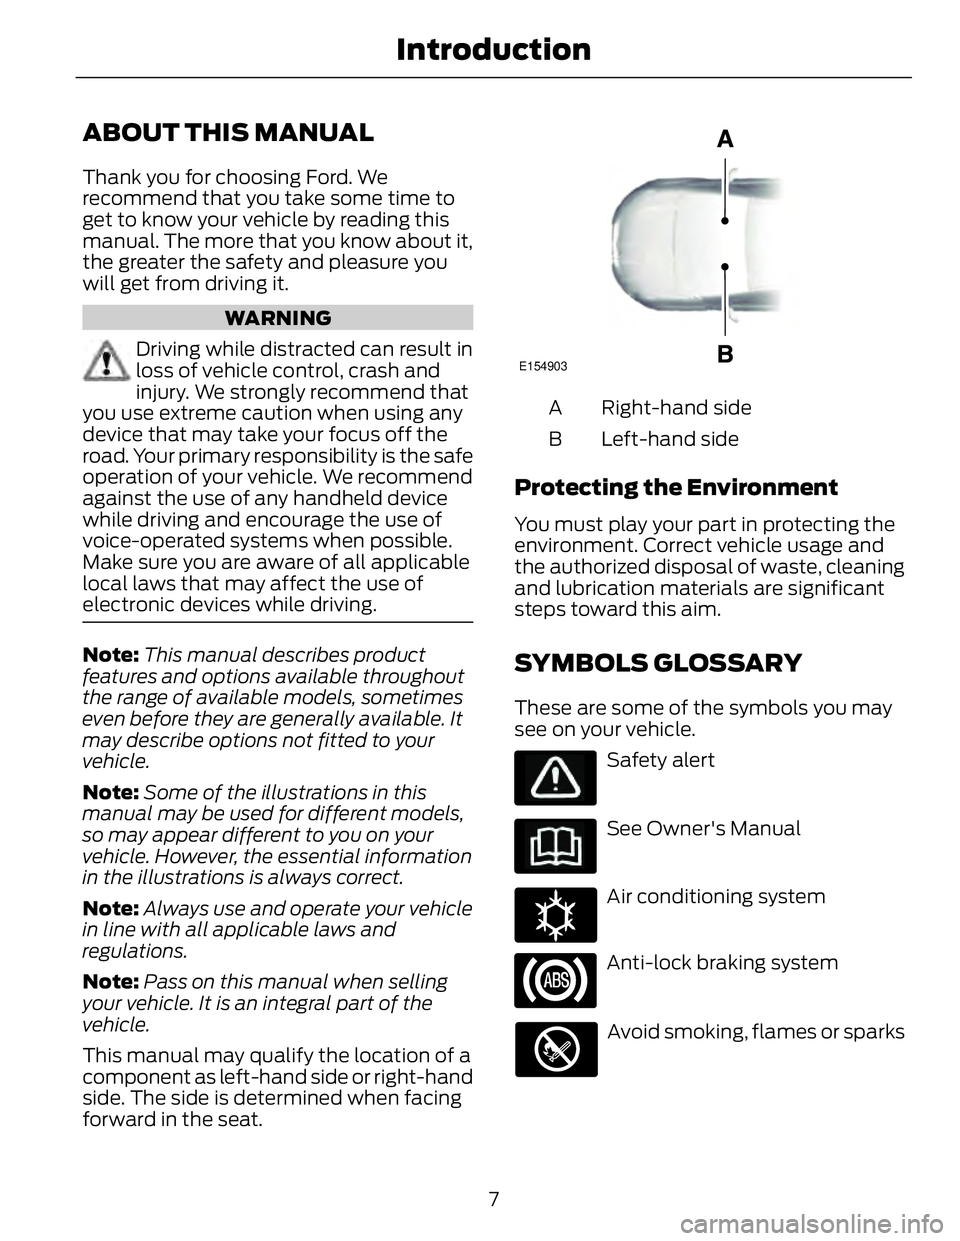
forward in the seat. E154903
Right-hand sideA
Left-hand sideB
Protecting the Environment You must play your part in protecting the
environment. Correct vehicle usage and
the authorized disposal of waste, cleaning
and lubrication materials are significant
steps toward this aim.
SYMBOLS GLOSSARY These are some of the symbols you may
see on your vehicle.
Safety alert
See Owner's Manual E162384
Air conditioning system
Anti-lock braking system
Avoid smoking, flames or sparks
7Introduction
Page 18 of 473
WARNINGS
Always carefully follow the
instructions and warnings provided
by the manufacturer of any child
restraint to determine if the restraint device
is appropriate for your child's size, height,
weight, or age. Follow the child restraint
manufacturer's instructions and warnings
provided for installation and use in
conjunction with the instructions and
warnings provided by your vehicle
manufacturer. A safety seat that is
improperly installed or utilized, is
inappropriate for your child's height, age,
or weight or does not properly fit the child
may increase the risk of serious injury or
death.
Never let a passenger hold a child on
his or her lap while your vehicle is
moving. The passenger cannot
protect the child from injury in a crash,
which may result in serious injury or death. WARNINGS
Never use pillows, books, or towels
to boost a child. They can slide
around and increase the likelihood
of injury or death in a crash.
Always restrain an unoccupied child
seat or booster seat. These objects
may become projectiles in a crash or
sudden stop, which may increase the risk
of serious injury.
Never place, or allow a child to place,
the shoulder belt under a child's arm
or behind the back because it
reduces the protection for the upper part
of the body and may increase the risk of
injury or death in a crash.
To avoid risk of injury, do not leave
children or pets unattended in your
vehicle.
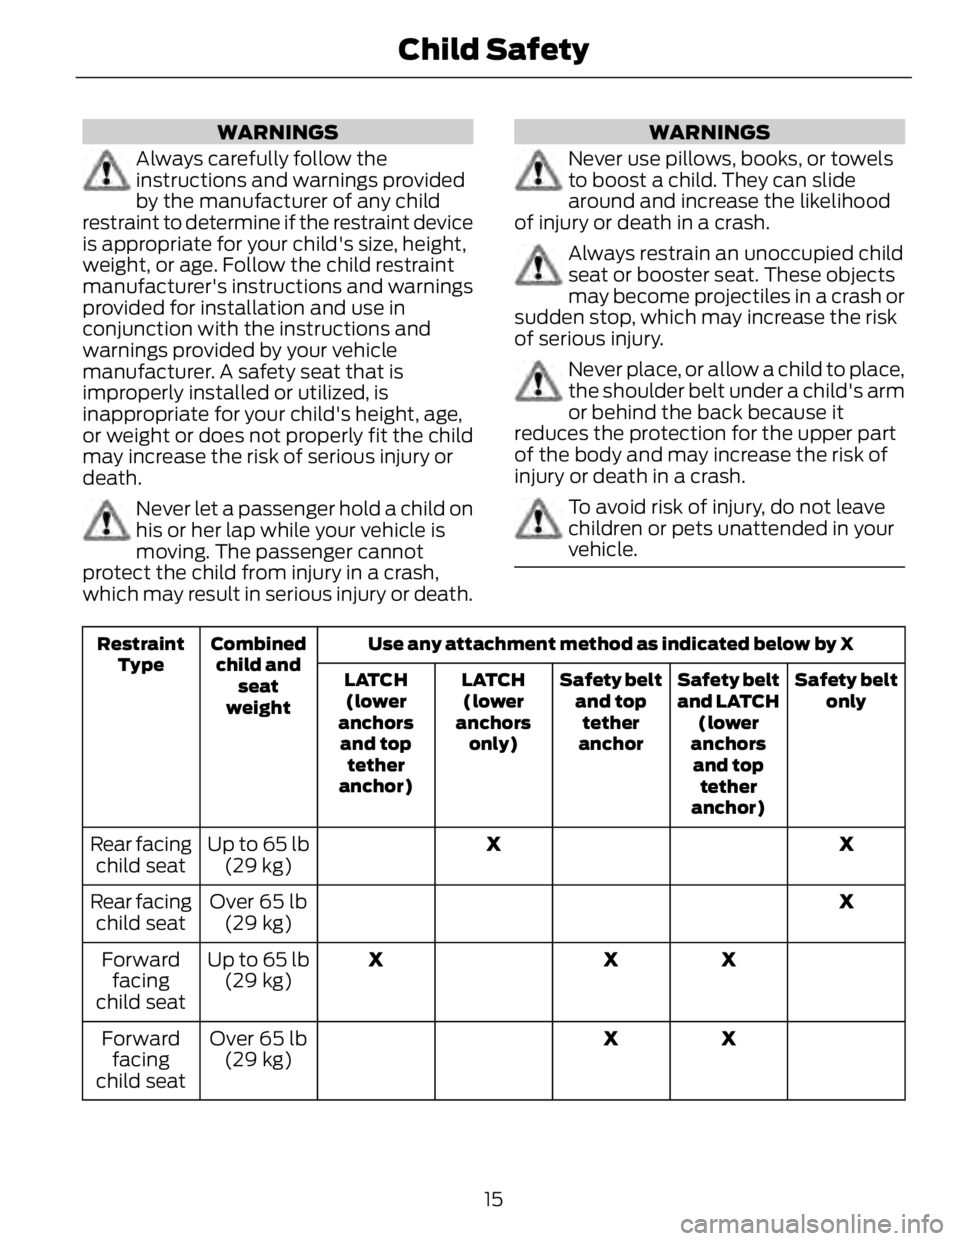
Use any attachment method as indicated below by XCombined
child and
seat
weightRestraint
Type
Safety belt
onlySafety belt
and LATCH
(lower
anchors
and top
tether
anchor)Safety belt
and top
tether
anchorLATCH
(lower
anchors
only)LATCH
(lower
anchors
and top
tether
anchor)
XXUp to 65 lb
(29 kg)Rear facing
child seat
XOver 65 lb
(29 kg)Rear facing
child seat
XXXUp to 65 lb
(29 kg)Forward
facing
child seat
XXOver 65 lb
(29 kg)Forward
facing
child seat
15Child Safety
Page 23 of 473
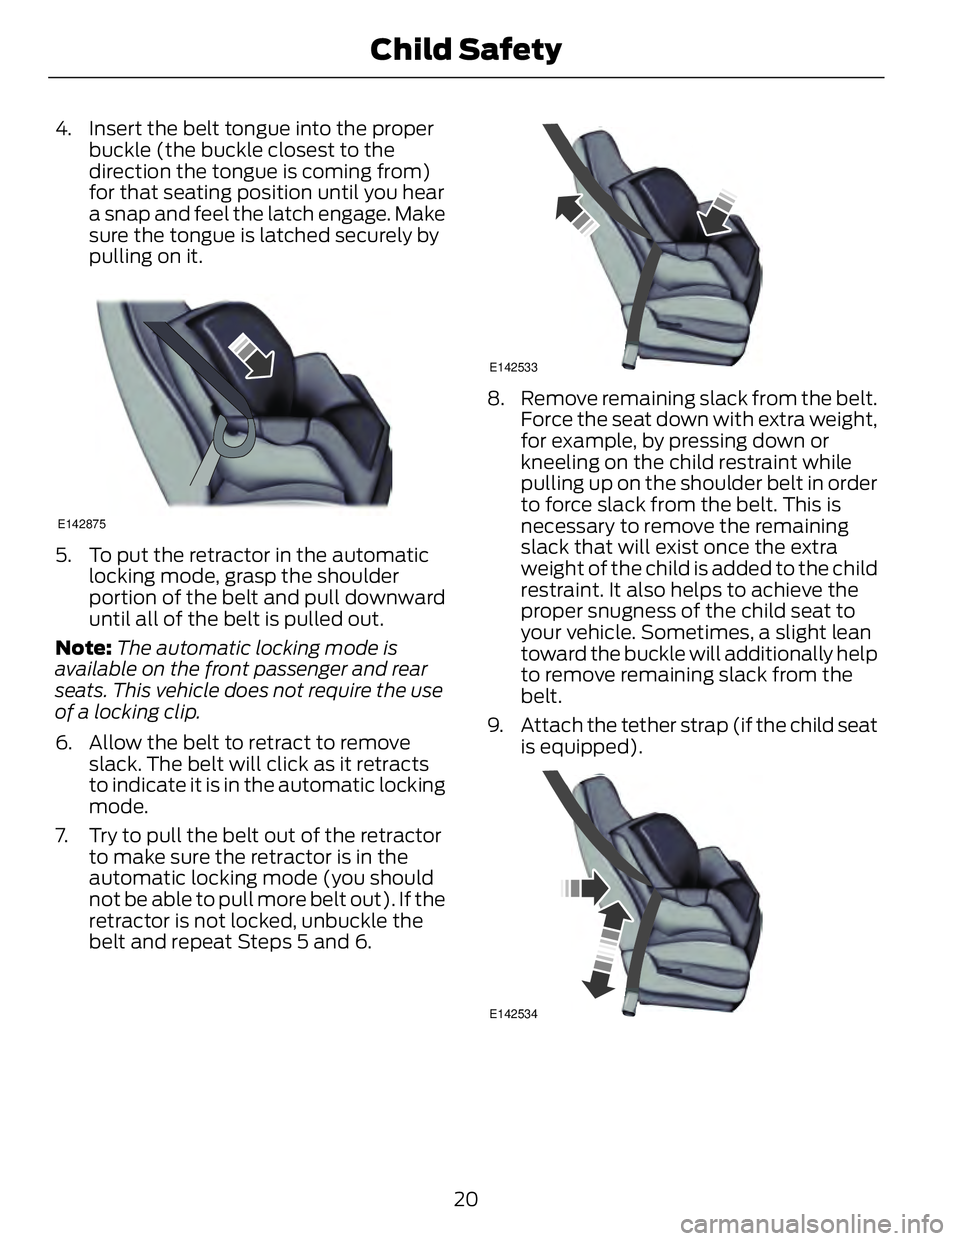
4. Insert the belt tongue into the proper
buckle (the buckle closest to the
direction the tongue is coming from)
for that seating position until you hear
a snap and feel the latch engage. Make
sure the tongue is latched securely by
pulling on it. E142875
5. To put the retractor in the automatic
locking mode, grasp the shoulder
portion of the belt and pull downward
until all of the belt is pulled out.
Note: The automatic locking mode is
available on the front passenger and rear
seats. This vehicle does not require the use
of a locking clip.
6. Allow the belt to retract to remove
slack. The belt will click as it retracts
to indicate it is in the automatic locking
mode.
7. Try to pull the belt out of the retractor
to make sure the retractor is in the
automatic locking mode (you should
not be able to pull more belt out). If the
retractor is not locked, unbuckle the
belt and repeat Steps 5 and 6. E142533
8. Remove remaining slack from the belt.
Force the seat down with extra weight,
for example, by pressing down or
kneeling on the child restraint while
pulling up on the shoulder belt in order
to force slack from the belt. This is
necessary to remove the remaining
slack that will exist once the extra
weight of the child is added to the child
restraint. It also helps to achieve the
proper snugness of the child seat to
your vehicle. Sometimes, a slight lean
toward the buckle will additionally help
to remove remaining slack from the
belt.
9. Attach the tether strap (if the child seat
is equipped).
E142534
20Child Safety
Page 40 of 473
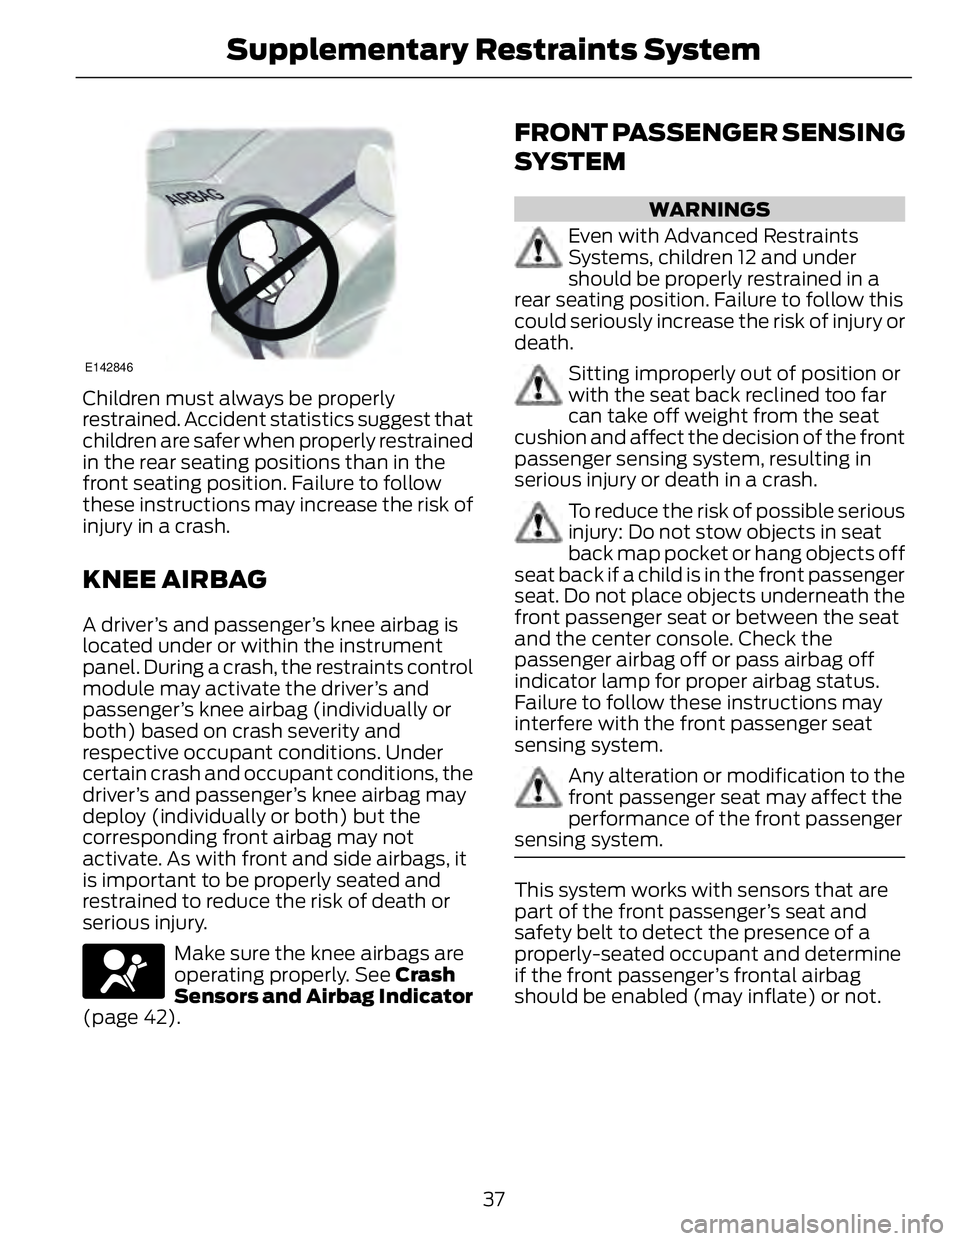
E142846
Children must always be properly
restrained. Accident statistics suggest that
children are safer when properly restrained
in the rear seating positions than in the
front seating position. Failure to follow
these instructions may increase the risk of
injury in a crash.
KNEE AIRBAG A driver’s and passenger’s knee airbag is
located under or within the instrument
panel. During a crash, the restraints control
module may activate the driver’s and
passenger’s knee airbag (individually or
both) based on crash severity and
respective occupant conditions. Under
certain crash and occupant conditions, the
driver’s and passenger’s knee airbag may
deploy (individually or both) but the
corresponding front airbag may not
activate. As with front and side airbags, it
is important to be properly seated and
restrained to reduce the risk of death or
serious injury.
Make sure the knee airbags are
operating properly. See Crash
Sensors and Airbag Indicator
(page 42). FRONT PASSENGER SENSING
SYSTEM WARNINGS
Even with Advanced Restraints
Systems, children 12 and under
should be properly restrained in a
rear seating position. Failure to follow this
could seriously increase the risk of injury or
death.
Sitting improperly out of position or
with the seat back reclined too far
can take off weight from the seat
cushion and affect the decision of the front
passenger sensing system, resulting in
serious injury or death in a crash.
To reduce the risk of possible serious
injury: Do not stow objects in seat
back map pocket or hang objects off
seat back if a child is in the front passenger
seat. Do not place objects underneath the
front passenger seat or between the seat
and the center console. Check the
passenger airbag off or pass airbag off
indicator lamp for proper airbag status.
Failure to follow these instructions may
interfere with the front passenger seat
sensing system.
Any alteration or modification to the
front passenger seat may affect the
performance of the front passenger
sensing system.
This system works with sensors that are
part of the front passenger’s seat and
safety belt to detect the presence of a
properly-seated occupant and determine
if the front passenger’s frontal airbag
should be enabled (may inflate) or not.
37Supplementary Restraints System
Page 42 of 473
Passenger airbagPassenger airbag OFF indic-
atorOccupant
DisabledUnlitEmpty
DisabledLitChild
EnabledUnlitAdult
Note: When the passenger airbag off light
is illuminated, the passenger (seat
mounted) side airbag may be disabled to
avoid the risk of airbag deployment injuries.
After all occupants have adjusted their
seats and put on safety belts, it is very
important that they continue to sit
properly. A properly seated occupant sits
upright, leaning against the seat back, and
centered on the seat cushion, with their
feet comfortably extended on the floor.
Sitting improperly can increase the chance
of injury in a crash event. For example, if
an occupant slouches, lies down, turns
sideways, sits forward, leans forward or
sideways, or puts one or both feet up, the
chance of injury during a crash is greatly
increased.
If you think that the status of the passenger
airbag off indicator lamp is incorrect, check
for the following:
• Objects lodged underneath the seat
• Objects between the seat cushion and
the center console
• Objects hanging off the seat back
• Objects stowed in the seat back map
pocket
• Objects placed on the occupant's lap
• Cargo interference with the seat
• Other passengers pushing or pulling on
the seat
• Rear passenger feet and knees resting
or pushing on the seat The conditions listed above may cause the
weight of a properly seated occupant to
be incorrectly interpreted by the front
passenger sensing system. The person in
the front passenger seat may appear
heavier or lighter due to the conditions
described in the list above.
Make sure the front passenger
sensing system is operating
properly. See Crash Sensors
and Airbag Indicator (page 42).
If the airbag readiness light is lit, do the
following:
The driver and adult passengers should
check for objects lodged underneath the
front passenger seat, or cargo interfering
with the seat.
If there are lodged objects, or cargo is
interfering with the seat, take the following
steps to remove the obstruction:
• Pull the vehicle over.
• Turn the vehicle off.
• Driver and adult passengers should
check for any objects lodged
underneath the front passenger seat
or cargo interfering with the seat.
• Remove the obstruction(s) (if found).
• Restart the vehicle.
39Supplementary Restraints System
Page 45 of 473
Crash sensors and monitoring
system with readiness indicator.
See Crash Sensors and Airbag
Indicator (page 42).
Children 12 years old and under should
always be properly restrained in the back
seats. The side curtain airbags will not
interfere with children restrained using a
properly installed child or booster seat
because it is designed to inflate downward
from the headliner above the doors along
the side window opening.
The design and development of the side
curtain airbags included recommended
testing procedures that were developed
by a group of automotive safety experts
known as the Side Airbag Technical
Working Group. These recommended
testing procedures help reduce the risk of
injuries related to the deployment of side
curtain airbags.
CRASH SENSORS AND
AIRBAG INDICATOR WARNING
Modifying or adding equipment to
the front end of the vehicle (including
frame, bumper, front end body
structure and tow hooks) may affect the
performance of the airbag system,
increasing the risk of injury. Do not modify
the front end of the vehicle.
Your vehicle has a collection of crash and
occupant sensors which provide
information to the restraints control
module. The restraints control module
deploys (activates) the front safety belt
pretensioners, driver airbag, passenger airbag, knee airbag(s), seat mounted side
airbags, side curtain airbags and optional
rear inflatable safety belts. Based on the
type of crash (frontal impact or side
impact), the restraints control module will
deploy the appropriate safety devices.
The restraints control module also
monitors the readiness of the above safety
devices plus the crash and occupant
sensors. The readiness of the safety
system is indicated by a warning indicator
light in the instrument cluster or by a
backup tone if the warning light is not
working. Routine maintenance of the
airbag is not required.
A difficulty with the system is indicated by
one or more of the following:
The readiness light will not
illuminate immediately after the
ignition is turned on.
• The readiness light will either flash or
stay lit.
• A series of five beeps will be heard. The
tone pattern will repeat periodically
until the problem, the light or both are
repaired.
If any of these things happen, even
intermittently, have the supplemental
restraint system serviced at an authorized
dealer immediately. Unless serviced, the
system may not function properly in the
event of a crash.
The safety belt pretensioners and the front
airbag supplemental restraint system are
designed to activate when the vehicle
sustains frontal deceleration sufficient to
cause the restraints control module to
deploy a safety device.
42Supplementary Restraints System
Page 47 of 473
GENERAL INFORMATION ON
RADIO FREQUENCIES This device complies with Part 15 of the
FCC Rules and with Industry Canada
license-exempt RSS standard(s).
Operation is subject to the following two
conditions: (1) This device may not cause
harmful interference, and (2) This device
must accept any interference received,
including interference that may cause
undesired operation.
Note: Changes or modifications not
expressively approved by the party
responsible for compliance could void the
user's authority to operate the equipment.
The term IC before the radio certification
number only signifies that Industry Canada
technical specifications were met.
The typical operating range for your
transmitter is approximately 33 feet (10
meters). Vehicles with the remote start
feature will have a greater range. One of
the following could cause a decrease in
operating range:
• weather conditions
• nearby radio towers
• structures around the vehicle
• other vehicles parked next to your
vehicle
The radio frequency used by your remote
control can also be used by other short
distance radio transmissions, for example
amateur radios, medical equipment,
wireless headphones, remote controls and
alarm systems. If the frequencies are
jammed, you will not be able to use your
remote control. You can lock and unlock
the doors with the key.
Note: Make sure to lock your vehicle before
leaving it unattended.
Note: If you are in range, the remote control
will operate if you press any button
unintentionally. Intelligent Access (If Equipped)
The system uses a radio frequency signal
to communicate with your vehicle and
authorize your vehicle to unlock when one
of the following conditions are met:
• You touch the inside of the front
exterior door handle.
• You press the luggage compartment
button.
• You press a button on the transmitter.
If excessive radio frequency interference
is present in the area or if the transmitter
battery is low, you may need to
mechanically unlock your door. You can
use the mechanical key blade in your
intelligent access key to open the driver
door in this situation. See Remote
Control (page 44).
REMOTE CONTROL Integrated Keyhead Transmitters (If Equipped)
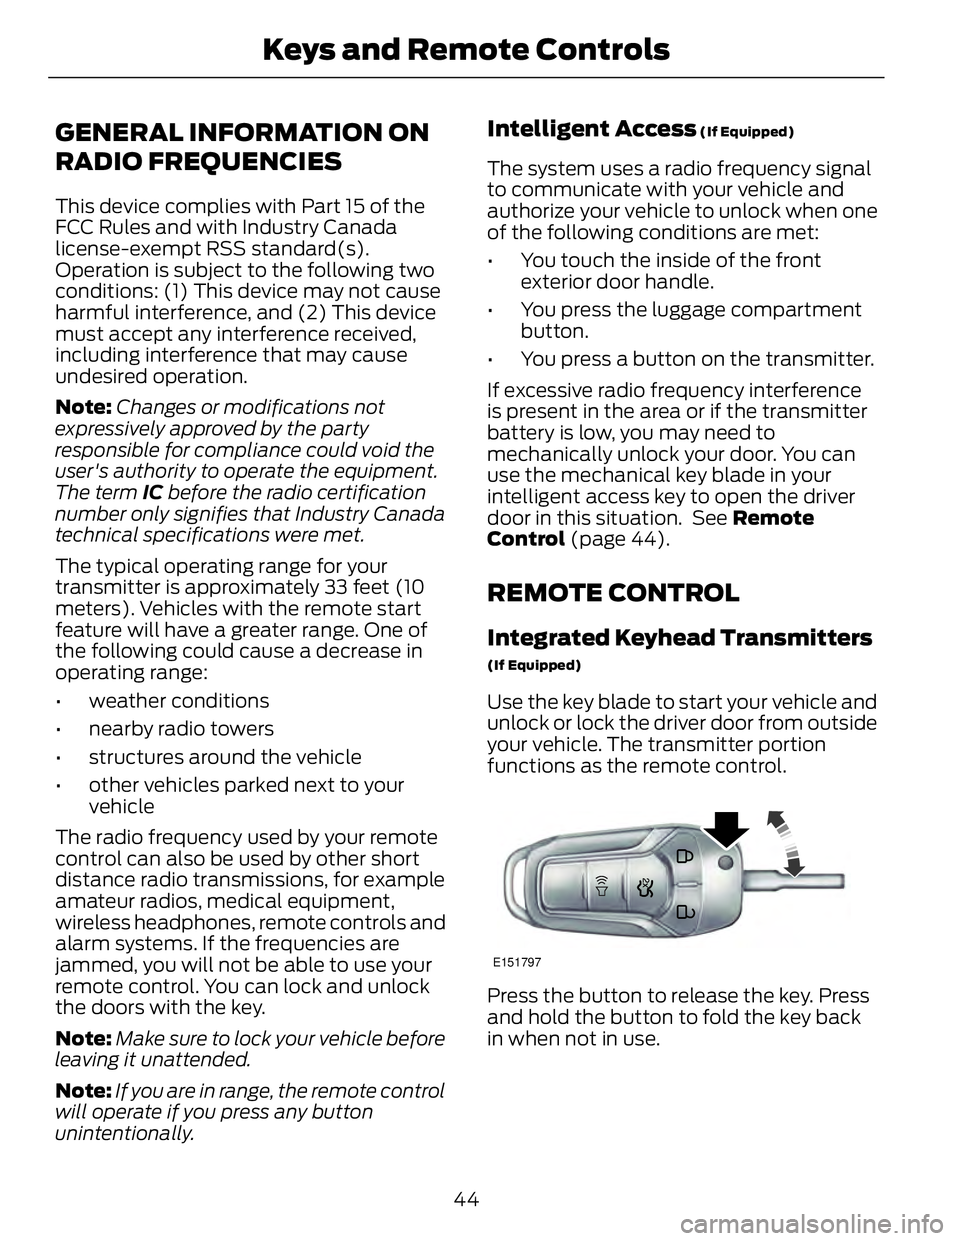
Use the key blade to start your vehicle and
unlock or lock the driver door from outside
your vehicle. The transmitter portion
functions as the remote control.
E151797
Press the button to release the key. Press
and hold the button to fold the key back
in when not in use.
44Keys and Remote Controls
Page 62 of 473
Anti-Scan Feature
The keypad will go into an anti-scan mode
if you enter the wrong code seven times
(35 consecutive button presses). This
mode disables the keypad for one minute
and the keypad lamp will flash.
The anti-scan feature will turn off after:
• one minute of keypad inactivity
• pressing the unlock button on the
remote control
• switching the ignition on
• unlocking your vehicle using intelligent
access.
Unlocking and Locking the Doors
To Unlock the Driver Door
Enter the factory-set 5-digit code or your
personal code. You must press each
number within five seconds of each other.
The interior lamps will illuminate.
Note: All doors will unlock if you enable the
all-door unlocking mode. See Locking and
Unlocking (page 54).
To Unlock All Doors
Enter the factory-set code or your personal
code, then press 3·4 within five seconds.
To Lock All Doors
Press and hold 7·8 and 9·0 at the same
time (with the driver door closed). You do
not need to enter the keypad code first.
To Release the Trunk
Enter the factory-set code or your personal
code, then press 5·6 within five seconds.
Displaying the Factory Set Code
With Integrated Keyhead Transmitters
Note: You will need to have two
programmed passive anti-theft keys for this
procedure. To display the factory-set code in the
information display:
1. Insert a key into the ignition and switch
the ignition on for a few seconds.
2. Switch the ignition off and remove the
key.
3. Insert the second key into the ignition
and switch the ignition on.
The factory-set code will display for a few
seconds.
Note: The code may not display until after
any other warning messages first display.
With Intelligent Access Keys
Note: You will need to have two
programmed intelligent access keys for this
procedure.
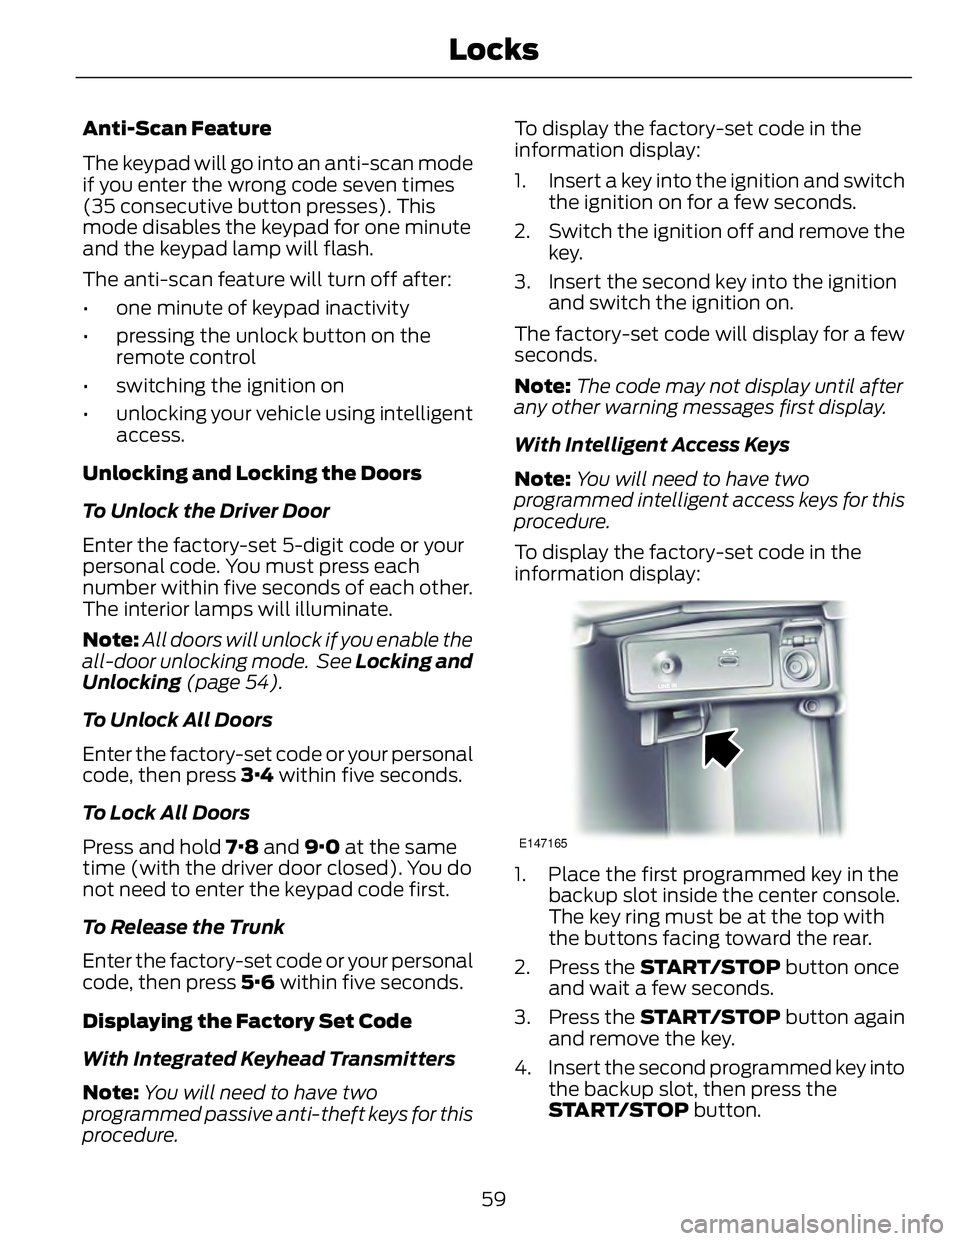
To display the factory-set code in the
information display:
E147165
1. Place the first programmed key in the
backup slot inside the center console.
The key ring must be at the top with
the buttons facing toward the rear.
2. Press the START/STOP button once
and wait a few seconds.
3. Press the START/STOP button again
and remove the key.
4. Insert the second programmed key into
the backup slot, then press the
START/STOP button.
59Locks