FORD FUSION HYBRID 2019 Owners Manual
Manufacturer: FORD, Model Year: 2019, Model line: FUSION HYBRID, Model: FORD FUSION HYBRID 2019Pages: 541, PDF Size: 7.19 MB
Page 171 of 541
CHARGING THE HIGH
VOLTAGE BATTERY
WARNING: Do not use the 120 volt
convenience cord with an extension cord,
two-prong adapter, surge protector, timer
or other adapter. WARNING:
In Canada, do not use
the 120 volt convenience cord in
commercial garages. WARNING:
This equipment has
arcing or sparking parts. Do not expose to
flammable vapors. Position this equipment
at least
18 in (450 mm) above the floor. WARNING:
The AC wall plug must
fit firmly into the AC outlet. If the
connection feels loose, worn or the AC
outlet is damaged, please have a qualified
electrician replace the AC outlet. Using a
convenience cord with a worn outlet may
cause burns, property damage and
increase the risk of electric shock.
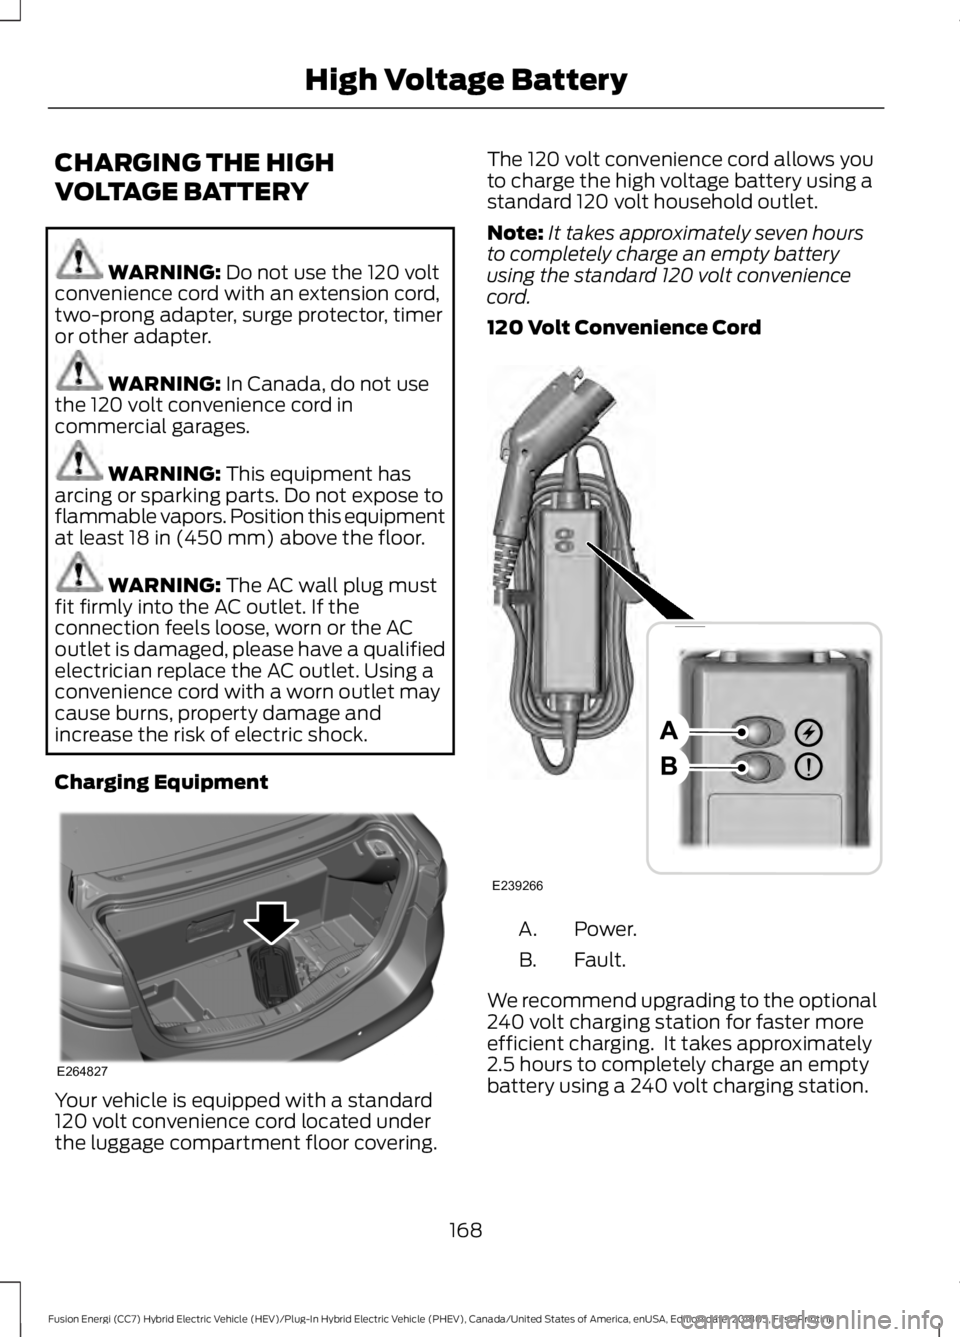
Charging Equipment Your vehicle is equipped with a standard
120 volt convenience cord located under
the luggage compartment floor covering. The 120 volt convenience cord allows you
to charge the high voltage battery using a
standard 120 volt household outlet.
Note:
It takes approximately seven hours
to completely charge an empty battery
using the standard 120 volt convenience
cord.
120 Volt Convenience Cord Power.
A.
Fault.
B.
We recommend upgrading to the optional
240 volt charging station for faster more
efficient charging. It takes approximately
2.5 hours to completely charge an empty
battery using a 240 volt charging station.
168
Fusion Energi (CC7) Hybrid Electric Vehicle (HEV)/Plug-In Hybrid Electric Vehicle (PHEV), Canada/United States of America, enUSA, Edition date: 201805, First-Printing High Voltage BatteryE264827 E239266
Page 172 of 541
Note:
The electrical source must meet
certain requirements for the high-voltage
batteries to charge. The AC outlet must be
a three-prong 110-120 volt AC outlet that is
properly grounded, 15– 20 amps (or greater)
and in good condition. You must use a
dedicated line, which means you cannot
have other appliances connected to the
same circuit. If you do not use a dedicated
circuit, the circuit breaker could trip or open.
If you do not have a dedicated circuit,
contact a licensed professional electrician
for proper installation. Make sure that the 120 volt convenience
cord is completely unwound before
charging. Always plug the cord into the AC
outlet before connecting the charging
coupler into the charge port on your
vehicle.
Note:
When the convenience cord is
plugged into an outlet, use the following
table to determine your vehicle charge
status. If the POWER indicator light is off
after plugging in the convenience cord, use
a different outlet.
Note: When the convenience cord is plugged into an outlet, use the following table to
determine your vehicle charge status. Status
Convenience Cord LED Indicators
Fault
Power
If the POWER and FAULT indicator lights are offafter plugging in the convenience cord, use a different outlet.
Off
Off
The convenience cord is plugged into the wall andready to charge your vehicle. Reference the
CHARGE PORT section below for information on how to tell if the vehicle is charging.
Off
On
The convenience cord is experiencing a chargingfault with the vehicle. The convenience cord will retry 3 times. If the fault persists, your vehicle is not charging or there is an internal fault in the charging equipment.
Blink
Off
Ground Fault Circuit Interrupter (GFCI) Fault
Detected. The convenience cord is retrying to charge.
Blink
On
The convenience cord detected a high temper-
ature at the AC plug and Wall Outlet. Your vehicle is not charging.
On Steady
Blinking
Missing Ground at AC Outlet. Connect to properlygrounded AC outlet. Your vehicle is not charging.
On Steady
Off
169
Fusion Energi (CC7) Hybrid Electric Vehicle (HEV)/Plug-In Hybrid Electric Vehicle (PHEV), Canada/United States of America, enUSA, Edition date: 201805, First-Printing High Voltage Battery
Page 173 of 541
Note:
If charging for your plug-in vehicle
fails, please call the Customer Relationship
Center, or click on Call for support or Live
chat at www.owner.ford.com.
Charge Port
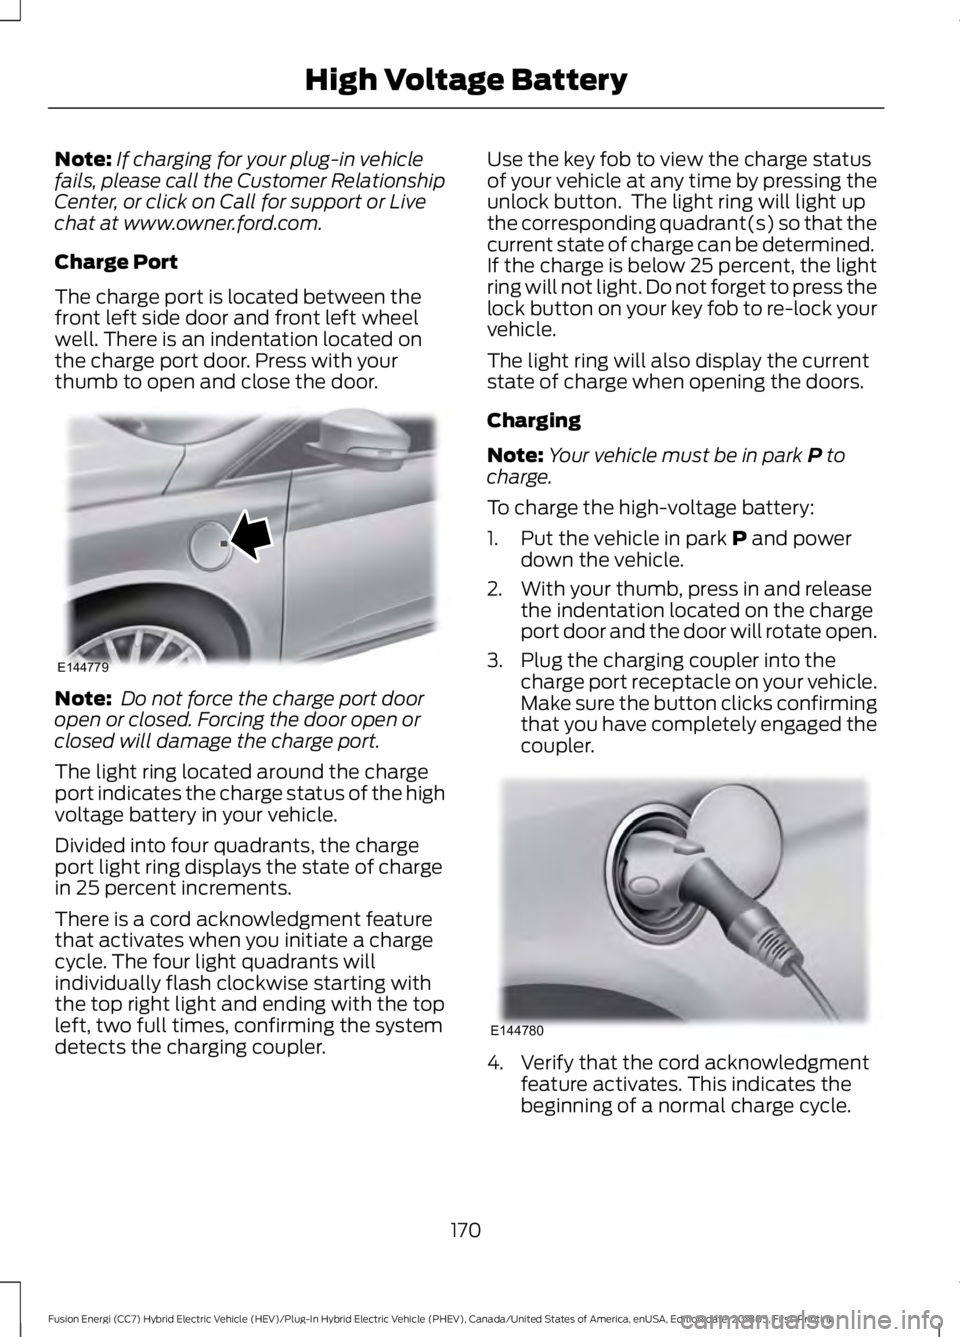
The charge port is located between the
front left side door and front left wheel
well. There is an indentation located on
the charge port door. Press with your
thumb to open and close the door. Note:
Do not force the charge port door
open or closed. Forcing the door open or
closed will damage the charge port.
The light ring located around the charge
port indicates the charge status of the high
voltage battery in your vehicle.
Divided into four quadrants, the charge
port light ring displays the state of charge
in 25 percent increments.
There is a cord acknowledgment feature
that activates when you initiate a charge
cycle. The four light quadrants will
individually flash clockwise starting with
the top right light and ending with the top
left, two full times, confirming the system
detects the charging coupler. Use the key fob to view the charge status
of your vehicle at any time by pressing the
unlock button. The light ring will light up
the corresponding quadrant(s) so that the
current state of charge can be determined.
If the charge is below 25 percent, the light
ring will not light. Do not forget to press the
lock button on your key fob to re-lock your
vehicle.
The light ring will also display the current
state of charge when opening the doors.
Charging
Note:
Your vehicle must be in park P to
charge.
To charge the high-voltage battery:
1. Put the vehicle in park
P and power
down the vehicle.
2. With your thumb, press in and release the indentation located on the charge
port door and the door will rotate open.
3. Plug the charging coupler into the charge port receptacle on your vehicle.
Make sure the button clicks confirming
that you have completely engaged the
coupler. 4. Verify that the cord acknowledgment
feature activates. This indicates the
beginning of a normal charge cycle.
170
Fusion Energi (CC7) Hybrid Electric Vehicle (HEV)/Plug-In Hybrid Electric Vehicle (PHEV), Canada/United States of America, enUSA, Edition date: 201805, First-Printing High Voltage BatteryE144779 E144780
Page 174 of 541
5. If using a 240–
volt charging station,
follow the instructions on the charge
station to begin the charging process.
The light ring will display how far along the
charge is:
• When the top right quadrant is pulsing,
the charge is between 0-25 percent.
• When the top right quadrant light is on
and the bottom right quadrant is
pulsing, the charge is between 25-50
percent.
• When the lights on both right side
quadrants are on and the bottom left
quadrant is pulsing, the charge is
between 50-75 percent.
• When the lights on the three quadrants
are on and the top left quadrant is
pulsing, the charge is between 75-100
percent.
• When all lights on the entire ring are
on, the charge is complete.
Note: The light ring will turn off one minute
after reaching a full charge.
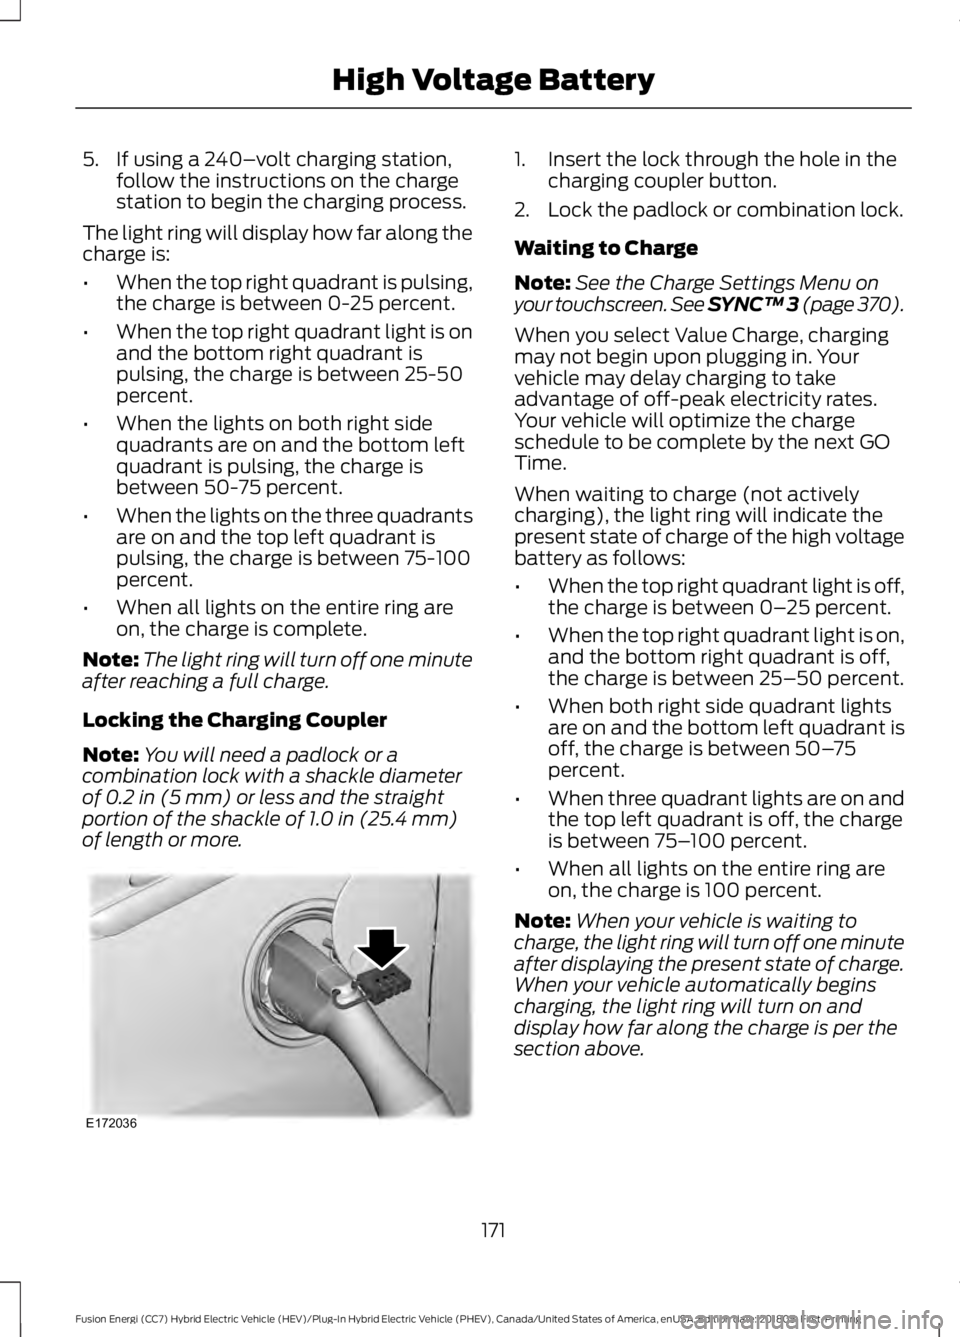
Locking the Charging Coupler
Note: You will need a padlock or a
combination lock with a shackle diameter
of 0.2 in (5 mm) or less and the straight
portion of the shackle of 1.0 in (25.4 mm)
of length or more. 1. Insert the lock through the hole in the
charging coupler button.
2. Lock the padlock or combination lock.
Waiting to Charge
Note: See the Charge Settings Menu on
your touchscreen. See SYNC™ 3 (page 370
).
When you select Value Charge, charging
may not begin upon plugging in. Your
vehicle may delay charging to take
advantage of off-peak electricity rates.
Your vehicle will optimize the charge
schedule to be complete by the next GO
Time.
When waiting to charge (not actively
charging), the light ring will indicate the
present state of charge of the high voltage
battery as follows:
• When the top right quadrant light is off,
the charge is between 0– 25 percent.
• When the top right quadrant light is on,
and the bottom right quadrant is off,
the charge is between 25–50 percent.
• When both right side quadrant lights
are on and the bottom left quadrant is
off, the charge is between 50– 75
percent.
• When three quadrant lights are on and
the top left quadrant is off, the charge
is between 75– 100 percent.
• When all lights on the entire ring are
on, the charge is 100 percent.
Note: When your vehicle is waiting to
charge, the light ring will turn off one minute
after displaying the present state of charge.
When your vehicle automatically begins
charging, the light ring will turn on and
display how far along the charge is per the
section above.
171
Fusion Energi (CC7) Hybrid Electric Vehicle (HEV)/Plug-In Hybrid Electric Vehicle (PHEV), Canada/United States of America, enUSA, Edition date: 201805, First-Printing High Voltage BatteryE172036
Page 175 of 541
Note:
If the system detects a vehicle
charging system fault at any point in a
charge cycle, the entire light ring will flash
continuously for one minute and then turn
off. If this happens, unplug the charging
coupler and then plug it back into the charge
port receptacle. If the problem persists,
contact an authorized dealer.
You can modify the lighting ring. Refer to
the Charge Port Light Ring Settings. See
SYNC™ 3 (page 370).
Disconnecting the Charging Coupler
Note: Do not pull the wall plug from the
wall while your vehicle is charging. Doing so
may damage the outlet and the cord.
1. Remove the lock from the charging coupler button.
2. Press the button on the charging coupler.
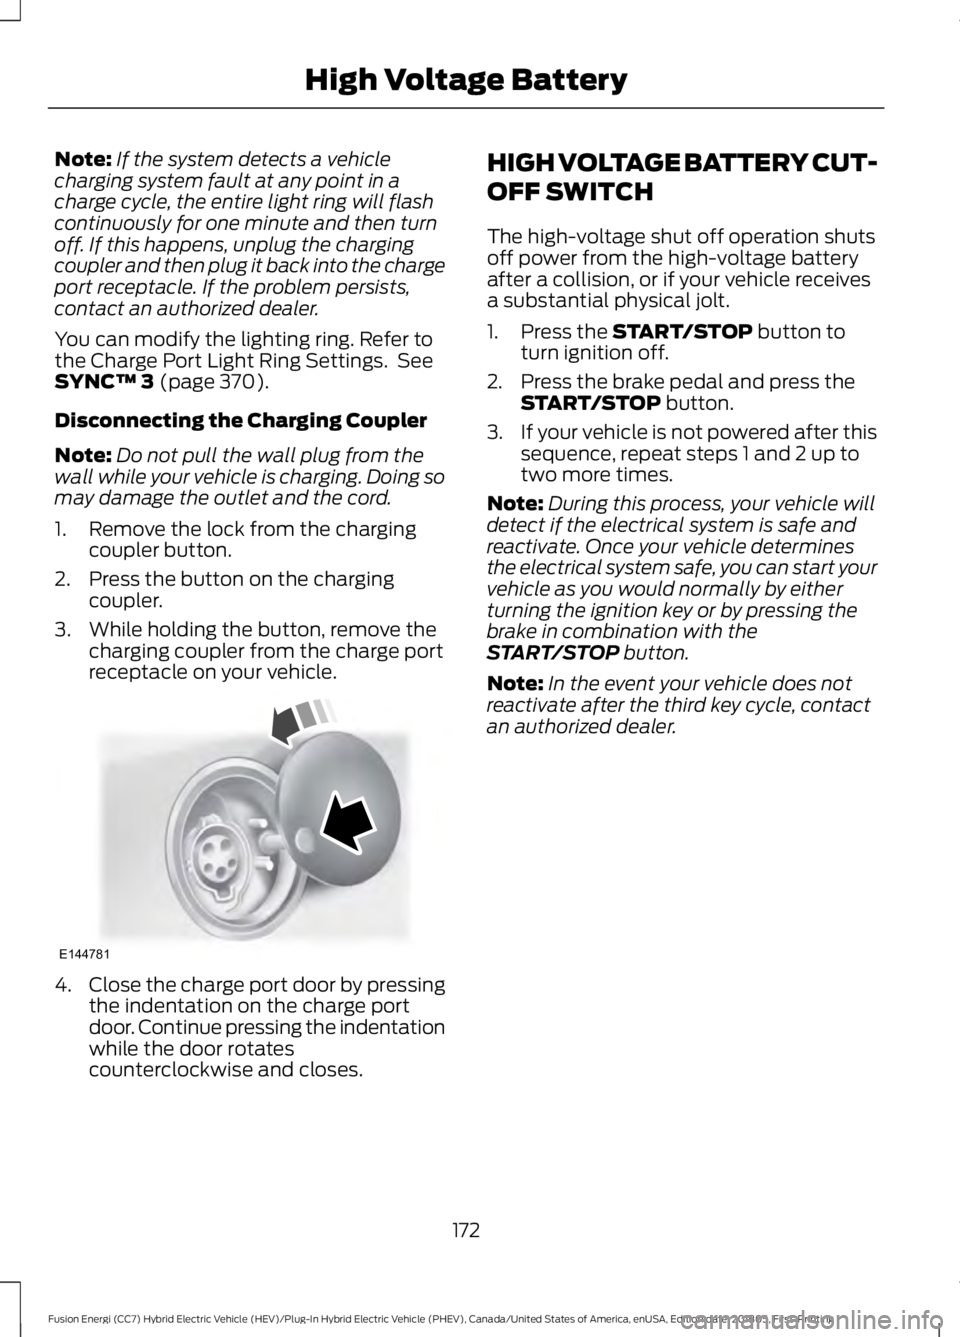
3. While holding the button, remove the charging coupler from the charge port
receptacle on your vehicle. 4.
Close the charge port door by pressing
the indentation on the charge port
door. Continue pressing the indentation
while the door rotates
counterclockwise and closes. HIGH VOLTAGE BATTERY CUT-
OFF SWITCH
The high-voltage shut off operation shuts
off power from the high-voltage battery
after a collision, or if your vehicle receives
a substantial physical jolt.
1. Press the
START/STOP button to
turn ignition off.
2. Press the brake pedal and press the START/STOP
button.
3. If your vehicle is not powered after this
sequence, repeat steps 1 and 2 up to
two more times.
Note: During this process, your vehicle will
detect if the electrical system is safe and
reactivate. Once your vehicle determines
the electrical system safe, you can start your
vehicle as you would normally by either
turning the ignition key or by pressing the
brake in combination with the
START/STOP
button.
Note: In the event your vehicle does not
reactivate after the third key cycle, contact
an authorized dealer.
172
Fusion Energi (CC7) Hybrid Electric Vehicle (HEV)/Plug-In Hybrid Electric Vehicle (PHEV), Canada/United States of America, enUSA, Edition date: 201805, First-Printing High Voltage BatteryE144781
Page 176 of 541
AUTOMATIC TRANSMISSION
WARNING: Always fully apply the
parking brake and make sure you shift into
park (P). Failure to follow this instruction
could result in personal injury or death. WARNING:
Do not apply the brake
pedal and accelerator pedal
simultaneously. Applying both pedals
simultaneously for more than a few
seconds will limit engine performance,
which may result in difficulty maintaining
speed in traffic and could lead to serious
injury. WARNING:
When your vehicle is
stationary, keep the brake pedal fully
pressed when shifting gears. Failure to
follow this instruction could result in
personal injury, death or property damage.
Note: The ready to drive indicator may be
off and you may not be able to shift out of
park (P) unless the intelligent access key is
inside your vehicle.
Understanding the Positions of
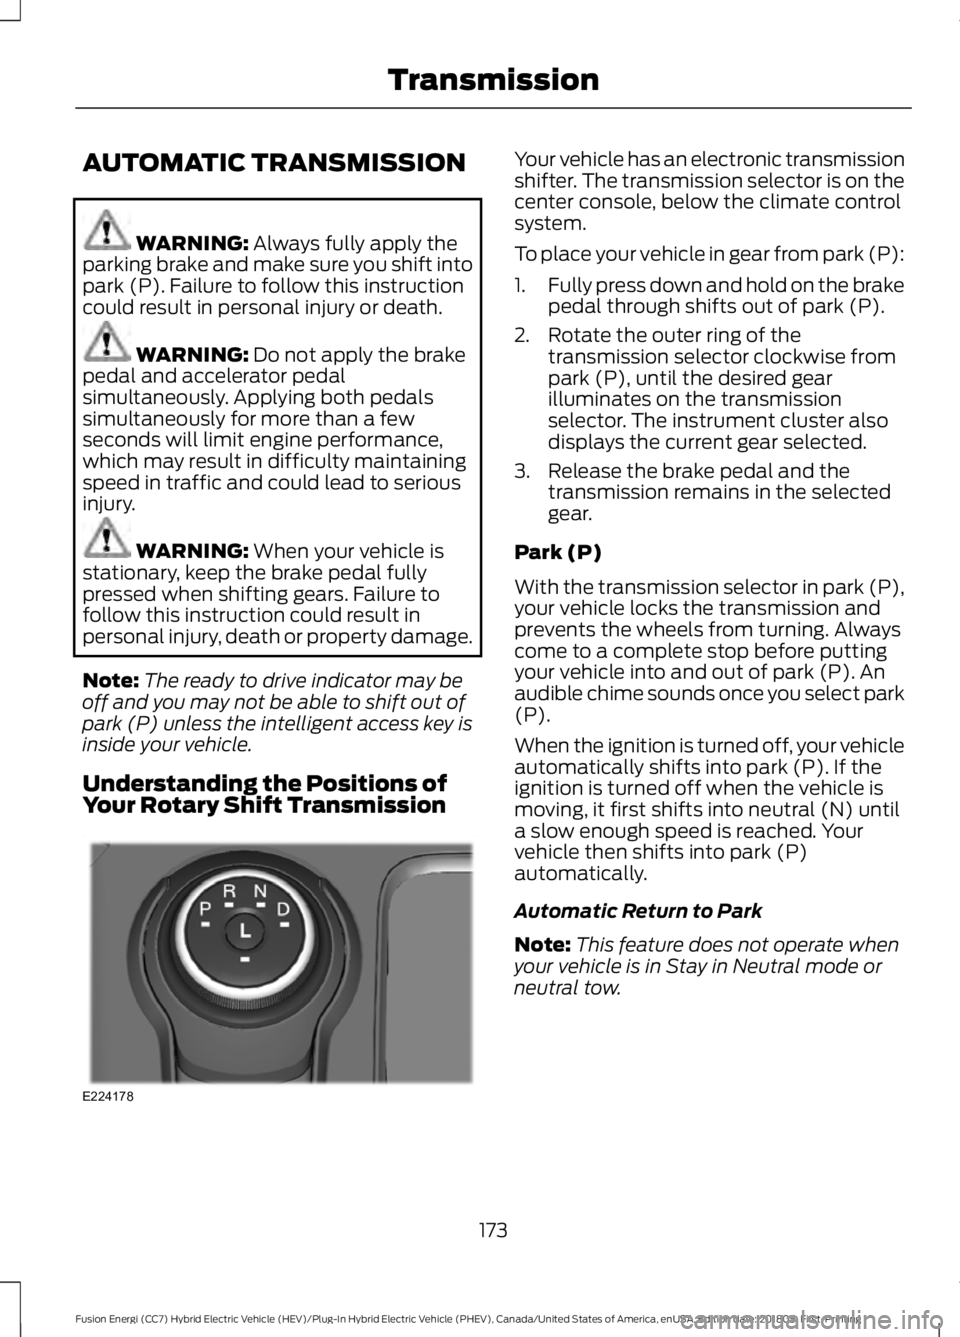
Your Rotary Shift Transmission Your vehicle has an electronic transmission
shifter. The transmission selector is on the
center console, below the climate control
system.
To place your vehicle in gear from park (P):
1.
Fully press down and hold on the brake
pedal through shifts out of park (P).
2. Rotate the outer ring of the transmission selector clockwise from
park (P), until the desired gear
illuminates on the transmission
selector. The instrument cluster also
displays the current gear selected.
3. Release the brake pedal and the transmission remains in the selected
gear.
Park (P)
With the transmission selector in park (P),
your vehicle locks the transmission and
prevents the wheels from turning. Always
come to a complete stop before putting
your vehicle into and out of park (P). An
audible chime sounds once you select park
(P).
When the ignition is turned off, your vehicle
automatically shifts into park (P). If the
ignition is turned off when the vehicle is
moving, it first shifts into neutral (N) until
a slow enough speed is reached. Your
vehicle then shifts into park (P)
automatically.
Automatic Return to Park
Note: This feature does not operate when
your vehicle is in Stay in Neutral mode or
neutral tow.
173
Fusion Energi (CC7) Hybrid Electric Vehicle (HEV)/Plug-In Hybrid Electric Vehicle (PHEV), Canada/United States of America, enUSA, Edition date: 201805, First-Printing TransmissionE224178
Page 177 of 541
Your vehicle has a feature that
automatically shifts your vehicle into park
(P) when any of the following conditions
occur:
•
You turn the vehicle off.
• You open the driver's door with your
seatbelt unlatched.
• Your seatbelt is unlatched when the
driver's door is open.
If you turn your vehicle off when moving,
your vehicle first shifts into neutral (N) until
it slows down enough to shift into park (P)
automatically.
Note: If you have waited an extended
period of time (2-15 minutes) before starting
your vehicle, unlatching your seatbelt causes
this feature to activate, even with the
driver's door closed.
Note: This feature may not work properly
if the door ajar switch is malfunctioning. If
your door ajar indicator does not illuminate
when you open the driver ’s door or the
indicator illuminates with the driver ’s door
closed, see your authorized dealer.
Reverse (R)
With the transmission selector in reverse
(R), your vehicle moves backward. Always
come to a complete stop before shifting
into and out of reverse (R).
Neutral (N)
With the transmission selector in neutral
(N), your vehicle can be started and is free
to roll. Hold the brake pedal down when in
this position.
Stay in Neutral Mode
Note: Always put your vehicle in Stay in
Neutral mode when entering an automatic
car wash. Failure to do this could result in
vehicle damage not covered by warranty. Note:
When entering an automatic car
wash, always shift to Neutral (N). If you are
exiting the vehicle before the car wash, Stay
in Neutral Mode is available.
Stay in Neutral mode allows your vehicle
to stay in neutral when you exit your
vehicle. Your vehicle must be stationary to
enter this mode.
To enter Stay in Neutral mode:
1. Switch your vehicle on but do not start
the engine. See Keyless Starting
(page 143).
2. Place your foot on the brake pedal and
rotate the transmission selector to
neutral (N).
Note: When in neutral (N), a message
appears in the display screen informing you
how to access Stay in Neutral mode.
3. Press either the low (L) or sport (S) button in the middle of the
transmission selector to enter Stay in
Neutral mode.
A message appears in the display screen
confirming your vehicle is in Stay in Neutral
mode. The neutral (N) indicator light on
the transmission selector also flashes.
To exit Stay in Neutral mode, place your
foot on the brake pedal and rotate the
transmission selector to park (P).
Drive (D)
Drive (D) is the normal driving position for
the best fuel economy.
Grade Assist Press the grade assist button to
activate grade assist. The grade
assist lamp appears in the
instrument cluster. Press the button again
to switch it off.
174
Fusion Energi (CC7) Hybrid Electric Vehicle (HEV)/Plug-In Hybrid Electric Vehicle (PHEV), Canada/United States of America, enUSA, Edition date: 201805, First-Printing TransmissionE144523
Page 178 of 541
Grade assist:
•
Provides additional grade braking with
a combination of engine motoring and
high-voltage battery charging to help
maintain vehicle speed when
descending a grade.
• As your vehicle determines the amount
of engine motoring and high-voltage
battery charging, you may notice the
engine speed increasing and
decreasing to help maintain your
vehicle speed when descending a
grade.
• The grade assist lamp in the instrument
cluster is illuminated.
Low (L)
• Provides maximum engine braking.
• The transmission may be shifted into
low (L) at any vehicle speed.
• Is not intended for use under extended
or normal driving conditions and results
in lower fuel economy.
Brake-Shift Interlock Override WARNING: When doing this
procedure, you need to take the
transmission out of park (P) which means
your vehicle can roll freely. To avoid
unwanted vehicle movement, always fully
apply the parking brake prior to doing this
procedure. Use wheels chocks if
appropriate. WARNING:
If the parking brake is
fully released, but the brake warning lamp
remains illuminated, the brakes may not
be working properly. Have your vehicle
checked as soon as possible.
Note: Do not drive your vehicle until you
verify that the brake lamps are working. Note:
See your authorized dealer as soon
as possible if this procedure is used.
Note: For some markets this feature is
disabled.
Note: This feature only functions if your
12-volt battery has power. If vehicle battery
voltage is not sufficient, an external 12-volt
power source (for example, jumper cables,
battery charger or jump pack) may be
required to function the interlock override
switch.
Use the brake-shift interlock override to
move your transmission from the park
position in the event of an electrical
malfunction. If your vehicle has a dead
battery, an external power source is
required.
1. Apply the parking brake and turn your ignition off before performing this
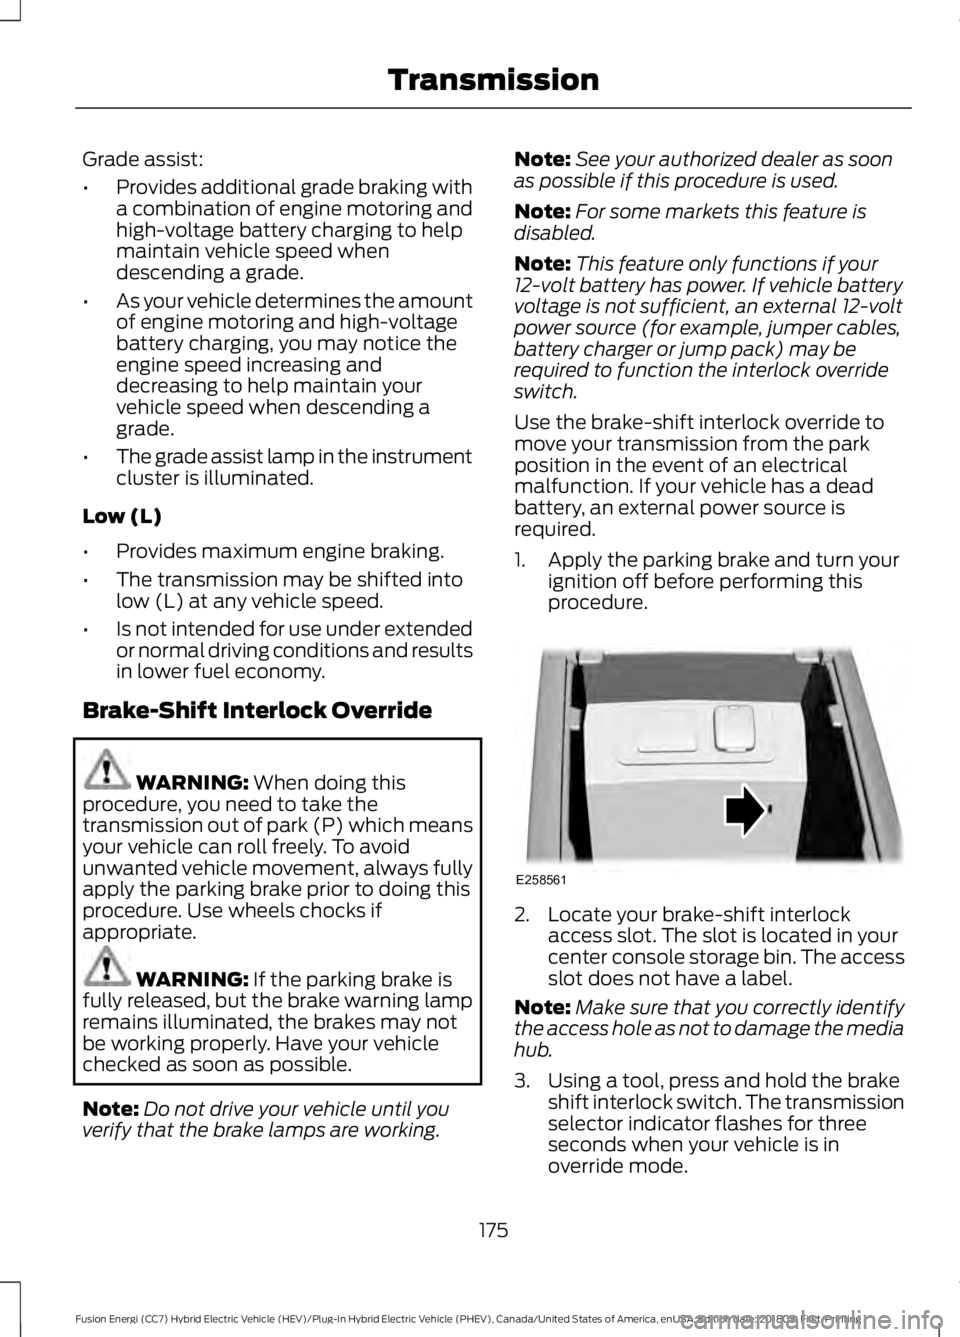
procedure. 2. Locate your brake-shift interlock
access slot. The slot is located in your
center console storage bin. The access
slot does not have a label.
Note: Make sure that you correctly identify
the access hole as not to damage the media
hub.
3. Using a tool, press and hold the brake shift interlock switch. The transmission
selector indicator flashes for three
seconds when your vehicle is in
override mode.
175
Fusion Energi (CC7) Hybrid Electric Vehicle (HEV)/Plug-In Hybrid Electric Vehicle (PHEV), Canada/United States of America, enUSA, Edition date: 201805, First-Printing TransmissionE258561
Page 179 of 541
4. When the transmission selector
indicator is still flashing, release the
override switch to shift from park (P)
to neutral (N).
5. Your vehicle remains in Stay in Neutral
mode for wrecker towing purposes or
can be shifted to the desired gear and
driven (if possible).
6. Release the parking brake.
If Your Vehicle Gets Stuck In Mud
or Snow
Note: Do not rock the vehicle if the engine
is not at normal operating temperature or
damage to the transmission may occur.
Note: Do not rock the vehicle for more than
a minute or damage to the transmission and
tires may occur, or the engine may overheat.
If your vehicle gets stuck in mud or snow,
it may be rocked out by shifting between
forward and reverse gears, stopping
between shifts in a steady pattern. Press
lightly on the accelerator in each gear.
176
Fusion Energi (CC7) Hybrid Electric Vehicle (HEV)/Plug-In Hybrid Electric Vehicle (PHEV), Canada/United States of America, enUSA, Edition date: 201805, First-Printing Transmission
Page 180 of 541
GENERAL INFORMATION
Note:
Occasional brake noise is normal. If
a metal-to-metal, continuous grinding or
continuous squeal sound is present, the
brake linings may be worn-out and an
authorized dealer should check them. If the
vehicle has continuous vibration or shudder
in the steering wheel while braking, an
authorized dealer should check your vehicle.
Note: Brake dust may accumulate on the
wheels, even under normal driving
conditions. Some dust is inevitable as the
brakes wear and does not contribute to
brake noise. See Cleaning the Wheels
(page 279). See
Warning Lamps and
Indicators (page 93).
Wet brakes result in reduced braking
efficiency. Gently press the brake pedal a
few times when driving from a car wash or
standing water to dry the brakes.
Brake Over Accelerator
In the event the accelerator pedal
becomes stuck or entrapped, apply steady
and firm pressure to the brake pedal to
slow the vehicle and reduce engine power.
If you experience this condition, apply the
brakes and bring your vehicle to a safe
stop. Switch the engine off, move the
transmission to park (P) and apply the
parking brake. Inspect the accelerator
pedal and the area around it for any items
or debris that may be obstructing its
movement.If none are found and the
condition persists, have your vehicle towed
to the nearest authorized dealer. Emergency Brake Assist
Emergency brake assist detects when you
brake heavily by measuring the rate at
which you press the brake pedal. It
provides maximum braking efficiency as
long as you press the pedal. Emergency
brake assist can reduce stopping distances
in critical situations.
Anti-lock Brake System
This system helps you maintain steering
control during emergency stops by keeping
the brakes from locking.
This lamp momentarily
illuminates when you switch the
ignition on. If the light does not
illuminate during start up, remains on or
flashes, the anti-lock braking system may
be disabled. Have the system checked by
an authorized dealer. If the anti-lock brake
system is disabled, normal braking is still
effective. If the brake warning lamp
illuminates with the parking
brake released, have your brake
system serviced immediately.
It also illuminates momentarily when you
switch the ignition on to confirm the lamp
is functional. If it does not illuminate when
you switch the ignition on, or begins to
flash at any time, have the system checked
by an authorized dealer.
HINTS ON DRIVING WITH
ANTI-LOCK BRAKES
The anti-lock braking system does not
eliminate the risks when:
• You drive too closely to the vehicle in
front of you.
• Your vehicle is hydroplaning.
177
Fusion Energi (CC7) Hybrid Electric Vehicle (HEV)/Plug-In Hybrid Electric Vehicle (PHEV), Canada/United States of America, enUSA, Edition date: 201805, First-Printing BrakesE138644 E138644