stop start FORD FUSION/HYBRID 2020 Owner's Manual
[x] Cancel search | Manufacturer: FORD, Model Year: 2020, Model line: FUSION/HYBRID, Model: FORD FUSION/HYBRID 2020Pages: 486, PDF Size: 6.28 MB
Page 154 of 486
3. Press the EV button. This will change
the mode to EV Later and permit
engine operation.
Your vehicle may automatically enter
Engine Enabled mode if system conditions
require it. A engine enabled message will
display if this occurs. This is normal
function, and your vehicle will return to EV
Now when possible.
Your vehicle may enter Enable Engine
mode if the climate control is in a defrost
mode and the outside temperature is cold.
A engine enabled message will display if
this occurs. If defrost is not needed, select
a different climate control mode to permit
EV Now.
When you enable EV Now, a blue EV icon
displays in the left-hand information
display. If your vehicle is in the Engine
Enabled mode, the EV icon will be yellow.
EV Now will automatically exit when the
Plug in power has been depleted.
EV Later This mode saves most of the
high voltage battery plug in
power for future use (for
example, your initial drive is at high speeds
on open roads, but later your drive will be
at low speeds in an urban area where
plug-in power usage is most efficient).
Your vehicle will run the engine as needed
and keep most of the high voltage battery
plug in power for later use in Auto Mode or
EV Now mode.
When you enable EV Later, a white EV
Later icon appears on the left-hand
information display.
The EV Later mode will automatically reset
to EV Auto mode when you power your
vehicle off. You may press the EV button
twice during the next drive to return to EV
Later mode, if desired. ECO Cruise
Note:
ECO Cruise is available as a separate
feature on Energi vehicles only. On non
plug-in vehicles it is included in EcoSelect.
This feature saves vehicle energy by
relaxing acceleration compared to
standard cruise control. For example, your
vehicle may temporarily lose speed when
going uphill. When set to on, ECO appears
in the information display when cruise
control is on.
You can switch it on or off in through the
information display. See General
Information (page 96). Settings
ECO Cruise
Driver Assist
Low Engine Use
The low engine use mode is equipped on
Energi models only. The Low Engine Use
mode maintains proper engine lubrication
at sufficient temperature, and will activate
automatically when you drive your vehicle
with limited engine operation. When your
vehicle is in low engine use mode, your
vehicle will automatically run the engine
as necessary.
Note: If your vehicle is in low engine use
mode when you start your vehicle, a
message will appear in the information
display. See
Information Messages (page
105).
If you select the EV Now mode while the
vehicle is in the low engine use mode, EV
Now mode will be suspended for as long
as you are in low engine use mode. The low
engine use mode will resume the next time
you start your vehicle and will
automatically stop when no longer needed.
Note: Cold temperatures will affect the
engine warm up time and the low engine
use mode may operate more frequently.
151
Fusion Energi (CC7) Hybrid Electric Vehicle (HEV)/Plug-In Hybrid Electric Vehicle (PHEV), Canada/United States of America, enUSA, Edition date: 201905, Second-Printing Unique Driving CharacteristicsE151263
Page 168 of 486
Your vehicle may not pass the I/M test if
the service engine soon indicator is on or
not working properly (bulb is burned out),
or if the OBD-II system has determined
that some of the emission control systems
have not been properly checked. In this
case, the vehicle is not ready for I/M
testing.
If the vehicle
’s engine or transmission has
just been serviced, or the battery has
recently run down or been replaced, the
OBD-II system may indicate that the
vehicle is not ready for I/M testing. To
determine if the vehicle is ready for I/M
testing, turn the ignition key to the on
position for 15 seconds without cranking
the engine. If the service engine soon
indicator blinks eight times, it means that
the vehicle is not ready for I/M testing; if
the service engine soon indicator stays on
solid, it means that your vehicle is ready
for I/M testing.
The OBD-II system checks the emission
control system during normal driving. A
complete check may take several days.
If the vehicle is not ready for I/M testing,
you can perform the following driving cycle
consisting of mixed city and highway
driving:
1. 15 minutes of steady driving on an expressway or highway followed by 20
minutes of stop-and-go driving with at
least four 30-second idle periods.
2. Allow your vehicle to sit for at least eight hours with the ignition off. Then,
start the vehicle and complete the
above driving cycle. The vehicle must
warm up to its normal operating
temperature. Once started, do not turn
off the vehicle until the above driving
cycle is complete.
If the vehicle is still not ready for I/M
testing, you need to repeat the above
driving cycle.
165
Fusion Energi (CC7) Hybrid Electric Vehicle (HEV)/Plug-In Hybrid Electric Vehicle (PHEV), Canada/United States of America, enUSA, Edition date: 201905, Second-Printing Engine Emission Control
Page 175 of 486
Note:
If the system detects a vehicle
charging system fault at any point in a
charge cycle, the entire light ring will flash
continuously for one minute and then turn
off. If this happens, unplug the charging
coupler and then plug it back into the charge
port receptacle. If the problem persists,
contact an authorized dealer.
You can modify the lighting ring. Refer to
the Charge Port Light Ring Settings. See
SYNC™ 3 (page 353).
Disconnecting the Charging Coupler
Note: Do not pull the wall plug from the
wall while your vehicle is charging. Doing so
may damage the outlet and the cord.
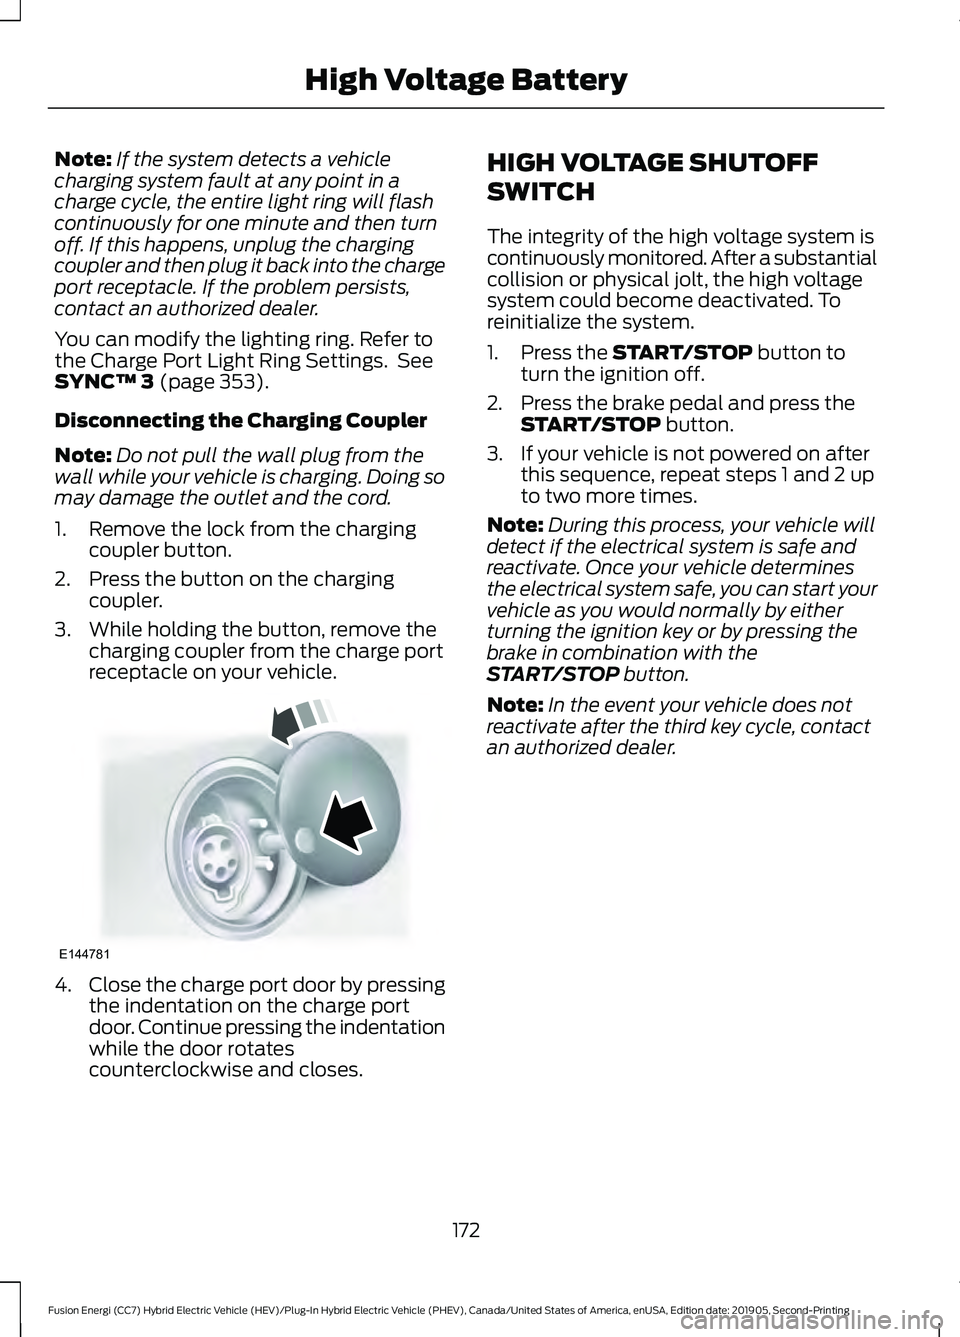
1. Remove the lock from the charging coupler button.
2. Press the button on the charging coupler.
3. While holding the button, remove the charging coupler from the charge port
receptacle on your vehicle. 4.
Close the charge port door by pressing
the indentation on the charge port
door. Continue pressing the indentation
while the door rotates
counterclockwise and closes. HIGH VOLTAGE SHUTOFF
SWITCH
The integrity of the high voltage system is
continuously monitored. After a substantial
collision or physical jolt, the high voltage
system could become deactivated. To
reinitialize the system.
1. Press the
START/STOP button to
turn the ignition off.
2. Press the brake pedal and press the START/STOP
button.
3. If your vehicle is not powered on after this sequence, repeat steps 1 and 2 up
to two more times.
Note: During this process, your vehicle will
detect if the electrical system is safe and
reactivate. Once your vehicle determines
the electrical system safe, you can start your
vehicle as you would normally by either
turning the ignition key or by pressing the
brake in combination with the
START/STOP
button.
Note: In the event your vehicle does not
reactivate after the third key cycle, contact
an authorized dealer.
172
Fusion Energi (CC7) Hybrid Electric Vehicle (HEV)/Plug-In Hybrid Electric Vehicle (PHEV), Canada/United States of America, enUSA, Edition date: 201905, Second-Printing High Voltage BatteryE144781
Page 177 of 486
Your vehicle has a feature that
automatically shifts your vehicle into park
(P) when any of the following conditions
occur:
•
You turn the vehicle off.
• You open the driver's door with your
seatbelt unlatched.
• Your seatbelt is unlatched when the
driver's door is open.
If you turn your vehicle off when moving,
your vehicle first shifts into neutral (N) until
it slows down enough to shift into park (P)
automatically.
Note: If you have waited an extended
period of time (2-15 minutes) before starting
your vehicle, unlatching your seatbelt causes
this feature to activate, even with the
driver's door closed.
Note: This feature may not work properly
if the door ajar switch is malfunctioning. If
your door ajar indicator does not illuminate
when you open the driver ’s door or the
indicator illuminates with the driver ’s door
closed, see your authorized dealer.
Reverse (R)
With the transmission selector in reverse
(R), your vehicle moves backward. Always
come to a complete stop before shifting
into and out of reverse (R).
Neutral (N)
With the transmission selector in neutral
(N), your vehicle can be started and is free
to roll. Hold the brake pedal down when in
this position.
Stay in Neutral Mode
Note: Always put your vehicle in Stay in
Neutral mode when entering an automatic
car wash. Failure to do this could result in
vehicle damage not covered by warranty. Note:
When entering an automatic car
wash, always shift to Neutral (N). If you are
exiting the vehicle before the car wash, Stay
in Neutral Mode is available.
Stay in Neutral mode allows your vehicle
to stay in neutral when you exit your
vehicle. Your vehicle must be stationary to
enter this mode.
To enter Stay in Neutral mode:
1. Switch your vehicle on but do not start
the engine. See Keyless Starting
(page 143).
2. Place your foot on the brake pedal and
rotate the transmission selector to
neutral (N).
Note: When in neutral (N), a message
appears in the display screen informing you
how to access Stay in Neutral mode.
3. Press either the low (L) or sport (S) button in the middle of the
transmission selector to enter Stay in
Neutral mode.
A message appears in the display screen
confirming your vehicle is in Stay in Neutral
mode. The neutral (N) indicator light on
the transmission selector also flashes.
To exit Stay in Neutral mode, place your
foot on the brake pedal and rotate the
transmission selector to park (P).
Drive (D)
Drive (D) is the normal driving position for
the best fuel economy.
Grade Assist Press the grade assist button to
activate grade assist. The grade
assist lamp appears in the
instrument cluster. Press the button again
to switch it off.
174
Fusion Energi (CC7) Hybrid Electric Vehicle (HEV)/Plug-In Hybrid Electric Vehicle (PHEV), Canada/United States of America, enUSA, Edition date: 201905, Second-Printing TransmissionE144523
Page 180 of 486
GENERAL INFORMATION
Note:
Occasional brake noise is normal. If
a metal-to-metal, continuous grinding or
continuous squeal sound is present, the
brake linings may be worn-out. Have the
system checked by an authorized dealer. If
the vehicle has continuous vibration or
shudder in the steering wheel while braking,
have it checked by an authorized dealer.
Note: Brake dust may accumulate on the
wheels, even under normal driving
conditions. Some dust is inevitable as the
brakes wear and does not contribute to
brake noise. See Cleaning the Wheels
(page 280). Wet brakes result in reduced braking
efficiency. Gently press the brake pedal a
few times when driving from a car wash or
standing water to dry the brakes.
Brake Over Accelerator
In the event the accelerator pedal
becomes stuck or entrapped, apply steady
and firm pressure to the brake pedal to
slow the vehicle and reduce engine power.
If you experience this condition, apply the
brakes and bring your vehicle to a safe
stop. Move the transmission to park (P),
switch the engine off and apply the parking
brake. Inspect the accelerator pedal for
any interference. If none are found and the
condition persists, have your vehicle towed
to the nearest authorized dealer.
Brake Assist
Brake assist detects when you rapidly
brake by measuring the rate at which you
press the brake pedal. It provides
maximum braking efficiency as long as you
press the pedal. Brake assist can reduce
stopping distances in critical situations. Anti-lock Brake System
This system helps you maintain steering
control during emergency stops by keeping
the brakes from locking. This lamp momentarily
illuminates when you switch the
ignition on. If the light does not
illuminate during start up, remains on or
flashes, the anti-lock braking system may
be disabled. Have the system checked by
an authorized dealer. If the anti-lock brake
system is disabled, normal braking is still
effective. If the brake warning lamp
illuminates when you release the
parking brake, have your system
checked by an authorized dealer. It also
illuminates momentarily when you switch
the ignition on to confirm the lamp is
functional. If it does not illuminate when
you switch the ignition on or begins to flash
at any time, have the system checked by
an authorized dealer.
Note: The brake warning lamp may
illuminate and stay illuminated until you
switch off your vehicle as a result of driving
at high elevation.
Regenerative Braking System
This feature is used to simulate the engine
braking of an internal combustion engine
and assist the standard brake system while
recovering some of the energy of motion
and storing it in the battery to improve fuel
economy. The standard brake system is
designed to fully stop the car if
regenerative braking is not available.
During regenerative braking, the motor is
spun as a generator to create electrical
current. This recharges the battery and
slows the vehicle. In effect, once the
accelerator pedal is released, the motor
changes from an energy user to an energy
producer.
177
Fusion Energi (CC7) Hybrid Electric Vehicle (HEV)/Plug-In Hybrid Electric Vehicle (PHEV), Canada/United States of America, enUSA, Edition date: 201905, Second-Printing BrakesE138644 E138644
Page 182 of 486
If it continues to flash or does not
illuminate, the system has malfunctioned.
Have your vehicle checked as soon as
possible.
Note:
You can apply the electric parking
brake when the ignition is off.
Note: The electric parking brake could
automatically apply when you shift into park
(P). See Transmission (page 173).
Applying the Electric Parking Brake in
an Emergency
Note: Do not apply the electric parking
brake when your vehicle is moving, except
in an emergency. If you repeatedly use the
electric parking brake to slow or stop your
vehicle, you could cause damage to the
brake system.
You can use the electric parking brake to
slow or stop your vehicle in an emergency. Pull the switch upward and hold
it.
The red warning lamp
illuminates, a tone sounds and
the stoplamps turn on.
The electric parking brake continues to
slow your vehicle down unless you release
the switch.
Manually Releasing the Electric
Parking Brake
Switch the ignition on.
Press and hold the brake pedal.
Push the switch downward.
The red warning lamp turns off. If it remains illuminated or flashes, the
system has malfunctioned. Have your
vehicle checked as soon as possible.
Automatically Releasing the
Electric Parking Brake
Close the driver door.
Shift into gear.
Press the accelerator pedal and pull away
in a normal manner.
The red warning lamp turns off.
If it remains illuminated or continues to
flash, the system did not release the
electric parking brake. Manually release
the parking brake.
Releasing the Electric Parking
Brake if the Vehicle Battery is
Running Out of Charge
Connect a booster battery to the vehicle
battery to release the electric parking brake
if the vehicle battery is running out of
charge. See
Jump Starting the Vehicle
(page 232).
HILL START ASSIST WARNING:
The system does not
replace the parking brake. When you
leave your vehicle, always apply the
parking brake.
179
Fusion Energi (CC7) Hybrid Electric Vehicle (HEV)/Plug-In Hybrid Electric Vehicle (PHEV), Canada/United States of America, enUSA, Edition date: 201905, Second-Printing BrakesE267156 E270480 E267156 E270480 E270480
Page 234 of 486
Vehicles Sold in Canada: Getting
Roadside Assistance
To fully assist you should you have a
vehicle concern, Ford Motor Company of
Canada, Limited offers a complimentary
roadside assistance program. This program
is eligible within Canada or the continental
United States.
The service is available 24 hours a day,
seven days a week.
This program is separate from the New
Vehicle Limited Warranty, but the coverage
is concurrent with the powertrain coverage
period of your vehicle. Canadian roadside
coverage and benefits may differ from the
U.S. coverage.
If you require more information, please call
us in Canada at 1-800-665-2006, or visit
our website at www.ford.ca.
HAZARD FLASHERS
Note:
The hazard flashers operate when
the ignition is in any position, or if the key is
not in the ignition. If used when the vehicle
is not running, the battery loses charge. As
a result, there may be insufficient power to
restart your vehicle. The flasher control is on the
instrument panel. Use your
hazard flashers when your
vehicle is creating a safety hazard for other
motorists.
• Press the flasher control and all front
and rear direction indicators flash.
• Press the button again to switch them
off. FUEL SHUTOFF WARNING: If your vehicle has been
involved in a crash, have the fuel system
checked. Failure to follow this instruction
could result in fire, personal injury or
death.
Note: When you try to restart your vehicle
after a fuel shutoff, the vehicle makes sure
that various systems are safe to restart.
Once the vehicle determines the systems
are safe, then the vehicle allows you to
restart.
Note: In the event that your vehicle does
not restart after your third attempt, contact
a qualified technician.
The fuel pump shutoff stops the flow of
fuel to the engine in the event of a
moderate to severe crash. Not every
impact causes a shutoff.
Should your vehicle shut off after a crash,
you may restart your vehicle.
If your vehicle has a key system:
1. Switch off the ignition.
2. Switch to start position.
3. Switch off the ignition.
4. Switch on the ignition to re-enable the
fuel pump.
5. If the vehicle does not start, repeat steps 1 through 4.
If your vehicle has a push button start
system:
1. Press START/STOP to switch off your
vehicle.
2. Press the brake pedal and START/STOP
to switch on your
vehicle.
3. Remove your foot from the brake pedal
and press
START/STOP to switch off
your vehicle.
231
Fusion Energi (CC7) Hybrid Electric Vehicle (HEV)/Plug-In Hybrid Electric Vehicle (PHEV), Canada/United States of America, enUSA, Edition date: 201905, Second-Printing Roadside Emergencies
Page 235 of 486
4. You can attempt to start the vehicle
by pressing the brake pedal and
START/STOP, or press START/STOP
without pressing the brake pedal.
5. If the vehicle does not start, repeat steps 1 through 4.
JUMP STARTING THE VEHICLE WARNING:
Batteries normally
produce explosive gases which can
cause personal injury. Therefore, do not
allow flames, sparks or lighted
substances to come near the battery.
When working near the battery, always
shield your face and protect your eyes.
Always provide correct ventilation. WARNING:
Keep batteries out of
reach of children. Batteries contain
sulfuric acid. Avoid contact with skin,
eyes or clothing. Shield your eyes when
working near the battery to protect
against possible splashing of acid
solution. In case of acid contact with skin
or eyes, flush immediately with water for
a minimum of 15 minutes and get prompt
medical attention. If acid is swallowed,
call a physician immediately. WARNING:
Use only adequately
sized cables with insulated clamps.
Preparing Your Vehicle
Do not attempt to push-start your
automatic transmission vehicle.
Note: Attempting to push-start a vehicle
with an automatic transmission may cause
transmission damage.
Note: Use only a 12-volt supply to start your
vehicle. Note:
Do not disconnect the battery of the
disabled vehicle as this could damage the
vehicle electrical system.
Park the booster vehicle close to the hood
of the disabled vehicle, making sure the
two vehicles do not touch.
Connecting the Jumper Cables WARNING: Do not connect the end
of the second cable to the negative (-)
terminal of the battery to be jumped. A
spark may cause an explosion of the
gases that surround the battery. WARNING:
Do not use fuel lines,
engine valve covers, windshield wiper
arms, the intake manifold, or hood latch
as ground points.
Note: Your vehicle has two battery prongs
that are accessible from under the hood,
even though the actual battery is located in
the trunk. You can jump start your vehicle
the same way conventional vehicles can be
using these prongs.
Note: Do not attach the end of the positive
cable to the studs or L-shaped eyelet
located above the positive (+) terminal of
your vehicle ’s battery. High current may flow
through and cause damage to the fuses.
Note: To avoid reverse polarity connections,
make sure that you correctly identify the
positive (+) and negative (-) terminals on
both the disabled and booster vehicles
before connecting the cables.
232
Fusion Energi (CC7) Hybrid Electric Vehicle (HEV)/Plug-In Hybrid Electric Vehicle (PHEV), Canada/United States of America, enUSA, Edition date: 201905, Second-Printing Roadside Emergencies
Page 255 of 486
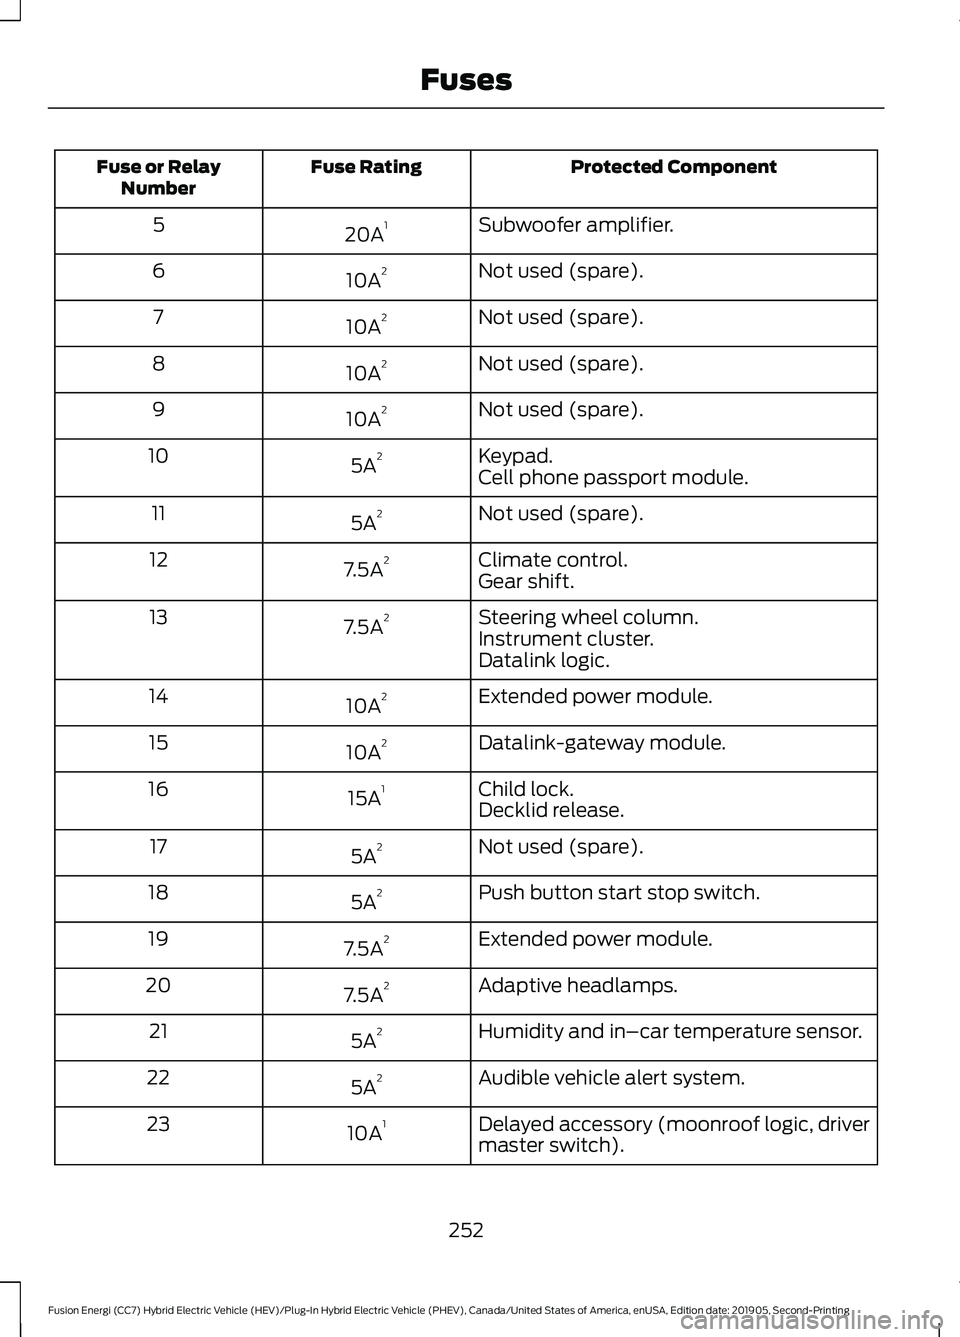
Protected Component
Fuse Rating
Fuse or Relay
Number
Subwoofer amplifier.
20A 1
5
Not used (spare).
10A 2
6
Not used (spare).
10A 2
7
Not used (spare).
10A 2
8
Not used (spare).
10A 2
9
Keypad.
5A 2
10
Cell phone passport module.
Not used (spare).
5A 2
11
Climate control.
7.5A 2
12
Gear shift.
Steering wheel column.
7.5A 2
13
Instrument cluster.
Datalink logic.
Extended power module.
10A 2
14
Datalink-gateway module.
10A 2
15
Child lock.
15A 1
16
Decklid release.
Not used (spare).
5A 2
17
Push button start stop switch.
5A 2
18
Extended power module.
7.5A 2
19
Adaptive headlamps.
7.5A 2
20
Humidity and in–car temperature sensor.
5A 2
21
Audible vehicle alert system.
5A 2
22
Delayed accessory (moonroof logic, driver
master switch).
10A 1
23
252
Fusion Energi (CC7) Hybrid Electric Vehicle (HEV)/Plug-In Hybrid Electric Vehicle (PHEV), Canada/United States of America, enUSA, Edition date: 201905, Second-Printing Fuses
Page 289 of 486
5. Remove the warning sticker found on
the casing/housing and place it on the
top of the instrument panel or the
center of the dash.
6. Start the vehicle leave the engine running so the compressor does not
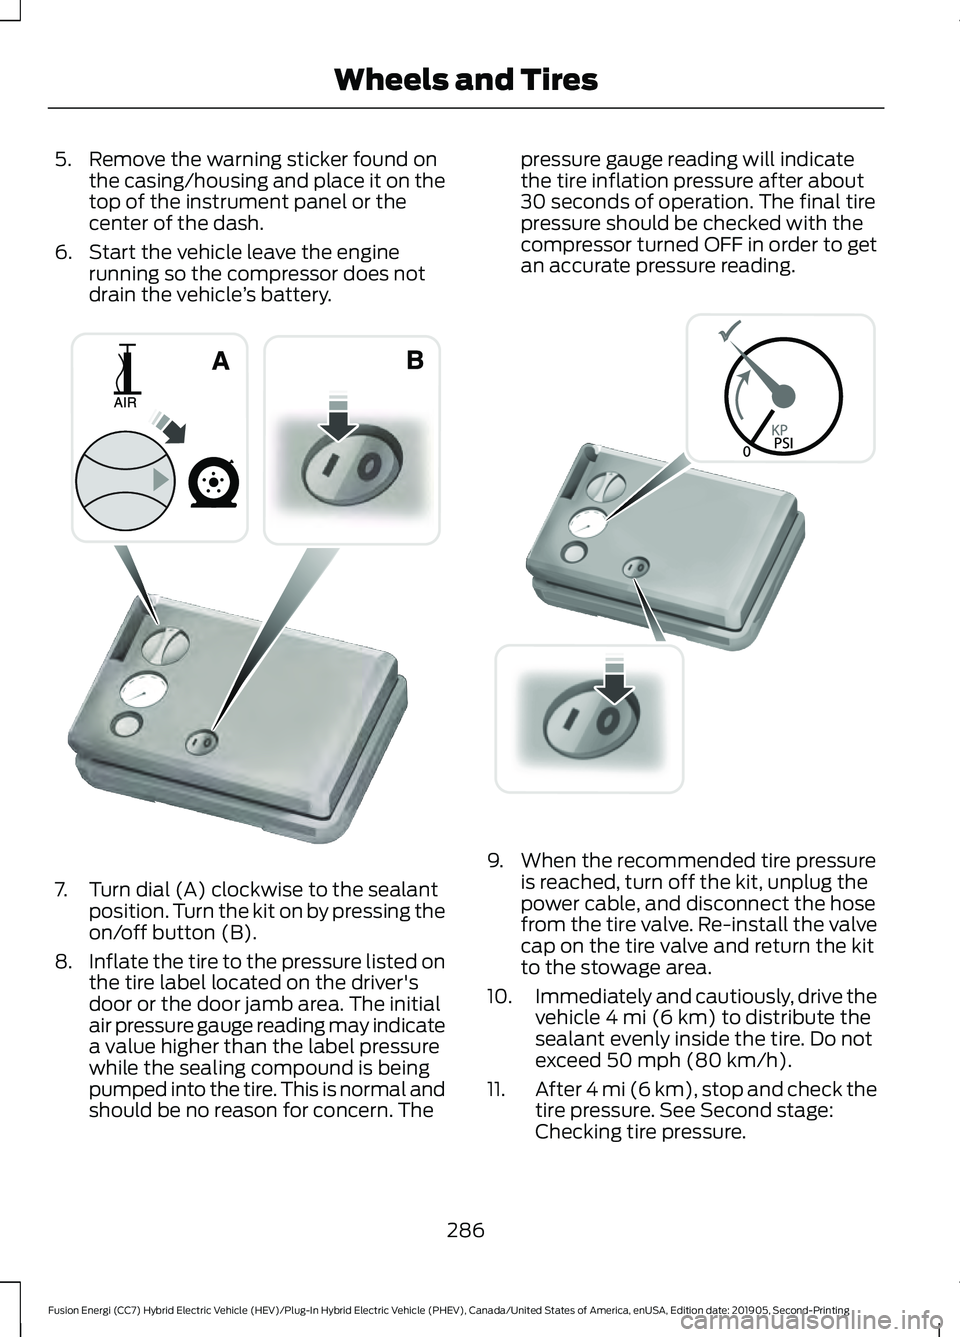
drain the vehicle ’s battery. 7. Turn dial (A) clockwise to the sealant
position. Turn the kit on by pressing the
on/off button (B).
8. Inflate the tire to the pressure listed on
the tire label located on the driver's
door or the door jamb area. The initial
air pressure gauge reading may indicate
a value higher than the label pressure
while the sealing compound is being
pumped into the tire. This is normal and
should be no reason for concern. The pressure gauge reading will indicate
the tire inflation pressure after about
30 seconds of operation. The final tire
pressure should be checked with the
compressor turned OFF in order to get
an accurate pressure reading.
9. When the recommended tire pressure
is reached, turn off the kit, unplug the
power cable, and disconnect the hose
from the tire valve. Re-install the valve
cap on the tire valve and return the kit
to the stowage area.
10. Immediately and cautiously, drive the
vehicle 4 mi (6 km) to distribute the
sealant evenly inside the tire. Do not
exceed
50 mph (80 km/h).
11. After 4 mi (6 km), stop and check the
tire pressure. See Second stage:
Checking tire pressure.
286
Fusion Energi (CC7) Hybrid Electric Vehicle (HEV)/Plug-In Hybrid Electric Vehicle (PHEV), Canada/United States of America, enUSA, Edition date: 201905, Second-Printing Wheels and TiresE175981 E175982