FORD GT 2006 1.G Owners Manual
Manufacturer: FORD, Model Year: 2006, Model line: GT, Model: FORD GT 2006 1.GPages: 200, PDF Size: 1.86 MB
Page 101 of 200
STEERING
To prevent damage to the power steering system:
•Never hold the steering wheel at its furthest turning points (until it
stops) for more than a few seconds when the engine is running.
• Do not operate the vehicle with a low power steering pump fluid level
(below the MIN mark on the reservoir). Refer to Checking and
adding power steering power fluid in theMaintenance and
Specifications chapter for information on checking and filling the
power steering fluid reservoir.
If the power steering system breaks down (or if the engine is turned
off), you can steer the vehicle manually, but it takes more effort.
If the steering wanders or pulls, check for:
• an improperly inflated tire
• uneven tire wear
• loose or worn suspension components
• loose or worn steering components
• improper steering alignment
A high crown in the road or high crosswinds may also make the steering
seem to wander/pull.
LIMITED-SLIP AXLE
This axle provides added traction on slippery surfaces, particularly when
one wheel is on a poor traction surface. Under normal conditions, the
limited slip axle functions like a standard rear axle.
Extended use of other than the manufacturer’s specified size tires on a
limited slip rear axle could result in a permanent reduction in
effectiveness. This loss of effectiveness does not affect normal driving
and should not be noticeable to the driver.
PREPARING TO DRIVE YOUR VEHICLE
Your vehicle has special design features, such as a decreased ground
clearance; care should be taken when driving your vehicle near curbs,
speed bumps and parking lot bump-stops.
Use extra caution while becoming familiar with your vehicle. Know the
capabilities and limitations of both you as a driver and your vehicle.
2006 GT (gto)
Owners Guide (post-2002-fmt)
USA_English (fus)
Driving
101
Page 102 of 200
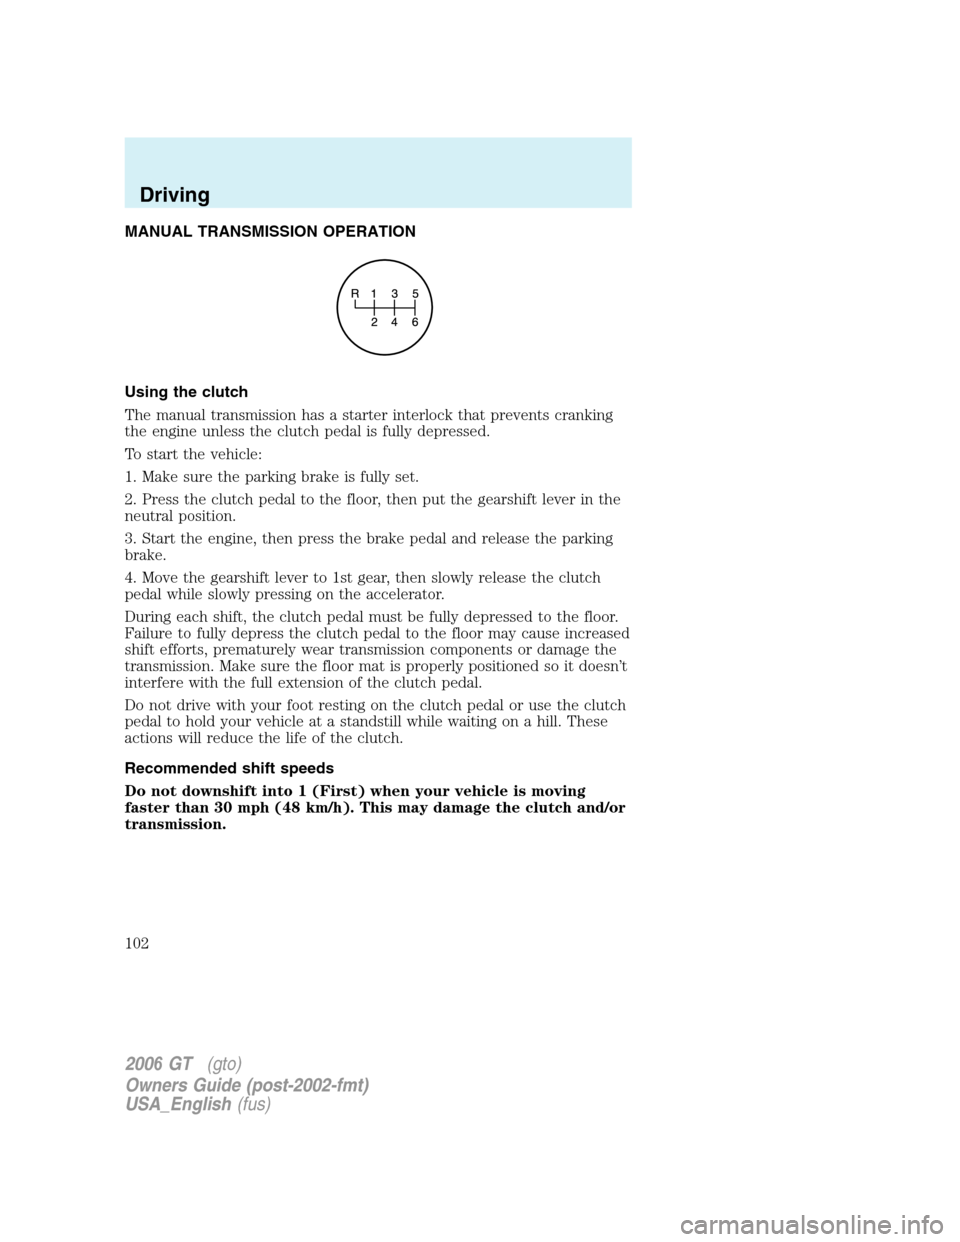
MANUAL TRANSMISSION OPERATION
Using the clutch
The manual transmission has a starter interlock that prevents cranking
the engine unless the clutch pedal is fully depressed.
To start the vehicle:
1. Make sure the parking brake is fully set.
2. Press the clutch pedal to the floor, then put the gearshift lever in the
neutral position.
3. Start the engine, then press the brake pedal and release the parking
brake.
4. Move the gearshift lever to 1st gear, then slowly release the clutch
pedal while slowly pressing on the accelerator.
During each shift, the clutch pedal must be fully depressed to the floor.
Failure to fully depress the clutch pedal to the floor may cause increased
shift efforts, prematurely wear transmission components or damage the
transmission. Make sure the floor mat is properly positioned so it doesn’t
interfere with the full extension of the clutch pedal.
Do not drive with your foot resting on the clutch pedal or use the clutch
pedal to hold your vehicle at a standstill while waiting on a hill. These
actions will reduce the life of the clutch.
Recommended shift speeds
Do not downshift into 1 (First) when your vehicle is moving
faster than 30 mph (48 km/h). This may damage the clutch and/or
transmission.
2006GT (gto)
Owners Guide (post-2002-fmt)
USA_English (fus)
Driving
102
Page 103 of 200
Upshift according to the following chart:
Upshifts when accelerating (recommended for best fueleconomy)
Shift from:
1 - 2 15 mph (24 km/h)
2 - 3 25 mph (40 km/h)
3 - 4 40 mph (64 km/h)
4 - 5 45 mph (72 km/h)
5 - 6 50 mph (80 km/h)
Reverse
1. Make sure that your vehicle is at a complete stop before you shift into
R (Reverse). Failure to do so may damage the transmission.
2. Move the gearshift lever into the neutral position and wait at least
three seconds before shifting into R (Reverse).
3. Shift into R (Reverse) by pulling the gearshift lever fully to the left
through the detent, then forward. The detent force is high to prevent
inadvertently shifting into R (Reverse).
Parking your vehicle
1. Apply the brake and shift into the neutral position.
2. Fully apply the parking brake, then shift into 1 (First).
3. Turn the ignition off.
Do not park your vehicle in Neutral, it may move unexpectedly
and injure someone. Use 1 (First) gear and set the parking brake
fully.
DRIVING THROUGH WATER
Do not drive quickly through standing water, especially if the depth is
unknown. Traction or brake capability may be limited and if the ignition
system gets wet, your engine may stall. Water may also enter your
engine’s air intake and severely damage your engine.
If driving through deep or standing water is unavoidable, proceed very
slowly. Never drive through water that is higher than the bottom of the
hubs (for trucks) or the bottom of the wheel rims (for cars).
2006 GT (gto)
Owners Guide (post-2002-fmt)
USA_English (fus)
Driving
103
Page 104 of 200
Once through the water, always try the brakes. Wet brakes do not stop
the vehicle as effectively as dry brakes. Drying can be improved by
moving your vehicle slowly while applying light pressure on the brake
pedal.
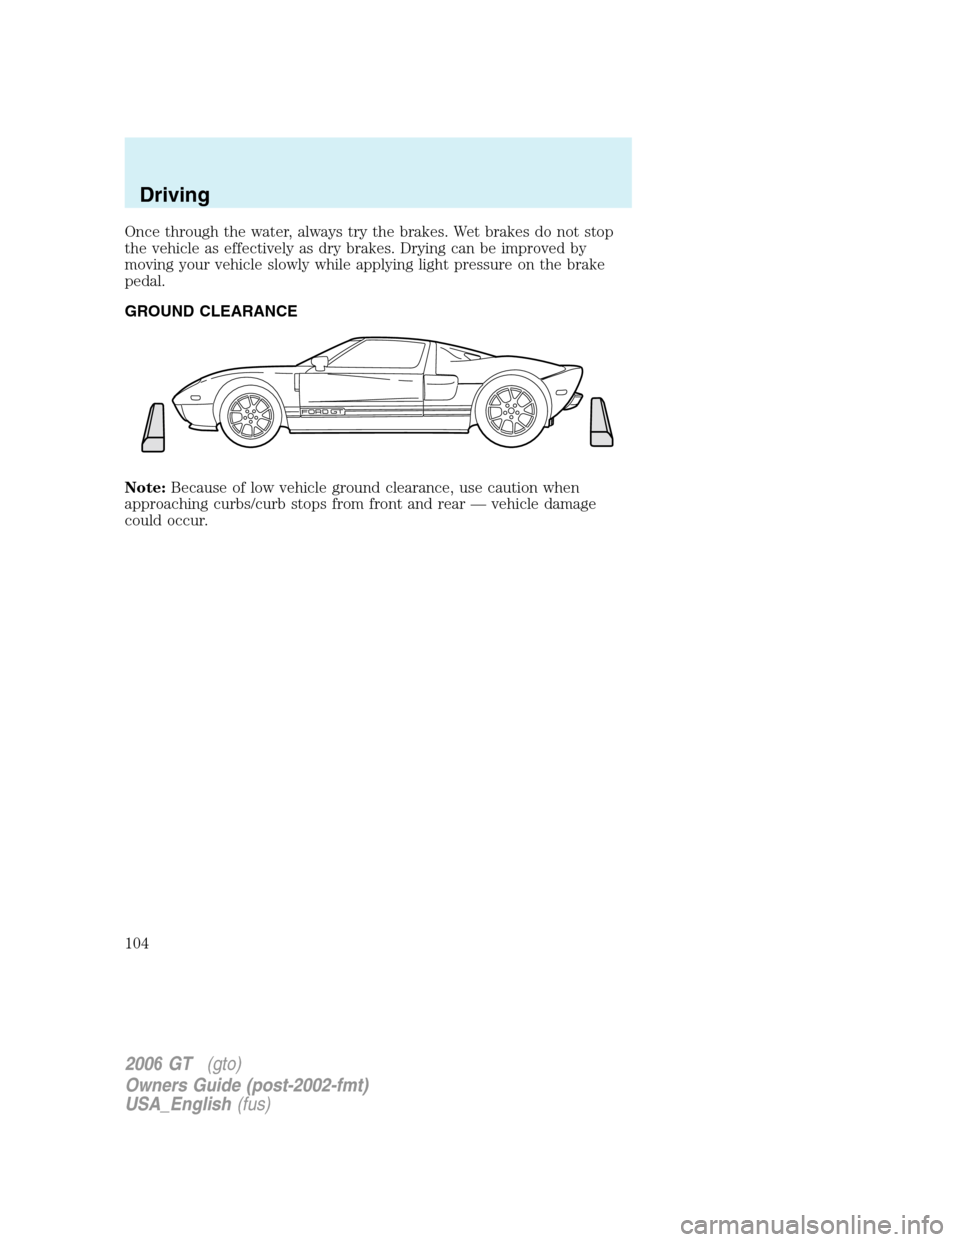
GROUND CLEARANCE
Note:Because of low vehicle ground clearance, use caution when
approaching curbs/curb stops from front and rear — vehicle damage
could occur.
2006 GT (gto)
Owners Guide (post-2002-fmt)
USA_English (fus)
Driving
104
Page 105 of 200
GETTING ROADSIDE ASSISTANCE
To fully assist you should you have a vehicle concern, Ford Motor
Company offers a complimentary roadside assistance program. This
program is separate from the New Vehicle Limited Warranty. The service
is available:
•24–hours, seven days a week
• for the New Vehicle Limited Warranty period of three years or 36,000
miles (60,000 km), whichever occurs first on Ford and Mercury
vehicles, and four years or 50,000 miles (80,000 km) on Lincoln
vehicles.
Roadside assistance will cover:
• a flat tire change with a good spare (except Ford GT which has a tire
inflation kit)
• battery jump start
• lock-out assistance (key replacement cost is the customer’s
responsibility)
• fuel delivery (2.0 gallons [7.5L], maximum two occurrences within 12
month period)
• towing of your disabled vehicle to the nearest Ford Motor Company
dealership, or your selling dealer if within 35 miles (56.3 km) of the
nearest Ford Motor Company dealership (one tow per disablement).
Even non-warranty related tows, like accidents, are covered (some
exclusions apply, such as impound towing or repossession).
Canadian customers refer to your Owner Information Guide for
information on:
• coverage period
• exact fuel amounts
• towing of your disabled vehicle
• emergency travel expense reimbursement
• travel planning benefits
USING ROADSIDE ASSISTANCE
Complete the roadside assistance identification card and place it in your
wallet for quick reference. In the United States, this card is found in the
Owner Guide portfolio in the glove compartment. In Canada, the card is
found in the Owner Information Guide in the glove compartment.
U.S. Ford or Mercury vehicle customers who require roadside assistance,
call 1–800–241–3673; Lincoln vehicle customers call 1–800–521–4140.
2006 GT (gto)
Owners Guide (post-2002-fmt)
USA_English (fus)
Roadside Emergencies
Roadside Emergencies
105
Page 106 of 200
Canadian customers who require roadside assistance, call
1–800–665–2006.
If you need to arrange roadside assistance for yourself, Ford Motor
Company will reimburse a reasonable amount. To obtain reimbursement
information, U.S. Ford or Mercury vehicles customers call
1-800-241-3673; Lincoln vehicle customers call 1–800–521–4140.
Canadian customers who need to obtain reimbursement information, call
1–800–665–2006.
ROADSIDE COVERAGE BEYOND BASIC WARRANTY
In the United States, you may purchase additional roadside assistance
coverage beyond this period through the Ford Auto Club by contacting
your Ford or Lincoln/Mercury dealer.
Similarly in Canada, for uninterrupted Roadside Assistance coverage, you
may purchase extended coverage prior to your Basic Warranty’s Roadside
Assistance expiring. For more information and enrollment, contact
1–877–294–2582 or visit our website at www.ford.ca.
HAZARD FLASHER
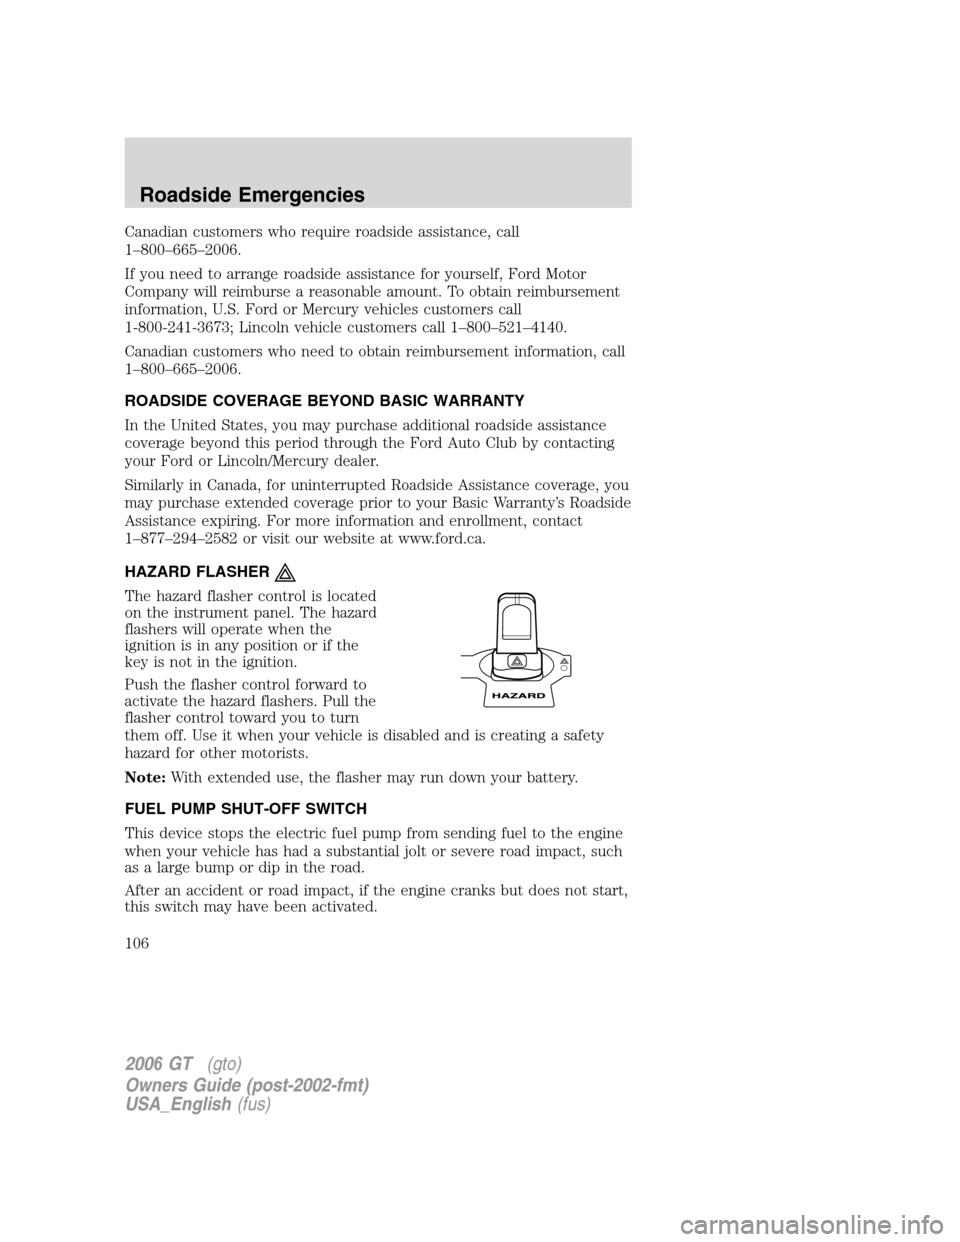
The hazard flasher control is located
on the instrument panel. The hazard
flashers will operate when the
ignition is in any position or if the
key is not in the ignition.
Push the flasher control forward to
activate the hazard flashers. Pull the
flasher control toward you to turn
them off. Use it when your vehicle is disabled and is creating a safety
hazard for other motorists.
Note:With extended use, the flasher may run down your battery.
FUEL PUMP SHUT-OFF SWITCH
This device stops the electric fuel pump from sending fuel to the engine
when your vehicle has had a substantial jolt or severe road impact, such
as a large bump or dip in the road.
After an accident or road impact, if the engine cranks but does not start,
this switch may have been activated.
2006 GT (gto)
Owners Guide (post-2002-fmt)
USA_English (fus)
Roadside Emergencies
106
Page 107 of 200
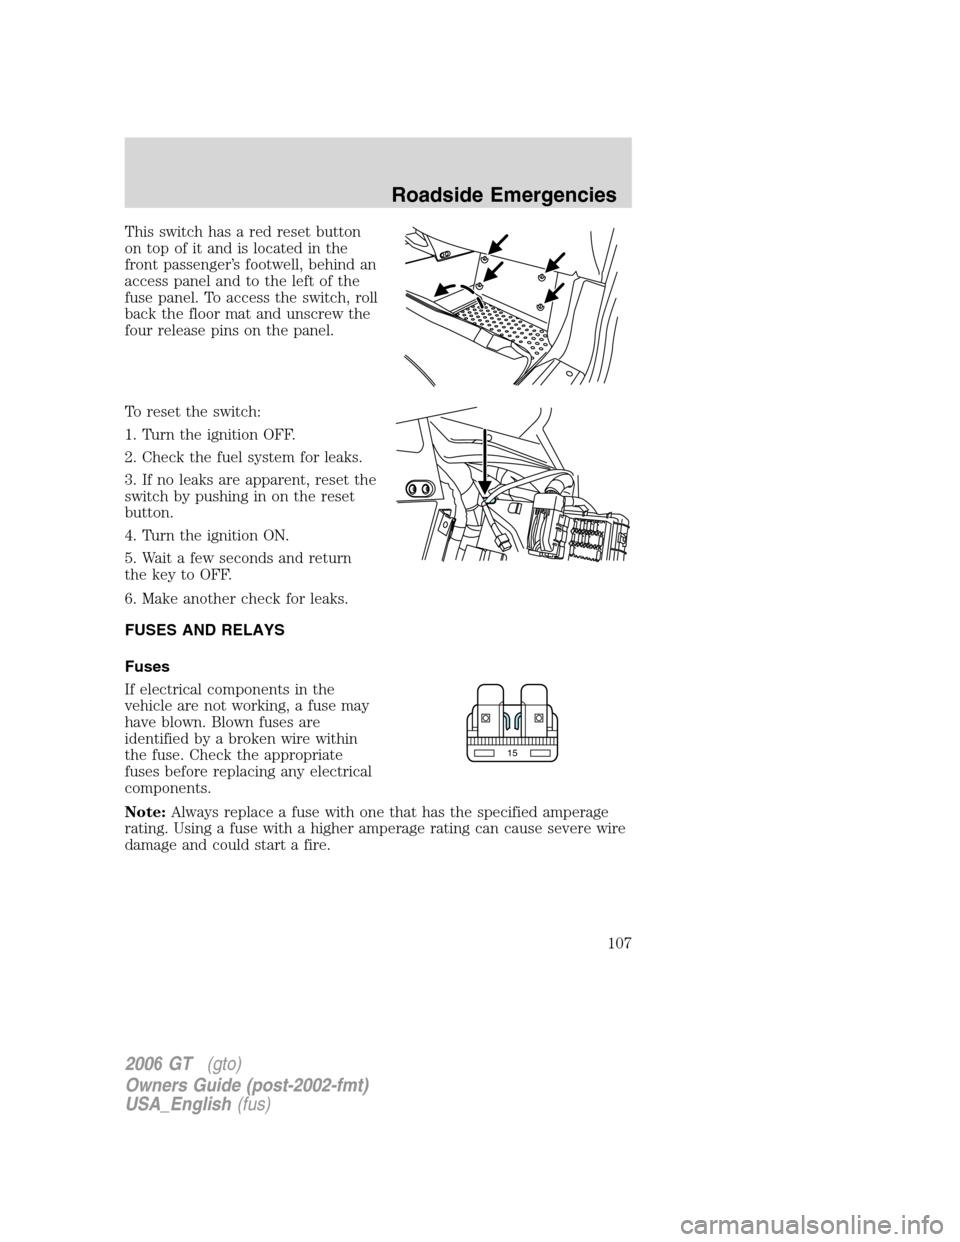
This switch has a red reset button
on top of it and is located in the
front passenger’s footwell, behind an
access panel and to the left of the
fuse panel. To access the switch, roll
back the floor mat and unscrew the
four release pins on the panel.
To reset the switch:
1. Turn the ignition OFF.
2. Check the fuel system for leaks.
3. If no leaks are apparent, reset the
switch by pushing in on the reset
button.
4. Turn the ignition ON.
5. Wait a few seconds and return
the key to OFF.
6. Make another check for leaks.
FUSES AND RELAYS
Fuses
If electrical components in the
vehicle are not working, a fuse may
have blown. Blown fuses are
identified by a broken wire within
the fuse. Check the appropriate
fuses before replacing any electrical
components.
Note:Always replace a fuse with one that has the specified amperage
rating. Using a fuse with a higher amperage rating can cause severe wire
damage and could start a fire.
15
2006 GT (gto)
Owners Guide (post-2002-fmt)
USA_English (fus)
Roadside Emergencies
107
Page 108 of 200
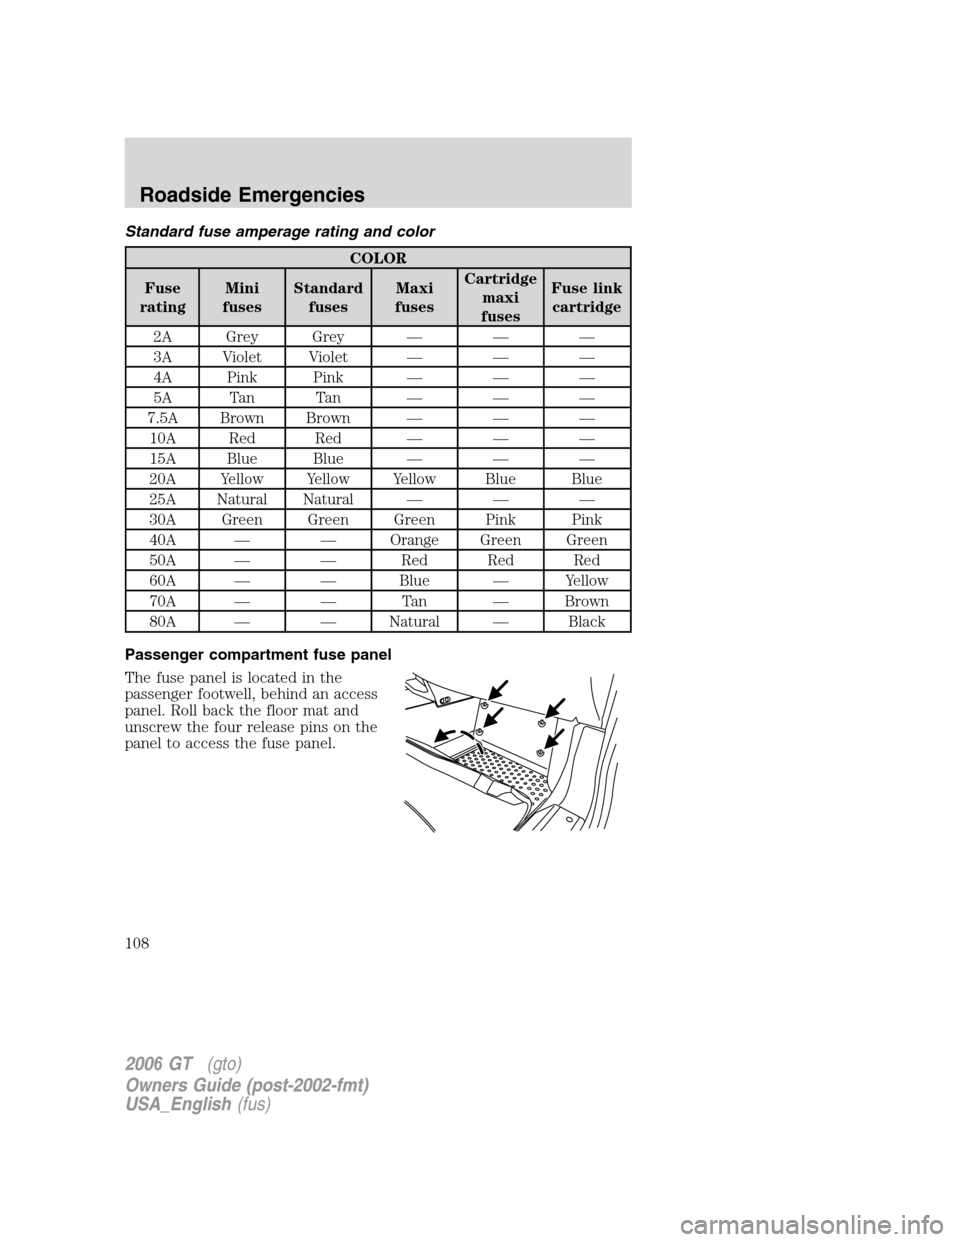
Standard fuse amperage rating and color
COLOR
Fuse
rating Mini
fuses Standard
fuses Maxi
fuses Cartridge
maxi
fuses Fuse link
cartridge
2A Grey Grey — — —
3A Violet Violet — — —
4A Pink Pink — — —
5A Tan Tan — — —
7.5A Brown Brown — — — 10A Red Red — — —
15A Blue Blue — — —
20A Yellow Yellow Yellow Blue Blue
25A Natural Natural — — —
30A Green Green Green Pink Pink
40A — — Orange Green Green
50A — — Red Red Red
60A — — Blue — Yellow
70A — — Tan — Brown
80A — — Natural — Black
Passenger compartment fuse panel
The fuse panel is located in the
passenger footwell, behind an access
panel. Roll back the floor mat and
unscrew the four release pins on the
panel to access the fuse panel.
2006 GT (gto)
Owners Guide (post-2002-fmt)
USA_English (fus)
Roadside Emergencies
108
Page 109 of 200
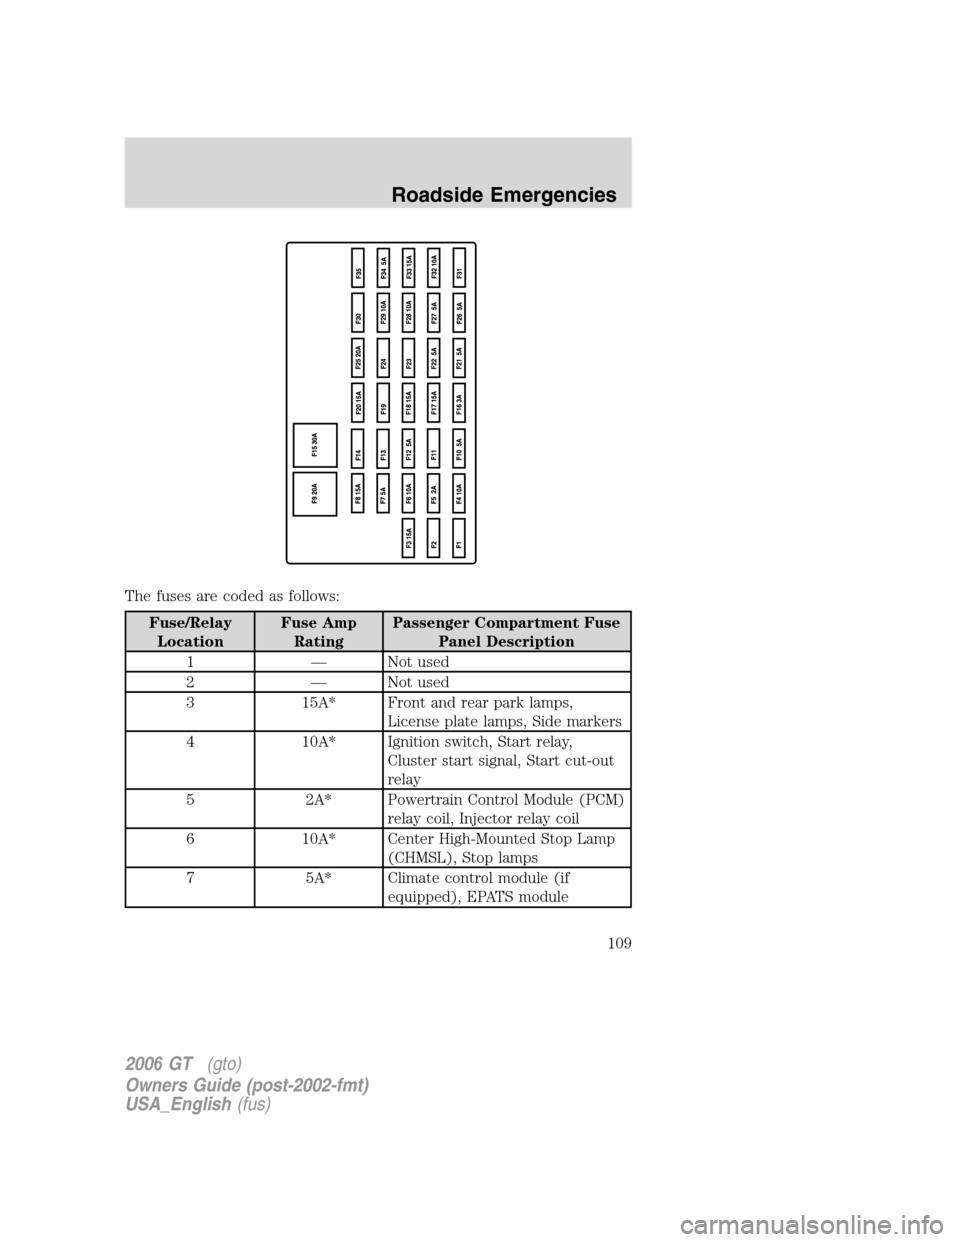
The fuses are coded as follows:
Fuse/RelayLocation Fuse Amp
Rating Passenger Compartment Fuse
Panel Description
1 — Not used
2 — Not used
3 15A* Front and rear park lamps, License plate lamps, Side markers
4 10A* Ignition switch, Start relay, Cluster start signal, Start cut-out
relay
5 2A* Powertrain Control Module (PCM) relay coil, Injector relay coil
6 10A* Center High-Mounted Stop Lamp (CHMSL), Stop lamps
7 5A* Climate control module (if equipped), EPATS module
2006GT (gto)
Owners Guide (post-2002-fmt)
USA_English (fus)
Roadside Emergencies
109
Page 110 of 200
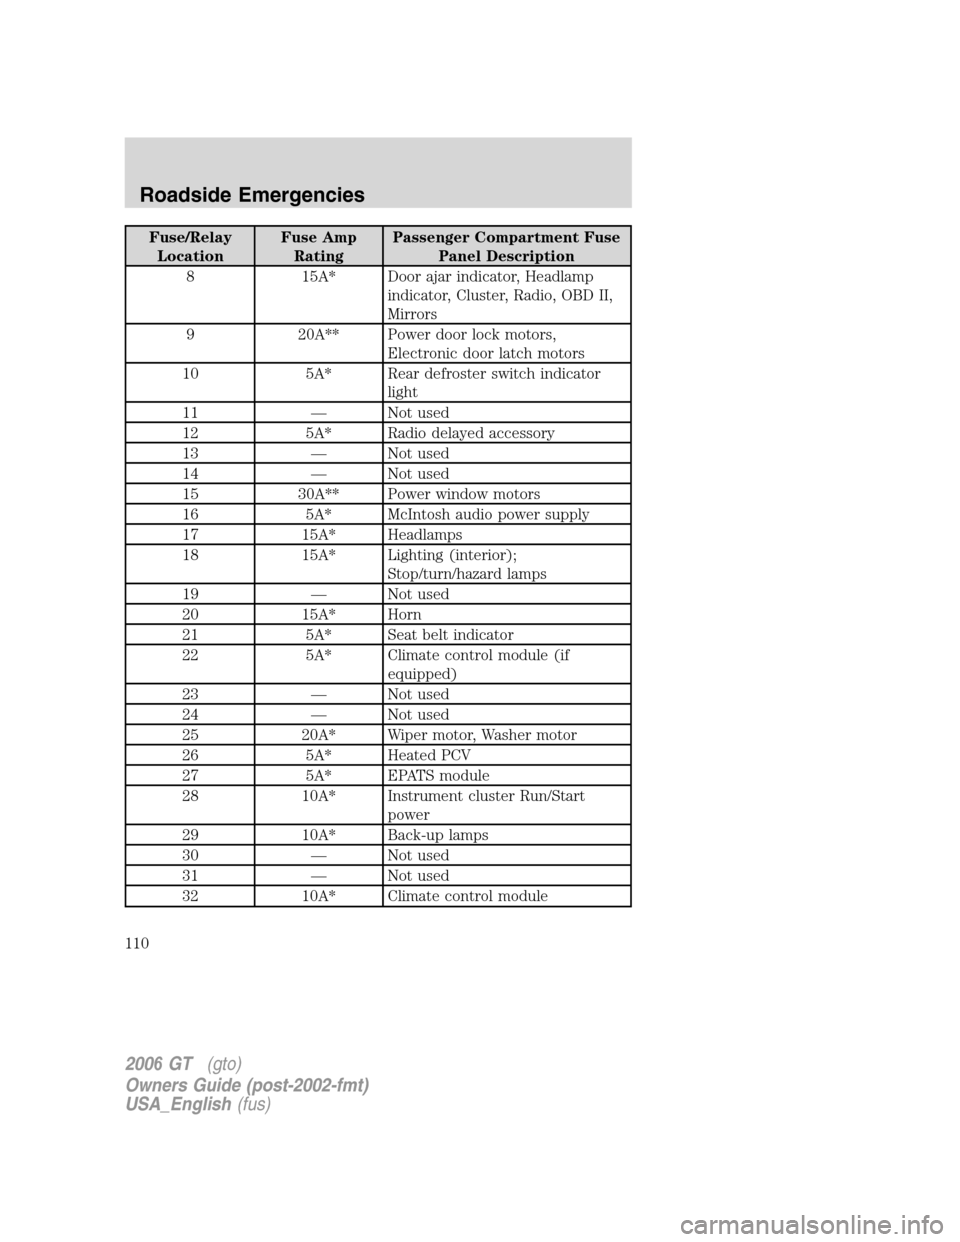
Fuse/RelayLocation Fuse Amp
Rating Passenger Compartment Fuse
Panel Description
8 15A* Door ajar indicator, Headlamp indicator, Cluster, Radio, OBD II,
Mirrors
9 20A** Power door lock motors, Electronic door latch motors
10 5A* Rear defroster switch indicator light
11 — Not used
12 5A* Radio delayed accessory
13 — Not used
14 — Not used
15 30A** Power window motors
16 5A* McIntosh audio power supply
17 15A* Headlamps
18 15A* Lighting (interior); Stop/turn/hazard lamps
19 — Not used
20 15A* Horn
21 5A* Seat belt indicator
22 5A* Climate control module (if equipped)
23 — Not used
24 — Not used
25 20A* Wiper motor, Washer motor
26 5A* Heated PCV
27 5A* EPATS module
28 10A* Instrument cluster Run/Start power
29 10A* Back-up lamps
30 — Not used
31 — Not used
32 10A* Climate control module
2006 GT (gto)
Owners Guide (post-2002-fmt)
USA_English (fus)
Roadside Emergencies
110