Page 83 to 93 FORD KUGA 2010 1.G Workshop Manual
[x] Cancel search | Manufacturer: FORD, Model Year: 2010, Model line: KUGA, Model: FORD KUGA 2010 1.GPages: 226, PDF Size: 8.07 MB
Page 146 of 226
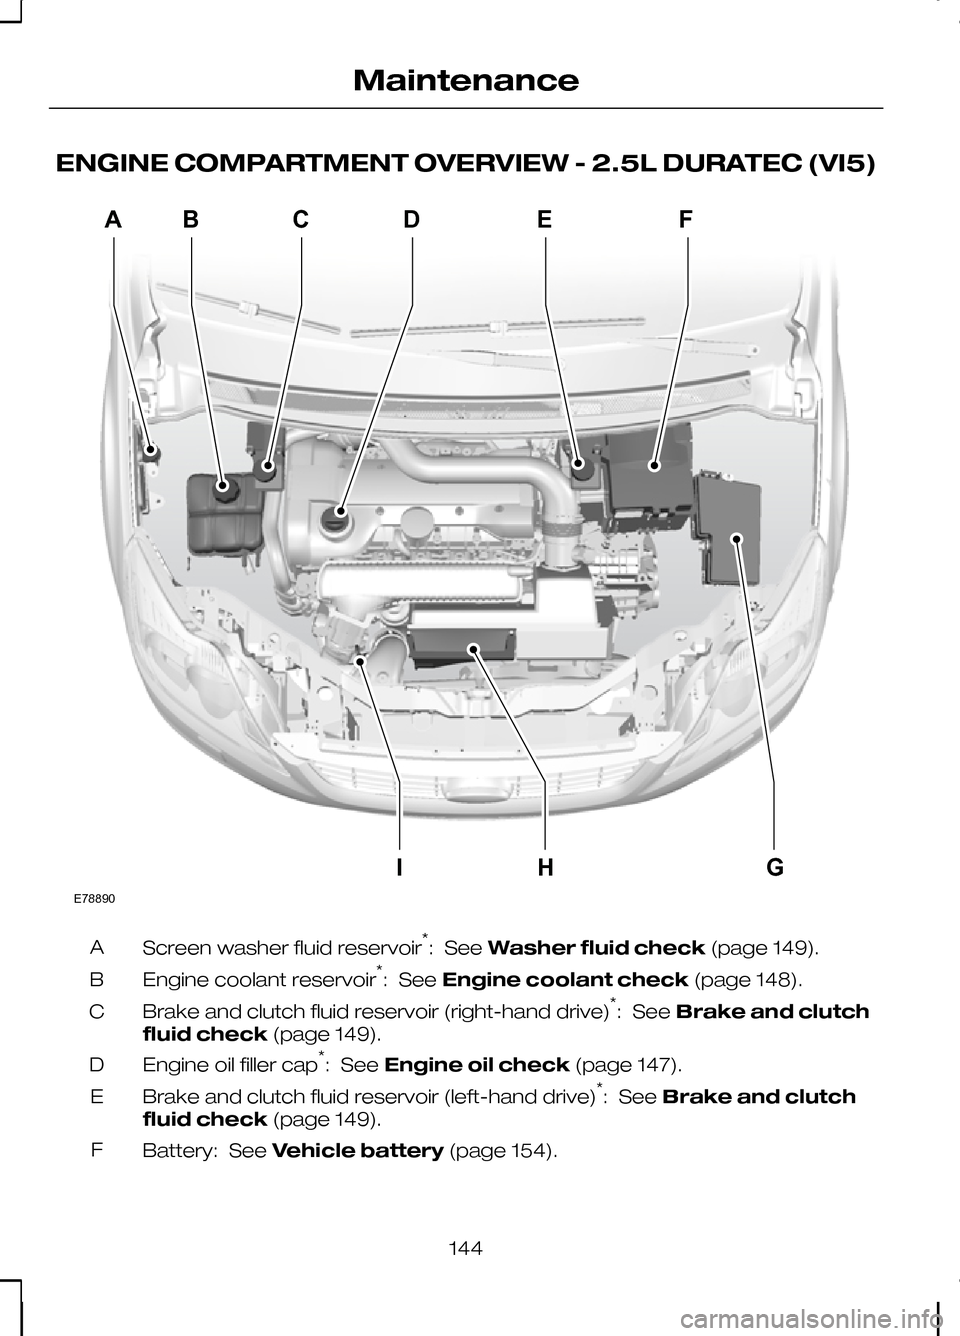
ENGINE COMPARTMENT OVERVIEW - 2.5L DURATEC (VI5)
Screen washer fluid reservoir
*
: See Washer fluid check (page 149).
A
Engine coolant reservoir *
: See Engine coolant check (page 148).
B
Brake and clutch fluid reservoir (right-hand drive) *
: See Brake and clutch
fluid check (page 149).
C
Engine oil filler cap *
: See Engine oil check (page 147).
D
Brake and clutch fluid reservoir (left-hand drive) *
: See Brake and clutch
fluid check (page 149).
E
Battery: See Vehicle battery (page 154).
F
144
MaintenanceE78890IFEDCBAHG
Page 147 of 226
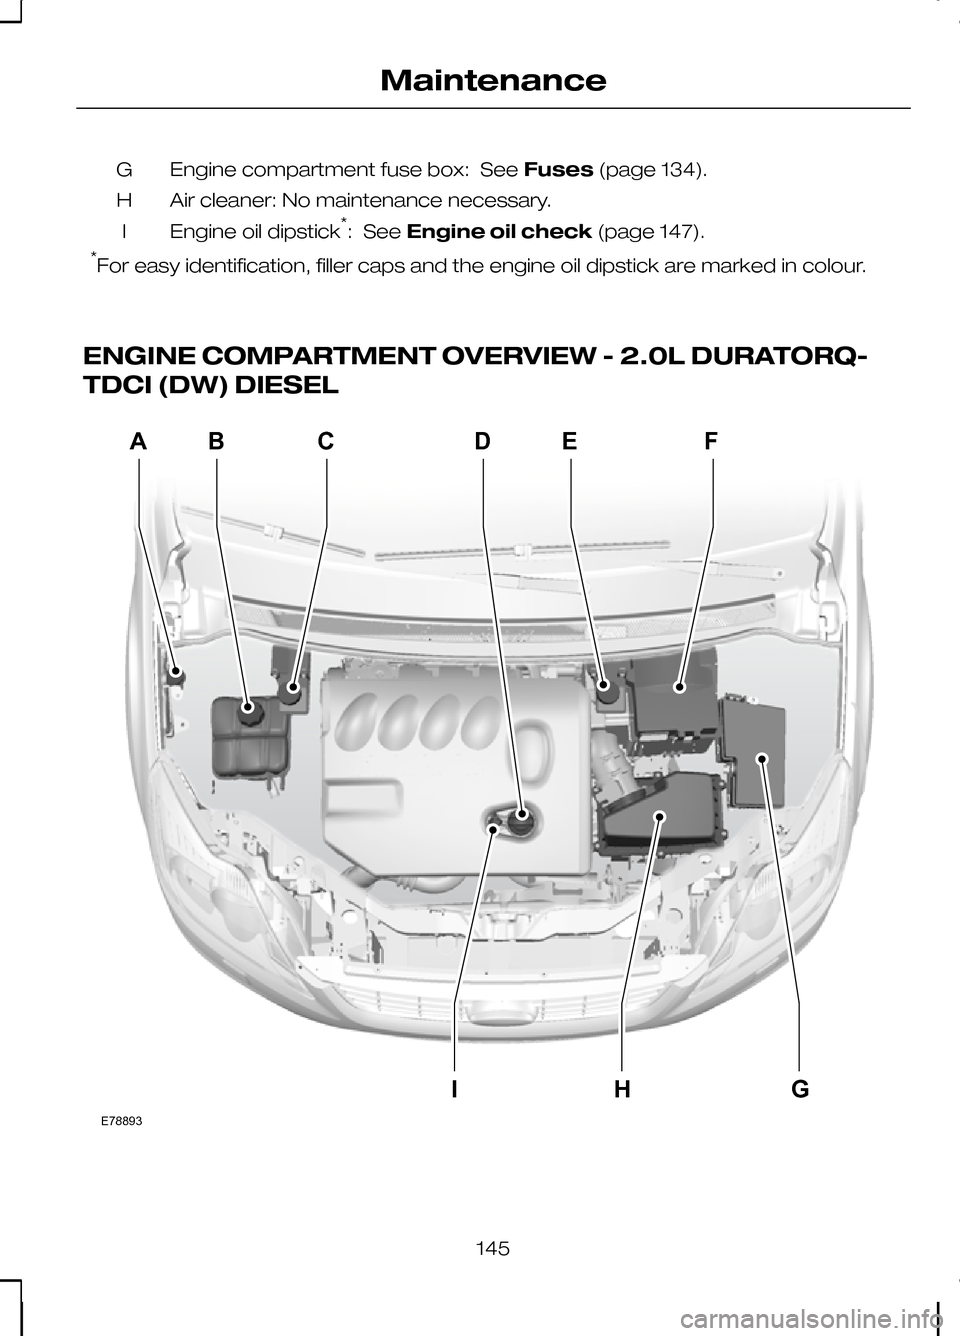
Engine compartment fuse box: See
Fuses(page 134).
G
Air cleaner: No maintenance necessary.
H
Engine oil dipstick *
: See Engine oil check (page 147).
I
* For easy identification, filler caps and the engine oil dipstick are marked in colour.
ENGINE COMPARTMENT OVERVIEW - 2.0L DURATORQ-
TDCI (DW) DIESEL 145
MaintenanceE78893IFEDCBAHG
Page 148 of 226
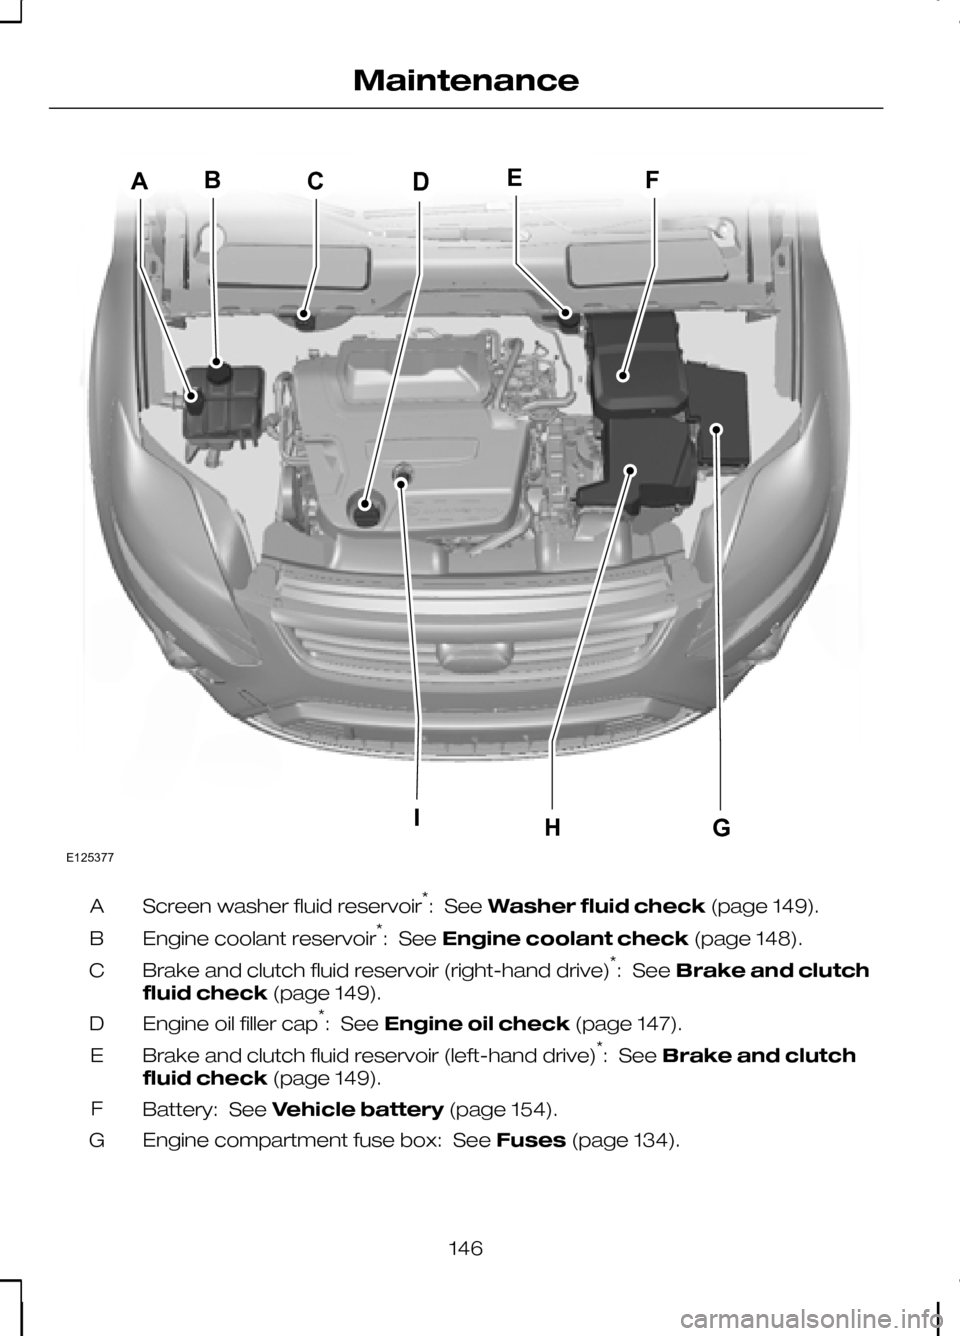
Screen washer fluid reservoir
*
: See Washer fluid check (page 149).
A
Engine coolant reservoir *
: See Engine coolant check (page 148).
B
Brake and clutch fluid reservoir (right-hand drive) *
: See Brake and clutch
fluid check (page 149).
C
Engine oil filler cap *
: See Engine oil check (page 147).
D
Brake and clutch fluid reservoir (left-hand drive) *
: See Brake and clutch
fluid check (page 149).
E
Battery: See Vehicle battery (page 154).
F
Engine compartment fuse box: See Fuses(page 134).
G
146
MaintenanceIFEDCBAHGE125377
Page 149 of 226
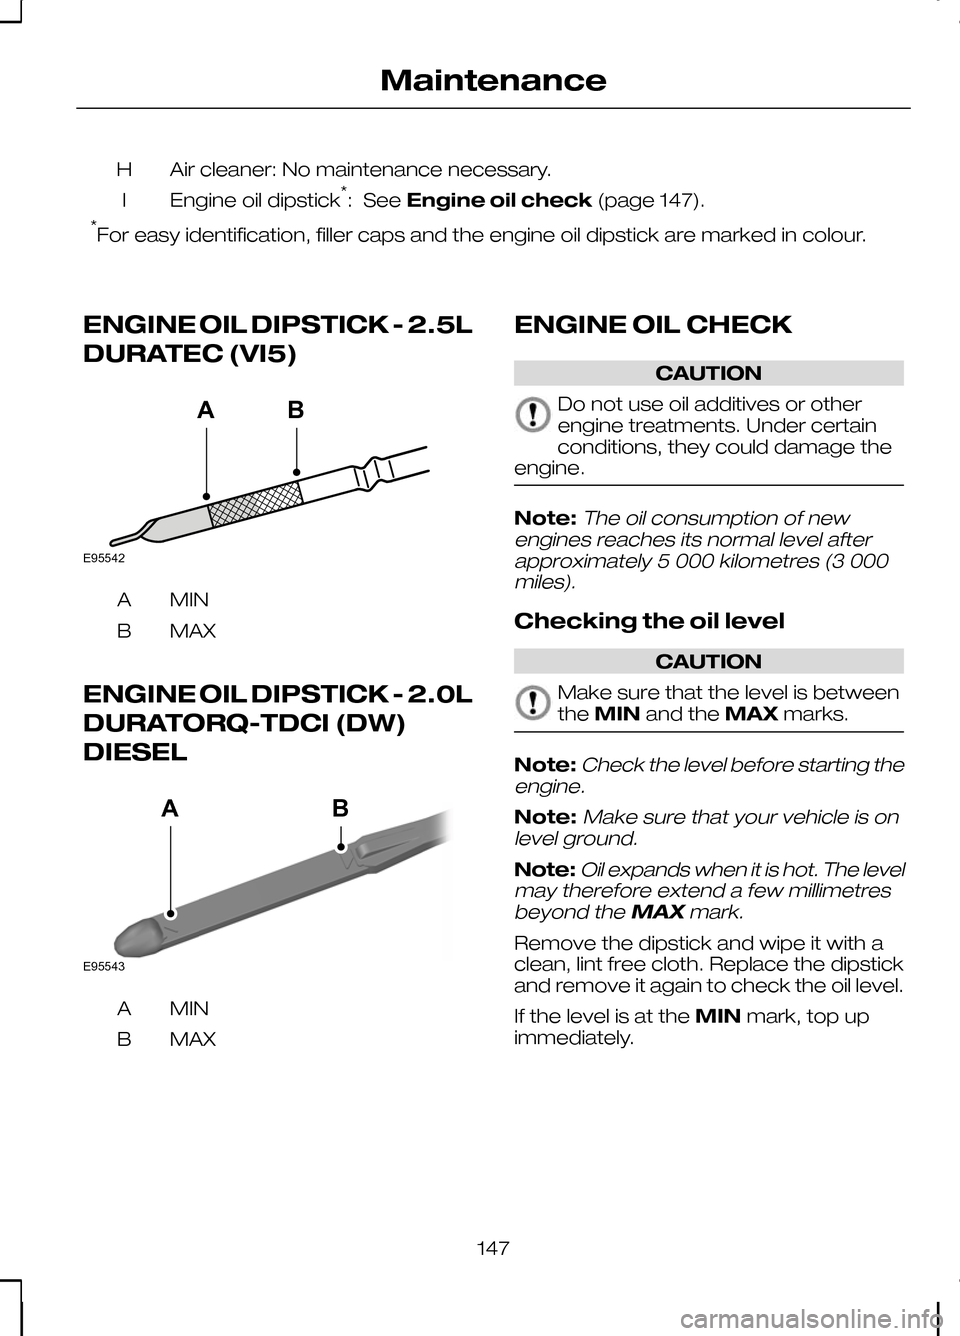
Air cleaner: No maintenance necessary.
H
Engine oil dipstick *
: See Engine oil check (page 147).
I
* For easy identification, filler caps and the engine oil dipstick are marked in colour.
ENGINE OIL DIPSTICK - 2.5L
DURATEC (VI5) MINA
MAX
B
ENGINE OIL DIPSTICK - 2.0L
DURATORQ-TDCI (DW)
DIESEL MINA
MAX
B ENGINE OIL CHECK CAUTION
Do not use oil additives or other
engine treatments. Under certain
conditions, they could damage the
engine. Note:The oil consumption of new
engines reaches its normal level after approximately 5 000 kilometres (3 000miles).
Checking the oil level CAUTION
Make sure that the level is between
the
MIN and the MAXmarks. Note:
Check the level before starting the
engine.
Note:Make sure that your vehicle is on
level ground.
Note:Oil expands when it is hot. The level
may therefore extend a few millimetres
beyond the MAXmark.
Remove the dipstick and wipe it with a
clean, lint free cloth. Replace the dipstick
and remove it again to check the oil level.
If the level is at the MINmark, top up
immediately.
147
MaintenanceE95542BA E95543BA
Page 150 of 226
Topping up
WARNINGS
Only top up when the engine is cold.
If the engine is hot, wait 10 minutes
for the engine to cool down.
Do not remove the filler cap when
the engine is running.
Remove the filler cap.
CAUTION
Do not top up further than the
MAX
mark. Top up with fluid that meets the Ford
specification. See
Technical
specifications (page 150).
ENGINE COOLANT CHECK
Checking the coolant level WARNING
Do not allow the fluid to touch your
skin or eyes. If this happens, rinse
the affected areas immediately with
plenty of water and contact your doctor. CAUTION
Make sure that the level is between
the
MIN and the MAXmarks.Note:Coolant expands when it is hot.
The level may therefore extend beyond
the MAX mark.
If the level is at the MINmark, top up
immediately. Topping up WARNINGS
Only top up when the engine is cold.
If the engine is hot, wait 10 minutes
for the engine to cool down.
Do not remove the filler cap when
the engine is running.
Do not remove the filler cap when
the engine is hot. Wait for the engine
to cool down.
Undiluted coolant is flammable and
may ignite if spilt on a hot exhaust.
CAUTIONS
In an emergency, you can add just
water to the cooling system to reach
a vehicle service station. The system
must then be drained and refilled with a
50/50 mixture of coolant and water. Have
the system checked by a properly trained
technician as soon as possible. Increased dilution of the coolant can
cause engine damage from
corrosion, overheating or freezing.
Unscrew the cap
slowly. Any pressure
will escape slowly as you unscrew the
cap. CAUTION
Do not top up further than the
MAX
mark. Top up with a 50/50 mixture of coolant
and water using fluid that meets the Ford
specification. See
Technical
specifications (page 150).
148
Maintenance
Page 151 of 226
BRAKE AND CLUTCH FLUID
CHECK
WARNINGS
Do not allow the fluid to touch your
skin or eyes. If this happens, rinse
the affected areas immediately with
plenty of water and contact your doctor. If the level is at the
MINmark, have
the system checked by a properly
trained technician as soon as
possible. Note:The brake and the clutch systems
are supplied from the same reservoir.
Top up with fluid that meets the Ford
specification. See Technical
specifications (page 150).
POWER STEERING FLUID
CHECK WARNING
Do not allow the fluid to touch your
skin or eyes. If this happens, rinse
the affected areas immediately with
plenty of water and contact your doctor. CAUTION
Make sure that the level is between
the
MIN and the MAXmarks. If the level is at the
MINmark, top up
immediately.
Topping up
Remove the filler cap. CAUTION
Do not top up further than the
MAX
mark. Top up with fluid that meets the Ford
specification. See
Technical
specifications (page 150).
WASHER FLUID CHECK
The front and rear washer systems are
supplied from the same reservoir.
149
Maintenance
Page 162 of 226
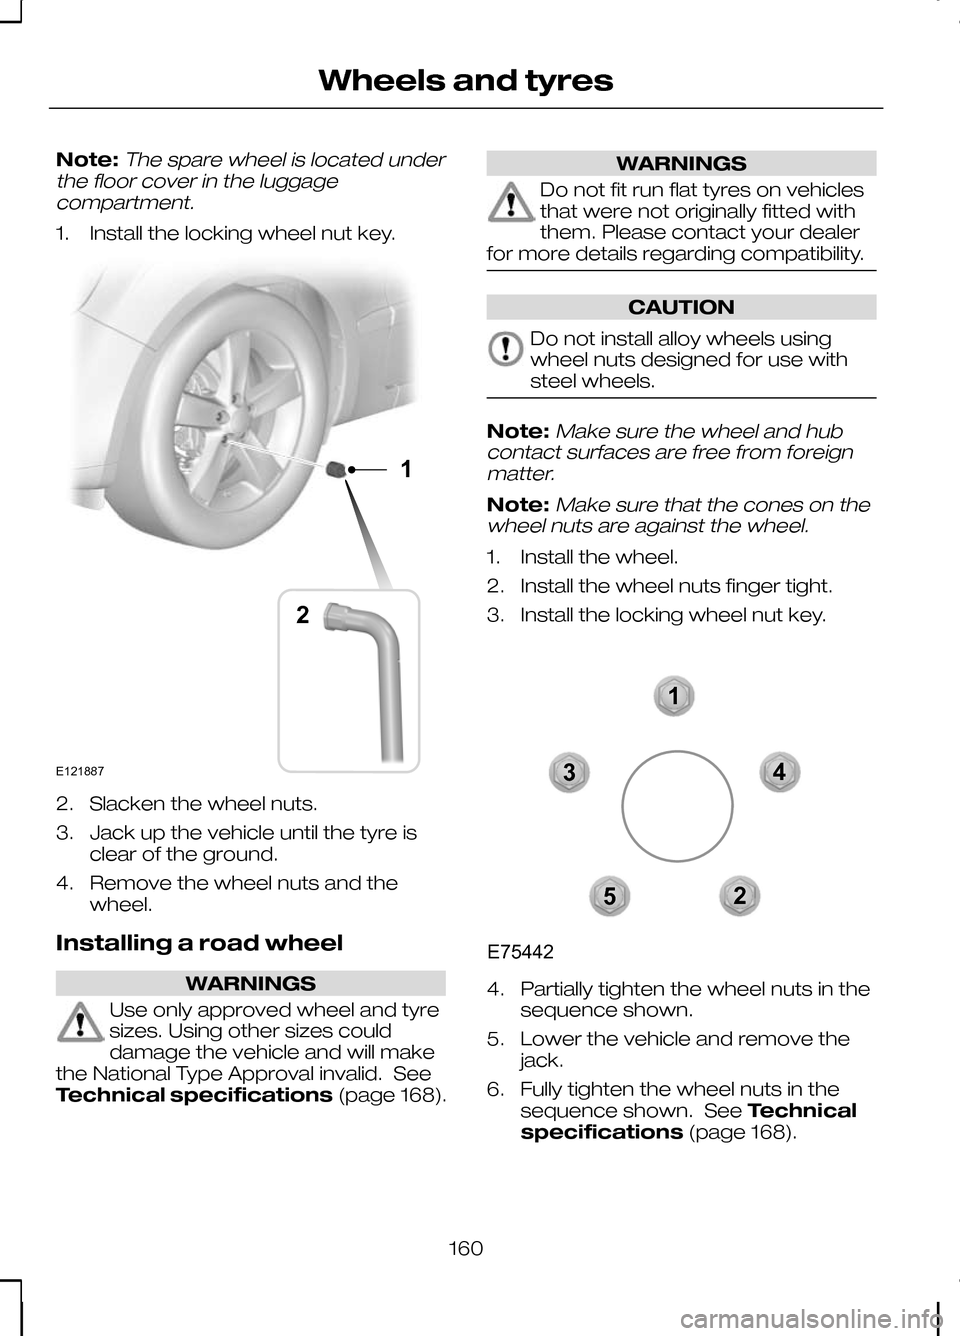
Note:The spare wheel is located under
the floor cover in the luggage compartment.
1. Install the locking wheel nut key. 2. Slacken the wheel nuts.
3. Jack up the vehicle until the tyre is
clear of the ground.
4. Remove the wheel nuts and the wheel.
Installing a road wheel WARNINGS
Use only approved wheel and tyre
sizes. Using other sizes could
damage the vehicle and will make
the National Type Approval invalid. See
Technical specifications (page 168). WARNINGS
Do not fit run flat tyres on vehicles
that were not originally fitted with
them. Please contact your dealer
for more details regarding compatibility. CAUTION
Do not install alloy wheels using
wheel nuts designed for use with
steel wheels.
Note:
Make sure the wheel and hub
contact surfaces are free from foreign matter.
Note:Make sure that the cones on the
wheel nuts are against the wheel.
1. Install the wheel.
2. Install the wheel nuts finger tight.
3. Install the locking wheel nut key. 4. Partially tighten the wheel nuts in the
sequence shown.
5. Lower the vehicle and remove the jack.
6. Fully tighten the wheel nuts in the sequence shown. See Technical
specifications (page 168).
160
Wheels and tyresE12188712 12345E75442
Page 163 of 226
7. Install the wheel trim using the ball of
your hand. WARNING
Have the wheel nuts checked for
tightness and the tyre pressure
checked as soon as possible.
Note:If the spare wheel is different in size
or construction to the road wheels, have this replaced as soon as possible.
TYRE REPAIR KIT
Your vehicle is not equipped with a spare
tyre, but does include an emergency tyre
repair kit that can be used to repair one
flat tyre.
The tyre repair kit is located in the
underfloor storage compartment. See
Storage compartments (page 98).
General information WARNINGS
Depending on the type and extent
of tyre damage, some tyres can
only be partially sealed or not sealed
at all. Loss of tyre pressure can affect
vehicle handling, leading to loss of vehicle
control. Do not use the tyre repair kit if the
tyre has already been damaged as
a result of being driven under
inflated. Do not use the tyre repair kit on run
flat tyres.
Do not try to seal damage other
than that located within the visible
tread of the tyre.
Do not try to seal damage to the
tyre’s sidewall. The tyre repair kit seals most tyre
punctures [with a diameter of up to six
millimetres (1/4 inch)] to temporarily
restore mobility.
Observe the following rules when using
the kit:
•
Drive with caution and avoid
making sudden steering or
driving manoeuvres, especially if
the vehicle is heavily loaded or you are
towing a trailer.
• The kit will provide you with an
emergency temporary repair, enabling
you to continue your journey to the
next vehicle or tyre dealer, or to drive
a maximum distance of
200 kilometres (125 miles).
• Do not exceed a
maximum speed
of 80 km/h (50 mph).
• Keep the kit out of the reach of
children.
• Only use the kit when the ambient
temperature is between –30°C (-22°F)
and +70°C (+158°F).
Using the tyre repair kit WARNINGS
Compressed air can act as an
explosive or propellant.
Never leave the tyre repair kit
unattended while in use.
CAUTION
Do not keep the compressor
operating for more than 10 minutes.
Note:
Use the tyre repair kit only for the
vehicle with which it was supplied.
161
Wheels and tyres
Page 165 of 226
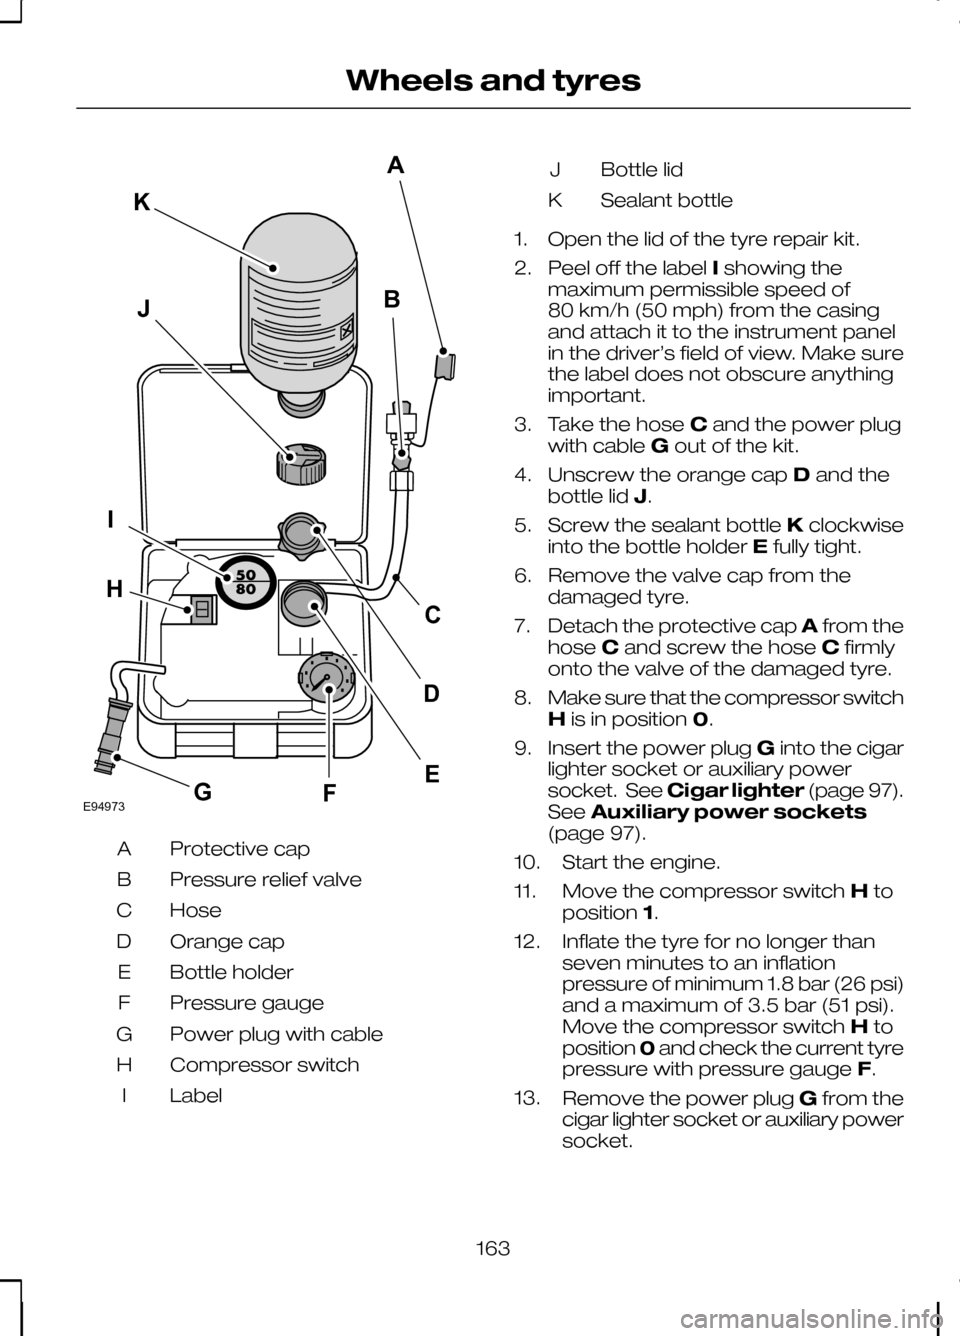
Protective cap
A
Pressure relief valve
B
Hose
C
Orange cap
D
Bottle holder
E
Pressure gauge
F
Power plug with cable
G
Compressor switch
H
Label
I Bottle lid
J
Sealant bottle
K
1. Open the lid of the tyre repair kit.
2. Peel off the label Ishowing the
maximum permissible speed of
80 km/h (50 mph) from the casing
and attach it to the instrument panel
in the driver’s field of view. Make sure
the label does not obscure anything
important.
3. Take the hose Cand the power plug
with cable Gout of the kit.
4. Unscrew the orange cap Dand the
bottle lid J.
5. Screw the sealant bottle Kclockwise
into the bottle holder Efully tight.
6. Remove the valve cap from the damaged tyre.
7. Detach the protective cap Afrom the
hose Cand screw the hose Cfirmly
onto the valve of the damaged tyre.
8. Make sure that the compressor switch
His in position 0.
9. Insert the power plug Ginto the cigar
lighter socket or auxiliary power
socket. See Cigar lighter (page 97).
See Auxiliary power sockets
(page 97).
10. Start the engine.
11. Move the compressor switch Hto
position 1.
12. Inflate the tyre for no longer than seven minutes to an inflation
pressure of minimum 1.8 bar (26 psi)
and a maximum of 3.5 bar (51 psi).
Move the compressor switch Hto
position 0and check the current tyre
pressure with pressure gauge F.
13. Remove the power plug Gfrom the
cigar lighter socket or auxiliary power
socket.
163
Wheels and tyresE94973BJIFECKAGHD
Page 166 of 226
14.
Quickly unscrew the hose Cfrom
the tyre valve and replace the
protective cap A. Fasten the valve
cap again.
15. Leave the sealant bottle Kin the
bottle holder E.
16. Make sure the kit, the bottle lid and the orange cap are stored safely, but
still easily accessible in the vehicle.
The kit will be required again when
you check the tyre pressure.
17. Immediately drive approximately three kilometres (two miles) so that
the sealant can seal the damaged
area.
Note:When pumping in the sealant
through the tyre valve, the pressure may rise up to 6 bar (87 psi) but will drop againafter about 30 seconds. WARNING
If you experience heavy vibrations,
unsteady steering behaviour or
noises while driving, reduce your
speed and drive with caution to a place
where it is safe for you to stop the vehicle.
Recheck the tyre and its pressure. If the
tyre pressure is less than 1.3 bar (19 psi)
or if there are any cracks, bumps or similar
damage visible, do not continue driving
with this tyre. Checking the tyre pressure
1. Stop the vehicle after driving
approximately three kilometres
(two miles). Check, and where
necessary, adjust the pressure of the
damaged tyre.
2. Attach the kit and read the tyre pressure from the pressure gauge F.
3. If the pressure of the sealant-filled tyre
is 1.3 bar (19 psi) or more, adjust it to
the specified pressure. See
Technical specifications (page
168). 4. Follow the inflation procedure once
again to top up the tyre.
5. Check the tyre pressure again from the pressure gauge F. If the tyre
pressure is too high, deflate the tyre
to the specified pressure using the
pressure relief valve B.
6. Once you have inflated the tyre to its correct tyre pressure, move the
compressor switch Hto position 0,
remove the power plug Gfrom the
socket, unscrew the hose C, fasten
the valve cap and replace the
protective cap A.
7. Leave the sealant bottle Kin the bottle
holder Eand store the kit away safely
in its original location.
8. Drive to the nearest tyre specialist to get the damaged tyre replaced.
Before the tyre is removed from the
rim, inform your tyre dealer that the
tyre contains sealant. Renew the kit
as soon as possible after it has been
used once.
Note:
Remember that emergency
roadside tyre repair kits only provide temporary mobility. Regulationsconcerning tyre repair after usage of tyrerepair kit may differ from country tocountry. You should consult a tyrespecialist for advice. WARNING
Before driving, make sure the tyre
is adjusted to the recommended
inflation pressure. See
Technical
specifications (page 168). Monitor the
tyre pressure until the sealed tyre is
replaced. Empty sealant bottles can be disposed
of together with normal household waste.
Return remains of sealant to your dealer
or dispose of it in compliance with local
waste disposal regulations.
164
Wheels and tyres