audio FORD KUGA 2010 1.G Owners Manual
[x] Cancel search | Manufacturer: FORD, Model Year: 2010, Model line: KUGA, Model: FORD KUGA 2010 1.GPages: 226, PDF Size: 8.07 MB
Page 3 of 226
Introduction
About this handbook................................5
Symbols glossary......................................5
Parts and accessories..............................5
Quick start
Quick start..................................................8
Child safety
Child seats................................................16
Child seat positioning..............................17
Booster cushions.....................................19
ISOFIX anchor points..............................20
Child safety locks.....................................21
Occupant protection
Principle of operation..............................22
Fastening the seat belts........................24
Seat belt height adjustment..................24
Seat belt reminder..................................24
Using seat belts during pregnancy......25
Disabling the passenger airbag............25
Keys and remote controls
General information on radio
frequencies...........................................27
Programming the remote control........27
Changing the remote control battery...................................................27
Locks
Locking and unlocking...........................29
Keyless entry............................................31
Global opening and closing...................34
Engine immobiliser
Principle of operation..............................36
Coded keys.............................................36
Arming the engine immobiliser.............36
Disarming the engine immobiliser........36 Alarm
Arming the alarm.....................................37
Disarming the alarm................................37
Steering wheel
Adjusting the steering wheel.................39
Audio control...........................................39
Voice control............................................40
Wipers and washers
Windscreen wipers..................................41
Autowipers................................................41
Windscreen washers.............................42
Rear window wiper and washers.........42
Adjusting the windscreen washer
jets.........................................................43
Headlamp washers................................43
Checking the wiper blades...................43
Changing the wiper blades...................44
Lighting
Lighting control........................................46
Autolamps................................................47
Front fog lamps.......................................47
Rear fog lamps........................................47
Headlamp levelling..................................47
Hazard warning flashers........................48
Adaptive front lighting system (AFS)......................................................49
Direction indicators.................................50
Interior lamps...........................................50
Removing a headlamp............................51
Changing a bulb......................................52
Bulb specification chart..........................58
Windows and mirrors
Electric windows.....................................60
Exterior mirrors.........................................61
Electric exterior mirrors..........................62
1
Table of contents
Page 6 of 226
Technical specifications
Technical specifications.........................171
Telephone
General information...............................175
Telephone setup....................................175
Bluetooth setup.....................................176
Telephone controls................................177
Using the telephone - Vehicles Without:
Navigation System.............................177
Using the telephone - Vehicles With: Navigation System.............................180
Voice control
Principle of operation............................182
Using voice control...............................182
Audio unit commands..........................183
Telephone commands.........................192
Navigation system commands...........197
Climate control commands.................197
Connectivity
General information..............................200
Connecting an external device...........201
Connecting an external device - Vehicles With: Bluetooth...................201
Using a USB device..............................202
Using an iPod........................................204
Navigation introduction
Road Safety...........................................208
Navigation system
Getting started......................................209
Appendices
Type approvals.......................................211
Type approvals.......................................211
Type approvals.......................................211
Electromagnetic compatibility.............212
4
Table of contents
Page 12 of 226
Horn.
E
Wiper lever. See Wipers and washers (page 41).
F
Card holder.
G
Air vents. See Air vents(page 80).
H
Hazard warning flasher switch. See Hazard warning flashers(page 48).
I
Airbag deactivation indicator. See Disabling the passenger airbag (page
25). Parking aid switch. See Using the parking aid(page 115).
J
Start button. See Keyless starting (page 101).
J
Heated windscreen switch. See Heated windows and mirrors (page
86).
K
Heated rear window switch. See Heated windows and mirrors (page
86).
L
Climate controls. See Climate control(page 80).
M
Audio or navigation unit. See separate handbook.
N
Heated front seat switch. See Heated seats(page 94).
O
Ignition switch.
P
Steering wheel adjustment. See Adjusting the steering wheel (page 39).
Q
Cruise control switches. See Using cruise control(page 120).
R
Audio controls. See Audio control(page 39).
S
Instrument lighting dimmer. See Instrument lighting dimmer(page 96).
T
10Quick start
Page 39 of 226
ARMING THE ALARM
The system is armed as soon as the
vehicle is locked and acts as a deterrent
to unauthorised persons who attempt to
open the doors, bonnet or luggage
compartment, or remove the audio
system.
The alarm sounds for 30 seconds if an
unauthorised person opens a door, the
luggage compartment or the bonnet. The
hazard flasher lights will flash for five
minutes.
Any attempt to start the engine without a
valid key or to remove the audio system
sounds the alarm again.
Automatic arming delay
The 20 seconds arming delay begins
when the bonnet, luggage compartment
and all doors are closed.
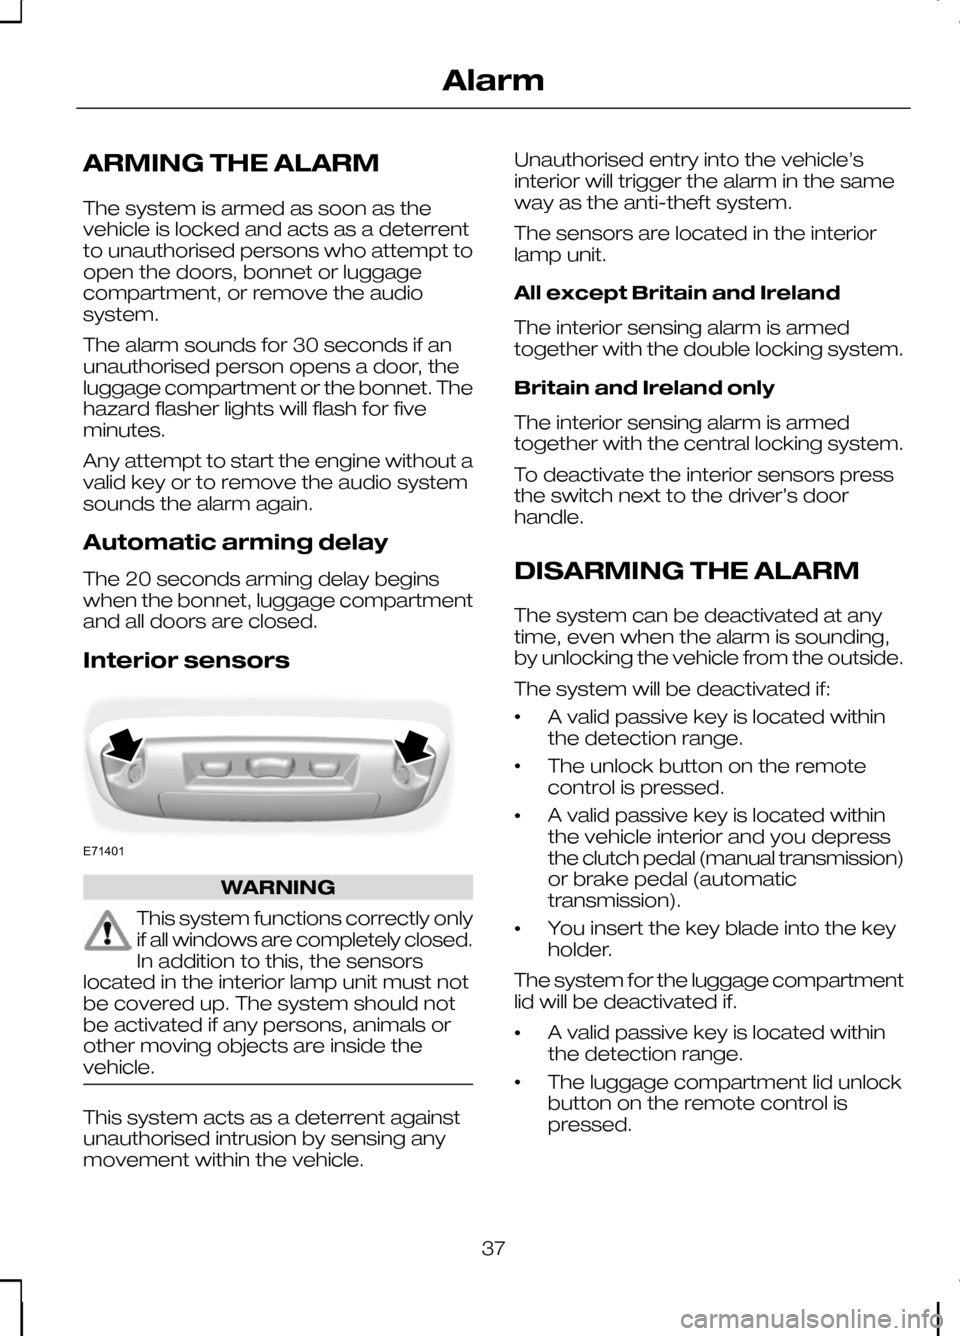
Interior sensors
WARNING
This system functions correctly only
if all windows are completely closed.
In addition to this, the sensors
located in the interior lamp unit must not
be covered up. The system should not
be activated if any persons, animals or
other moving objects are inside the
vehicle. This system acts as a deterrent against
unauthorised intrusion by sensing any
movement within the vehicle. Unauthorised entry into the vehicle’s
interior will trigger the alarm in the same
way as the anti-theft system.
The sensors are located in the interior
lamp unit.
All except Britain and Ireland
The interior sensing alarm is armed
together with the double locking system.
Britain and Ireland only
The interior sensing alarm is armed
together with the central locking system.
To deactivate the interior sensors press
the switch next to the driver’s door
handle.
DISARMING THE ALARM
The system can be deactivated at any
time, even when the alarm is sounding,
by unlocking the vehicle from the outside.
The system will be deactivated if:
•
A valid passive key is located within
the detection range.
• The unlock button on the remote
control is pressed.
• A valid passive key is located within
the vehicle interior and you depress
the clutch pedal (manual transmission)
or brake pedal (automatic
transmission).
• You insert the key blade into the key
holder.
The system for the luggage compartment
lid will be deactivated if.
• A valid passive key is located within
the detection range.
• The luggage compartment lid unlock
button on the remote control is
pressed.
37
AlarmE71401
Page 41 of 226
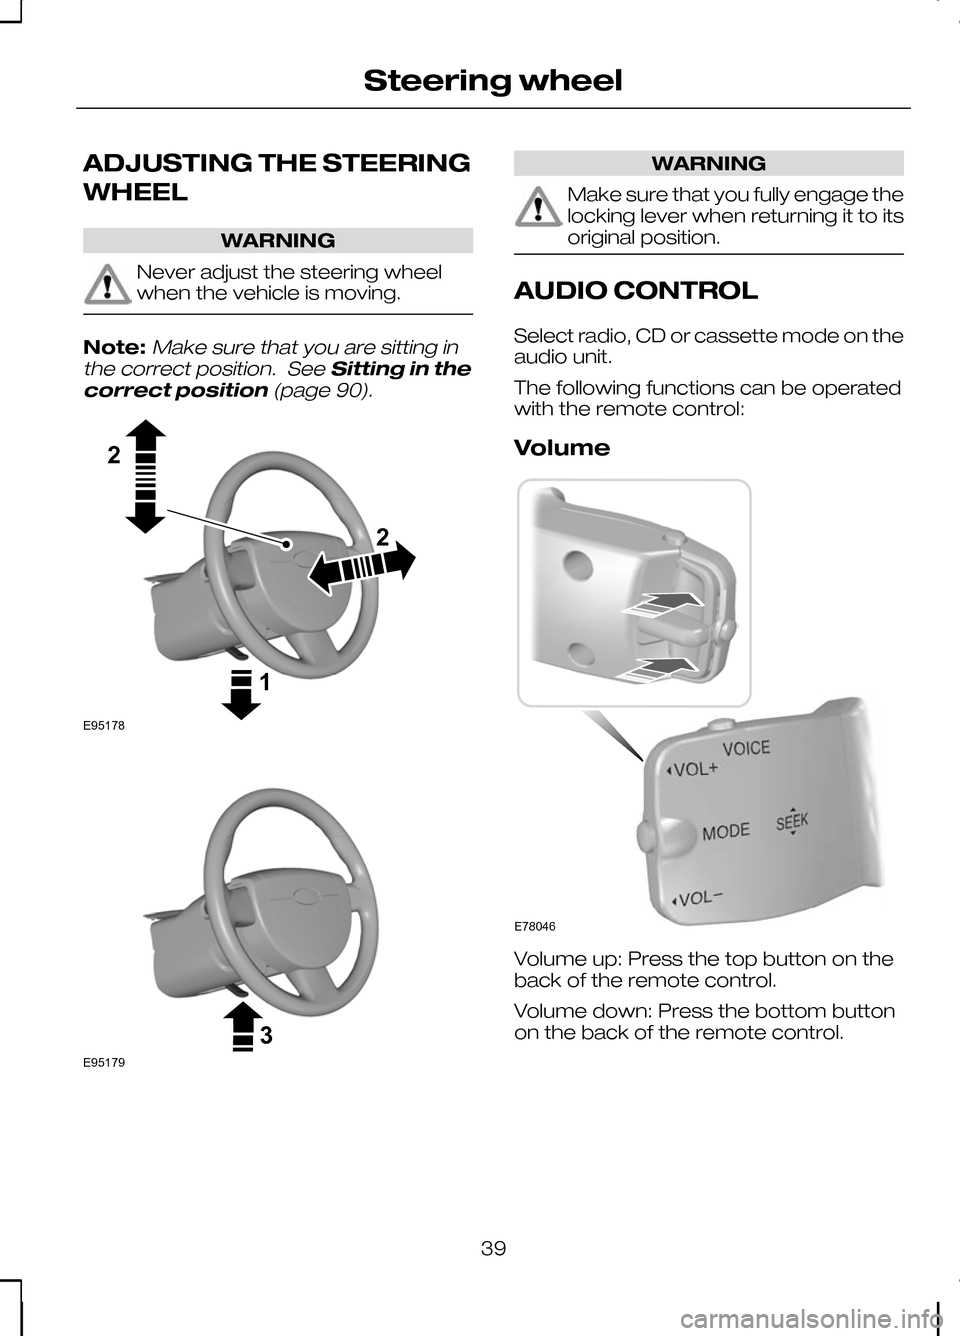
ADJUSTING THE STEERING
WHEEL
WARNING
Never adjust the steering wheel
when the vehicle is moving.
Note:Make sure that you are sitting in
the correct position. See Sitting in the
correct position (page 90). WARNING
Make sure that you fully engage the
locking lever when returning it to its
original position.
AUDIO CONTROL
Select radio, CD or cassette mode on the
audio unit.
The following functions can be operated
with the remote control:
Volume
Volume up: Press the top button on the
back of the remote control.
Volume down: Press the bottom button
on the back of the remote control.
39
Steering wheel122E95178 3E95179 E78046
Page 101 of 226
To gain access to the storage area, fold
up the rear seat cushions. See
Rear
seats (page 94).
Note:Do not overload the storage areas
under the rear seats. Ensure that the rear seat cushions can be folded backcompletely.
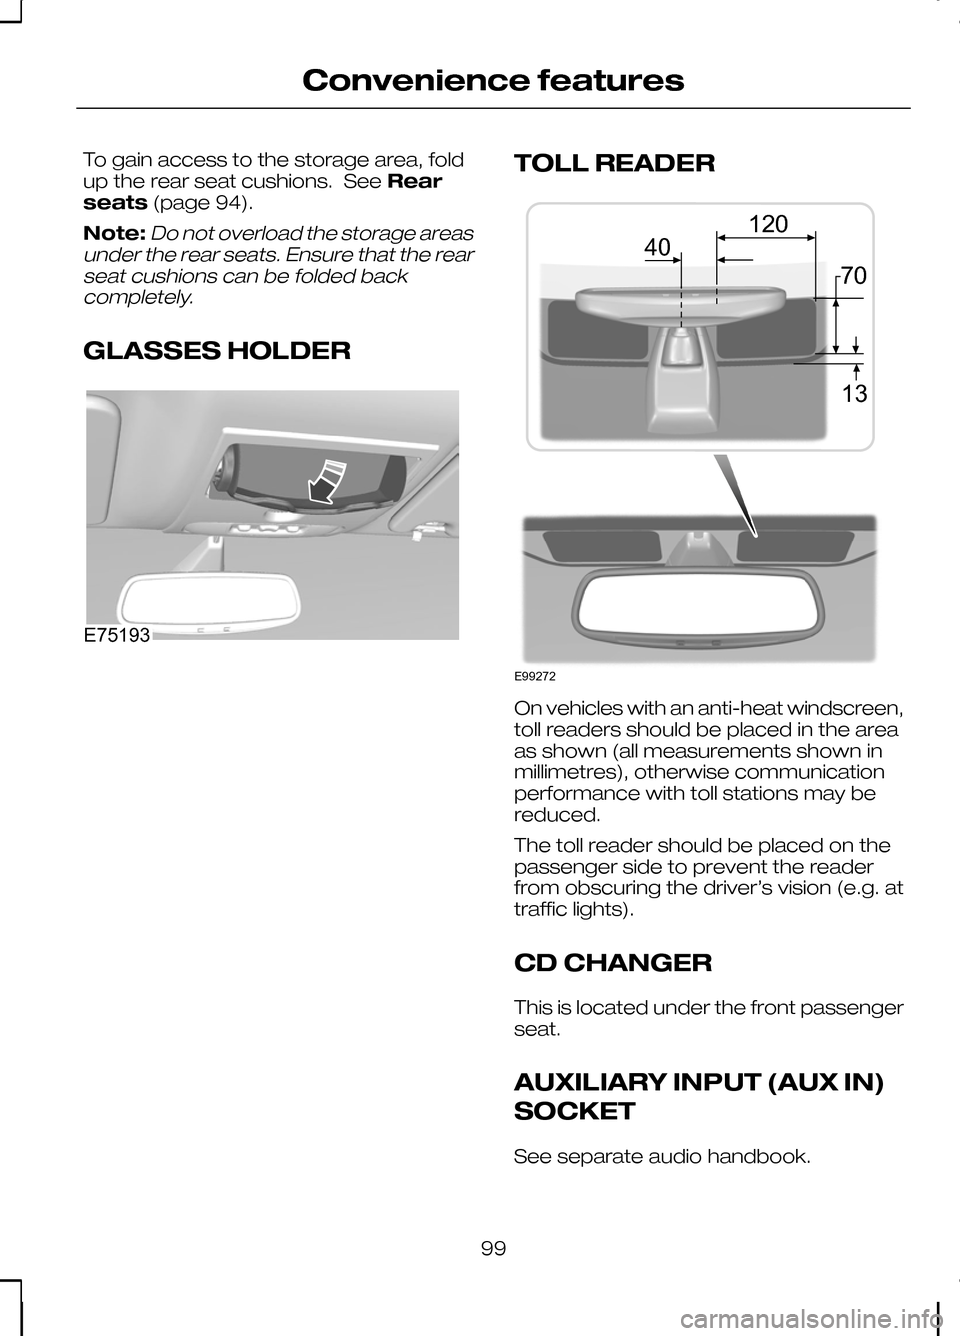
GLASSES HOLDER TOLL READER
On vehicles with an anti-heat windscreen,
toll readers should be placed in the area
as shown (all measurements shown in
millimetres), otherwise communication
performance with toll stations may be
reduced.
The toll reader should be placed on the
passenger side to prevent the reader
from obscuring the driver’s vision (e.g. at
traffic lights).
CD CHANGER
This is located under the front passenger
seat.
AUXILIARY INPUT (AUX IN)
SOCKET
See separate audio handbook.
99
Convenience featuresE75193 E99272401370120
Page 119 of 226
PRINCIPLE OF OPERATION
The camera is a visual aid for use when
reversing.
WARNING
The camera does not relieve you of
your responsibility to drive with due
care and attention.
CAUTIONS
If you use a high pressure spray to
wash your vehicle, only spray the
camera briefly from a distance not
less than 20 centimetres (8 inches). Do not apply pressure to the camera.
The position and the angle of the
camera automatically changes.
Note:Keep the camera free from dirt,
ice and snow. Do not clean with sharp objects, degreaser, wax or organicproducts. Use only a soft cloth.
During operation, guide lines appear in
the display which represent your vehicle's
path and approximate distance from
rearward objects.
USING THE REAR VIEW
CAMERA WARNINGS
The operation of the camera may
vary depending on the ambient
temperature, vehicle and road
conditions. The distances shown in the display
may differ from the actual distance.
Do not place objects in front of the
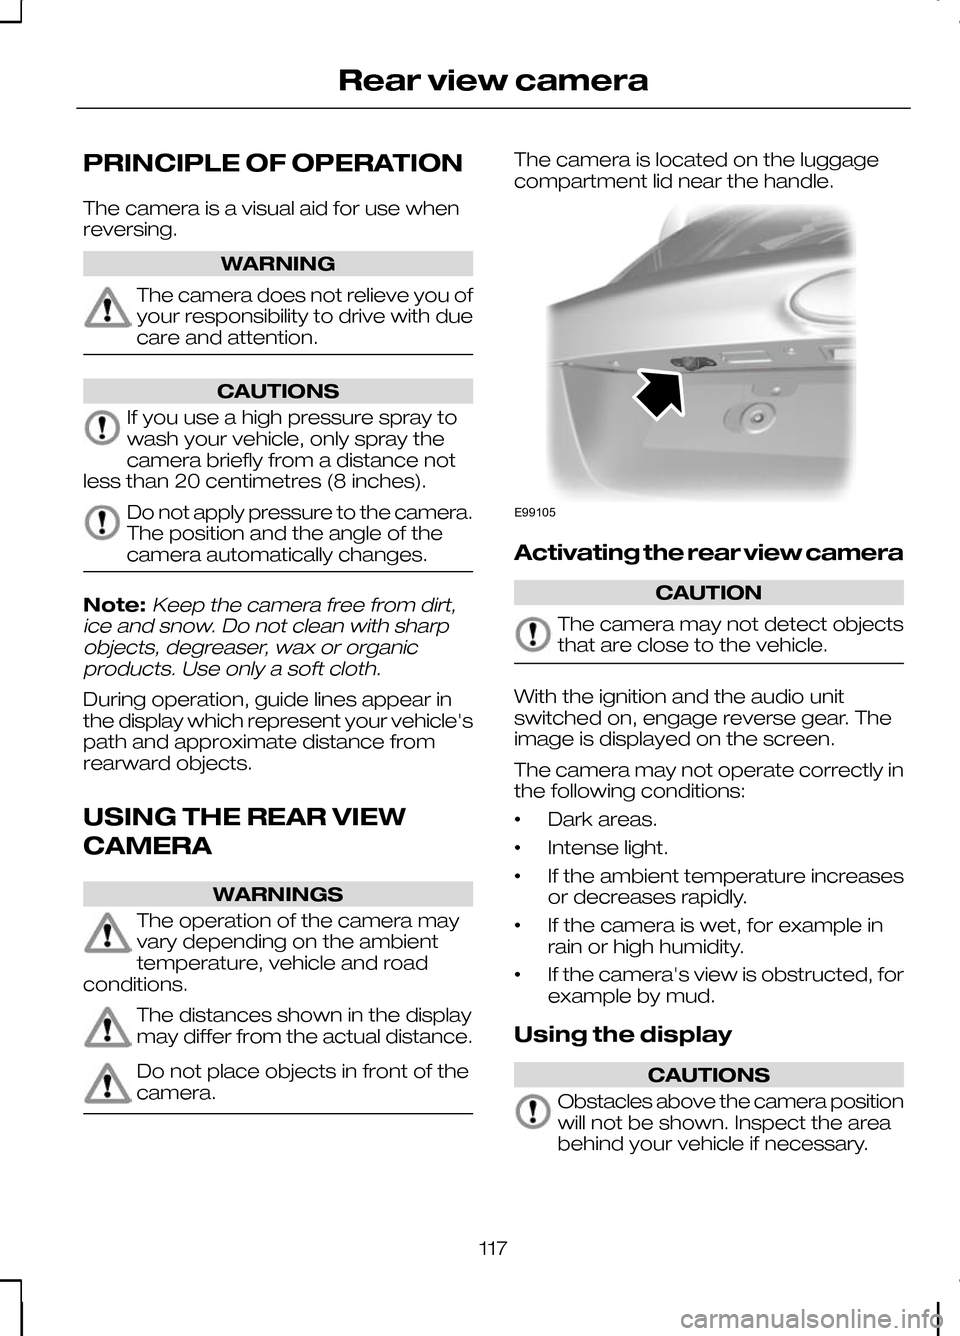
camera. The camera is located on the luggage
compartment lid near the handle.
Activating the rear view camera
CAUTION
The camera may not detect objects
that are close to the vehicle.
With the ignition and the audio unit
switched on, engage reverse gear. The
image is displayed on the screen.
The camera may not operate correctly in
the following conditions:
•
Dark areas.
• Intense light.
• If the ambient temperature increases
or decreases rapidly.
• If the camera is wet, for example in
rain or high humidity.
• If the camera's view is obstructed, for
example by mud.
Using the display CAUTIONS
Obstacles above the camera position
will not be shown. Inspect the area
behind your vehicle if necessary.
117
Rear view cameraE99105
Page 139 of 226
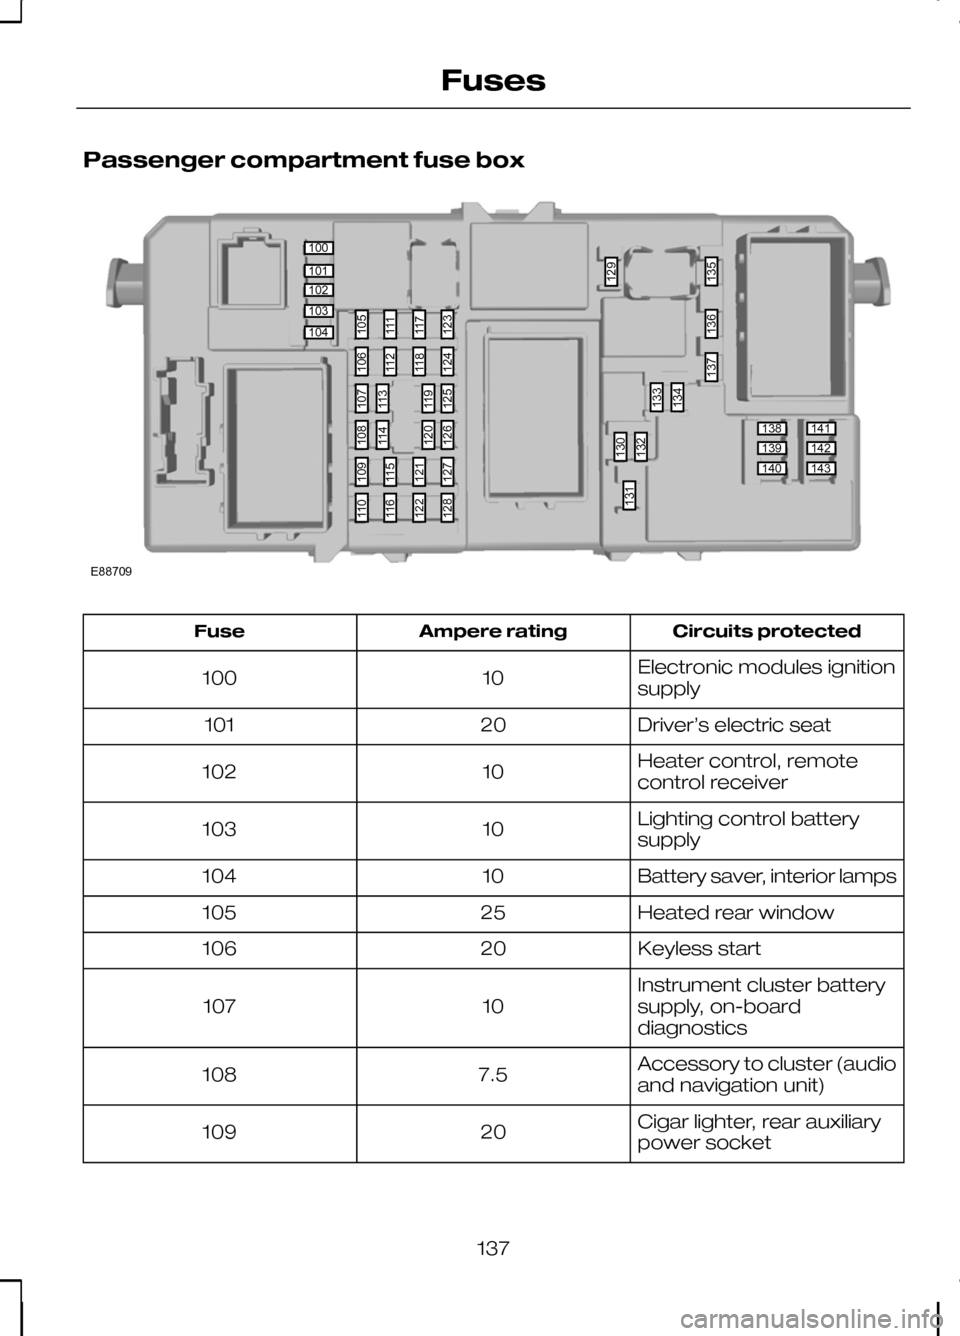
Passenger compartment fuse box
Circuits protected
Ampere rating
Fuse
Electronic modules ignition
supply
10
100
Driver’s electric seat
20
101
Heater control, remote
control receiver
10
102
Lighting control battery
supply
10
103
Battery saver, interior lamps
10
104
Heated rear window
25
105
Keyless start
20
106
Instrument cluster battery
supply, on-board
diagnostics
10
107
Accessory to cluster (audio
and navigation unit)
7.5
108
Cigar lighter, rear auxiliary
power socket
20
109
137
Fuses100101102103104138139140141142143105111117123130132133129134135136137131106112118124109115121127110116122128107113119125108114120126E88709
Page 140 of 226
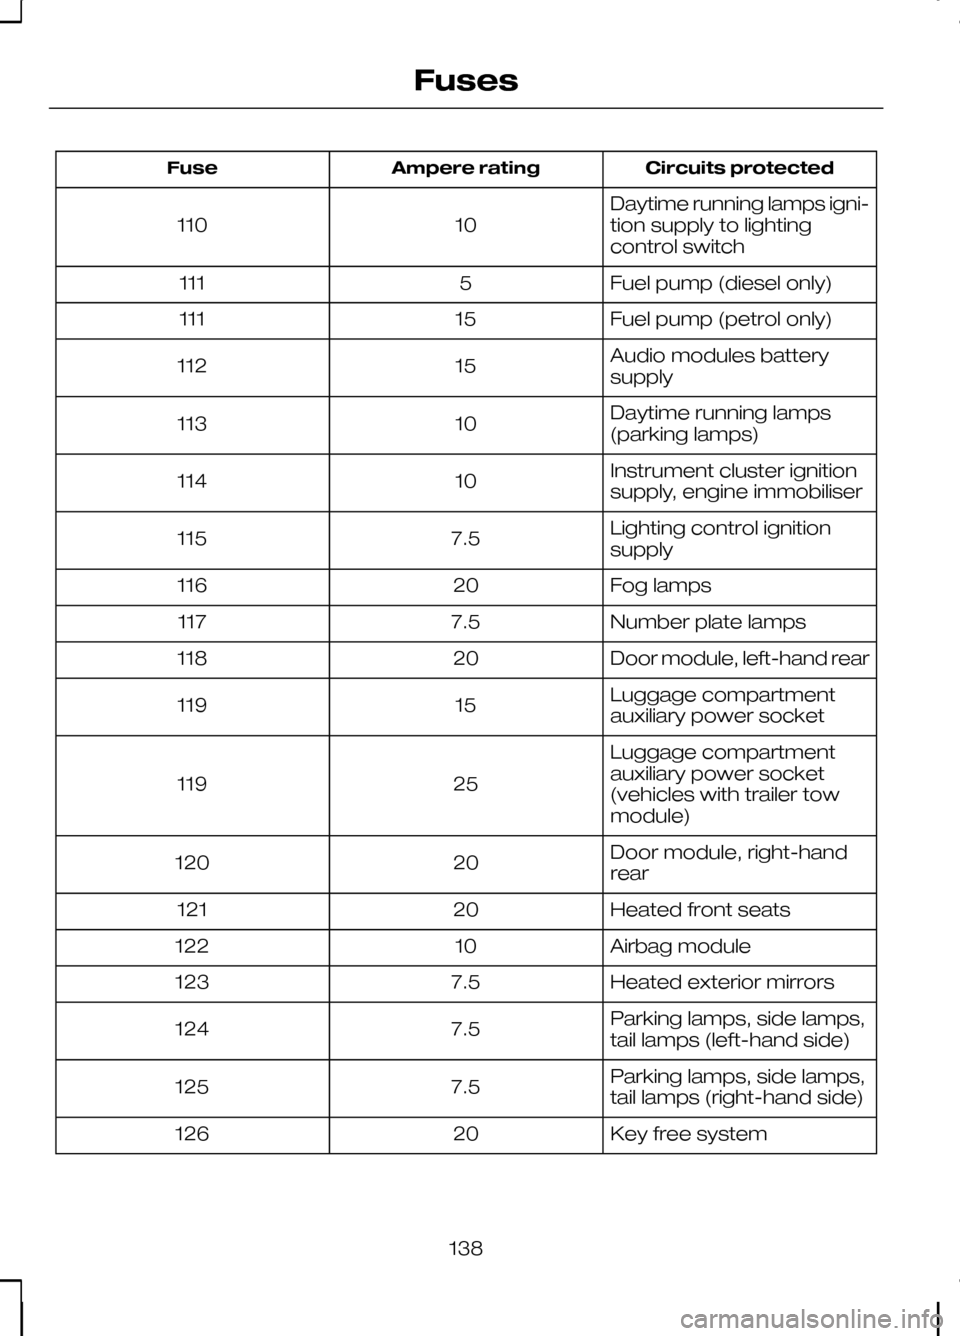
Circuits protected
Ampere rating
Fuse
Daytime running lamps igni-
tion supply to lighting
control switch
10
110
Fuel pump (diesel only)
5
111
Fuel pump (petrol only)
15
111
Audio modules battery
supply
15
112
Daytime running lamps
(parking lamps)
10
113
Instrument cluster ignition
supply, engine immobiliser
10
114
Lighting control ignition
supply
7.5
115
Fog lamps
20
116
Number plate lamps
7.5
117
Door module, left-hand rear
20
118
Luggage compartment
auxiliary power socket
15
119
Luggage compartment
auxiliary power socket
(vehicles with trailer tow
module)
25
119
Door module, right-hand
rear
20
120
Heated front seats
20
121
Airbag module
10
122
Heated exterior mirrors
7.5
123
Parking lamps, side lamps,
tail lamps (left-hand side)
7.5
124
Parking lamps, side lamps,
tail lamps (right-hand side)
7.5
125
Key free system
20
126
138
Fuses
Page 177 of 226
GENERAL INFORMATION
CAUTION
Using the system with the engine off
will drain the battery.
This section describes the functions and
features of the Bluetooth mobile phone
hands free system.
The Bluetooth mobile phone part of the
system provides interaction with the audio
or navigation system and your mobile
phone. It allows you to use the audio or
navigation system to make and receive
calls without having to use your mobile
phone.
Compatibility of phones
CAUTION
As no common agreement exists,
mobile phone manufacturers are able
to implement a variety of profiles in
their Bluetooth devices. Because of this,
an incompatibility can occur between the
phone and hands-free system, which in
some cases may significantly degrade the
system performance. To avoid this
situation, only recommended phones
should be used.
Please visit the website www.ford-
mobile-connectivity.com for full
details. TELEPHONE SETUP
Phonebook
After start up access to the phonebook
list can be delayed for several minutes,
depending upon the size. Phonebook categories
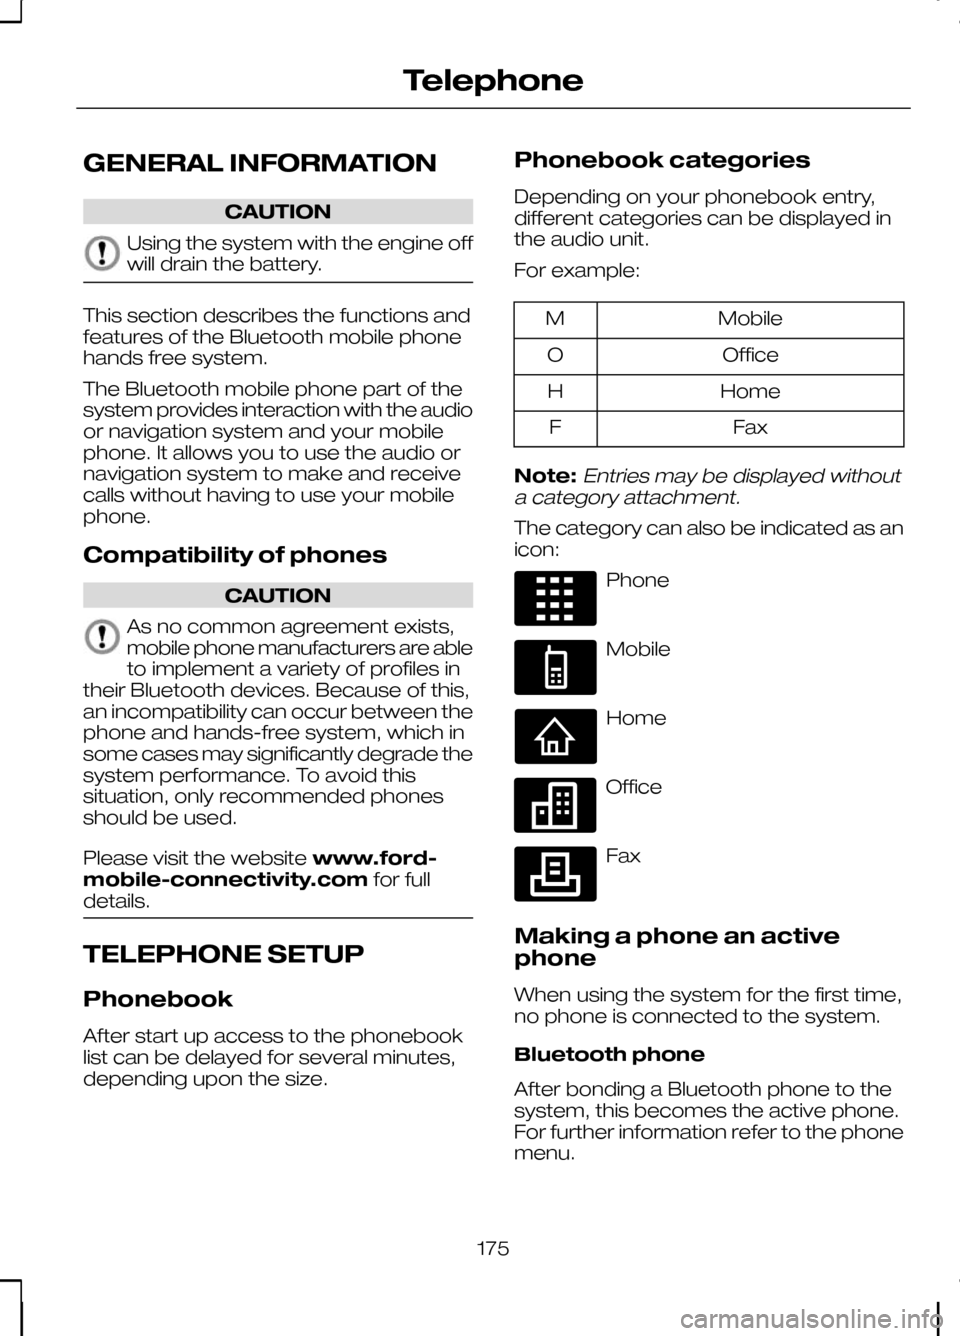
Depending on your phonebook entry,
different categories can be displayed in
the audio unit.
For example: Mobile
M
Office
O
Home
H
Fax
F
Note:Entries may be displayed without
a category attachment.
The category can also be indicated as an
icon: Phone
Mobile
Home
Office
Fax
Making a phone an active
phone
When using the system for the first time,
no phone is connected to the system.
Bluetooth phone
After bonding a Bluetooth phone to the
system, this becomes the active phone.
For further information refer to the phone
menu.
175
TelephoneE87990 E87991 E87992 E87993 E87994