ground FORD MUSTANG 2019 User Guide
[x] Cancel search | Manufacturer: FORD, Model Year: 2019, Model line: MUSTANG, Model: FORD MUSTANG 2019Pages: 495, PDF Size: 8.04 MB
Page 201 of 495
ESSENTIAL TOWING CHECKS
Follow these guidelines for safe towing:
•
Do not tow a trailer until you drive your
vehicle at least 1,000 mi (1,600 km).
• Consult your local motor vehicle laws
for towing a trailer.
• See the instructions included with
towing accessories for the proper
installation and adjustment
specifications.
• Service your vehicle more frequently if
you tow a trailer. See your scheduled
maintenance information.
• If you use a rental trailer, follow the
instructions the rental agency gives
you.
You can find information on load
specification terms found on the tire label
and Safety Compliance label as well as
instructions on calculating your vehicle's
load in the Load Carrying chapter. See
Load Limit
(page 191).
Remember to account for the trailer
tongue weight as part of your vehicle load
when calculating the total vehicle weight.
Hitches
Do not use a hitch that either clamps onto
the bumper or attaches to the axle.
Distribute the trailer load so 10-15% of the
total trailer weight is on the tongue.
Safety Chains
Note: Never attach safety chains to the
bumper.
Always connect the safety chains to the
hook retainers of your vehicle hitch.
To connect the safety chains, cross them
under the trailer tongue and allow enough
slack for turning tight corners. Do not allow
the chains to drag on the ground. Trailer Brakes WARNING:
Do not connect a
trailer's hydraulic brake system directly
to your vehicle's brake system. Your
vehicle may not have enough braking
power and your chances of having a
collision greatly increase.
Electric brakes and manual, automatic or
surge-type trailer brakes are safe if you
install them properly and adjust them to
the manufacturer's specifications. The
trailer brakes must meet local and federal
regulations.
The rating for the tow vehicle's braking
system operation is at the gross vehicle
weight rating, not the gross combined
weight rating.
Trailer Lamps WARNING:
Never connect any
trailer lamp wiring to the vehicle's tail
lamp wiring; this may damage the
electrical system resulting in fire. Contact
your authorized dealer as soon as
possible for assistance in proper trailer
tow wiring installation. Additional
electrical equipment may be required.
Trailer lamps are required on most towed
vehicles. Make sure all running lights, brake
lights, direction indicators and hazard lights
are working.
Before Towing a Trailer
Practice turning, stopping and backing up
to get the feel of your vehicle-trailer
combination before starting on a trip.
When turning, make wider turns so the
trailer wheels clear curbs and other
obstacles.
198
Mustang (CZG) Canada/United States of America, Vehicles Built From: 14-05-2018, enUSA, Edition date: 201804, Second-Printing Towing
Page 203 of 495
You can flat-tow (all wheels on the
ground, regardless of the powertrain or
transmission configuration) your disabled
vehicle (without access to wheel dollies
or vehicle transport trailer) under the
following conditions:
•
Your vehicle is facing forward so you
tow it in a forward direction.
• You shift into neutral (N). If you cannot
shift into neutral (N), you may need to
override the gearshift lever. See
Transmission (page 147).
• Maximum speed is 35 mph (56 km/h).
• Maximum distance is
50 mi (80 km).
Recreational Towing
Note: Put your climate control system in
recirculated air mode to prevent exhaust
fumes from entering the vehicle. See
Climate Control
(page 109).
Follow these guidelines if you have a need
for recreational (RV) towing. An example
of recreational towing would be towing
your vehicle behind a motorhome. These
guidelines are to make sure you do not
damage the transmission during towing.
Do not tow your vehicle with any wheels
on the ground, as vehicle or transmission
damage may occur. It is required to
recreational tow your vehicle with all four
wheels off the ground, for example when
using a vehicle transport trailer. Otherwise,
you cannot tow your vehicle.
200
Mustang (CZG) Canada/United States of America, Vehicles Built From: 14-05-2018, enUSA, Edition date: 201804, Second-Printing Towing
Page 207 of 495
BREAKING-IN
Tires
New tires need to be run-in for
approximately 300 mi (500 km). During
this time, you may experience different
driving characteristics.
Brakes and Clutch
Avoid heavy use of the brakes and clutch
if possible for the first
100 mi (150 km) in
town and for the first 1,000 mi (1,500 km)
on freeways.
Engine
Avoid driving too fast during the first
1,000 mi (1,500 km)
. Vary your speed
frequently and change up through the
gears early. Do not labor the engine.
Ground Clearance
GT Performance Package Level 2 Only
Since ground clearance is reduced, use
caution when approaching curbs or curb
stops from the front and rear as vehicle
damage may occur. Additionally, when
crossing speed bumps or driveway curbs,
you should approach at a 45 degree angle
to reduce the risk of vehicle damage.
Your vehicle carries the same warranty as
other Ford models. Damage caused by
accidents, crashes or objects striking the
vehicle, including driving through a car
wash, or misuse of the vehicle, such as
driving over curbs, overloading or racing is
not covered under the new vehicle limited
warranty. See the Warranty Guide for
complete information. REDUCED ENGINE
PERFORMANCE WARNING: If you continue to drive
your vehicle when the engine is
overheating, the engine could stop
without warning. Failure to follow this
instruction could result in the loss of
control of your vehicle.
If the engine coolant temperature gauge
needle moves to the upper limit position,
the engine is overheating. See
Gauges
(page 81).
You must only drive your vehicle for a short
distance if the engine overheats. The
distance you can travel depends on
ambient temperature, vehicle load and
terrain. The engine continues to operate
with limited power for a short period of
time.
If the engine temperature continues to rise,
the fuel supply to the engine reduces. The
air conditioning switches off and the engine
cooling fan operates continually.
1. Gradually reduce your speed and stop your vehicle as soon as it is safe to do
so.
2. Immediately switch the engine off to prevent severe engine damage.
3. Wait for the engine to cool down.
4. Check the coolant level. See
Engine
Coolant Check (page 237).
5. Have your vehicle checked as soon as possible.
204
Mustang (CZG) Canada/United States of America, Vehicles Built From: 14-05-2018, enUSA, Edition date: 201804, Second-Printing Driving Hints
Page 212 of 495
JUMP STARTING THE VEHICLE
WARNING: Batteries normally
produce explosive gases which can
cause personal injury. Therefore, do not
allow flames, sparks or lighted
substances to come near the battery.
When working near the battery, always
shield your face and protect your eyes.
Always provide correct ventilation. WARNING:
Keep batteries out of
reach of children. Batteries contain
sulfuric acid. Avoid contact with skin,
eyes or clothing. Shield your eyes when
working near the battery to protect
against possible splashing of acid
solution. In case of acid contact with skin
or eyes, flush immediately with water for
a minimum of 15 minutes and get prompt
medical attention. If acid is swallowed,
call a physician immediately. WARNING:
Use only adequately
sized cables with insulated clamps.
Note: Do not attempt to push-start your
automatic transmission vehicle. Attempting
to push-start a vehicle with an automatic
transmission may cause transmission
damage.
Note: Do not disconnect the battery of the
disabled vehicle as this could damage the
vehicle electrical system.
Preparing Your Vehicle
Note: Use only a 12-volt supply to start your
vehicle.
Park the booster vehicle close to the hood
of the disabled vehicle, making sure the
two vehicles do not touch. Removing the Battery Shield
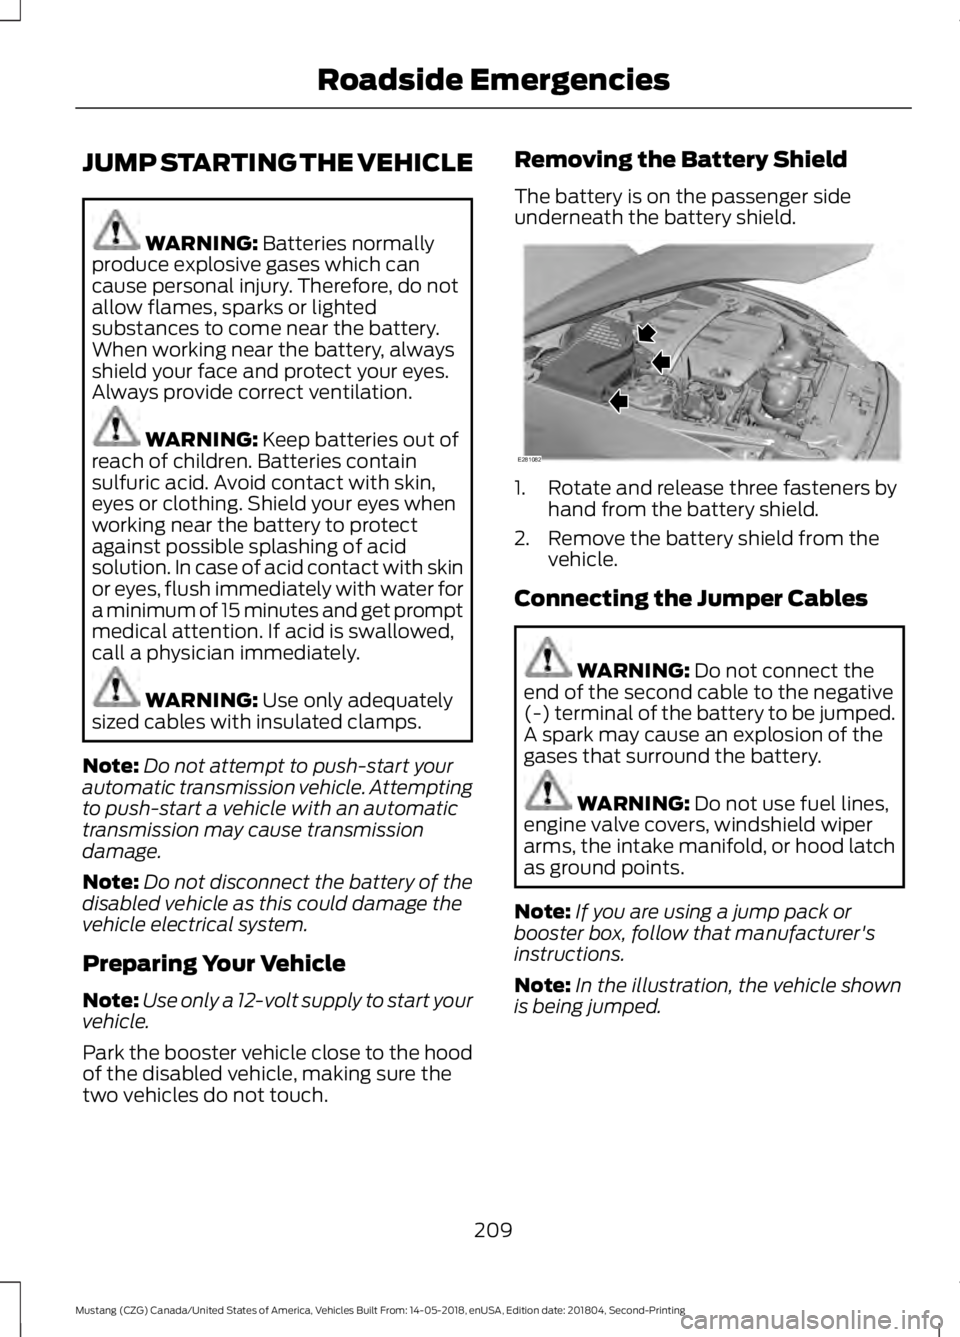
The battery is on the passenger side
underneath the battery shield.
1. Rotate and release three fasteners by
hand from the battery shield.
2. Remove the battery shield from the vehicle.
Connecting the Jumper Cables WARNING:
Do not connect the
end of the second cable to the negative
(-) terminal of the battery to be jumped.
A spark may cause an explosion of the
gases that surround the battery. WARNING:
Do not use fuel lines,
engine valve covers, windshield wiper
arms, the intake manifold, or hood latch
as ground points.
Note: If you are using a jump pack or
booster box, follow that manufacturer's
instructions.
Note: In the illustration, the vehicle shown
is being jumped.
209
Mustang (CZG) Canada/United States of America, Vehicles Built From: 14-05-2018, enUSA, Edition date: 201804, Second-Printing Roadside EmergenciesE281082
Page 213 of 495
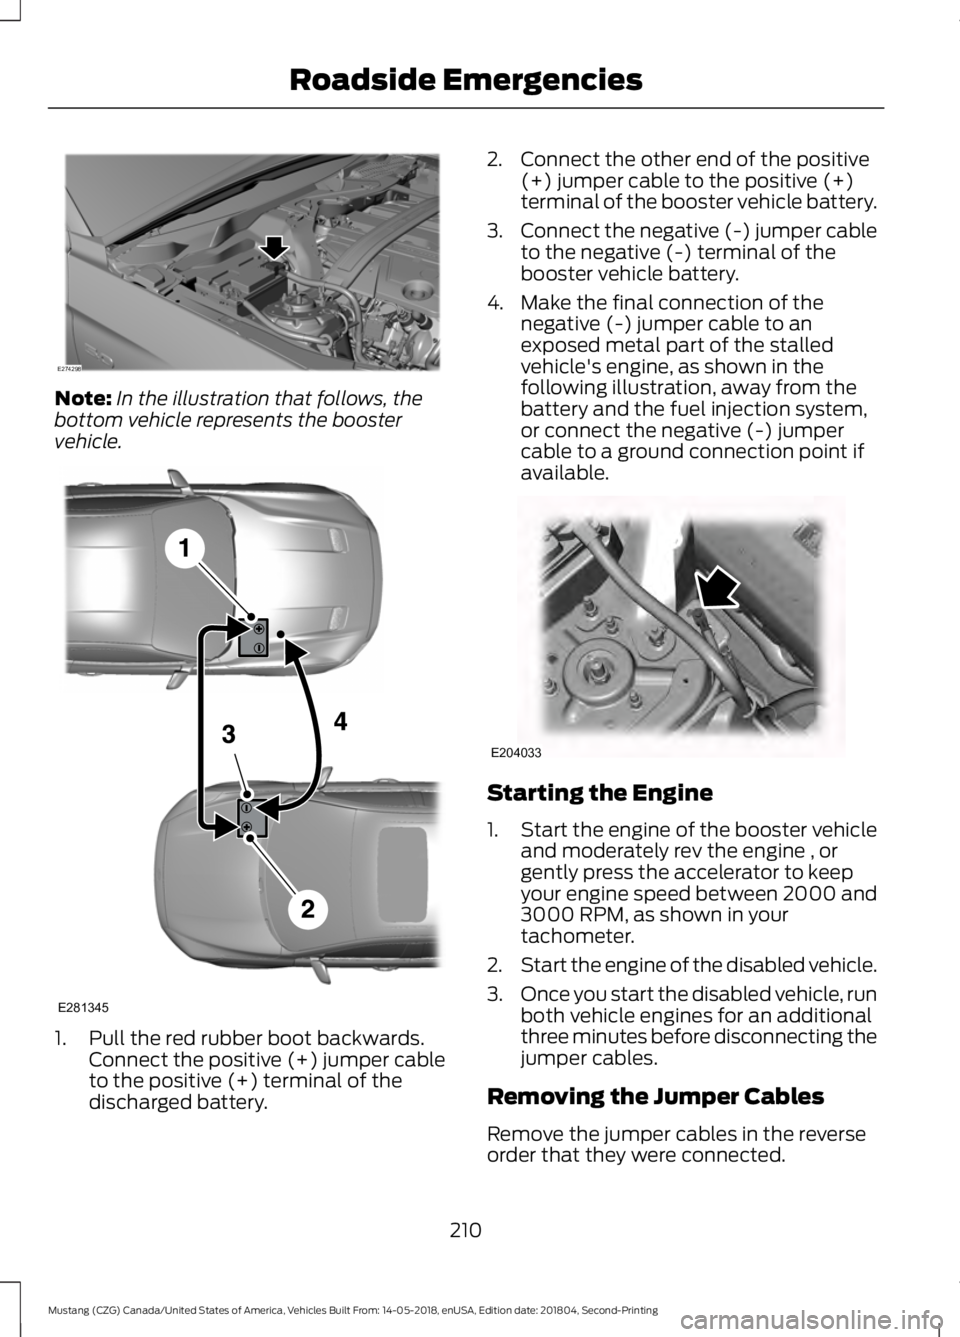
Note:
In the illustration that follows, the
bottom vehicle represents the booster
vehicle. 1. Pull the red rubber boot backwards.
Connect the positive (+) jumper cable
to the positive (+) terminal of the
discharged battery. 2. Connect the other end of the positive
(+) jumper cable to the positive (+)
terminal of the booster vehicle battery.
3. Connect the negative (-) jumper cable
to the negative (-) terminal of the
booster vehicle battery.
4. Make the final connection of the negative (-) jumper cable to an
exposed metal part of the stalled
vehicle's engine, as shown in the
following illustration, away from the
battery and the fuel injection system,
or connect the negative (-) jumper
cable to a ground connection point if
available. Starting the Engine
1.
Start the engine of the booster vehicle
and moderately rev the engine , or
gently press the accelerator to keep
your engine speed between 2000 and
3000 RPM, as shown in your
tachometer.
2. Start the engine of the disabled vehicle.
3. Once you start the disabled vehicle, run
both vehicle engines for an additional
three minutes before disconnecting the
jumper cables.
Removing the Jumper Cables
Remove the jumper cables in the reverse
order that they were connected.
210
Mustang (CZG) Canada/United States of America, Vehicles Built From: 14-05-2018, enUSA, Edition date: 201804, Second-Printing Roadside EmergenciesE274298 E281345 E204033
Page 238 of 495
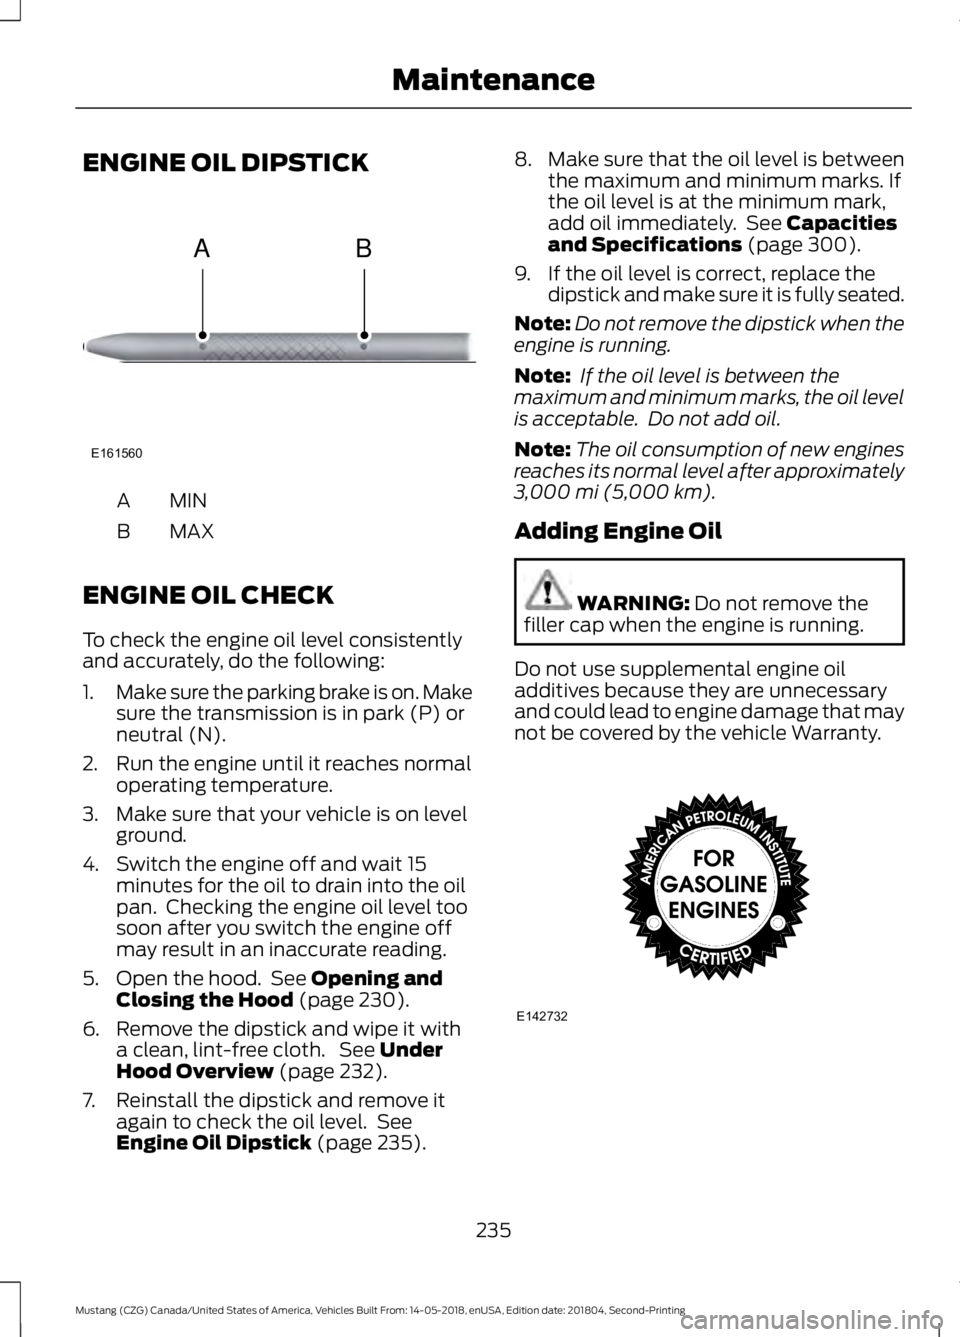
ENGINE OIL DIPSTICK
MINA
MAX
B
ENGINE OIL CHECK
To check the engine oil level consistently
and accurately, do the following:
1. Make sure the parking brake is on. Make
sure the transmission is in park (P) or
neutral (N).
2. Run the engine until it reaches normal operating temperature.
3. Make sure that your vehicle is on level ground.
4. Switch the engine off and wait 15 minutes for the oil to drain into the oil
pan. Checking the engine oil level too
soon after you switch the engine off
may result in an inaccurate reading.
5. Open the hood. See Opening and
Closing the Hood (page 230).
6. Remove the dipstick and wipe it with a clean, lint-free cloth. See
Under
Hood Overview (page 232).
7. Reinstall the dipstick and remove it again to check the oil level. See
Engine Oil Dipstick
(page 235). 8.
Make sure that the oil level is between
the maximum and minimum marks. If
the oil level is at the minimum mark,
add oil immediately. See
Capacities
and Specifications (page 300).
9. If the oil level is correct, replace the dipstick and make sure it is fully seated.
Note: Do not remove the dipstick when the
engine is running.
Note: If the oil level is between the
maximum and minimum marks, the oil level
is acceptable. Do not add oil.
Note: The oil consumption of new engines
reaches its normal level after approximately
3,000 mi (5,000 km)
.
Adding Engine Oil WARNING:
Do not remove the
filler cap when the engine is running.
Do not use supplemental engine oil
additives because they are unnecessary
and could lead to engine damage that may
not be covered by the vehicle Warranty. 235
Mustang (CZG) Canada/United States of America, Vehicles Built From: 14-05-2018, enUSA, Edition date: 201804, Second-Printing MaintenanceE161560
AB E142732
Page 248 of 495

After battery replacement, or in some
cases after charging the battery with an
external charger, the battery management
system requires eight hours of vehicle sleep
time to relearn the battery state of charge.
During this time your vehicle must remain
fully locked with the ignition switched off.
Note:
Prior to relearning the battery state
of charge, the battery management system
may temporarily disable some electrical
systems.
Electrical Accessory Installation
To make sure the battery management
system works correctly, do not connect an
electrical device ground connection
directly to the battery negative post. This
can cause inaccurate measurements of
the battery condition and potential
incorrect system operation.
Note: If you add electrical accessories or
components to the vehicle, it may adversely
affect battery performance and durability.
This may also affect the performance of
other electrical systems in the vehicle.
CHECKING THE WIPER
BLADES Run the tip of your fingers over the edge of
the blade to check for roughness.
Clean the wiper blades with washer fluid
or water applied with a soft sponge or
cloth. CHANGING THE WIPER
BLADES
1. Pull the wiper blade and arm away
from the glass and press the locking
buttons together. 2. Rotate and remove the wiper blade.
3. Attach the new blade to the arm and
snap it into place.
Replace wiper blades at least once per
year for optimum performance.
Poor wiper quality can be improved by
cleaning the wiper blades and the
windshield. See Cleaning the Windows
and Wiper Blades (page 255).
ADJUSTING THE HEADLAMPS
Vertical Aim Adjustment
The headlamps on your vehicle are
properly aimed at the assembly plant. If
your vehicle has been in an accident, have
the alignment of your headlamps checked
by an authorized dealer.
245
Mustang (CZG) Canada/United States of America, Vehicles Built From: 14-05-2018, enUSA, Edition date: 201804, Second-Printing MaintenanceE142463 E129990
1
1 2
Page 249 of 495

Headlamp Aiming Target
8 feet (2.4 meters)
A
Center height of lamp to ground
B
25 feet (7.6 meters)
C
Horizontal reference line
D
Vertical Aim Adjustment
1. Park the vehicle directly in front of a wall or screen on a level surface,
approximately 25 ft (7.6 m) away.
2. Measure the height from the center of your headlamp indicated by a 3mm
circle on the lens to the ground and
mark an
8 ft (2.4 m) horizontal
reference line on the vertical wall or
screen at this height, a piece of
masking tape works well.
Note: To see a clearer light pattern for
adjusting, you may want to block the light
from one headlamp while adjusting the
other.
3. Turn on the low beam headlamps to illuminate the wall or screen and open
the hood. Cover one of the headlamps
so no light hits the wall. 4. On the wall or screen you will observe
a flat zone of high intensity light
located at the top of the right hand
portion of the beam pattern. If the top
edge of the high intensity light zone is
not at the horizontal reference line, the
headlamp will need to be adjusted. 5. Locate the vertical adjuster on each
headlamp. Use a Phillips #2
screwdriver to turn the adjuster either
clockwise or counterclockwise to
adjust the vertical aim of the
headlamp.
6. Repeat steps 3 through 7 to adjust the other headlamp.
7. Close the hood and turn off the lamps.
246
Mustang (CZG) Canada/United States of America, Vehicles Built From: 14-05-2018, enUSA, Edition date: 201804, Second-Printing MaintenanceE142592 E142465 E250054
Page 263 of 495
•
Check fluid levels (including coolant,
oil and gas) to make sure there are no
leaks, and fluids are at recommended
levels.
• If you remove the battery, clean the
battery cable ends and check for
damage.
Contact an authorized dealer if you have
any concerns or issues.
CLEANING THE CONVERTIBLE
TOP (IF EQUIPPED)
Remove lint with a lint roller or a vacuum
with a soft bristle brush.
For cloth and vinyl tops, wash with an
approved high-quality convertible top
cleaner and protectant.
Note: Do not use stiff bristle brushes,
abrasive materials or household cleaning
products.
Note: High-pressure water may cause
water leaks and possible seal damage to
the convertible top.
Note: Do not fold the convertible top when
it is wet.
Note: Avoid hot wax on vinyl materials
during car washes.
BODY STYLING KITS
The distance between the underside of
your vehicle and the ground is less than
that of other models. Drive with extreme
care to avoid damage to your vehicle.
260
Mustang (CZG) Canada/United States of America, Vehicles Built From: 14-05-2018, enUSA, Edition date: 201804, Second-Printing Vehicle Care
Page 291 of 495
If you have a dissimilar spare wheel and
tire, then it is intended for temporary use
only. This means that if you need to use it,
you should replace it as soon as possible
with a road wheel and tire assembly that
is the same size and type as the road tires
and wheels that were originally provided
by Ford. If the dissimilar spare tire or wheel
is damaged, it should be replaced rather
than repaired.
A dissimilar spare wheel and tire assembly
is defined as a spare wheel and tire
assembly that is different in brand, size or
appearance from the road tires and wheels
and can be one of three types:
1.
T-type mini-spare: This spare tire
begins with the letter T for tire size and
may have Temporary Use Only molded in
the sidewall.
2. Full-size dissimilar spare with label
on wheel:
This spare tire has a label on
the wheel that states: THIS WHEEL AND
TIRE ASSEMBLY FOR TEMPORARY USE
ONLY.
When driving with one of the dissimilar
spare tires listed above, do not:
• Exceed
50 mph (80 km/h).
• Load the vehicle beyond maximum
vehicle load rating listed on the Safety
Compliance Label.
• Use snow chains on the end of the
vehicle with the dissimilar spare tire.
• Use more than one dissimilar spare tire
at a time.
• Use commercial car washing
equipment.
• Try to repair the dissimilar spare tire.
Use of one of the dissimilar spare tires
listed above at any one wheel location can
lead to impairment of the following:
• Handling, stability and braking
performance.
• Comfort and noise. •
Ground clearance and parking at curbs.
• Winter weather driving capability.
• Wet weather driving capability.
• All-wheel driving capability.
3. Full-size dissimilar spare without
label on wheel
When driving with the full-size dissimilar
spare wheel and tire assembly, do not:
• Exceed
75 mph (120 km/h).
• Use more than one dissimilar spare
wheel and tire assembly at a time.
• Use commercial car washing
equipment.
• Use snow chains on the end of the
vehicle with the dissimilar spare wheel
and tire assembly.
The usage of a full-size dissimilar spare
wheel and tire assembly can lead to
impairment of the following:
• Handling, stability and braking
performance.
• Comfort and noise.
• Ground clearance and parking at curbs.
• Winter weather driving capability.
• Wet weather driving capability.
• All-wheel driving capability.
When driving with the full-size dissimilar
spare wheel and tire assembly additional
caution should be given to:
• Driving vehicles with a load on the
cargo rack.
Drive cautiously when using a full-size
dissimilar spare wheel and tire assembly
and seek service as soon as possible.
288
Mustang (CZG) Canada/United States of America, Vehicles Built From: 14-05-2018, enUSA, Edition date: 201804, Second-Printing Wheels and Tires