lock FORD MUSTANG 2019 Manual PDF
[x] Cancel search | Manufacturer: FORD, Model Year: 2019, Model line: MUSTANG, Model: FORD MUSTANG 2019Pages: 495, PDF Size: 8.04 MB
Page 226 of 495
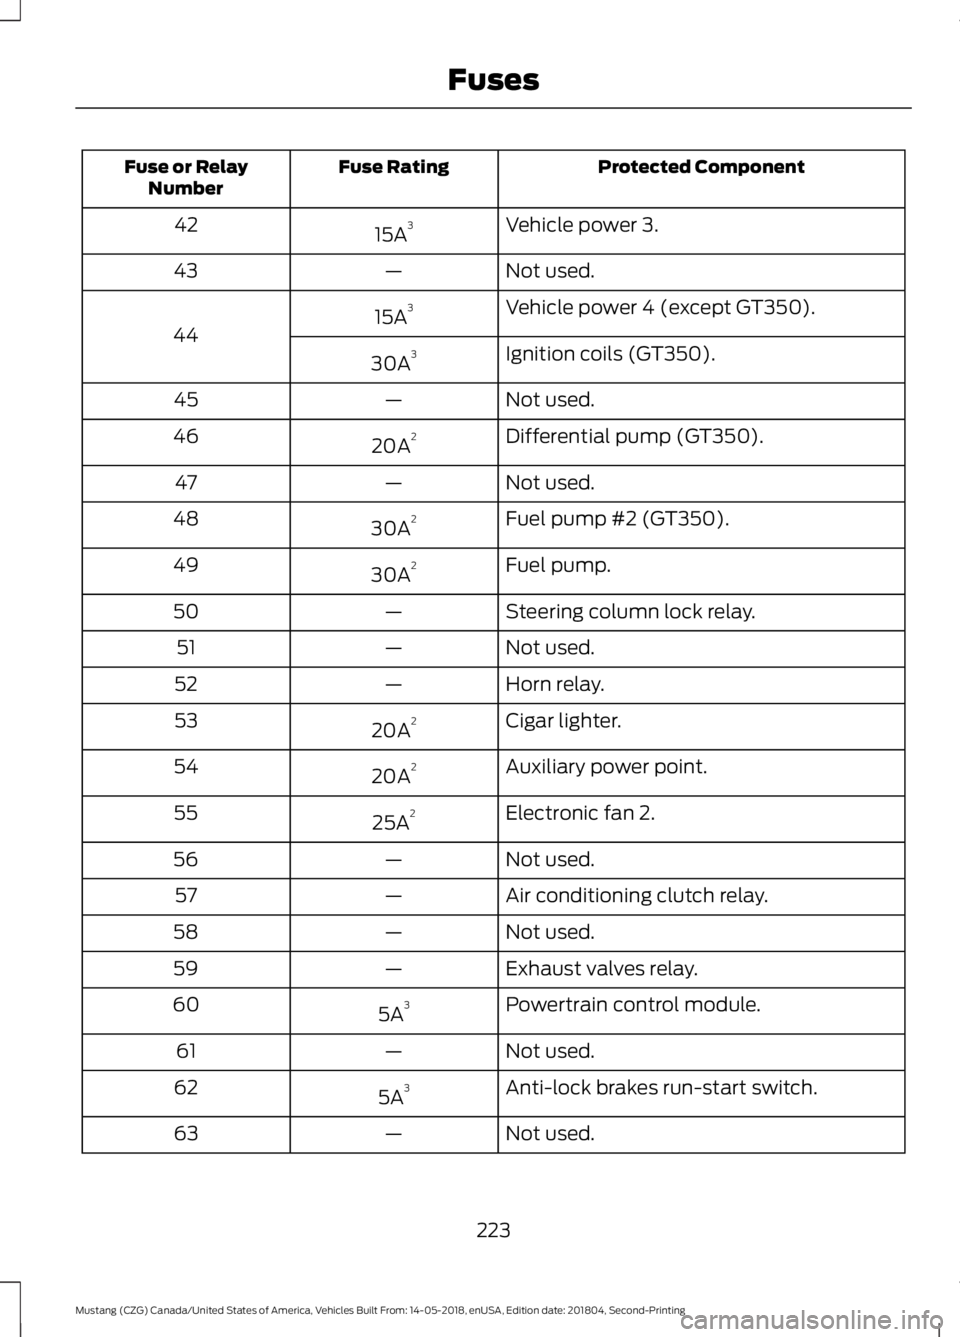
Protected Component
Fuse Rating
Fuse or Relay
Number
Vehicle power 3.
15A 3
42
Not used.
—
43
Vehicle power 4 (except GT350).
15A 3
44 Ignition coils (GT350).
30A 3
Not used.
—
45
Differential pump (GT350).
20A 2
46
Not used.
—
47
Fuel pump #2 (GT350).
30A 2
48
Fuel pump.
30A 2
49
Steering column lock relay.
—
50
Not used.
—
51
Horn relay.
—
52
Cigar lighter.
20A 2
53
Auxiliary power point.
20A 2
54
Electronic fan 2.
25A 2
55
Not used.
—
56
Air conditioning clutch relay.
—
57
Not used.
—
58
Exhaust valves relay.
—
59
Powertrain control module.
5A 3
60
Not used.
—
61
Anti-lock brakes run-start switch.
5A 3
62
Not used.
—
63
223
Mustang (CZG) Canada/United States of America, Vehicles Built From: 14-05-2018, enUSA, Edition date: 201804, Second-Printing Fuses
Page 229 of 495
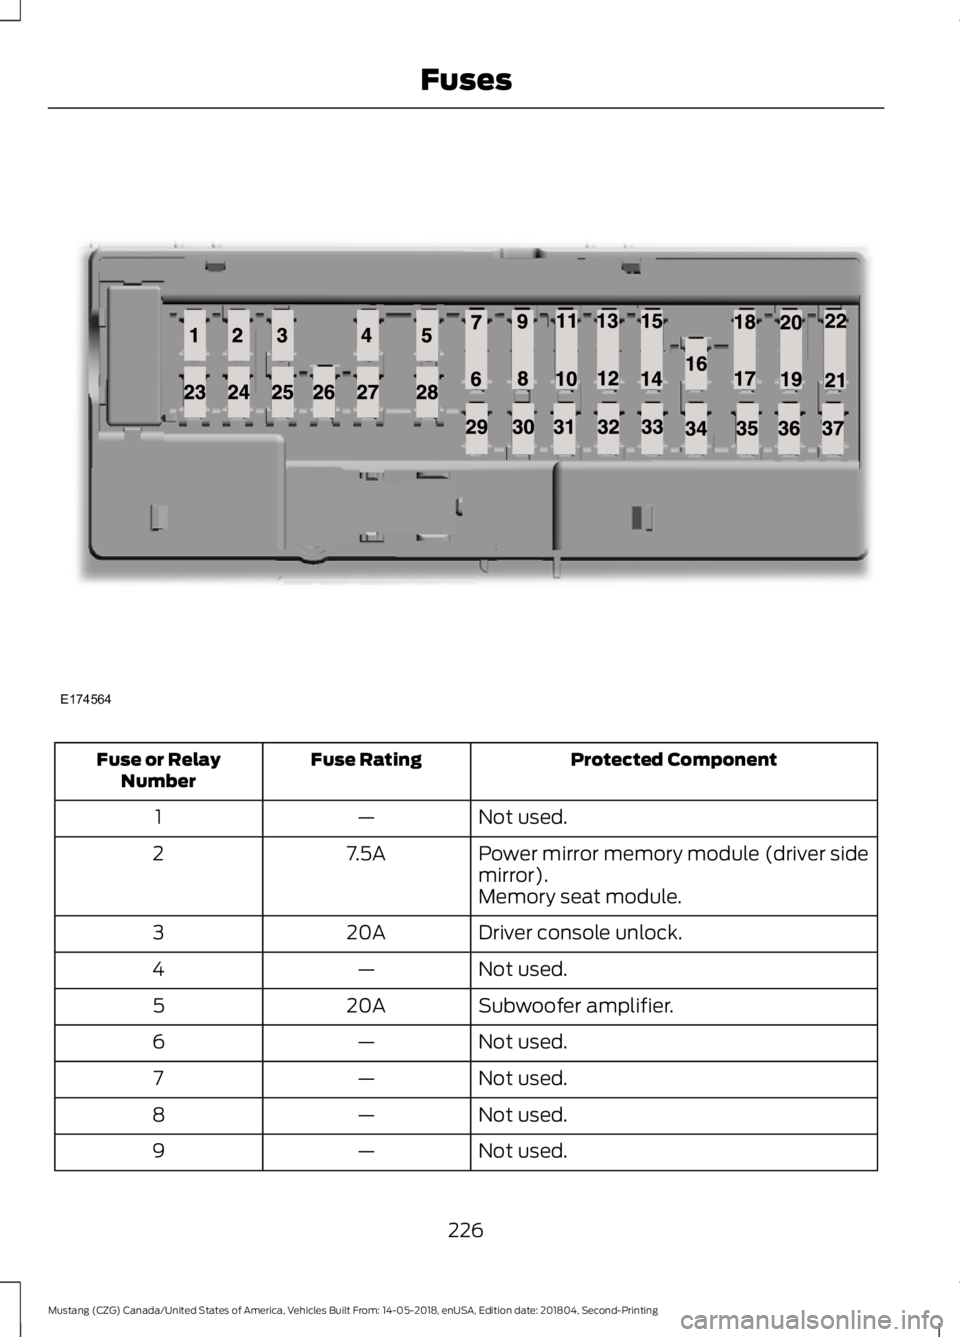
Protected Component
Fuse Rating
Fuse or Relay
Number
Not used.
—
1
Power mirror memory module (driver side
mirror).
7.5A
2
Memory seat module.
Driver console unlock.
20A
3
Not used.
—
4
Subwoofer amplifier.
20A
5
Not used.
—
6
Not used.
—
7
Not used.
—
8
Not used.
—
9
226
Mustang (CZG) Canada/United States of America, Vehicles Built From: 14-05-2018, enUSA, Edition date: 201804, Second-Printing FusesE174564
Page 230 of 495
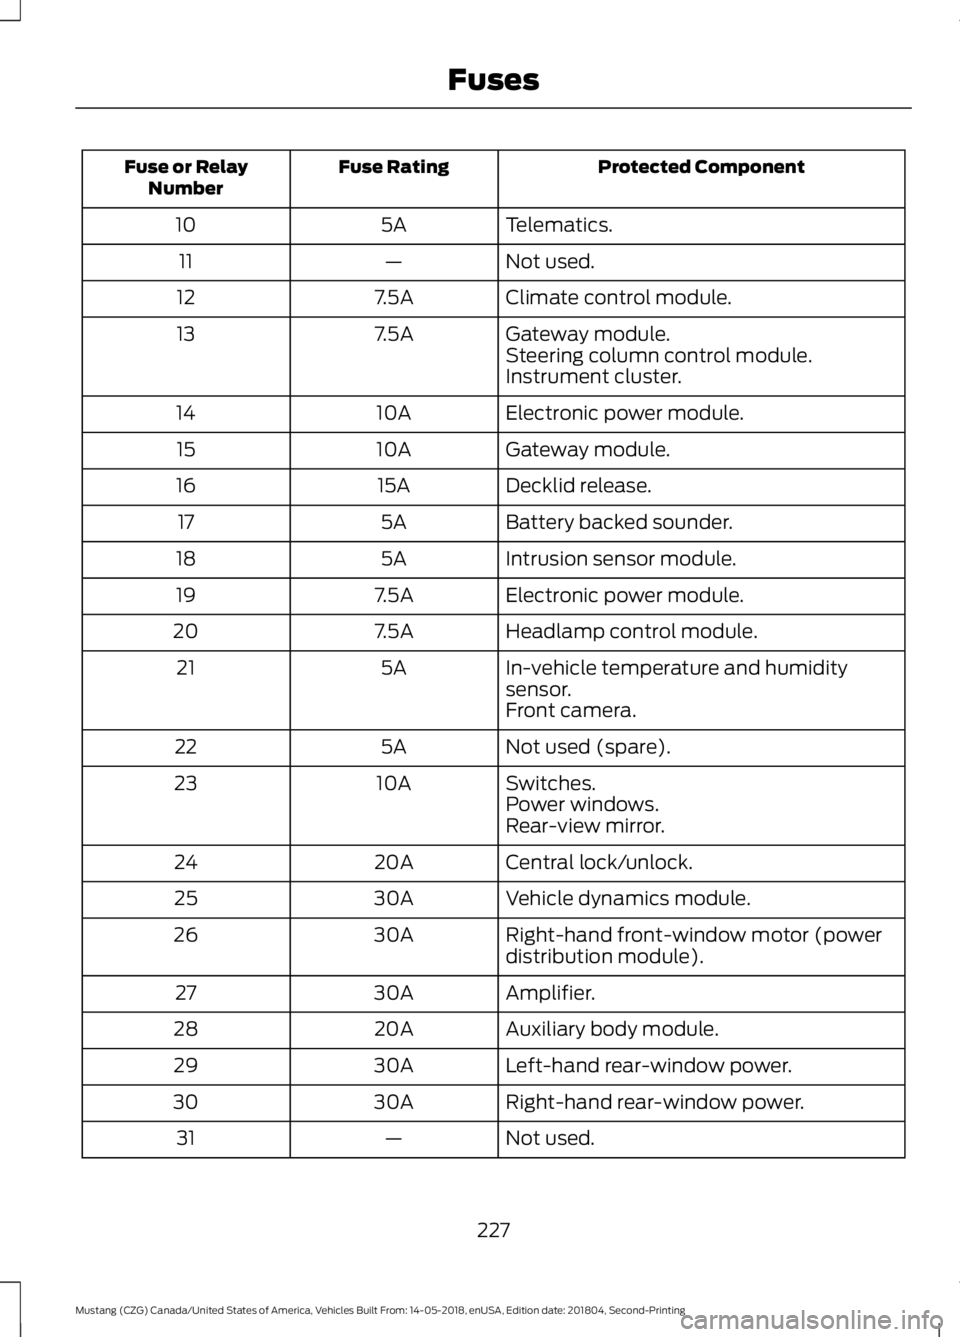
Protected Component
Fuse Rating
Fuse or Relay
Number
Telematics.
5A
10
Not used.
—
11
Climate control module.
7.5A
12
Gateway module.
7.5A
13
Steering column control module.
Instrument cluster.
Electronic power module.
10A
14
Gateway module.
10A
15
Decklid release.
15A
16
Battery backed sounder.
5A
17
Intrusion sensor module.
5A
18
Electronic power module.
7.5A
19
Headlamp control module.
7.5A
20
In-vehicle temperature and humidity
sensor.
5A
21
Front camera.
Not used (spare).
5A
22
Switches.
10A
23
Power windows.
Rear-view mirror.
Central lock/unlock.
20A
24
Vehicle dynamics module.
30A
25
Right-hand front-window motor (power
distribution module).
30A
26
Amplifier.
30A
27
Auxiliary body module.
20A
28
Left-hand rear-window power.
30A
29
Right-hand rear-window power.
30A
30
Not used.
—
31
227
Mustang (CZG) Canada/United States of America, Vehicles Built From: 14-05-2018, enUSA, Edition date: 201804, Second-Printing Fuses
Page 233 of 495
GENERAL INFORMATION
Have your vehicle serviced regularly to help
maintain its roadworthiness and resale
value. There is a large network of
authorized dealers that are there to help
you with their professional servicing
expertise. We believe that their specially
trained technicians are best qualified to
service your vehicle properly and expertly.
They are supported by a wide range of
highly specialized tools developed
specifically for servicing your vehicle.
If your vehicle requires professional service,
an authorized dealer can provide the
necessary parts and service. Check your
warranty information to find out which
parts and services are covered.
Use only recommended fuels, lubricants,
fluids and service parts conforming to
specifications. Motorcraft® parts are
designed and built to provide the best
performance in your vehicle.
Precautions
•
Do not work on a hot engine.
• Make sure that nothing gets caught in
moving parts.
• Do not work on a vehicle with the
engine running in an enclosed space,
unless you are sure you have enough
ventilation.
• Keep all open flames and other burning
material (such as cigarettes) away
from the battery and all fuel related
parts.
Working with the Engine Off
1. Set the parking brake and shift the transmission to park (P).
2. Switch off the engine.
3. Block the wheels. Working with the Engine On WARNING: To reduce the risk of
vehicle damage and personal burn
injuries, do not start your engine with the
air cleaner removed and do not remove
it while the engine is running.
1. Set the parking brake and shift the transmission to park (P).
2. Block the wheels.
OPENING AND CLOSING THE
HOOD
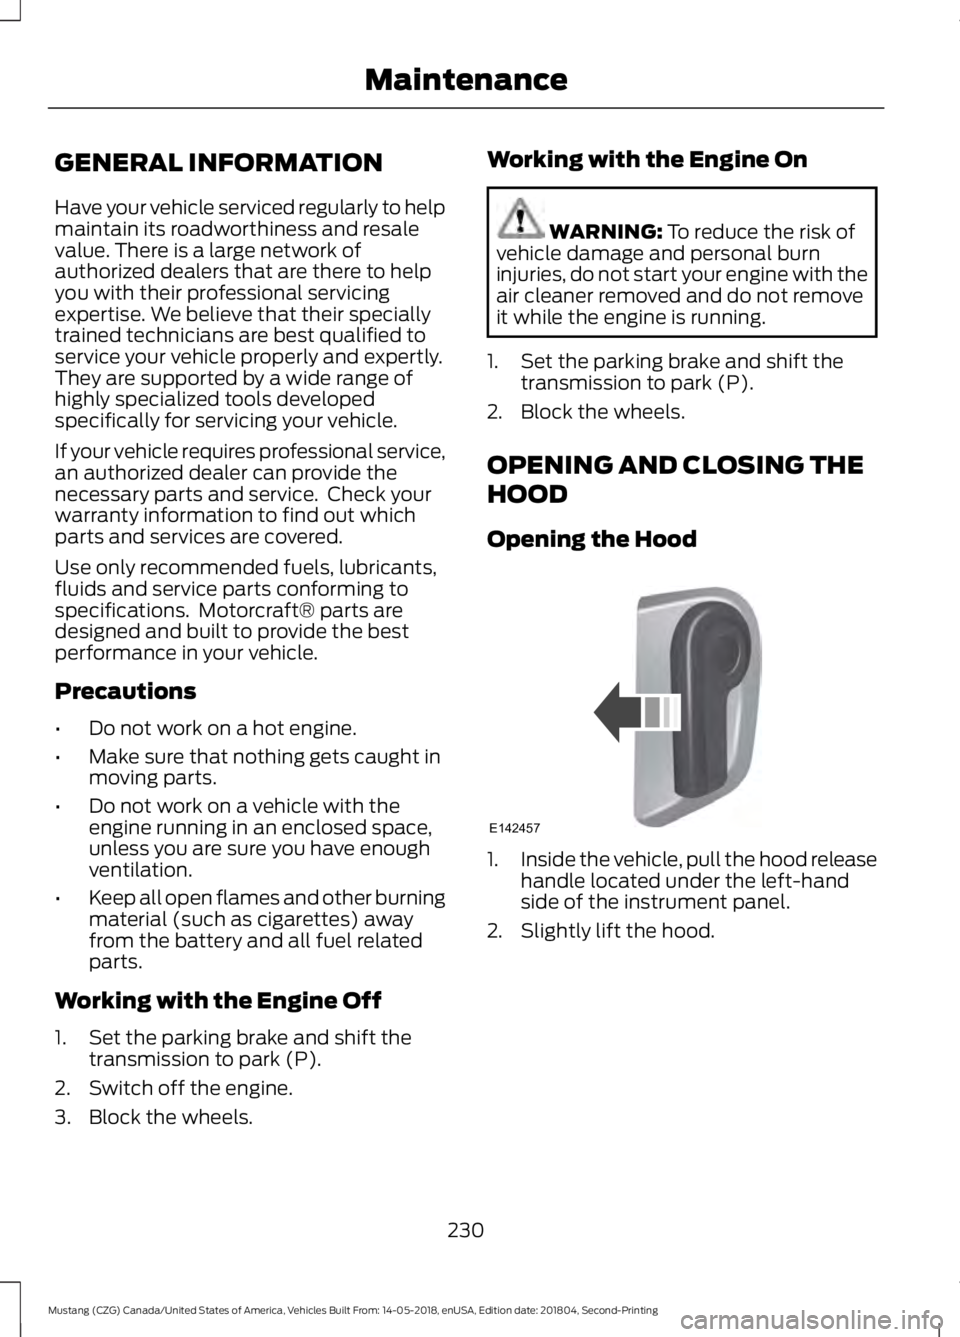
Opening the Hood 1.
Inside the vehicle, pull the hood release
handle located under the left-hand
side of the instrument panel.
2. Slightly lift the hood.
230
Mustang (CZG) Canada/United States of America, Vehicles Built From: 14-05-2018, enUSA, Edition date: 201804, Second-Printing MaintenanceE142457
Page 239 of 495
Only use oils certified for gasoline engines
by the American Petroleum Institute (API).
An oil with this trademark symbol
conforms to the current engine and
emission system protection standards and
fuel economy requirements of the
International Lubricants Specification
Advisory Committee (ILSAC).
To top up the engine oil level do the
following:
1. Clean the area surrounding the engine
oil filler cap before you remove it.
2. Remove the engine oil filler cap. See Under Hood Overview (page 232).
Turn it counterclockwise and remove
it.
3. Add engine oil that meets our specifications. See
Capacities and
Specifications (page 300). You may
have to use a funnel to pour the engine
oil into the opening.
4. Recheck the oil level.
5. If the oil level is correct, replace the dipstick and make sure it is fully seated.
6. Replace the engine oil filler cap. Turn it clockwise until you feel a strong
resistance.
Note: Do not add oil further than the
maximum mark. Oil levels above the
maximum mark may cause engine damage.
Note: Make sure you install the oil filler cap
correctly.
Note: Soak up any spillage with an
absorbent cloth immediately.
OIL CHANGE INDICATOR
RESET
Use the information display controls on
the steering wheel to reset the oil change
indicator. From the main menu scroll to: Action and description
Message
Press the right arrow button,
then from this menu scroll
to the following message.
Settings
Press OK
Advanced
Settings
Press the right arrow button,
then from this menu scroll
to the following message.
Vehicle
Press the right arrow button,
then from this menu scroll
to the following message.
Oil Life
Press and hold the
OK
button until the instrument
cluster displays the
following message.
Hold OK to
Reset
Reset Successful
When the oil change indic-
ator resets the instrument
cluster displays 100%.
Remaining Life
{00}%
If the instrument cluster
displays one of the following
messages, repeat the
process.
Not Reset
Reset Cancelled
236
Mustang (CZG) Canada/United States of America, Vehicles Built From: 14-05-2018, enUSA, Edition date: 201804, Second-Printing Maintenance
Page 241 of 495

It is very important to use prediluted
coolant approved to the correct
specification in order to avoid plugging the
small passageways in the engine cooling
system. See Capacities and
Specifications (page 294). Do not mix
different colors or types of coolant in your
vehicle. Mixing of engine coolants or using
an incorrect coolant may harm the engine
or cooling system components and may
not be covered by the vehicle Warranty.
Note: If prediluted coolant is not available,
use the approved concentrated coolant
diluting it to 50/50 with distilled water. See
Capacities and Specifications (page 294).
Using water that has not been deionised
may contribute to deposit formation,
corrosion and plugging of the small cooling
system passageways.
Note: Coolants marketed for all makes and
models may not be approved to our
specifications and may cause damage to
the cooling system. Resulting component
damage may not be covered by the vehicle
Warranty.
If the coolant level is at or below the
minimum mark, add prediluted coolant
immediately.
To top up the coolant level do the
following:
1. Unscrew the cap slowly. Any pressure escapes as you unscrew the cap.
2. Add prediluted coolant approved to the correct specification. See
Capacities and Specifications (page
294
).
3. Add enough prediluted coolant to reach the correct level.
4. Replace the coolant reservoir cap, turn
it clockwise until you feel a strong
resistance. 5. Check the coolant level in the coolant
reservoir the next few times you drive
your vehicle. If necessary, add enough
prediluted engine coolant to bring the
coolant level to the correct level.
If you have to add more than
1.1 qt (1 L) of
engine coolant per month, have your
vehicle checked as soon as possible.
Operating an engine with a low level of
coolant can result in engine overheating
and possible engine damage.
In case of emergency, you can add a large
amount of water without engine coolant
in order to reach a vehicle service location.
In this instance, qualified personnel:
1. Must drain the cooling system.
2. Chemically clean the coolant system.
3. Refill with engine coolant as soon as possible.
Water alone, without engine coolant, can
cause engine damage from corrosion,
overheating or freezing.
Do not use the following as a coolant
substitute:
• Alcohol.
• Methanol.
• Brine.
• Any coolant mixed with alcohol or
methanol antifreeze.
Alcohol and other liquids can cause engine
damage from overheating or freezing.
Do not add extra inhibitors or additives to
the coolant. These can be harmful and
compromise the corrosion protection of
the coolant.
Recycled Coolant
We do not recommend the use of recycled
coolant as an approved recycling process
is not yet available.
Note: Dispose of used coolant in the
appropriate manner.
238
Mustang (CZG) Canada/United States of America, Vehicles Built From: 14-05-2018, enUSA, Edition date: 201804, Second-Printing Maintenance
Page 247 of 495
If you see any corrosion on the battery or
terminals, remove the cables from the
terminals and clean with a wire brush. You
can neutralize the acid with a solution of
baking soda and water.
Because your vehicle
’s engine is
electronically controlled by a computer,
some control conditions are maintained
by power from the battery. When the
battery is disconnected or a new battery
is installed, the engine must relearn its idle
and fuel trim strategy for optimum
driveability and performance. Flexible fuel
vehicles (FFV) must also relearn the
ethanol content of the fuel for optimum
driveability and performance.
To restore the settings, do the following:
1. Apply the parking brake.
2. Shift into park (P) or neutral (N).
3. Switch off all accessories.
4. Press the brake pedal and start your vehicle.
5. Run the engine until it reaches normal operating temperature. While the
engine is warming up, complete the
following: Reset the clock. Reset the
power windows bounce-back feature.
See Windows and Mirrors (page 77).
Reset the radio station presets. See
Audio System
(page 313).
6. Allow the engine to idle for at least one
minute.
7. Drive the vehicle at least 10 mi (16 km)
to completely relearn the idle trim and
fuel trim strategy.
Note: If you do not allow the engine to
relearn the idle and fuel trim strategy, the
idle quality of your vehicle may be adversely
affected until the engine computer
eventually relearns the idle trim and fuel
trim strategy. Note:
For flexible fuel vehicles, if you are
operating on E85, you may experience poor
starts or an inability to start the engine and
driveability problems until the fuel trim and
ethanol content have been relearned.
Make sure that you dispose of old batteries
in an environmentally friendly way. Seek
advice from your local authority about
recycling old batteries.
If storing your vehicle for more than 30
days without recharging the battery, we
recommend that you disconnect the
negative battery cable to maintain battery
charge for quick starting.
Battery Management System
(If
Equipped)
The battery management system monitors
battery conditions and takes actions to
extend battery life. If excessive battery
drain is detected, the system temporarily
disables some electrical systems to
protect the battery.
Systems included are:
• Heated rear window.
• Heated seats.
• Climate control.
• Heated steering wheel.
• Audio unit.
• Navigation system.
A message may appear in the information
displays to alert you that battery
protection actions are active. These
messages are only for notification that an
action is taking place, and not intended to
indicate an electrical problem or that the
battery requires replacement.
244
Mustang (CZG) Canada/United States of America, Vehicles Built From: 14-05-2018, enUSA, Edition date: 201804, Second-Printing Maintenance
Page 248 of 495

After battery replacement, or in some
cases after charging the battery with an
external charger, the battery management
system requires eight hours of vehicle sleep
time to relearn the battery state of charge.
During this time your vehicle must remain
fully locked with the ignition switched off.
Note:
Prior to relearning the battery state
of charge, the battery management system
may temporarily disable some electrical
systems.
Electrical Accessory Installation
To make sure the battery management
system works correctly, do not connect an
electrical device ground connection
directly to the battery negative post. This
can cause inaccurate measurements of
the battery condition and potential
incorrect system operation.
Note: If you add electrical accessories or
components to the vehicle, it may adversely
affect battery performance and durability.
This may also affect the performance of
other electrical systems in the vehicle.
CHECKING THE WIPER
BLADES Run the tip of your fingers over the edge of
the blade to check for roughness.
Clean the wiper blades with washer fluid
or water applied with a soft sponge or
cloth. CHANGING THE WIPER
BLADES
1. Pull the wiper blade and arm away
from the glass and press the locking
buttons together. 2. Rotate and remove the wiper blade.
3. Attach the new blade to the arm and
snap it into place.
Replace wiper blades at least once per
year for optimum performance.
Poor wiper quality can be improved by
cleaning the wiper blades and the
windshield. See Cleaning the Windows
and Wiper Blades (page 255).
ADJUSTING THE HEADLAMPS
Vertical Aim Adjustment
The headlamps on your vehicle are
properly aimed at the assembly plant. If
your vehicle has been in an accident, have
the alignment of your headlamps checked
by an authorized dealer.
245
Mustang (CZG) Canada/United States of America, Vehicles Built From: 14-05-2018, enUSA, Edition date: 201804, Second-Printing MaintenanceE142463 E129990
1
1 2
Page 249 of 495

Headlamp Aiming Target
8 feet (2.4 meters)
A
Center height of lamp to ground
B
25 feet (7.6 meters)
C
Horizontal reference line
D
Vertical Aim Adjustment
1. Park the vehicle directly in front of a wall or screen on a level surface,
approximately 25 ft (7.6 m) away.
2. Measure the height from the center of your headlamp indicated by a 3mm
circle on the lens to the ground and
mark an
8 ft (2.4 m) horizontal
reference line on the vertical wall or
screen at this height, a piece of
masking tape works well.
Note: To see a clearer light pattern for
adjusting, you may want to block the light
from one headlamp while adjusting the
other.
3. Turn on the low beam headlamps to illuminate the wall or screen and open
the hood. Cover one of the headlamps
so no light hits the wall. 4. On the wall or screen you will observe
a flat zone of high intensity light
located at the top of the right hand
portion of the beam pattern. If the top
edge of the high intensity light zone is
not at the horizontal reference line, the
headlamp will need to be adjusted. 5. Locate the vertical adjuster on each
headlamp. Use a Phillips #2
screwdriver to turn the adjuster either
clockwise or counterclockwise to
adjust the vertical aim of the
headlamp.
6. Repeat steps 3 through 7 to adjust the other headlamp.
7. Close the hood and turn off the lamps.
246
Mustang (CZG) Canada/United States of America, Vehicles Built From: 14-05-2018, enUSA, Edition date: 201804, Second-Printing MaintenanceE142592 E142465 E250054
Page 250 of 495
Horizontal Aim Adjustment
The horizontal aim does not require any
adjustment for this vehicle. If a fault
occurs, have the system checked by an
authorized dealer.
CHANGING A BULB
Replacing Reverse Lamp Bulbs
1. Make sure the lighting control is in the
off position.
2. Locate the reverse lamp bulb under the
rear bumper of your vehicle. To access
the bulb, reach behind the bumper.
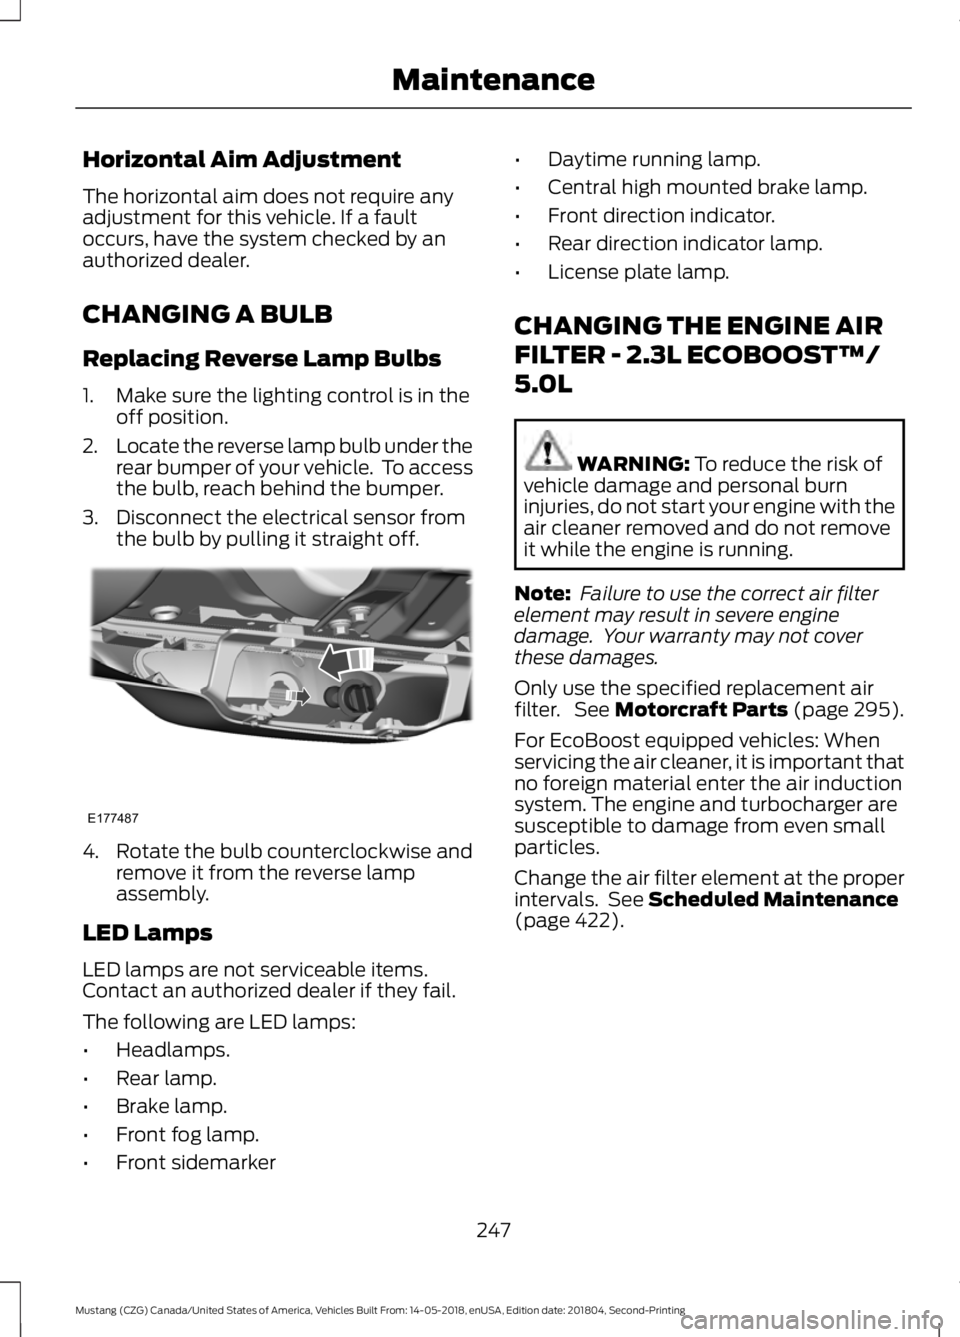
3. Disconnect the electrical sensor from the bulb by pulling it straight off. 4. Rotate the bulb counterclockwise and
remove it from the reverse lamp
assembly.
LED Lamps
LED lamps are not serviceable items.
Contact an authorized dealer if they fail.
The following are LED lamps:
• Headlamps.
• Rear lamp.
• Brake lamp.
• Front fog lamp.
• Front sidemarker •
Daytime running lamp.
• Central high mounted brake lamp.
• Front direction indicator.
• Rear direction indicator lamp.
• License plate lamp.
CHANGING THE ENGINE AIR
FILTER - 2.3L ECOBOOST™/
5.0L WARNING: To reduce the risk of
vehicle damage and personal burn
injuries, do not start your engine with the
air cleaner removed and do not remove
it while the engine is running.
Note: Failure to use the correct air filter
element may result in severe engine
damage. Your warranty may not cover
these damages.
Only use the specified replacement air
filter. See
Motorcraft Parts (page 295).
For EcoBoost equipped vehicles: When
servicing the air cleaner, it is important that
no foreign material enter the air induction
system. The engine and turbocharger are
susceptible to damage from even small
particles.
Change the air filter element at the proper
intervals. See
Scheduled Maintenance
(page 422).
247
Mustang (CZG) Canada/United States of America, Vehicles Built From: 14-05-2018, enUSA, Edition date: 201804, Second-Printing MaintenanceE177487