display FORD POLICE INTERCEPTOR 2018 Warranty Guide
[x] Cancel search | Manufacturer: FORD, Model Year: 2018, Model line: POLICE INTERCEPTOR, Model: FORD POLICE INTERCEPTOR 2018Pages: 364, PDF Size: 8.07 MB
Page 260 of 364
MP3 and WMA Track and Folder
Structure
Audio systems capable of recognizing and
playing MP3 and WMA individual tracks
and folder structures work as follows:
•
There are two different modes for MP3
and WMA disc playback: MP3 and
WMA track mode (system default) and
MP3 and WMA folder mode.
• MP3 and WMA track mode ignores any
folder structure on the MP3 and WMA
disc. The player numbers each MP3
and WMA track on the disc (noted by
the MP3 or WMA file extension) from
T001 to a maximum of T255. The
maximum number of playable MP3 and
WMA files may be less depending on
the structure of the CD and exact
model of radio present.
• MP3 and WMA folder mode represents
a folder structure consisting of one
level of folders. The CD player numbers
all MP3 and WMA tracks on the disc
(noted by the MP3 or WMA file
extension) and all folders containing
MP3 and WMA files, from F001 (folder)
T001 (track) to F253 T255.
• Creating discs with only one level of
folders helps with navigation through
the disc files.
If you are burning your own MP3 and WMA
discs, it is important to understand how
the system reads the structures you create.
While various files may be present (files
with extensions other than MP3 and
WMA), only files with the MP3 and WMA extension are played; other files are
ignored by the system. This enables you to
use the same MP3 and WMA disc for a
variety of tasks on your work computer,
home computer and your in-vehicle
system.
In track mode, the system displays and
plays the structure as if it were only one
level deep (all MP3 and WMA files play,
regardless of being in a specific folder). In
folder mode, the system only plays the
MP3 and WMA files in the current folder.
AUDIO UNIT
WARNING
Driving while distracted can result in
loss of vehicle control, crash and
injury. We strongly recommend that
you use extreme caution when using any
device that may take your focus off the
road. Your primary responsibility is the safe
operation of your vehicle. We recommend
against the use of any hand-held device
while driving and encourage the use of
voice-operated systems when possible.
Make sure you are aware of all applicable
local laws that may affect the use of
electronic devices while driving. Note:
Some features, such as SIRIUS
satellite radio, may not be available in your
location. Check with an authorized dealer.
Note: Depending on your vehicle option
package, your system may look different
from what you see here.
257
Taurus (CPH) Police, Canada/United States of America, enUSA, Edition date: 201708, Second Printing Audio System
Page 262 of 364
as jazz, rock or news), press to
find the next or previous station
in the category you select. In CD
mode, press to select the next or
previous track. Press and hold to
move quickly forward or
backward through the current
track.
OK and cursor arrows: Press
the up and down arrow buttons
to select the various settings.
When you make your selection,
press the left and right arrow
buttons to change the settings.
Press OK to set, or press MENU
to exit.
G
Eject:
Press to eject a CD.
H
Vol and Power:
Turn to adjust
the volume. Press to switch the
system on and off.
I
Clock:
Press to access the clock
setting. Use the center arrow
controls to change the hours and
minutes. You can also set the
clock by pressing
MENU and
scrolling to Clock Settings. If not
in phone mode, press to display
the clock.
J
SOUND:
Press to access
settings for Treble, Midrange,
Bass, Fade and Balance. Use the
up and down arrow buttons to
select the various settings. When
you make your selection, press
K the left and right arrow buttons
to change the settings. Press OK
to set or press
MENU to exit.
Sound settings can be set for
each audio source
independently.
MENU: Press to access different
audio system features. See
Menu Structure
.
L
PHONE:
Press to access the
phone features of the SYNC
system. See your SYNC
information.
M
AUX:
Press to access or switch
between devices you plug into
your vehicle.
N
SIRIUS:
Press to listen to
SIRIUS satellite radio.
O
Menu Structure
Note: Depending on your system, some
options may appear slightly different.
Press
MENU.
Press the up and down arrow buttons to
scroll through the options.
Press the right arrow to enter a menu.
Press the left arrow to exit a menu.
Press
OK to confirm a selection.
259
Taurus (CPH) Police, Canada/United States of America, enUSA, Edition date: 201708, Second Printing Audio System
Page 263 of 364
Radio
Use the left and right arrows to go up or down the
frequency band.
Manual Tune
Select for a brief sampling of all available channels.
Scan
Select to store the six strongest local stations on the AM-
AST and FM-AST frequency bands.
AST
Select to have the system search by certain music
categories (such as Rock, Pop or Country).
Set Category for Seek/Scan
Select to view additional broadcast data, if available. This
feature defaults to off. RBDS must be on for you to set a
category.
RDS Text Display SIRIUS
Select for a brief sampling of all available channels.
Scan
Select to view your satellite radio electronic serial number
(ESN). You will need this number when communicating
with SIRIUS to activate, modify or track your account.
Electronic Serial Number
(ESN)
Select to view available satellite radio channels. Press OK
to open a list of the following options for this channel.
Once you skip or lock a channel, you can only access it by
pressing Direct Tune and entering the channel number.
Locking or unlocking a channel requires your PIN.
Check Channel Guide
Select to view channel categories (such as Pop, Rock or
News). If you select a category, seek and scan functions
only stop on channels in that category.
Set Category for Seek/Scan
Select to switch alerts on or off for songs, artists or teams.
The system alerts you when the selection is playing on
another channel. Save up to 20 alerts.
Alerts
Use your PIN to unlock previously locked stations.
Unlock All Stations
Use to restore any channels you previously skipped.
Skip No Stations
Select to create a PIN, which allows you to lock or unlock
channels. Your initial PIN is 1234.
Parental Lockout
260
Taurus (CPH) Police, Canada/United States of America, enUSA, Edition date: 201708, Second Printing Audio System
Page 264 of 364
Audio Settings
Automatically adjusts the volume to compensate for
speed and wind noise. You can set the system between
0 and +7 or off, low, medium and high.
Speed Compensated
Volume
Select to adjust settings for Treble, Midrange, Bass, Fade
or Balance.
Sound
Select to optimize sound quality for the chosen seating
position.
Occupancy Mode
Choose between stereo and surround. Only with the
external sound systems.
Sound Mode CD Settings
Select to scan all disc selections.
Scan All
Select to scan all music in the current MP3 folder.
Scan Folder
Select to bring soft and loud passages together for a more
consistent listening level.
CD Compression Clock Settings
Select to set the time and calendar date.
Set Date and Time
Select to view clock time in a 12-hour mode or 24-hour
mode.
24 Hour Display Settings
Select to change display brightness.
Brightness
Select to display the language in English, French or
Spanish.
Language
Select to display the outside temperature in Fahrenheit
or Celsius.
Temp. Setting
261
Taurus (CPH) Police, Canada/United States of America, enUSA, Edition date: 201708, Second Printing Audio System
Page 265 of 364
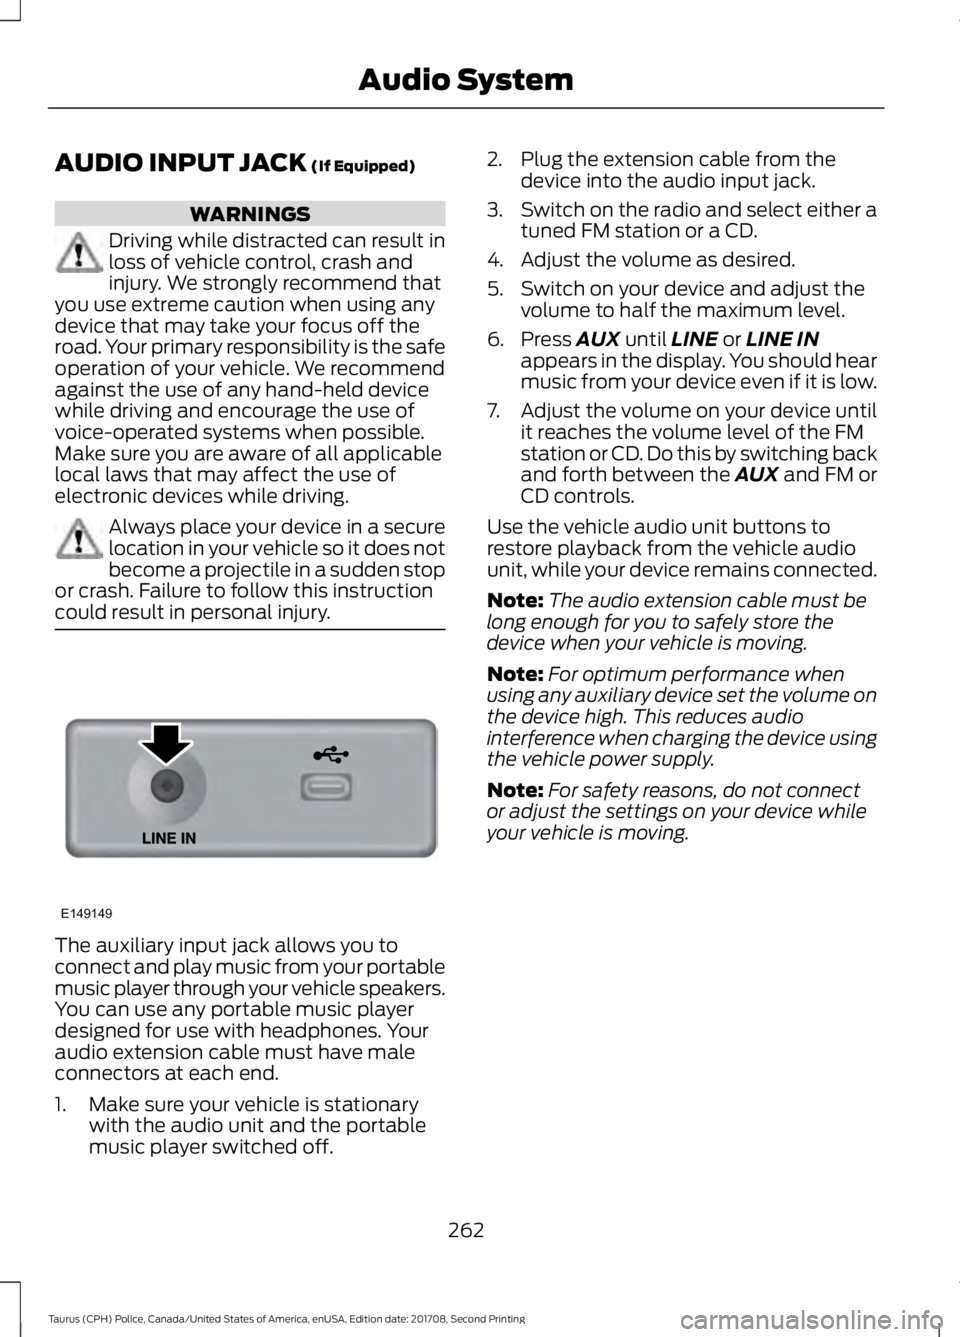
AUDIO INPUT JACK (If Equipped)
WARNINGS
Driving while distracted can result in
loss of vehicle control, crash and
injury. We strongly recommend that
you use extreme caution when using any
device that may take your focus off the
road. Your primary responsibility is the safe
operation of your vehicle. We recommend
against the use of any hand-held device
while driving and encourage the use of
voice-operated systems when possible.
Make sure you are aware of all applicable
local laws that may affect the use of
electronic devices while driving. Always place your device in a secure
location in your vehicle so it does not
become a projectile in a sudden stop
or crash. Failure to follow this instruction
could result in personal injury. The auxiliary input jack allows you to
connect and play music from your portable
music player through your vehicle speakers.
You can use any portable music player
designed for use with headphones. Your
audio extension cable must have male
connectors at each end.
1. Make sure your vehicle is stationary
with the audio unit and the portable
music player switched off. 2. Plug the extension cable from the
device into the audio input jack.
3. Switch on the radio and select either a
tuned FM station or a CD.
4. Adjust the volume as desired.
5. Switch on your device and adjust the volume to half the maximum level.
6. Press
AUX until LINE or LINE IN
appears in the display. You should hear
music from your device even if it is low.
7. Adjust the volume on your device until
it reaches the volume level of the FM
station or CD. Do this by switching back
and forth between the AUX and FM or
CD controls.
Use the vehicle audio unit buttons to
restore playback from the vehicle audio
unit, while your device remains connected.
Note: The audio extension cable must be
long enough for you to safely store the
device when your vehicle is moving.
Note: For optimum performance when
using any auxiliary device set the volume on
the device high. This reduces audio
interference when charging the device using
the vehicle power supply.
Note: For safety reasons, do not connect
or adjust the settings on your device while
your vehicle is moving.
262
Taurus (CPH) Police, Canada/United States of America, enUSA, Edition date: 201708, Second Printing Audio SystemE149149
Page 272 of 364
USING SYNC™ WITH YOUR
PHONE
Hands-free calling is one of the main
features of SYNC. While the system
supports a variety of features, many are
dependent on your cell phone's
functionality. At a minimum, most cell
phones with Bluetooth wireless technology
support the following functions:
•
Answering an incoming call.
• Ending a call.
• Using privacy mode.
• Dialing a number.
• Redialing.
• Call waiting notification.
• Caller identification. Other features, such as text messaging
using Bluetooth and automatic phonebook
download, are cell phone-dependent
features. To check your cell phone's
compatibility, see your cell phone's manual
and visit www.SYNCMyRide.com,
www.SYNCMyRide.ca or
www.syncmaroute.ca.
Pairing Your Cell Phone for the
First Time
Note:
SYNC can support downloading up
to approximately 1000 entries per
Bluetooth-enabled cell phone.
Note: Make sure to switch on the ignition
and the radio. Put the transmission in
position park (P) (automatic transmission)
or neutral with the parking brake applied
(manual transmission).
Note: To scroll through the menus, press
the up and down arrows on your audio
system.
Wirelessly pairing your cell phone with
SYNC allows you to make and receive
hands-free calls.
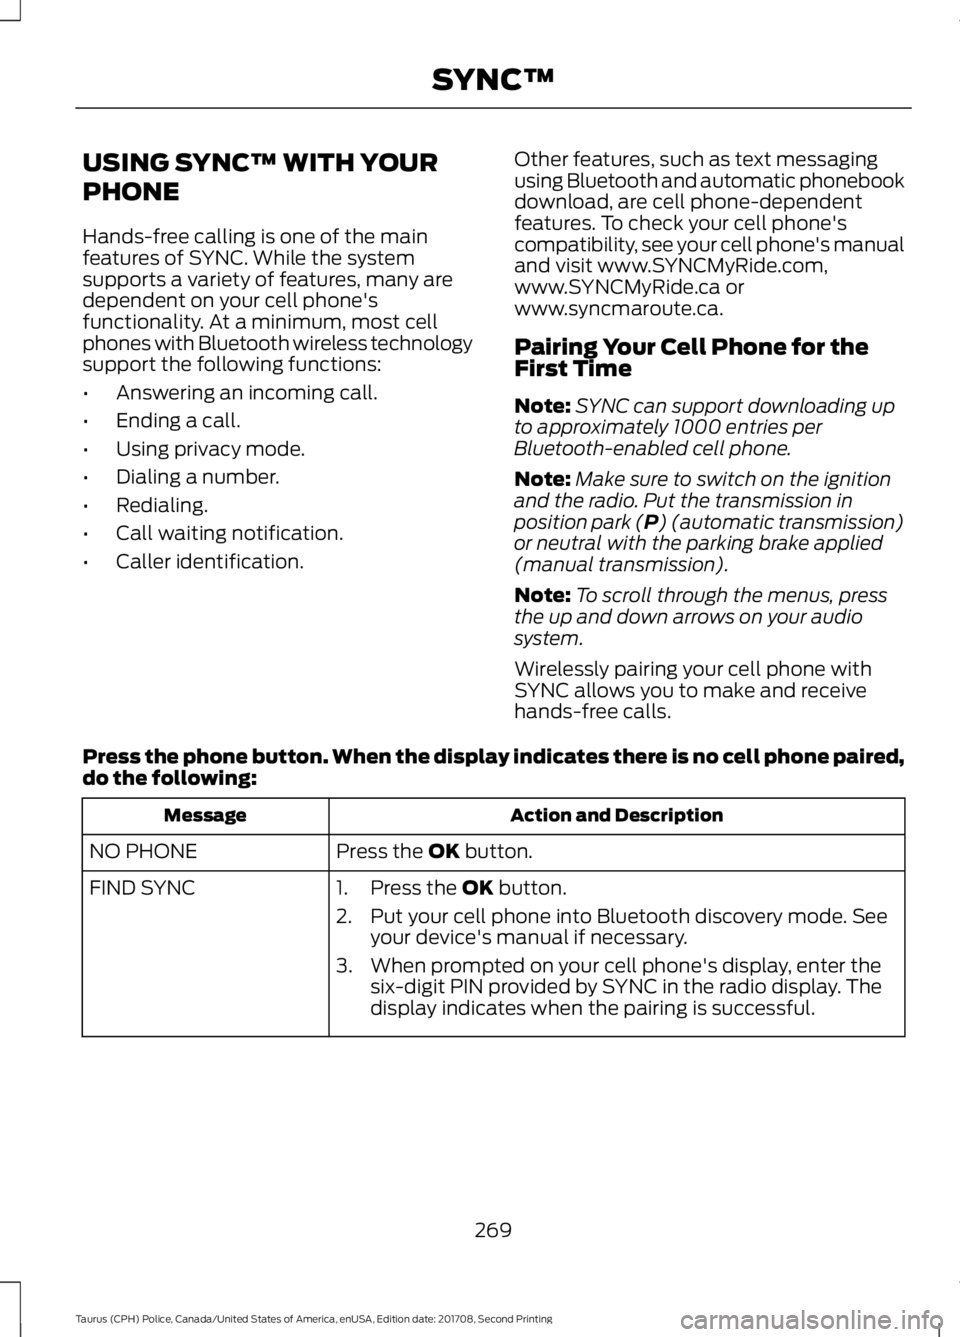
Press the phone button. When the display indicates there is no cell phone paired,
do the following: Action and Description
Message
Press the
OK button.
NO PHONE
FIND SYNC 1. Press the
OK button.
2. Put your cell phone into Bluetooth discovery mode. See your device's manual if necessary.
3. When prompted on your cell phone's display, enter the six-digit PIN provided by SYNC in the radio display. The
display indicates when the pairing is successful.
269
Taurus (CPH) Police, Canada/United States of America, enUSA, Edition date: 201708, Second Printing SYNC™
Page 273 of 364
Depending on your cell phone's capability
and your market, the system may prompt
you with questions, such as setting the
current cell phone as the primary cell
phone (the cell phone SYNC automatically
tries to connect with first upon vehicle
start-up) and downloading your
phonebook.
Pairing Subsequent Cell Phones
Note:
To scroll through the menus, press
the up and down arrows on your audio
system.
Note: Make sure to switch on the ignition
and the radio. Put the transmission in
position park (P) (automatic transmission)
or neutral with the parking brake applied
(manual transmission).
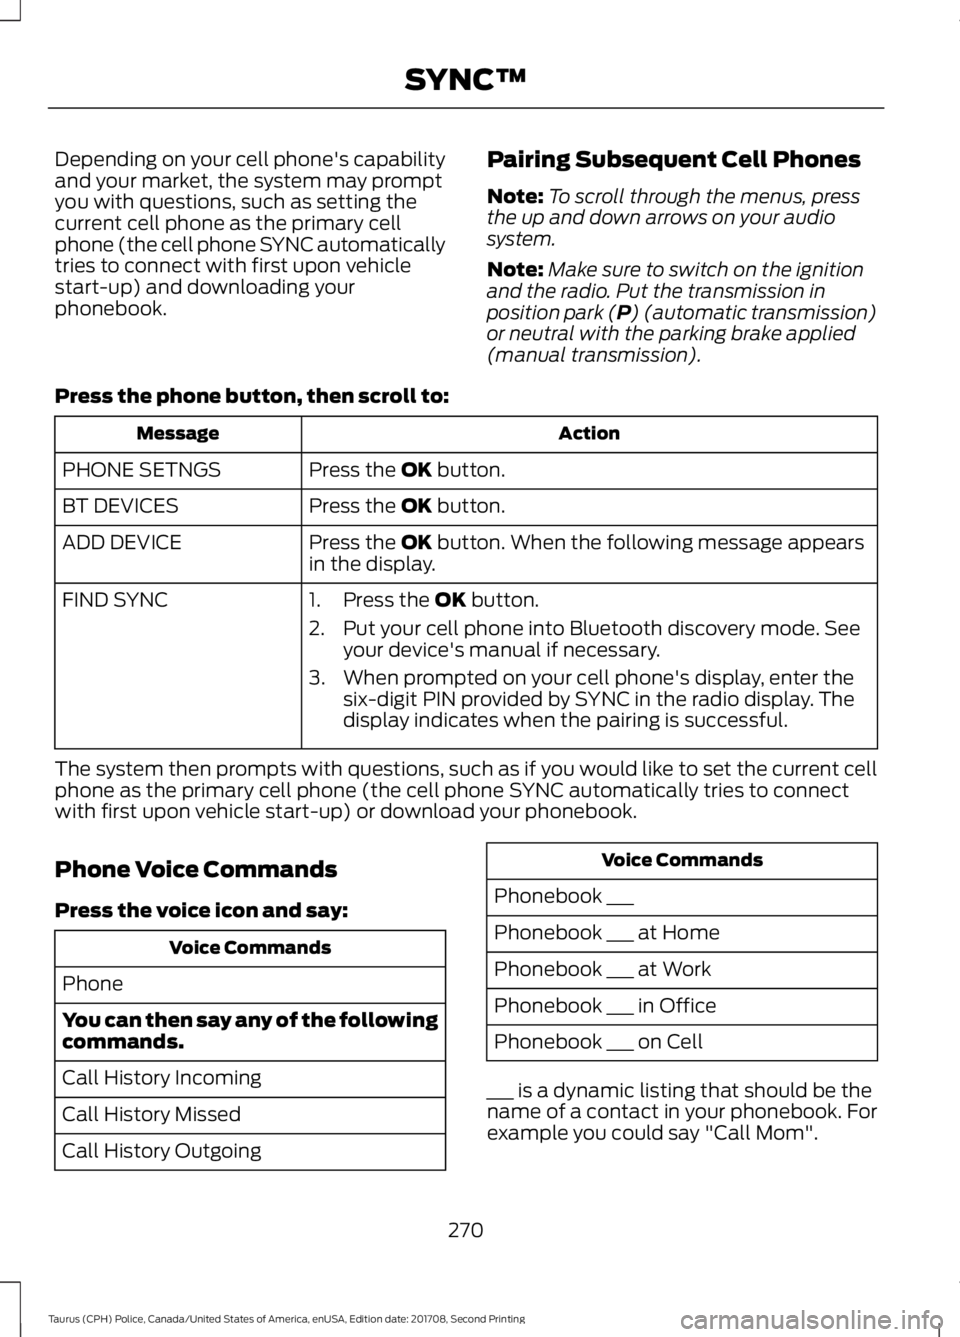
Press the phone button, then scroll to: Action
Message
Press the
OK button.
PHONE SETNGS
Press the
OK button.
BT DEVICES
Press the
OK button. When the following message appears
in the display.
ADD DEVICE
FIND SYNC
1. Press the
OK button.
2. Put your cell phone into Bluetooth discovery mode. See your device's manual if necessary.
3. When prompted on your cell phone's display, enter the six-digit PIN provided by SYNC in the radio display. The
display indicates when the pairing is successful.
The system then prompts with questions, such as if you would like to set the current cell
phone as the primary cell phone (the cell phone SYNC automatically tries to connect
with first upon vehicle start-up) or download your phonebook.
Phone Voice Commands
Press the voice icon and say: Voice Commands
Phone
You can then say any of the following
commands.
Call History Incoming
Call History Missed
Call History Outgoing Voice Commands
Phonebook ___
Phonebook ___ at Home
Phonebook ___ at Work
Phonebook ___ in Office
Phonebook ___ on Cell
___ is a dynamic listing that should be the
name of a contact in your phonebook. For
example you could say "Call Mom".
270
Taurus (CPH) Police, Canada/United States of America, enUSA, Edition date: 201708, Second Printing SYNC™
Page 274 of 364
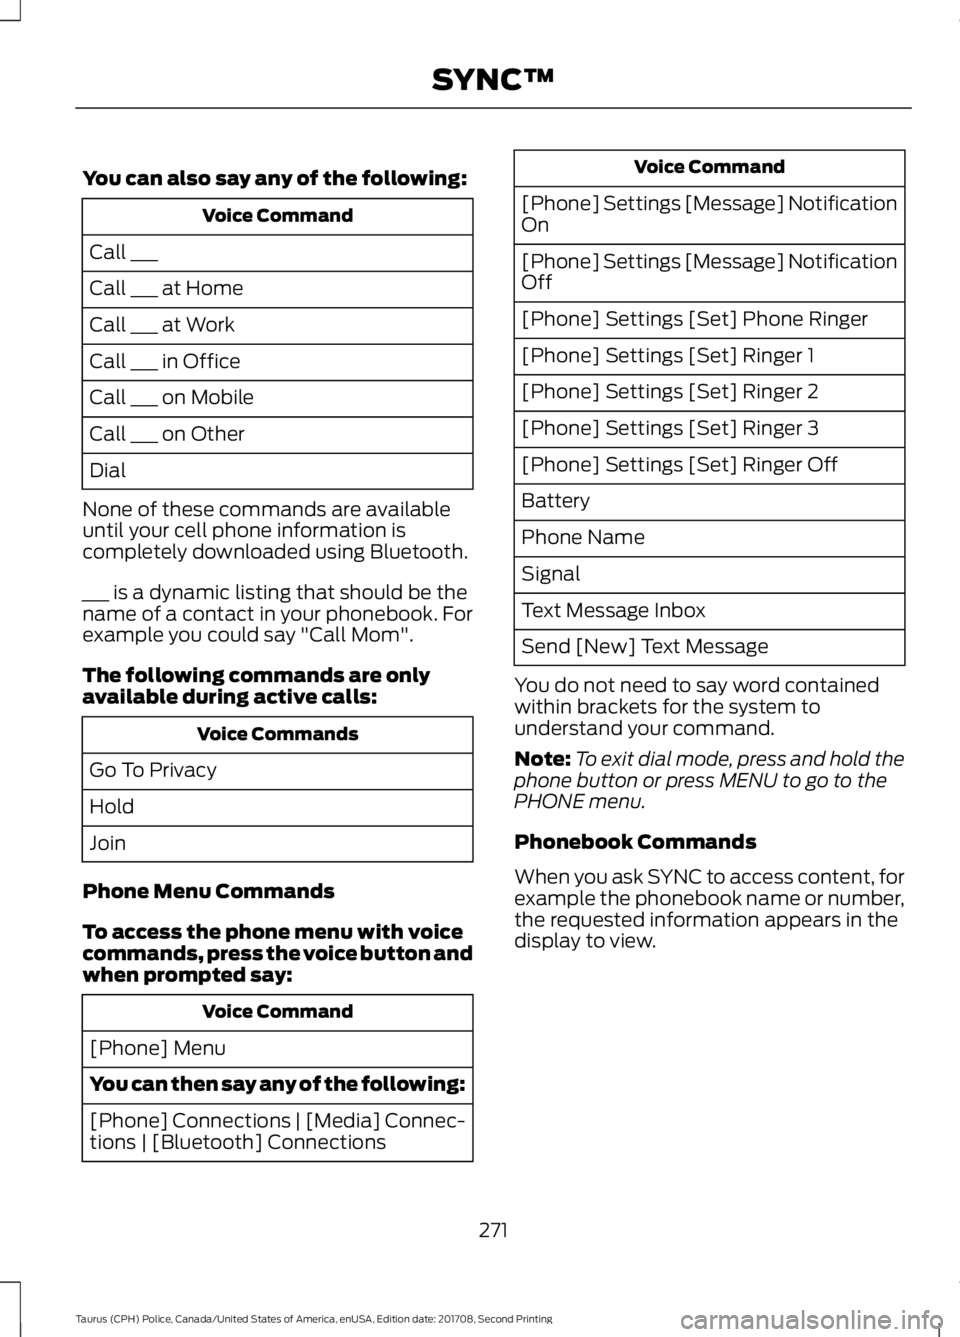
You can also say any of the following:
Voice Command
Call ___
Call ___ at Home
Call ___ at Work
Call ___ in Office
Call ___ on Mobile
Call ___ on Other
Dial
None of these commands are available
until your cell phone information is
completely downloaded using Bluetooth.
___ is a dynamic listing that should be the
name of a contact in your phonebook. For
example you could say "Call Mom".
The following commands are only
available during active calls: Voice Commands
Go To Privacy
Hold
Join
Phone Menu Commands
To access the phone menu with voice
commands, press the voice button and
when prompted say: Voice Command
[Phone] Menu
You can then say any of the following:
[Phone] Connections | [Media] Connec-
tions | [Bluetooth] Connections Voice Command
[Phone] Settings [Message] Notification
On
[Phone] Settings [Message] Notification
Off
[Phone] Settings [Set] Phone Ringer
[Phone] Settings [Set] Ringer 1
[Phone] Settings [Set] Ringer 2
[Phone] Settings [Set] Ringer 3
[Phone] Settings [Set] Ringer Off
Battery
Phone Name
Signal
Text Message Inbox
Send [New] Text Message
You do not need to say word contained
within brackets for the system to
understand your command.
Note: To exit dial mode, press and hold the
phone button or press MENU to go to the
PHONE menu.
Phonebook Commands
When you ask SYNC to access content, for
example the phonebook name or number,
the requested information appears in the
display to view.
271
Taurus (CPH) Police, Canada/United States of America, enUSA, Edition date: 201708, Second Printing SYNC™
Page 276 of 364
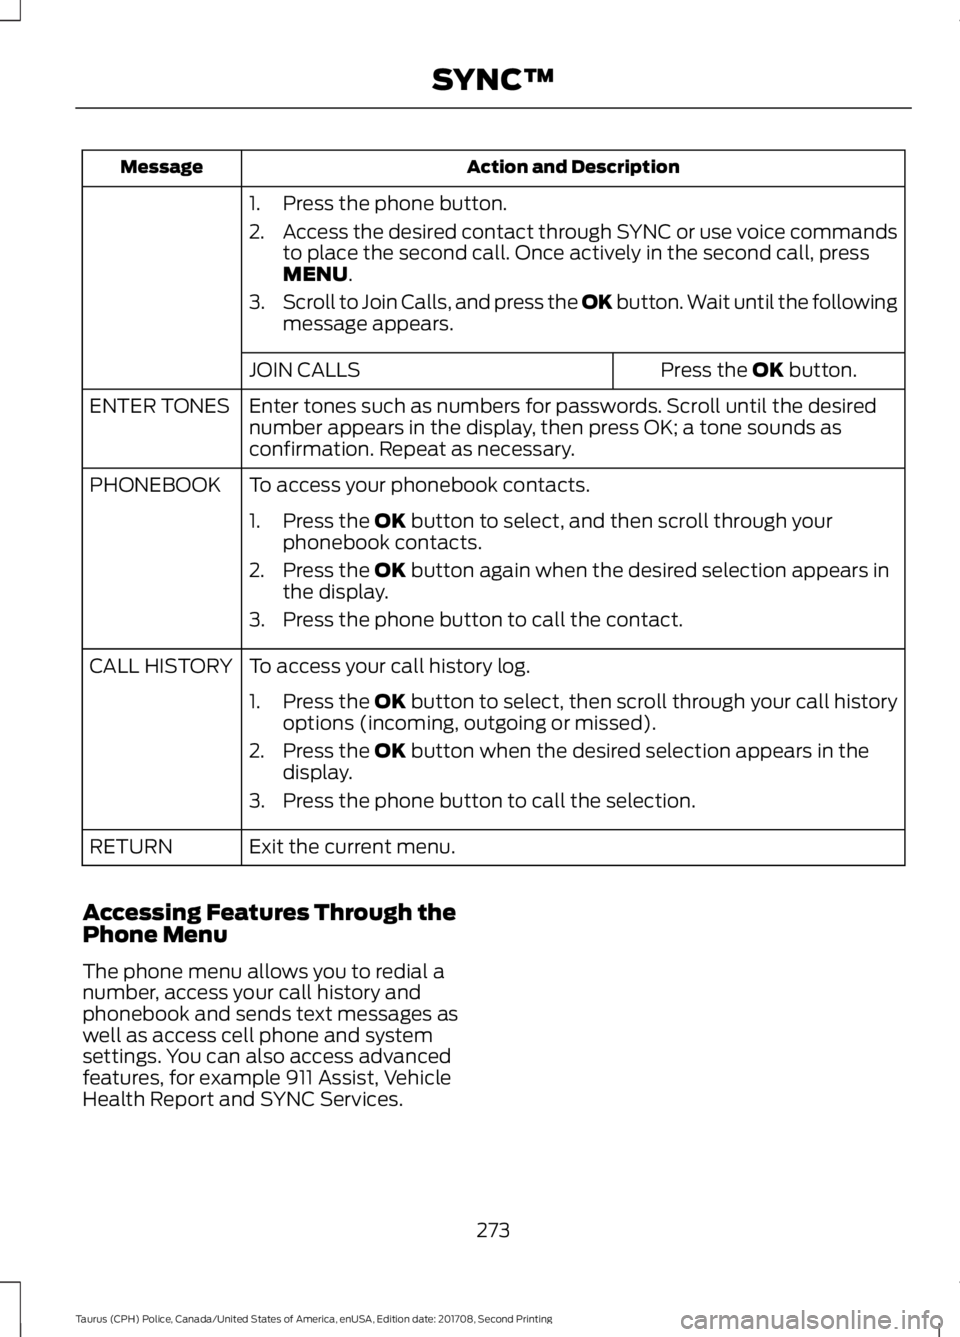
Action and Description
Message
1. Press the phone button.
2.Access the desired contact through SYNC or use voice commands
to place the second call. Once actively in the second call, press
MENU.
3. Scroll to Join Calls, and press the
OK button. Wait until the following
message appears.
Press the
OK button.
JOIN CALLS
Enter tones such as numbers for passwords. Scroll until the desired
number appears in the display, then press OK; a tone sounds as
confirmation. Repeat as necessary.
ENTER TONES
To access your phonebook contacts.
PHONEBOOK
1. Press the
OK button to select, and then scroll through your
phonebook contacts.
2. Press the
OK button again when the desired selection appears in
the display.
3. Press the phone button to call the contact.
To access your call history log.
CALL HISTORY
1.Press the OK button to select, then scroll through your call history
options (incoming, outgoing or missed).
2. Press the
OK button when the desired selection appears in the
display.
3. Press the phone button to call the selection.
Exit the current menu.
RETURN
Accessing Features Through the
Phone Menu
The phone menu allows you to redial a
number, access your call history and
phonebook and sends text messages as
well as access cell phone and system
settings. You can also access advanced
features, for example 911 Assist, Vehicle
Health Report and SYNC Services.
273
Taurus (CPH) Police, Canada/United States of America, enUSA, Edition date: 201708, Second Printing SYNC™
Page 277 of 364
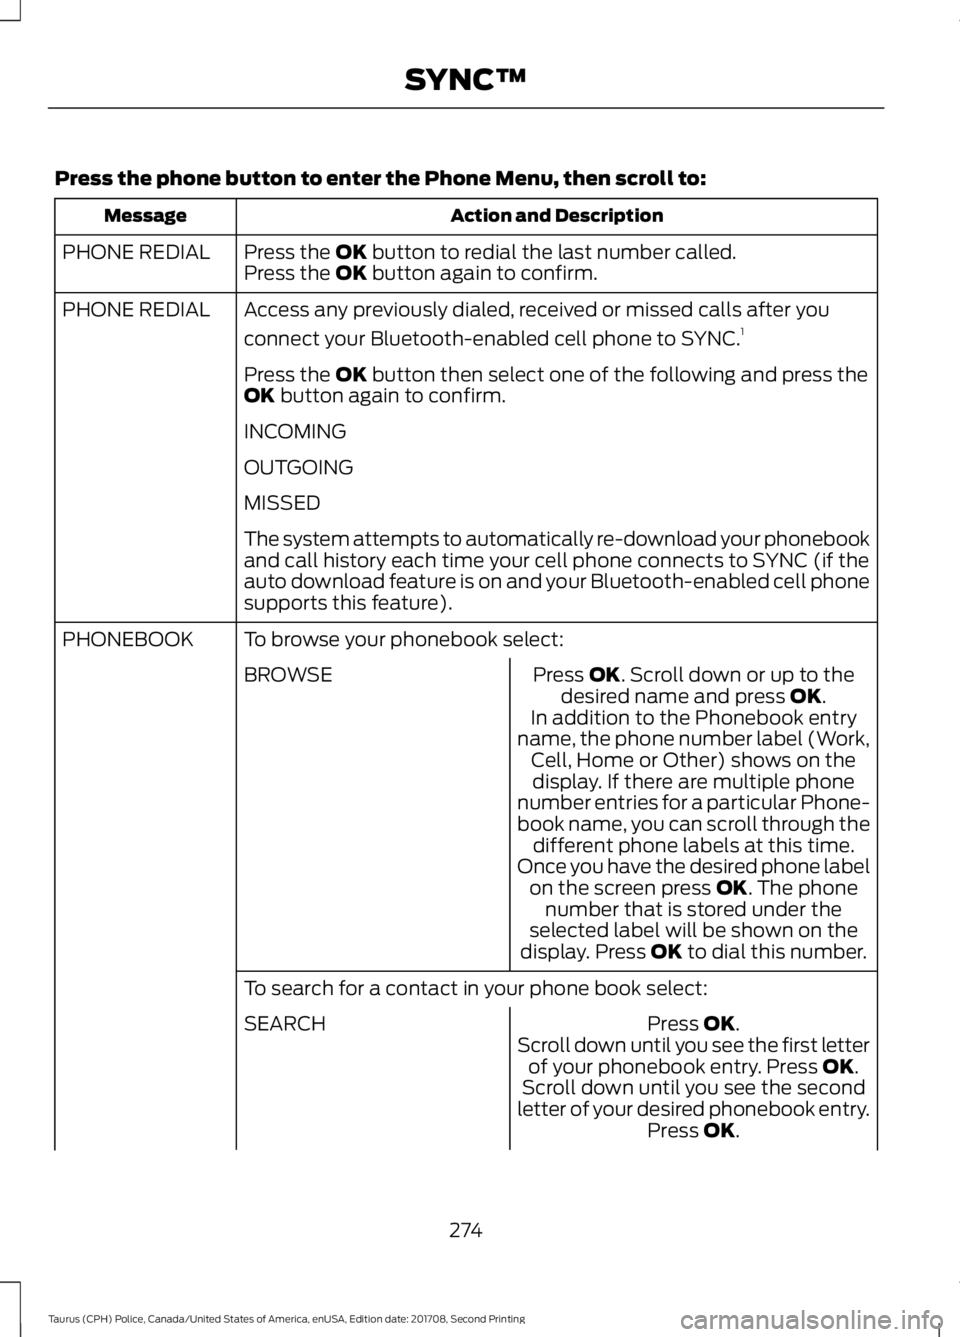
Press the phone button to enter the Phone Menu, then scroll to:
Action and Description
Message
Press the OK button to redial the last number called.
PHONE REDIAL
Press the OK button again to confirm.
Access any previously dialed, received or missed calls after you
connect your Bluetooth-enabled cell phone to SYNC. 1
PHONE REDIAL
Press the
OK button then select one of the following and press the
OK button again to confirm.
INCOMING
OUTGOING
MISSED
The system attempts to automatically re-download your phonebook
and call history each time your cell phone connects to SYNC (if the
auto download feature is on and your Bluetooth-enabled cell phone
supports this feature).
To browse your phonebook select:
PHONEBOOK
Press
OK. Scroll down or up to the
desired name and press OK.
BROWSE
In addition to the Phonebook entry
name, the phone number label (Work, Cell, Home or Other) shows on thedisplay. If there are multiple phone
number entries for a particular Phone-
book name, you can scroll through the different phone labels at this time.
Once you have the desired phone label on the screen press
OK. The phone
number that is stored under the
selected label will be shown on the
display. Press
OK to dial this number.
To search for a contact in your phone book select: Press
OK.
SEARCH
Scroll down until you see the first letterof your phonebook entry. Press
OK.
Scroll down until you see the second
letter of your desired phonebook entry. Press
OK.
274
Taurus (CPH) Police, Canada/United States of America, enUSA, Edition date: 201708, Second Printing SYNC™