headlamp FORD POLICE INTERCEPTOR SEDAN 2016 1.G Owners Manual
[x] Cancel search | Manufacturer: FORD, Model Year: 2016, Model line: POLICE INTERCEPTOR SEDAN, Model: FORD POLICE INTERCEPTOR SEDAN 2016 1.GPages: 358, PDF Size: 3.55 MB
Page 6 of 358
Cruise Control
Principle of Operation..................................121
Using Cruise Control.....................................121
Driving Aids
Blind Spot Information System...............123
Cross Traffic Alert.........................................125
Steering............................................................128
Load Carrying
Rear Loadspace Hatches..........................130
Rear Under Floor Storage
..........................130
Load Limit
.......................................................130
Towing
Towing a Trailer.............................................138
Recommended Towing Weights............139
Essential Towing Checks...........................140
Transporting the Vehicle............................142
Towing the Vehicle on Four Wheels......142
Driving Hints
Breaking-In......................................................144
Economical Driving......................................144
Driving Through Water
................................145
Floor Mats
.......................................................145
Roadside Emergencies
Roadside Assistance...................................147
Hazard Warning Flashers
..........................148
Fuel Shutoff
...................................................148
Jump Starting the Vehicle
.........................149
Customer Assistance
Getting the Services You Need
................152
In California (U.S. Only)..............................153
The Better Business Bureau (BBB) Auto Line Program (U.S. Only)......................154
Utilizing the Mediation/Arbitration Program (Canada Only)........................155 Getting Assistance Outside the U.S. and
Canada.........................................................155
Ordering Additional Owner's Literature.....................................................156
Reporting Safety Defects (U.S. Only)..............................................................157
Reporting Safety Defects (Canada Only)..............................................................157
Fuses
Fuse Specification Chart...........................159
Changing a Fuse
...........................................168
Maintenance
General Information
....................................170
Opening and Closing the Hood
...............170
Under Hood Overview - 2.0L EcoBoost™.................................................172
Under Hood Overview - 3.5L Ecoboost™.................................................173
Under Hood Overview - 3.5L Duratec/ 3.7L.................................................................174
Engine Oil Dipstick - 2.0L EcoBoost™.................................................175
Engine Oil Dipstick - 3.5L Duratec/3.5L Ecoboost™/3.7L.......................................175
Engine Oil Check
...........................................175
Oil Change Indicator Reset.......................176
Engine Coolant Check.................................176
Automatic Transmission Fluid Check - 2.0L EcoBoost™
......................................180
Automatic Transmission Fluid Check - 3.5L Duratec/3.5L Ecoboost™/
3.7L................................................................180
Brake Fluid Check.........................................184
Power Steering Fluid Check.....................184
Washer Fluid Check.....................................184
Fuel Filter
.........................................................185
Changing the 12V Battery..........................185
Checking the Wiper Blades
.......................187
Changing the Wiper Blades
......................187
Adjusting the Headlamps..........................187
3
Police Interceptor (CPH), enUSA, Edition date: 10/2015, First Printing Table of Contents
Page 52 of 358
Press and hold both the lock and unlock
buttons on the remote control for three
seconds to change between driver door or
all doors unlock mode. The direction
indicators will flash twice to indicate a
change to the unlocking mode. Driver door
mode only unlocks the driver door when
you press the unlock button once. All door
mode unlocks all doors when you press
the unlock button once. The unlocking
mode applies to the remote control.
Locking the Doors
Press the button to lock all
doors. The direction indicators
will flash. Press the button again
within three seconds to confirm that all
the doors are closed.
The doors will lock again, the horn will
sound and the direction indicators will
flash if all the doors and the luggage
compartment are closed.
Note: If any door or the luggage
compartment is open, or if the hood is open
on vehicles with an anti-theft alarm or
remote start, the horn will sound twice and
the direction indicators will not flash.
Locking and Unlocking the Doors
with the Key Blade
Locking the Doors
Turn the top of the key toward the front of
your vehicle.
Unlocking the Doors
Turn the top of the key toward the rear of
your vehicle.
Note: If the child safety locks are on and
you pull the interior handle, you only switch
off the emergency locking, not the child
safety lock. You can only open the doors
using the external door handle. Opening a Rear Door From the
Inside
Pull the interior door handle twice to
unlock and open a rear door. The first pull
unlocks the door and the second pull
opens the door.
Illuminated Entry (If Equipped)
The interior lamps and some exterior
lamps illuminate when you unlock the
doors with the remote control.
The lamps turn off if:
• The ignition is on.
• You press the remote control lock
button.
• 25 seconds have elapsed.
The lamps do not turn off if:
• You switch them on with the lighting
control.
• Any door is open.
Illuminated Exit
(If Equipped)
The interior lamps and some exterior
lamps illuminate when all doors are closed
and you switch the ignition off.
The lamps will turn off if all the doors
remain closed and:
• 25 seconds have elapsed.
• You lock your vehicle from the outside.
Battery Saver
If you leave the courtesy lamps, interior
lamps or headlamps on, the battery saver
shuts them off 10 minutes after you switch
the ignition off.
49
Police Interceptor (CPH), enUSA, Edition date: 10/2015, First Printing LocksE138623
Page 60 of 358
GENERAL INFORMATION
Condensation in Lamp Assemblies
Exterior lamps have vents to
accommodate normal changes in air
pressure.
Condensation can be a natural by-product
of this design. When moist air enters the
lamp assembly through the vents, there is
a possibility that condensation can occur
when the temperature is cold. When
normal condensation occurs, a fine mist
can form on the interior of the lens. The
fine mist eventually clears and exits
through the vents during normal operation.
Clearing time may take as long as 48 hours
under dry weather conditions.
Examples of acceptable condensation are:
•
The presence of a fine mist (no streaks,
drip marks or large droplets).
• A fine mist covers less than 50% of the
lens.
Examples of unacceptable condensation
are:
• A water puddle inside the lamp.
• Streaks, drip marks or large droplets
present on the interior of the lens.
If you see any unacceptable condensation,
have your vehicle checked by an authorized
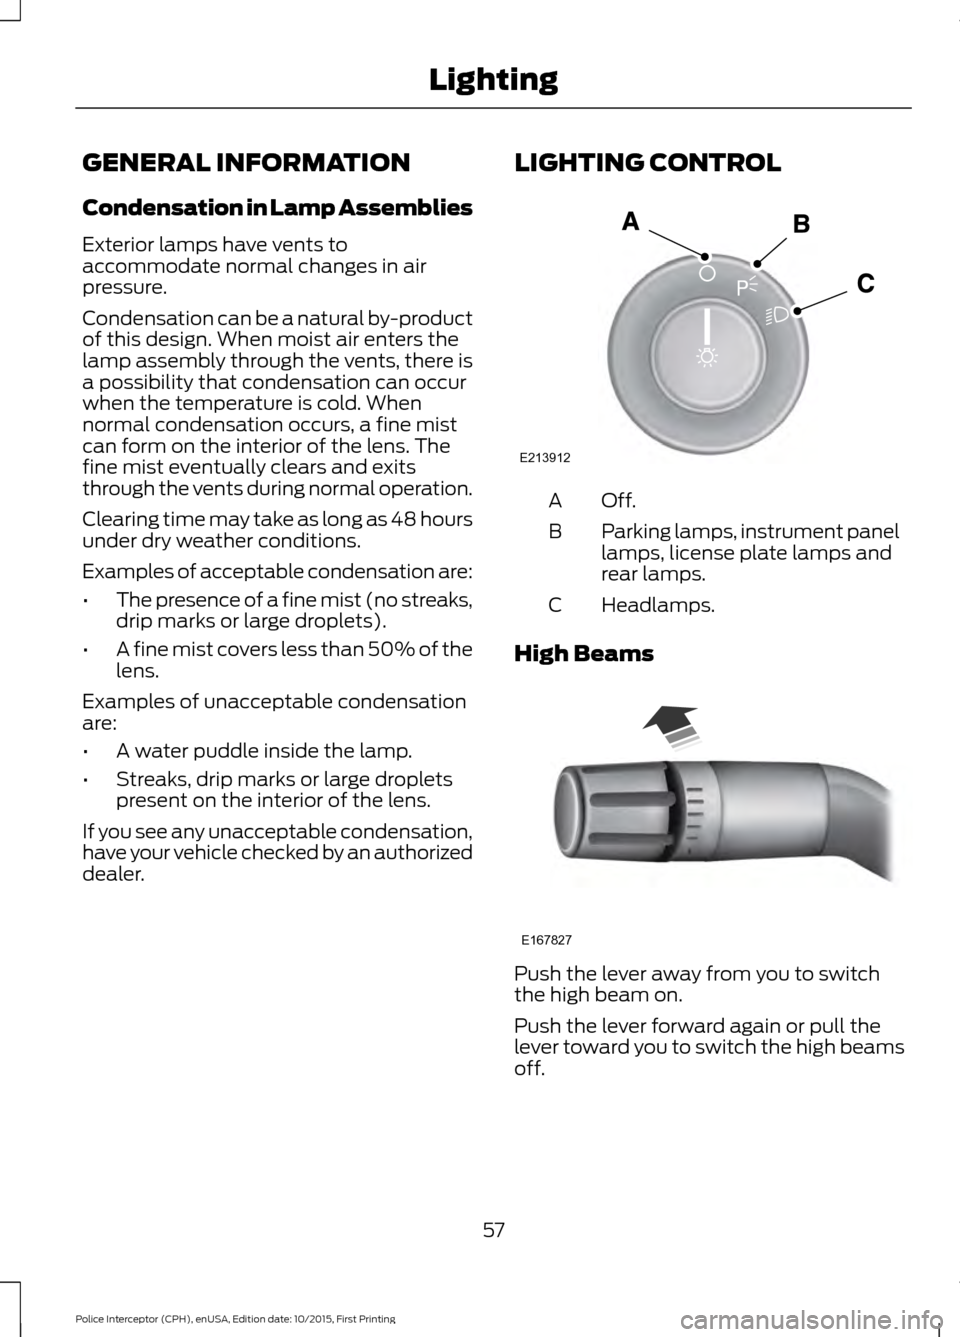
dealer. LIGHTING CONTROL Off.A
Parking lamps, instrument panel
lamps, license plate lamps and
rear lamps.
B
Headlamps.
C
High Beams Push the lever away from you to switch
the high beam on.
Push the lever forward again or pull the
lever toward you to switch the high beams
off.
57
Police Interceptor (CPH), enUSA, Edition date: 10/2015, First Printing LightingE213912 E167827
Page 61 of 358
Headlamp Flasher
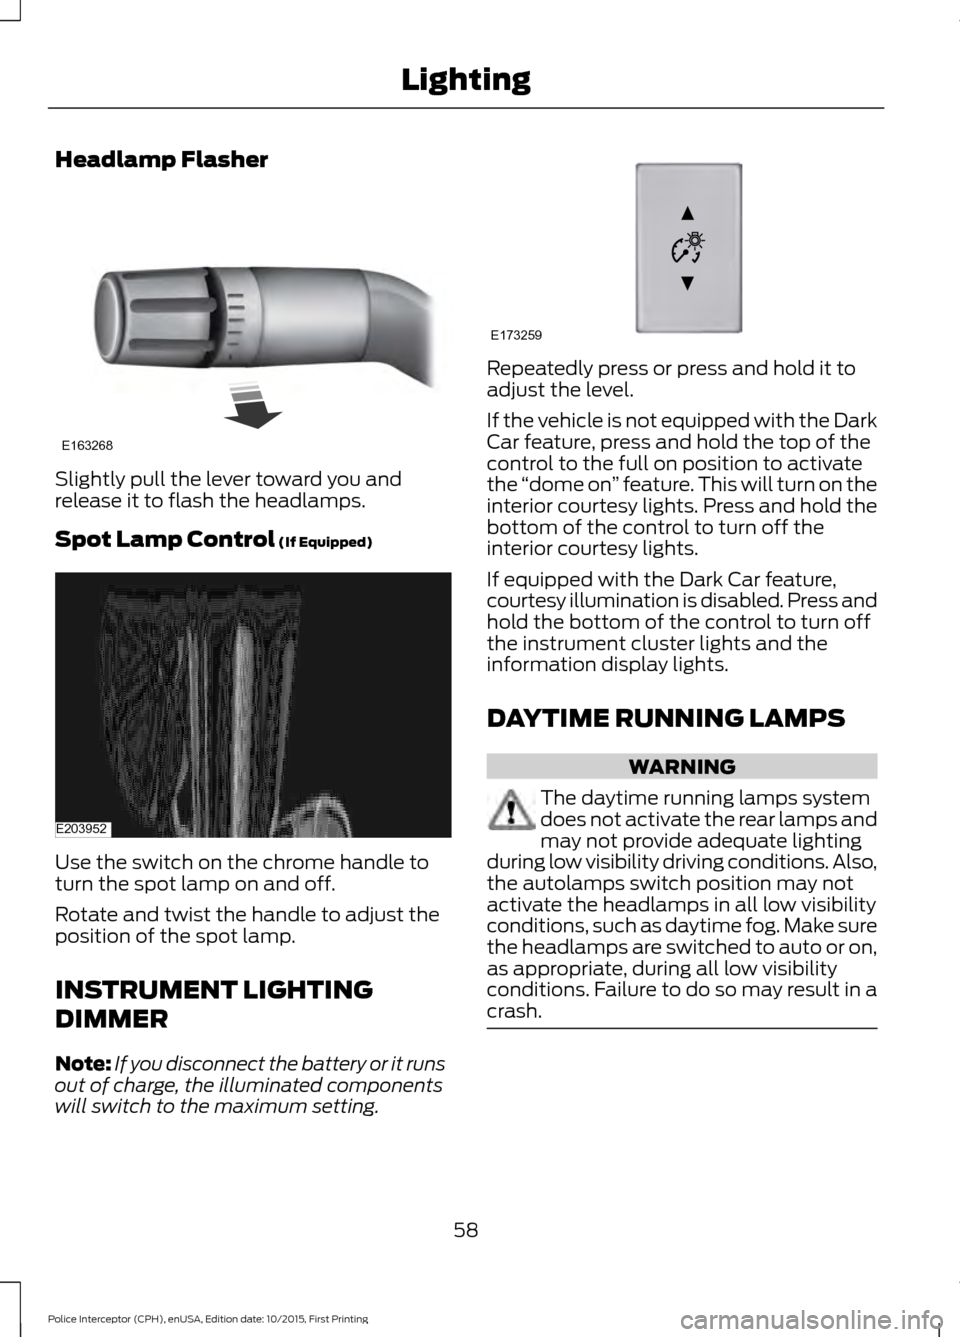
Slightly pull the lever toward you and
release it to flash the headlamps.
Spot Lamp Control (If Equipped)
Use the switch on the chrome handle to
turn the spot lamp on and off.
Rotate and twist the handle to adjust the
position of the spot lamp.
INSTRUMENT LIGHTING
DIMMER
Note:
If you disconnect the battery or it runs
out of charge, the illuminated components
will switch to the maximum setting. Repeatedly press or press and hold it to
adjust the level.
If the vehicle is not equipped with the Dark
Car feature, press and hold the top of the
control to the full on position to activate
the
“dome on ” feature. This will turn on the
interior courtesy lights. Press and hold the
bottom of the control to turn off the
interior courtesy lights.
If equipped with the Dark Car feature,
courtesy illumination is disabled. Press and
hold the bottom of the control to turn off
the instrument cluster lights and the
information display lights.
DAYTIME RUNNING LAMPS WARNING
The daytime running lamps system
does not activate the rear lamps and
may not provide adequate lighting
during low visibility driving conditions. Also,
the autolamps switch position may not
activate the headlamps in all low visibility
conditions, such as daytime fog. Make sure
the headlamps are switched to auto or on,
as appropriate, during all low visibility
conditions. Failure to do so may result in a
crash. 58
Police Interceptor (CPH), enUSA, Edition date: 10/2015, First Printing LightingE163268 E203952 E173259
Page 70 of 358
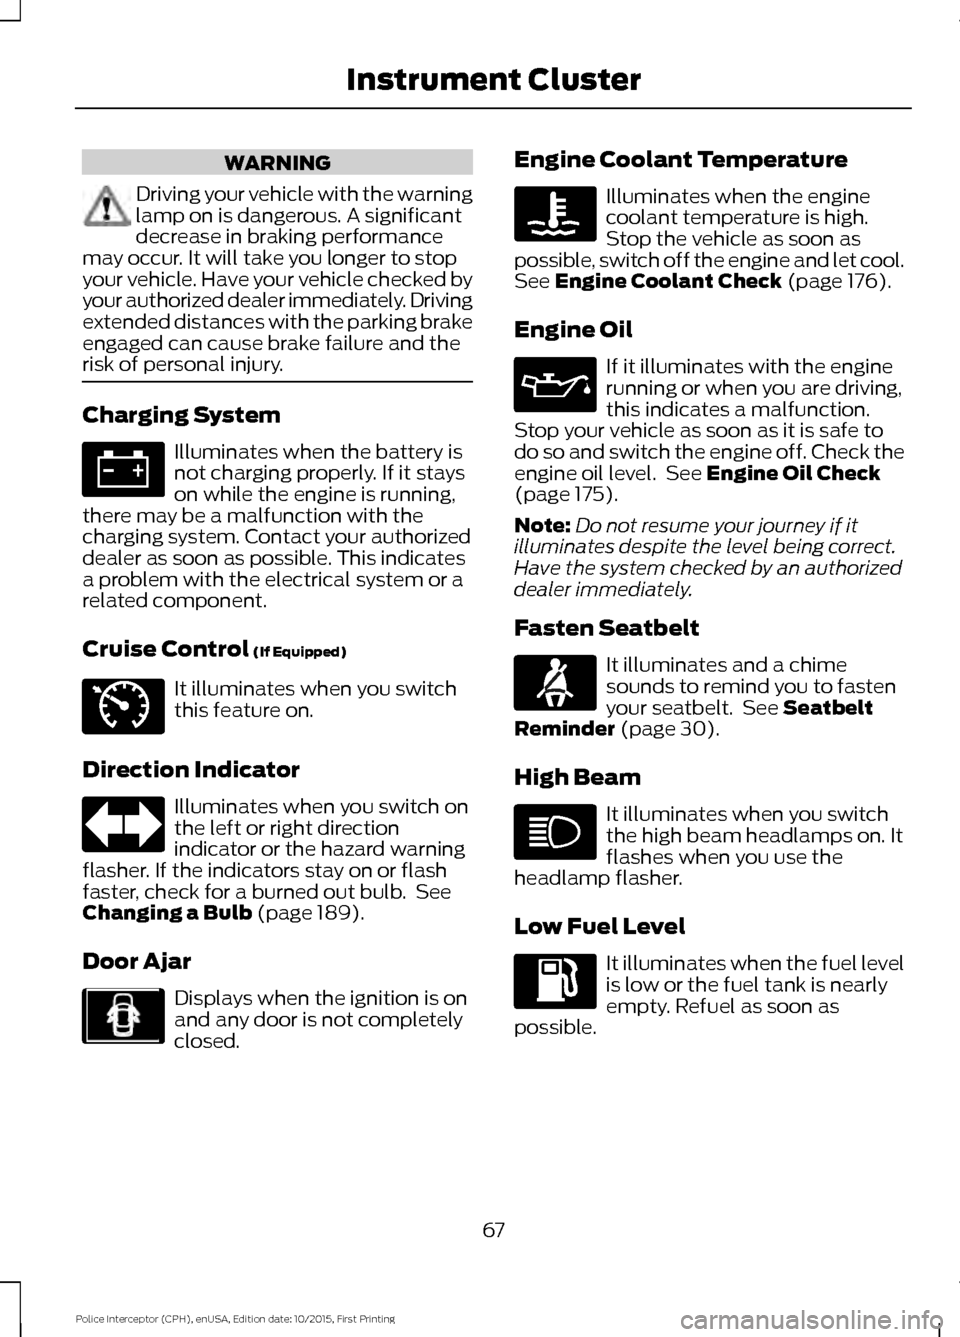
WARNING
Driving your vehicle with the warning
lamp on is dangerous. A significant
decrease in braking performance
may occur. It will take you longer to stop
your vehicle. Have your vehicle checked by
your authorized dealer immediately. Driving
extended distances with the parking brake
engaged can cause brake failure and the
risk of personal injury. Charging System
Illuminates when the battery is
not charging properly. If it stays
on while the engine is running,
there may be a malfunction with the
charging system. Contact your authorized
dealer as soon as possible. This indicates
a problem with the electrical system or a
related component.
Cruise Control (If Equipped) It illuminates when you switch
this feature on.
Direction Indicator Illuminates when you switch on
the left or right direction
indicator or the hazard warning
flasher. If the indicators stay on or flash
faster, check for a burned out bulb. See
Changing a Bulb
(page 189).
Door Ajar Displays when the ignition is on
and any door is not completely
closed. Engine Coolant Temperature Illuminates when the engine
coolant temperature is high.
Stop the vehicle as soon as
possible, switch off the engine and let cool.
See
Engine Coolant Check (page 176).
Engine Oil If it illuminates with the engine
running or when you are driving,
this indicates a malfunction.
Stop your vehicle as soon as it is safe to
do so and switch the engine off. Check the
engine oil level. See
Engine Oil Check
(page 175).
Note: Do not resume your journey if it
illuminates despite the level being correct.
Have the system checked by an authorized
dealer immediately.
Fasten Seatbelt It illuminates and a chime
sounds to remind you to fasten
your seatbelt. See
Seatbelt
Reminder (page 30).
High Beam It illuminates when you switch
the high beam headlamps on. It
flashes when you use the
headlamp flasher.
Low Fuel Level It illuminates when the fuel level
is low or the fuel tank is nearly
empty. Refuel as soon as
possible.
67
Police Interceptor (CPH), enUSA, Edition date: 10/2015, First Printing Instrument Cluster E71340 E213957
Page 72 of 358
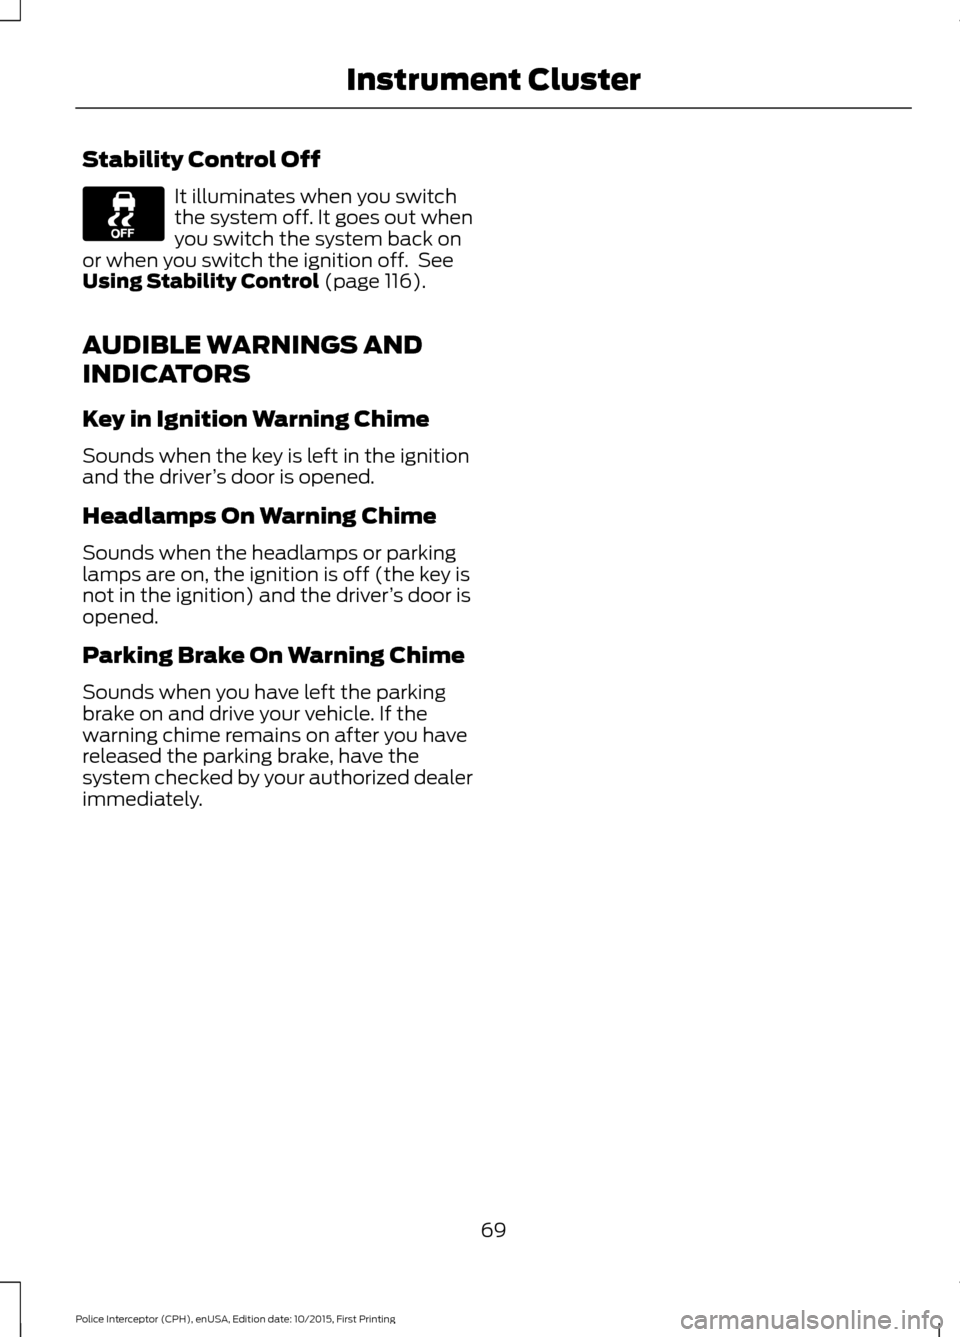
Stability Control Off
It illuminates when you switch
the system off. It goes out when
you switch the system back on
or when you switch the ignition off. See
Using Stability Control (page 116).
AUDIBLE WARNINGS AND
INDICATORS
Key in Ignition Warning Chime
Sounds when the key is left in the ignition
and the driver ’s door is opened.
Headlamps On Warning Chime
Sounds when the headlamps or parking
lamps are on, the ignition is off (the key is
not in the ignition) and the driver ’s door is
opened.
Parking Brake On Warning Chime
Sounds when you have left the parking
brake on and drive your vehicle. If the
warning chime remains on after you have
released the parking brake, have the
system checked by your authorized dealer
immediately.
69
Police Interceptor (CPH), enUSA, Edition date: 10/2015, First Printing Instrument Cluster
Page 93 of 358
Note:
You can crank the engine for a total
of 60 seconds without the engine starting
before the starting system temporarily
disables. The 60 seconds does not have to
be all at once. For example, if you crank the
engine three times for 20 seconds each
time, without the engine starting, you
reached the 60-second time limit. A
message appears in the information display
alerting you that you exceeded the cranking
time. You cannot attempt to start the
engine for at least 15 minutes. After 15
minutes, you are limited to a 15-second
engine cranking time. You need to wait 60
minutes before you can crank the engine for
60 seconds again.
Before starting your vehicle, check the
following:
• Make sure all occupants have fastened
their safety belts.
• Make sure the headlamps and
electrical accessories are off.
• Make sure the parking brake is on.
• Make sure the transmission is in park
(P).
To start the engine, do the following:
Note: Do not touch the accelerator pedal.
1. Fully depress the brake pedal.
2. Turn the key to the start position to start the engine.
Note: The engine may continue cranking
for up to 15 seconds or until it starts.
Note: If you cannot start the engine on the
first try, wait for a short period and try again.
Failure to Start
If you cannot start the engine after three
attempts, wait 10 seconds and follow this
procedure:
1. Fully depress the brake pedal.
2. Shift into park (P). 3. Fully press the accelerator pedal and
hold it there.
4. Start the engine.
Cold Weather Starting - Flex Fuel
Vehicles WARNING
Do not use starting fluid, for example
ether, in the air intake system. Such
fluid could cause immediate
explosive damage to the engine and
possible personal injury. The starting characteristics of all grades
of E85 ethanol make it unsuitable for use
when ambient temperatures fall below
-0°F (-18°C). Consult your fuel distributor
for the availability of winter grade ethanol.
As the outside temperature approaches
freezing, ethanol fuel distributors should
supply winter grade ethanol, the same as
with unleaded gasoline. If summer grade
ethanol is used in cold weather conditions,
0°F to 32°F (-18°C to 0°C), you may
experience increased cranking times, rough
idle or hesitation until the engine has
warmed up.
You may experience a decrease in peak
performance when the engine is cold when
operating on E85 ethanol.
Do not crank the engine for more than 10
seconds at a time. This may cause
damage to the starter motor. If the engine
does not start, turn the key to the off
position and wait 30 seconds before trying
again.
If your vehicle does not start on E85
ethanol, and neither an alternative brand
of E85 ethanol nor an engine block heater
is available, the addition of unleaded
gasoline to the fuel tank improves cold
starting performance.
If the engine fails to start, do the following:
90
Police Interceptor (CPH), enUSA, Edition date: 10/2015, First Printing Starting and Stopping the Engine
Page 170 of 358
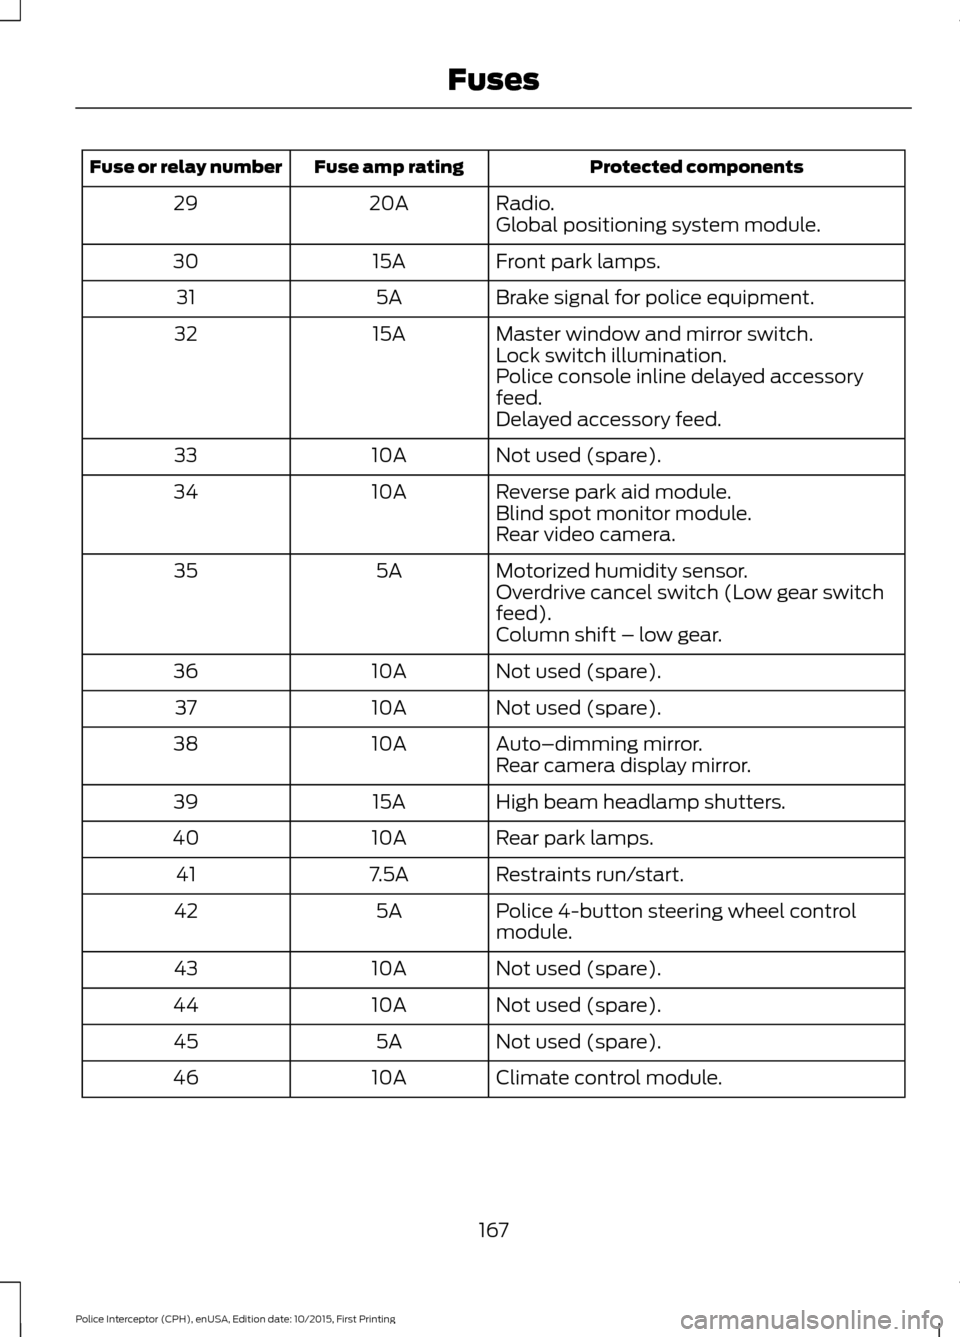
Protected components
Fuse amp rating
Fuse or relay number
Radio.
20A
29
Global positioning system module.
Front park lamps.
15A
30
Brake signal for police equipment.
5A
31
Master window and mirror switch.
15A
32
Lock switch illumination.
Police console inline delayed accessory
feed.
Delayed accessory feed.
Not used (spare).
10A
33
Reverse park aid module.
10A
34
Blind spot monitor module.
Rear video camera.
Motorized humidity sensor.
5A
35
Overdrive cancel switch (Low gear switch
feed).
Column shift – low gear.
Not used (spare).
10A
36
Not used (spare).
10A
37
Auto–dimming mirror.
10A
38
Rear camera display mirror.
High beam headlamp shutters.
15A
39
Rear park lamps.
10A
40
Restraints run/start.
7.5A
41
Police 4-button steering wheel control
module.
5A
42
Not used (spare).
10A
43
Not used (spare).
10A
44
Not used (spare).
5A
45
Climate control module.
10A
46
167
Police Interceptor (CPH), enUSA, Edition date: 10/2015, First Printing Fuses
Page 190 of 358
After battery replacement, or in some
cases after charging the battery with an
external charger, the battery management
system requires eight hours of vehicle sleep
time to relearn the battery state of charge.
During this time your vehicle must remain
fully locked with the ignition switched off.
Note:
Prior to relearning the battery state
of charge, the battery management system
may temporarily disable some electrical
systems.
Electrical Accessory Installation
To make sure the battery management
system works correctly, do not connect an
electrical device ground connection
directly to the battery negative post. This
can cause inaccurate measurements of
the battery condition and potential
incorrect system operation.
Note: If you add electrical accessories or
components to the vehicle, it may adversely
affect battery performance and durability.
This may also affect the performance of
other electrical systems in the vehicle.
CHECKING THE WIPER
BLADES Run the tip of your fingers over the edge of
the blade to check for roughness.
Clean the wiper blades with washer fluid
or water applied with a soft sponge or
cloth. CHANGING THE WIPER
BLADES
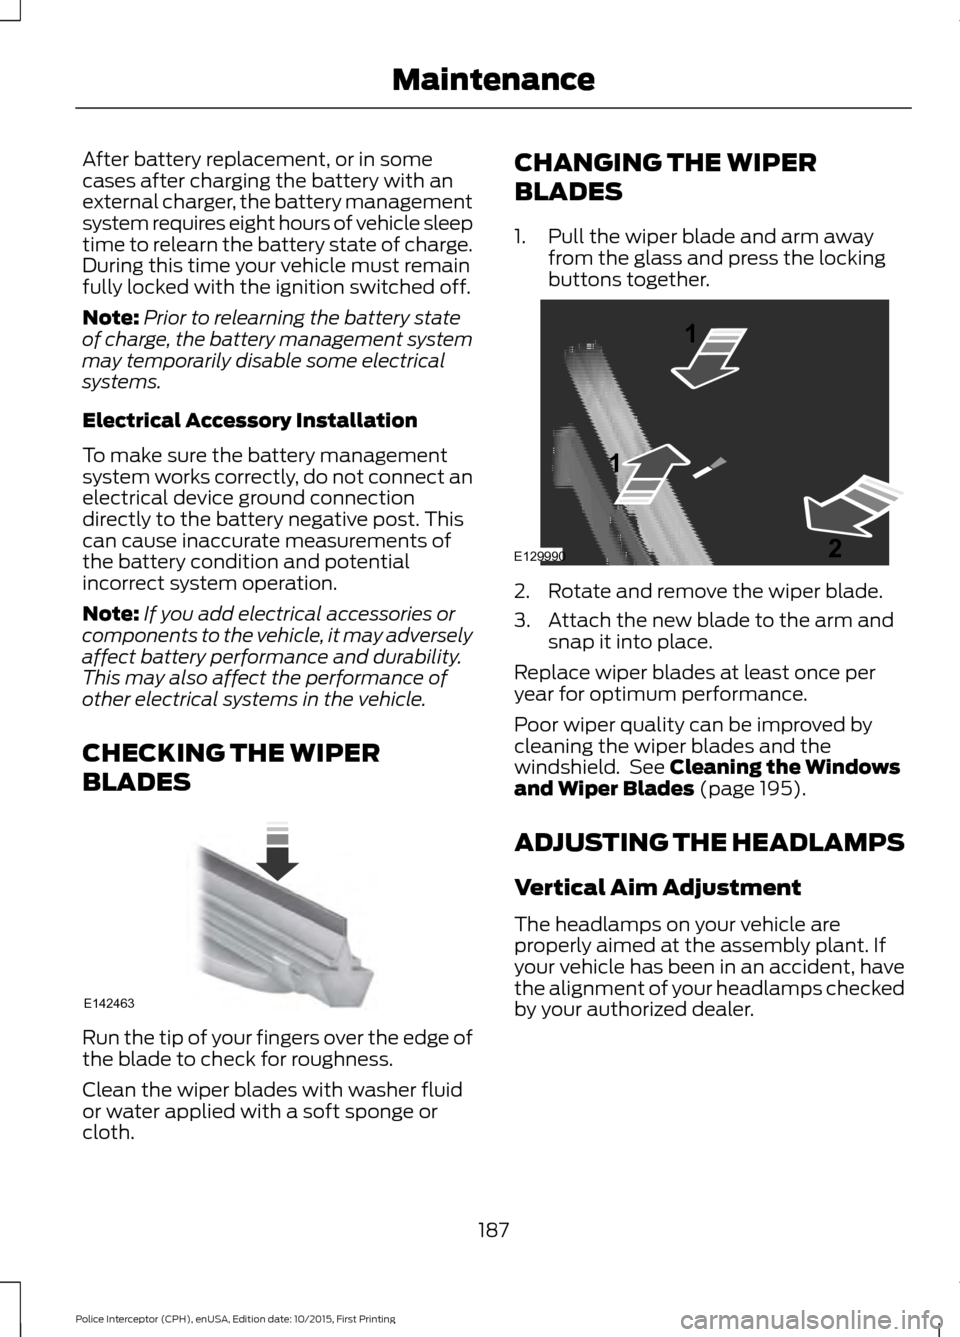
1. Pull the wiper blade and arm away
from the glass and press the locking
buttons together. 2. Rotate and remove the wiper blade.
3. Attach the new blade to the arm and
snap it into place.
Replace wiper blades at least once per
year for optimum performance.
Poor wiper quality can be improved by
cleaning the wiper blades and the
windshield. See Cleaning the Windows
and Wiper Blades (page 195).
ADJUSTING THE HEADLAMPS
Vertical Aim Adjustment
The headlamps on your vehicle are
properly aimed at the assembly plant. If
your vehicle has been in an accident, have
the alignment of your headlamps checked
by your authorized dealer.
187
Police Interceptor (CPH), enUSA, Edition date: 10/2015, First Printing MaintenanceE142463 E129990
1
1 2
Page 191 of 358
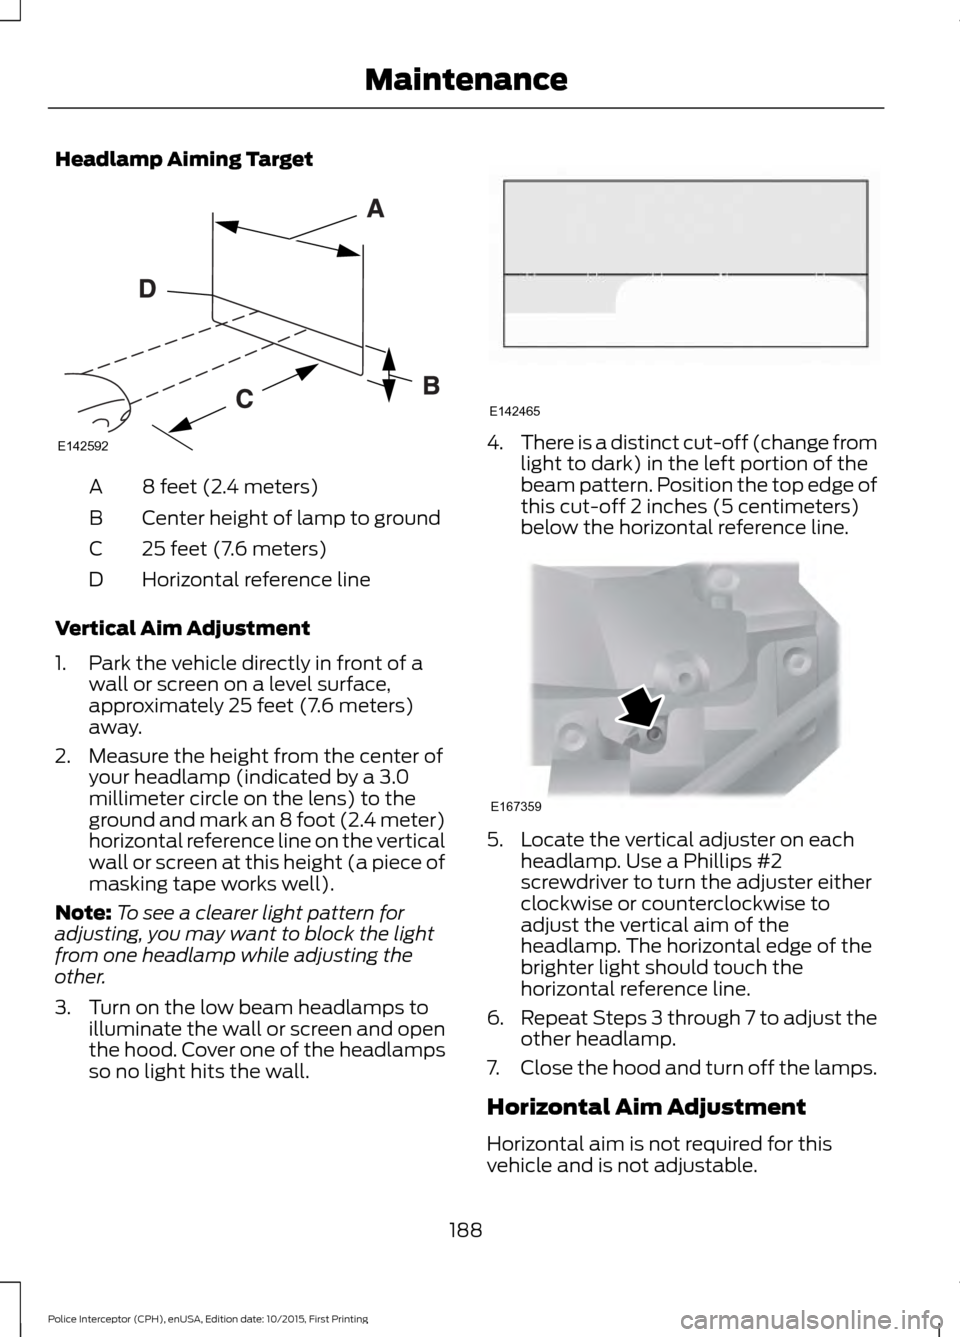
Headlamp Aiming Target
8 feet (2.4 meters)
A
Center height of lamp to ground
B
25 feet (7.6 meters)
C
Horizontal reference line
D
Vertical Aim Adjustment
1. Park the vehicle directly in front of a wall or screen on a level surface,
approximately 25 feet (7.6 meters)
away.
2. Measure the height from the center of your headlamp (indicated by a 3.0
millimeter circle on the lens) to the
ground and mark an 8 foot (2.4 meter)
horizontal reference line on the vertical
wall or screen at this height (a piece of
masking tape works well).
Note: To see a clearer light pattern for
adjusting, you may want to block the light
from one headlamp while adjusting the
other.
3. Turn on the low beam headlamps to illuminate the wall or screen and open
the hood. Cover one of the headlamps
so no light hits the wall. 4.
There is a distinct cut-off (change from
light to dark) in the left portion of the
beam pattern. Position the top edge of
this cut-off 2 inches (5 centimeters)
below the horizontal reference line. 5. Locate the vertical adjuster on each
headlamp. Use a Phillips #2
screwdriver to turn the adjuster either
clockwise or counterclockwise to
adjust the vertical aim of the
headlamp. The horizontal edge of the
brighter light should touch the
horizontal reference line.
6. Repeat Steps 3 through 7 to adjust the
other headlamp.
7. Close the hood and turn off the lamps.
Horizontal Aim Adjustment
Horizontal aim is not required for this
vehicle and is not adjustable.
188
Police Interceptor (CPH), enUSA, Edition date: 10/2015, First Printing MaintenanceE142592 E142465 E167359