sensor FORD POLICE INTERCEPTOR UTILITY 2015 1.G Owner's Manual
[x] Cancel search | Manufacturer: FORD, Model Year: 2015, Model line: POLICE INTERCEPTOR UTILITY, Model: FORD POLICE INTERCEPTOR UTILITY 2015 1.GPages: 398, PDF Size: 6.24 MB
Page 165 of 398
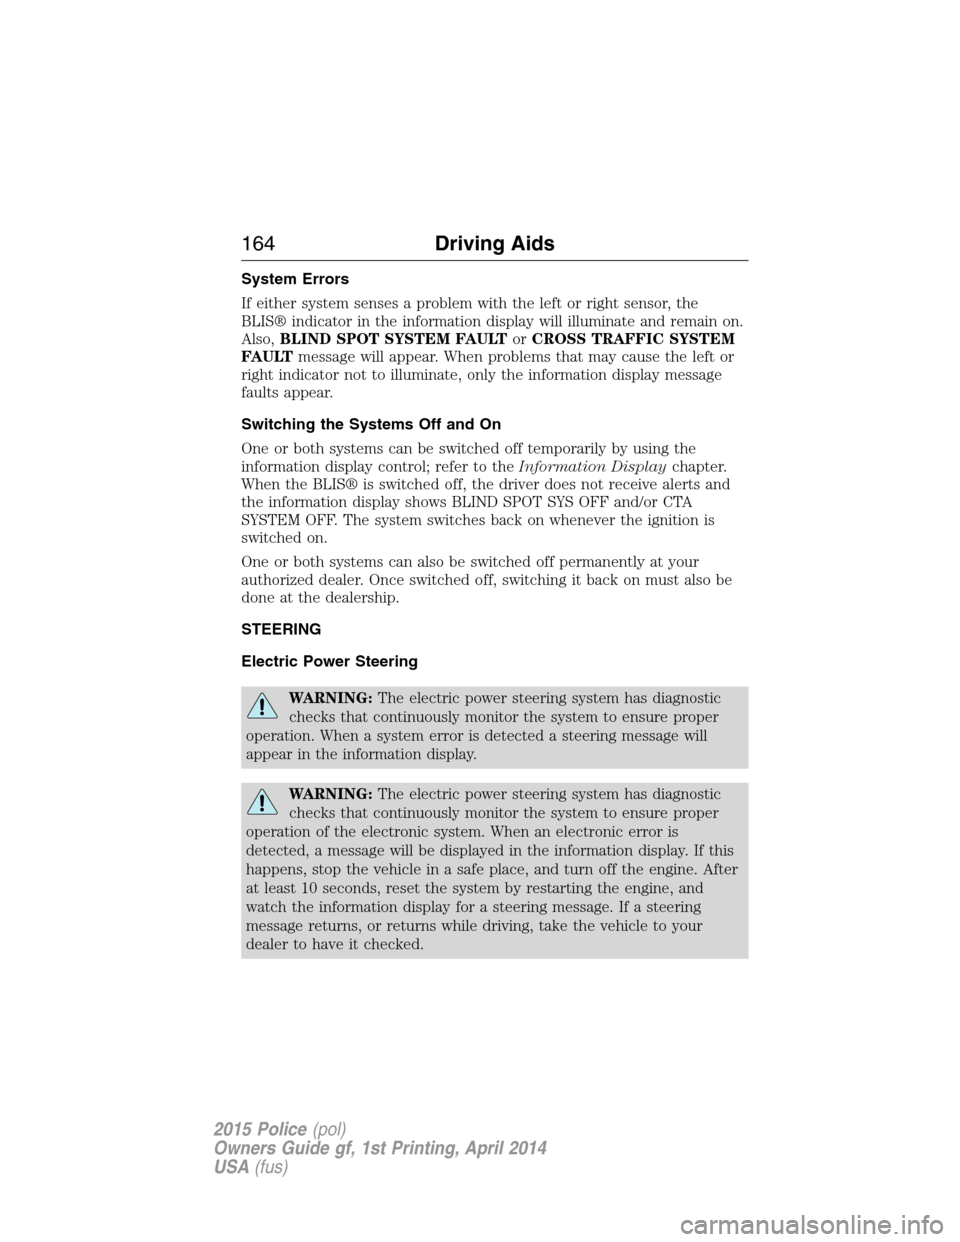
System Errors
If either system senses a problem with the left or right sensor, the
BLIS® indicator in the information display will illuminate and remain on.
Also,BLIND SPOT SYSTEM FAULTorCROSS TRAFFIC SYSTEM
FAULTmessage will appear. When problems that may cause the left or
right indicator not to illuminate, only the information display message
faults appear.
Switching the Systems Off and On
One or both systems can be switched off temporarily by using the
information display control; refer to theInformation Displaychapter.
When the BLIS® is switched off, the driver does not receive alerts and
the information display shows BLIND SPOT SYS OFF and/or CTA
SYSTEM OFF. The system switches back on whenever the ignition is
switched on.
One or both systems can also be switched off permanently at your
authorized dealer. Once switched off, switching it back on must also be
done at the dealership.
STEERING
Electric Power Steering
WARNING:The electric power steering system has diagnostic
checks that continuously monitor the system to ensure proper
operation. When a system error is detected a steering message will
appear in the information display.
WARNING:The electric power steering system has diagnostic
checks that continuously monitor the system to ensure proper
operation of the electronic system. When an electronic error is
detected, a message will be displayed in the information display. If this
happens, stop the vehicle in a safe place, and turn off the engine. After
at least 10 seconds, reset the system by restarting the engine, and
watch the information display for a steering message. If a steering
message returns, or returns while driving, take the vehicle to your
dealer to have it checked.
164Driving Aids
2015 Police(pol)
Owners Guide gf, 1st Printing, April 2014
USA(fus)
Page 205 of 398
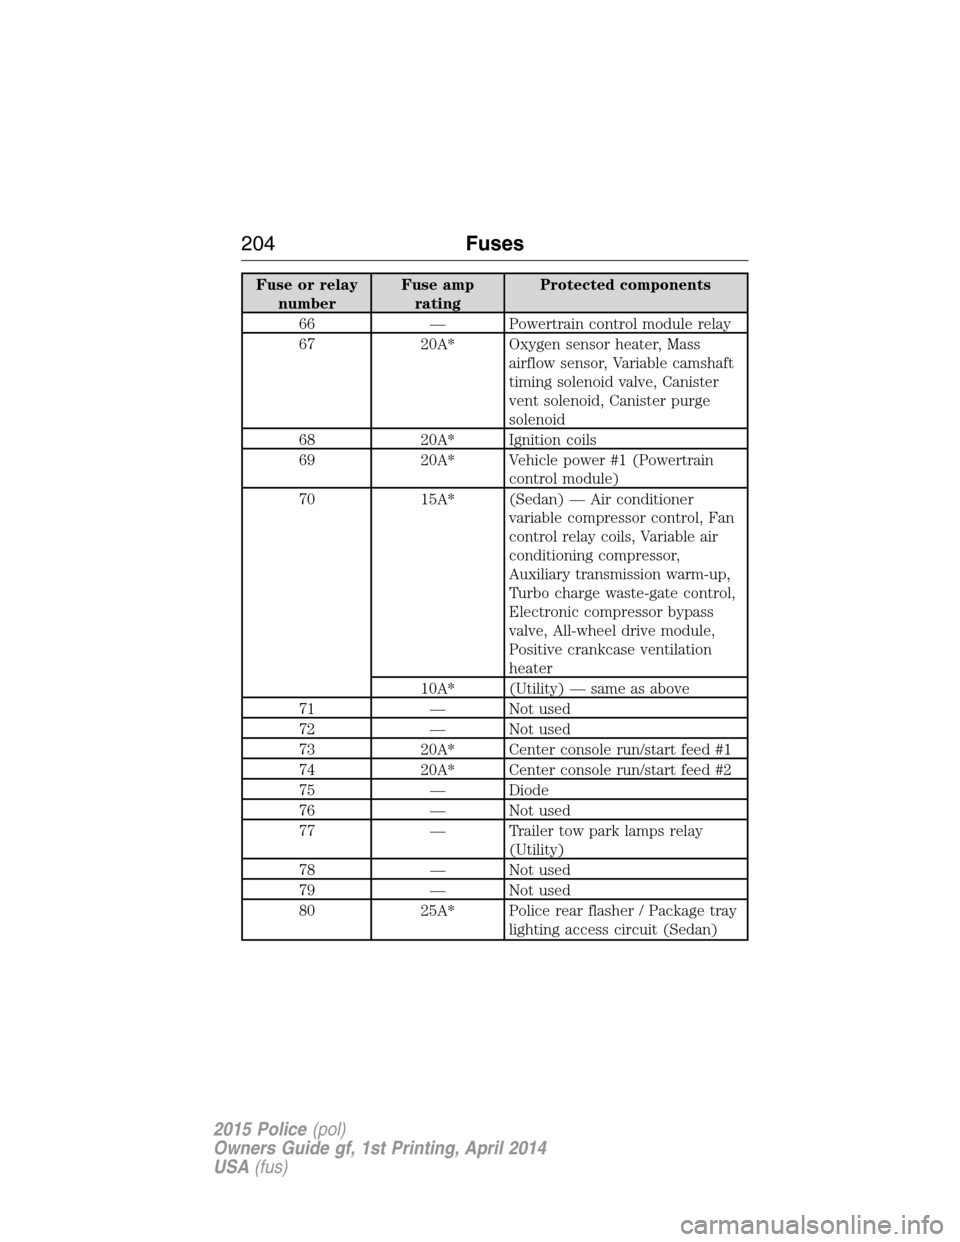
Fuse or relay
numberFuse amp
ratingProtected components
66 — Powertrain control module relay
67 20A* Oxygen sensor heater, Mass
airflow sensor, Variable camshaft
timing solenoid valve, Canister
vent solenoid, Canister purge
solenoid
68 20A* Ignition coils
69 20A* Vehicle power #1 (Powertrain
control module)
70 15A* (Sedan) — Air conditioner
variable compressor control, Fan
control relay coils, Variable air
conditioning compressor,
Auxiliary transmission warm-up,
Turbo charge waste-gate control,
Electronic compressor bypass
valve, All-wheel drive module,
Positive crankcase ventilation
heater
10A* (Utility) — same as above
71 — Not used
72 — Not used
73 20A* Center console run/start feed #1
74 20A* Center console run/start feed #2
75 — Diode
76 — Not used
77 — Trailer tow park lamps relay
(Utility)
78 — Not used
79 — Not used
80 25A* Police rear flasher / Package tray
lighting access circuit (Sedan)
204Fuses
2015 Police(pol)
Owners Guide gf, 1st Printing, April 2014
USA(fus)
Page 209 of 398
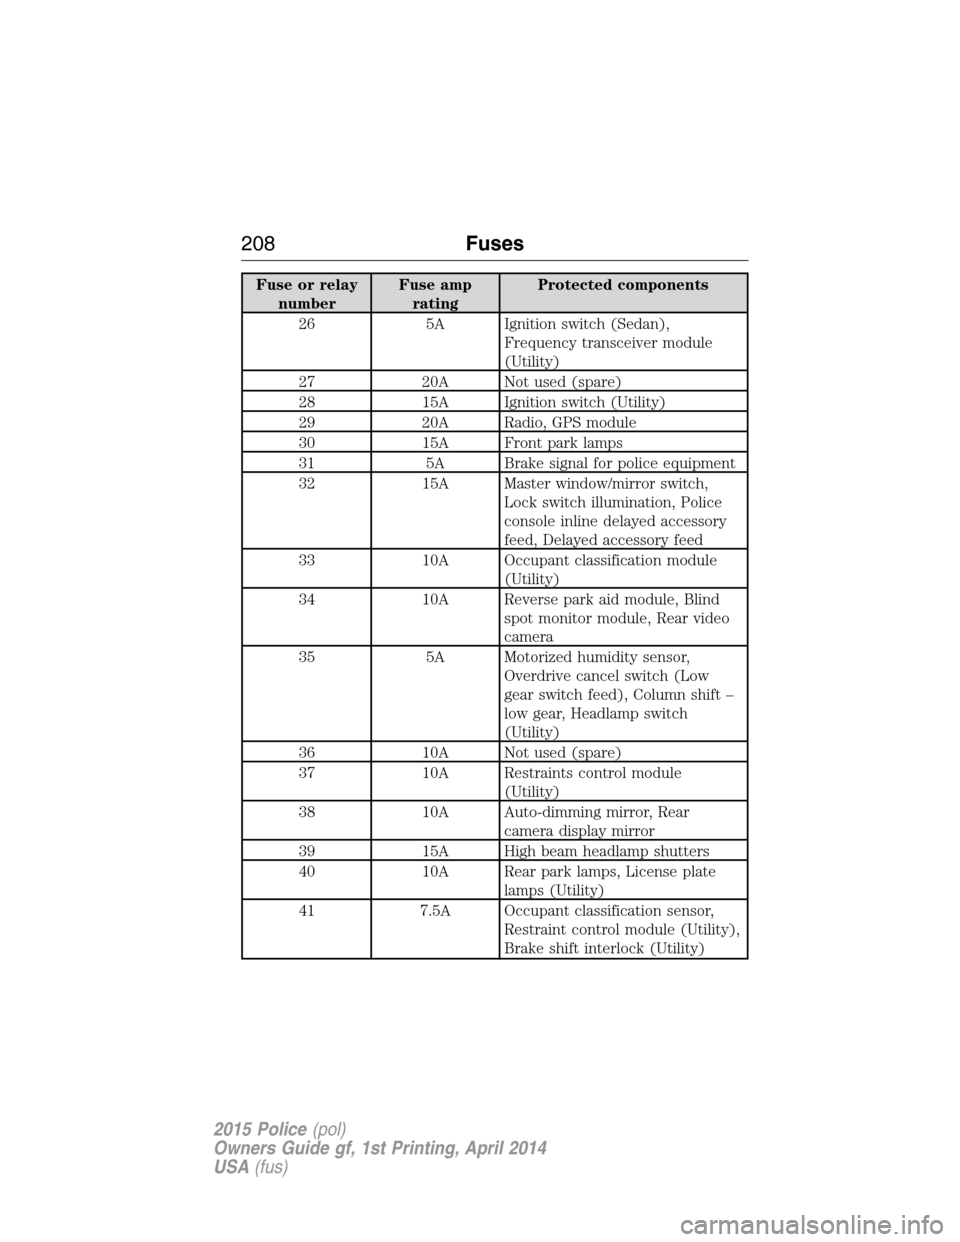
Fuse or relay
numberFuse amp
ratingProtected components
26 5A Ignition switch (Sedan),
Frequency transceiver module
(Utility)
27 20A Not used (spare)
28 15A Ignition switch (Utility)
29 20A Radio, GPS module
30 15A Front park lamps
31 5A Brake signal for police equipment
32 15A Master window/mirror switch,
Lock switch illumination, Police
console inline delayed accessory
feed, Delayed accessory feed
33 10A Occupant classification module
(Utility)
34 10A Reverse park aid module, Blind
spot monitor module, Rear video
camera
35 5A Motorized humidity sensor,
Overdrive cancel switch (Low
gear switch feed), Column shift –
low gear, Headlamp switch
(Utility)
36 10A Not used (spare)
37 10A Restraints control module
(Utility)
38 10A Auto-dimming mirror, Rear
camera display mirror
39 15A High beam headlamp shutters
40 10A Rear park lamps, License plate
lamps (Utility)
41 7.5A Occupant classification sensor,
Restraint control module (Utility),
Brake shift interlock (Utility)
208Fuses
2015 Police(pol)
Owners Guide gf, 1st Printing, April 2014
USA(fus)
Page 226 of 398
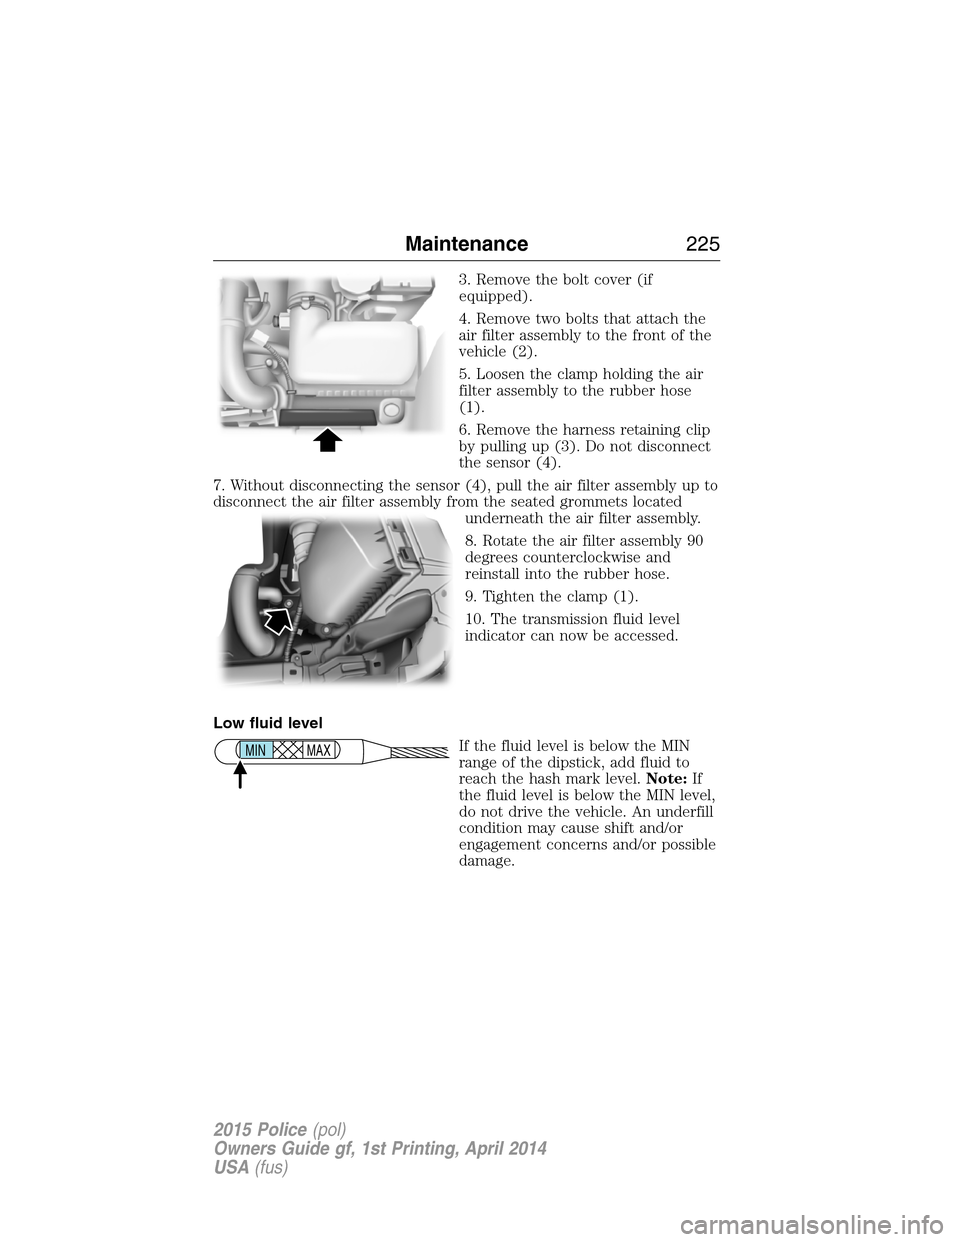
3. Remove the bolt cover (if
equipped).
4. Remove two bolts that attach the
air filter assembly to the front of the
vehicle (2).
5. Loosen the clamp holding the air
filter assembly to the rubber hose
(1).
6. Remove the harness retaining clip
by pulling up (3). Do not disconnect
the sensor (4).
7. Without disconnecting the sensor (4), pull the air filter assembly up to
disconnect the air filter assembly from the seated grommets located
underneath the air filter assembly.
8. Rotate the air filter assembly 90
degrees counterclockwise and
reinstall into the rubber hose.
9. Tighten the clamp (1).
10. The transmission fluid level
indicator can now be accessed.
Low fluid level
If the fluid level is below the MIN
range of the dipstick, add fluid to
reach the hash mark level.Note:If
the fluid level is below the MIN level,
do not drive the vehicle. An underfill
condition may cause shift and/or
engagement concerns and/or possible
damage.
MAX MIN
Maintenance225
2015 Police(pol)
Owners Guide gf, 1st Printing, April 2014
USA(fus)
Page 272 of 398
WARNING:To reduce the risk of serious injury, when mounting
replacement tires and wheels, you should not exceed the
maximum pressure indicated on the sidewall of the tire to set the beads
without additional precautions listed below. If the beads do not seat at
the maximum pressure indicated, re-lubricate and try again.
When inflating the tire for mounting pressures up to 20 psi (1.38 bar)
greater than the maximum pressure on the tire sidewall, the following
precautions must be taken to protect the person mounting the tire:
1. Make sure that you have the correct tire and wheel size.
2. Lubricate the tire bead and wheel bead seat area again.
3. Stand at a minimum of 12 feet (3.66 meters) away from the tire
wheel assembly.
4. Use both eye and ear protection.
For a mounting pressure more than 20 psi (1.38 bar) greater than the
maximum pressure, a Ford dealer or other tire service professional
should do the mounting.
Always inflate steel carcass tires with a remote air fill with the person
inflating standing at a minimum of 12 feet (3.66 meters) away from the
tire wheel assembly.
Your vehicle is equipped with tires designed to provide a safe ride and
handling capability.
Important:Remember to replace the wheel valve stems when the road
tires are replaced on your vehicle.
The two front tires or two rear tires should generally be replaced as a
pair.
The tire pressure sensors mounted in the wheels (originally installed on
your vehicle) are not designed to be used in aftermarket wheels.
The use of wheels or tires not recommended by Ford Motor Company
may affect the operation of your tire pressure monitoring system.
If the tire pressure monitoring system indicator is flashing, the system is
malfunctioning. Your replacement tire might be incompatible with your
tire pressure monitoring system, or some component of the system may
be damaged.
Wheels and Tires271
2015 Police(pol)
Owners Guide gf, 1st Printing, April 2014
USA(fus)
Page 279 of 398
Changing Tires with a Tire Pressure Monitoring System
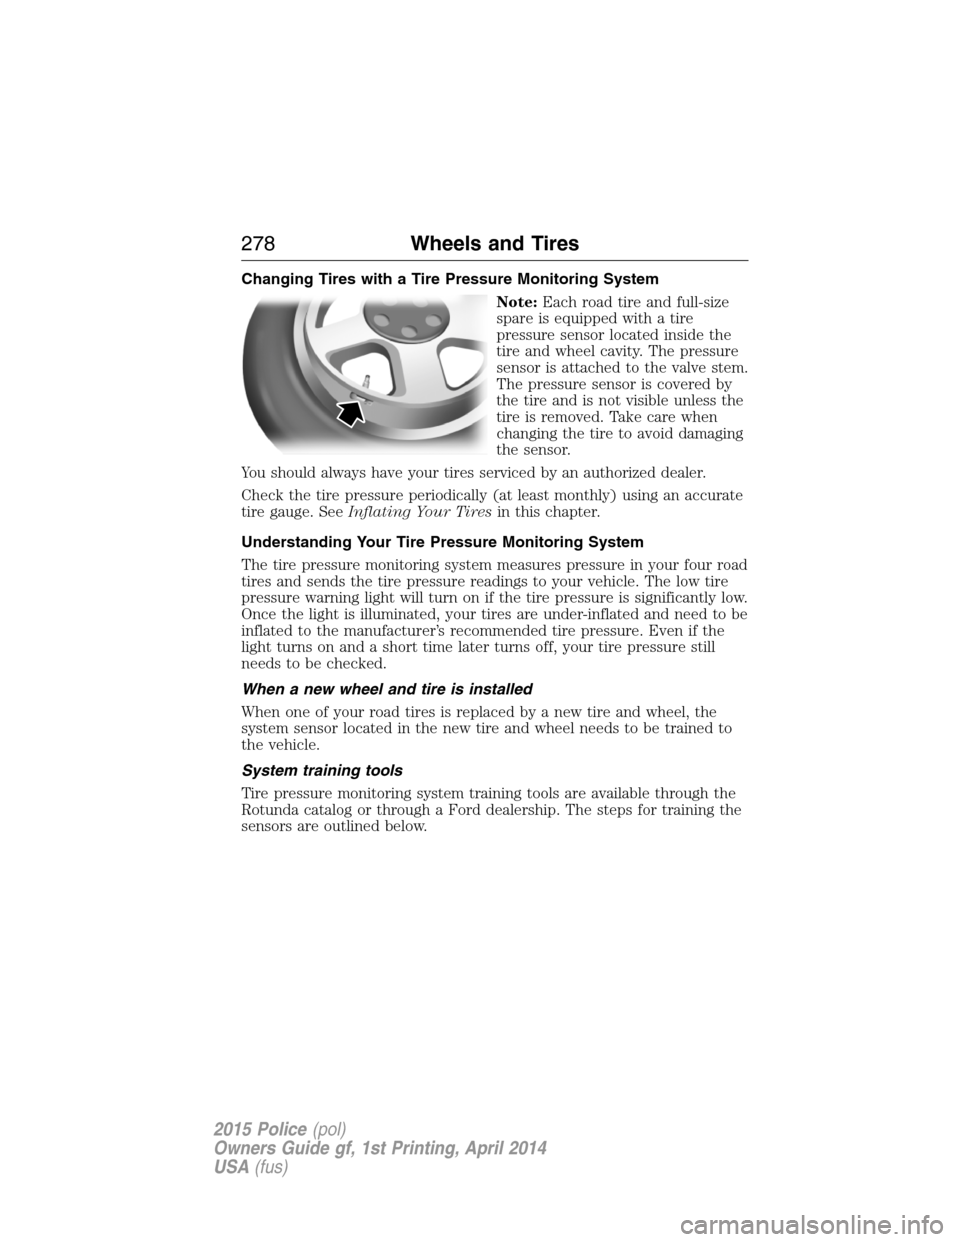
Note:Each road tire and full-size
spare is equipped with a tire
pressure sensor located inside the
tire and wheel cavity. The pressure
sensor is attached to the valve stem.
The pressure sensor is covered by
the tire and is not visible unless the
tire is removed. Take care when
changing the tire to avoid damaging
the sensor.
You should always have your tires serviced by an authorized dealer.
Check the tire pressure periodically (at least monthly) using an accurate
tire gauge. SeeInflating Your Tiresin this chapter.
Understanding Your Tire Pressure Monitoring System
The tire pressure monitoring system measures pressure in your four road
tires and sends the tire pressure readings to your vehicle. The low tire
pressure warning light will turn on if the tire pressure is significantly low.
Once the light is illuminated, your tires are under-inflated and need to be
inflated to the manufacturer’s recommended tire pressure. Even if the
light turns on and a short time later turns off, your tire pressure still
needs to be checked.
When a new wheel and tire is installed
When one of your road tires is replaced by a new tire and wheel, the
system sensor located in the new tire and wheel needs to be trained to
the vehicle.
System training tools
Tire pressure monitoring system training tools are available through the
Rotunda catalog or through a Ford dealership. The steps for training the
sensors are outlined below.
278Wheels and Tires
2015 Police(pol)
Owners Guide gf, 1st Printing, April 2014
USA(fus)
Page 280 of 398
System sensor training procedure
Note:To reduce the chances of interference from another vehicle,
system training should be performed at least three feet (one meter)
away from another Ford Motor Company vehicle undergoing the system
training procedure at the same time.
Note:Do not wait more than two minutes between resetting each tire
sensor or the system will time-out and the entire procedure will have to
be repeated on all four wheels.
A double horn chirp indicates the need to repeat the procedure.
System training procedure
Note:It is recommended that you read the entire procedure before
attempting.
Note:To enter the training mode, Steps 1–6 must be completed within
60 seconds.
1. Place the ignition in the off position and keep the key in the ignition.
2. Press and release the brake pedal.
3. Cycle the ignition from off to on three times ending in the on position
- Do not start the engine.
4. Press and hold the brake pedal for two seconds, then release.
5. Turn the ignition to off - Do not remove the key.
6. Cycle the ignition from off to on three times ending in on - Do not
start the engine.
If the training mode has been entered successfully, the horn will sound
once, the system indicator will flash, and the information display will
show TRAIN LF TIRE.
If after repeated attempts to enter the training mode, the horn does not
sound, the system indicator does not flash, and the information display
does not show TRAIN LF TIRE, seek service from your authorized
dealer.
Wheels and Tires279
2015 Police(pol)
Owners Guide gf, 1st Printing, April 2014
USA(fus)
Page 281 of 398
Training procedure
Note:It may take up to six seconds to activate a tire pressure sensor.
During this time, the tool must remain in place at the valve stem.
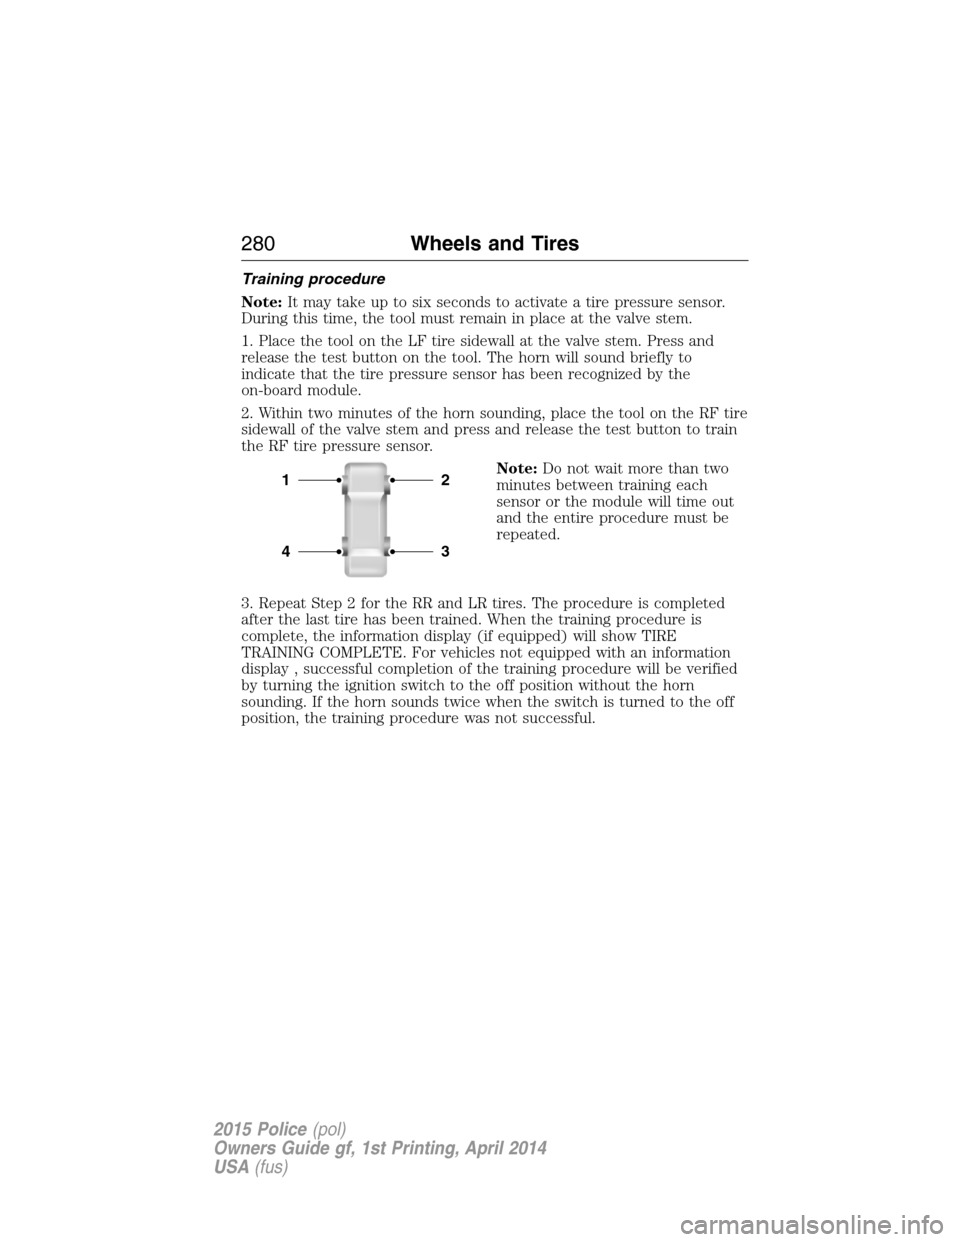
1. Place the tool on the LF tire sidewall at the valve stem. Press and
release the test button on the tool. The horn will sound briefly to
indicate that the tire pressure sensor has been recognized by the
on-board module.
2. Within two minutes of the horn sounding, place the tool on the RF tire
sidewall of the valve stem and press and release the test button to train
the RF tire pressure sensor.
Note:Do not wait more than two
minutes between training each
sensor or the module will time out
and the entire procedure must be
repeated.
3. Repeat Step 2 for the RR and LR tires. The procedure is completed
after the last tire has been trained. When the training procedure is
complete, the information display (if equipped) will show TIRE
TRAINING COMPLETE. For vehicles not equipped with an information
display , successful completion of the training procedure will be verified
by turning the ignition switch to the off position without the horn
sounding. If the horn sounds twice when the switch is turned to the off
position, the training procedure was not successful.
21
43
280Wheels and Tires
2015 Police(pol)
Owners Guide gf, 1st Printing, April 2014
USA(fus)
Page 282 of 398
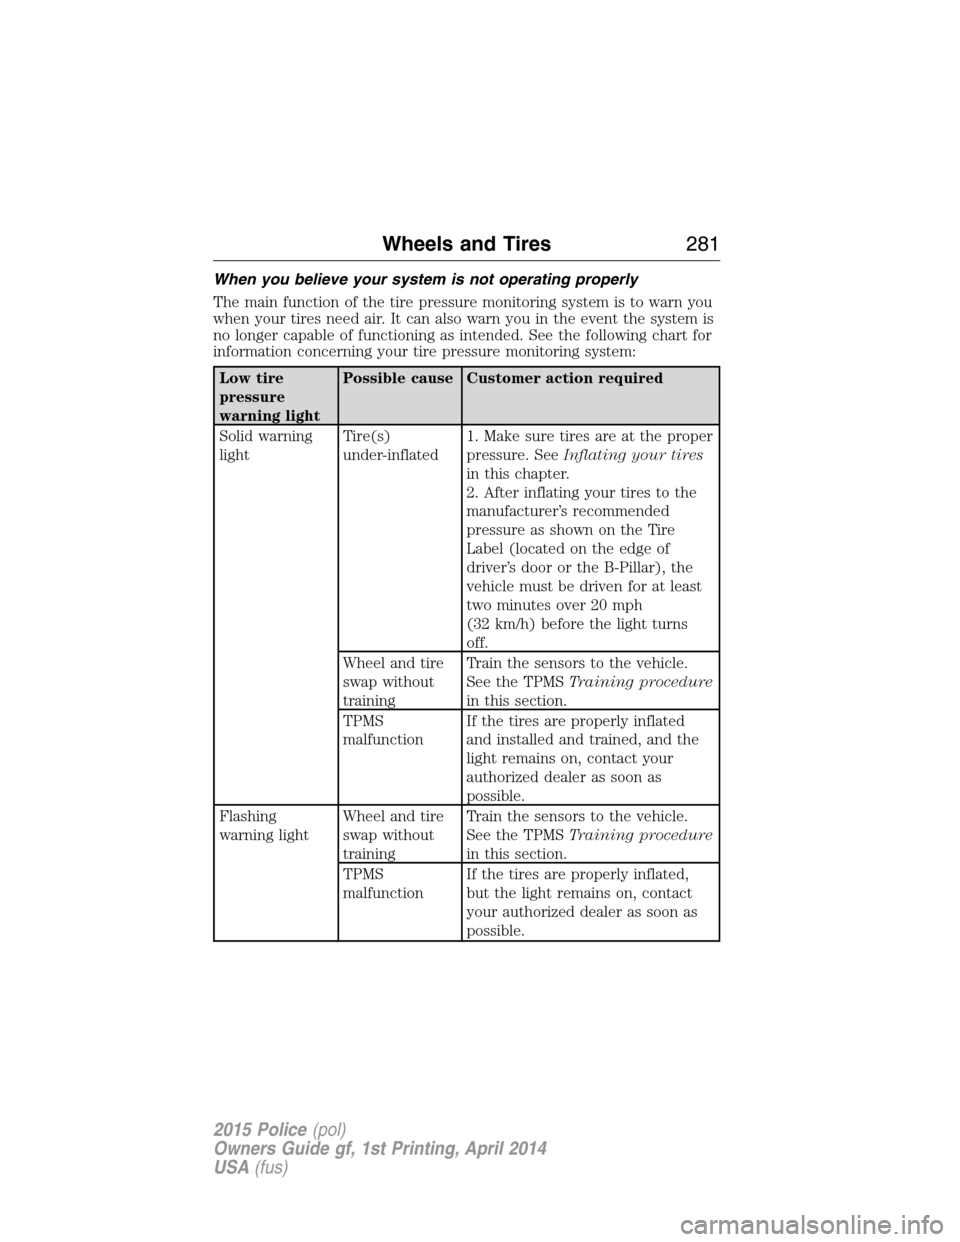
When you believe your system is not operating properly
The main function of the tire pressure monitoring system is to warn you
when your tires need air. It can also warn you in the event the system is
no longer capable of functioning as intended. See the following chart for
information concerning your tire pressure monitoring system:
Low tire
pressure
warning lightPossible cause Customer action required
Solid warning
lightTire(s)
under-inflated1. Make sure tires are at the proper
pressure. SeeInflating your tires
in this chapter.
2. After inflating your tires to the
manufacturer’s recommended
pressure as shown on the Tire
Label (located on the edge of
driver’s door or the B-Pillar), the
vehicle must be driven for at least
two minutes over 20 mph
(32 km/h) before the light turns
off.
Wheel and tire
swap without
trainingTrain the sensors to the vehicle.
See the TPMSTraining procedure
in this section.
TPMS
malfunctionIf the tires are properly inflated
and installed and trained, and the
light remains on, contact your
authorized dealer as soon as
possible.
Flashing
warning lightWheel and tire
swap without
trainingTrain the sensors to the vehicle.
See the TPMSTraining procedure
in this section.
TPMS
malfunctionIf the tires are properly inflated,
but the light remains on, contact
your authorized dealer as soon as
possible.
Wheels and Tires281
2015 Police(pol)
Owners Guide gf, 1st Printing, April 2014
USA(fus)
Page 283 of 398
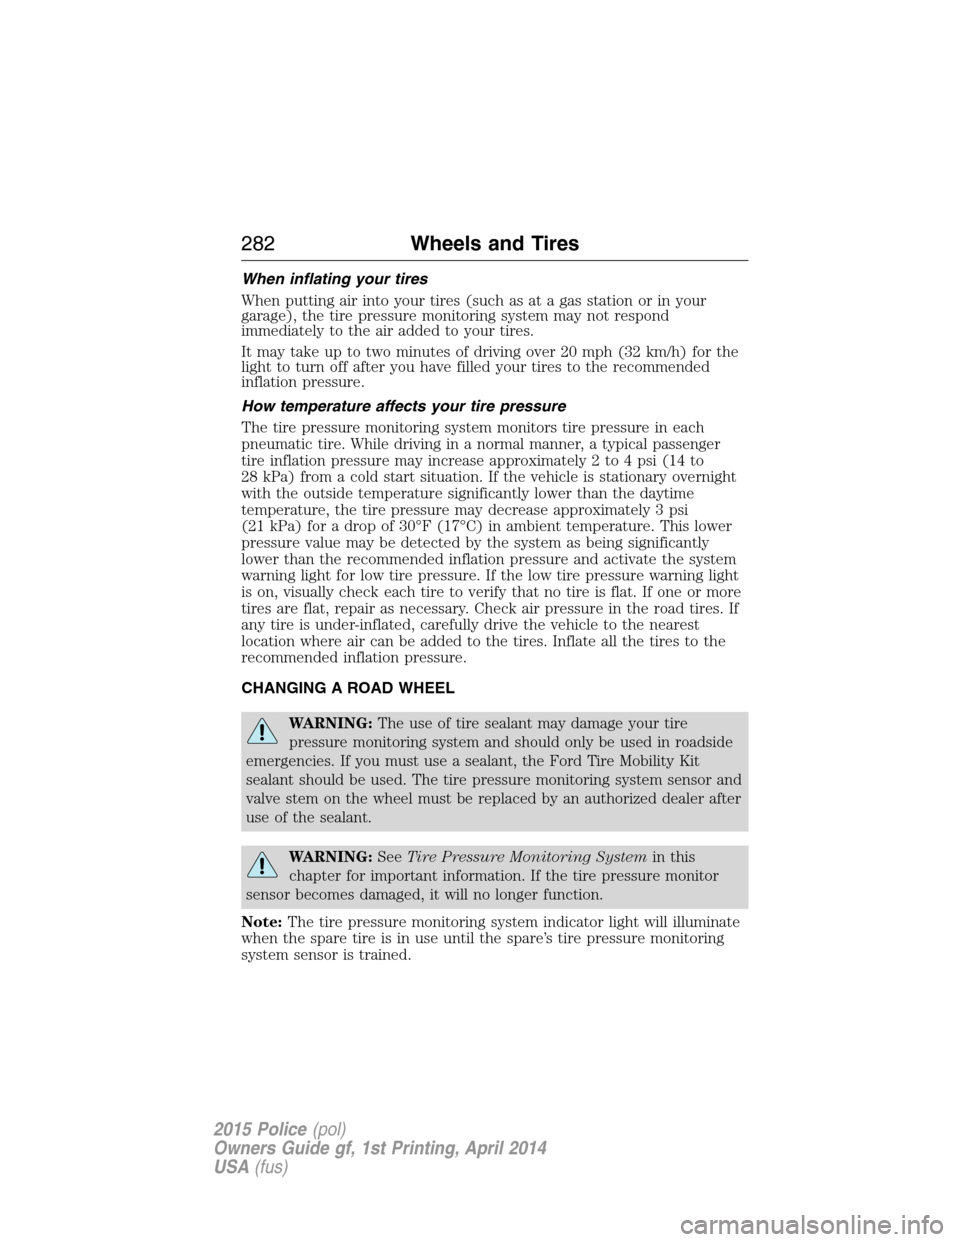
When inflating your tires
When putting air into your tires (such as at a gas station or in your
garage), the tire pressure monitoring system may not respond
immediately to the air added to your tires.
It may take up to two minutes of driving over 20 mph (32 km/h) for the
light to turn off after you have filled your tires to the recommended
inflation pressure.
How temperature affects your tire pressure
The tire pressure monitoring system monitors tire pressure in each
pneumatic tire. While driving in a normal manner, a typical passenger
tire inflation pressure may increase approximately 2 to 4 psi (14 to
28 kPa) from a cold start situation. If the vehicle is stationary overnight
with the outside temperature significantly lower than the daytime
temperature, the tire pressure may decrease approximately 3 psi
(21 kPa) for a drop of 30°F (17°C) in ambient temperature. This lower
pressure value may be detected by the system as being significantly
lower than the recommended inflation pressure and activate the system
warning light for low tire pressure. If the low tire pressure warning light
is on, visually check each tire to verify that no tire is flat. If one or more
tires are flat, repair as necessary. Check air pressure in the road tires. If
any tire is under-inflated, carefully drive the vehicle to the nearest
location where air can be added to the tires. Inflate all the tires to the
recommended inflation pressure.
CHANGING A ROAD WHEEL
WARNING:The use of tire sealant may damage your tire
pressure monitoring system and should only be used in roadside
emergencies. If you must use a sealant, the Ford Tire Mobility Kit
sealant should be used. The tire pressure monitoring system sensor and
valve stem on the wheel must be replaced by an authorized dealer after
use of the sealant.
WARNING:SeeTire Pressure Monitoring Systemin this
chapter for important information. If the tire pressure monitor
sensor becomes damaged, it will no longer function.
Note:The tire pressure monitoring system indicator light will illuminate
when the spare tire is in use until the spare’s tire pressure monitoring
system sensor is trained.
282Wheels and Tires
2015 Police(pol)
Owners Guide gf, 1st Printing, April 2014
USA(fus)