light FORD POLICE INTERCEPTOR UTILITY 2015 1.G Workshop Manual
[x] Cancel search | Manufacturer: FORD, Model Year: 2015, Model line: POLICE INTERCEPTOR UTILITY, Model: FORD POLICE INTERCEPTOR UTILITY 2015 1.GPages: 398, PDF Size: 6.24 MB
Page 186 of 398
•Add particular accessories to your vehicle (e.g.; bug deflectors,
rollbars or light bars, running boards, ski racks).
•Drive with the wheels out of alignment.
DRIVING THROUGH WATER
WARNING:Drive through water in an emergency only, and not
as part of normal driving.
WARNING:Engine damage can occur if water enters the air
filter.
Note:Driving through deep water may allow water into the transmission
or air intake and can cause internal vehicle damage or cause it to stall.
Note:Once through the water, always dry the brakes by moving your
vehicle slowly while applying light pressure on the brake pedal.
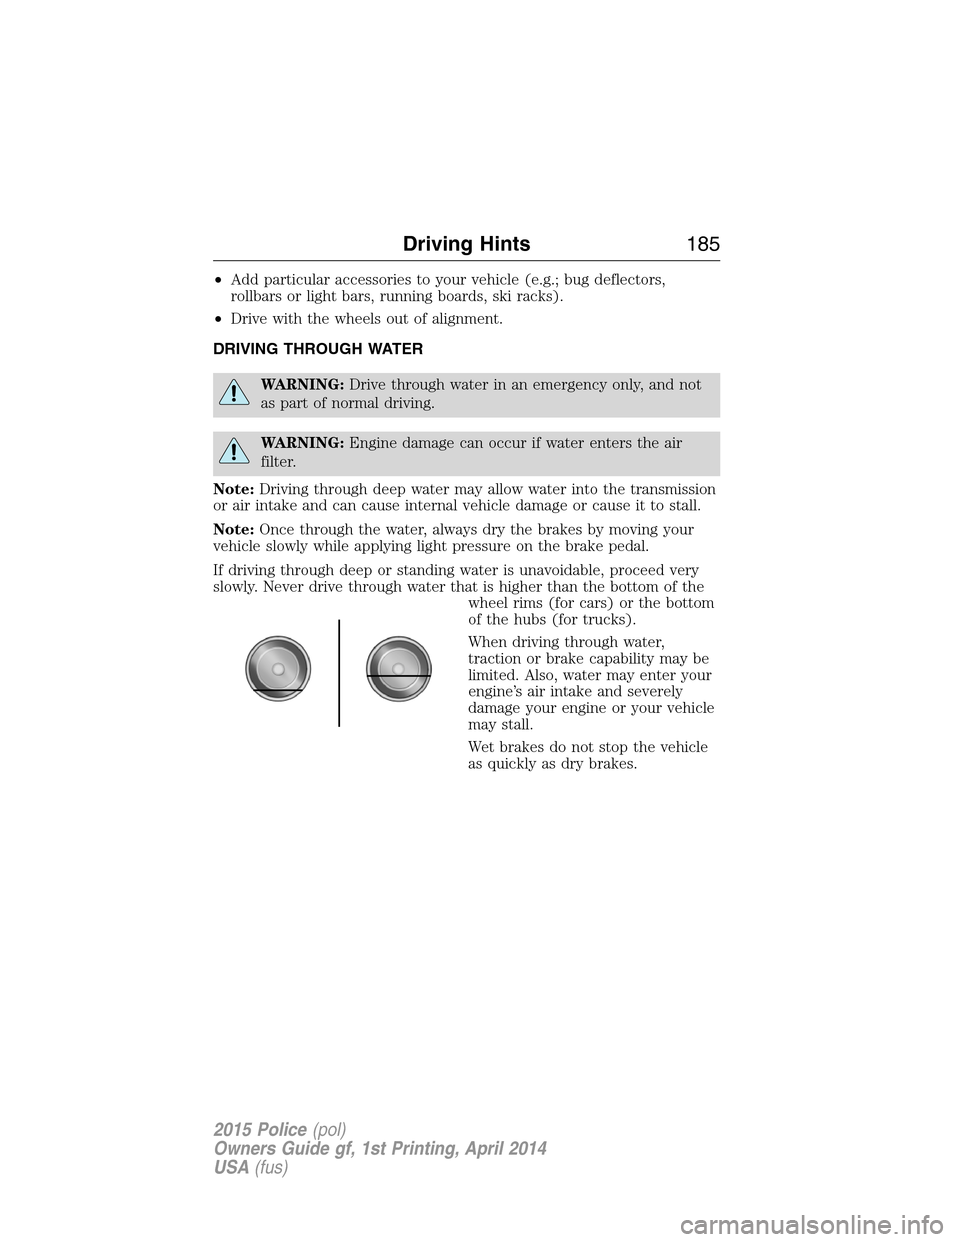
If driving through deep or standing water is unavoidable, proceed very
slowly. Never drive through water that is higher than the bottom of the
wheel rims (for cars) or the bottom
of the hubs (for trucks).
When driving through water,
traction or brake capability may be
limited. Also, water may enter your
engine’s air intake and severely
damage your engine or your vehicle
may stall.
Wet brakes do not stop the vehicle
as quickly as dry brakes.
Driving Hints185
2015 Police(pol)
Owners Guide gf, 1st Printing, April 2014
USA(fus)
Page 205 of 398
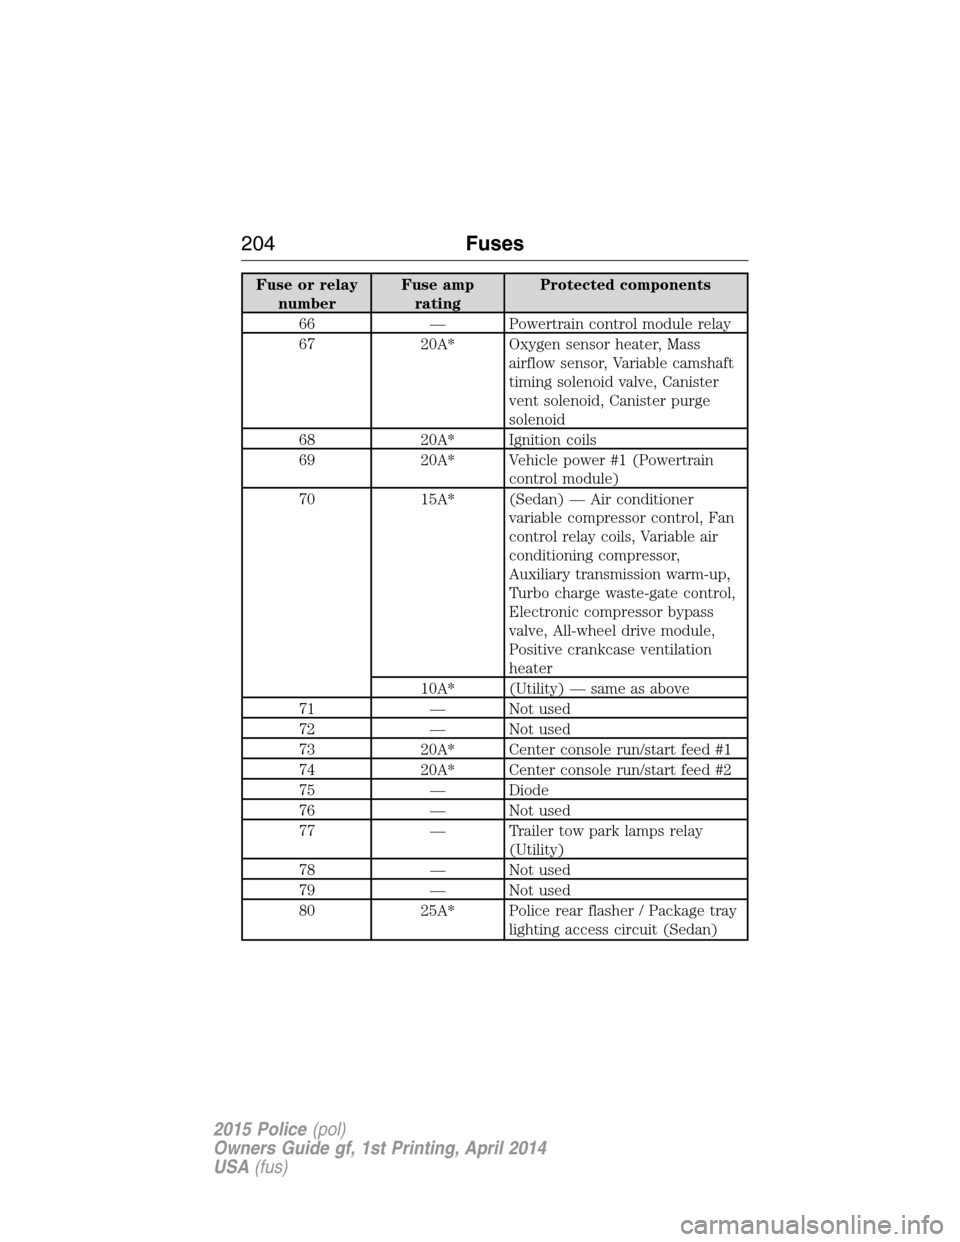
Fuse or relay
numberFuse amp
ratingProtected components
66 — Powertrain control module relay
67 20A* Oxygen sensor heater, Mass
airflow sensor, Variable camshaft
timing solenoid valve, Canister
vent solenoid, Canister purge
solenoid
68 20A* Ignition coils
69 20A* Vehicle power #1 (Powertrain
control module)
70 15A* (Sedan) — Air conditioner
variable compressor control, Fan
control relay coils, Variable air
conditioning compressor,
Auxiliary transmission warm-up,
Turbo charge waste-gate control,
Electronic compressor bypass
valve, All-wheel drive module,
Positive crankcase ventilation
heater
10A* (Utility) — same as above
71 — Not used
72 — Not used
73 20A* Center console run/start feed #1
74 20A* Center console run/start feed #2
75 — Diode
76 — Not used
77 — Trailer tow park lamps relay
(Utility)
78 — Not used
79 — Not used
80 25A* Police rear flasher / Package tray
lighting access circuit (Sedan)
204Fuses
2015 Police(pol)
Owners Guide gf, 1st Printing, April 2014
USA(fus)
Page 206 of 398
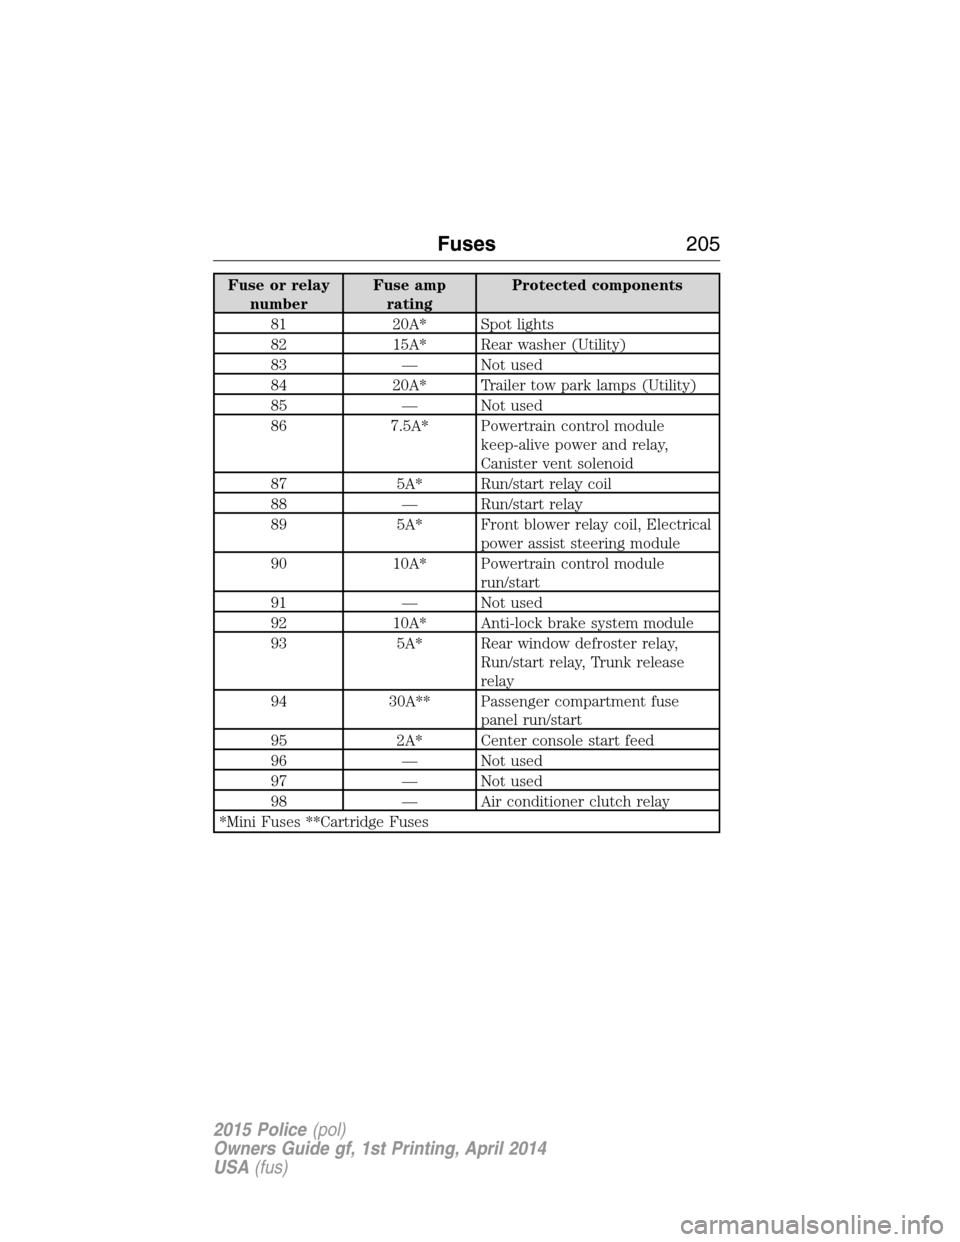
Fuse or relay
numberFuse amp
ratingProtected components
81 20A* Spot lights
82 15A* Rear washer (Utility)
83 — Not used
84 20A* Trailer tow park lamps (Utility)
85 — Not used
86 7.5A* Powertrain control module
keep-alive power and relay,
Canister vent solenoid
87 5A* Run/start relay coil
88 — Run/start relay
89 5A* Front blower relay coil, Electrical
power assist steering module
90 10A* Powertrain control module
run/start
91 — Not used
92 10A* Anti-lock brake system module
93 5A* Rear window defroster relay,
Run/start relay, Trunk release
relay
94 30A** Passenger compartment fuse
panel run/start
95 2A* Center console start feed
96 — Not used
97 — Not used
98 — Air conditioner clutch relay
*Mini Fuses **Cartridge Fuses
Fuses205
2015 Police(pol)
Owners Guide gf, 1st Printing, April 2014
USA(fus)
Page 208 of 398
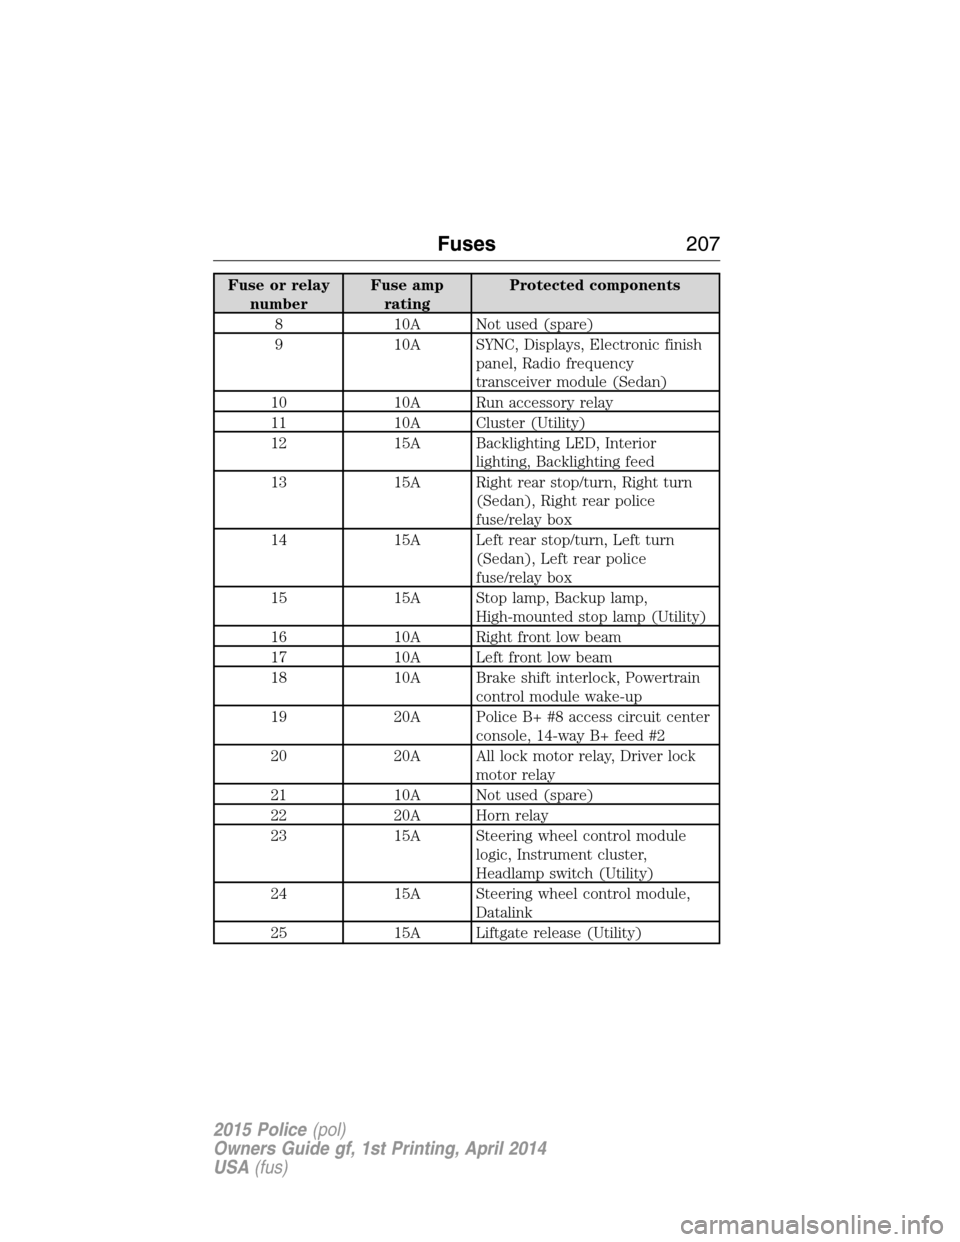
Fuse or relay
numberFuse amp
ratingProtected components
8 10A Not used (spare)
9 10A SYNC, Displays, Electronic finish
panel, Radio frequency
transceiver module (Sedan)
10 10A Run accessory relay
11 10A Cluster (Utility)
12 15A Backlighting LED, Interior
lighting, Backlighting feed
13 15A Right rear stop/turn, Right turn
(Sedan), Right rear police
fuse/relay box
14 15A Left rear stop/turn, Left turn
(Sedan), Left rear police
fuse/relay box
15 15A Stop lamp, Backup lamp,
High-mounted stop lamp (Utility)
16 10A Right front low beam
17 10A Left front low beam
18 10A Brake shift interlock, Powertrain
control module wake-up
19 20A Police B+ #8 access circuit center
console, 14-way B+ feed #2
20 20A All lock motor relay, Driver lock
motor relay
21 10A Not used (spare)
22 20A Horn relay
23 15A Steering wheel control module
logic, Instrument cluster,
Headlamp switch (Utility)
24 15A Steering wheel control module,
Datalink
25 15A Liftgate release (Utility)
Fuses207
2015 Police(pol)
Owners Guide gf, 1st Printing, April 2014
USA(fus)
Page 220 of 398
WARNING:Do not put engine coolant in the windshield washer
fluid container. If sprayed on the windshield, engine coolant
could make it difficult to see through the windshield.
WARNING:To reduce the risk of personal injury, make sure the
engine is cool before unscrewing the coolant pressure relief cap.
The cooling system is under pressure; steam and hot liquid can come
out forcefully when the cap is loosened slightly.
WARNING:Do not add coolant further than the MAX mark.
Note:Do not use stop leak pellets, cooling system sealants or additives
as they can cause damage to the engine cooling or heating systems. This
damage would not be covered under your vehicle’s warranty.
Note:During normal vehicle operation, the engine coolant may change
color from orange to pink or light red. As long as the engine coolant is
clear and uncontaminated, this color change does not indicate the engine
coolant has degraded nor does it require the engine coolant to be
drained, the system to be flushed, or the engine coolant to be replaced.
•DO NOT MIX different colors or types of coolant in your vehicle. Make
sure the correct coolant is used. Mixing of engine coolants may harm
your engine’s cooling system. The use of an improper coolant may
harm engine and cooling system components and may void the
warranty.
•In case of emergency, a large amount of water without engine coolant
may be added in order to reach a vehicle service location. In this
instance, the cooling system must be drained, chemically cleaned with
Motorcraft Premium Cooling System Flush, and refilled with engine
coolant as soon as possible. Water alone (without engine coolant) can
cause engine damage from corrosion, overheating or freezing.
•Do not use alcohol, methanol, brine or any engine coolants mixed with
alcohol or methanol antifreeze (coolant). Alcohol and other liquids can
cause engine damage from overheating or freezing.
•Do not add extra inhibitors or additives to the coolant. These can be
harmful and compromise the corrosion protection of the engine
coolant.
Unscrew the cap slowly. Any pressure will escape as you unscrew the cap.
Maintenance219
2015 Police(pol)
Owners Guide gf, 1st Printing, April 2014
USA(fus)
Page 222 of 398
Your vehicle has been designed to pull a trailer, but because of the added
load, the vehicle’s engine may temporarily reach higher temperatures
during severe operating conditions such as ascending a long or steep
grade while pulling a trailer in hot ambient temperatures.
At this time, you may notice your engine coolant temperature gauge
needle move toward the H (hot) and the POWER REDUCED TO LOWER
TEMP message may appear on the message center.
You may notice a reduction in the vehicle’s speed caused by reduced
engine power. Your vehicle has been designed to enter this mode if
certain high temperature/high load conditions take place in order to
manage the engine’s fluid temperatures. The amount of speed reduction
will depend on the vehicle loading, towing, grade, ambient temperature,
and other factors. If this occurs, there is no need to pull off the road.
The vehicle can continue to be driven while this message is active.
The air conditioning may also cycle on and off during severe operating
conditions to protect overheating of the engine. When the engine coolant
temperature decreases to a more normal operating temperature, the air
conditioning will turn on once again.
If you notice any of the following:
•
the engine coolant temperature gauge moves fully into the red (hot) area
•the coolant temperature warning light illuminates
•the service engine soon indicator illuminates
1. Pull off the road as soon as safely possible and place the vehicle in P
(Park).
2. Leave the engine running until the coolant temperature gauge needle
moves away from the H range. After several minutes, if this does not
happen, follow the remaining steps.
3. Turn the engine off and wait for it to cool before checking the coolant
level.
WARNING:Never remove the coolant reservoir cap while the
engine is running or hot.
4. If the coolant level is normal, you may restart your engine and
continue on.
5. If the coolant is low, add coolant, restart the engine and take your
vehicle to an authorized dealer. SeeAdding engine coolantin this
chapter for more information.
Refer to fail-safe cooling for additional information.
Maintenance221
2015 Police(pol)
Owners Guide gf, 1st Printing, April 2014
USA(fus)
Page 229 of 398
WASHER FLUID CHECK
WARNING:If you operate your vehicle in temperatures below
40°F (5°C), use washer fluid with antifreeze protection. Failure
to use washer fluid with antifreeze protection in cold weather could
result in impaired windshield vision and increase the risk of injury or
accident.
Add fluid to fill the reservoir if the level is low. Only use a washer fluid
that meets Ford specifications. See the technical specifications chart in
theCapacities and Specificationschapter.
Note:The front and rear washer systems are supplied from the same
reservoir.
State or local regulations on volatile organic compounds may restrict the
use of methanol, a common windshield washer antifreeze additive.
Washer fluids containing non-methanol antifreeze agents should be used
only if they provide cold weather protection without damaging the
vehicle’s paint finish, wiper blades or washer system.
CHANGING THE VEHICLE BATTERY
WARNING:Batteries normally produce explosive gases which
can cause personal injury. Therefore, do not allow flames, sparks
or lighted substances to come near the battery. When working near the
battery, always shield your face and protect your eyes. Always provide
proper ventilation.
WARNING:When lifting a plastic-cased battery, excessive
pressure on the end walls could cause acid to flow through the
vent caps, resulting in personal injury and/or damage to the vehicle or
battery. Lift the battery with a battery carrier or with your hands on
opposite corners.
228Maintenance
2015 Police(pol)
Owners Guide gf, 1st Printing, April 2014
USA(fus)
Page 235 of 398
ADJUSTING THE HEADLAMPS
The headlamps on your vehicle are properly aimed at the assembly plant.
If your vehicle has been in an accident, an authorized dealer should
check the alignment of your headlamps.
Vertical Aim Adjustment
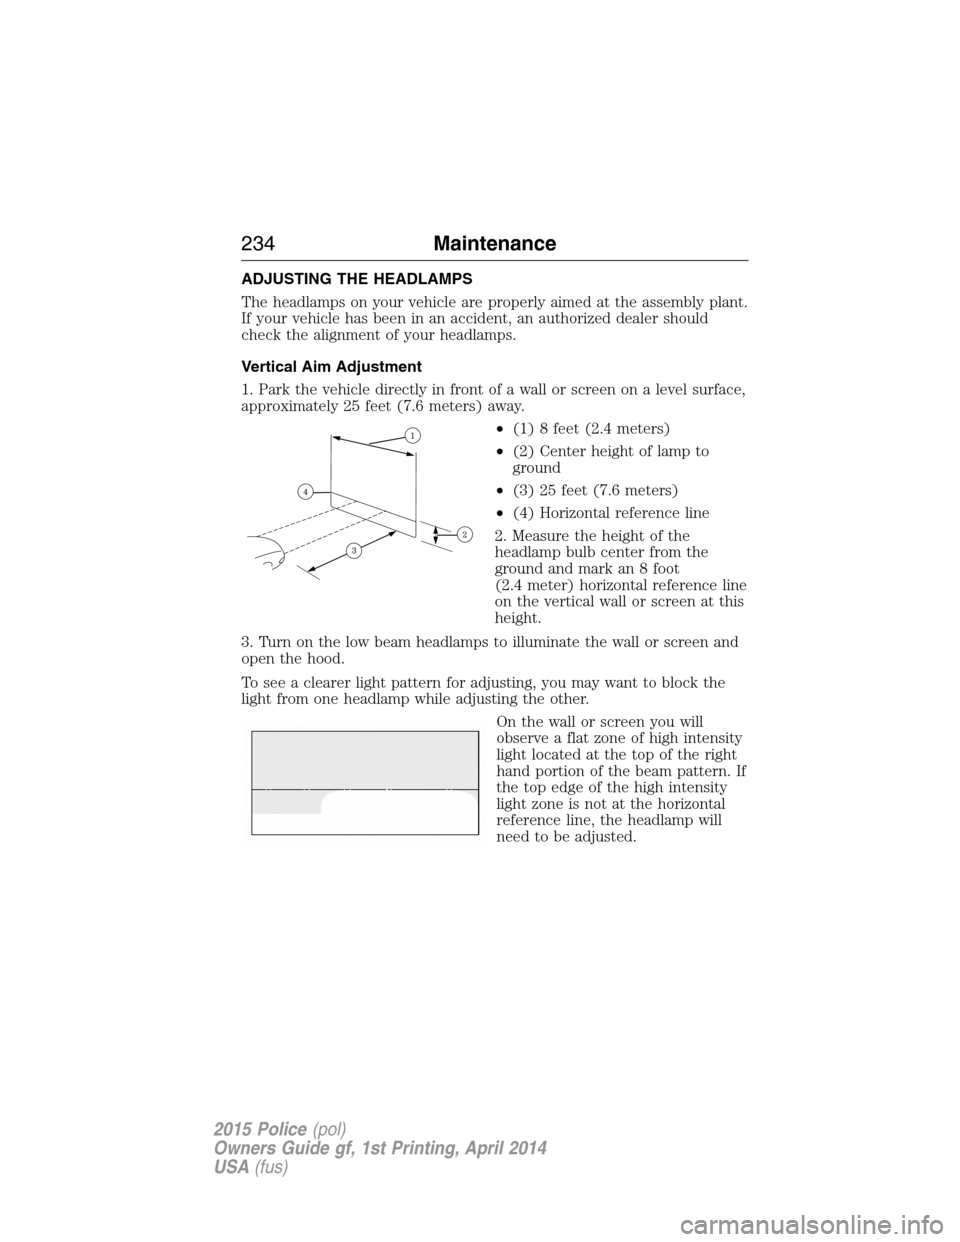
1. Park the vehicle directly in front of a wall or screen on a level surface,
approximately 25 feet (7.6 meters) away.
•(1) 8 feet (2.4 meters)
•(2) Center height of lamp to
ground
•(3) 25 feet (7.6 meters)
•(4) Horizontal reference line
2. Measure the height of the
headlamp bulb center from the
ground and mark an 8 foot
(2.4 meter) horizontal reference line
on the vertical wall or screen at this
height.
3. Turn on the low beam headlamps to illuminate the wall or screen and
open the hood.
To see a clearer light pattern for adjusting, you may want to block the
light from one headlamp while adjusting the other.
On the wall or screen you will
observe a flat zone of high intensity
light located at the top of the right
hand portion of the beam pattern. If
the top edge of the high intensity
light zone is not at the horizontal
reference line, the headlamp will
need to be adjusted.
234Maintenance
2015 Police(pol)
Owners Guide gf, 1st Printing, April 2014
USA(fus)
Page 236 of 398
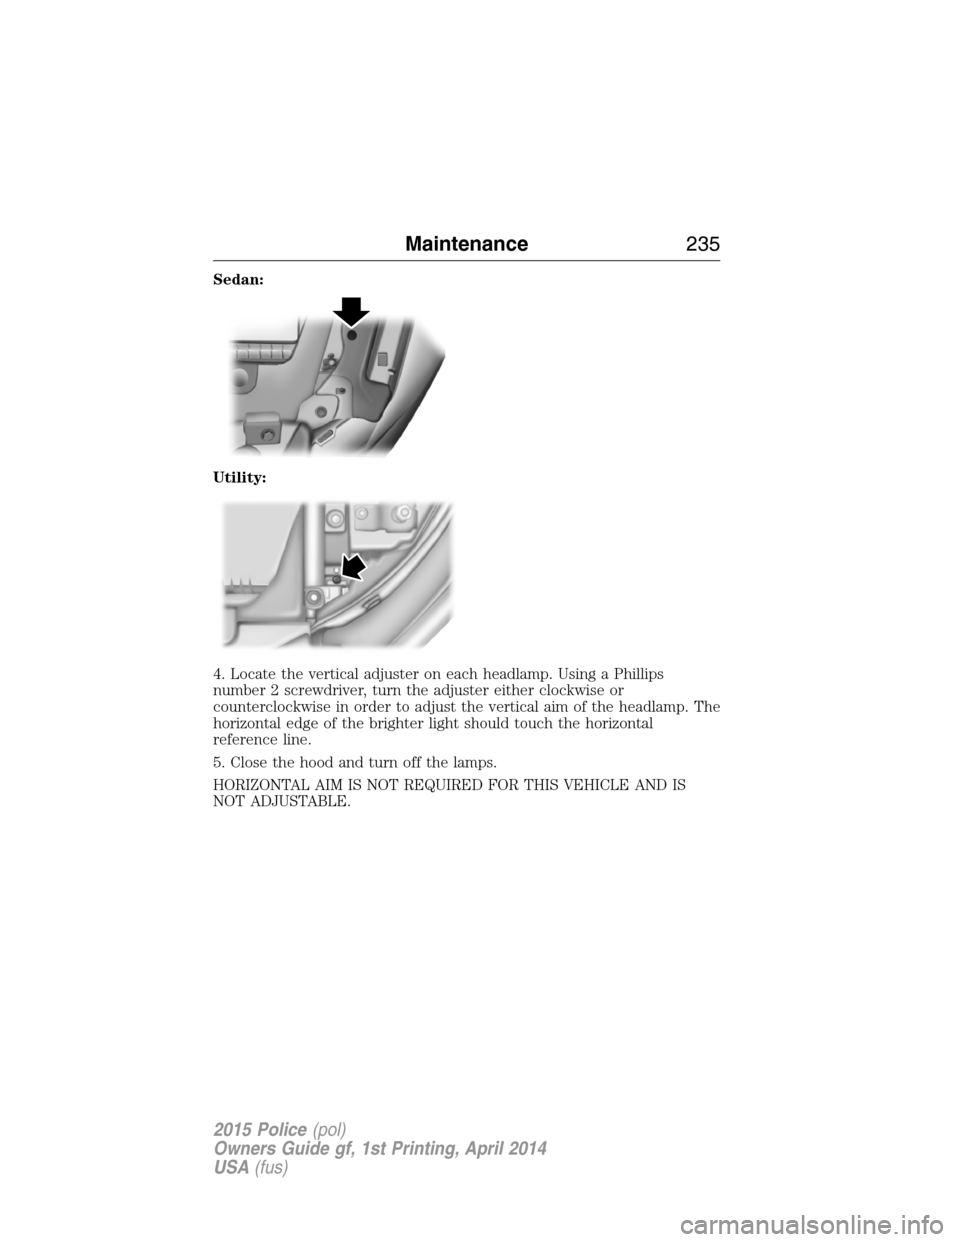
Sedan:
Utility:
4. Locate the vertical adjuster on each headlamp. Using a Phillips
number 2 screwdriver, turn the adjuster either clockwise or
counterclockwise in order to adjust the vertical aim of the headlamp. The
horizontal edge of the brighter light should touch the horizontal
reference line.
5. Close the hood and turn off the lamps.
HORIZONTAL AIM IS NOT REQUIRED FOR THIS VEHICLE AND IS
NOT ADJUSTABLE.
Maintenance235
2015 Police(pol)
Owners Guide gf, 1st Printing, April 2014
USA(fus)
Page 241 of 398
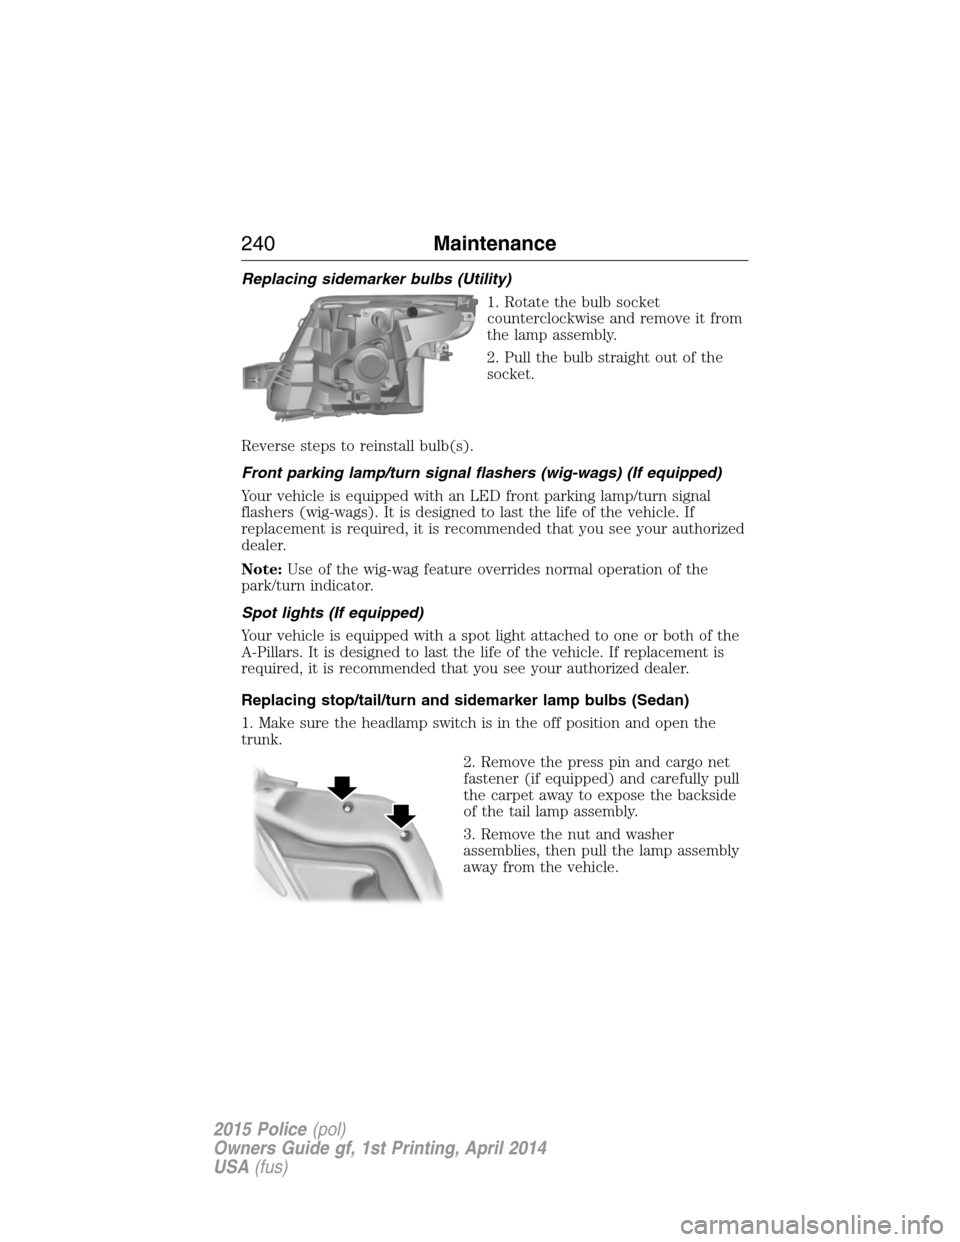
Replacing sidemarker bulbs (Utility)
1. Rotate the bulb socket
counterclockwise and remove it from
the lamp assembly.
2. Pull the bulb straight out of the
socket.
Reverse steps to reinstall bulb(s).
Front parking lamp/turn signal flashers (wig-wags) (If equipped)
Your vehicle is equipped with an LED front parking lamp/turn signal
flashers (wig-wags). It is designed to last the life of the vehicle. If
replacement is required, it is recommended that you see your authorized
dealer.
Note:Use of the wig-wag feature overrides normal operation of the
park/turn indicator.
Spot lights (If equipped)
Your vehicle is equipped with a spot light attached to one or both of the
A-Pillars. It is designed to last the life of the vehicle. If replacement is
required, it is recommended that you see your authorized dealer.
Replacing stop/tail/turn and sidemarker lamp bulbs (Sedan)
1. Make sure the headlamp switch is in the off position and open the
trunk.
2. Remove the press pin and cargo net
fastener (if equipped) and carefully pull
the carpet away to expose the backside
of the tail lamp assembly.
3. Remove the nut and washer
assemblies, then pull the lamp assembly
away from the vehicle.
240Maintenance
2015 Police(pol)
Owners Guide gf, 1st Printing, April 2014
USA(fus)