key FORD RANGER 2003 2.G Owner's Manual
[x] Cancel search | Manufacturer: FORD, Model Year: 2003, Model line: RANGER, Model: FORD RANGER 2003 2.GPages: 248, PDF Size: 2.53 MB
Page 117 of 248
Always set the parking brake fully and make sure the gearshift is
latched in P (Park). Turn the ignition to the LOCK position and
remove the key whenever you leave your vehicle.
R (Reverse)
With the gearshift lever in R (Reverse), the vehicle will move backward.
Always come to a complete stop before shifting into and out of R
(Reverse).
N (Neutral)
With the gearshift lever in N (Neutral), the vehicle can be started and is
free to roll. Hold the brake pedal down while in this position.
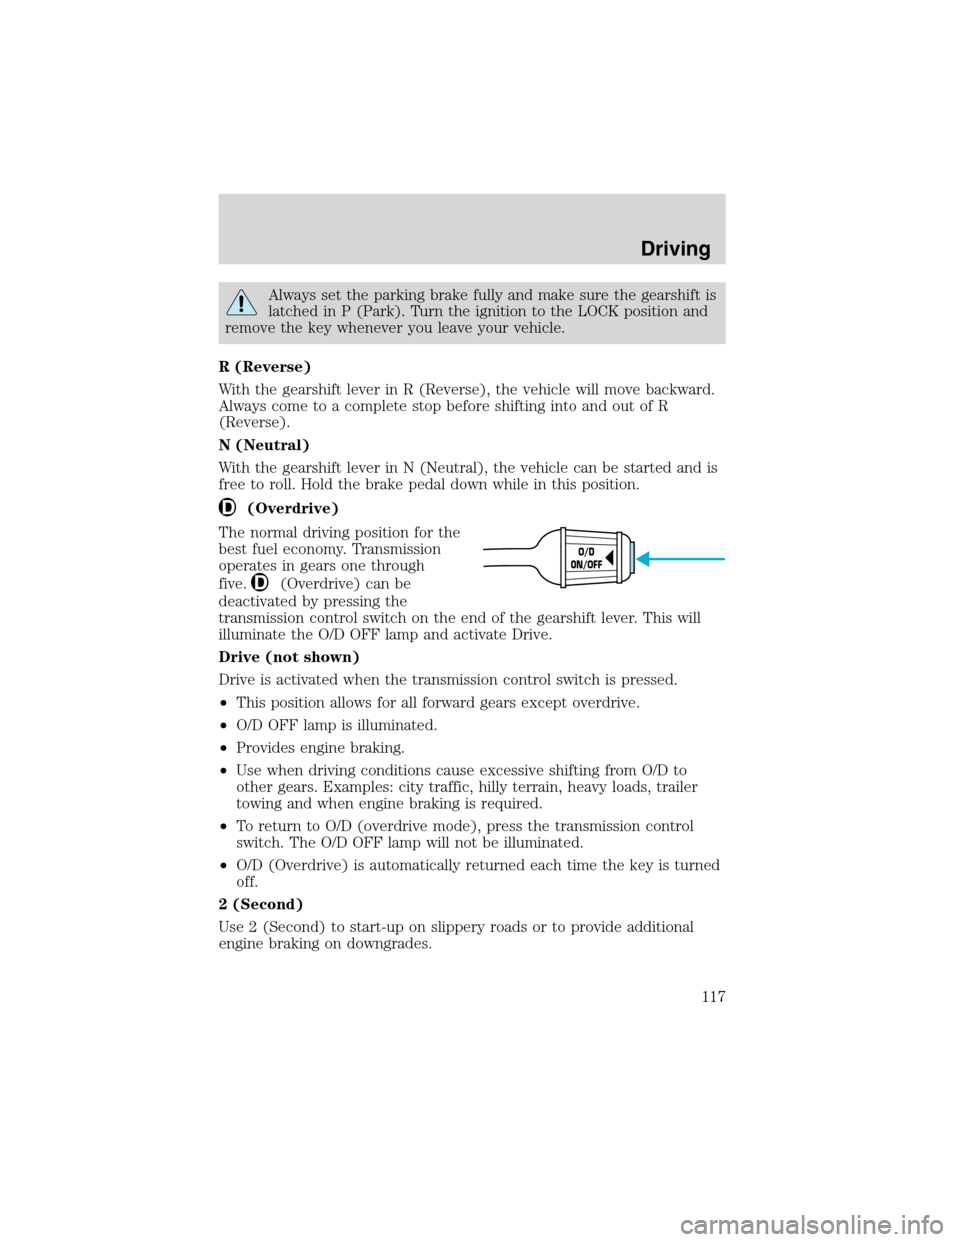
(Overdrive)
The normal driving position for the
best fuel economy. Transmission
operates in gears one through
five.
(Overdrive) can be
deactivated by pressing the
transmission control switch on the end of the gearshift lever. This will
illuminate the O/D OFF lamp and activate Drive.
Drive (not shown)
Drive is activated when the transmission control switch is pressed.
•This position allows for all forward gears except overdrive.
•O/D OFF lamp is illuminated.
•Provides engine braking.
•Use when driving conditions cause excessive shifting from O/D to
other gears. Examples: city traffic, hilly terrain, heavy loads, trailer
towing and when engine braking is required.
•To return to O/D (overdrive mode), press the transmission control
switch. The O/D OFF lamp will not be illuminated.
•O/D (Overdrive) is automatically returned each time the key is turned
off.
2 (Second)
Use 2 (Second) to start-up on slippery roads or to provide additional
engine braking on downgrades.
O/D
ON/OFF
Driving
117
Page 120 of 248
Parking your vehicle
1. Apply the brake and shift into the neutral position.
2. Fully apply the parking brake, then shift into 1 (First).
3. Turn the ignition off.
Do not park your vehicle in Neutral, it may move unexpectedly
and injure someone. Use 1 (First) gear and set the parking brake
fully.
Removing the key
Turn the ignition off, push the release lever (located above the ignition),
then turn the key toward you and remove the key.
If your vehicle gets stuck in mud or snow
If your vehicle gets stuck in mud or snow, it may be rocked out by
shifting from forward and reverse gears, stopping between shifts in a
steady pattern. Press lightly on the accelerator in each gear.
Do not rock the vehicle if the engine is not at normal operating
temperature or damage to the transmission may occur.
Do not rock the vehicle for more than a minute or damage to the
transmission and tires may occur, or the engine may overheat.
FOUR-WHEEL DRIVE (4WD) OPERATION (IF EQUIPPED)
For important information regarding safe operation of this type
of vehicle, seePreparing to drive your vehiclein this chapter.
Four–wheel drive (4WD) supplies power to all four wheels. 4WD should
not be operated on dry pavement; driveline damage may occur.
If equipped with the Electronic Shift 4WD System, and 4WD Low
is selected while the vehicle is moving, the 4WD system will not
engage. This is normal and should be no reason for concern.Refer
toShifting to/from 4WD Lowfor proper operation.
Driving
120
Page 125 of 248
If your vehicle gets stuck
If your vehicle gets stuck in mud or snow it may be rocked out by
shifting between forward and reverse gears, stopping between shifts, in a
steady pattern. Press lightly on the accelerator in each gear.
Do not rock the vehicle if the engine is not at normal operating
temperature or damage to the transmission may occur.
Do not rock the vehicle for more than a few minutes or damage
to the transmission and tires may occur or the engine may
overheat.
Always set the parking brake fully and make sure the gearshift is
latched in P (Park). Turn the ignition to the LOCK position and
remove the key whenever you leave your vehicle.
If the parking brake is fully released, but the brake warning lamp
remains illuminated, the brakes may not be working properly.
See your dealer or a qualified service technician.
Do not spin the wheels at over 56 km/h (35 mph). The tires may
fail and injure a passenger or bystander.
Emergency maneuvers
•In an unavoidable emergency situation where a sudden sharp turn
must be made, remember to avoid“over-driving”your vehicle, i.e.,
turn the steering wheel only as rapidly and as far as required to avoid
the emergency. Excessive steering will result in less vehicle control,
not more. Additionally, smooth variations of the accelerator and/or
brake pedal pressure should be utilized if changes in vehicle speed are
called for. Avoid abrupt steering, acceleration or braking which could
result in an increased risk of loss of vehicle control, vehicle rollover
and/or personal injury. Use all available road surface to return the
vehicle to a safe direction of travel.
•In the event of an emergency stop, avoid skidding the tires and do not
attempt any sharp steering wheel movements.
Driving
125
Page 144 of 248
•do not allow waves to break higher than 15 cm (6 inches) above the
bottom edge of the rear bumper.
Exceeding these limits may allow water to enter vehicle components:
•causing internal damage to the components.
•affecting driveability, emissions and reliability.
Replace the rear axle lubricant any time the axle has been submerged in
water. Rear axle lubricant quantities are not to be checked or changed
unless a leak is suspected or repair required.
RECREATIONAL TOWING
Follow these guidelines if you have a need for recreational towing. An
example of recreational towing would be towing your vehicle behind a
motorhome. These guidelines are designed to ensure that your
transmission is not damaged.
4x2 equipped with a manual transmission:
Before you have your vehicle towed:
•Release the parking brake.
•Move the gearshift to the neutral position.
•Turn the key in the ignition to the OFF/UNLOCKED position.
•The maximum recommended speed is 88 km/h (55 mph).
•The maximum recommended distance is unlimited.
•The vehicle must be towed in the forward position to ensure no
damage is done to the internal transmission components.
In addition, it is recommended that you follow the instructions
provided by the aftermarket manufacturer of the towing
apparatus if one has been installed.
4x4 vehicles equipped with manual-shift transfer case:
•Release the parking brake.
•Turn the key in the ignition to the OFF/UNLOCKED position.
•Place the transmission in N (Neutral).
•Place the transfer case lever in N (Neutral).
•Do not exceed 88 km/h (55 mph) vehicle speed.
•The maximum recommended distance is unlimited.
•The vehicle must be towed in the forward position to ensure no
damage is done to the internal transfer case components.
Driving
144
Page 145 of 248
The transfer case N (Neutral) position overrides the transmission
and puts the vehicle in neutral regardless of transmission
gearshift lever position. The vehicle can move forward or
backward.
This position should only be used when towing the vehicle.
Do not leave the vehicle unattended with the transfer case in the
N (Neutral) position. Always set the parking brake fully and turn
off the ignition when leaving the vehicle.
After reaching the destination, you must place the Ranger’s 4x4 gearshift
lever in gear (2H, 4H or 4L).
4x2 and 4x4 vehicles equipped with automatic transmissions:
4x2 vehicles with automatic transmissions or 4x4 vehicles with an
electronic-shift transfer case and automatic transmission, follow these
guidelines for recreational towing:
•Release the parking brake.
•Turn the key in the ignition to the OFF/UNLOCKED position.
•Place the transmission in N (Neutral).
•Do not exceed a distance of 80 km (50 miles).
•Do not exceed 56 km/h (35 mph) vehicle speed.
•The vehicle must be towed in the forward position to ensure no
damage is done to the internal transfer case components.
If a distance of 80 km (50 miles) or a speed of 56 km/h (35 mph) must
be exceeded, you must disconnect the front (4x4 only) and rear
driveshafts. Ford recommends the driveshafts be removed/installed only
by a qualified technician. See your local dealer for driveshaft
removal/installation.
Improper removal/installation of the driveshaft can cause
transmission fluid or transfer case fluid loss, damage to the
driveshaft and internal transmission and transfer case
components.
CAMPER BODIES
Your Ranger Pickup is not recommended for slide–in camper bodies.
Driving
145
Page 148 of 248
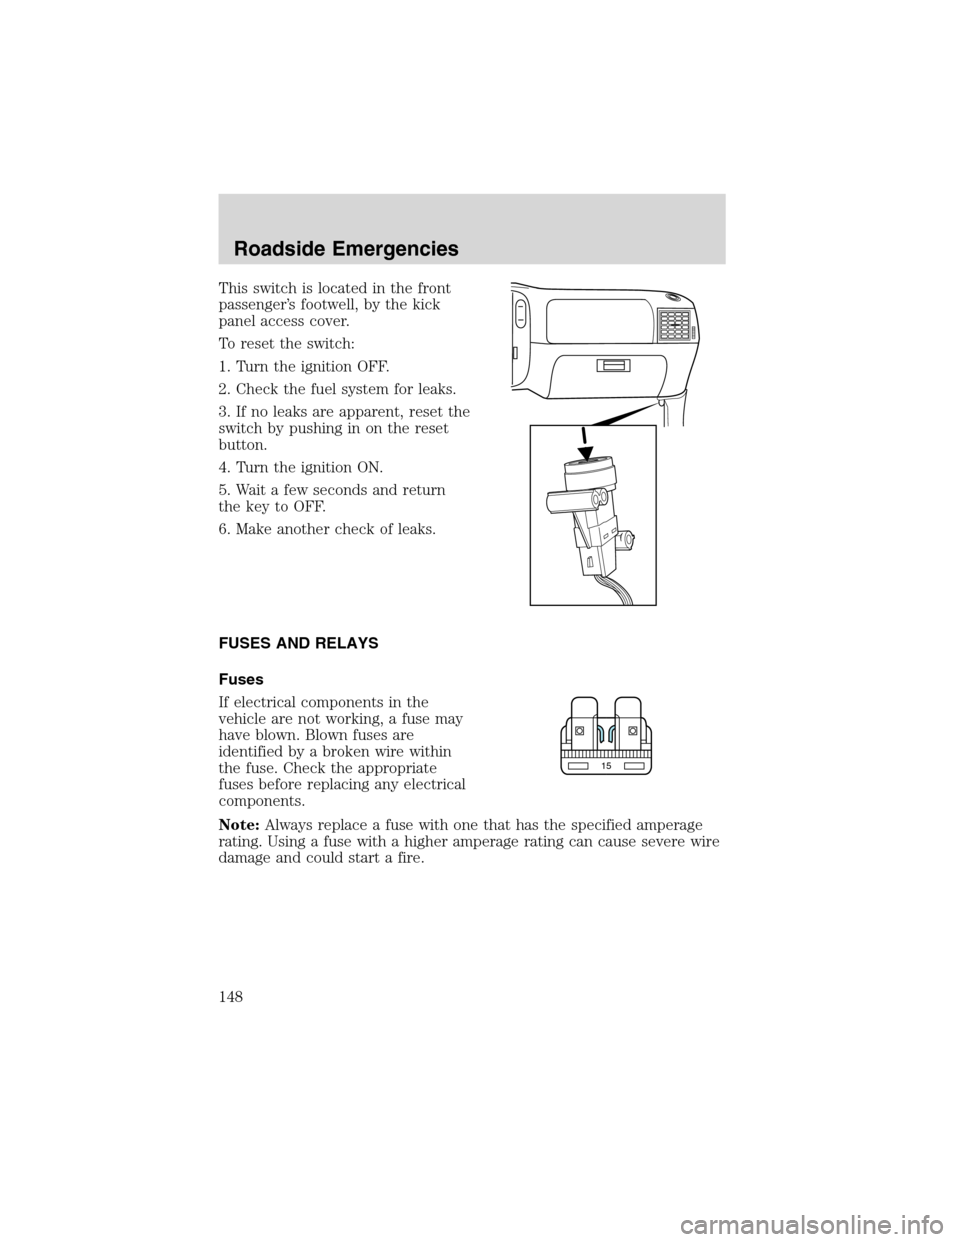
This switch is located in the front
passenger’s footwell, by the kick
panel access cover.
To reset the switch:
1. Turn the ignition OFF.
2. Check the fuel system for leaks.
3. If no leaks are apparent, reset the
switch by pushing in on the reset
button.
4. Turn the ignition ON.
5. Wait a few seconds and return
the key to OFF.
6. Make another check of leaks.
FUSES AND RELAYS
Fuses
If electrical components in the
vehicle are not working, a fuse may
have blown. Blown fuses are
identified by a broken wire within
the fuse. Check the appropriate
fuses before replacing any electrical
components.
Note:Always replace a fuse with one that has the specified amperage
rating. Using a fuse with a higher amperage rating can cause severe wire
damage and could start a fire.
15
Roadside Emergencies
148
Page 160 of 248
Location of the spare tire and tools
The spare tire and tools for your vehicle are stowed in the following
locations:
Tool Location
Spare tire Under the vehicle, just forward of
the rear bumper
Jack, jack handle, wheel nut
wrenchRegular Cab: behind seats and
underneath the jack and tools
cover
SuperCab: stowed in the passenger
side rear cab compartment or
behind the jump seat in a separate
tool bag
Four-door models: stowed behind
the front seats, between jump
seats and underneath jack and
tools cover.
Key, spare tire lock (if equipped) In the glove box
Removing the spare tire
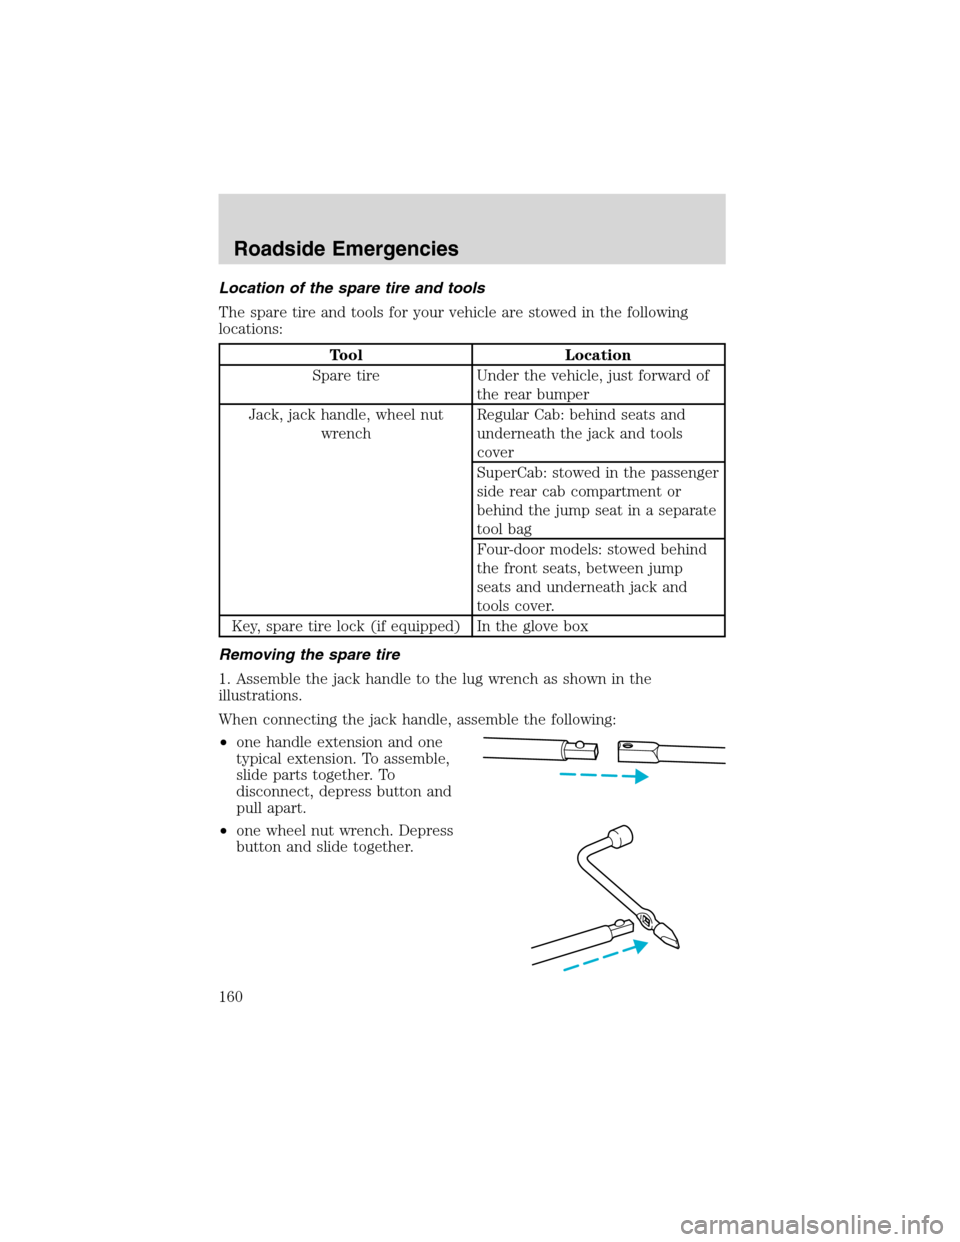
1. Assemble the jack handle to the lug wrench as shown in the
illustrations.
When connecting the jack handle, assemble the following:
•one handle extension and one
typical extension. To assemble,
slide parts together. To
disconnect, depress button and
pull apart.
•one wheel nut wrench. Depress
button and slide together.
Roadside Emergencies
160
Page 164 of 248
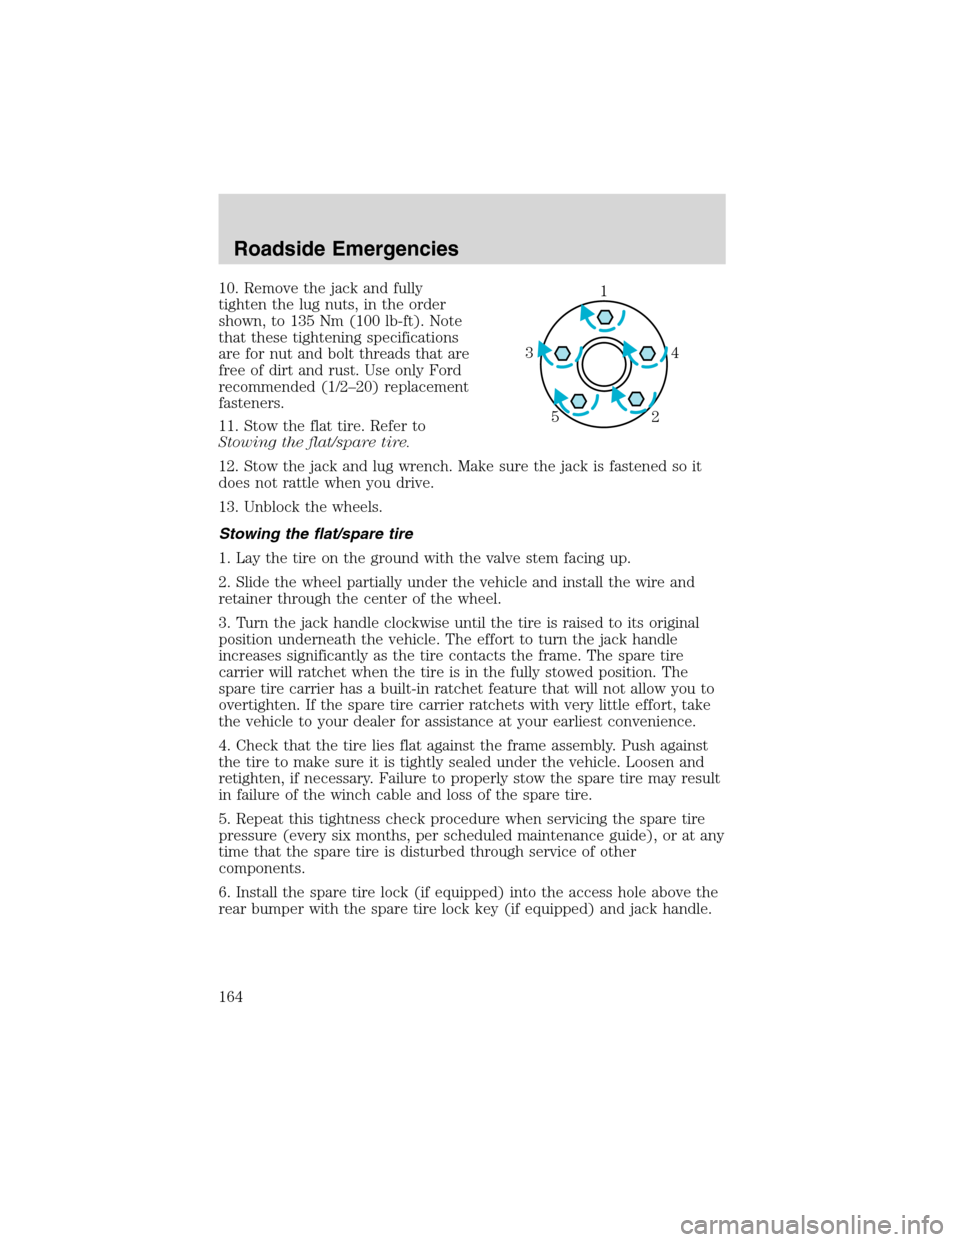
10. Remove the jack and fully
tighten the lug nuts, in the order
shown, to 135 Nm (100 lb-ft). Note
that these tightening specifications
are for nut and bolt threads that are
free of dirt and rust. Use only Ford
recommended (1/2–20) replacement
fasteners.
11. Stow the flat tire. Refer to
Stowing the flat/spare tire.
12. Stow the jack and lug wrench. Make sure the jack is fastened so it
does not rattle when you drive.
13. Unblock the wheels.
Stowing the flat/spare tire
1. Lay the tire on the ground with the valve stem facing up.
2. Slide the wheel partially under the vehicle and install the wire and
retainer through the center of the wheel.
3. Turn the jack handle clockwise until the tire is raised to its original
position underneath the vehicle. The effort to turn the jack handle
increases significantly as the tire contacts the frame. The spare tire
carrier will ratchet when the tire is in the fully stowed position. The
spare tire carrier has a built-in ratchet feature that will not allow you to
overtighten. If the spare tire carrier ratchets with very little effort, take
the vehicle to your dealer for assistance at your earliest convenience.
4. Check that the tire lies flat against the frame assembly. Push against
the tire to make sure it is tightly sealed under the vehicle. Loosen and
retighten, if necessary. Failure to properly stow the spare tire may result
in failure of the winch cable and loss of the spare tire.
5. Repeat this tightness check procedure when servicing the spare tire
pressure (every six months, per scheduled maintenance guide), or at any
time that the spare tire is disturbed through service of other
components.
6. Install the spare tire lock (if equipped) into the access hole above the
rear bumper with the spare tire lock key (if equipped) and jack handle.1
4 3
2 5
Roadside Emergencies
164
Page 187 of 248
SERVICE RECOMMENDATIONS
To help you service your vehicle:
•We highlight do-it-yourself items in the engine compartment for easy
location.
•We provide a scheduled maintenance guide which makes tracking
routine service easy.
If your vehicle requires professional service, your dealership can provide
the necessary parts and service. Check yourWarranty Guide/Owner
Information Guideto find out which parts and services are covered.
Use only recommended fuels, lubricants, fluids and service parts
conforming to specifications. Motorcraft parts are designed and built to
provide the best performance in your vehicle.
PRECAUTIONS WHEN SERVICING YOUR VEHICLE
•Do not work on a hot engine.
•Make sure that nothing gets caught in moving parts.
•Do not work on a vehicle with the engine running in an enclosed
space, unless you are sure you have enough ventilation.
•Keep all open flames and other lit material away from the battery and
all fuel related parts.
Working with the engine off
•Automatic transmission:
1. Set the parking brake and shift to P (Park).
2. Turn off the engine and remove the key.
3. Block the wheels.
•Manual transmission:
1. Set the parking brake, depress the clutch and place the gearshift in 1
(First).
2. Turn off the engine and remove the key.
3. Block the wheels.
Working with the engine on
•Automatic transmission:
1. Set the parking brake and shift to P (Park).
2. Block the wheels.
Maintenance and Specifications
187
Page 240 of 248
FORD ACCESSORIES FOR YOUR VEHICLE
A wide selection of genuine Ford accessories are available for your
vehicle through your local authorized Ford, Lincoln Mercury or Ford of
Canada dealer. These quality accessories have been specifically
engineered to fulfill your automotive needs; they are custom designed to
complement the style and aerodynamic appearance of your vehicle. In
addition, each accessory is made from high quality materials and meets
or exceeds Ford’s rigorous engineering and safety specifications. Ford
Motor Company will repair or replace any properly dealer-installed Ford
accessory found to be defective in factory-supplied materials or
workmanship during the warranty period, as well as any component
damaged by the defective accessory. The accessory will be warranted for
whichever provides you the greatest benefit:
•12 months or 20,000 km (12,000 miles) (whichever occurs first), or
•The remainder of your new vehicle limited warranty.
This means that genuine Ford accessories purchased along with your
new vehicle and installed by the dealer are covered for the full length of
your New Vehicle’s Limited Warranty—3 years or 60,000 km (36,000
miles) (whichever occurs first). Contact your dealer for details and a
copy of the warranty.
Not all accessories are available for all models.
Vehicle Security
Cargo security shade
Keyless entry system
Styled wheel protector locks
Vehicle security systems
Comfort and convenience
Cargo cage / bed extender
Cargo organizers
Cargo retainer net
Engine block heaters
Manual sliding rear window
Remote start
Tire step
Travel equipment
Automatic headlamp system with DRL
Bed rail caps
Accessories
240