clock FORD RANGER 2021 Owners Manual
[x] Cancel search | Manufacturer: FORD, Model Year: 2021, Model line: RANGER, Model: FORD RANGER 2021Pages: 475, PDF Size: 7.9 MB
Page 35 of 475
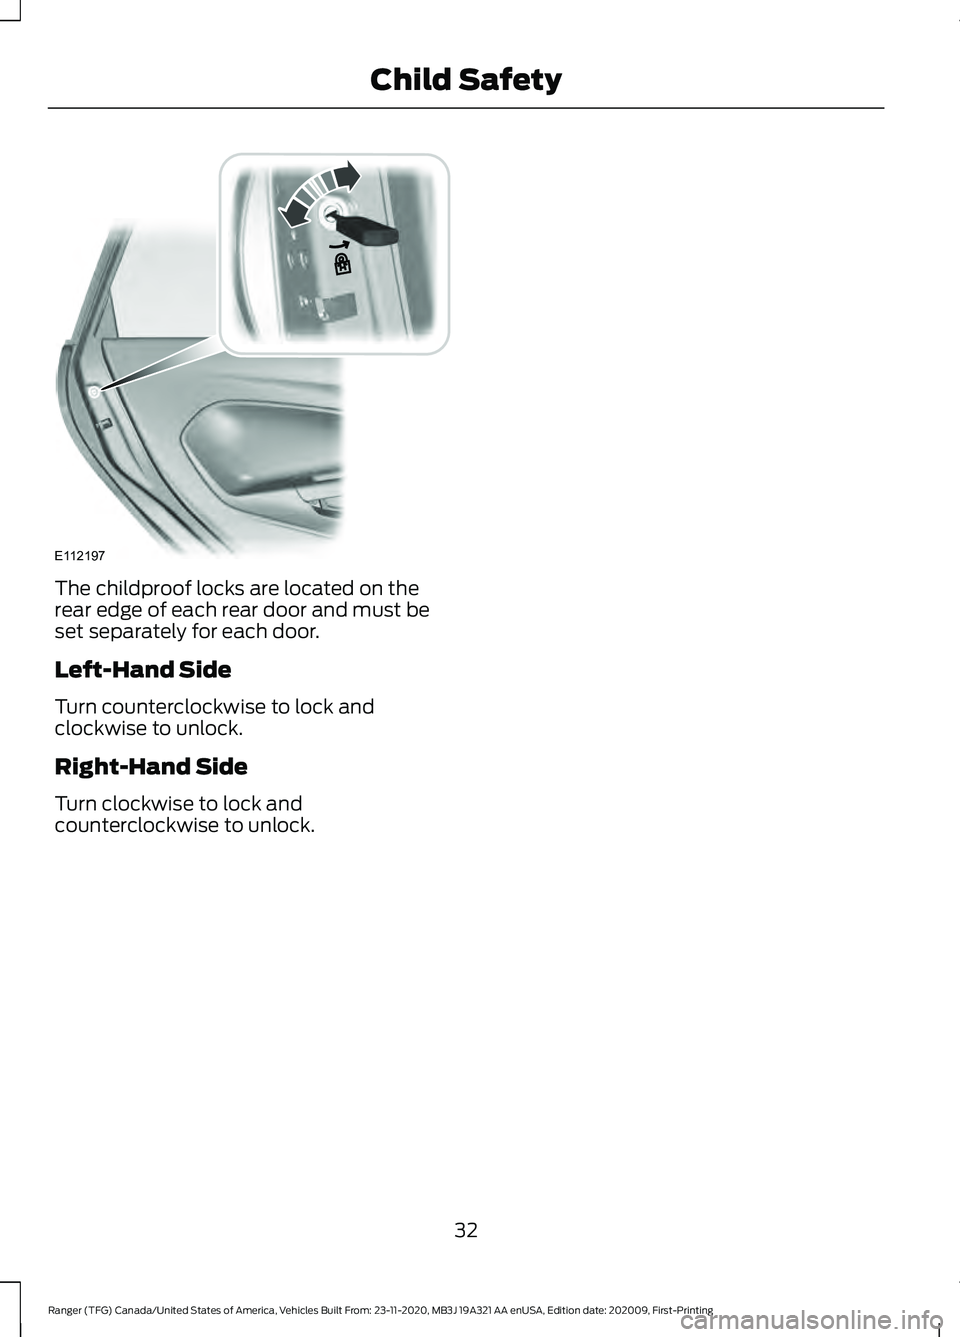
The childproof locks are located on the
rear edge of each rear door and must be
set separately for each door.
Left-Hand Side
Turn counterclockwise to lock and
clockwise to unlock.
Right-Hand Side
Turn clockwise to lock and
counterclockwise to unlock.
32
Ranger (TFG) Canada/United States of America, Vehicles Built From: 23-11-2020, MB3J 19A321 AA enUSA, Edition date: 202009, First-Printing Child SafetyE112197
Page 121 of 475
Switching Maximum Air
Conditioning On and Off
Turn the temperature control
counterclockwise to the lowest
setting.
Note: Recirculated air flows through the
instrument panel air vents, air conditioning
turns on and the blower motor adjusts to
the highest speed.
Switching Maximum Defrost On
and Off Turn the temperature control
clockwise to the highest setting.
Note: Air flows through the windshield air
vents, and the blower motor adjusts to the
highest speed.
You can also use this setting to defog and
clear the windshield of a thin covering of
ice. The heated rear window also turns on
when you select maximum defrost.
Note: To prevent window fogging, you
cannot select recirculated air when
maximum defrost is on.
Switching Recirculated Air On and
Off Press and release the button to
switch between outside air and
recirculated air.
The air currently in the passenger
compartment recirculates. This may
reduce the time needed to cool the interior,
when used with A/C, and reduce unwanted
odors from entering your vehicle.
Note: Recirculated air may turn off, or
prevent you from switching on, in all air flow
modes except MAX A/C to reduce the risk
of fogging. Recirculation may also turn on
and off in various air distribution control
combinations during hot weather to improve
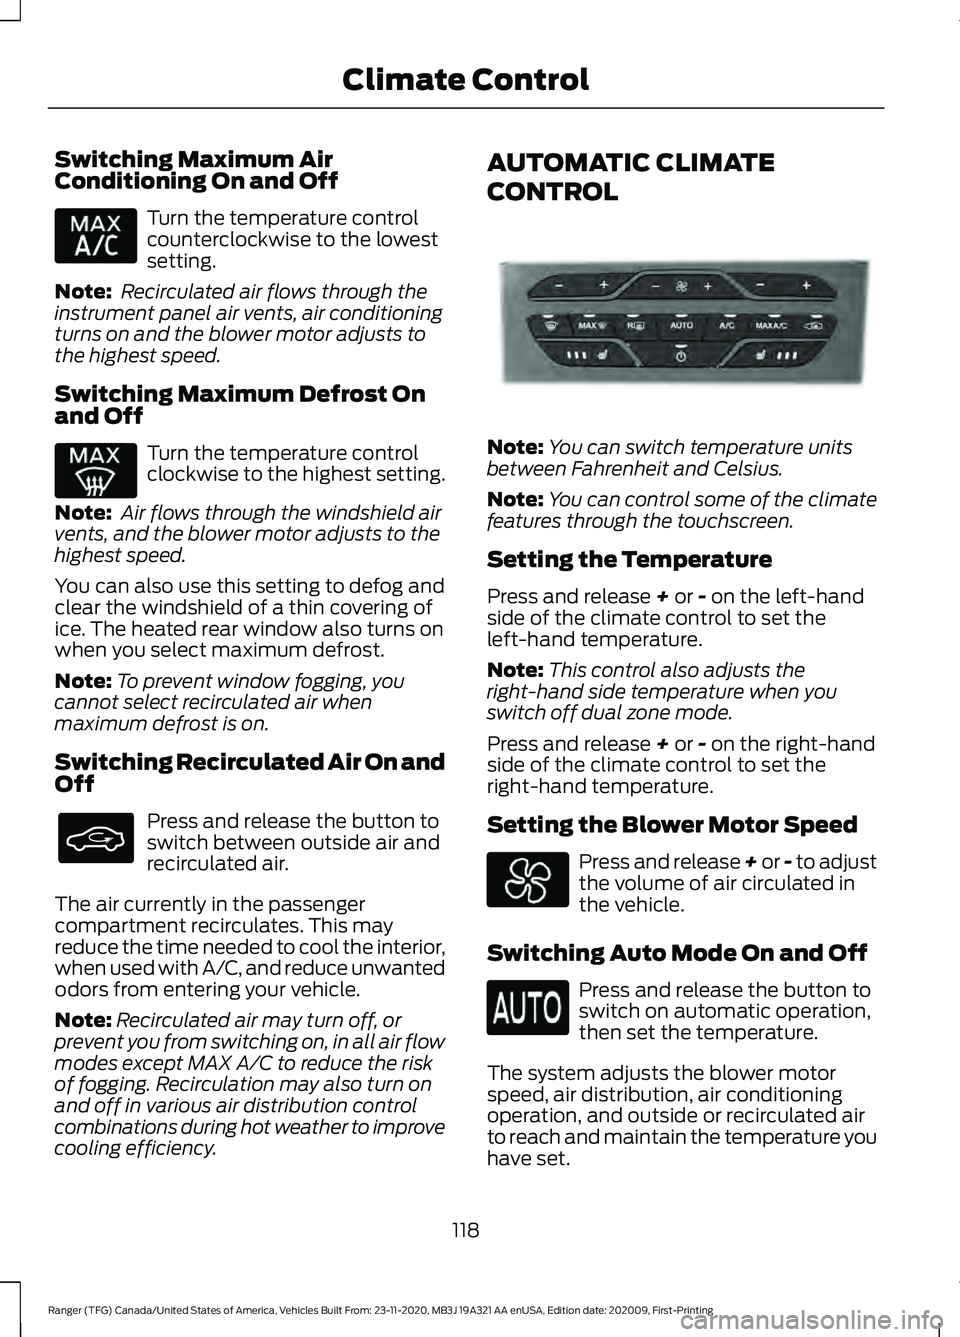
cooling efficiency. AUTOMATIC CLIMATE
CONTROL
Note:
You can switch temperature units
between Fahrenheit and Celsius.
Note: You can control some of the climate
features through the touchscreen.
Setting the Temperature
Press and release + or - on the left-hand
side of the climate control to set the
left-hand temperature.
Note: This control also adjusts the
right-hand side temperature when you
switch off dual zone mode.
Press and release
+ or - on the right-hand
side of the climate control to set the
right-hand temperature.
Setting the Blower Motor Speed Press and release + or - to adjust
the volume of air circulated in
the vehicle.
Switching Auto Mode On and Off Press and release the button to
switch on automatic operation,
then set the temperature.
The system adjusts the blower motor
speed, air distribution, air conditioning
operation, and outside or recirculated air
to reach and maintain the temperature you
have set.
118
Ranger (TFG) Canada/United States of America, Vehicles Built From: 23-11-2020, MB3J 19A321 AA enUSA, Edition date: 202009, First-Printing Climate Control E318500
Page 142 of 475
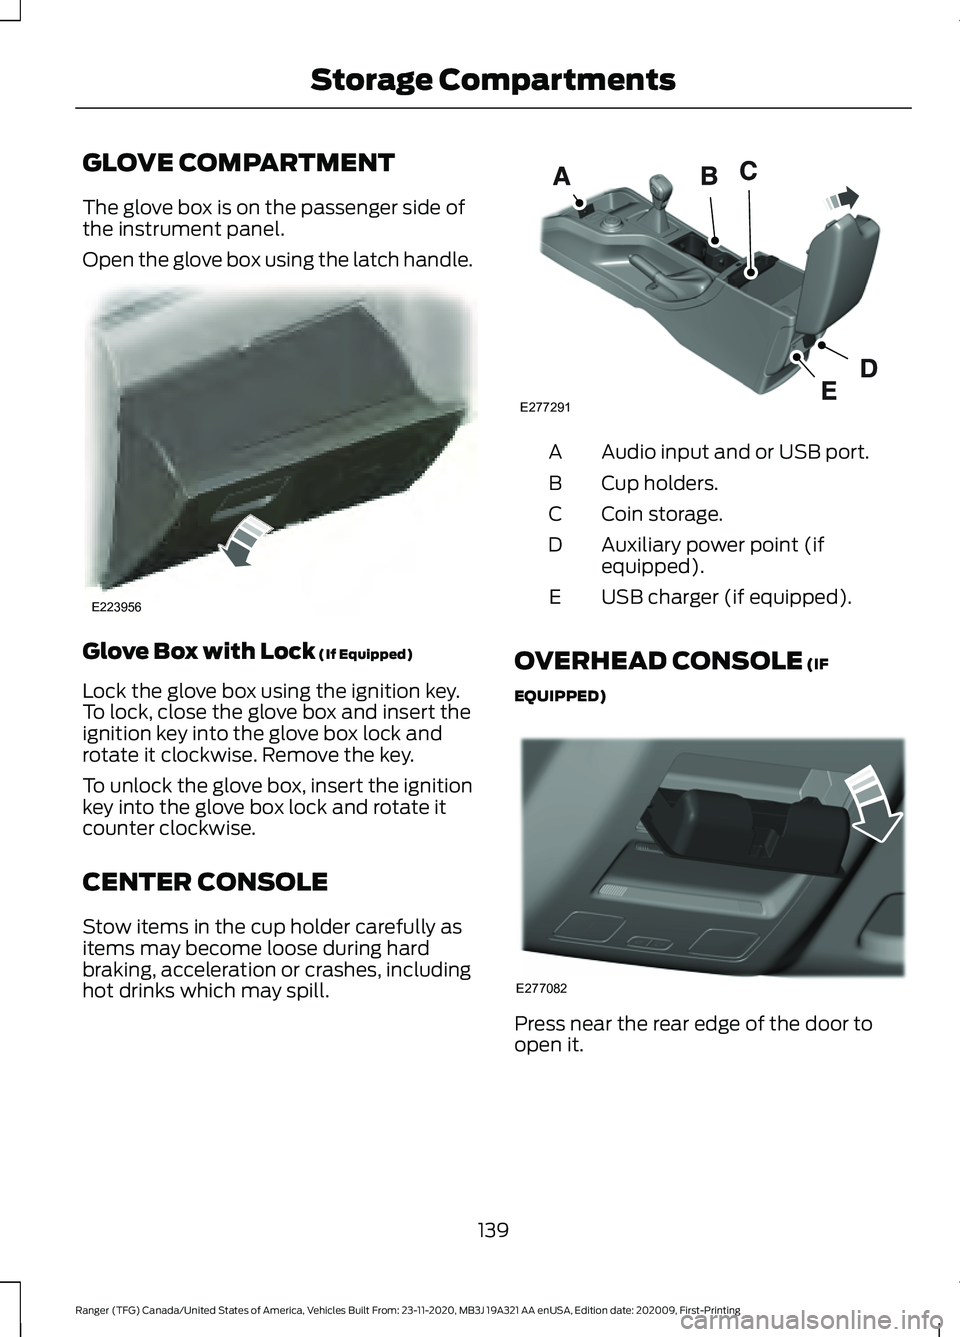
GLOVE COMPARTMENT
The glove box is on the passenger side of
the instrument panel.
Open the glove box using the latch handle.
Glove Box with Lock (If Equipped)
Lock the glove box using the ignition key.
To lock, close the glove box and insert the
ignition key into the glove box lock and
rotate it clockwise. Remove the key.
To unlock the glove box, insert the ignition
key into the glove box lock and rotate it
counter clockwise.
CENTER CONSOLE
Stow items in the cup holder carefully as
items may become loose during hard
braking, acceleration or crashes, including
hot drinks which may spill. Audio input and or USB port.
A
Cup holders.
B
Coin storage.
C
Auxiliary power point (if
equipped).
D
USB charger (if equipped).
E
OVERHEAD CONSOLE (IF
EQUIPPED) Press near the rear edge of the door to
open it.
139
Ranger (TFG) Canada/United States of America, Vehicles Built From: 23-11-2020, MB3J 19A321 AA enUSA, Edition date: 202009, First-Printing Storage CompartmentsE223956 E277291 E277082
Page 269 of 475
Only use oils certified for gasoline engines
by the American Petroleum Institute (API).
An oil with this trademark symbol
conforms to the current engine and
emission system protection standards and
fuel economy requirements of the
International Lubricants Specification
Advisory Committee (ILSAC).
To top up the engine oil level do the
following:
1. Clean the area surrounding the engine
oil filler cap before you remove it.
2. Remove the engine oil filler cap. See Under Hood Overview (page 264).
Turn it counterclockwise and remove
it.
3. Add engine oil that meets our specifications. See
Capacities and
Specifications (page 328). You may
have to use a funnel to pour the engine
oil into the opening.
4. Recheck the oil level.
5. If the oil level is correct, replace the dipstick and make sure it is fully seated.
6. Replace the engine oil filler cap. Turn it clockwise until you feel a strong
resistance.
Note: Do not add oil further than the
maximum mark. Oil levels above the
maximum mark may cause engine damage.
Note: Make sure you install the oil filler cap
correctly.
Note: Soak up any spillage with an
absorbent cloth immediately. CHANGING THE ENGINE AIR
FILTER WARNING:
To reduce the risk of
vehicle damage and personal burn
injuries, do not start your engine with the
air cleaner removed and do not remove
it while the engine is running.
When changing the engine air filter, do not
allow debris or foreign material to enter
the air induction system. Engine
components are susceptible to damage
not covered by the vehicle Warranty.
Change the air filter element at the correct
interval. See
Scheduled Maintenance
(page 416).
Incorrect component use can cause
damage not covered by the vehicle
Warranty. See
Motorcraft Parts (page
325).
To replace the air filter element do the
following:
266
Ranger (TFG) Canada/United States of America, Vehicles Built From: 23-11-2020, MB3J 19A321 AA enUSA, Edition date: 202009, First-Printing Maintenance
Page 272 of 475
It is very important to use prediluted
coolant approved to the correct
specification in order to avoid plugging the
small passageways in the engine cooling
system. See Capacities and
Specifications (page 328). Do not mix
different colors or types of coolant in your
vehicle. Mixing of engine coolants or using
an incorrect coolant may harm the engine
or cooling system components and may
not be covered by the vehicle Warranty.
Note: If prediluted coolant is not available,
use the approved concentrated coolant
diluting it to 50/50 with distilled water. See
Capacities and Specifications (page 328).
Using water that has not been deionised
may contribute to deposit formation,
corrosion and plugging of the small cooling
system passageways.
Note: Coolants marketed for all makes and
models may not be approved to our
specifications and may cause damage to
the cooling system. Resulting component
damage may not be covered by the vehicle
Warranty.
If the coolant level is at or below the
minimum mark, add prediluted coolant
immediately.
To top up the coolant level do the
following:
1. Unscrew the cap slowly. Any pressure escapes as you unscrew the cap.
2. Add prediluted coolant approved to the correct specification. See
Capacities and Specifications (page
328
).
3. Add enough prediluted coolant to reach the correct level.
4. Replace the coolant reservoir cap. Turn
the cap clockwise until it contacts the
hard stop. 5. Check the coolant level in the coolant
reservoir the next few times you drive
your vehicle. If necessary, add enough
prediluted engine coolant to bring the
coolant level to the correct level.
If you have to add more than
1.1 qt (1 L) of
engine coolant per month, have your
vehicle checked as soon as possible.
Operating an engine with a low level of
coolant can result in engine overheating
and possible engine damage.
In case of emergency, you can add a large
amount of water without engine coolant
in order to reach a vehicle service location.
In this instance, qualified personnel:
1. Must drain the cooling system.
2. Chemically clean the coolant system.
3. Refill with engine coolant as soon as possible.
Water alone, without engine coolant, can
cause engine damage from corrosion,
overheating or freezing.
Do not use the following as a coolant
substitute:
• Alcohol.
• Methanol.
• Brine.
• Any coolant mixed with alcohol or
methanol antifreeze.
Alcohol and other liquids can cause engine
damage from overheating or freezing.
Do not add extra inhibitors or additives to
the coolant. These can be harmful and
compromise the corrosion protection of
the coolant.
Recycled Coolant
We do not recommend the use of recycled
coolant as an approved recycling process
is not yet available.
269
Ranger (TFG) Canada/United States of America, Vehicles Built From: 23-11-2020, MB3J 19A321 AA enUSA, Edition date: 202009, First-Printing Maintenance
Page 279 of 475
Note:
If you disconnect or replace the
battery, you must reset the clock and the
pre-set radio stations once the battery is
reconnected.
Battery Disposal Make sure that you dispose of
old batteries in an
environmentally friendly way.
Seek advice from your local authority
about recycling old batteries.
WASHER FLUID CHECK WARNING: If you operate your
vehicle in temperatures below 40°F
(5°C), use washer fluid with antifreeze
protection. Failure to use washer fluid
with antifreeze protection in cold
weather could result in impaired
windshield vision and increase the risk
of injury or accident.
Add fluid to fill the reservoir if the level is
low. Only use a washer fluid that meets
Ford specifications. See
Capacities and
Specifications (page 328).
State or local regulations on volatile
organic compounds may restrict the use
of methanol, a common windshield washer
antifreeze additive. Washer fluids
containing non-methanol antifreeze
agents should be used only if they provide
cold weather protection without damaging
the vehicle ’s paint finish, wiper blades or
washer system. CHECKING THE WIPER
BLADES
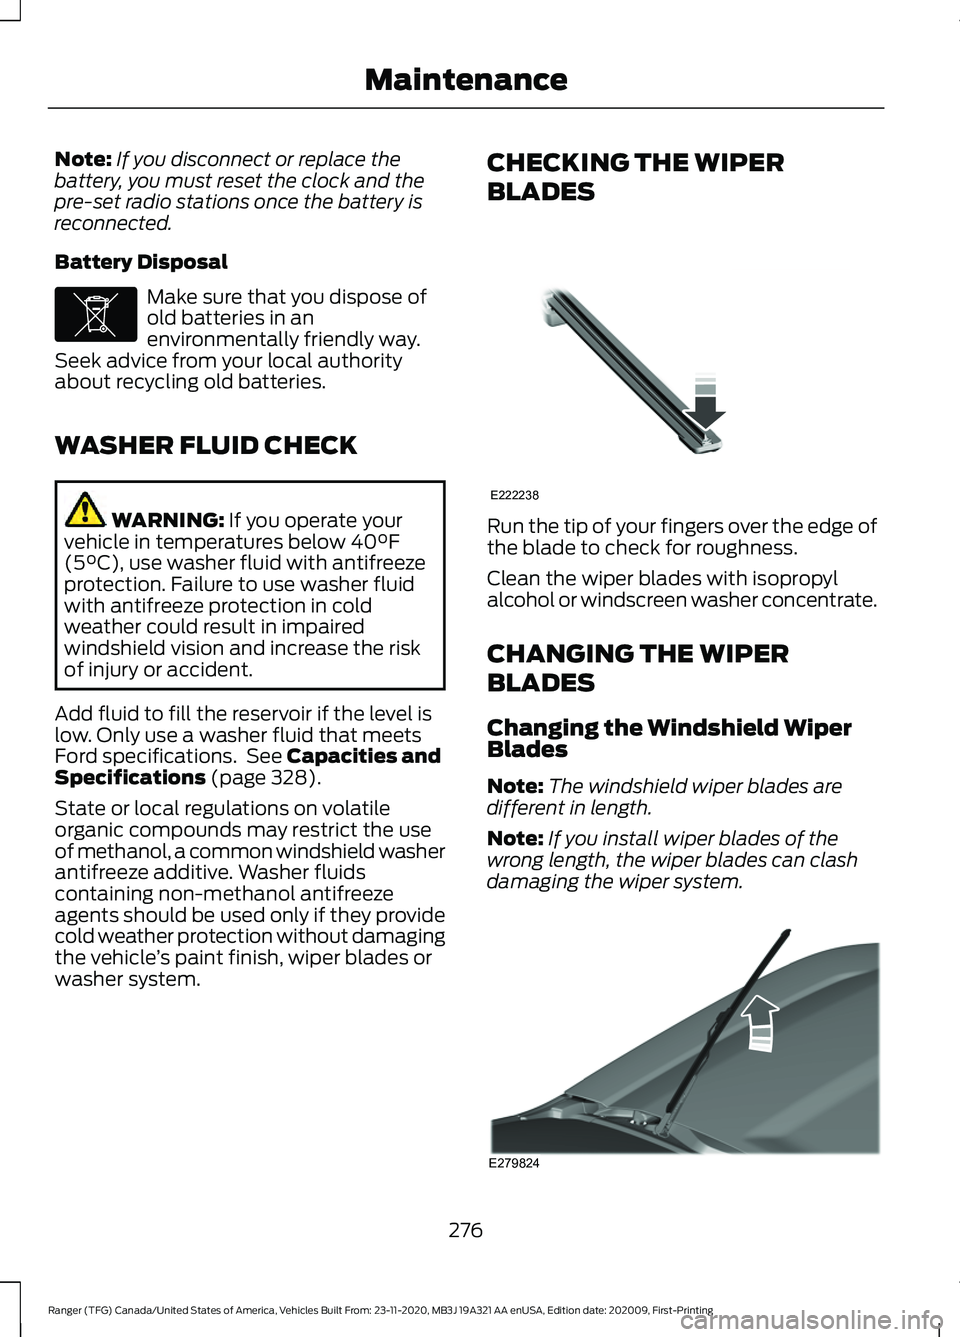
Run the tip of your fingers over the edge of
the blade to check for roughness.
Clean the wiper blades with isopropyl
alcohol or windscreen washer concentrate.
CHANGING THE WIPER
BLADES
Changing the Windshield Wiper
Blades
Note:
The windshield wiper blades are
different in length.
Note: If you install wiper blades of the
wrong length, the wiper blades can clash
damaging the wiper system. 276
Ranger (TFG) Canada/United States of America, Vehicles Built From: 23-11-2020, MB3J 19A321 AA enUSA, Edition date: 202009, First-Printing MaintenanceE107998 E222238 E279824
Page 281 of 475
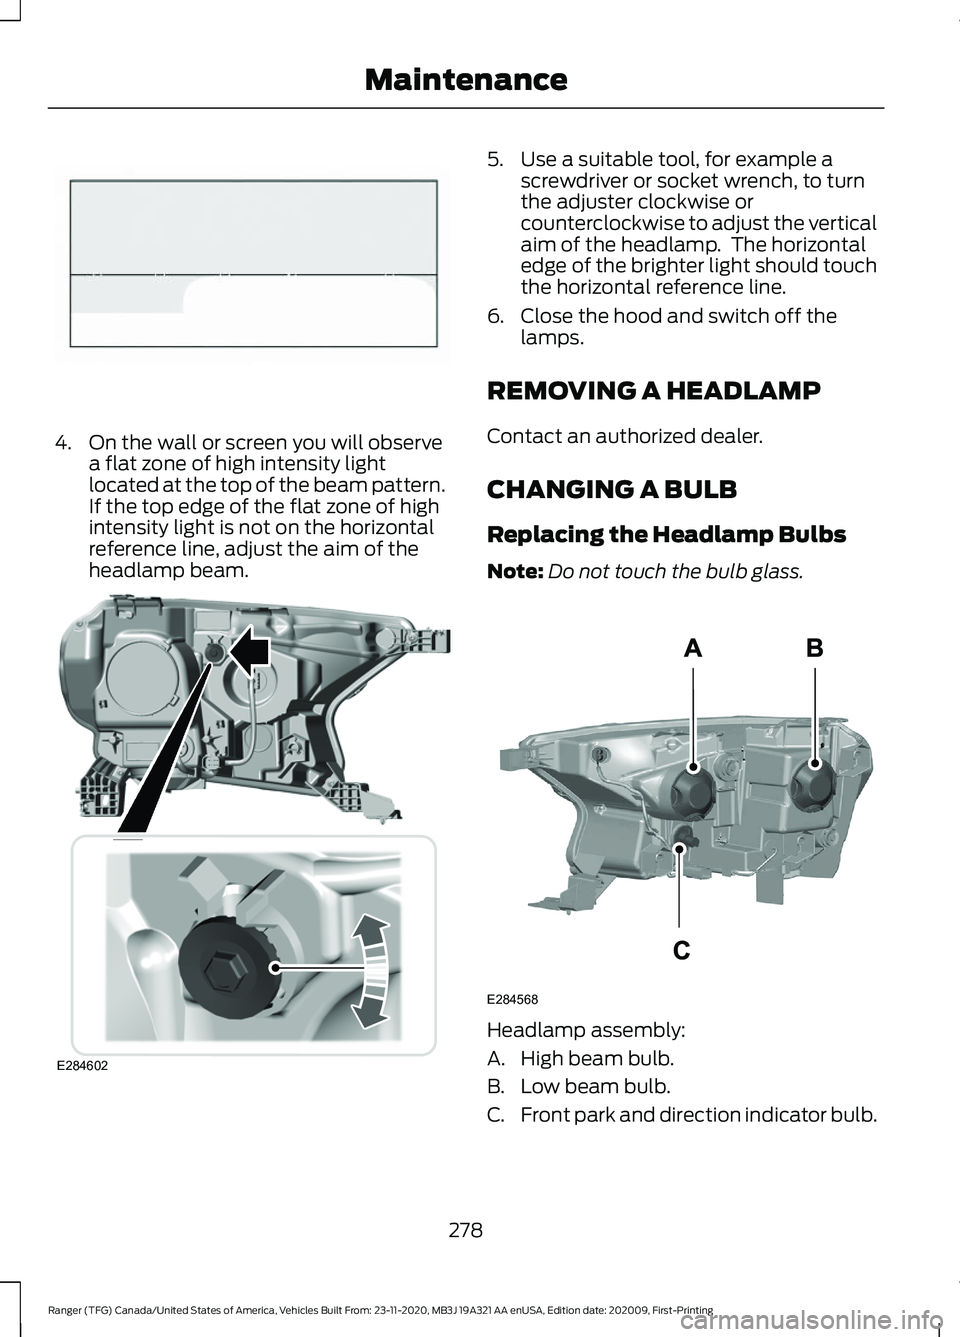
4. On the wall or screen you will observe
a flat zone of high intensity light
located at the top of the beam pattern.
If the top edge of the flat zone of high
intensity light is not on the horizontal
reference line, adjust the aim of the
headlamp beam. 5. Use a suitable tool, for example a
screwdriver or socket wrench, to turn
the adjuster clockwise or
counterclockwise to adjust the vertical
aim of the headlamp. The horizontal
edge of the brighter light should touch
the horizontal reference line.
6. Close the hood and switch off the lamps.
REMOVING A HEADLAMP
Contact an authorized dealer.
CHANGING A BULB
Replacing the Headlamp Bulbs
Note: Do not touch the bulb glass. Headlamp assembly:
A. High beam bulb.
B. Low beam bulb.
C.
Front park and direction indicator bulb.
278
Ranger (TFG) Canada/United States of America, Vehicles Built From: 23-11-2020, MB3J 19A321 AA enUSA, Edition date: 202009, First-Printing MaintenanceE142465 E284602 E284568
Page 282 of 475
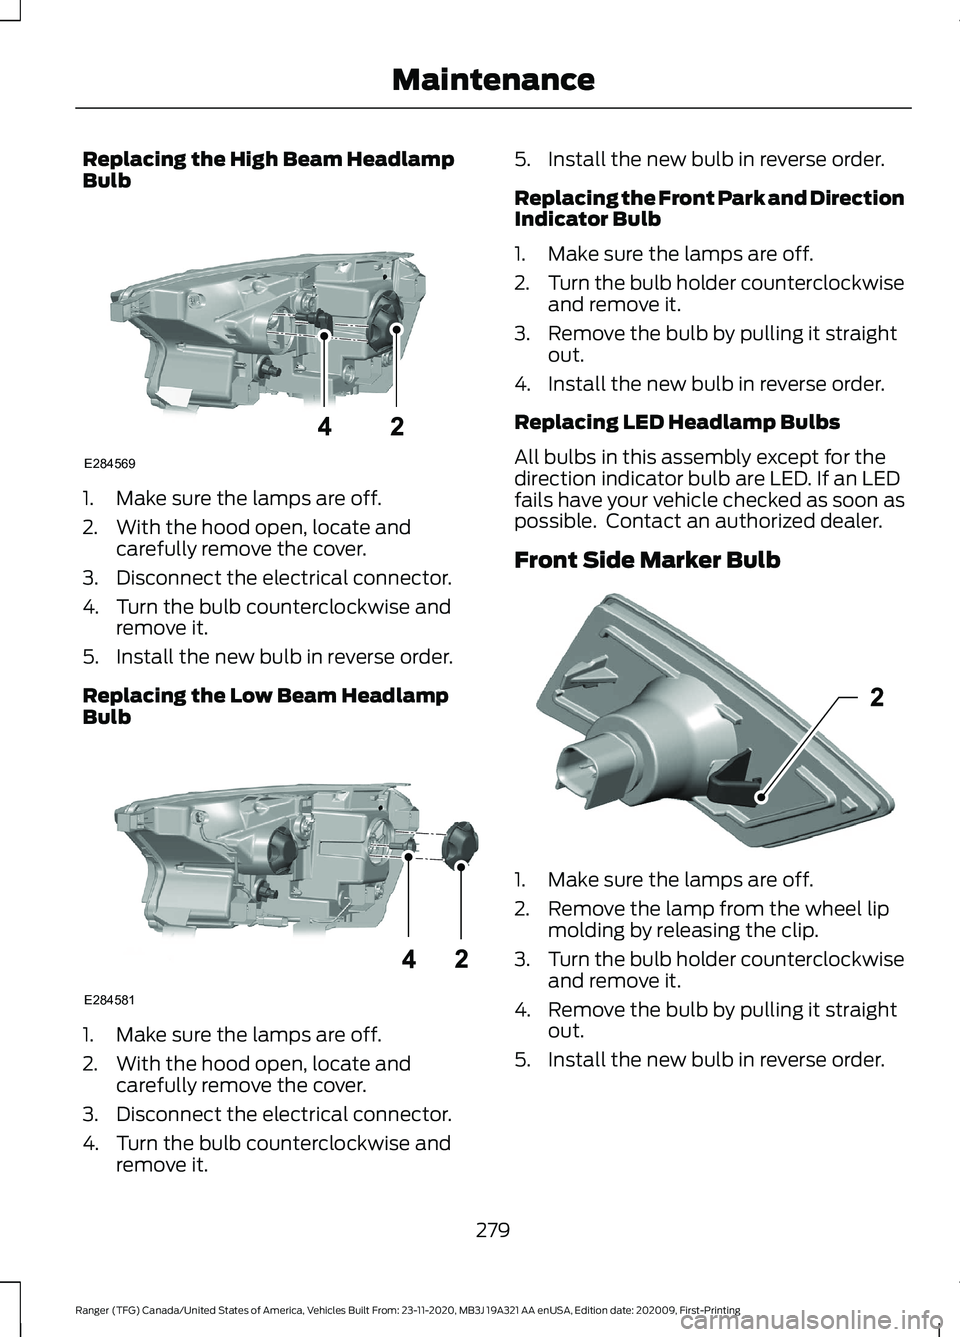
Replacing the High Beam Headlamp
Bulb
1. Make sure the lamps are off.
2. With the hood open, locate and
carefully remove the cover.
3. Disconnect the electrical connector.
4. Turn the bulb counterclockwise and remove it.
5. Install the new bulb in reverse order.
Replacing the Low Beam Headlamp
Bulb 1. Make sure the lamps are off.
2. With the hood open, locate and
carefully remove the cover.
3. Disconnect the electrical connector.
4. Turn the bulb counterclockwise and remove it. 5. Install the new bulb in reverse order.
Replacing the Front Park and Direction
Indicator Bulb
1. Make sure the lamps are off.
2.
Turn the bulb holder counterclockwise
and remove it.
3. Remove the bulb by pulling it straight out.
4. Install the new bulb in reverse order.
Replacing LED Headlamp Bulbs
All bulbs in this assembly except for the
direction indicator bulb are LED. If an LED
fails have your vehicle checked as soon as
possible. Contact an authorized dealer.
Front Side Marker Bulb 1. Make sure the lamps are off.
2. Remove the lamp from the wheel lip
molding by releasing the clip.
3. Turn the bulb holder counterclockwise
and remove it.
4. Remove the bulb by pulling it straight out.
5. Install the new bulb in reverse order.
279
Ranger (TFG) Canada/United States of America, Vehicles Built From: 23-11-2020, MB3J 19A321 AA enUSA, Edition date: 202009, First-Printing MaintenanceE284569 E284581 E301637
Page 283 of 475
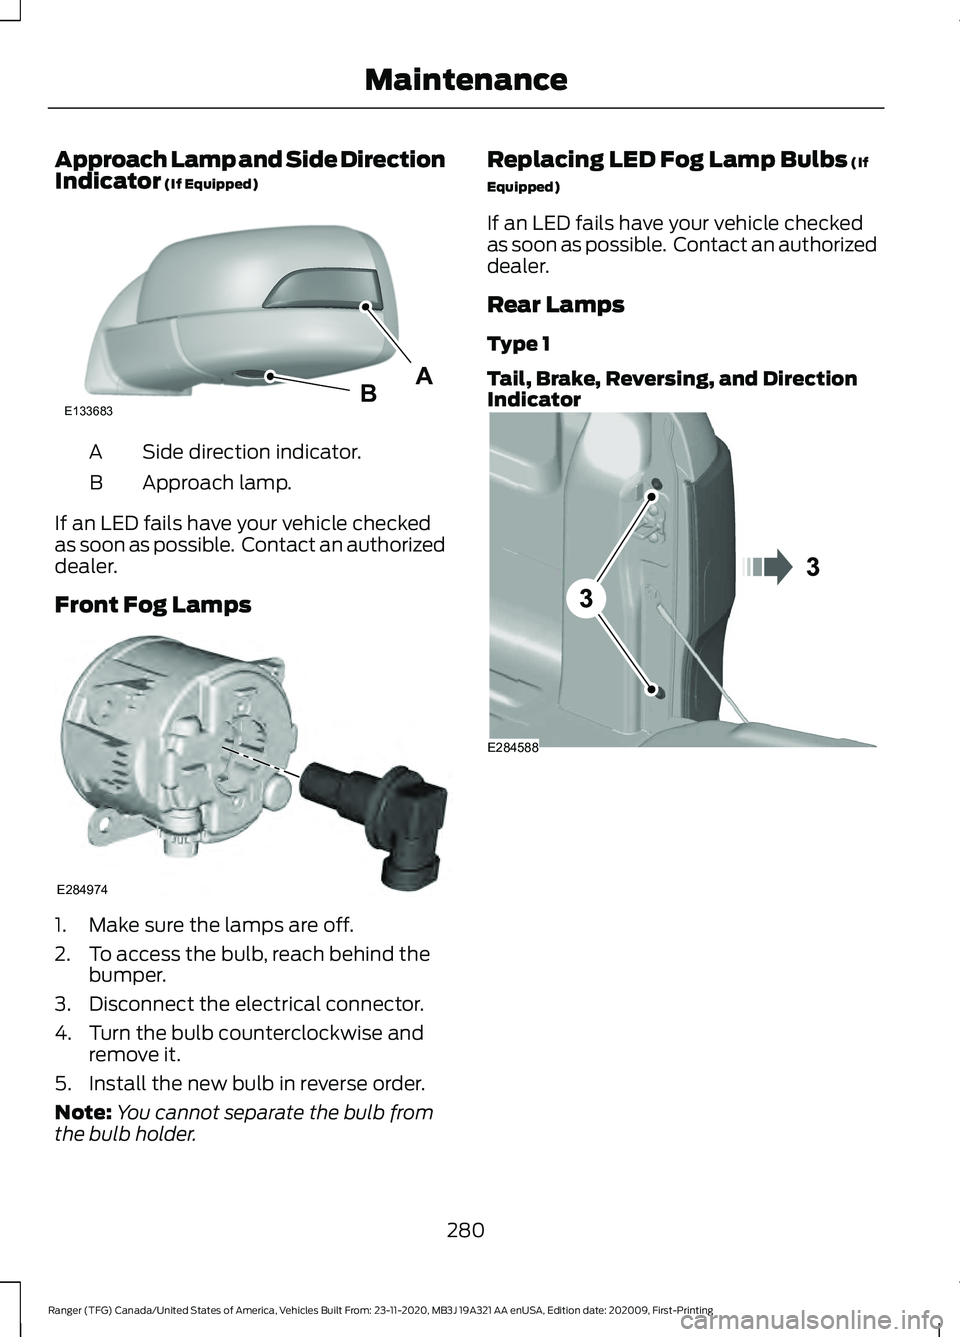
Approach Lamp and Side Direction
Indicator (If Equipped)
Side direction indicator.
A
Approach lamp.
B
If an LED fails have your vehicle checked
as soon as possible. Contact an authorized
dealer.
Front Fog Lamps 1. Make sure the lamps are off.
2. To access the bulb, reach behind the
bumper.
3. Disconnect the electrical connector.
4. Turn the bulb counterclockwise and remove it.
5. Install the new bulb in reverse order.
Note: You cannot separate the bulb from
the bulb holder. Replacing LED Fog Lamp Bulbs (If
Equipped)
If an LED fails have your vehicle checked
as soon as possible. Contact an authorized
dealer.
Rear Lamps
Type 1
Tail, Brake, Reversing, and Direction
Indicator 280
Ranger (TFG) Canada/United States of America, Vehicles Built From: 23-11-2020, MB3J 19A321 AA enUSA, Edition date: 202009, First-Printing MaintenanceABE133683 E284974 E284588
Page 284 of 475
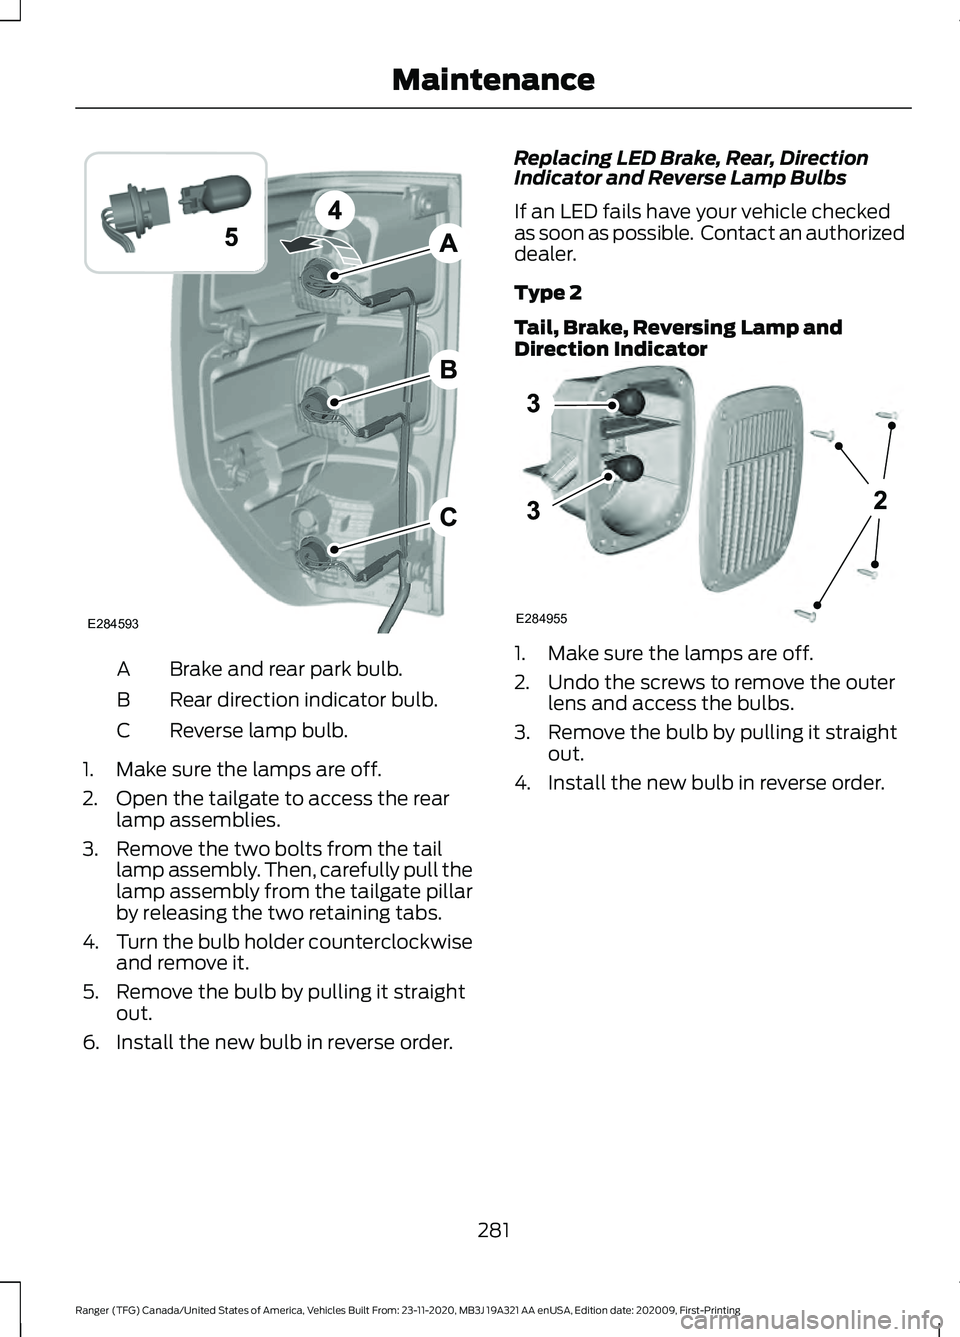
Brake and rear park bulb.
A
Rear direction indicator bulb.
B
Reverse lamp bulb.
C
1. Make sure the lamps are off.
2. Open the tailgate to access the rear lamp assemblies.
3. Remove the two bolts from the tail lamp assembly. Then, carefully pull the
lamp assembly from the tailgate pillar
by releasing the two retaining tabs.
4. Turn the bulb holder counterclockwise
and remove it.
5. Remove the bulb by pulling it straight out.
6. Install the new bulb in reverse order. Replacing LED Brake, Rear, Direction
Indicator and Reverse Lamp Bulbs
If an LED fails have your vehicle checked
as soon as possible. Contact an authorized
dealer.
Type 2
Tail, Brake, Reversing Lamp and
Direction Indicator
1. Make sure the lamps are off.
2. Undo the screws to remove the outer
lens and access the bulbs.
3. Remove the bulb by pulling it straight out.
4. Install the new bulb in reverse order.
281
Ranger (TFG) Canada/United States of America, Vehicles Built From: 23-11-2020, MB3J 19A321 AA enUSA, Edition date: 202009, First-Printing MaintenanceE284593 E284955