clock FORD RANGER 2023 User Guide
[x] Cancel search | Manufacturer: FORD, Model Year: 2023, Model line: RANGER, Model: FORD RANGER 2023Pages: 470, PDF Size: 13.06 MB
Page 281 of 470
Note:If you disconnect or replace thebattery, you must reset the clock and thepre-set radio stations once the battery isreconnected.
Battery Disposal
Make sure that you dispose ofold batteries in anenvironmentally friendly way.Seek advice from your local authorityabout recycling old batteries.
WASHER FLUID CHECK
WARNING: If you operate yourvehicle in temperatures below 40°F(5°C), use washer fluid with antifreezeprotection. Failure to use washer fluidwith antifreeze protection in coldweather could result in impairedwindshield vision and increase the riskof injury or accident.
Add fluid to fill the reservoir if the level islow. Only use a washer fluid that meetsFord specifications. See Capacities andSpecifications (page 325).
State or local regulations on volatileorganic compounds may restrict the useof methanol, a common windshield washerantifreeze additive. Washer fluidscontaining non-methanol antifreezeagents should be used only if they providecold weather protection without damagingthe vehicle’s paint finish, wiper blades orwasher system.
CHECKING THE WIPER
BLADES
Run the tip of your fingers over the edge ofthe blade to check for roughness.
Clean the wiper blades with isopropylalcohol or windscreen washer concentrate.
CHANGING THE WIPER
BLADES
Changing the Windshield WiperBlades
Note:The windshield wiper blades aredifferent in length.
Note:If you install wiper blades of thewrong length, the wiper blades can clashdamaging the wiper system.
277
2023 Ranger (TFG) Canada/United States of America, Vehicles Built From: 10-10-2022, enUSA, Edition date: 202208, First-PrintingMaintenanceE107998 E222238 E279824
Page 283 of 470
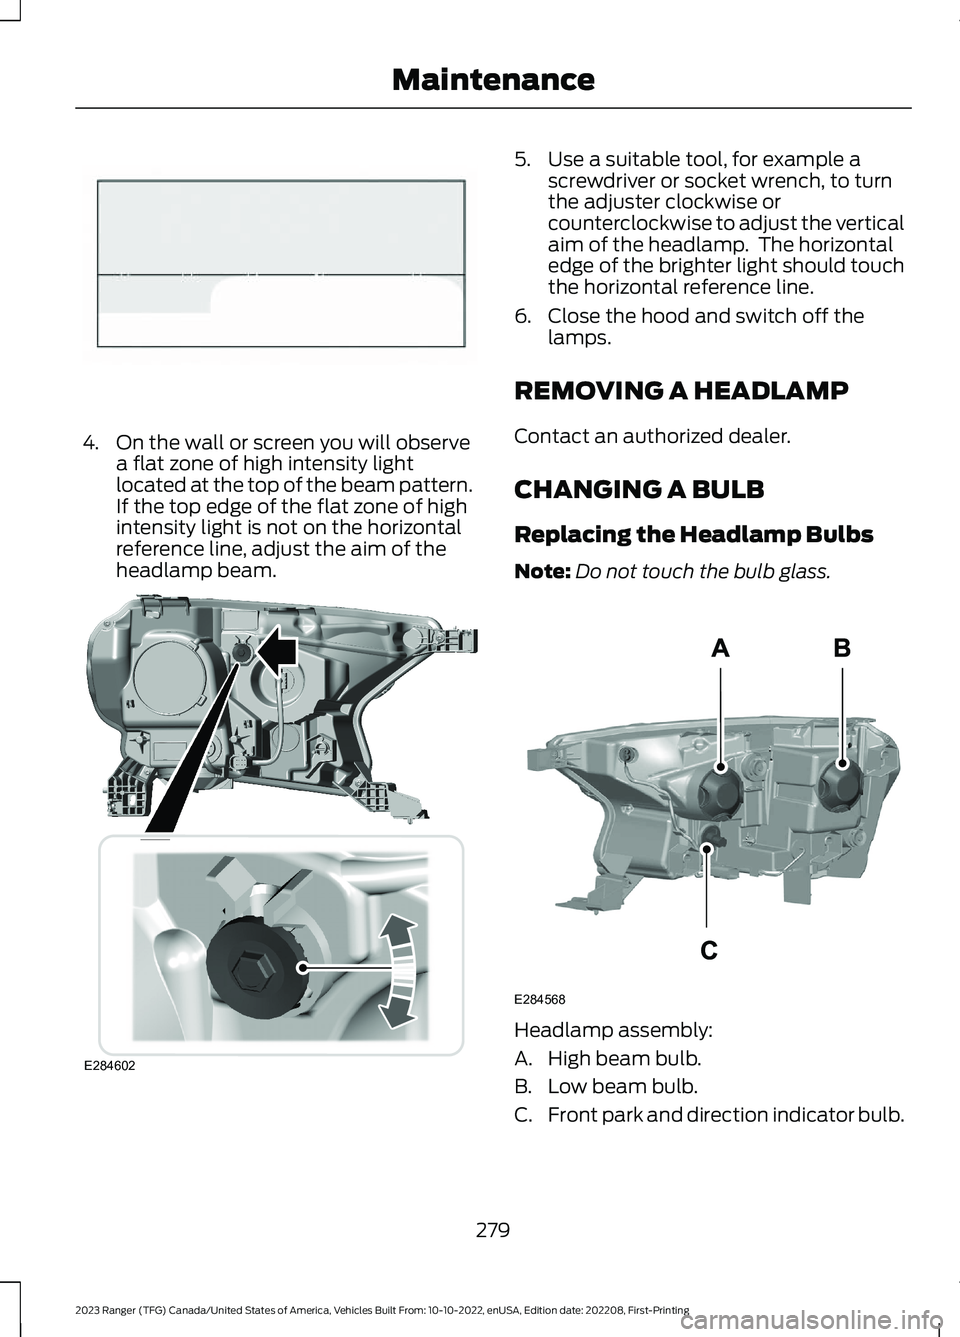
4.On the wall or screen you will observea flat zone of high intensity lightlocated at the top of the beam pattern.If the top edge of the flat zone of highintensity light is not on the horizontalreference line, adjust the aim of theheadlamp beam.
5.Use a suitable tool, for example ascrewdriver or socket wrench, to turnthe adjuster clockwise orcounterclockwise to adjust the verticalaim of the headlamp. The horizontaledge of the brighter light should touchthe horizontal reference line.
6.Close the hood and switch off thelamps.
REMOVING A HEADLAMP
Contact an authorized dealer.
CHANGING A BULB
Replacing the Headlamp Bulbs
Note:Do not touch the bulb glass.
Headlamp assembly:
A.High beam bulb.
B.Low beam bulb.
C.Front park and direction indicator bulb.
279
2023 Ranger (TFG) Canada/United States of America, Vehicles Built From: 10-10-2022, enUSA, Edition date: 202208, First-PrintingMaintenanceE142465 E284602 E284568
Page 284 of 470
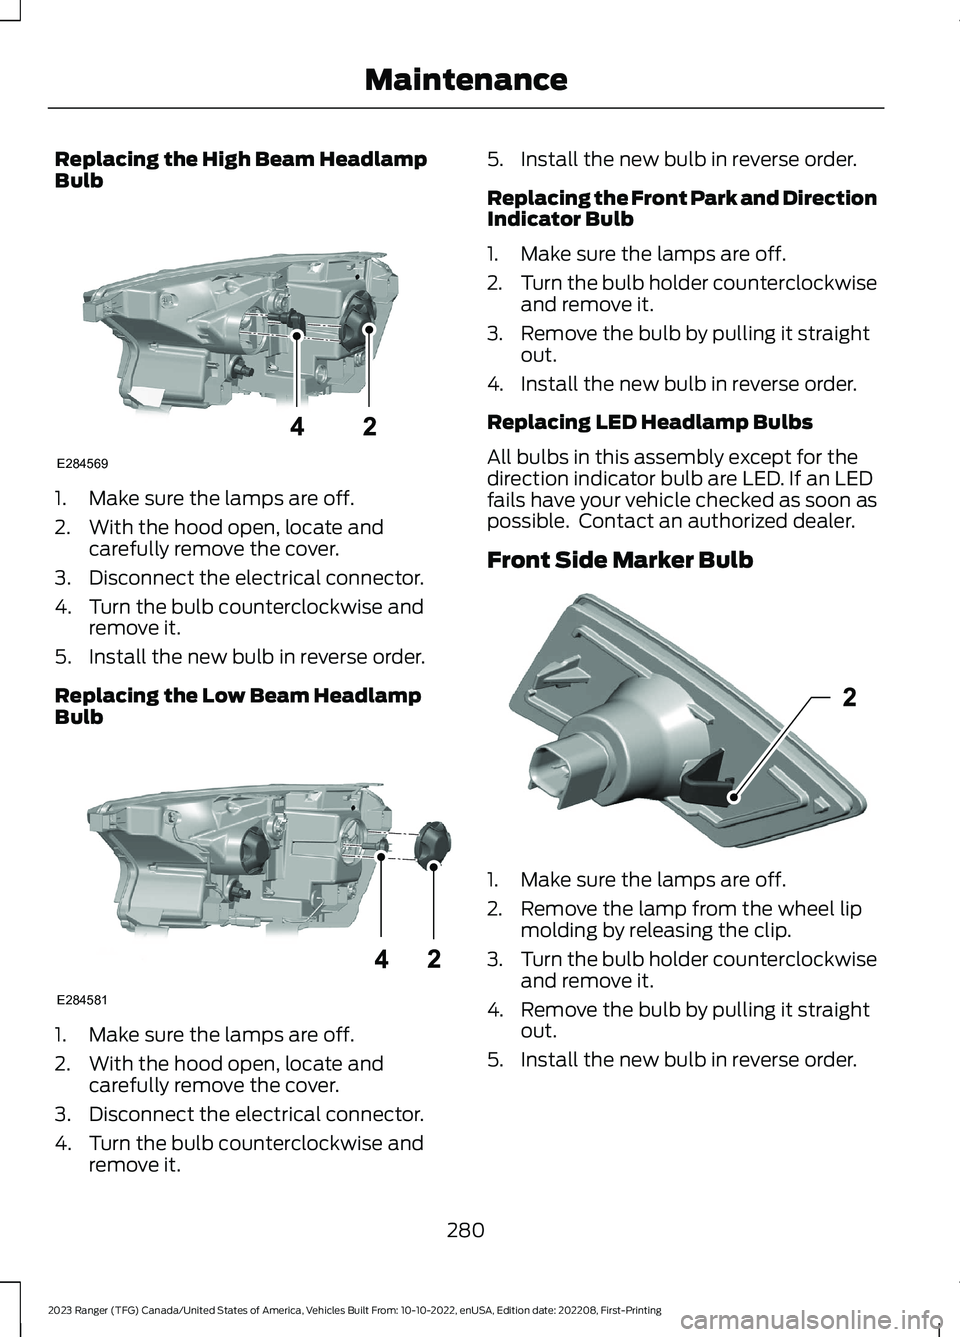
Replacing the High Beam HeadlampBulb
1.Make sure the lamps are off.
2.With the hood open, locate andcarefully remove the cover.
3.Disconnect the electrical connector.
4.Turn the bulb counterclockwise andremove it.
5.Install the new bulb in reverse order.
Replacing the Low Beam HeadlampBulb
1.Make sure the lamps are off.
2.With the hood open, locate andcarefully remove the cover.
3.Disconnect the electrical connector.
4.Turn the bulb counterclockwise andremove it.
5.Install the new bulb in reverse order.
Replacing the Front Park and DirectionIndicator Bulb
1.Make sure the lamps are off.
2.Turn the bulb holder counterclockwiseand remove it.
3.Remove the bulb by pulling it straightout.
4.Install the new bulb in reverse order.
Replacing LED Headlamp Bulbs
All bulbs in this assembly except for thedirection indicator bulb are LED. If an LEDfails have your vehicle checked as soon aspossible. Contact an authorized dealer.
Front Side Marker Bulb
1.Make sure the lamps are off.
2.Remove the lamp from the wheel lipmolding by releasing the clip.
3.Turn the bulb holder counterclockwiseand remove it.
4.Remove the bulb by pulling it straightout.
5.Install the new bulb in reverse order.
280
2023 Ranger (TFG) Canada/United States of America, Vehicles Built From: 10-10-2022, enUSA, Edition date: 202208, First-PrintingMaintenanceE284569 E284581 E301637
Page 285 of 470
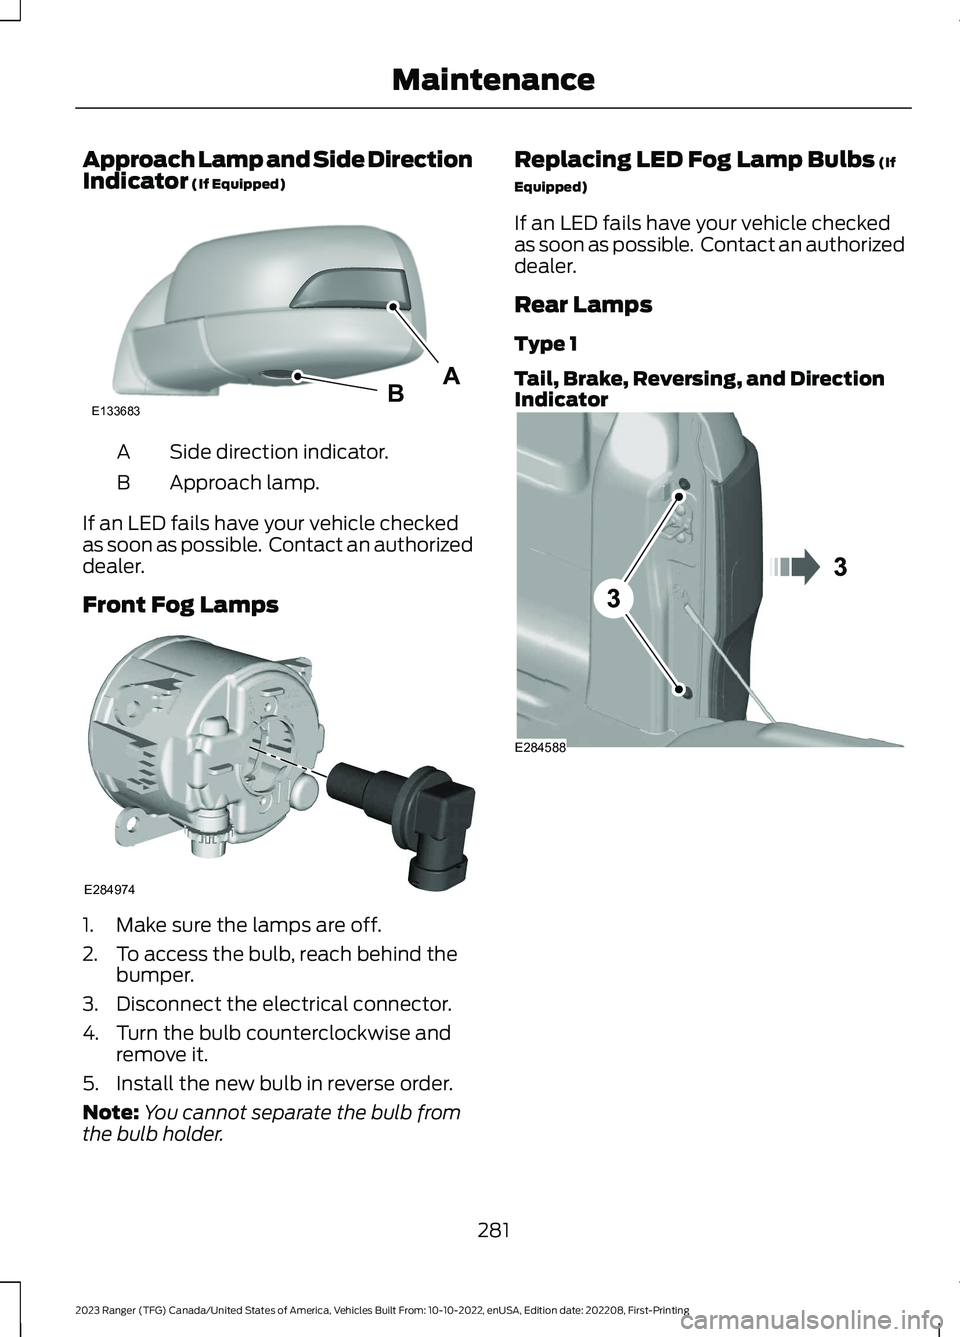
Approach Lamp and Side DirectionIndicator (If Equipped)
Side direction indicator.A
Approach lamp.B
If an LED fails have your vehicle checkedas soon as possible. Contact an authorizeddealer.
Front Fog Lamps
1.Make sure the lamps are off.
2.To access the bulb, reach behind thebumper.
3.Disconnect the electrical connector.
4.Turn the bulb counterclockwise andremove it.
5.Install the new bulb in reverse order.
Note:You cannot separate the bulb fromthe bulb holder.
Replacing LED Fog Lamp Bulbs (If
Equipped)
If an LED fails have your vehicle checkedas soon as possible. Contact an authorizeddealer.
Rear Lamps
Type 1
Tail, Brake, Reversing, and DirectionIndicator
281
2023 Ranger (TFG) Canada/United States of America, Vehicles Built From: 10-10-2022, enUSA, Edition date: 202208, First-PrintingMaintenanceABE133683 E284974 E284588
Page 286 of 470

Brake and rear park bulb.A
Rear direction indicator bulb.B
Reverse lamp bulb.C
1.Make sure the lamps are off.
2.Open the tailgate to access the rearlamp assemblies.
3.Remove the two bolts from the taillamp assembly. Then, carefully pull thelamp assembly from the tailgate pillarby releasing the two retaining tabs.
4.Turn the bulb holder counterclockwiseand remove it.
5.Remove the bulb by pulling it straightout.
6.Install the new bulb in reverse order.
Replacing LED Brake, Rear, DirectionIndicator and Reverse Lamp Bulbs
If an LED fails have your vehicle checkedas soon as possible. Contact an authorizeddealer.
Type 2
Tail, Brake, Reversing Lamp andDirection Indicator
1.Make sure the lamps are off.
2.Undo the screws to remove the outerlens and access the bulbs.
3.Remove the bulb by pulling it straightout.
4.Install the new bulb in reverse order.
282
2023 Ranger (TFG) Canada/United States of America, Vehicles Built From: 10-10-2022, enUSA, Edition date: 202208, First-PrintingMaintenanceE284593 E284955
Page 287 of 470
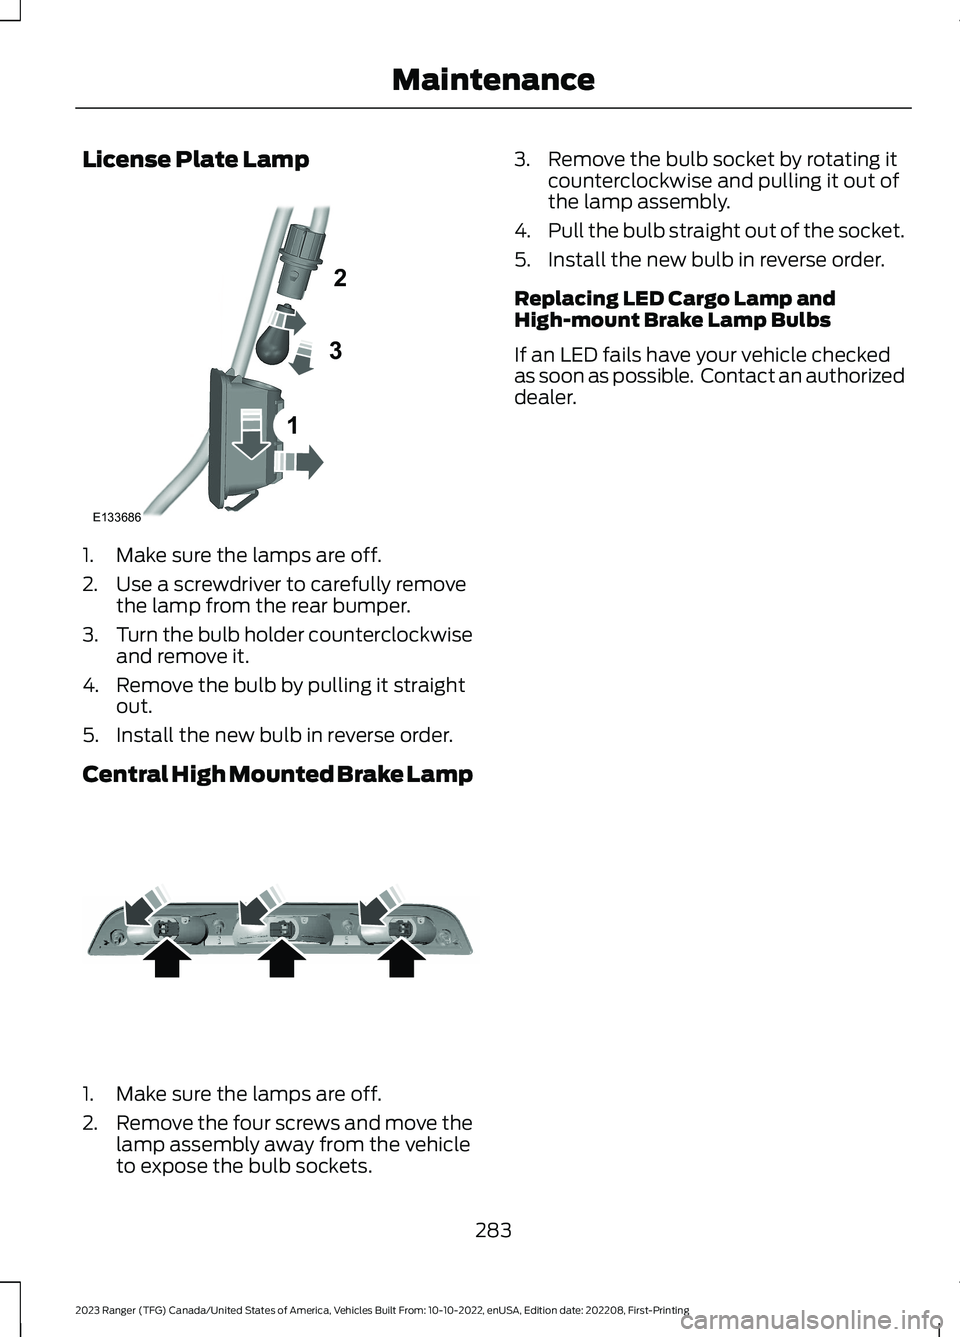
License Plate Lamp
1.Make sure the lamps are off.
2.Use a screwdriver to carefully removethe lamp from the rear bumper.
3.Turn the bulb holder counterclockwiseand remove it.
4.Remove the bulb by pulling it straightout.
5.Install the new bulb in reverse order.
Central High Mounted Brake Lamp
1.Make sure the lamps are off.
2.Remove the four screws and move thelamp assembly away from the vehicleto expose the bulb sockets.
3.Remove the bulb socket by rotating itcounterclockwise and pulling it out ofthe lamp assembly.
4.Pull the bulb straight out of the socket.
5.Install the new bulb in reverse order.
Replacing LED Cargo Lamp andHigh-mount Brake Lamp Bulbs
If an LED fails have your vehicle checkedas soon as possible. Contact an authorizeddealer.
283
2023 Ranger (TFG) Canada/United States of America, Vehicles Built From: 10-10-2022, enUSA, Edition date: 202208, First-PrintingMaintenance123E133686 E187290
Page 323 of 470
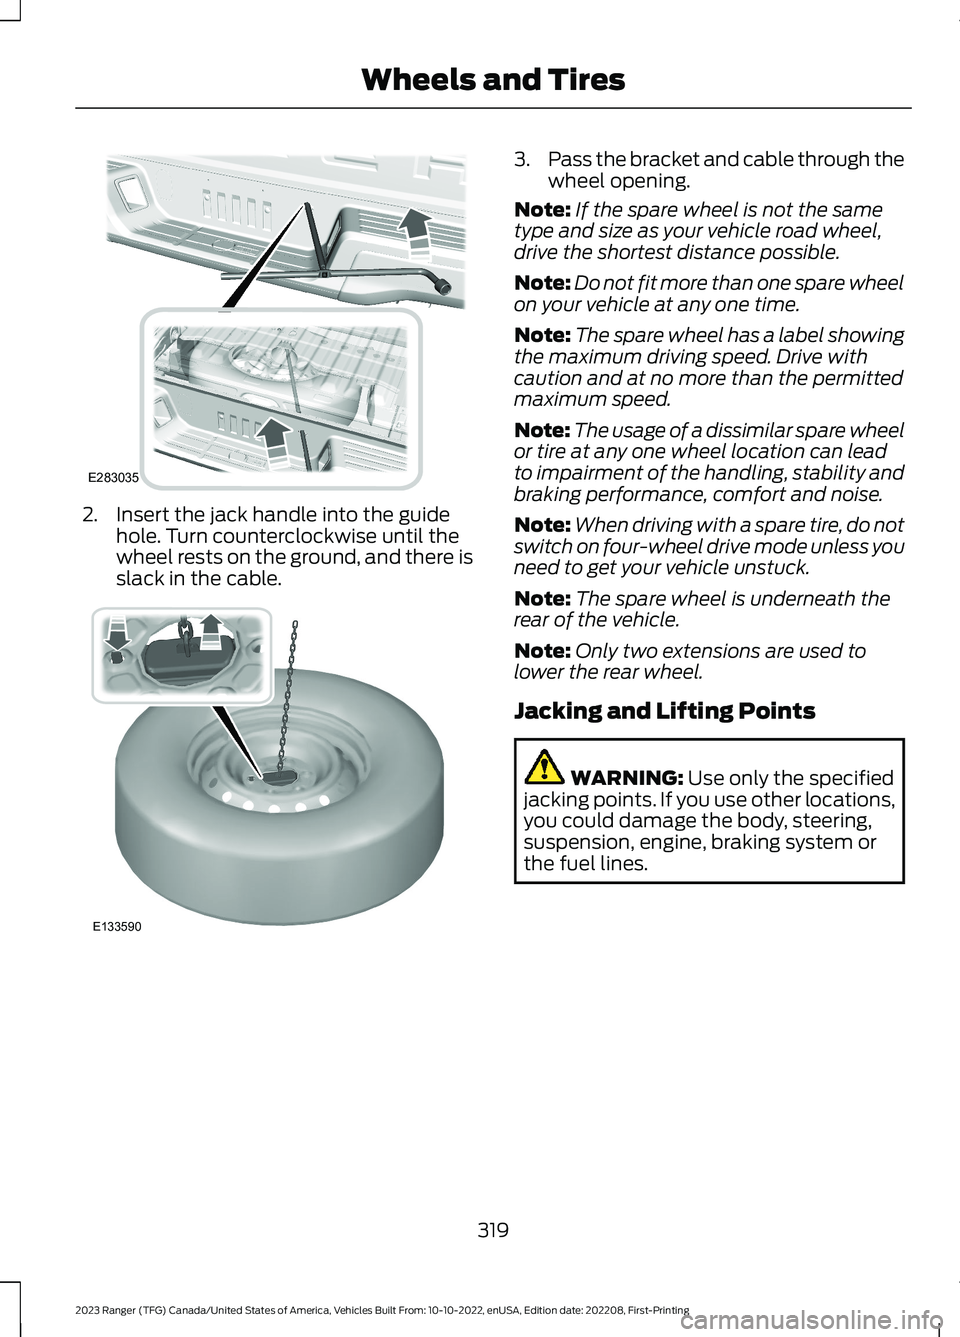
2.Insert the jack handle into the guidehole. Turn counterclockwise until thewheel rests on the ground, and there isslack in the cable.
3.Pass the bracket and cable through thewheel opening.
Note:If the spare wheel is not the sametype and size as your vehicle road wheel,drive the shortest distance possible.
Note:Do not fit more than one spare wheelon your vehicle at any one time.
Note:The spare wheel has a label showingthe maximum driving speed. Drive withcaution and at no more than the permittedmaximum speed.
Note:The usage of a dissimilar spare wheelor tire at any one wheel location can leadto impairment of the handling, stability andbraking performance, comfort and noise.
Note:When driving with a spare tire, do notswitch on four-wheel drive mode unless youneed to get your vehicle unstuck.
Note:The spare wheel is underneath therear of the vehicle.
Note:Only two extensions are used tolower the rear wheel.
Jacking and Lifting Points
WARNING: Use only the specifiedjacking points. If you use other locations,you could damage the body, steering,suspension, engine, braking system orthe fuel lines.
319
2023 Ranger (TFG) Canada/United States of America, Vehicles Built From: 10-10-2022, enUSA, Edition date: 202208, First-PrintingWheels and TiresE283035 E133590
Page 326 of 470
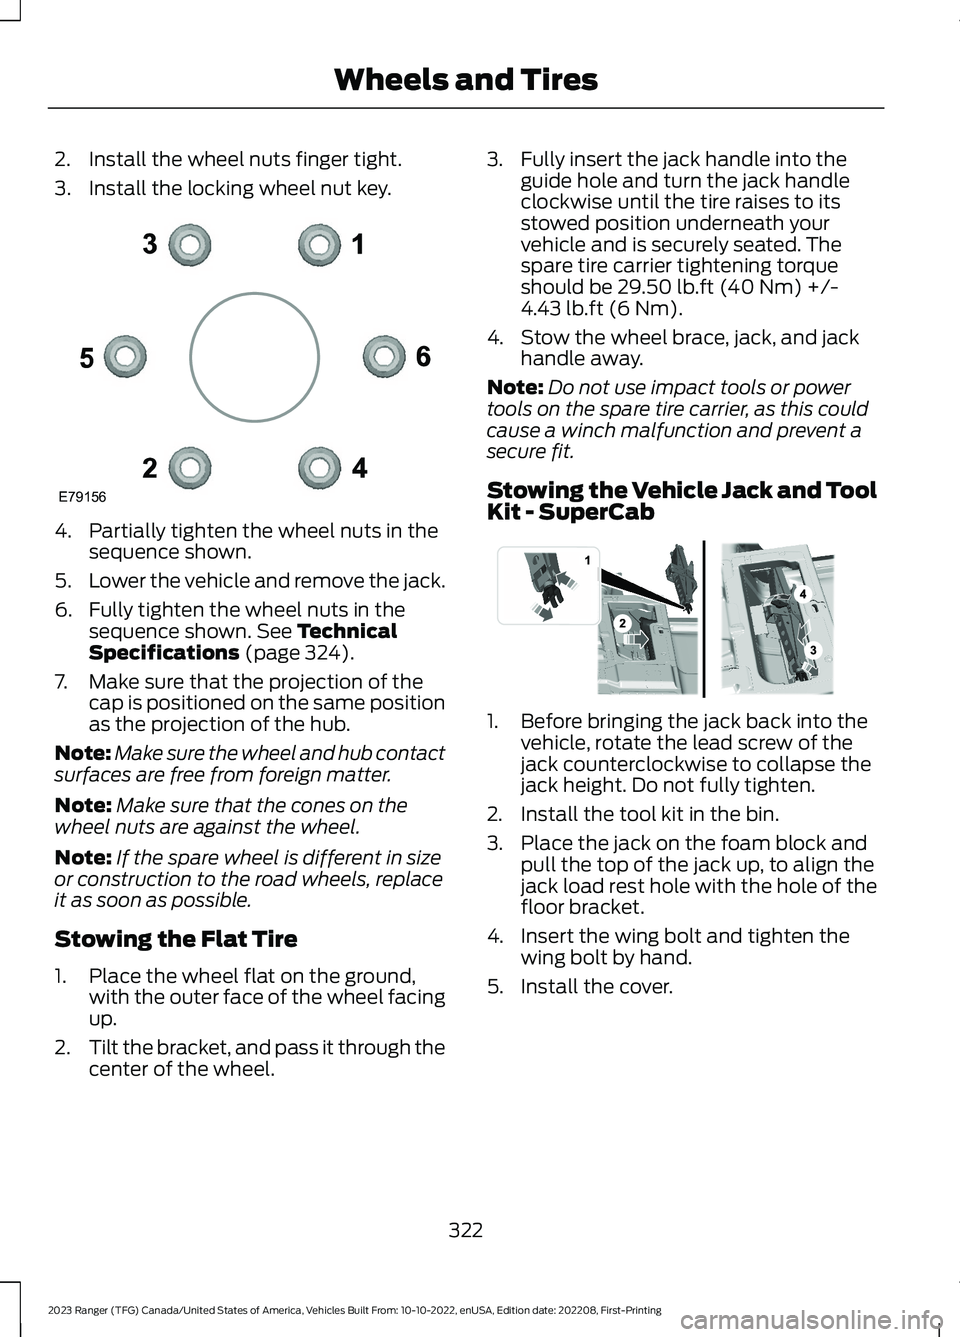
2.Install the wheel nuts finger tight.
3.Install the locking wheel nut key.
4.Partially tighten the wheel nuts in thesequence shown.
5.Lower the vehicle and remove the jack.
6.Fully tighten the wheel nuts in thesequence shown. See TechnicalSpecifications (page 324).
7.Make sure that the projection of thecap is positioned on the same positionas the projection of the hub.
Note:Make sure the wheel and hub contactsurfaces are free from foreign matter.
Note:Make sure that the cones on thewheel nuts are against the wheel.
Note:If the spare wheel is different in sizeor construction to the road wheels, replaceit as soon as possible.
Stowing the Flat Tire
1.Place the wheel flat on the ground,with the outer face of the wheel facingup.
2.Tilt the bracket, and pass it through thecenter of the wheel.
3.Fully insert the jack handle into theguide hole and turn the jack handleclockwise until the tire raises to itsstowed position underneath yourvehicle and is securely seated. Thespare tire carrier tightening torqueshould be 29.50 lb.ft (40 Nm) +/-4.43 lb.ft (6 Nm).
4.Stow the wheel brace, jack, and jackhandle away.
Note:Do not use impact tools or powertools on the spare tire carrier, as this couldcause a winch malfunction and prevent asecure fit.
Stowing the Vehicle Jack and ToolKit - SuperCab
1.Before bringing the jack back into thevehicle, rotate the lead screw of thejack counterclockwise to collapse thejack height. Do not fully tighten.
2.Install the tool kit in the bin.
3.Place the jack on the foam block andpull the top of the jack up, to align thejack load rest hole with the hole of thefloor bracket.
4.Insert the wing bolt and tighten thewing bolt by hand.
5.Install the cover.
322
2023 Ranger (TFG) Canada/United States of America, Vehicles Built From: 10-10-2022, enUSA, Edition date: 202208, First-PrintingWheels and TiresE79156 E296013
Page 327 of 470
Stowing the Vehicle Jack -SuperCrew
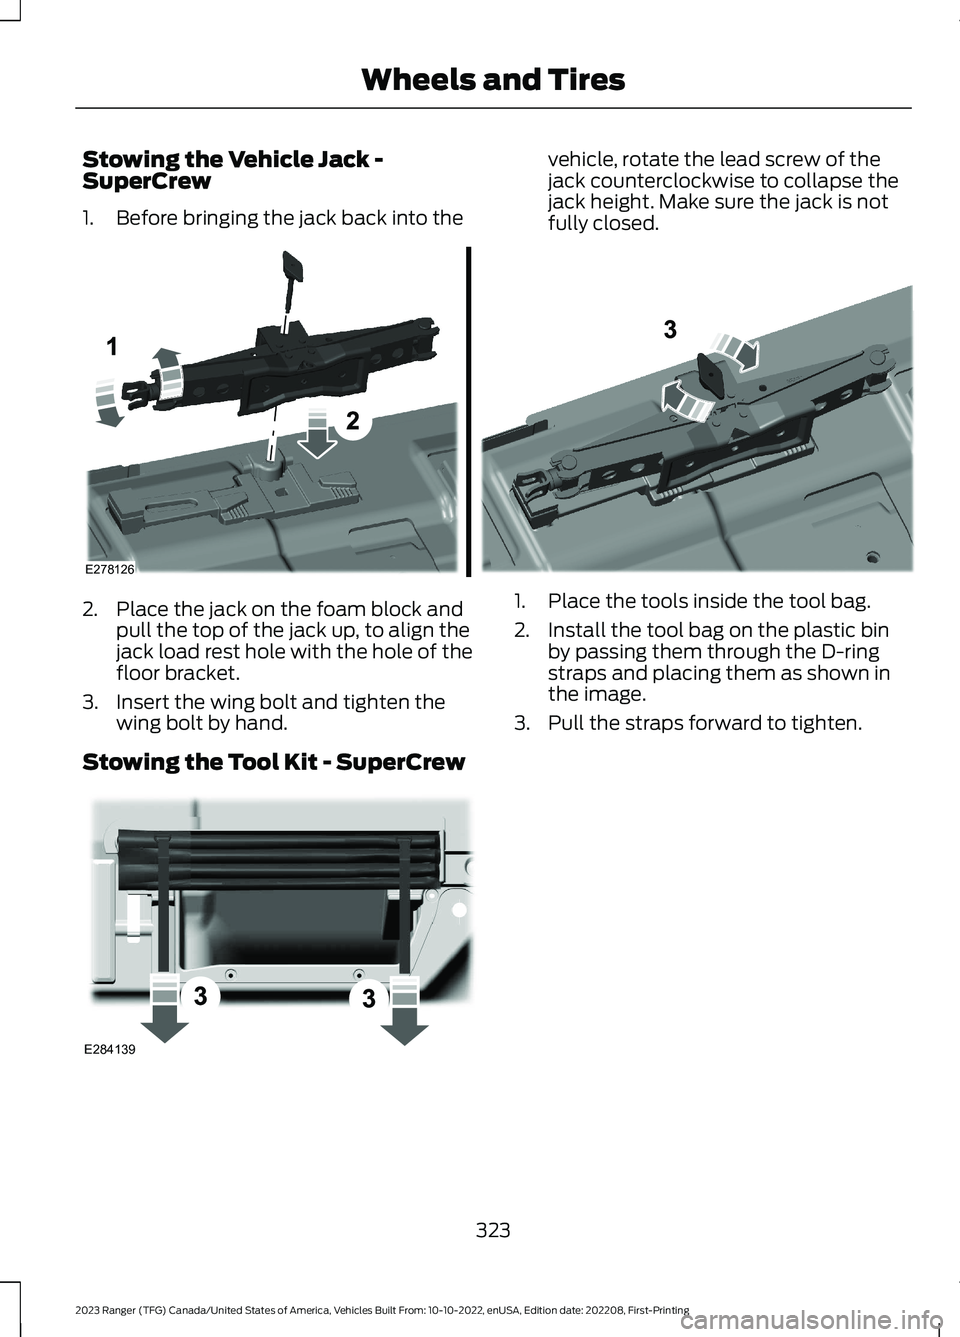
1.Before bringing the jack back into the
vehicle, rotate the lead screw of thejack counterclockwise to collapse thejack height. Make sure the jack is notfully closed.
2.Place the jack on the foam block andpull the top of the jack up, to align thejack load rest hole with the hole of thefloor bracket.
3.Insert the wing bolt and tighten thewing bolt by hand.
Stowing the Tool Kit - SuperCrew
1.Place the tools inside the tool bag.
2.Install the tool bag on the plastic binby passing them through the D-ringstraps and placing them as shown inthe image.
3.Pull the straps forward to tighten.
323
2023 Ranger (TFG) Canada/United States of America, Vehicles Built From: 10-10-2022, enUSA, Edition date: 202208, First-PrintingWheels and TiresE278126 E284139
Page 348 of 470
Accessing the Clock Settings
Press and release the button toaccess the clock setting.
Use the center arrow controls tochange the hours and minutes.
Accessing the Media Source Menu
Press and release the button toopen the media source menu.
You can press this multiple times tochange to a media device or scroll throughthe media sources using the arrow buttons.Press OK to select a source.
Accessing the Menu
Press and release the button toaccess different audio systemfeatures.
Accessing the Phone Features
Press and release the button toaccess the phone features of thesystem.
Accessing the Sound Settings
Press and release the button toaccess settings for Treble,Midrange, Bass, Fade andBalance.
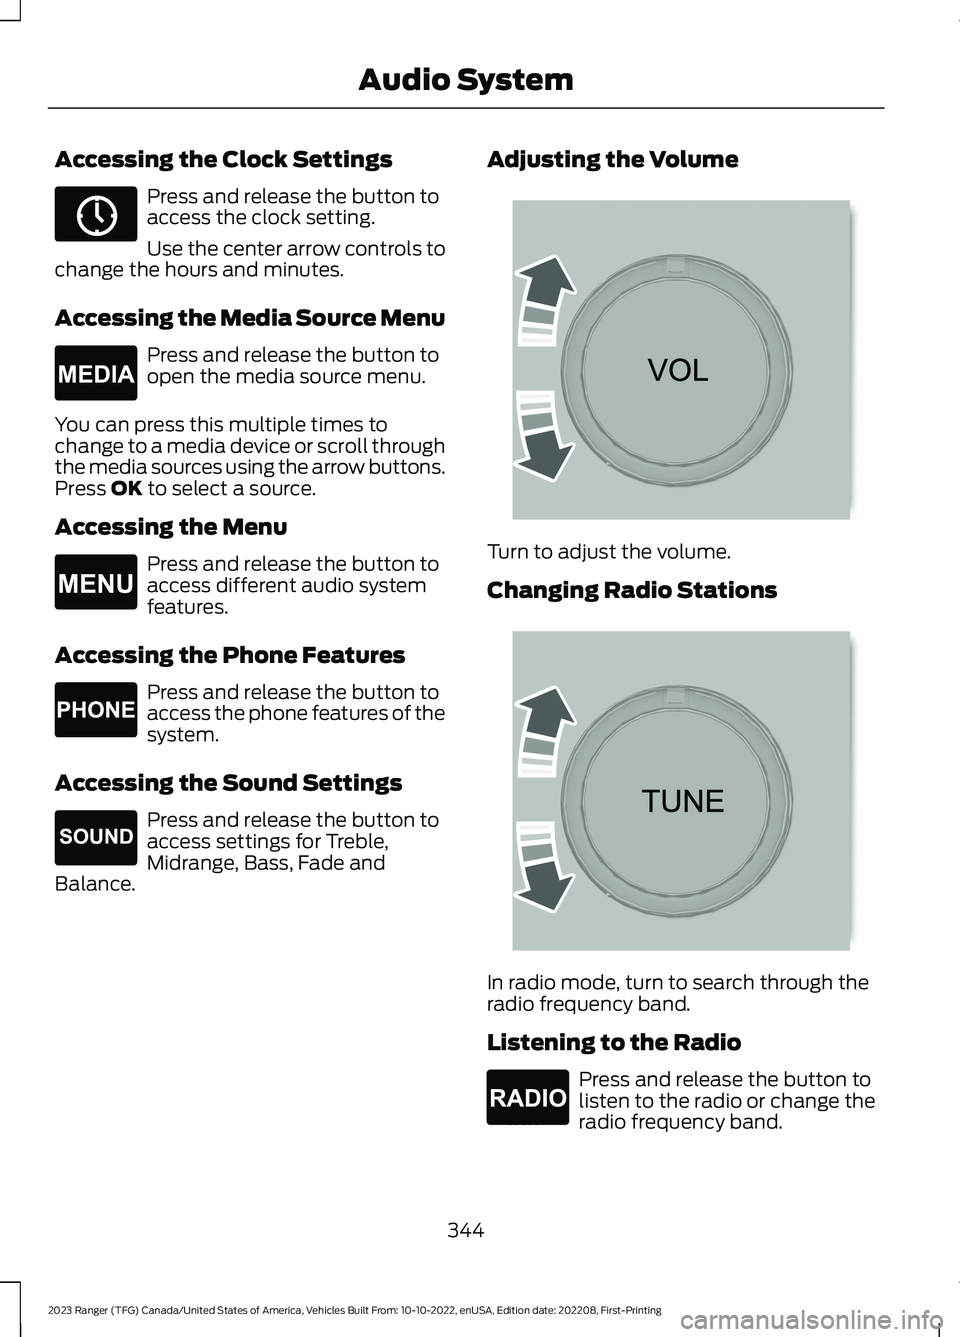
Adjusting the Volume
Turn to adjust the volume.
Changing Radio Stations
In radio mode, turn to search through theradio frequency band.
Listening to the Radio
Press and release the button tolisten to the radio or change theradio frequency band.
344
2023 Ranger (TFG) Canada/United States of America, Vehicles Built From: 10-10-2022, enUSA, Edition date: 202208, First-PrintingAudio SystemE265036 E265035 E265038 E265037 E265271 E265373 E265696 E265033