tow FORD SIERRA 1983 1.G SOHC Engines Workshop Manual
[x] Cancel search | Manufacturer: FORD, Model Year: 1983, Model line: SIERRA, Model: FORD SIERRA 1983 1.GPages: 24, PDF Size: 1.03 MB
Page 13 of 24

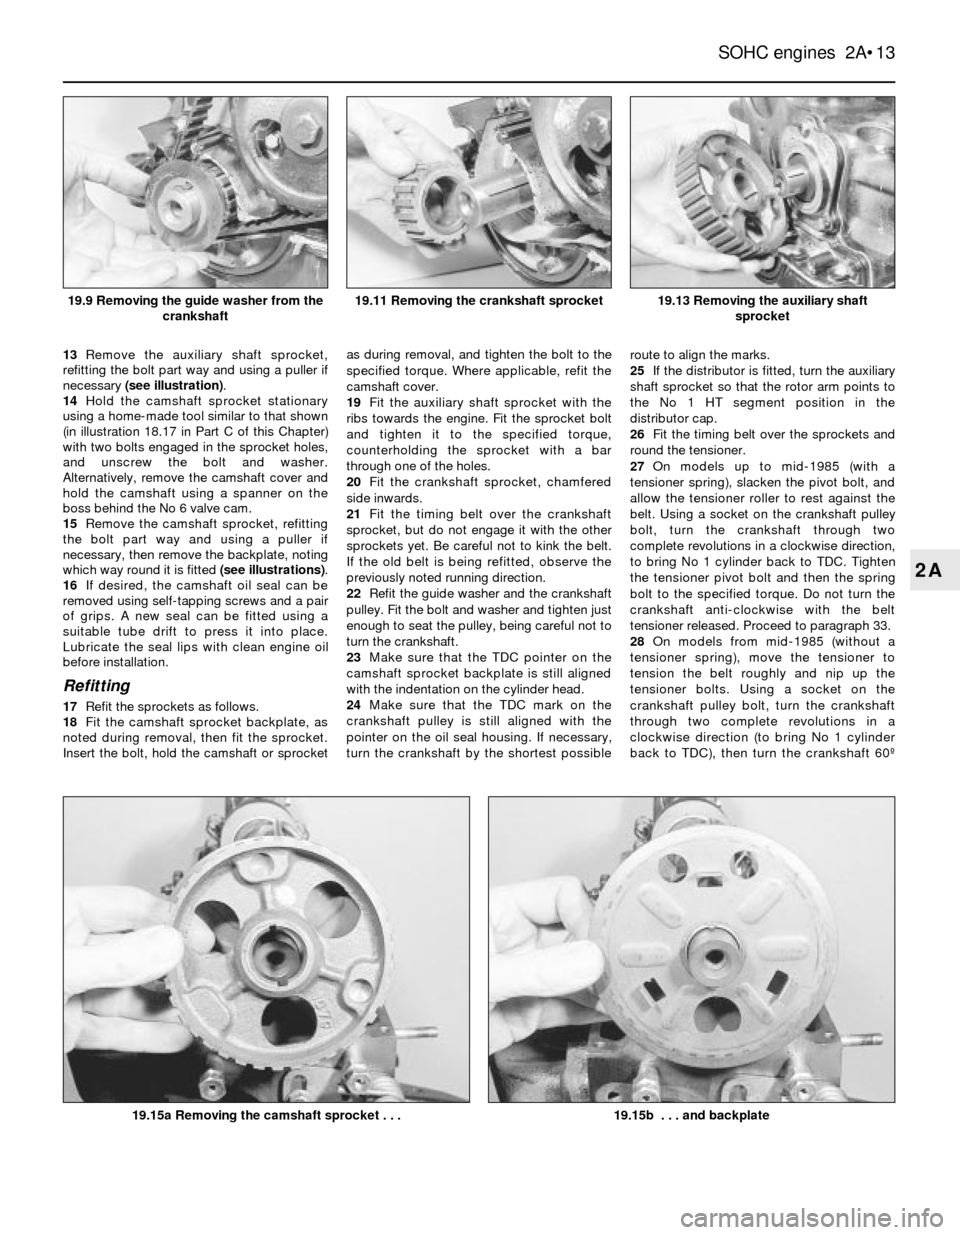
13Remove the auxiliary shaft sprocket,
refitting the bolt part way and using a puller if
necessary (see illustration).
14Hold the camshaft sprocket stationary
using a home-made tool similar to that shown
(in illustration 18.17 in Part C of this Chapter)
with two bolts engaged in the sprocket holes,
and unscrew the bolt and washer.
Alternatively, remove the camshaft cover and
hold the camshaft using a spanner on the
boss behind the No 6 valve cam.
15Remove the camshaft sprocket, refitting
the bolt part way and using a puller if
necessary, then remove the backplate, noting
which way round it is fitted (see illustrations).
16If desired, the camshaft oil seal can be
removed using self-tapping screws and a pair
of grips. A new seal can be fitted using a
suitable tube drift to press it into place.
Lubricate the seal lips with clean engine oil
before installation.
Refitting
17Refit the sprockets as follows.
18Fit the camshaft sprocket backplate, as
noted during removal, then fit the sprocket.
Insert the bolt, hold the camshaft or sprocketas during removal, and tighten the bolt to the
specified torque. Where applicable, refit the
camshaft cover.
19Fit the auxiliary shaft sprocket with the
ribs towards the engine. Fit the sprocket bolt
and tighten it to the specified torque,
counterholding the sprocket with a bar
through one of the holes.
20Fit the crankshaft sprocket, chamfered
side inwards.
21Fit the timing belt over the crankshaft
sprocket, but do not engage it with the other
sprockets yet. Be careful not to kink the belt.
If the old belt is being refitted, observe the
previously noted running direction.
22Refit the guide washer and the crankshaft
pulley. Fit the bolt and washer and tighten just
enough to seat the pulley, being careful not to
turn the crankshaft.
23Make sure that the TDC pointer on the
camshaft sprocket backplate is still aligned
with the indentation on the cylinder head.
24Make sure that the TDC mark on the
crankshaft pulley is still aligned with the
pointer on the oil seal housing. If necessary,
turn the crankshaft by the shortest possibleroute to align the marks.
25If the distributor is fitted, turn the auxiliary
shaft sprocket so that the rotor arm points to
the No 1 HT segment position in the
distributor cap.
26Fit the timing belt over the sprockets and
round the tensioner.
27On models up to mid-1985 (with a
tensioner spring), slacken the pivot bolt, and
allow the tensioner roller to rest against the
belt. Using a socket on the crankshaft pulley
bolt, turn the crankshaft through two
complete revolutions in a clockwise direction,
to bring No 1 cylinder back to TDC. Tighten
the tensioner pivot bolt and then the spring
bolt to the specified torque. Do not turn the
crankshaft anti-clockwise with the belt
tensioner released. Proceed to paragraph 33.
28On models from mid-1985 (without a
tensioner spring), move the tensioner to
tension the belt roughly and nip up the
tensioner bolts. Using a socket on the
crankshaft pulley bolt, turn the crankshaft
through two complete revolutions in a
clockwise direction (to bring No 1 cylinder
back to TDC), then turn the crankshaft 60¼
SOHC engines 2A¥13
2A
19.13 Removing the auxiliary shaft
sprocket
19.15b . . . and backplate19.15a Removing the camshaft sprocket . . .
19.11 Removing the crankshaft sprocket19.9 Removing the guide washer from the
crankshaft
Page 18 of 24

Note: A new gasket should be used when
refitting the auxiliary shaft cover (see text).
Removal
1Remove the timing belt and the auxiliary
shaft sprocket.
2Remove the distributor.
3Remove the mechanical fuel pump and
operating pushrod (where applicable).
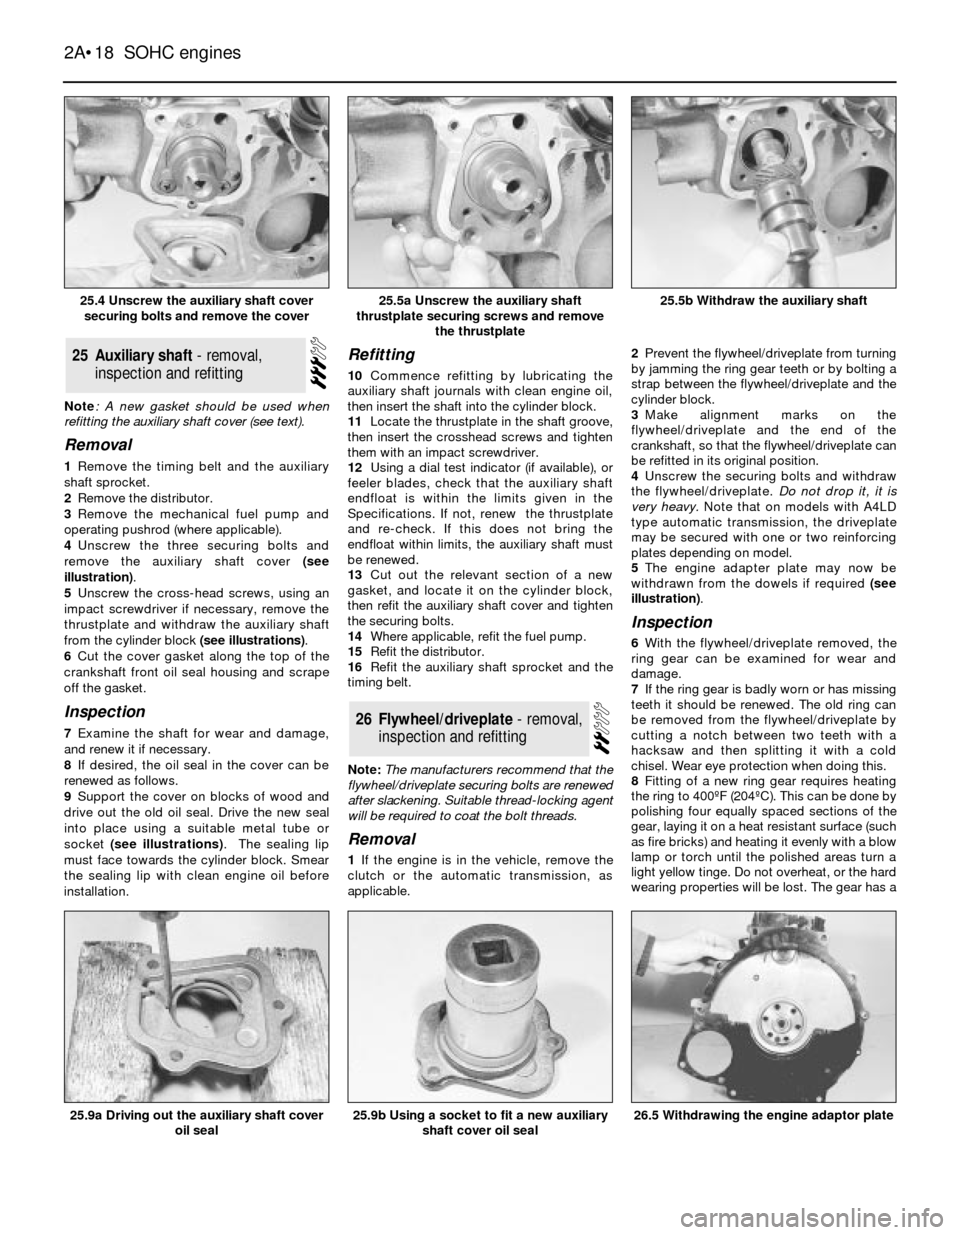
4Unscrew the three securing bolts and
remove the auxiliary shaft cover (see
illustration).
5Unscrew the cross-head screws, using an
impact screwdriver if necessary, remove the
thrustplate and withdraw the auxiliary shaft
from the cylinder block (see illustrations).
6Cut the cover gasket along the top of the
crankshaft front oil seal housing and scrape
off the gasket.
Inspection
7Examine the shaft for wear and damage,
and renew it if necessary.
8If desired, the oil seal in the cover can be
renewed as follows.
9Support the cover on blocks of wood and
drive out the old oil seal. Drive the new seal
into place using a suitable metal tube or
socket (see illustrations). The sealing lip
must face towards the cylinder block. Smear
the sealing lip with clean engine oil before
installation.
Refitting
10Commence refitting by lubricating the
auxiliary shaft journals with clean engine oil,
then insert the shaft into the cylinder block.
11Locate the thrustplate in the shaft groove,
then insert the crosshead screws and tighten
them with an impact screwdriver.
12Using a dial test indicator (if available), or
feelerblades, check that the auxiliary shaft
endfloat is within the limits given in the
Specifications. If not, renew the thrustplate
and re-check. If this does not bring the
endfloat within limits, the auxiliary shaft must
be renewed.
13Cut out the relevant section of a new
gasket, and locate it on the cylinder block,
then refit the auxiliary shaft cover and tighten
the securing bolts.
14Where applicable, refit the fuel pump.
15Refit the distributor.
16Refit the auxiliary shaft sprocket and the
timing belt.
Note: The manufacturers recommend that the
flywheel/driveplate securing bolts are renewed
after slackening. Suitable thread-locking agent
will be required to coat the bolt threads.
Removal
1If the engine is in the vehicle, remove the
clutch or the automatic transmission, as
applicable.2Prevent the flywheel/driveplate from turning
by jamming the ring gear teeth or by bolting a
strap between the flywheel/driveplate and the
cylinder block.
3Make alignment marks on the
flywheel/driveplate and the end of the
crankshaft, so that the flywheel/driveplate can
be refitted in its original position.
4Unscrew the securing bolts and withdraw
the flywheel/driveplate. Do not drop it, it is
very heavy. Note that on models with A4LD
type automatic transmission, the driveplate
may be secured with one or two reinforcing
plates depending on model.
5The engine adapter plate may now be
withdrawn from the dowels if required (see
illustration).
Inspection
6With the flywheel/driveplate removed, the
ring gear can be examined for wear and
damage.
7If the ring gear is badly worn or has missing
teeth it should be renewed. The old ring can
be removed from the flywheel/driveplate by
cutting a notch between two teeth with a
hacksaw and then splitting it with a cold
chisel. Wear eye protection when doing this.
8Fitting of a new ring gear requires heating
the ring to 400¼F (204¼C). This can be done by
polishing four equally spaced sections of the
gear, laying it on a heat resistant surface (such
as fire bricks) and heating it evenly with a blow
lamp or torch until the polished areas turn a
light yellow tinge. Do not overheat, or the hard
wearing properties will be lost. The gear has a
26Flywheel/driveplate - removal,
inspection and refitting
25Auxiliary shaft - removal,
inspection and refitting
2A¥18SOHC engines
25.4 Unscrew the auxiliary shaft cover
securing bolts and remove the cover25.5b Withdraw the auxiliary shaft
26.5 Withdrawing the engine adaptor plate25.9b Using a socket to fit a new auxiliary
shaft cover oil seal25.9a Driving out the auxiliary shaft cover
oil seal
25.5a Unscrew the auxiliary shaft
thrustplate securing screws and remove
the thrustplate
Page 23 of 24

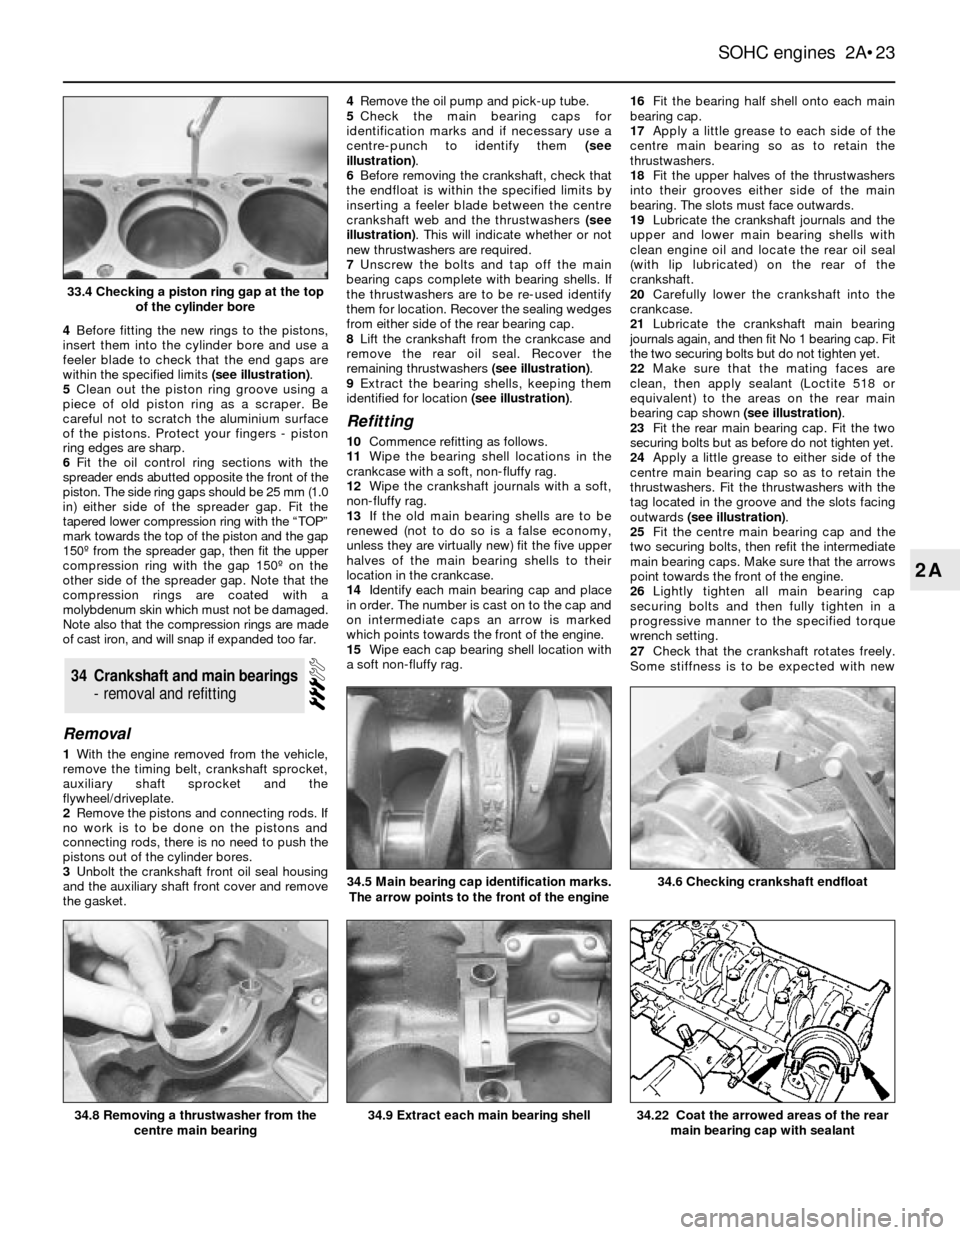
4Before fitting the new rings to the pistons,
insert them into the cylinder bore and use a
feelerblade to check that the end gaps are
within the specified limits (see illustration).
5Clean out the piston ring groove using a
piece of old piston ring as a scraper. Be
careful not to scratch the aluminium surface
of the pistons. Protect your fingers - piston
ring edges are sharp.
6Fit the oil control ring sections with the
spreader ends abutted opposite the front of the
piston. The side ring gaps should be 25 mm (1.0
in) either side of the spreader gap. Fit the
tapered lower compression ring with the ÒTOPÓ
mark towards the top of the piston and the gap
150¼ from the spreader gap, then fit the upper
compression ring with the gap 150¼ on the
other side of the spreader gap. Note that the
compression rings are coated with a
molybdenum skin which must not be damaged.
Note also that the compression rings are made
of cast iron, and will snap if expanded too far.
Removal
1With the engine removed from the vehicle,
remove the timing belt, crankshaft sprocket,
auxiliary shaft sprocket and the
flywheel/driveplate.
2Remove the pistons and connecting rods. If
no work is to be done on the pistons and
connecting rods, there is no need to push the
pistons out of the cylinder bores.
3Unbolt the crankshaft front oil seal housing
and the auxiliary shaft front cover and remove
the gasket.4Remove the oil pump and pick-up tube.
5Check the main bearing caps for
identification marks and if necessary use a
centre-punch to identify them (see
illustration).
6Before removing the crankshaft, check that
the endfloat is within the specified limits by
inserting a feeler blade between the centre
crankshaft web and the thrustwashers (see
illustration). This will indicate whether or not
new thrustwashers are required.
7Unscrew the bolts and tap off the main
bearing caps complete with bearing shells. If
the thrustwashers are to be re-used identify
them for location. Recover the sealing wedges
from either side of the rear bearing cap.
8Lift the crankshaft from the crankcase and
remove the rear oil seal. Recover the
remaining thrustwashers (see illustration).
9Extract the bearing shells, keeping them
identified for location (see illustration).
Refitting
10Commence refitting as follows.
11Wipe the bearing shell locations in the
crankcase with a soft, non-fluffy rag.
12Wipe the crankshaft journals with a soft,
non-fluffy rag.
13If the old main bearing shells are to be
renewed (not to do so is a false economy,
unless they are virtually new) fit the five upper
halves of the main bearing shells to their
location in the crankcase.
14Identify each main bearing cap and place
in order. The number is cast on to the cap and
on intermediate caps an arrow is marked
which points towards the front of the engine.
15Wipe each cap bearing shell location with
a soft non-fluffy rag. 16Fit the bearing half shell onto each main
bearing cap.
17Apply a little grease to each side of the
centre main bearing so as to retain the
thrustwashers.
18Fit the upper halves of the thrustwashers
into their grooves either side of the main
bearing. The slots must face outwards.
19Lubricate the crankshaft journals and the
upper and lower main bearing shells with
clean engine oil and locate the rear oil seal
(with lip lubricated) on the rear of the
crankshaft.
20Carefully lower the crankshaft into the
crankcase.
21Lubricate the crankshaft main bearing
journals again, and then fit No 1 bearing cap. Fit
the two securing bolts but do not tighten yet.
22Make sure that the mating faces are
clean, then apply sealant (Loctite 518 or
equivalent) to the areas on the rear main
bearing cap shown (see illustration).
23Fit the rear main bearing cap. Fit the two
securing bolts but as before do not tighten yet.
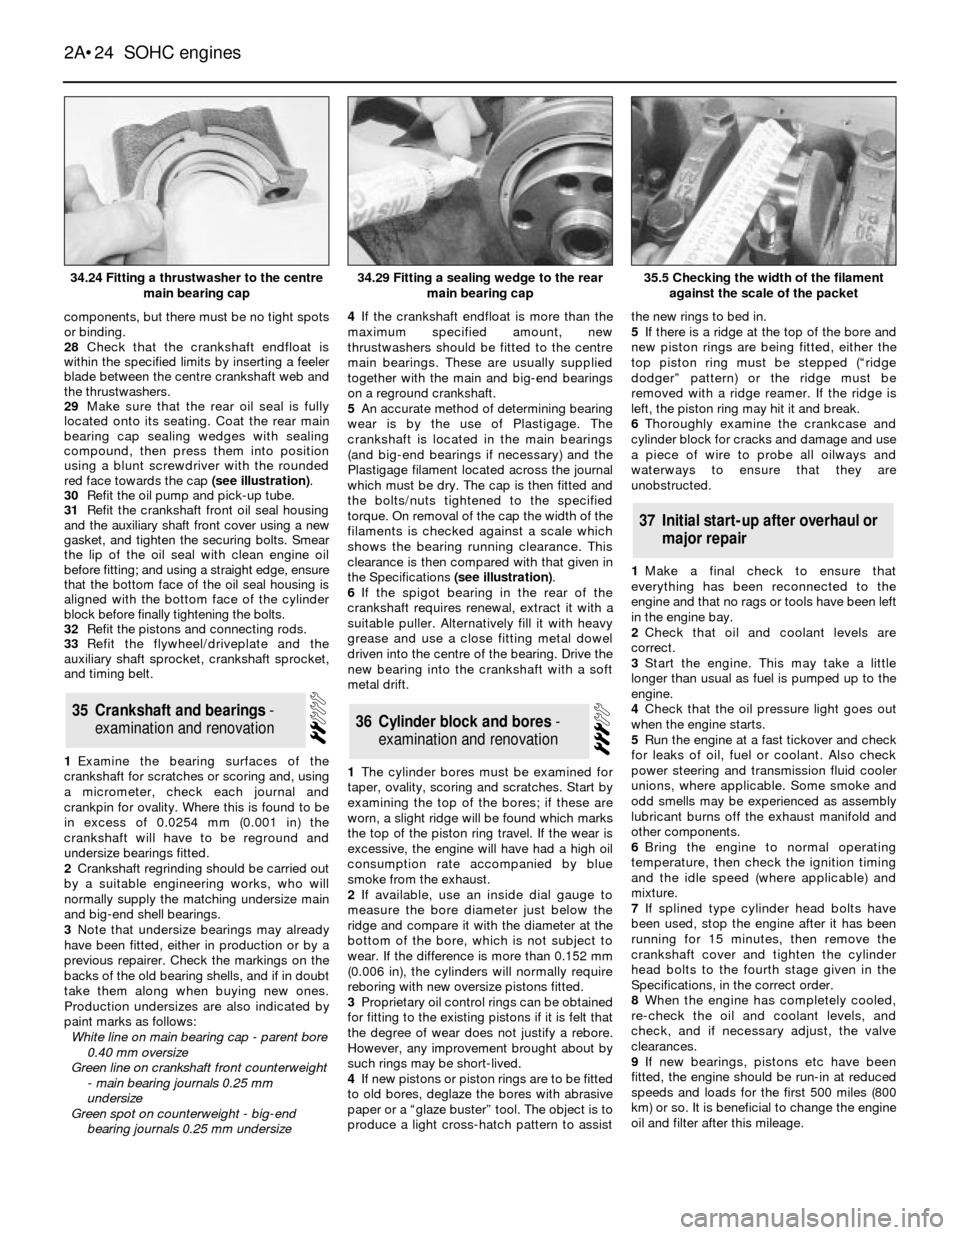
24Apply a little grease to either side of the
centre main bearing cap so as to retain the
thrustwashers. Fit the thrustwashers with the
tag located in the groove and the slots facing
outwards (see illustration).
25Fit the centre main bearing cap and the
two securing bolts, then refit the intermediate
main bearing caps. Make sure that the arrows
point towards the front of the engine.
26Lightly tighten all main bearing cap
securing bolts and then fully tighten in a
progressive manner to the specified torque
wrench setting.
27Check that the crankshaft rotates freely.
Some stiffness is to be expected with new
34Crankshaft and main bearings
- removal and refitting
SOHC engines 2A¥23
2A
34.6 Checking crankshaft endfloat
34.22 Coat the arrowed areas of the rear
main bearing cap with sealant34.9 Extract each main bearing shell34.8 Removing a thrustwasher from the
centre main bearing
34.5 Main bearing cap identification marks.
The arrow points to the front of the engine
33.4 Checking a piston ring gap at the top
of the cylinder bore
Page 24 of 24

components, but there must be no tight spots
or binding.
28Check that the crankshaft endfloat is
within the specified limits by inserting a feeler
blade between the centre crankshaft web and
the thrustwashers.
29Make sure that the rear oil seal is fully
located onto its seating. Coat the rear main
bearing cap sealing wedges with sealing
compound, then press them into position
using a blunt screwdriver with the rounded
red face towards the cap (see illustration).
30Refit the oil pump and pick-up tube.
31Refit the crankshaft front oil seal housing
and the auxiliary shaft front cover using a new
gasket, and tighten the securing bolts. Smear
the lip of the oil seal with clean engine oil
before fitting; and using a straight edge, ensure
that the bottom face of the oil seal housing is
aligned with the bottom face of the cylinder
block before finally tightening the bolts.
32Refit the pistons and connecting rods.
33Refit the flywheel/driveplate and the
auxiliary shaft sprocket, crankshaft sprocket,
and timing belt.
1Examine the bearing surfaces of the
crankshaft for scratches or scoring and, using
a micrometer, check each journal and
crankpin for ovality. Where this is found to be
in excess of 0.0254 mm (0.001 in) the
crankshaft will have to be reground and
undersize bearings fitted.
2Crankshaft regrinding should be carried out
by a suitable engineering works, who will
normally supply the matching undersize main
and big-end shell bearings.
3Note that undersize bearings may already
have been fitted, either in production or by a
previous repairer. Check the markings on the
backs of the old bearing shells, and if in doubt
take them along when buying new ones.
Production undersizes are also indicated by
paint marks as follows:
White line on main bearing cap - parent bore
0.40 mm oversize
Green line on crankshaft front counterweight
- main bearing journals 0.25 mm
undersize
Green spot on counterweight - big-end
bearing journals 0.25 mm undersize4If the crankshaft endfloat is more than the
maximum specified amount, new
thrustwashers should be fitted to the centre
main bearings. These are usually supplied
together with the main and big-end bearings
on a reground crankshaft.
5An accurate method of determining bearing
wear is by the use of Plastigage. The
crankshaft is located in the main bearings
(and big-end bearings if necessary) and the
Plastigage filament located across the journal
which must be dry. The cap is then fitted and
the bolts/nuts tightened to the specified
torque. On removal of the cap the width of the
filaments is checked against a scale which
shows the bearing running clearance. This
clearance is then compared with that given in
the Specifications (see illustration).
6If the spigot bearing in the rear of the
crankshaft requires renewal, extract it with a
suitable puller. Alternatively fill it with heavy
grease and use a close fitting metal dowel
driven into the centre of the bearing. Drive the
new bearing into the crankshaft with a soft
metal drift.
1The cylinder bores must be examined for
taper, ovality, scoring and scratches. Start by
examining the top of the bores; if these are
worn, a slight ridge will be found which marks
the top of the piston ring travel. If the wear is
excessive, the engine will have had a high oil
consumption rate accompanied by blue
smoke from the exhaust.
2If available, use an inside dial gauge to
measure the bore diameter just below the
ridge and compare it with the diameter at the
bottom of the bore, which is not subject to
wear. If the difference is more than 0.152 mm
(0.006 in), the cylinders will normally require
reboring with new oversize pistons fitted.
3Proprietary oil control rings can be obtained
for fitting to the existing pistons if it is felt that
the degree of wear does not justify a rebore.
However, any improvement brought about by
such rings may be short-lived.
4If new pistons or piston rings are to be fitted
to old bores, deglaze the bores with abrasive
paper or a Òglaze busterÓ tool. The object is to
produce a light cross-hatch pattern to assistthe new rings to bed in.
5If there is a ridge at the top of the bore and
new piston rings are being fitted, either the
top piston ring must be stepped (Òridge
dodgerÓ pattern) or the ridge must be
removed with a ridge reamer. If the ridge is
left, the piston ring may hit it and break.
6Thoroughly examine the crankcase and
cylinder block for cracks and damage and use
a piece of wire to probe all oilways and
waterways to ensurethatthey are
unobstructed.
1Make a final check to ensure that
everything has been reconnected to the
engine and that no rags or tools have been left
in the engine bay.
2Check that oil and coolant levels are
correct.
3Start the engine. This may take a little
longer than usual as fuel is pumped up to the
engine.
4Check that the oil pressure light goes out
when the engine starts.
5Run the engine at a fast tickover and check
for leaks of oil, fuel or coolant. Also check
power steering and transmission fluid cooler
unions, where applicable. Some smoke and
odd smells may be experienced as assembly
lubricant burns off the exhaust manifold and
other components.
6Bring the engine to normal operating
temperature, then check the ignition timing
and the idle speed (where applicable) and
mixture.
7If splined type cylinder head bolts have
been used, stop the engine after it has been
running for 15 minutes, then remove the
crankshaft cover and tighten the cylinder
head bolts to the fourth stage given in the
Specifications, in the correct order.
8When the engine has completely cooled,
re-check the oil and coolant levels, and
check, and if necessary adjust, the valve
clearances.
9If new bearings, pistons etc have been
fitted, the engine should be run-in at reduced
speeds and loads for the first 500 miles (800
km) or so. It is beneficial to change the engine
oil and filter after this mileage.
37Initial start-up after overhaul or
major repair
36Cylinder block and bores -
examination and renovation35Crankshaft and bearings -
examination and renovation
2A¥24SOHC engines
34.24 Fitting a thrustwasher to the centre
main bearing cap35.5 Checking the width of the filament
against the scale of the packet34.29 Fitting a sealing wedge to the rear
main bearing cap