tow FORD SIERRA 1986 1.G Introduction Workshop Manual
[x] Cancel search | Manufacturer: FORD, Model Year: 1986, Model line: SIERRA, Model: FORD SIERRA 1986 1.GPages: 18, PDF Size: 0.5 MB
Page 2 of 18

LIVING WITH YOUR FORD SIERRAIntroduction to the Ford SierraPage0•4
AcknowledgementsPage0•4
Safety first!Page0•5
ROADSIDE REPAIRSJacking, vehicle support and wheel changingPage0•6
TowingPage0•7
Identifying leaksPage0•8
Jump startingPage0•9
Weekly Checks
IntroductionPage0•10
Underbonnet check pointsPage0•10
Engine Oil levelPage0•12
Coolant levelPage0•12
Screen washer fluid levelPage0•13
Brake fluid levelPage0•13
Power steering fluid levelPage0•14
Electrical systemsPage0•14
BatteryPage0•15
Wiper bladesPage0•15
Tyre condition and pressurePage0•16
Lubricants and fluidsPage0•17
Tyre pressuresPage0•18
MAINTENANCE
Routine Maintenance and ServicingPage1•1
Maintenance schedulePage1•4
Maintenance proceduresPage1•9
Contents
Page 4 of 18

0•4
The Ford Sierra was first introduced in late 1982 with the option of
seven different engines and four different trim levels. This manual
covers the four cylinder in-line petrol engines, but other models in the
range are fitted with V6 or diesel engines.
The Sierra was introduced by Ford as the successor to the Cortina
and initially received a mixed reception as it was one of the first
vehicles to make use of the “aeroback” body style designed to reduce
the air drag coefficient to a minimum in the interests of fuel economy.
Mechanically the Sierra is similar to the Cortina with the exception of
all-round independent suspension.
Initially, 1.3, 1.6 and 2.0 litre SOHC carburettor engines were
available, with Hatchback and Estate body styles. In late 1984, a 1.8
litre SOHC engine became available and in 1985, a performance
orientated 2.0 litre SOHC fuel injection engine was introduced.Towards the end of 1986, the 1.3 litre engine was phased out. In order
to fill a gap in the range, a Saloon body style, designated the Sapphire,
was introduced in early 1987 and shortly afterwards, a 1.8 litre CVH
engine replaced the previously used 1.8 litre SOHC engine throughout
the model range.
A 1.6 litre CVH engine was introduced in September 1991 to replace
the 1.6 litre SOHC engine used previously, this engine being broadly
similar to the original 1.8 litre CVH engine which was in turn uprated in
March, 1992.
A 2.0 litre DOHC (Double OverHead Camshaft) engine was in-
troduced in August 1989 to replace the 2.0 litre SOHC engine.
In early 1988, a Sierra-based P100 pick-up model became available
to replace the previous Cortina-based design. The P100 consists of a
Sierra-type “cab” and front suspension, and a Ford Transit-type rear
suspension and 2.0 litre engine.
A wide range of standard and optional
equipment is available within the Sierra
range to suit most tastes, including an
anti-lock braking system.
For the home mechanic, the Sierra is a
straightforward vehicle to maintain and
repair since design features have been
incorporated to reduce the actual cost of
ownership to a minimum, and most of the
items requiring frequent attention are
easily accessible.
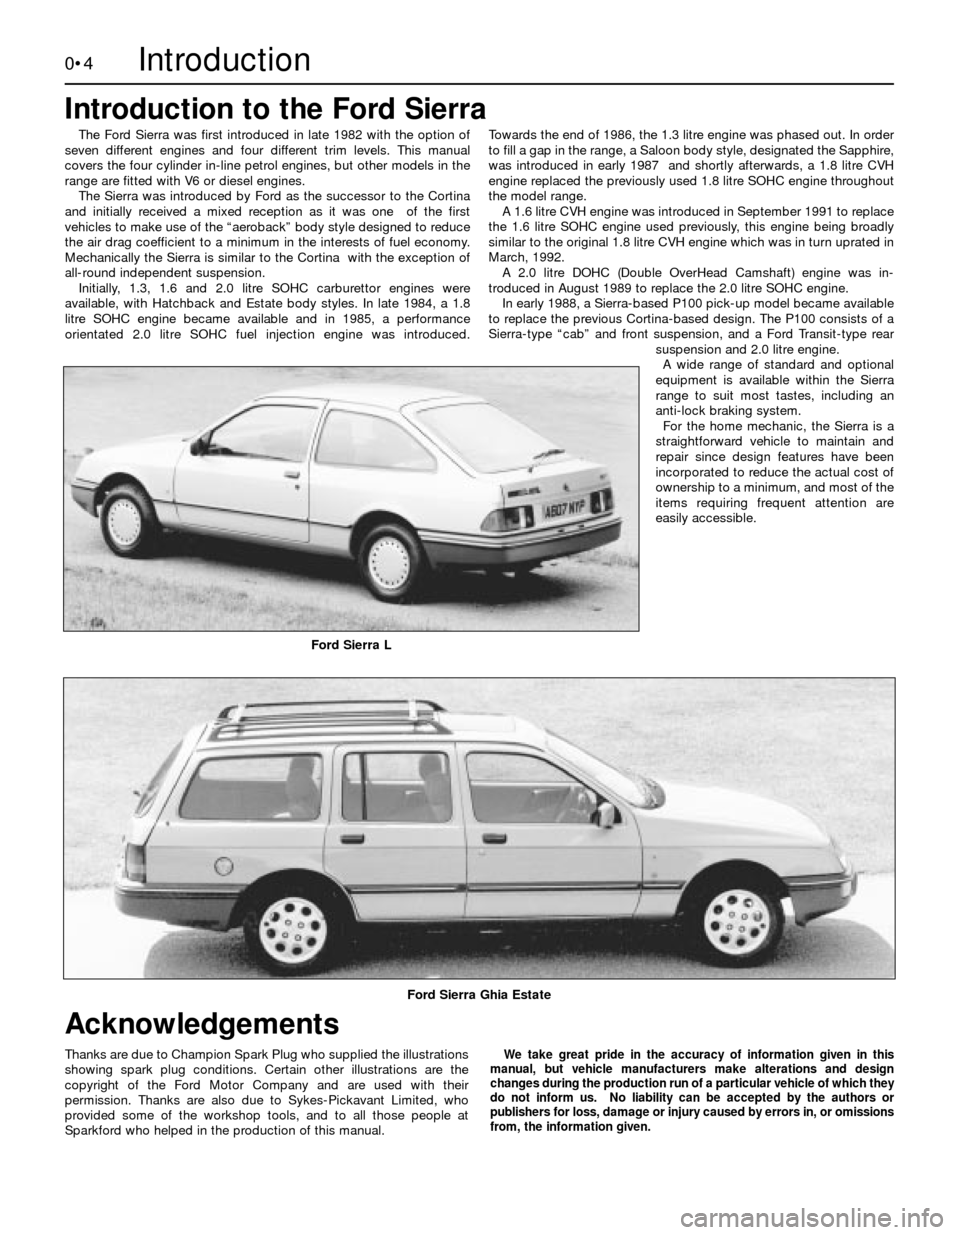
Ford Sierra L
Ford Sierra Ghia Estate
Introduction
We take great pride in the accuracy of information given in this
manual, but vehicle manufacturers make alterations and design
changes during the production run of a particular vehicle of which they
do not inform us. No liability can be accepted by the authors or
publishers for loss, damage or injury caused by errors in, or omissions
from, the information given.Thanks are due to Champion Spark Plug who supplied the illustrations
showing spark plug conditions. Certain other illustrations are the
copyright of the Ford Motor Company and are used with their
permission. Thanks are also due to Sykes-Pickavant Limited, who
provided some of the workshop tools, and to all those people at
Sparkford who helped in the production of this manual.
Introduction to the Ford Sierra
Acknowledgements
Page 6 of 18

0•6
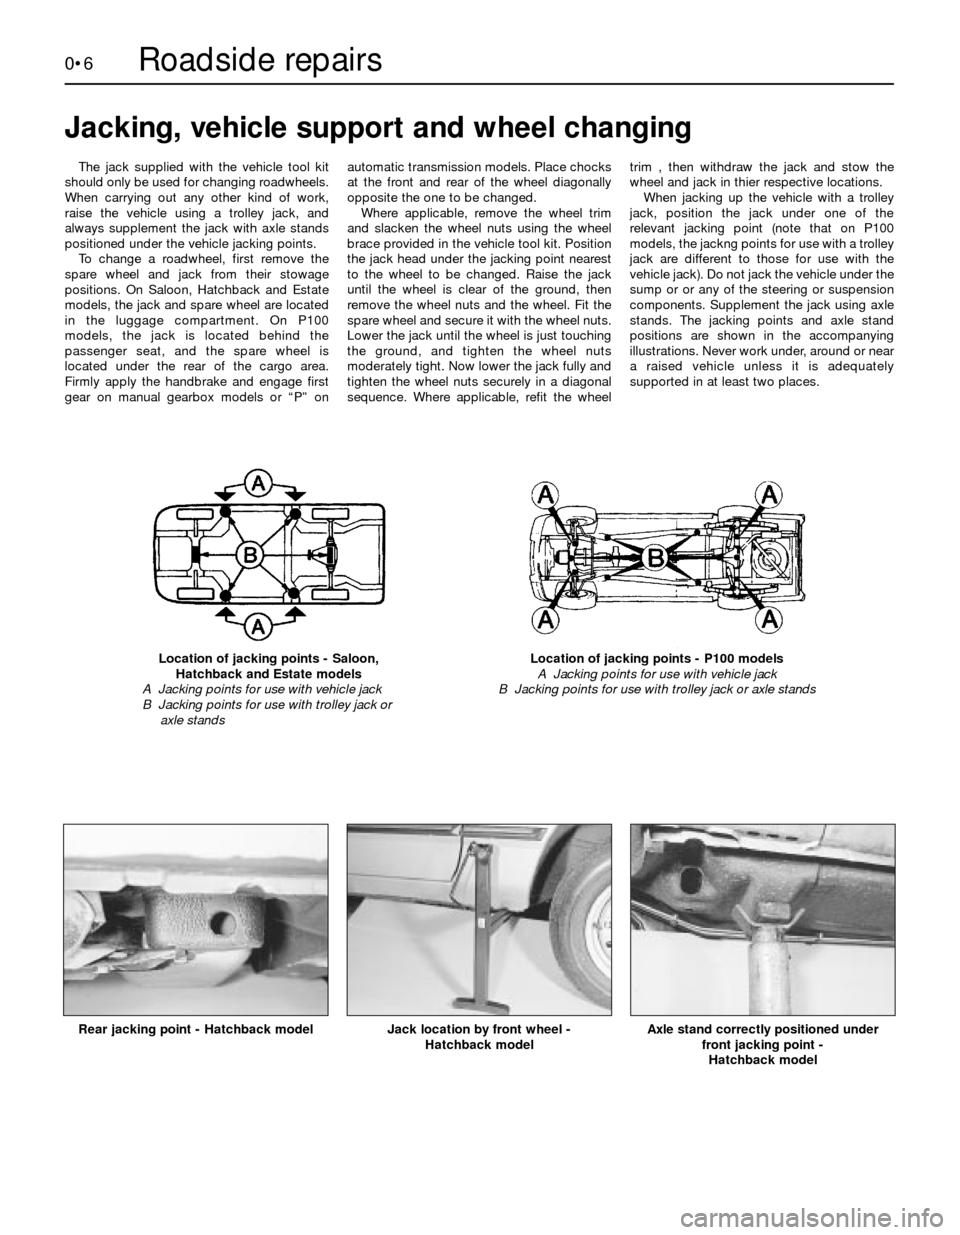
The jack supplied with the vehicle tool kit
should only be used for changing roadwheels.
When carrying out any other kind of work,
raise the vehicle using a trolley jack, and
always supplement the jack with axle stands
positioned under the vehicle jacking points.
To change a roadwheel, first remove the
spare wheel and jack from their stowage
positions. On Saloon, Hatchback and Estate
models, the jack and spare wheel are located
in the luggage compartment. On P100
models, the jack is located behind the
passenger seat, and the spare wheel is
located under the rear of the cargo area.
Firmly apply the handbrake and engage first
gear on manual gearbox models or “P” onautomatic transmission models. Place chocks
at the front and rear of the wheel diagonally
opposite the one to be changed.
Where applicable, remove the wheel trim
and slacken the wheel nuts using the wheel
brace provided in the vehicle tool kit. Position
the jack head under the jacking point nearest
to the wheel to be changed. Raise the jack
until the wheel is clear of the ground, then
remove the wheel nuts and the wheel. Fit the
spare wheel and secure it with the wheel nuts.
Lower the jack until the wheel is just touching
the ground, and tighten the wheel nuts
moderately tight. Now lower the jack fully and
tighten the wheel nuts securely in a diagonal
sequence. Where applicable, refit the wheeltrim , then withdraw the jack and stow the
wheel and jack in thier respective locations.
When jacking up the vehicle with a trolley
jack, position the jack under one of the
relevant jacking point (note that on P100
models, the jackng points for use with a trolley
jack are different to those for use with the
vehicle jack). Do not jack the vehicle under the
sump or or any of the steering or suspension
components. Supplement the jack using axle
stands. The jacking points and axle stand
positions are shown in the accompanying
illustrations. Never work under, around or near
a raised vehicle unless it is adequately
supported in at least two places.
Jacking, vehicle support and wheel changing
Location of jacking points - Saloon,
Hatchback and Estate models
A Jacking points for use with vehicle jack
B Jacking points for use with trolley jack or
axle standsLocation of jacking points - P100 models
A Jacking points for use with vehicle jack
B Jacking points for use with trolley jack or axle stands
Rear jacking point - Hatchback model
Jack location by front wheel -
Hatchback modelAxle stand correctly positioned under
front jacking point -
Hatchback model
Roadside repairs
Page 7 of 18

0•7
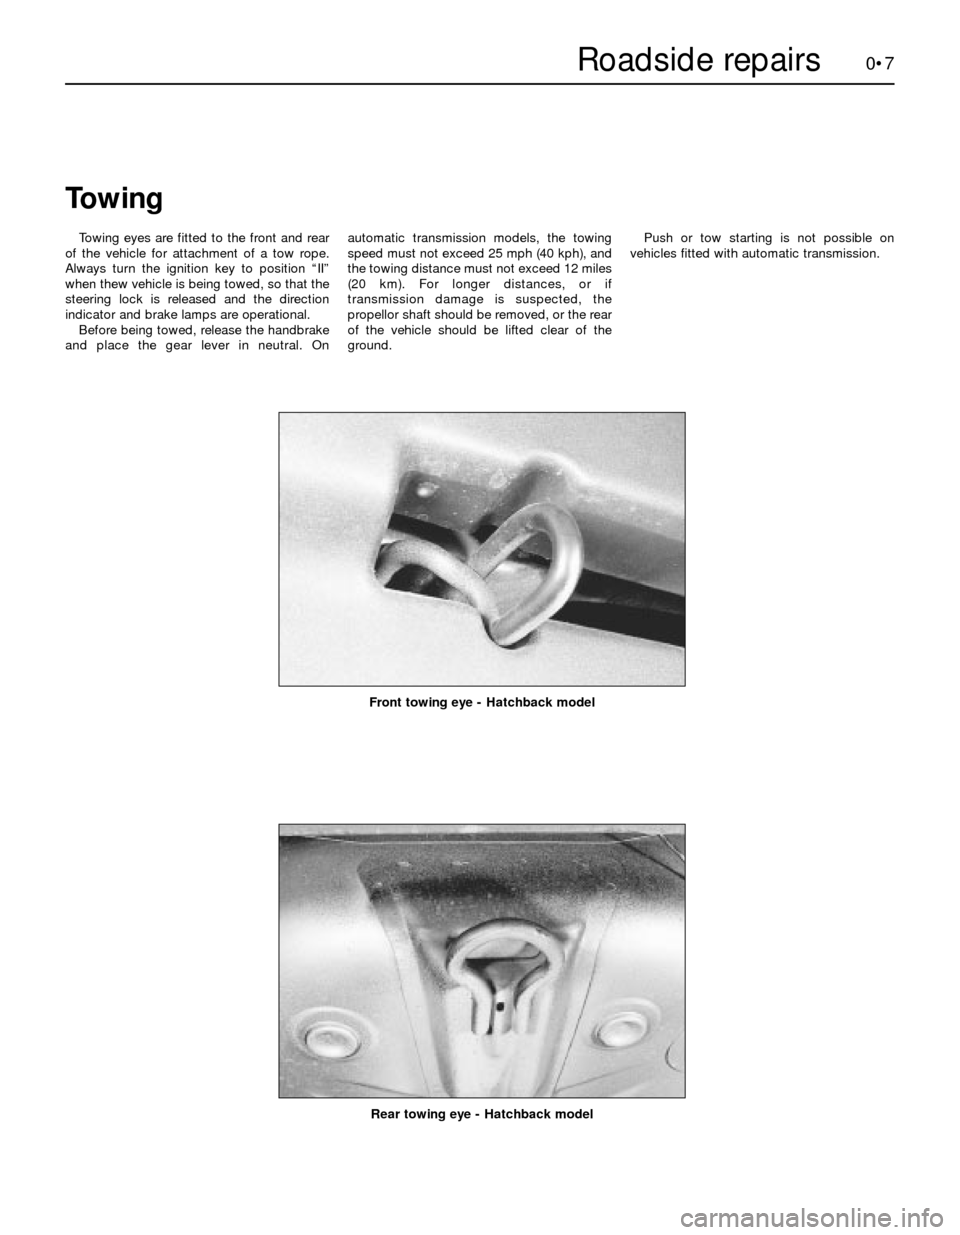
Rear towing eye - Hatchback model
Front towing eye - Hatchback model
Towing
Towing eyes are fitted to the front and rear
of the vehicle for attachment of a tow rope.
Always turn the ignition key to position “II”
when thew vehicle is being towed, so that the
steering lock is released and the direction
indicator and brake lamps are operational.
Before being towed, release the handbrake
and place the gear lever in neutral. Onautomatic transmission models, the towing
speed must not exceed 25 mph (40 kph), and
the towing distance must not exceed 12 miles
(20 km). For longer distances, or if
transmission damage is suspected, the
propellor shaft should be removed, or the rear
of the vehicle should be lifted clear of the
ground.Push or tow starting is not possible on
vehicles fitted with automatic transmission.
Roadside repairs
Page 12 of 18

Coolant level Engine oil level
Before you start
4Make sure that your car is on level ground.
4Check the oil level before the car is driven,
or at least 5 minutes after the engine has been
switched off.
The correct oil
Modern engines place great demands on their
oil. It is very important that the correct oil for
your car is used (See “Lubricants and Fluids”).
Car Care
l If you have to add oil frequently, you should
check whether you have any oil leaks. Place
some clean paper under the car overnight,
and check for stains in the morning. If there
are no leaks, the engine may be burning oil
(see “Fault Finding”).
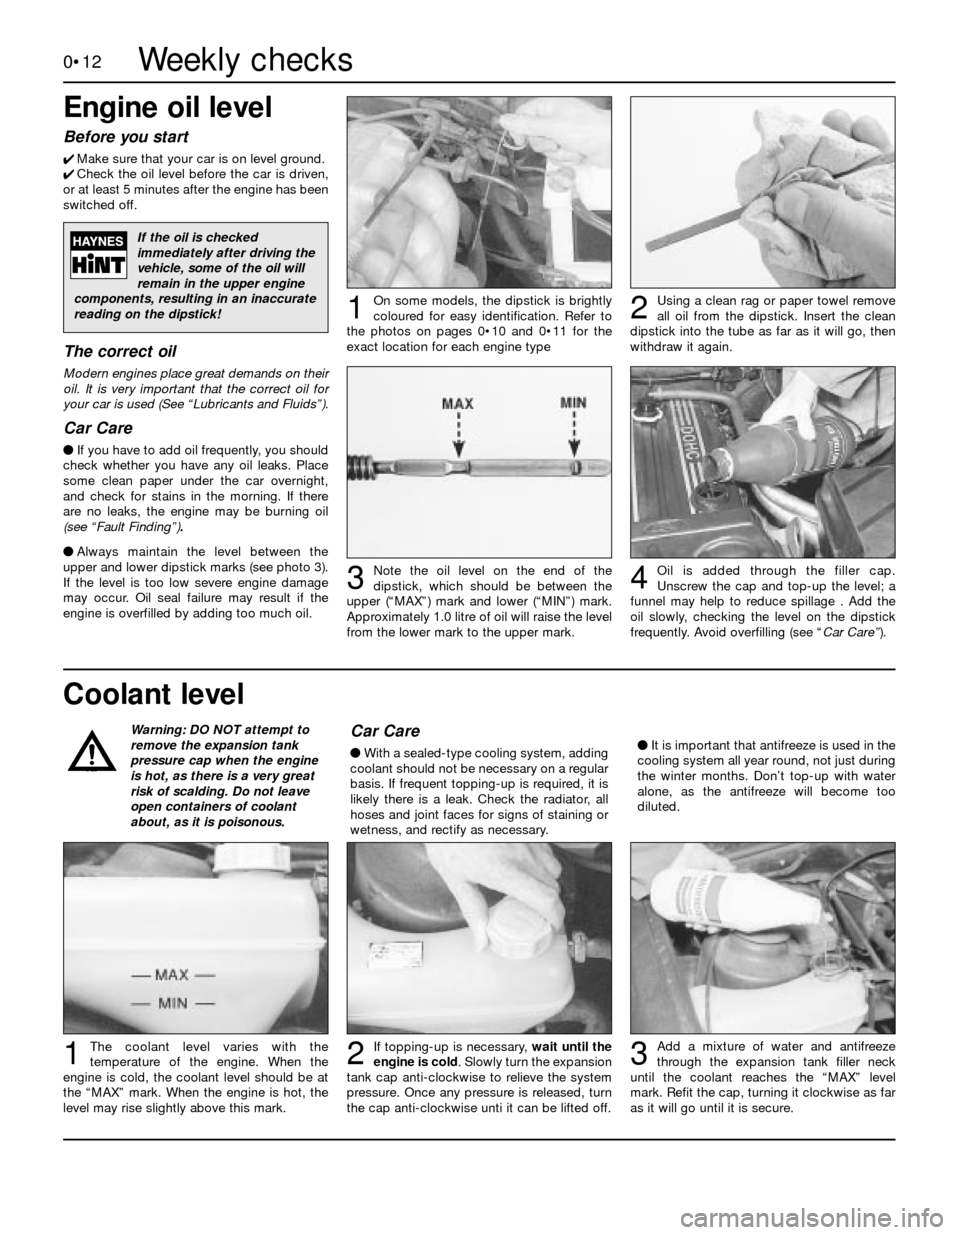
lAlways maintain the level between the
upper and lower dipstick marks (see photo 3).
If the level is too low severe engine damage
may occur. Oil seal failure may result if the
engine is overfilled by adding too much oil.
0•12
Using a clean rag or paper towel remove
all oil from the dipstick. Insert the clean
dipstick into the tube as far as it will go, then
withdraw it again.
Add a mixture of water and antifreeze
through the expansion tank filler neck
until the coolant reaches the “MAX” level
mark. Refit the cap, turning it clockwise as far
as it will go until it is secure.
If topping-up is necessary, wait until the
engine is cold. Slowly turn the expansion
tank cap anti-clockwise to relieve the system
pressure. Once any pressure is released, turn
the cap anti-clockwise unti it can be lifted off.The coolant level varies with the
temperature of the engine. When the
engine is cold, the coolant level should be at
the “MAX” mark. When the engine is hot, the
level may rise slightly above this mark.
Note the oil level on the end of the
dipstick, which should be between the
upper (“MAX”) mark and lower (“MIN”) mark.
Approximately 1.0 litre of oil will raise the level
from the lower mark to the upper mark.Oil is added through the filler cap.
Unscrew the cap and top-up the level; a
funnel may help to reduce spillage . Add the
oil slowly, checking the level on the dipstick
frequently. Avoid overfilling (see “Car Care”).
On some models, the dipstick is brightly
coloured for easy identification. Refer to
the photos on pages 0•10 and 0•11 for the
exact location for each engine type12
3
123
4
Warning: DO NOT attempt to
remove the expansion tank
pressure cap when the engine
is hot, as there is a very great
risk of scalding. Do not leave
open containers of coolant
about, as it is poisonous.Car Care
lWith a sealed-type cooling system, adding
coolant should not be necessary on a regular
basis. If frequent topping-up is required, it is
likely there is a leak. Check the radiator, all
hoses and joint faces for signs of staining or
wetness, and rectify as necessary.lIt is important that antifreeze is used in the
cooling system all year round, not just during
the winter months. Don’t top-up with water
alone, as the antifreeze will become too
diluted.
If the oil is checked
immediately after driving the
vehicle, some of the oil will
remain in the upper engine
components, resulting in an inaccurate
reading on the dipstick!
Weekly checks