FORD SUPER DUTY 2004 1.G Manual Online
Manufacturer: FORD, Model Year: 2004, Model line: SUPER DUTY, Model: FORD SUPER DUTY 2004 1.GPages: 304, PDF Size: 3.96 MB
Page 81 of 304
Tips:
•Do not set a code that uses five of the same number.
•Do not use five numbers in sequential order.
•The factory set code will work even if you have set your own personal
code.
•If you set a second personal code it will erase your first personal code.
Erasing personal code
1. Enter the factory set 5–digit code.
2. Press and hold the 1•2 for three seconds. This must be done within
five seconds of completing step 1.
Your personal code is now erased and only the factory set 5–digit code
will work.
Anti-scan feature
If the wrong code has been entered 7 times (35 consecutive button
presses), the keypad is disabled for one minute and the keypad lamp will
flash during this time.Note:Pressing 7•8 and the 9•0 simultaneously
during this one minute period will still lock the vehicle.
The anti-scan feature will turn off after one minute of keypad inactivity.
Unlocking and locking the doors using keyless entry
To unlock the driver’s door,enter the factory set 5-digit code or your
personal code. Each number must be pressed within five seconds of each
other.
To unlock all doors,press the 3•4 control within three seconds of
entering a valid keypad code.
To lock all doors,press the 7•8 and the 9•0 at the same time. You
do notneed to enter the keypad code first.
To verify all doors are closed properly, press the 7•8 and the 9•0
again within three seconds. If the doors are closed, the horn will chirp
once; if any door is ajar, the horn will chirp twice.
Low battery warning
When the battery in the keypad is running low and needs to be changed,
the vehicle will provide you with a warning. After entering your factory
set or personal entry code into the keypad, instead of unlocking the
driver’s door, the vehicle will unlock the driver’s door, lock it, then unlock
it again.
2004 F250/350/450/550(f23)
Owners Guide (post-2002-fmt)
USA English(fus)
Locks and Security
81
Page 82 of 304
Replacing the batteries
The keyless entry keypad uses one coin-type three-volt lithium battery
(Service Part Number 3L2W-19G545–A). This replacement battery is only
available through your authorized dealer.
To replace the battery:
1. Use the largest flathead screwdriver that will insert into the slot on
the right side of the keypad. Gently twist the screwdriver to pry off the
top cover. Pull the cover off by pulling to the left and then up. The top
cover and the internal components of the keypad will come off the
vehicle and the back cover will remain mounted to the vehicle.
2. Remove the internal components of the keypad from the top cover
and place the top cover on a soft surface to avoid scratching the
decorative finish.Note:Donotremove the silicone rubber membrane
from the rest of the electronics.
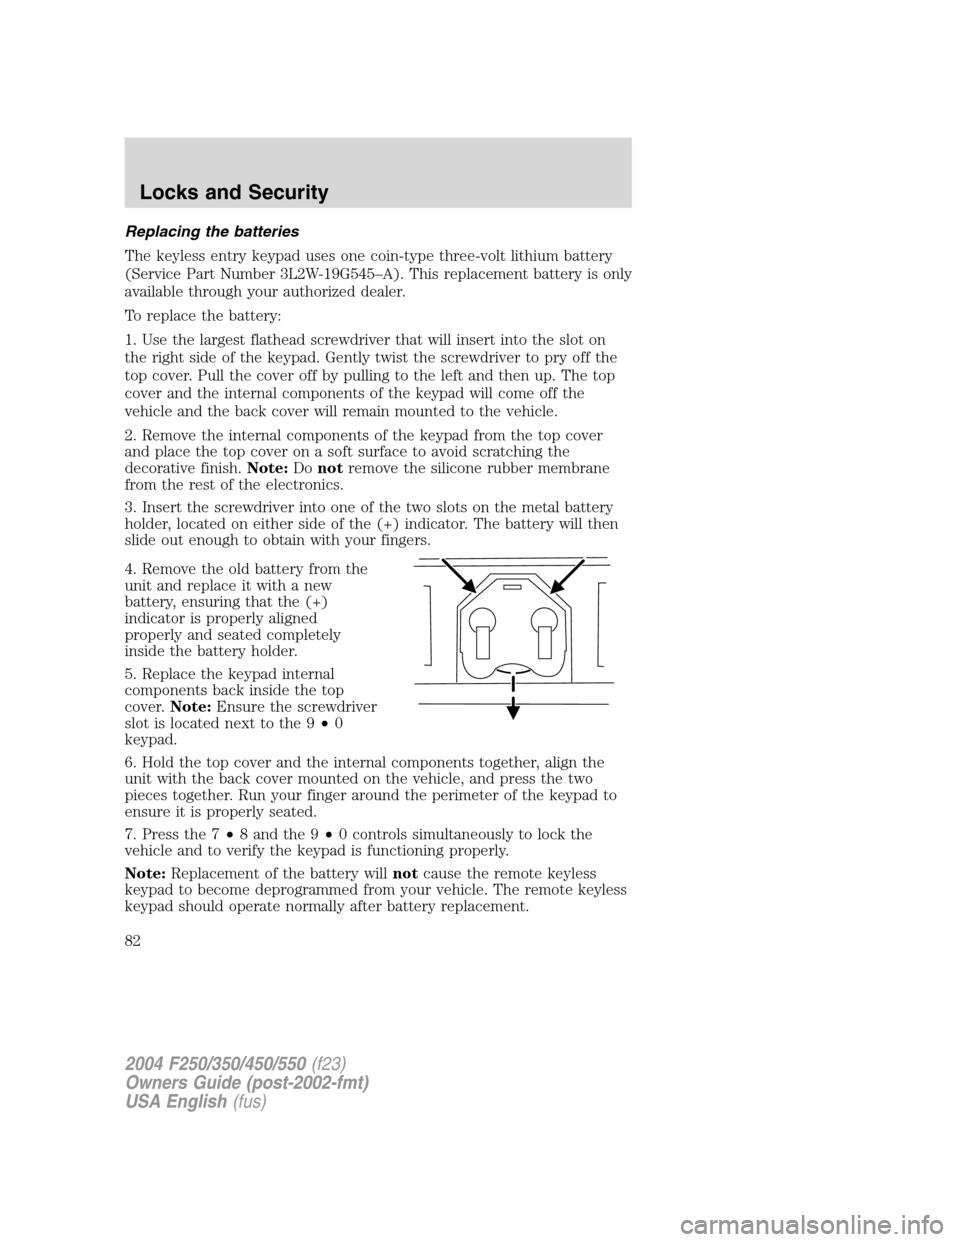
3. Insert the screwdriver into one of the two slots on the metal battery
holder, located on either side of the (+) indicator. The battery will then
slide out enough to obtain with your fingers.
4. Remove the old battery from the
unit and replace it with a new
battery, ensuring that the (+)
indicator is properly aligned
properly and seated completely
inside the battery holder.
5. Replace the keypad internal
components back inside the top
cover.Note:Ensure the screwdriver
slot is located next to the 9•0
keypad.
6. Hold the top cover and the internal components together, align the
unit with the back cover mounted on the vehicle, and press the two
pieces together. Run your finger around the perimeter of the keypad to
ensure it is properly seated.
7. Press the 7•8 and the 9•0 controls simultaneously to lock the
vehicle and to verify the keypad is functioning properly.
Note:Replacement of the battery willnotcause the remote keyless
keypad to become deprogrammed from your vehicle. The remote keyless
keypad should operate normally after battery replacement.
2004 F250/350/450/550(f23)
Owners Guide (post-2002-fmt)
USA English(fus)
Locks and Security
82
Page 83 of 304
Replacing lost/damaged remote keyless entry keypad
If a keyless entry keypad has been lost or damaged, or you would like to
buy an additional keyless entry keypad, you can either reprogram them
yourself, or takeall keyless entry keypads and remote entry
transmittersto your authorized dealer for reprogramming.
How to program your remote keyless entry keypad
You must haveall keyless entry keypads and remote entry
transmitters(maximum of four) available before beginning this
procedure.
To program the keyless entry
keypads and remote entry
transmitters yourself:
1. Ensure the vehicle is
electronically unlocked.
2. Put the key in the ignition.
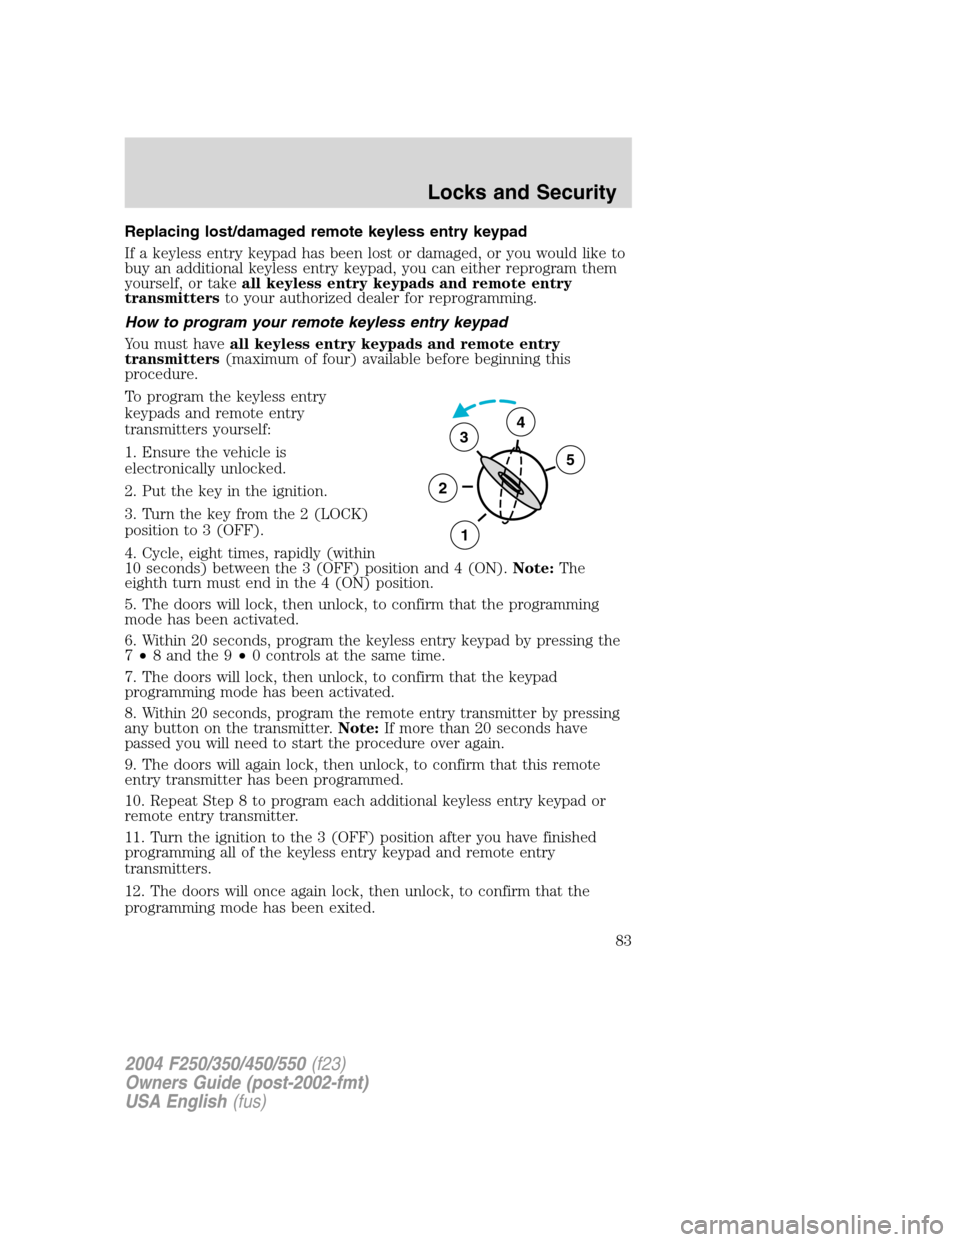
3. Turn the key from the 2 (LOCK)
position to 3 (OFF).
4. Cycle, eight times, rapidly (within
10 seconds) between the 3 (OFF) position and 4 (ON).Note:The
eighth turn must end in the 4 (ON) position.
5. The doors will lock, then unlock, to confirm that the programming
mode has been activated.
6. Within 20 seconds, program the keyless entry keypad by pressing the
7•8 and the 9•0 controls at the same time.
7. The doors will lock, then unlock, to confirm that the keypad
programming mode has been activated.
8. Within 20 seconds, program the remote entry transmitter by pressing
any button on the transmitter.Note:If more than 20 seconds have
passed you will need to start the procedure over again.
9. The doors will again lock, then unlock, to confirm that this remote
entry transmitter has been programmed.
10. Repeat Step 8 to program each additional keyless entry keypad or
remote entry transmitter.
11. Turn the ignition to the 3 (OFF) position after you have finished
programming all of the keyless entry keypad and remote entry
transmitters.
12. The doors will once again lock, then unlock, to confirm that the
programming mode has been exited.
3
2
1
5
4
2004 F250/350/450/550(f23)
Owners Guide (post-2002-fmt)
USA English(fus)
Locks and Security
83
Page 84 of 304
SEATING
Notes:
Reclining the seatback can cause an occupant to slide under the
seat’s safety belt, resulting in severe personal injuries in the
event of a collision.
Do not pile cargo higher than the seatbacks to reduce the risk of
injury in a collision or sudden stop.
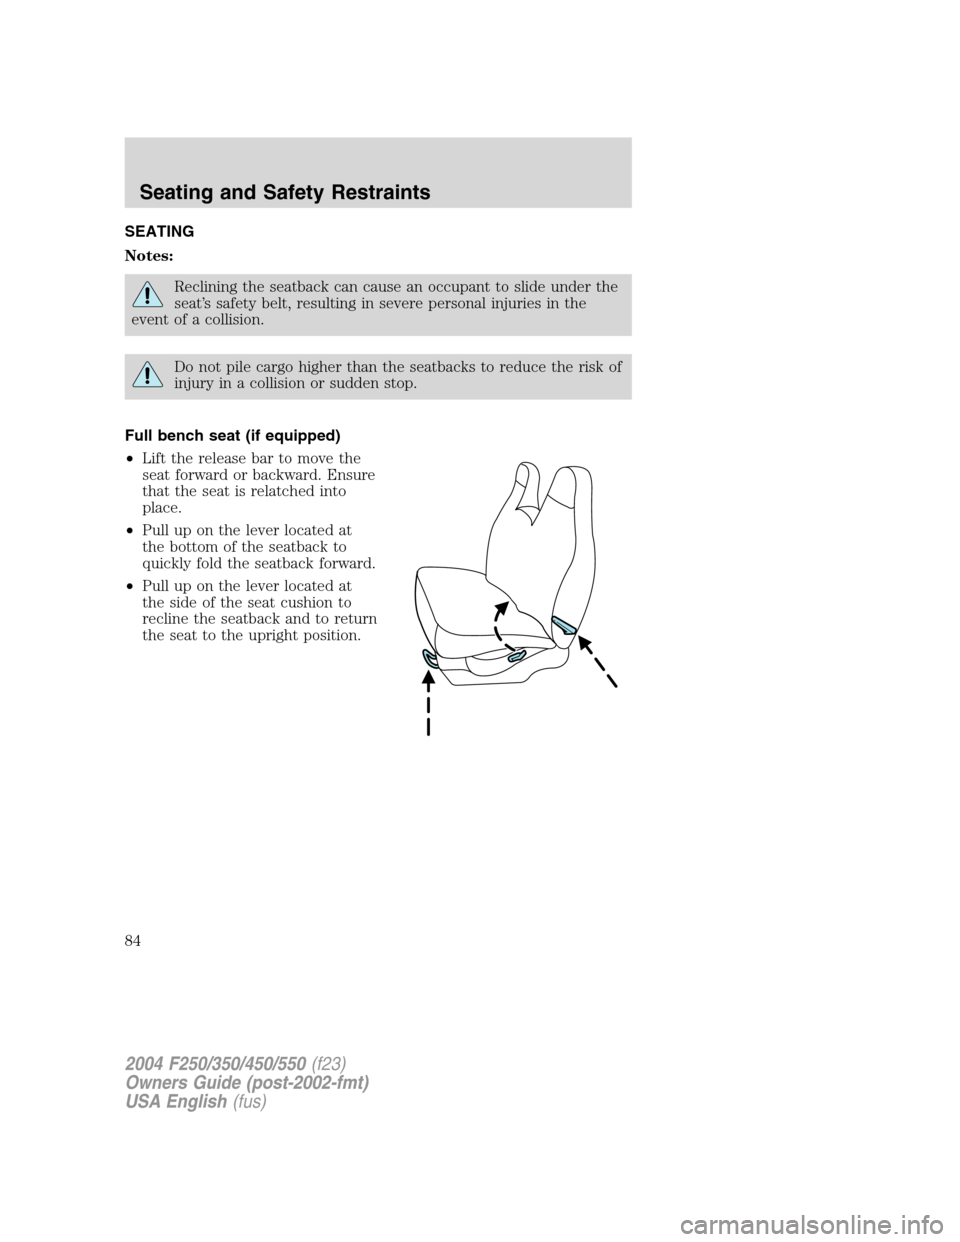
Full bench seat (if equipped)
•Lift the release bar to move the
seat forward or backward. Ensure
that the seat is relatched into
place.
•Pull up on the lever located at
the bottom of the seatback to
quickly fold the seatback forward.
•Pull up on the lever located at
the side of the seat cushion to
recline the seatback and to return
the seat to the upright position.
2004 F250/350/450/550(f23)
Owners Guide (post-2002-fmt)
USA English(fus)
Seating and Safety Restraints
Seating and Safety Restraints
84
Page 85 of 304
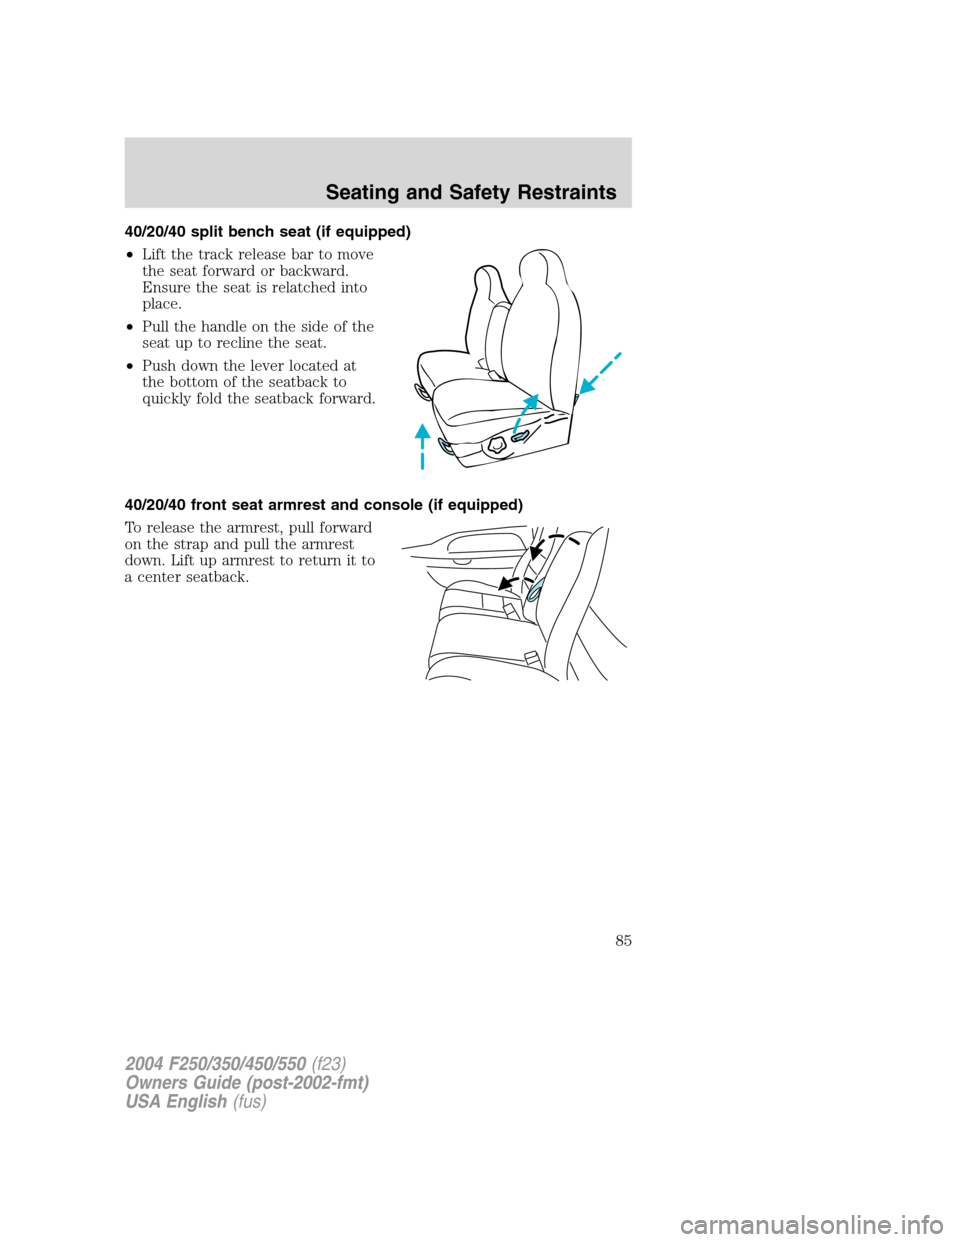
40/20/40 split bench seat (if equipped)
•Lift the track release bar to move
the seat forward or backward.
Ensure the seat is relatched into
place.
•Pull the handle on the side of the
seat up to recline the seat.
•Push down the lever located at
the bottom of the seatback to
quickly fold the seatback forward.
40/20/40 front seat armrest and console (if equipped)
To release the armrest, pull forward
on the strap and pull the armrest
down. Lift up armrest to return it to
a center seatback.
2004 F250/350/450/550(f23)
Owners Guide (post-2002-fmt)
USA English(fus)
Seating and Safety Restraints
85
Page 86 of 304
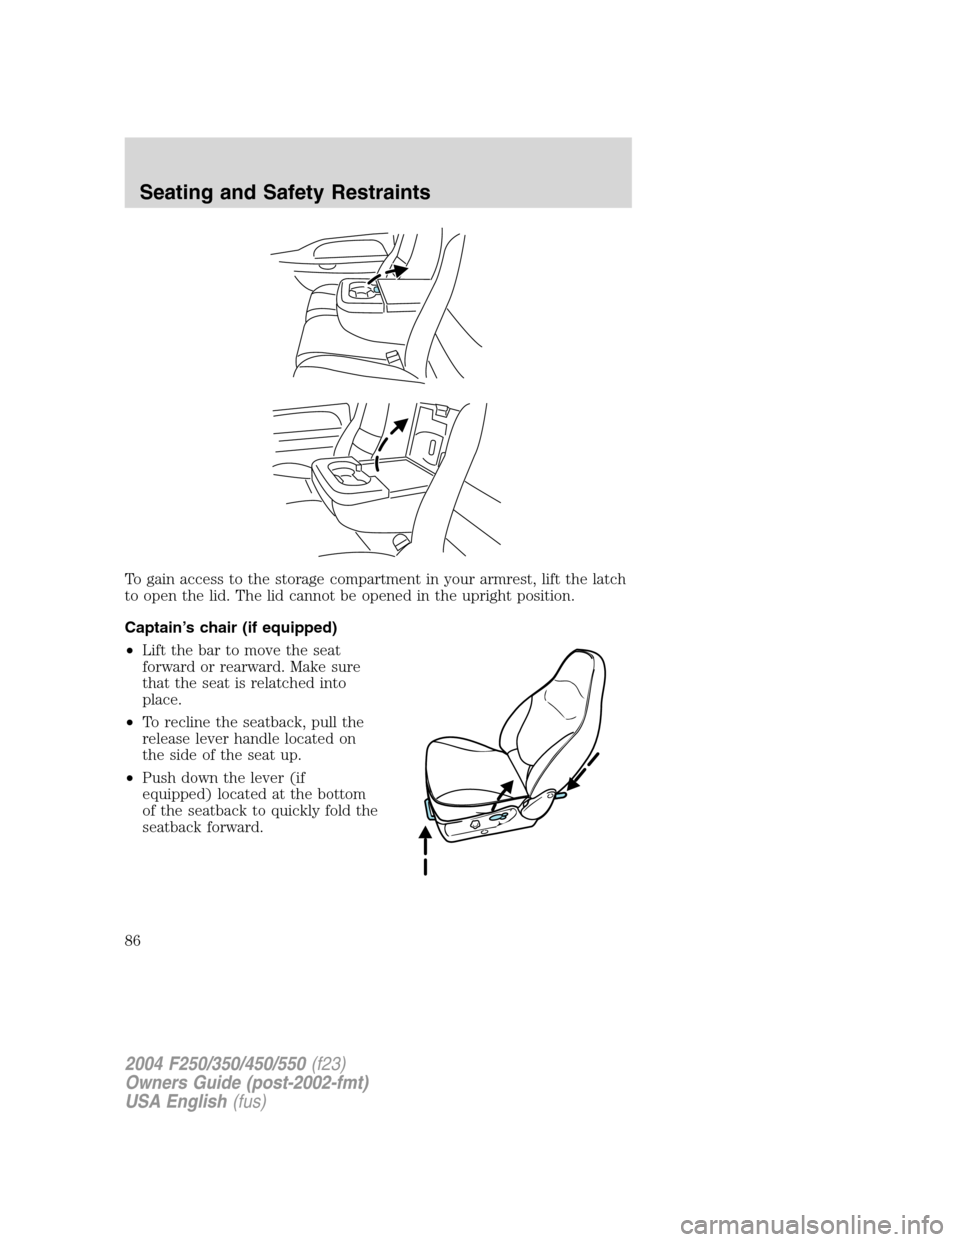
To gain access to the storage compartment in your armrest, lift the latch
to open the lid. The lid cannot be opened in the upright position.
Captain’s chair (if equipped)
•Lift the bar to move the seat
forward or rearward. Make sure
that the seat is relatched into
place.
•To recline the seatback, pull the
release lever handle located on
the side of the seat up.
•Push down the lever (if
equipped) located at the bottom
of the seatback to quickly fold the
seatback forward.
2004 F250/350/450/550(f23)
Owners Guide (post-2002-fmt)
USA English(fus)
Seating and Safety Restraints
86
Page 87 of 304
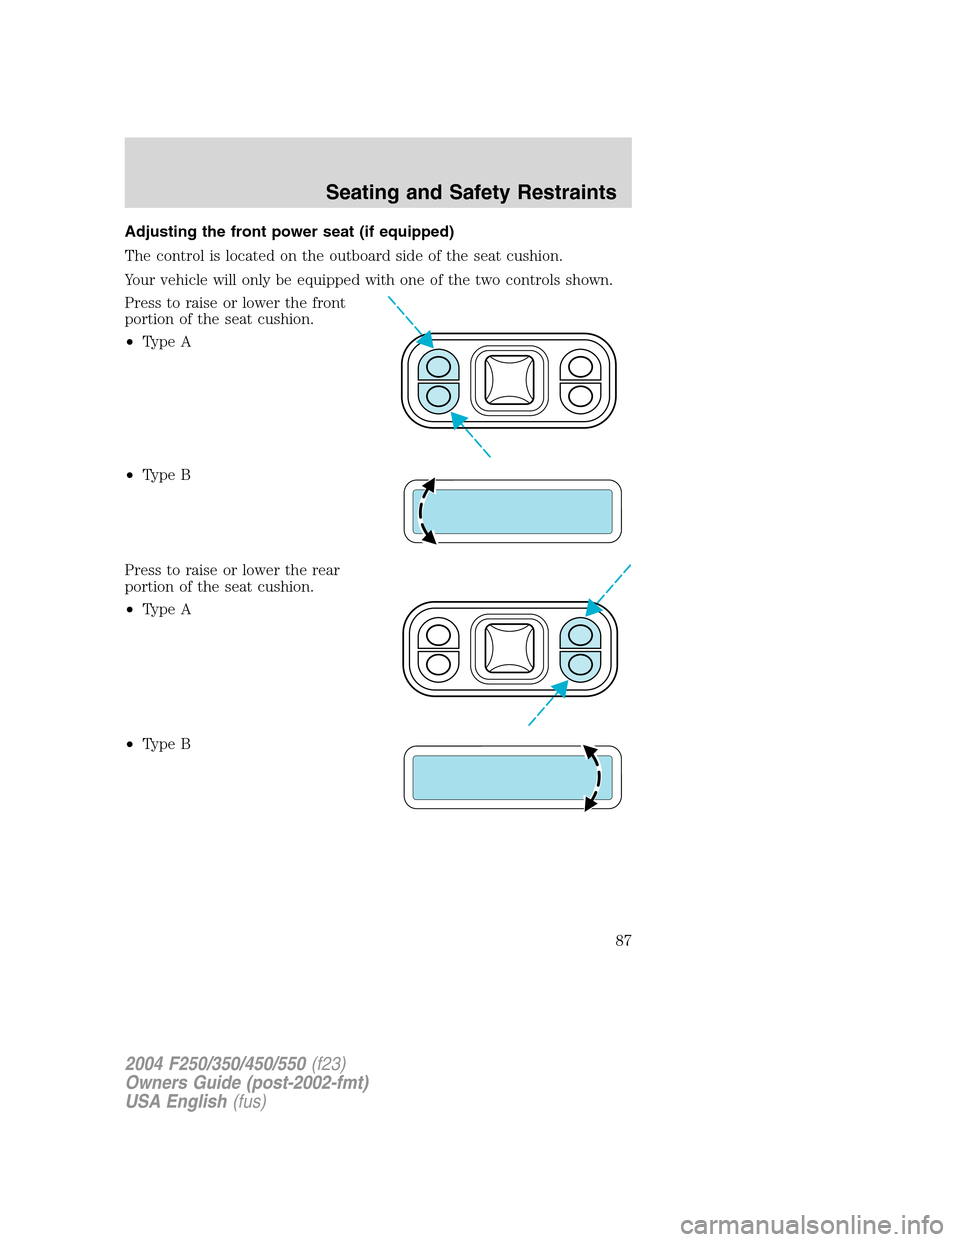
Adjusting the front power seat (if equipped)
The control is located on the outboard side of the seat cushion.
Your vehicle will only be equipped with one of the two controls shown.
Press to raise or lower the front
portion of the seat cushion.
•Type A
•Type B
Press to raise or lower the rear
portion of the seat cushion.
•Type A
•Type B
2004 F250/350/450/550(f23)
Owners Guide (post-2002-fmt)
USA English(fus)
Seating and Safety Restraints
87
Page 88 of 304
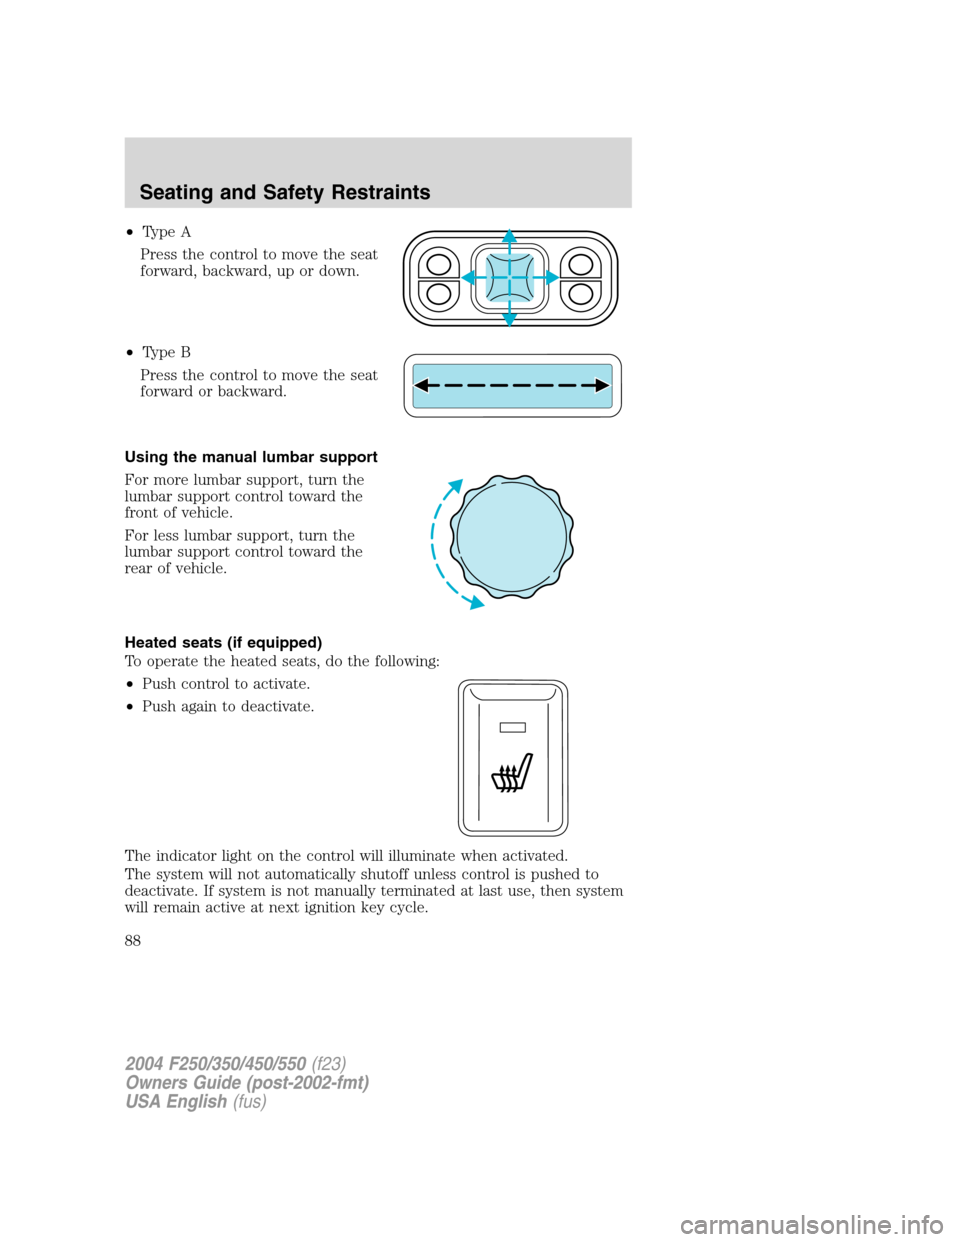
•Type A
Press the control to move the seat
forward, backward, up or down.
•Type B
Press the control to move the seat
forward or backward.
Using the manual lumbar support
For more lumbar support, turn the
lumbar support control toward the
front of vehicle.
For less lumbar support, turn the
lumbar support control toward the
rear of vehicle.
Heated seats (if equipped)
To operate the heated seats, do the following:
•Push control to activate.
•Push again to deactivate.
The indicator light on the control will illuminate when activated.
The system will not automatically shutoff unless control is pushed to
deactivate. If system is not manually terminated at last use, then system
will remain active at next ignition key cycle.
2004 F250/350/450/550(f23)
Owners Guide (post-2002-fmt)
USA English(fus)
Seating and Safety Restraints
88
Page 89 of 304
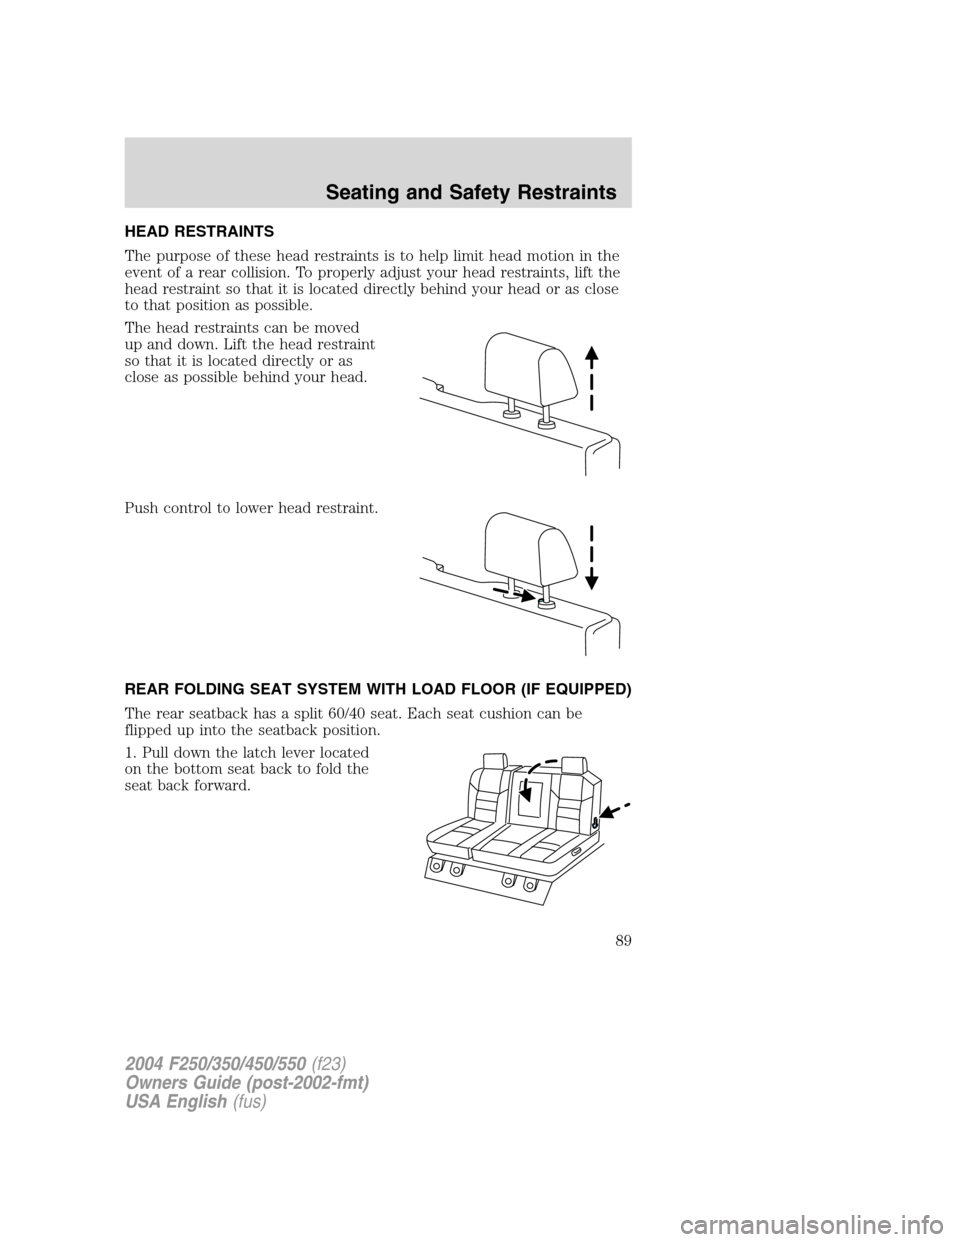
HEAD RESTRAINTS
The purpose of these head restraints is to help limit head motion in the
event of a rear collision. To properly adjust your head restraints, lift the
head restraint so that it is located directly behind your head or as close
to that position as possible.
The head restraints can be moved
up and down. Lift the head restraint
so that it is located directly or as
close as possible behind your head.
Push control to lower head restraint.
REAR FOLDING SEAT SYSTEM WITH LOAD FLOOR (IF EQUIPPED)
The rear seatback has a split 60/40 seat. Each seat cushion can be
flipped up into the seatback position.
1. Pull down the latch lever located
on the bottom seat back to fold the
seat back forward.
2004 F250/350/450/550(f23)
Owners Guide (post-2002-fmt)
USA English(fus)
Seating and Safety Restraints
89
Page 90 of 304
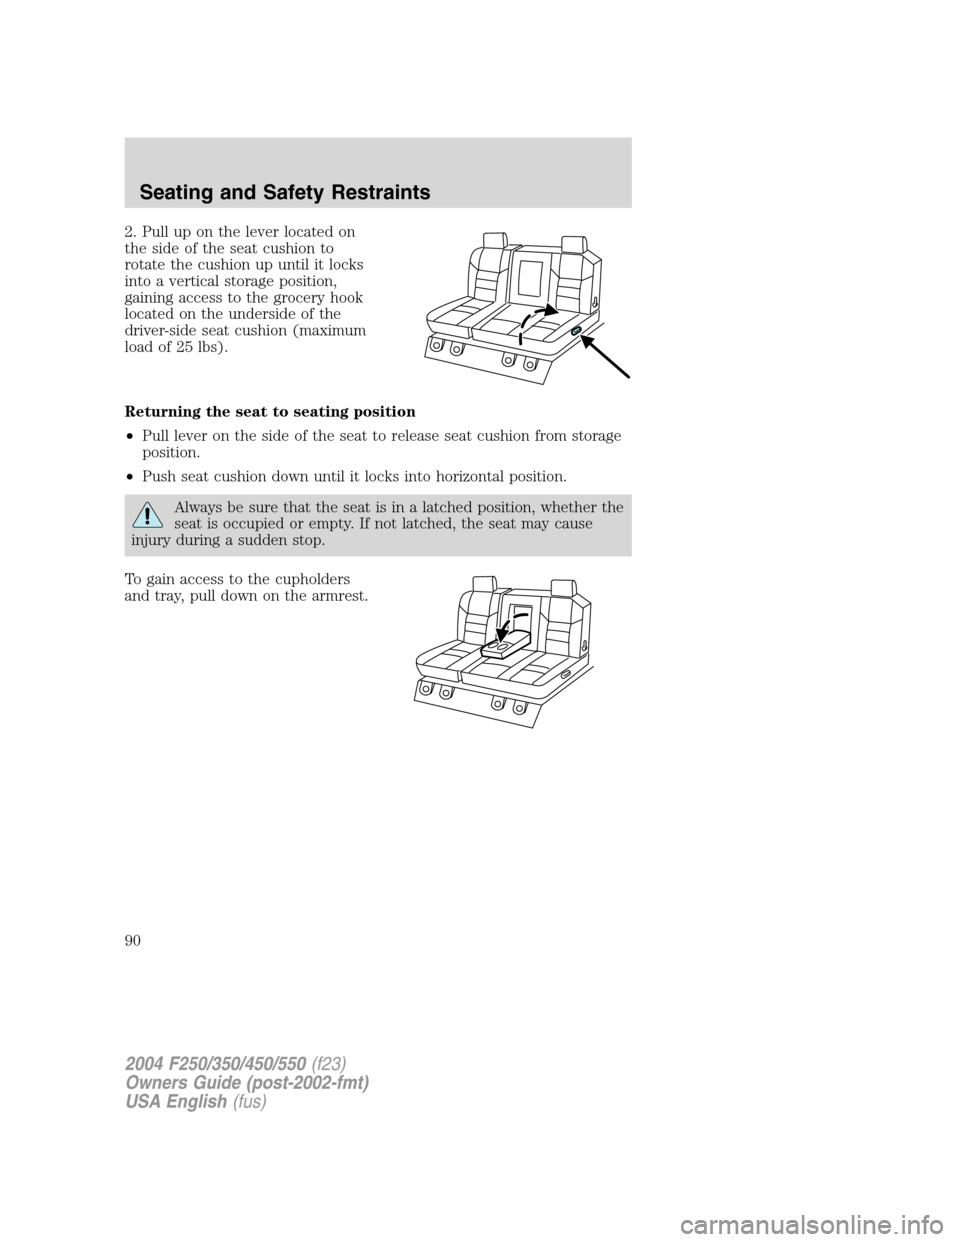
2. Pull up on the lever located on
the side of the seat cushion to
rotate the cushion up until it locks
into a vertical storage position,
gaining access to the grocery hook
located on the underside of the
driver-side seat cushion (maximum
load of 25 lbs).
Returning the seat to seating position
•Pull lever on the side of the seat to release seat cushion from storage
position.
•Push seat cushion down until it locks into horizontal position.
Always be sure that the seat is in a latched position, whether the
seat is occupied or empty. If not latched, the seat may cause
injury during a sudden stop.
To gain access to the cupholders
and tray, pull down on the armrest.
2004 F250/350/450/550(f23)
Owners Guide (post-2002-fmt)
USA English(fus)
Seating and Safety Restraints
90