maintenance schedule FORD SUPER DUTY 2015 3.G User Guide
[x] Cancel search | Manufacturer: FORD, Model Year: 2015, Model line: SUPER DUTY, Model: FORD SUPER DUTY 2015 3.GPages: 470, PDF Size: 18.24 MB
Page 235 of 470
GENERAL INFORMATION
Have your vehicle serviced regularly to helpmaintain its roadworthiness and resalevalue. There is a large network of Fordauthorized dealers that are there to helpyou with their professional servicingexpertise. We believe that their speciallytrained technicians are best qualified toservice your vehicle properly and expertly.They are supported by a wide range ofhighly specialized tools developedspecifically for servicing your vehicle.
To help you service your vehicle, weprovide scheduled maintenanceinformation which makes tracking routineservice easy. See ScheduledMaintenance (page 440).
If your vehicle requires professional service,your authorized dealer can provide thenecessary parts and service. Check yourwarranty information to find out whichparts and services are covered.
Use only recommended fuels, lubricants,fluids and service parts conforming tospecifications. Motorcraft® parts aredesigned and built to provide the bestperformance in your vehicle.
Precautions
•Do not work on a hot engine.
•Make sure that nothing gets caught inmoving parts.
•Do not work on a vehicle with theengine running in an enclosed space,unless you are sure you have enoughventilation.
•Keep all open flames and other burningmaterial (such as cigarettes) awayfrom the battery and all fuel relatedparts.
Working with the Engine Off
1.Set the parking brake and shift to P(Park).
2.Turn off the engine and remove the key(if equipped).
3.Block the wheels.
Working with the Engine On
WARNING
To reduce the risk of vehicle damageand/or personal burn injuries, do notstart your engine with the air cleanerremoved and do not remove it while theengine is running.
1.Set the parking brake and shift to P(Park).
2.Block the wheels
OPENING AND CLOSING THE
HOOD
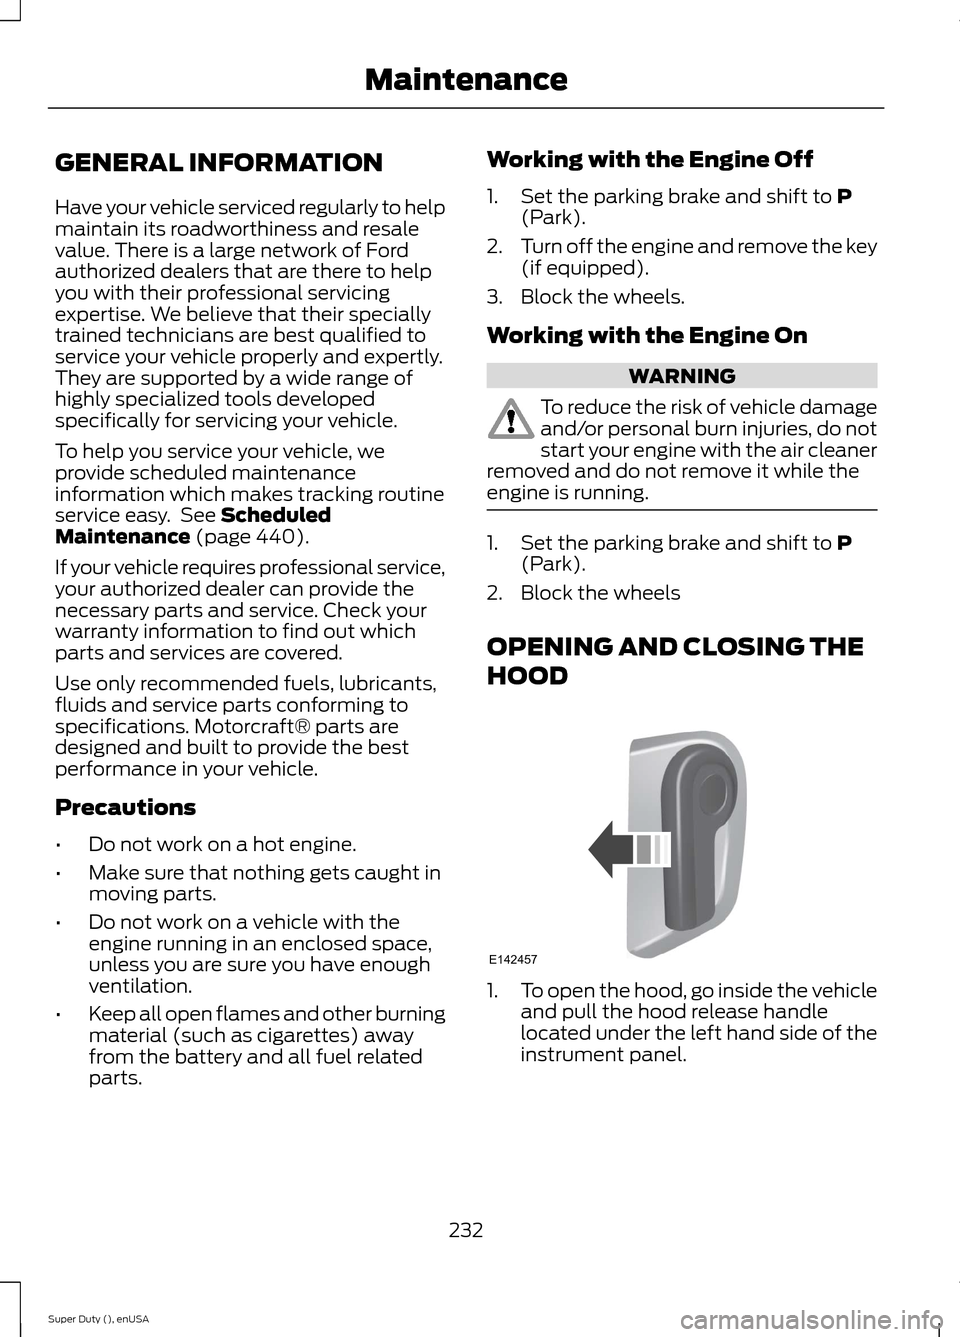
1.To open the hood, go inside the vehicleand pull the hood release handlelocated under the left hand side of theinstrument panel.
232Super Duty (), enUSAMaintenanceE142457
Page 239 of 470

Only use oils certified for gasoline enginesby the American Petroleum Institute (API).An oil with this trademark symbolconforms to the current engine andemission system protection standards andfuel economy requirements of theInternational Lubricants SpecificationAdvisory Council (ILSAC), comprised ofU.S. and Japanese automobilemanufacturers.
1.Check the engine oil level.
2.If the engine oil level is not within thenormal range, add engine oil thatmeets Ford specifications. SeeCapacities and Specifications for moreinformation.
3.Remove the engine oil filler cap anduse a funnel to pour the engine oil intothe opening.
4.Recheck the engine oil level. Make surethe oil level is not above the normaloperating range on the engine oil leveldipstick.
5.Install the engine oil level dipstick andensure it is fully seated.
6.Fully install the engine oil filler cap byturning the filler cap clockwise untilthree clicks are heard or until the capis fully seated.
ENGINE COOLANT CHECK
Checking the Engine Coolant
Note:If your vehicle is equipped with adiesel engine, refer to the DieselSupplement.
When the engine is cold, check theconcentration and level of the enginecoolant at the intervals listed in thescheduled maintenance information. SeeScheduled Maintenance (page 440).
Note:Make sure that the level is betweenthe MIN and MAX marks on the coolantreservoir.
Note:Coolant expands when it is hot. Thelevel may extend beyond the MAX mark
Note:If the level is at the MIN mark, belowthe MIN mark, or empty, add coolantimmediately. See Adding Engine Coolantin this chapter.
The coolant concentration should bemaintained within 48% to 50%, whichequates to a freeze point between -29°F(-34°C) and -35°F (-37°C).
Note:For best results, coolantconcentration should be tested with arefractometer such as Rotunda tool300-ROB75240 available from yourauthorized dealer. Ford does notrecommend the use of hydrometers orcoolant test strips for measuring coolantconcentrations.
Note:Automotive fluids are notinterchangeable. Do not use engine coolantor antifreeze or windshield washer fluidoutside of its specified function and vehiclelocation.
236Super Duty (), enUSAMaintenanceE142732
Page 243 of 470
•the engine coolant temperature gaugemoves fully into the red (hot) area
•the coolant temperature warning lightilluminates
•the service engine soon indicatorilluminates.
WARNING
Never remove the coolant reservoircap while the engine is running or hot.
1.Pull off the road as soon as safelypossible and place the vehicle in P(Park).
2.Leave the engine running until thecoolant temperature gauge needlemoves away from the H range. Afterseveral minutes, if this does nothappen, follow the remaining steps.
3.Turn the engine off and wait for it tocool before checking the coolant level.
4.If the coolant level is normal, you mayrestart your engine and continue on.
5.If the coolant is low, add coolant,restart the engine and take your vehicleto an authorized dealer. See Addingengine coolant in this chapter for moreinformation. Refer to fail-safe coolingfor additional information.
AUTOMATIC TRANSMISSION
FLUID CHECK
Have an authorized dealer check andchange the transmission fluid and filter atthe correct service interval. SeeScheduled Maintenance (page 440).
Do not use supplemental transmissionfluid additives, treatments or cleaningagents. The use of these materials mayaffect transmission operation and resultin damage to internal transmissioncomponents.
Checking Automatic TransmissionFluid (If Equipped)
For scheduled intervals of the fluid checksand changes, See ScheduledMaintenance (page 440). Yourtransmission does not consume fluid.However, the fluid level should be checkedif the transmission is not working properly,i.e., if the transmission slips or shifts slowlyor if you notice some sign of fluid leakage.
Automatic transmission fluid expandswhen warmed. To obtain an accurate fluidcheck, drive the vehicle until it is at normaloperating temperature (approximately19 mi (30 km)). Verify that thetransmission fluid temperature gauge,located on the instrument cluster, is withinnormal range.
1.Drive the vehicle 19 mi (30 km)until itreaches normal operating temperature.
2.Park the vehicle on a level surface andengage the parking brake.
3.With the engine running, parking brakeengaged and your foot on the brakepedal, move the gearshift lever throughall of the gear ranges. Allow sufficienttime for each gear to engage.
4.Latch the gearshift lever in P and leavethe engine running.
5.Remove the dipstick, wiping it cleanwith a clean, dry lint free rag. Ifnecessary, refer to the Under HoodOverview in this chapter for thelocation of the dipstick.
6.Install the dipstick making sure it is fullyseated in the filler tube.
7.Remove the dipstick and inspect thefluid level. The fluid should be in thedesignated area for normal operatingtemperature or ambient temperature.
Low Fluid Level
Type A
240Super Duty (), enUSAMaintenance
Page 246 of 470

TRANSFER CASE FLUID
CHECK
1.Clean the filler plug.
2.Remove the filler plug and inspect thefluid level.
3.Add only enough fluid through the filleropening so that the fluid level is at thebottom of the opening.
Use only fluid that meets Fordspecifications. Refer to the SeeCapacities and Specifications (page301).section.
BRAKE FLUID CHECK
Fluid levels between the MIN and MAXlines are within the normal operating range;there is no need to add fluid. If the fluidlevels are outside of the normal operatingrange, the performance of the systemcould be compromised; seek service fromyour authorized dealer immediately.
POWER STEERING FLUID
CHECK
Check the power steering fluid. SeeScheduled Maintenance (page 440). Ifadding fluid is necessary, use onlyMERCON LV ATF
Note:This procedure is for vehicles withgasoline engines. Vehicles with dieselengines are similar. See Under HoodOverview in your diesel supplement.
Check the fluid level when it is at ambienttemperature.
1.Check the fluid level in the reservoir. Itshould be between the MIN and MAXrange. Do not add fluid if the level iswithin this range.
2.If the fluid level is low, add fluid to bringthe fluid level up to between the MINand MAX range.
3.Switch the engine on.
4.While the engine idles, turn the steeringwheel left and right several times.
5.Switch the engine off.
243Super Duty (), enUSAMaintenanceE164246
Page 257 of 470

CHANGING THE ENGINE AIR
FILTER
WARNINGS
To reduce the risk of vehicle damageand personal burn injuries, do notstart your engine with the air cleanerremoved and do not remove it while theengine is running.
To reduce the risk of vehicle damageand personal burn injuries, do notstart your engine with the air cleanerremoved and do not remove it while theengine is running.
Note:Failure to use the correct air filterelement may result in severe enginedamage. The customer warranty may bevoid for any damage to the engine if thecorrect air filter element is not used.
When changing the air filter element, useonly the air filter element listed. SeeCapacities and Specifications (page301).
Change the air filter element at the properinterval. See Scheduled Maintenance(page 440).
1.Locate the mass air flow sensorelectrical connector on the air outlettube. Disconnect the mass air flowsensor electrical connector.
2.Reposition the locking clip on theconnector (connector shown frombelow for clarity), squeeze theconnector and pull it off of the airoutlet tube.
3.Clean the area from around the air tubeto the air cover connection to preventdebris from entering the system. Next,loosen the bolt on the air tube clampso the clamp is no longer snug to theair tube. It is not necessary tocompletely remove the clamp.
4.Pull the air tube off from the air cleanerhousing.
254Super Duty (), enUSAMaintenanceE163755 E163756 E163757
Page 284 of 470

Note:If your tires show unevenwear ask an authorized dealer tocheck for and correct any wheelmisalignment, tire imbalance ormechanical problem involvedbefore tire rotation.
Note:Your vehicle may beequipped with a dissimilar sparewheel and tire assembly. Adissimilar spare wheel and tireassembly is defined as a sparewheel and tire assembly that isdifferent in brand, size orappearance from the road tires andwheels. If you have a dissimilarspare wheel and tire assembly it isintended for temporary use onlyand should not be used in a tirerotation.
Note:After having your tiresrotated, inflation pressure must bechecked and adjusted to thevehicle requirements.
Rotating your tires at therecommended interval (asindicated in the ScheduledMaintenance chapter) will helpyour tires wear more evenly,providing better tire performanceand longer tire life.
Rear-wheel drive vehicles andfour-wheel drive vehicles (fronttires at left of diagram)
Dual rear wheel drive vehicle - sixtire rotation (front tires at top ofdiagram)
281Super Duty (), enUSAWheels and TiresE142548 E166988
Page 301 of 470
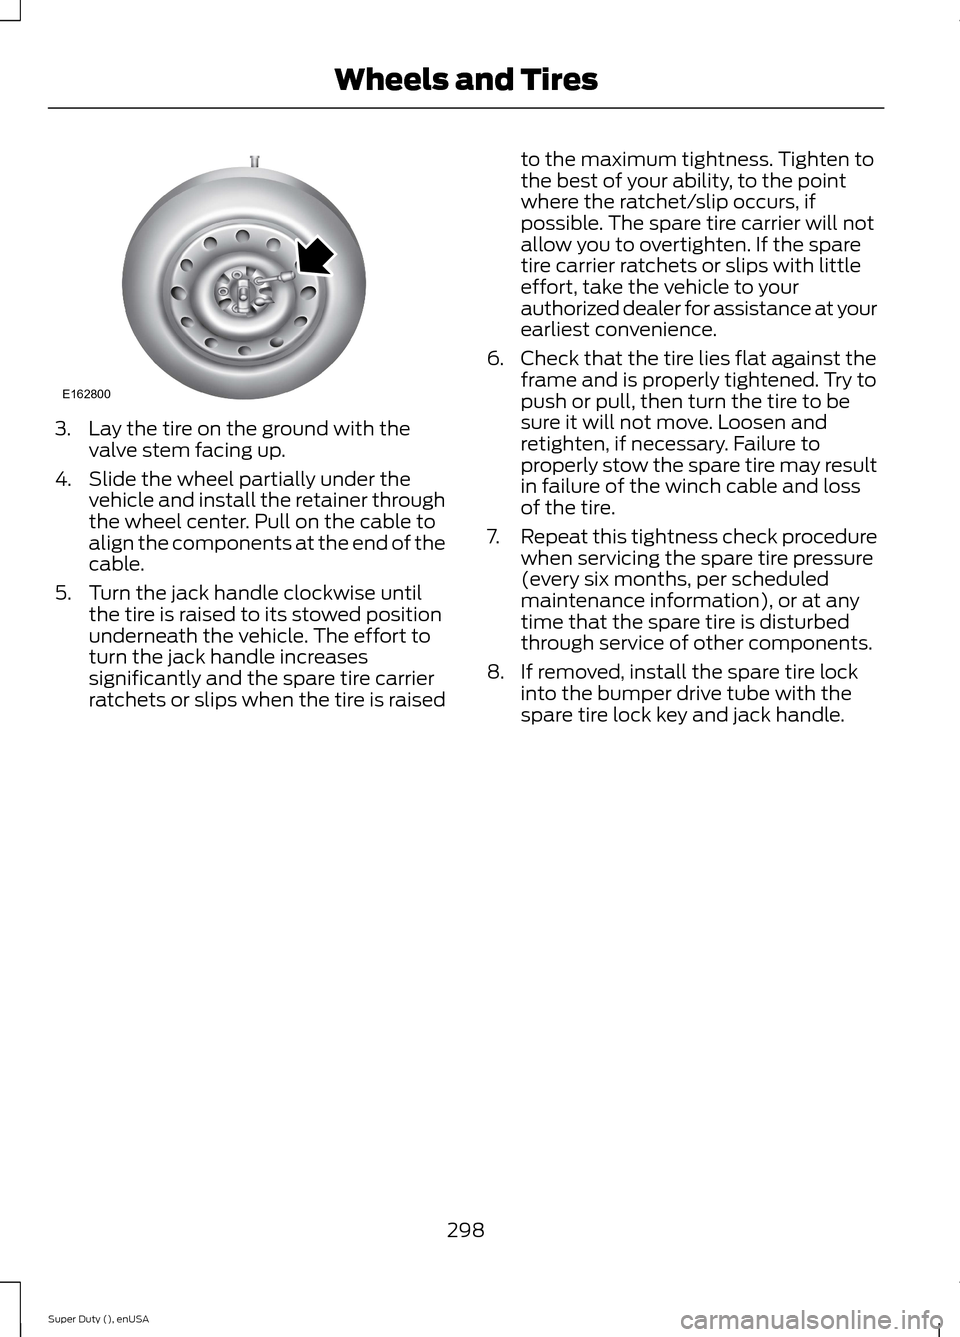
3.Lay the tire on the ground with thevalve stem facing up.
4.Slide the wheel partially under thevehicle and install the retainer throughthe wheel center. Pull on the cable toalign the components at the end of thecable.
5.Turn the jack handle clockwise untilthe tire is raised to its stowed positionunderneath the vehicle. The effort toturn the jack handle increasessignificantly and the spare tire carrierratchets or slips when the tire is raised
to the maximum tightness. Tighten tothe best of your ability, to the pointwhere the ratchet/slip occurs, ifpossible. The spare tire carrier will notallow you to overtighten. If the sparetire carrier ratchets or slips with littleeffort, take the vehicle to yourauthorized dealer for assistance at yourearliest convenience.
6.Check that the tire lies flat against theframe and is properly tightened. Try topush or pull, then turn the tire to besure it will not move. Loosen andretighten, if necessary. Failure toproperly stow the spare tire may resultin failure of the winch cable and lossof the tire.
7.Repeat this tightness check procedurewhen servicing the spare tire pressure(every six months, per scheduledmaintenance information), or at anytime that the spare tire is disturbedthrough service of other components.
8.If removed, install the spare tire lockinto the bumper drive tube with thespare tire lock key and jack handle.
298Super Duty (), enUSAWheels and TiresE162800
Page 305 of 470
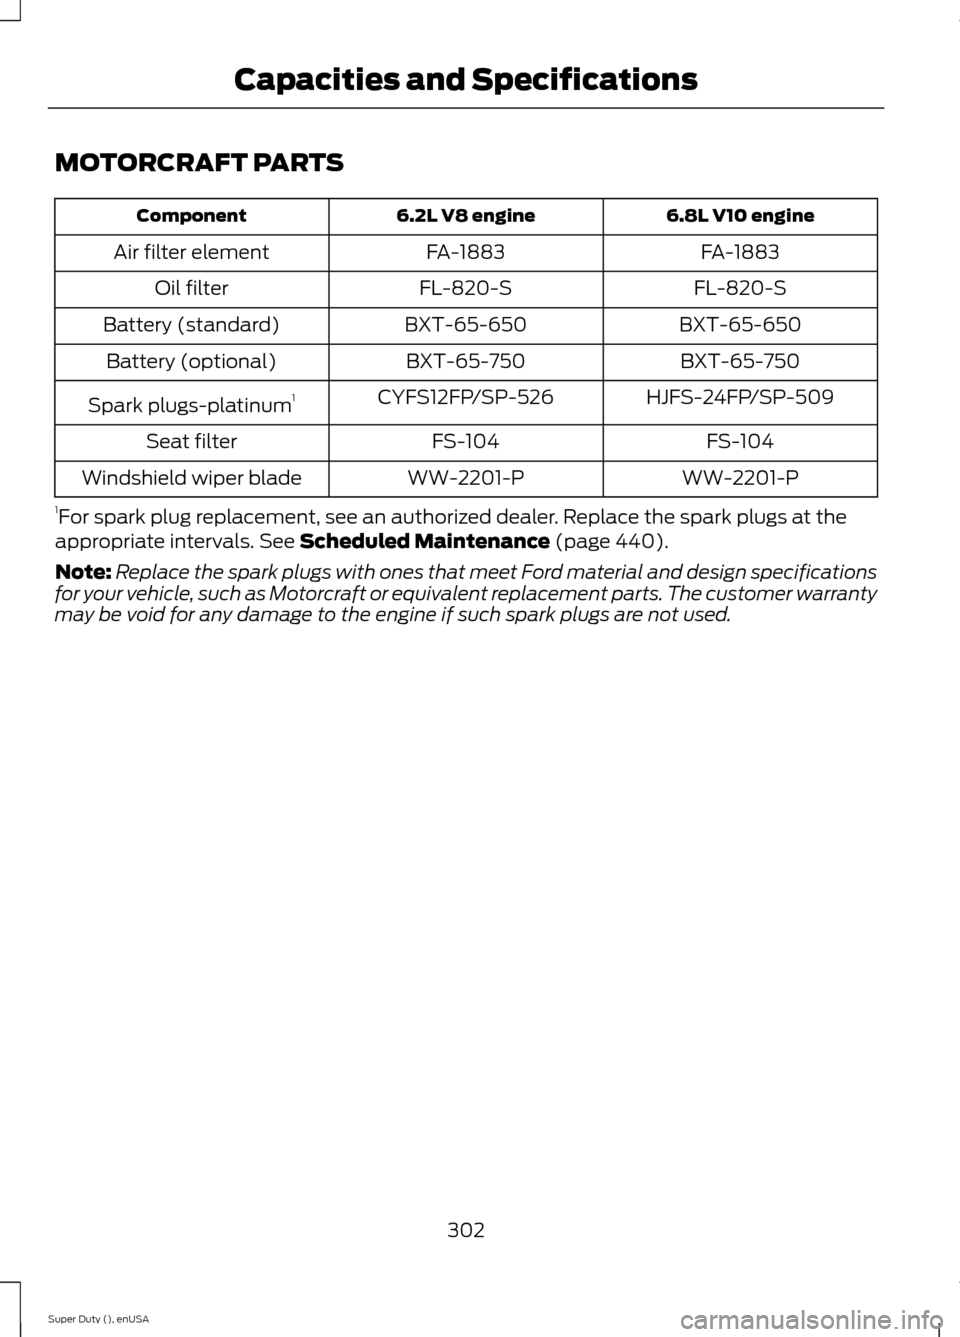
MOTORCRAFT PARTS
6.8L V10 engine6.2L V8 engineComponent
FA-1883FA-1883Air filter element
FL-820-SFL-820-SOil filter
BXT-65-650BXT-65-650Battery (standard)
BXT-65-750BXT-65-750Battery (optional)
HJFS-24FP/SP-509CYFS12FP/SP-526Spark plugs-platinum1
FS-104FS-104Seat filter
WW-2201-PWW-2201-PWindshield wiper blade
1For spark plug replacement, see an authorized dealer. Replace the spark plugs at theappropriate intervals. See Scheduled Maintenance (page 440).
Note:Replace the spark plugs with ones that meet Ford material and design specificationsfor your vehicle, such as Motorcraft or equivalent replacement parts. The customer warrantymay be void for any damage to the engine if such spark plugs are not used.
302Super Duty (), enUSACapacities and Specifications
Page 312 of 470
1Add 8 oz. (236 ml) of Additive Friction Modifier XL-3 or equivalent meeting FordSpecification EST-M2C118–A for complete refill of limited slip Ford axles. Ford designrear axles contain a synthetic lubricant that does not require changing unless you submergethe axle in water.2Ford recommends using Motorcraft (Ford) DOT 3 LV High Performance Motor VehicleBrake Fluid, Motorcraft (Ford) DOT 4 LV High Performance Motor Vehicle Brake Fluid orequivalent meeting WSS-M6C65-A1 or WSS-M6C65-A2. Use of any fluid other than therecommended fluid may cause degraded brake performance and not meet the Fordperformance standards. Keep brake fluid clean and dry. Contamination with dirt, water,petroleum products or other materials may result in brake system damage and possiblefailure.3Add the coolant type originally equipped in your vehicle.4Ford has designed your engine to use Motorcraft engine oils or equivalent oils that meetFord’s specification. It is also acceptable to use an engine oil of recommended viscositygrade that meets API SN requirements and displays the API Certification Mark for gasolineengines.5Do not use oils labeled as API SN unless the label also display the API certification mark.These oils do not meet the requirements of your vehicles engine and emissions system.6Do not use supplemental engine oil additives. They are unnecessary and could lead toengine damage not covered by your Ford warranty.7Use the correct automatic transmission fluid. Transmission fluid requirements areindicated on the dipstick blade or the dipstick handle. Check the container to verify thefluid you are adding is of the correct type. Refer to your scheduled maintenance informationto determine the correct service interval.
Note:Automatic transmissions that require MERCON LV should only use MERCON LV fluid.Use of any fluid other than the recommended fluid may cause transmission damage.8Indicates only approximate dry-fill capacity. Some applications may vary based on coolersize and if equipped with an in-tank cooler. You should set the amount of transmissionfluid and fluid level by the indication on the dipstick’s normal operating range.9Fill to the proper capacity according to dipstick Type A. For correct dipstick type, SeeAutomatic Transmission Fluid Check (page 240).9Fill to the proper capacity according to dipstick Type B. For correct dipstick type, SeeAutomatic Transmission Fluid Check (page 240).10See the Warning below:
WARNING
The air conditioning refrigerant system contains refrigerant R-134a under highpressure. Opening the air conditioning refrigerant system can cause personal injury.Have the air conditioning refrigerant system serviced only by qualified personnel.
309Super Duty (), enUSACapacities and Specifications
Page 343 of 470
911 Assist May Not Work If
•Your cellular phone or 911 Assisthardware sustains damage in a crash.
•The vehicle's battery or the SYNCsystem has no power.
•The phone(s) thrown from your vehicleare the ones paired and connected tothe system.
911 Assist Privacy Notice
When you turn on 911 Assist, it maydisclose to emergency services that yourvehicle has been in a crash involving thedeployment of an airbag or activation ofthe fuel pump shut-off. Certain versions orupdates to 911 Assist may also be capableof electronically or verbally disclosing to911 operators your vehicle location or otherdetails about your vehicle or crash to assist911 operators to provide the mostappropriate emergency services. If you donot want to disclose this information, donot turn the feature on.
Vehicle Health Report
WARNING
Always follow scheduledmaintenance instructions, regularlyinspect your vehicle, and seek repairfor any damage or problem you suspect.Vehicle Health Report supplements, butcannot replace, normal maintenance andvehicle inspection. Vehicle Health Reportonly monitors certain systemselectronically monitored by your vehicleand will not monitor or report the statusof any other system, (such as brake liningwear). Failure to perform scheduledmaintenance and regularly inspect yourvehicle may result in vehicle damage andserious injury.
Note:This feature is only available in theUnited States.
Note:Your Vehicle Health Report featurerequires activation before use. Visitwww.SYNCMyRide.com to register. Thereis no fee or subscription associated withVehicle Health Report, but you must registerto use this feature.
Note:This feature may not functionproperly if you have enabled caller IDblocking on your cellular phone. Beforerunning a report, review the Vehicle HealthReport Privacy Notice.
Note:In order to allow a break-in period foryour vehicle, you may not be able to createa Vehicle Health Report until your vehicleodometer has reached 200 miles.
Note:Cellular phone and SMS charges mayapply when making a report.
Register for Vehicle Health Report and setyour report preferences atwww.SYNCMyRide.com. After registering,you can request a Vehicle Health Report(inside your vehicle). Return to youraccount at www.SYNCMyRide.com to viewyour report. You can also choose for SYNCto remind you automatically to run reportsat specific mileage intervals.
The system allows you to check yourvehicle's overall health in the form of adiagnostic report card. The vehicle healthreport contains valuable information suchas:
•Vehicle diagnostic information
•Scheduled maintenance
•Open recalls and Field Service Actions
•Items noted during vehicle inspectionsby an authorized dealer that still needservicing.
You can run a report (after your vehicle hasbeen running a minimum of 60 seconds)by pressing the voice button and saying"Vehicle health report", or pressing thephone button.
To run a report using the phone button:
340Super Duty (), enUSASYNC™ (If Equipped)