lug FORD SUPER DUTY 2015 3.G Owners Manual
[x] Cancel search | Manufacturer: FORD, Model Year: 2015, Model line: SUPER DUTY, Model: FORD SUPER DUTY 2015 3.GPages: 470, PDF Size: 18.24 MB
Page 11 of 470
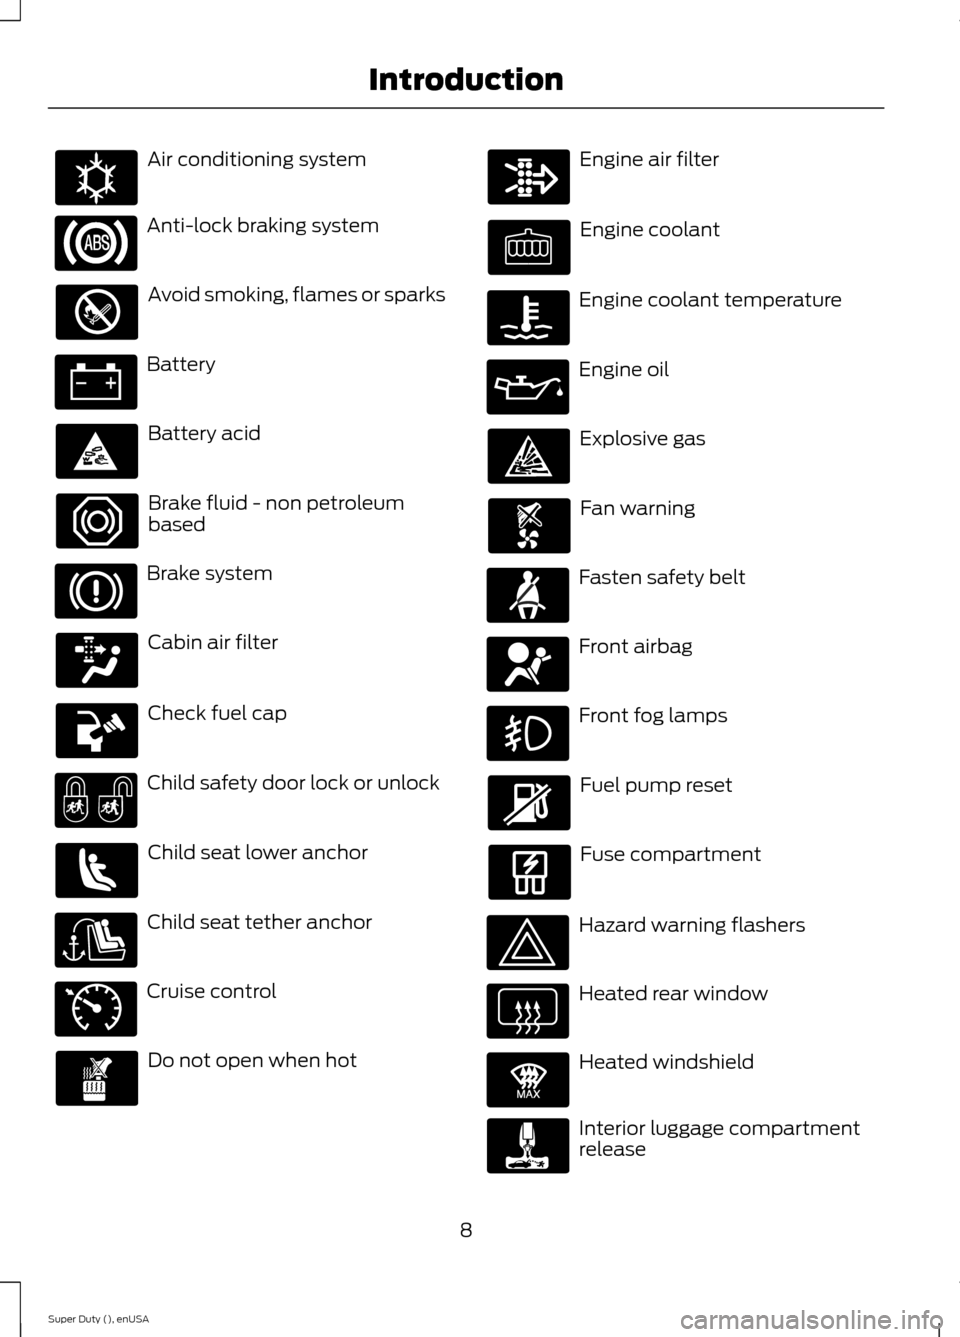
Air conditioning system
Anti-lock braking system
Avoid smoking, flames or sparks
Battery
Battery acid
Brake fluid - non petroleumbased
Brake system
Cabin air filter
Check fuel cap
Child safety door lock or unlock
Child seat lower anchor
Child seat tether anchor
Cruise control
Do not open when hot
Engine air filter
Engine coolant
Engine coolant temperature
Engine oil
Explosive gas
Fan warning
Fasten safety belt
Front airbag
Front fog lamps
Fuel pump reset
Fuse compartment
Hazard warning flashers
Heated rear window
Heated windshield
Interior luggage compartmentrelease
8Super Duty (), enUSAIntroductionE162384 E71340 E91392
Page 83 of 470
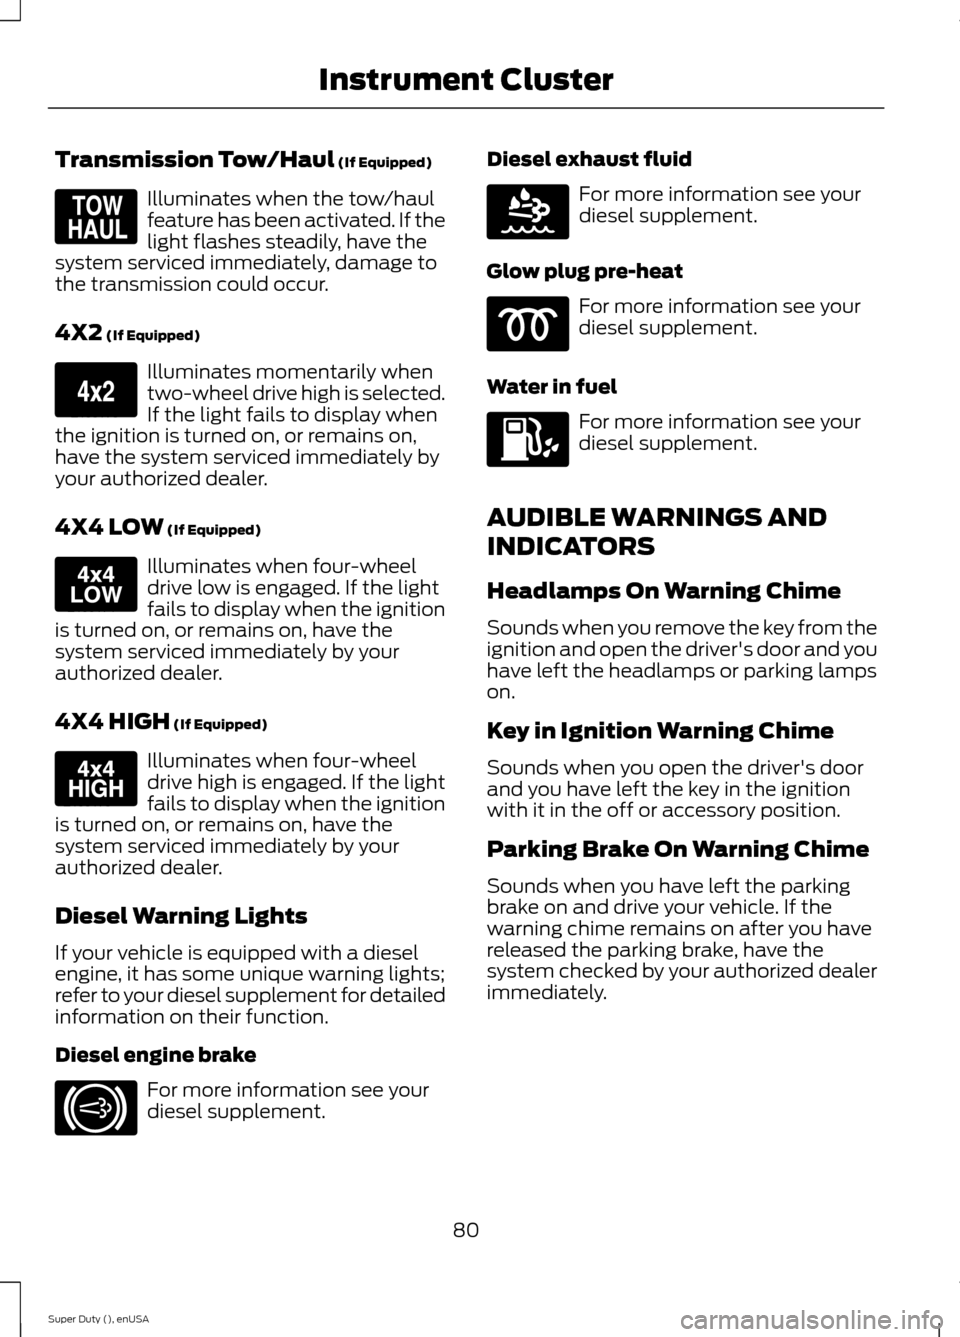
Transmission Tow/Haul (If Equipped)
Illuminates when the tow/haulfeature has been activated. If thelight flashes steadily, have thesystem serviced immediately, damage tothe transmission could occur.
4X2 (If Equipped)
Illuminates momentarily whentwo-wheel drive high is selected.If the light fails to display whenthe ignition is turned on, or remains on,have the system serviced immediately byyour authorized dealer.
4X4 LOW (If Equipped)
Illuminates when four-wheeldrive low is engaged. If the lightfails to display when the ignitionis turned on, or remains on, have thesystem serviced immediately by yourauthorized dealer.
4X4 HIGH (If Equipped)
Illuminates when four-wheeldrive high is engaged. If the lightfails to display when the ignitionis turned on, or remains on, have thesystem serviced immediately by yourauthorized dealer.
Diesel Warning Lights
If your vehicle is equipped with a dieselengine, it has some unique warning lights;refer to your diesel supplement for detailedinformation on their function.
Diesel engine brake
For more information see yourdiesel supplement.
Diesel exhaust fluid
For more information see yourdiesel supplement.
Glow plug pre-heat
For more information see yourdiesel supplement.
Water in fuel
For more information see yourdiesel supplement.
AUDIBLE WARNINGS AND
INDICATORS
Headlamps On Warning Chime
Sounds when you remove the key from theignition and open the driver's door and youhave left the headlamps or parking lampson.
Key in Ignition Warning Chime
Sounds when you open the driver's doorand you have left the key in the ignitionwith it in the off or accessory position.
Parking Brake On Warning Chime
Sounds when you have left the parkingbrake on and drive your vehicle. If thewarning chime remains on after you havereleased the parking brake, have thesystem checked by your authorized dealerimmediately.
80Super Duty (), enUSAInstrument ClusterE161509 E163173 E163174 E163175 E171217 E163176
Page 132 of 470
12 Volt DC Power Point
WARNING
Do not plug optional electricalaccessories into the cigar lightersocket (if equipped). Improper useof the lighter can cause damage notcovered by your warranty, and can resultin fire or serious injury.
Note:If used when the engine is notrunning, the battery will discharge. Theremay be insufficient power to restart yourengine.
Note:Do not insert objects other than anaccessory plug into the power point. Thiswill damage the outlet and blow the fuse.
Note:Do not hang any type of accessory oraccessory bracket from the plug.
Note:Do not use the power point over thevehicle capacity of 12 volt DC 180 watts ora fuse may blow.
Note:Do not use the power point foroperating a cigar lighter element.
Note:Improper use of the power point cancause damage not covered by yourwarranty.
Note:Always keep the power point capsclosed when not in use.
Run the engine for full capacity use of thepower point. To prevent the battery frombeing discharged:
•do not use the power point longer thannecessary when the engine is notrunning
•do not leave devices plugged inovernight or when the vehicle is parkedfor extended periods.
Locations
Power points may be found:
•On the instrument panel (twolocations).
•Inside the center console.
•On the rear of the center console.
•Inside the front under-seat storagecompartment (if equipped).
•Inside the rear under-seat storagecompartment (if equipped).
110 Volt AC Power Points (If Equipped)
WARNING
Do not keep electrical devicesplugged in the power points whenthe devices are not in use. Do not useany extension cord with the 110 volt ACpower points, since it will defeat the safetyprotection design. Do not use a singlepower point to power multiple devices. Itmay cause the power point to exceed the150 watt load limit and overload, resultingin fire or serious injury.
Note:Keep the engine running to use thepower points.
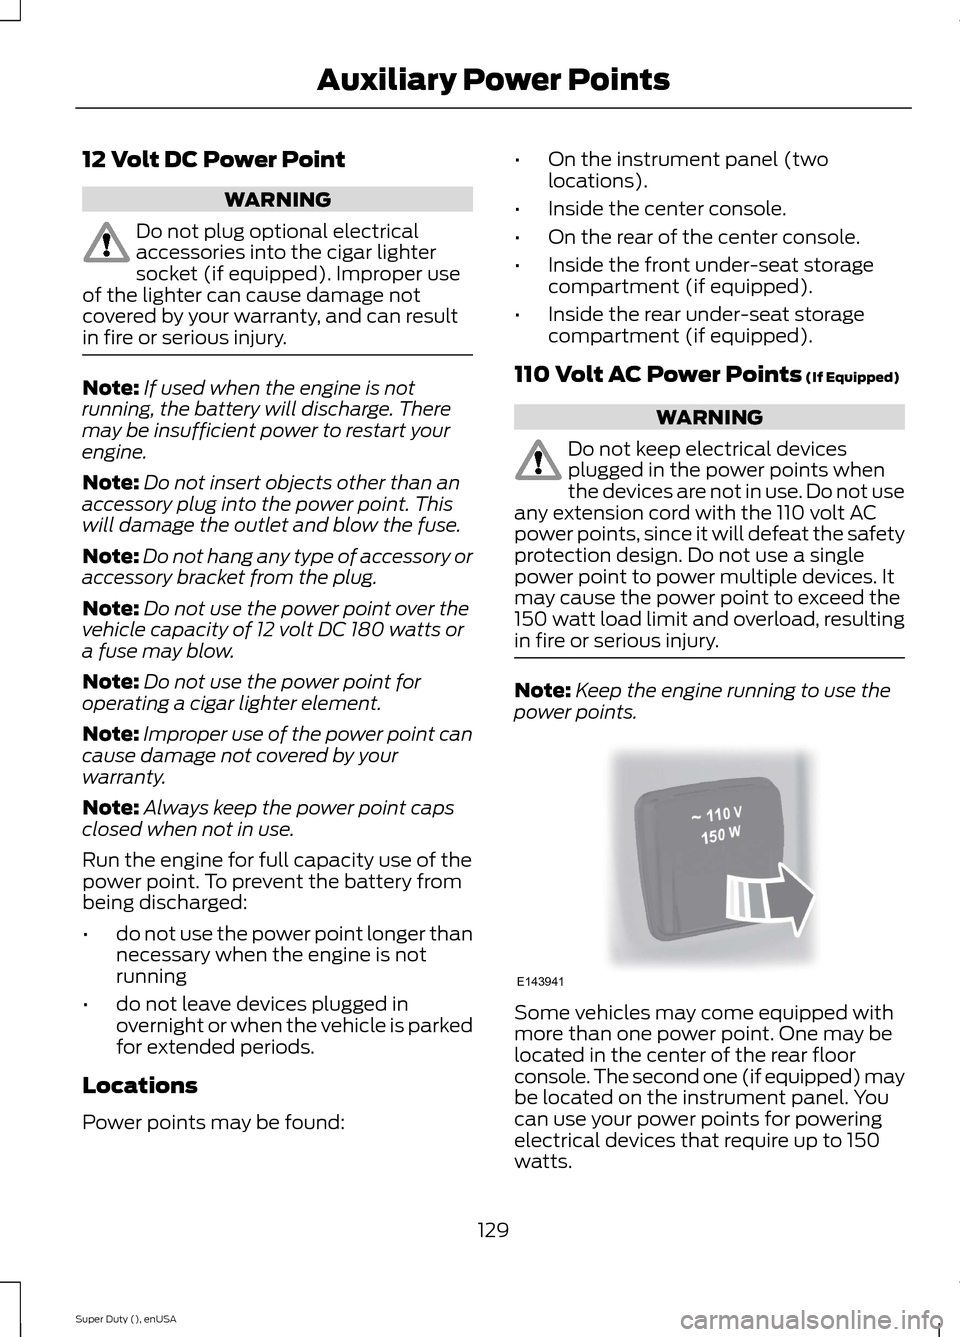
Some vehicles may come equipped withmore than one power point. One may belocated in the center of the rear floorconsole. The second one (if equipped) maybe located on the instrument panel. Youcan use your power points for poweringelectrical devices that require up to 150watts.
129Super Duty (), enUSAAuxiliary Power PointsE143941
Page 133 of 470
When the indicator light, located on thepower point, is:
•on — the power point is ready to supplypower.
•off — the power point power supply isoff; ignition is not on.
•flashing — the power point is in faultmode.
The power point temporarily turns offpower if the 150 watt limit is exceeded. Itcan also switch to a fault mode when it isoverloaded, overheated, or shorted. Unplugyour device and switch the ignition off, andthen switch the ignition back on foroverloading and shorting conditions. Letthe system cool off, and then turn theignition off, and then switch the ignitionback on for an overheating condition.
The power points are not designed forelectric devices such as:
•cathode ray tube type televisions
•motor loads, for example vacuumcleaners, electric saws and otherelectric power tools, orcompressor-driven refrigerators
•measuring devices which processprecise data, for example medicalequipment or measuring equipment
•other appliances requiring an extremelystable power supply, for examplemicrocomputer-controlled electricblankets or touch sensor lamps.
130Super Duty (), enUSAAuxiliary Power Points
Page 138 of 470
temperatures, and be clearly markedSuitable for Use with OutdoorAppliances. Do not use an indoorextension cord outdoors. This couldresult in an electric shock or become afire hazard.
•Use as short an extension cord aspossible.
•Do not use multiple extension cords.
•Make sure that when in operation, theextension cord plug and heater cordplug connections are free and clear ofwater. This could cause an electricshock or fire.
•Make sure your vehicle is parked in aclean area, clear of combustibles.
•Make sure the heater, heater cord andextension cord are firmly connected.
•Check for heat anywhere in theelectrical hookup once the system hasbeen operating for approximately 30minutes.
•Make sure the system is unplugged andproperly stowed before driving yourvehicle. Make sure the protective coverseals the prongs of the block heatercord plug when not in use.
•Make sure the heater system ischecked for proper operation beforewinter.
Using the Engine Block Heater
Make sure the receptacle terminals areclean and dry prior to use. Clean them witha dry cloth if necessary.
The heater uses 0.4 to 1.0 kilowatt-hoursof energy per hour of use. The system doesnot have a thermostat. It achievesmaximum temperature afterapproximately three hours of operation.Using the heater longer than three hoursdoes not improve system performance andunnecessarily uses electricity.
135Super Duty (), enUSAStarting and Stopping the Engine
Page 162 of 470
On some Four-wheel drive vehicles, whenthe transfer case is in the N (Neutral)position, the engine and transmission aredisconnected from the rest of the driveline.Therefore, the vehicle is free to roll even ifthe automatic transmission is in P (Park)or the manual transmission is in gear. Donot leave the vehicle unattended with thetransfer case in the N (Neutral) position.Always set the parking brake fully and turnoff the ignition when leaving the vehicle.
Maintenance and Modifications
The suspension and steering systems onyour vehicle have been designed andtested to provide predictable performancewhether loaded or empty. For this reason,we strongly recommend that you do notmake modifications such as adding orremoving parts (i.e. lift kits or stabilizerbars) or by using replacement parts notequivalent to the original factoryequipment.
We recommend that you use caution whenyour vehicle has either a high load or device(i.e. ladder or luggage racks). Anymodifications to your vehicle that raise thecenter of gravity may cause your vehicleto roll over when there is a loss of vehiclecontrol.
Failure to maintain your vehicle correctlymay void the warranty, increase your repaircost, reduce vehicle performance andoperational capabilities and adverselyaffect you and your passenger's safety. Werecommend you frequently inspect yourvehicle's chassis components when yourvehicle is subject to off road usage.
159Super Duty (), enUSAFour-Wheel Drive (If Equipped)
Page 177 of 470
Using the Rear View CameraSystem
The rear view camera system displayswhat is behind your vehicle when you placethe transmission in reverse (R).
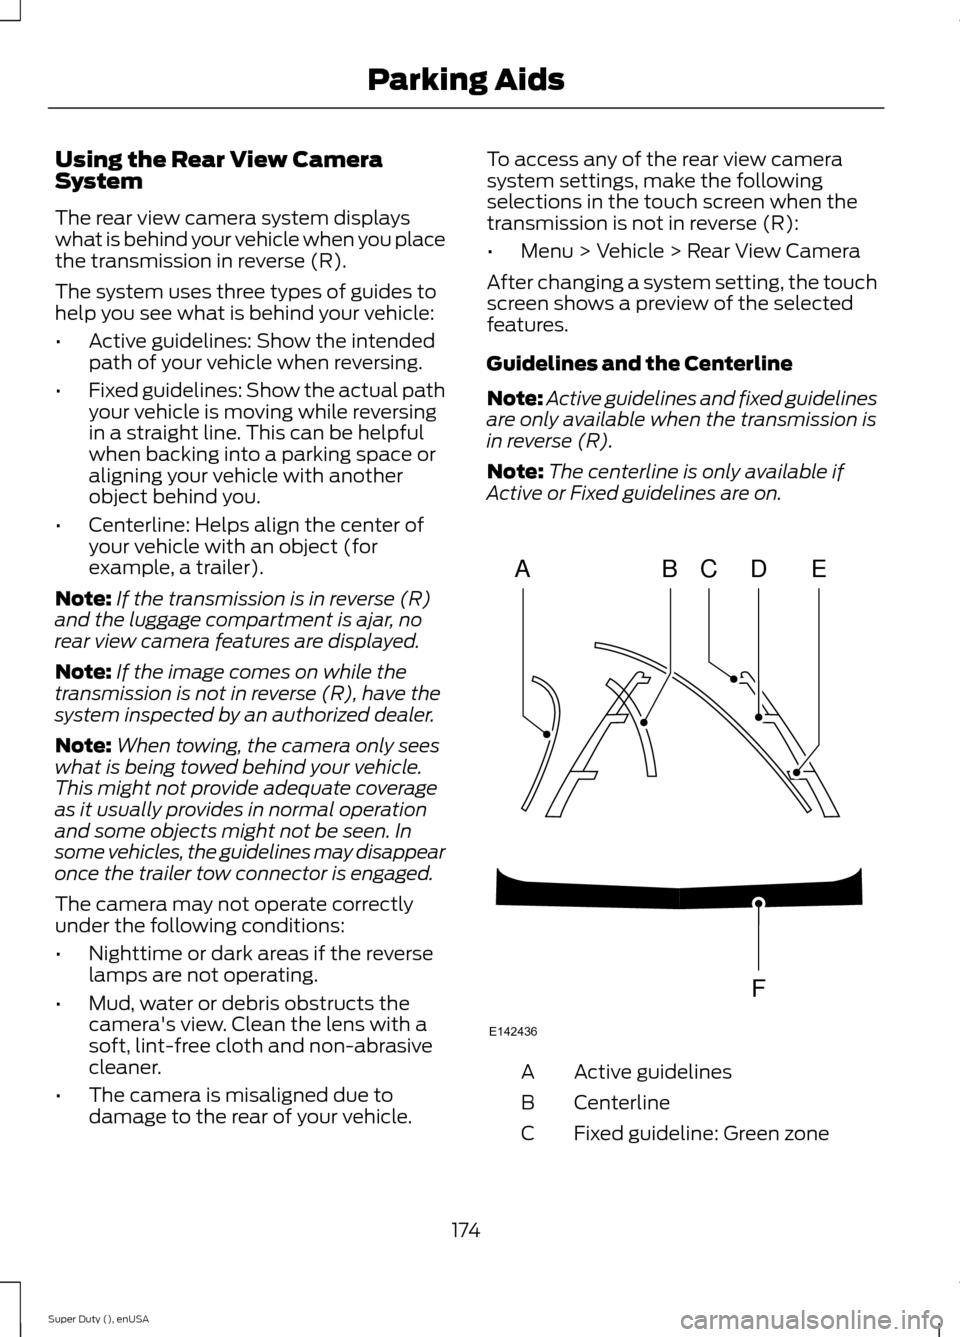
The system uses three types of guides tohelp you see what is behind your vehicle:
•Active guidelines: Show the intendedpath of your vehicle when reversing.
•Fixed guidelines: Show the actual pathyour vehicle is moving while reversingin a straight line. This can be helpfulwhen backing into a parking space oraligning your vehicle with anotherobject behind you.
•Centerline: Helps align the center ofyour vehicle with an object (forexample, a trailer).
Note:If the transmission is in reverse (R)and the luggage compartment is ajar, norear view camera features are displayed.
Note:If the image comes on while thetransmission is not in reverse (R), have thesystem inspected by an authorized dealer.
Note:When towing, the camera only seeswhat is being towed behind your vehicle.This might not provide adequate coverageas it usually provides in normal operationand some objects might not be seen. Insome vehicles, the guidelines may disappearonce the trailer tow connector is engaged.
The camera may not operate correctlyunder the following conditions:
•Nighttime or dark areas if the reverselamps are not operating.
•Mud, water or debris obstructs thecamera's view. Clean the lens with asoft, lint-free cloth and non-abrasivecleaner.
•The camera is misaligned due todamage to the rear of your vehicle.
To access any of the rear view camerasystem settings, make the followingselections in the touch screen when thetransmission is not in reverse (R):
•Menu > Vehicle > Rear View Camera
After changing a system setting, the touchscreen shows a preview of the selectedfeatures.
Guidelines and the Centerline
Note:Active guidelines and fixed guidelinesare only available when the transmission isin reverse (R).
Note:The centerline is only available ifActive or Fixed guidelines are on.
Active guidelinesA
CenterlineB
Fixed guideline: Green zoneC
174Super Duty (), enUSAParking AidsABCDFEE142436
Page 187 of 470
2.Determine the combinedweight of the driver andpassengers that will be ridingin your vehicle.
3.Subtract the combined weightof the driver and passengersfrom XXX kg or XXX lb.
4.The resulting figure equals theavailable amount of cargo andluggage load capacity. Forexample, if the “XXX” amountequals 1,400 lb. and there willbe five 150 lb. passengers inyour vehicle, the amount ofavailable cargo and luggageload capacity is 650 lb.(1400-750 (5 x 150) = 650 lb.)
5.Determine the combinedweight of luggage and cargobeing loaded on the vehicle.That weight may not safelyexceed the available cargo andluggage load capacitycalculated in Step 4.
6.If your vehicle will be towing atrailer, load from your trailerwill be transferred to yourvehicle. Consult this manual todetermine how this reduces theavailable cargo and luggageload capacity of your vehicle.
The following gives you a fewexamples on how to calculate theavailable amount of cargo andluggage load capacity:
*Suppose your vehicle has a1400-pound (635-kilogram) cargoand luggage capacity. You decideto go golfing. Is there enough loadcapacity to carry you, four of yourfriends and all the golf bags? Youand four friends average 220pounds (99 kilograms) each andthe golf bags weigh approximately30 pounds (13.5 kilograms) each.The calculation would be: 1400 -(5 x 220) - (5 x 30) = 1400 - 1100- 150 = 150 pounds. Yes, you haveenough load capacity in yourvehicle to transport four friendsand your golf bags. In metric units,the calculation would be: 635kilograms - (5 x 99 kilograms) -(5 x 13.5 kilograms) = 635 - 495 -67.5 = 72.5 kilograms.
*Suppose your vehicle has a1400-pound (635-kilogram) cargoand luggage capacity. You andone of your friends decide to pickup cement from the local homeimprovement store to finish thatpatio you have been planning forthe past two years. Measuring theinside of the vehicle with the rearseat folded down, you have roomfor twelve 100-pound(45-kilogram) bags of cement. Doyou have enough load capacity totransport the cement to yourhome? If you and your friend eachweigh 220 pounds (99 kilograms),the calculation would be: 1400 -(2 x 220) - (12 x 100) = 1400 - 440- 1200 = - 240 pounds. No, you donot have enough cargo capacity
to carry that much weight. Inmetric units, the calculation would
184Super Duty (), enUSALoad Carrying
Page 196 of 470
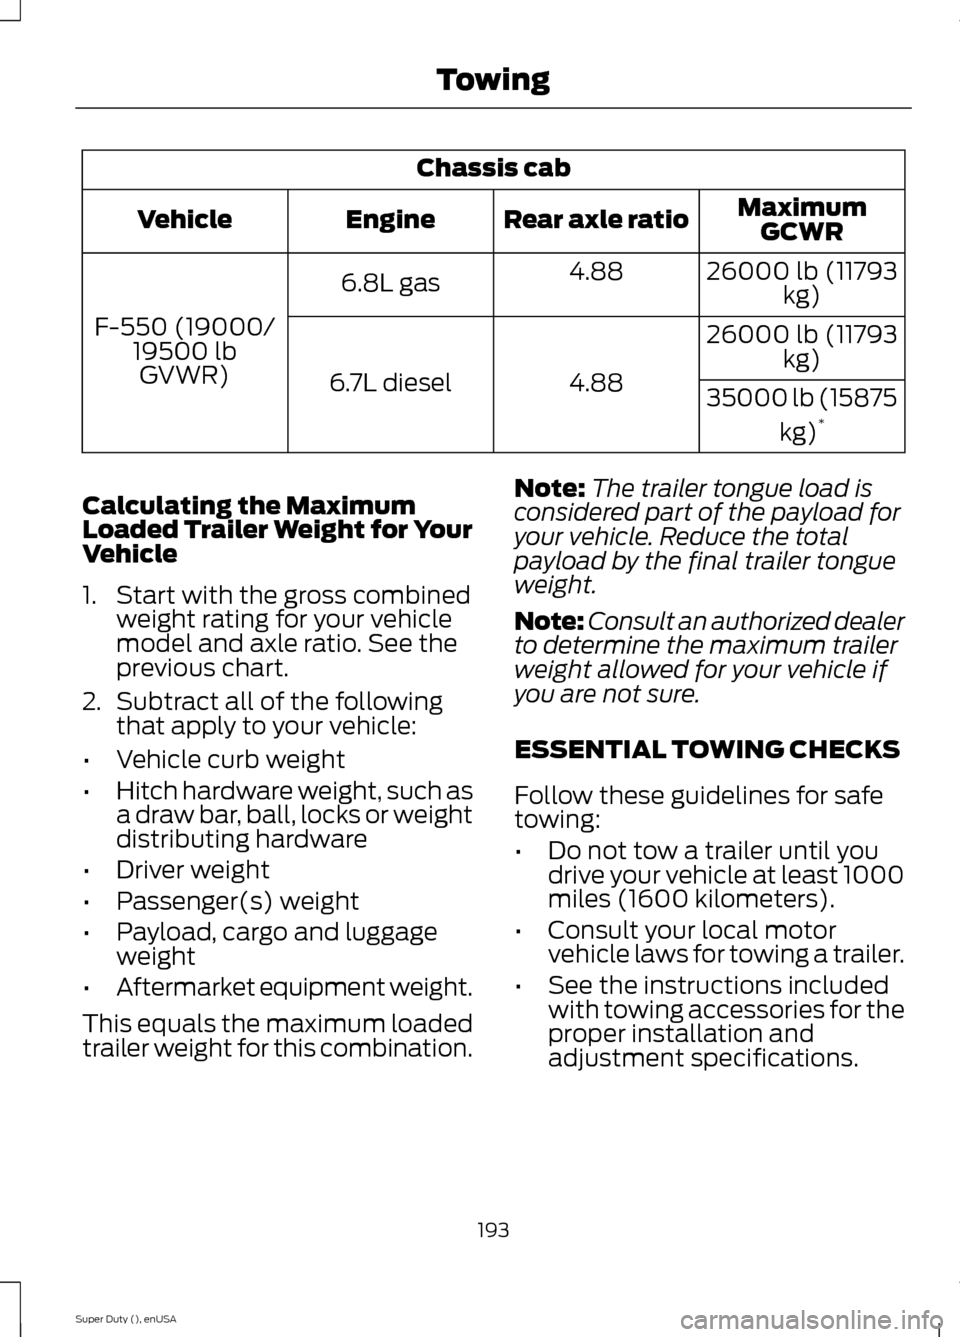
Chassis cab
MaximumGCWRRear axle ratioEngineVehicle
26000 lb (11793kg)4.886.8L gas
F-550 (19000/19500 lbGVWR)
26000 lb (11793kg)
4.886.7L diesel35000 lb (15875
kg)*
Calculating the MaximumLoaded Trailer Weight for YourVehicle
1.Start with the gross combinedweight rating for your vehiclemodel and axle ratio. See theprevious chart.
2.Subtract all of the followingthat apply to your vehicle:
•Vehicle curb weight
•Hitch hardware weight, such asa draw bar, ball, locks or weightdistributing hardware
•Driver weight
•Passenger(s) weight
•Payload, cargo and luggageweight
•Aftermarket equipment weight.
This equals the maximum loadedtrailer weight for this combination.
Note:The trailer tongue load isconsidered part of the payload foryour vehicle. Reduce the totalpayload by the final trailer tongueweight.
Note:Consult an authorized dealerto determine the maximum trailer
weight allowed for your vehicle ifyou are not sure.
ESSENTIAL TOWING CHECKS
Follow these guidelines for safetowing:
•Do not tow a trailer until youdrive your vehicle at least 1000miles (1600 kilometers).
•Consult your local motorvehicle laws for towing a trailer.
•See the instructions includedwith towing accessories for theproper installation andadjustment specifications.
193Super Duty (), enUSATowing
Page 203 of 470
•TRAILER CONNECTED:Displays when the systemsenses a correct trailer wiringconnection during a givenignition cycle.
•TRAILER DISCONNECTED:Displays, accompanied by asingle audible time, when thesystem senses a trailerconnection and then adisconnection, eitherintentional or unintentional,during a given ignition cycle. Italso displays if a truck ortrailer-wiring fault occurscausing the trailer to appeardisconnected. This messagecan also display if you use themanual control lever without atrailer connected.
Procedure for Adjusting Gain
Note:Only perform this procedurein a traffic-free environment atspeeds of approximately 20-25mph (30-40 km/h).
The gain setting sets the trailerbrake controller for the specifictowing condition. You shouldchange the setting as towingconditions change. Changes totowing conditions include trailerload, vehicle load, road conditionsand weather.
The gain should be set to providethe maximum trailer brakingassistance while making sure thetrailer wheels do not lock whenusing the brakes. Locked trailerwheels may lead to trailerinstability.
1.Make sure the trailer brakes arein good working condition,functioning normally andproperly adjusted. See yourtrailer dealer if necessary.
2.Hook up the trailer and makethe electrical connectionsaccording to the trailermanufacturer's instructions.
3.When you plug in a trailer withelectric orelectric-over-hydraulic brakes,TRAILER CONNECTEDappears in the informationdisplay.
4.Use the gain adjustment (+ and-) buttons to increase ordecrease the gain setting to thedesired starting point. A gainsetting of 6.0 is a good startingpoint for heavier loads.
5.In a traffic-free environment,tow the trailer on a dry, levelsurface at a speed of 20-25mph (30-40 km/h) andsqueeze the manual controllever completely.
6.If the trailer wheels lock up,indicated by squealing tires,reduce the gain setting. If thetrailer wheels turn freely,
increase the gain setting.Repeat Steps 5 and 6 until the
200Super Duty (), enUSATowing