tow bar FORD SUPER DUTY 2023 Owners Manual
[x] Cancel search | Manufacturer: FORD, Model Year: 2023, Model line: SUPER DUTY, Model: FORD SUPER DUTY 2023Pages: 738, PDF Size: 18.49 MB
Page 69 of 738
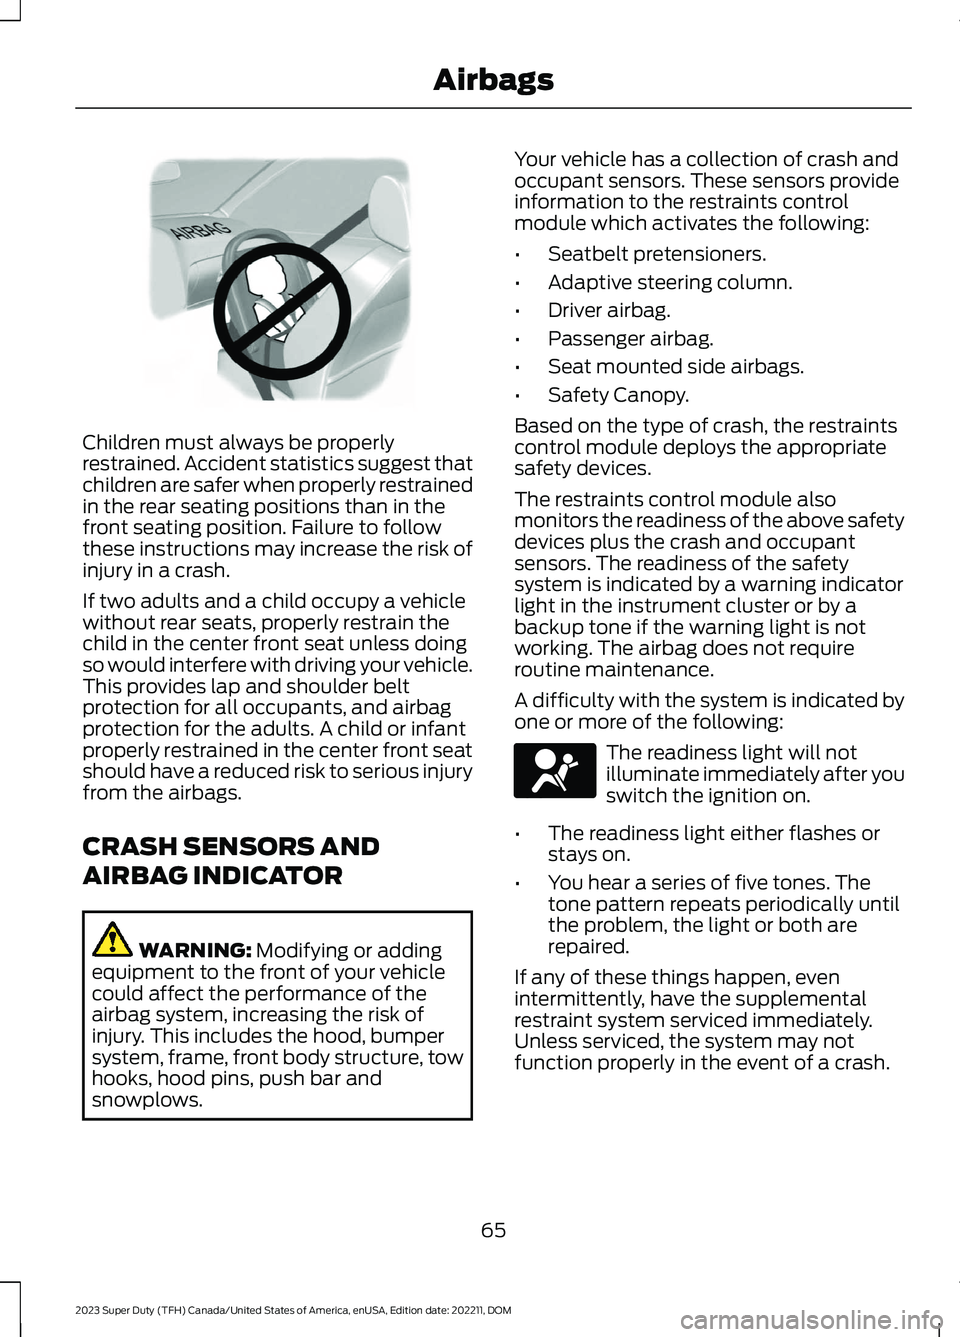
Children must always be properlyrestrained. Accident statistics suggest thatchildren are safer when properly restrainedin the rear seating positions than in thefront seating position. Failure to followthese instructions may increase the risk ofinjury in a crash.
If two adults and a child occupy a vehiclewithout rear seats, properly restrain thechild in the center front seat unless doingso would interfere with driving your vehicle.This provides lap and shoulder beltprotection for all occupants, and airbagprotection for the adults. A child or infantproperly restrained in the center front seatshould have a reduced risk to serious injuryfrom the airbags.
CRASH SENSORS AND
AIRBAG INDICATOR
WARNING: Modifying or addingequipment to the front of your vehiclecould affect the performance of theairbag system, increasing the risk ofinjury. This includes the hood, bumpersystem, frame, front body structure, towhooks, hood pins, push bar andsnowplows.
Your vehicle has a collection of crash andoccupant sensors. These sensors provideinformation to the restraints controlmodule which activates the following:
•Seatbelt pretensioners.
•Adaptive steering column.
•Driver airbag.
•Passenger airbag.
•Seat mounted side airbags.
•Safety Canopy.
Based on the type of crash, the restraintscontrol module deploys the appropriatesafety devices.
The restraints control module alsomonitors the readiness of the above safetydevices plus the crash and occupantsensors. The readiness of the safetysystem is indicated by a warning indicatorlight in the instrument cluster or by abackup tone if the warning light is notworking. The airbag does not requireroutine maintenance.
A difficulty with the system is indicated byone or more of the following:
The readiness light will notilluminate immediately after youswitch the ignition on.
•The readiness light either flashes orstays on.
•You hear a series of five tones. Thetone pattern repeats periodically untilthe problem, the light or both arerepaired.
If any of these things happen, evenintermittently, have the supplementalrestraint system serviced immediately.Unless serviced, the system may notfunction properly in the event of a crash.
65
2023 Super Duty (TFH) Canada/United States of America, enUSA, Edition date: 202211, DOMAirbagsE142846 E67017
Page 97 of 738
•Make sure you use the grab handlewhen climbing on the step.
•Do not use the step with bare feet.
•Make sure the step is clean before use.
•Keep the step load below the totalmaximum load of 350 lb (159 kg).
STOWING THE TAILGATE STEP
1.Press the yellow button on the handleto lower and then press the yellowlever at the bottom of the handle tounlock. Rotate the handle down fromthe vertical to the horizontal positionand push it into the tailgate.
2.Rotate the step up until it is horizontal,then push it back into the tailgate untilthe step is secure.
Note:Make sure to close and fully latch thestep before moving your vehicle. Do notdrive with the step or grab handle open.
Note:The power tailgate cannot close ifthe step is open. A warning messageappears and a tone sounds. After stowingthe step the power close function isrestored.
TAILGATE VIDEOS
Integrated Tailgate Step Video Link
Remote tailgate release Video Link
93
2023 Super Duty (TFH) Canada/United States of America, enUSA, Edition date: 202211, DOMTailgate - Vehicles With: Manual Tailgate
Page 101 of 738
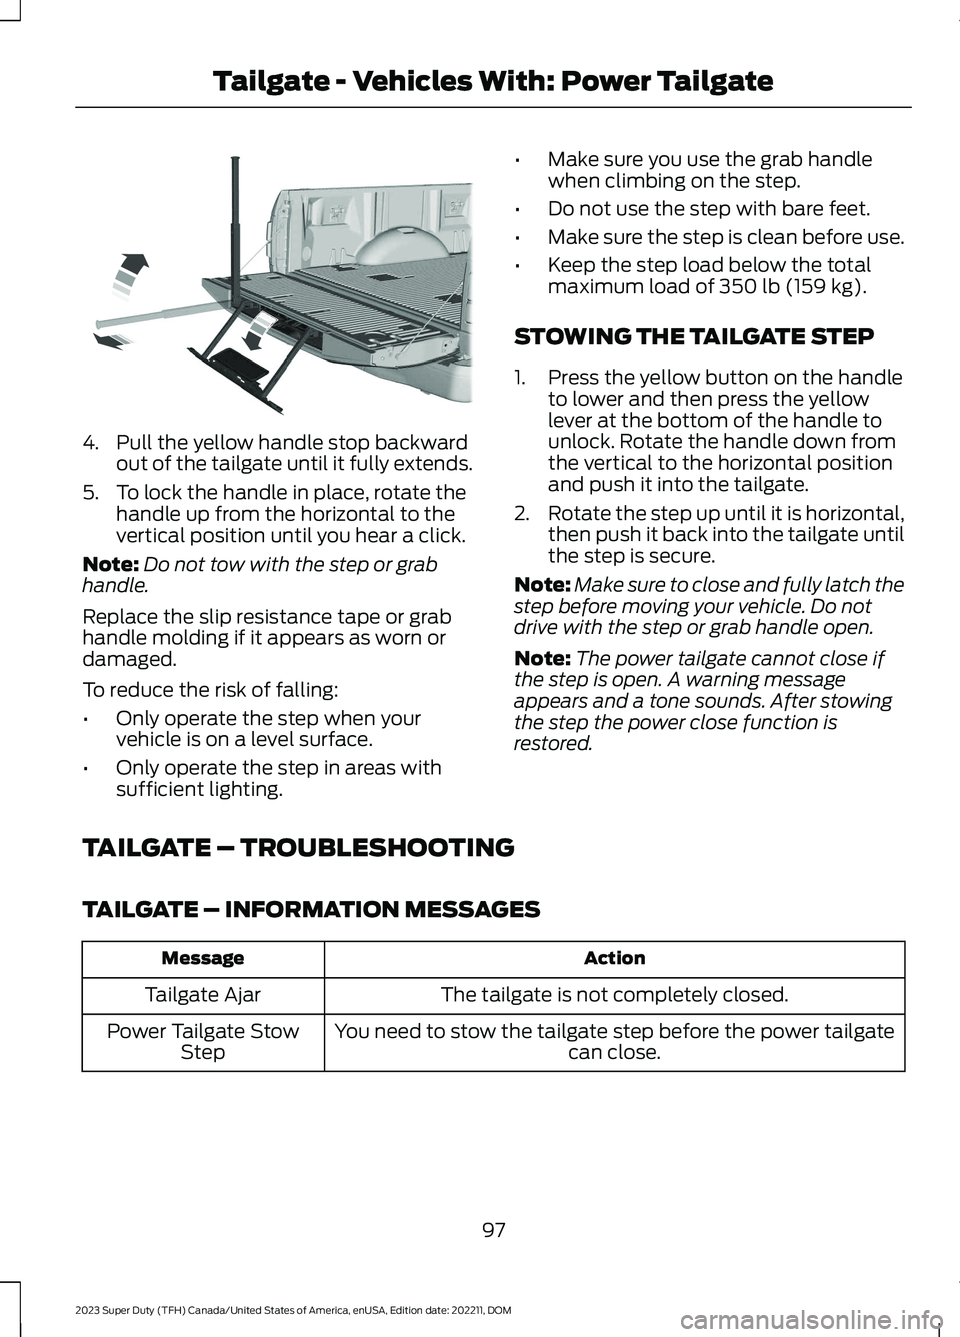
4.Pull the yellow handle stop backwardout of the tailgate until it fully extends.
5.To lock the handle in place, rotate thehandle up from the horizontal to thevertical position until you hear a click.
Note:Do not tow with the step or grabhandle.
Replace the slip resistance tape or grabhandle molding if it appears as worn ordamaged.
To reduce the risk of falling:
•Only operate the step when yourvehicle is on a level surface.
•Only operate the step in areas withsufficient lighting.
•Make sure you use the grab handlewhen climbing on the step.
•Do not use the step with bare feet.
•Make sure the step is clean before use.
•Keep the step load below the totalmaximum load of 350 lb (159 kg).
STOWING THE TAILGATE STEP
1.Press the yellow button on the handleto lower and then press the yellowlever at the bottom of the handle tounlock. Rotate the handle down fromthe vertical to the horizontal positionand push it into the tailgate.
2.Rotate the step up until it is horizontal,then push it back into the tailgate untilthe step is secure.
Note:Make sure to close and fully latch thestep before moving your vehicle. Do notdrive with the step or grab handle open.
Note:The power tailgate cannot close ifthe step is open. A warning messageappears and a tone sounds. After stowingthe step the power close function isrestored.
TAILGATE – TROUBLESHOOTING
TAILGATE – INFORMATION MESSAGES
ActionMessage
The tailgate is not completely closed.Tailgate Ajar
You need to stow the tailgate step before the power tailgatecan close.Power Tailgate StowStep
97
2023 Super Duty (TFH) Canada/United States of America, enUSA, Edition date: 202211, DOMTailgate - Vehicles With: Power TailgateE189557
Page 105 of 738
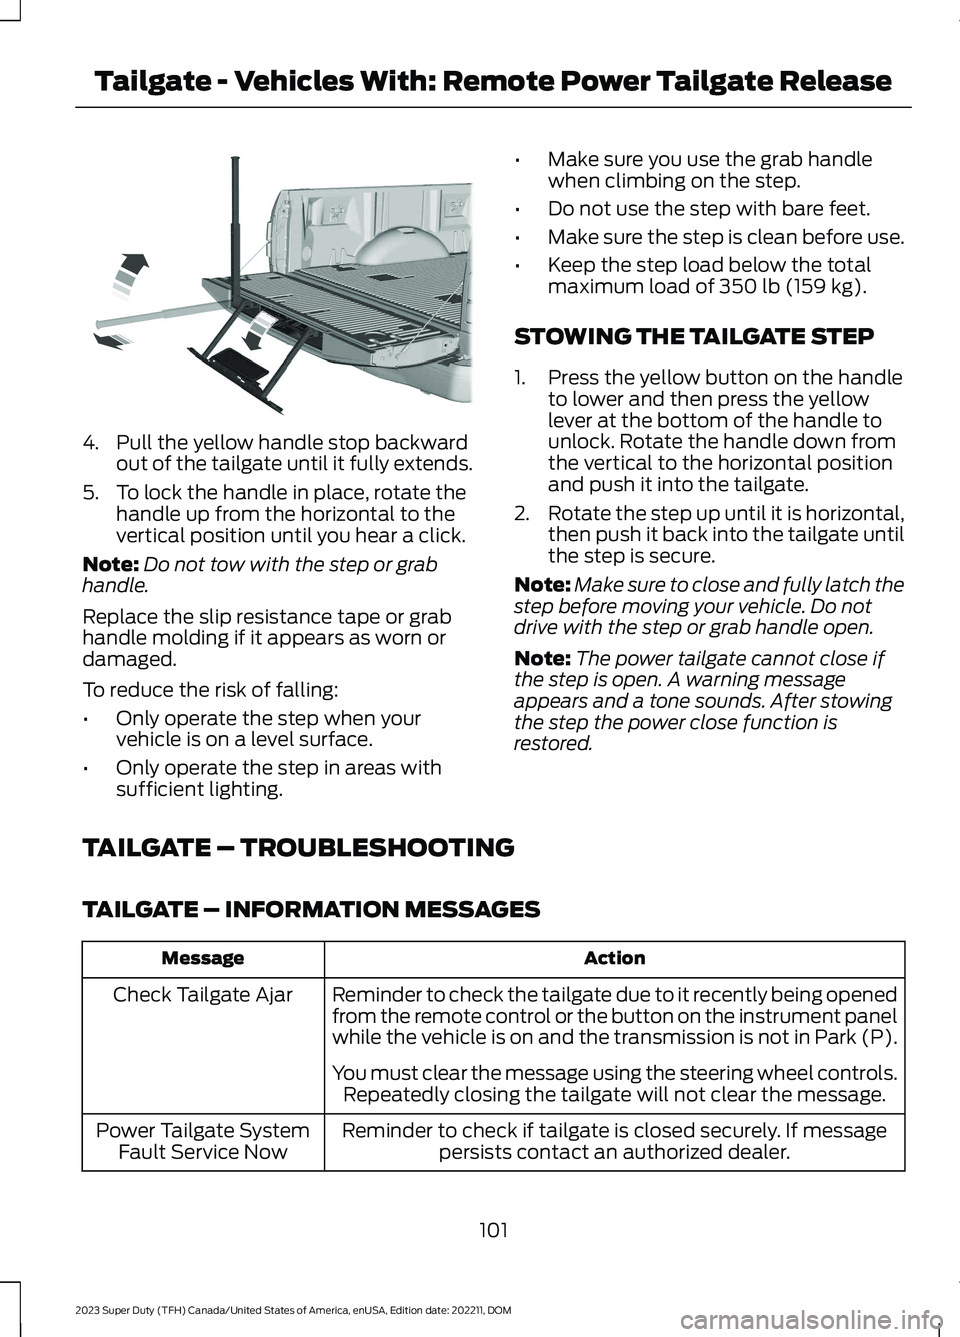
4.Pull the yellow handle stop backwardout of the tailgate until it fully extends.
5.To lock the handle in place, rotate thehandle up from the horizontal to thevertical position until you hear a click.
Note:Do not tow with the step or grabhandle.
Replace the slip resistance tape or grabhandle molding if it appears as worn ordamaged.
To reduce the risk of falling:
•Only operate the step when yourvehicle is on a level surface.
•Only operate the step in areas withsufficient lighting.
•Make sure you use the grab handlewhen climbing on the step.
•Do not use the step with bare feet.
•Make sure the step is clean before use.
•Keep the step load below the totalmaximum load of 350 lb (159 kg).
STOWING THE TAILGATE STEP
1.Press the yellow button on the handleto lower and then press the yellowlever at the bottom of the handle tounlock. Rotate the handle down fromthe vertical to the horizontal positionand push it into the tailgate.
2.Rotate the step up until it is horizontal,then push it back into the tailgate untilthe step is secure.
Note:Make sure to close and fully latch thestep before moving your vehicle. Do notdrive with the step or grab handle open.
Note:The power tailgate cannot close ifthe step is open. A warning messageappears and a tone sounds. After stowingthe step the power close function isrestored.
TAILGATE – TROUBLESHOOTING
TAILGATE – INFORMATION MESSAGES
ActionMessage
Reminder to check the tailgate due to it recently being openedfrom the remote control or the button on the instrument panelwhile the vehicle is on and the transmission is not in Park (P).
Check Tailgate Ajar
You must clear the message using the steering wheel controls.Repeatedly closing the tailgate will not clear the message.
Reminder to check if tailgate is closed securely. If messagepersists contact an authorized dealer.Power Tailgate SystemFault Service Now
101
2023 Super Duty (TFH) Canada/United States of America, enUSA, Edition date: 202211, DOMTailgate - Vehicles With: Remote Power Tailgate ReleaseE189557
Page 171 of 738
If you fully recline the passenger seat andthe vehicle is moving, a message appearson the instrument cluster and a tonesounds. To switch the warning off, returnthe seat to an upright position.
Adjusting the Upper Seat Backrest
(If Equipped)
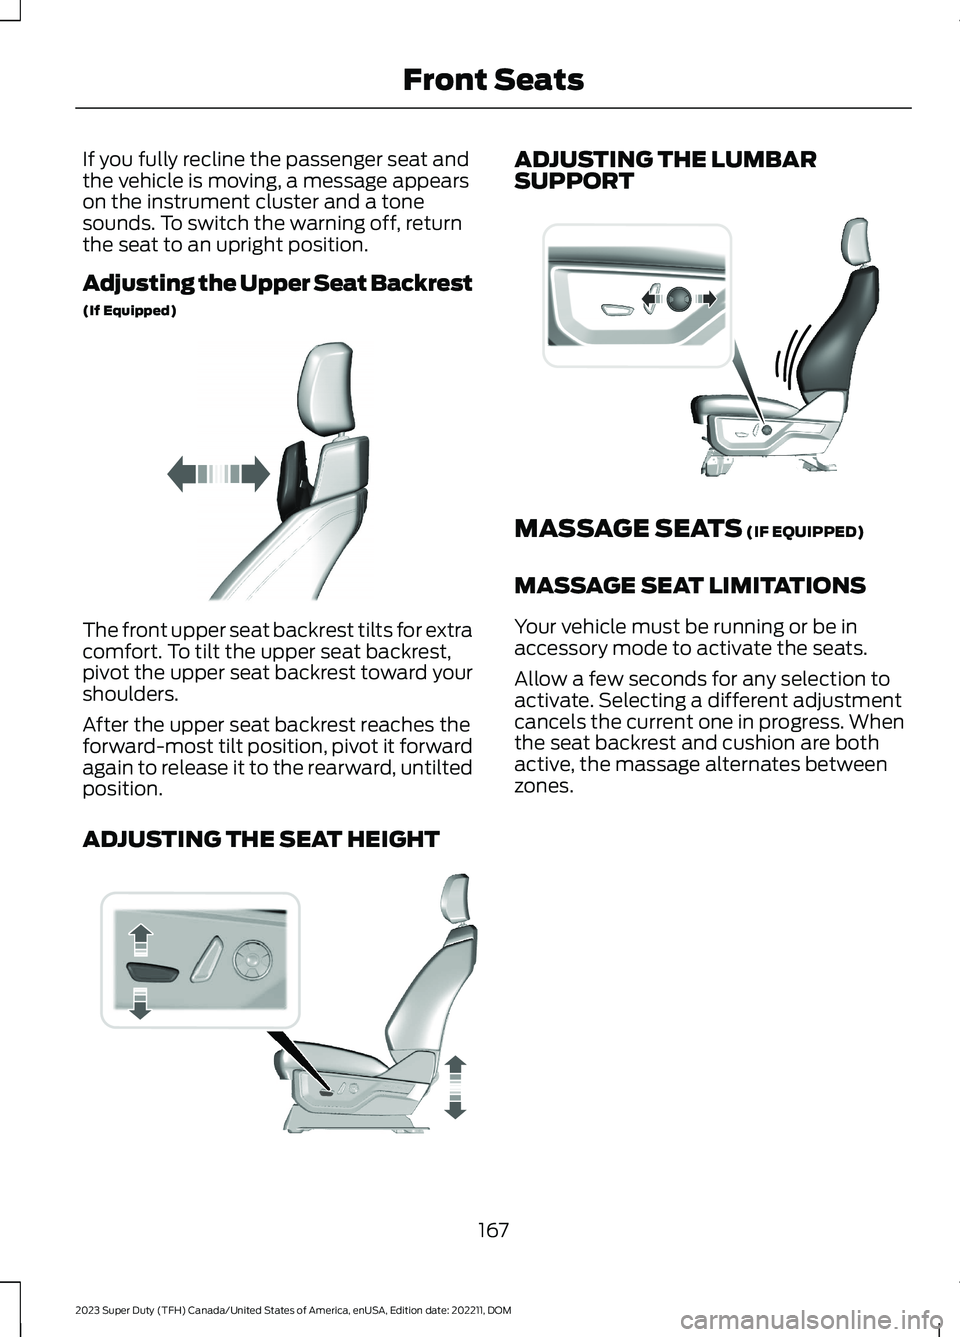
The front upper seat backrest tilts for extracomfort. To tilt the upper seat backrest,pivot the upper seat backrest toward yourshoulders.
After the upper seat backrest reaches theforward-most tilt position, pivot it forwardagain to release it to the rearward, untiltedposition.
ADJUSTING THE SEAT HEIGHT
ADJUSTING THE LUMBARSUPPORT
MASSAGE SEATS (IF EQUIPPED)
MASSAGE SEAT LIMITATIONS
Your vehicle must be running or be inaccessory mode to activate the seats.
Allow a few seconds for any selection toactivate. Selecting a different adjustmentcancels the current one in progress. Whenthe seat backrest and cushion are bothactive, the massage alternates betweenzones.
167
2023 Super Duty (TFH) Canada/United States of America, enUSA, Edition date: 202211, DOMFront SeatsE311333 E308337 E327927
Page 301 of 738
Note:An audible alarm sounds and thesystem shuts down if it applies brakes foran extended period of time. This allows thebrakes to cool. The system functionsnormally again after the brakes cool.
Note:When towing with adaptive cruisecontrol, switch on Tow/Haul Mode andDiesel Engine Brake.
Note:Tow/Haul mode increases the timegaps and allows more distance for braking.
ADAPTIVE CRUISE CONTROL
LIMITATIONS
Sensor Limitations
WARNING: On rare occasions,detection issues can occur due to theroad infrastructures, for example bridges,tunnels and safety barriers. In thesecases, the system may brake late orunexpectedly. At all times, you areresponsible for controlling your vehicle,supervising the system and intervening,if required.
WARNING: If the systemmalfunctions, have your vehicle checkedas soon as possible.
WARNING: Large contrasts inoutside lighting can limit sensorperformance.
WARNING: The system only warnsof vehicles detected by the radar sensor.In some cases there may be no warningor a delayed warning. Apply the brakeswhen necessary. Failure to follow thisinstruction could result in personal injuryor death.
WARNING: The system may notdetect stationary or slow movingvehicles below 6 mph (10 km/h).
WARNING: The system does notdetect pedestrians or objects in the road.
WARNING: The system does notdetect oncoming vehicles in the samelane.
WARNING: The system may notoperate properly if the sensor is blocked.Keep the windshield free fromobstruction.
WARNING: The sensor mayincorrectly track lane markings as otherstructures or objects. This can result ina false or missed warning.
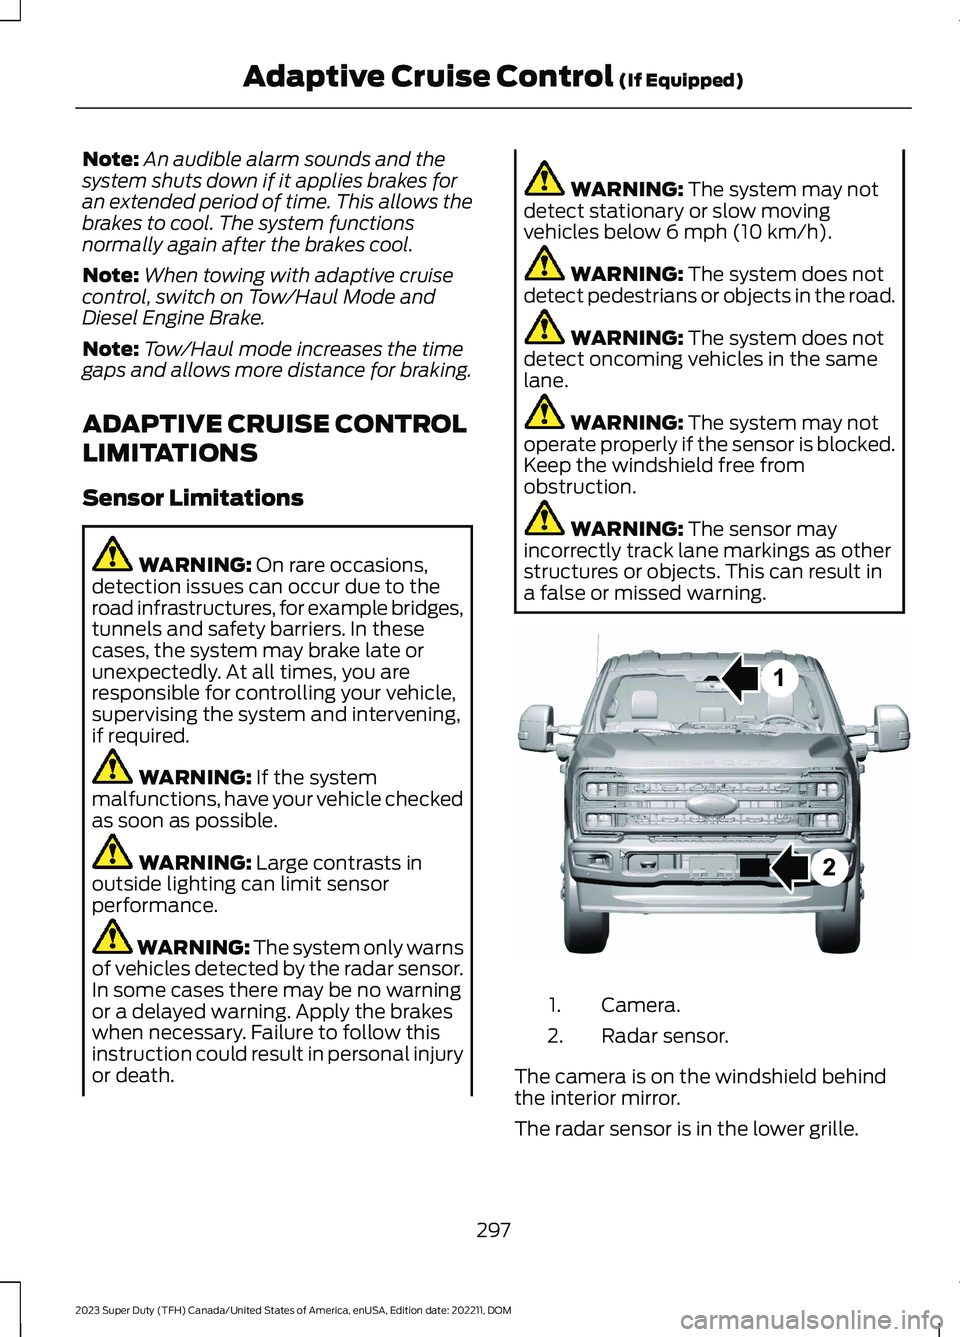
Camera.1.
Radar sensor.2.
The camera is on the windshield behindthe interior mirror.
The radar sensor is in the lower grille.
297
2023 Super Duty (TFH) Canada/United States of America, enUSA, Edition date: 202211, DOMAdaptive Cruise Control (If Equipped)E371980
Page 331 of 738
WHAT IS BLIND SPOT
INFORMATION SYSTEM
Blind spot information system detectsvehicles that may have entered the blindspot zone.
HOW DOES BLIND SPOT
INFORMATION SYSTEM WORK
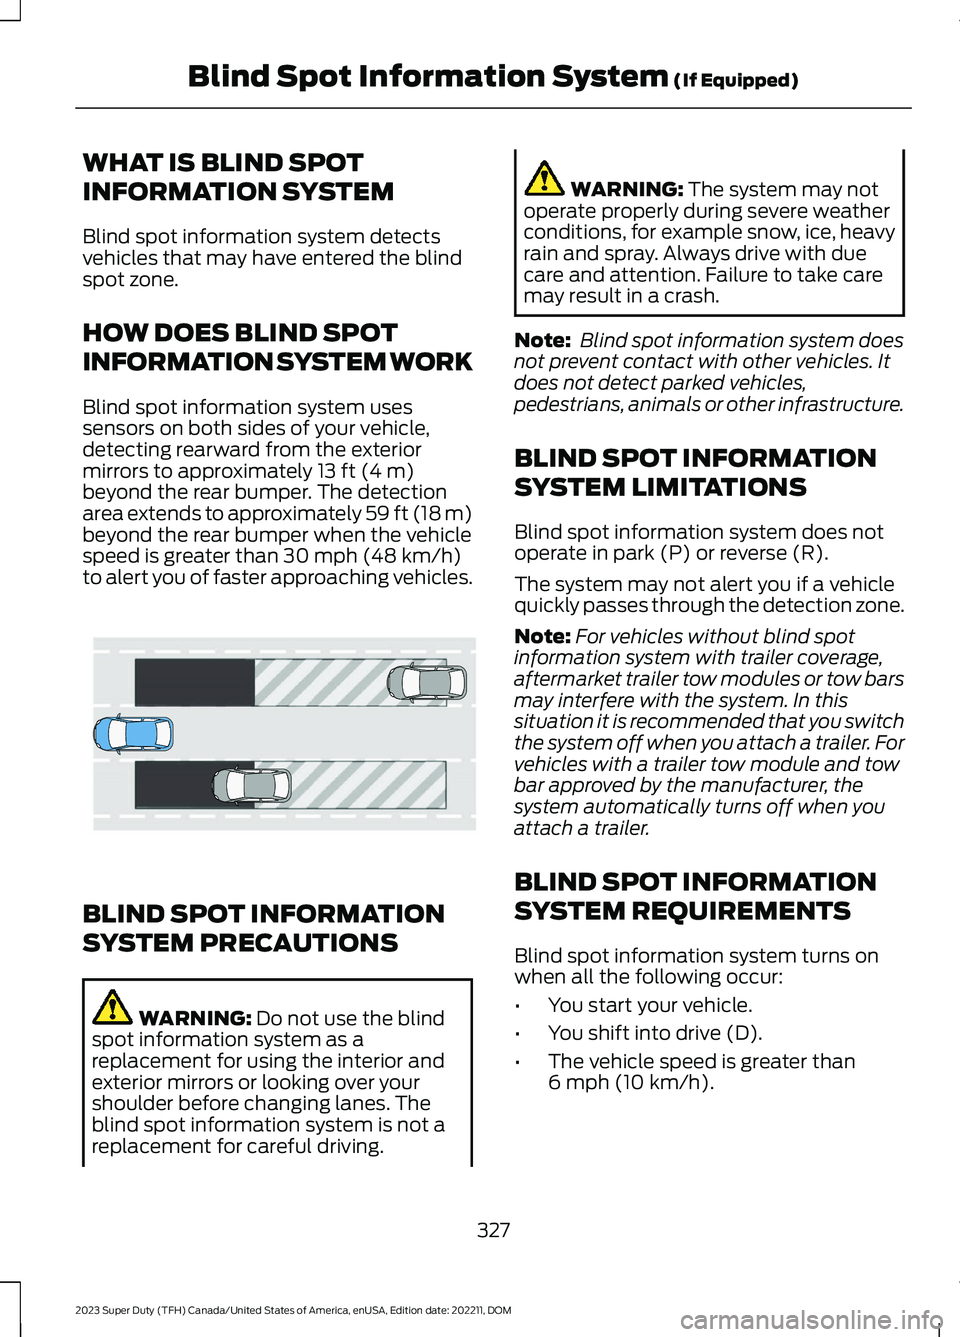
Blind spot information system usessensors on both sides of your vehicle,detecting rearward from the exteriormirrors to approximately 13 ft (4 m)beyond the rear bumper. The detectionarea extends to approximately 59 ft (18 m)beyond the rear bumper when the vehiclespeed is greater than 30 mph (48 km/h)to alert you of faster approaching vehicles.
BLIND SPOT INFORMATION
SYSTEM PRECAUTIONS
WARNING: Do not use the blindspot information system as areplacement for using the interior andexterior mirrors or looking over yourshoulder before changing lanes. Theblind spot information system is not areplacement for careful driving.
WARNING: The system may notoperate properly during severe weatherconditions, for example snow, ice, heavyrain and spray. Always drive with duecare and attention. Failure to take caremay result in a crash.
Note: Blind spot information system doesnot prevent contact with other vehicles. Itdoes not detect parked vehicles,pedestrians, animals or other infrastructure.
BLIND SPOT INFORMATION
SYSTEM LIMITATIONS
Blind spot information system does notoperate in park (P) or reverse (R).
The system may not alert you if a vehiclequickly passes through the detection zone.
Note:For vehicles without blind spotinformation system with trailer coverage,aftermarket trailer tow modules or tow barsmay interfere with the system. In thissituation it is recommended that you switchthe system off when you attach a trailer. Forvehicles with a trailer tow module and towbar approved by the manufacturer, thesystem automatically turns off when youattach a trailer.
BLIND SPOT INFORMATION
SYSTEM REQUIREMENTS
Blind spot information system turns onwhen all the following occur:
•You start your vehicle.
•You shift into drive (D).
•The vehicle speed is greater than6 mph (10 km/h).
327
2023 Super Duty (TFH) Canada/United States of America, enUSA, Edition date: 202211, DOMBlind Spot Information System (If Equipped)E255695
Page 340 of 738
Cross Traffic Alert Limitationswith a Trailer Attached
The system remains on when you attacha trailer in vehicles with blind spotinformation system with trailer tow underthe following conditions:
•You connect a trailer.
•The trailer is a bike rack or cargo rackwith a maximum length of 3 ft (1 m).
•You set the trailer length to 3 ft (1 m)in the instrument cluster display.
Note:The system may not correctly operatewhen towing a trailer. For vehicles with anapproved trailer tow module and tow bar,the system turns off when you attach atrailer. For vehicles with an aftermarkettrailer tow module or tow bar, werecommend that you switch the system offwhen you attach a trailer.
SWITCHING CROSS TRAFFIC
ALERT ON AND OFF
To switch cross traffic alert on or off usethe touchscreen.
1.Press Features on the touchscreen.
2.Press Driver Assistance.
3.Switch Cross Traffic Alert on or off.
Note:The system switches on every timeyou switch the ignition on. To permanentlyswitch the system off, contact an authorizeddealer.
SWITCHING CROSS TRAFFIC
ALERT ON AND OFF
To switch the system on or off, use theinstrument cluster display:
1.Select Driver Assist.
2.Select Cross Traffic Alert.
3.Switch the feature on or off.
Note:The system switches on every timeyou switch the ignition on. To permanentlyswitch the system off, contact an authorizeddealer.
LOCATING THE CROSS
TRAFFIC ALERT SENSORS
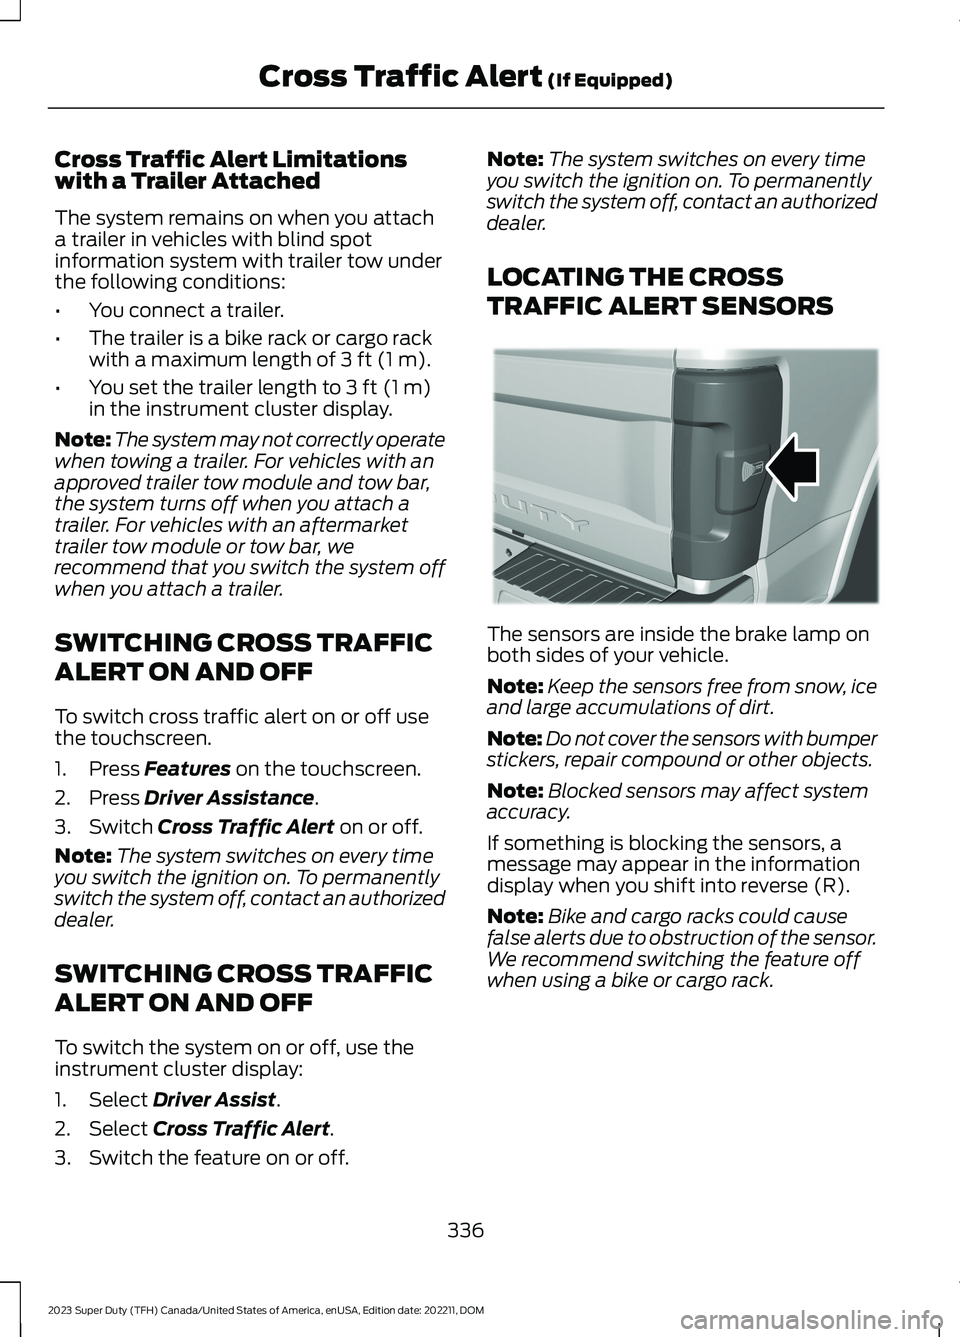
The sensors are inside the brake lamp onboth sides of your vehicle.
Note:Keep the sensors free from snow, iceand large accumulations of dirt.
Note:Do not cover the sensors with bumperstickers, repair compound or other objects.
Note:Blocked sensors may affect systemaccuracy.
If something is blocking the sensors, amessage may appear in the informationdisplay when you shift into reverse (R).
Note:Bike and cargo racks could causefalse alerts due to obstruction of the sensor.We recommend switching the feature offwhen using a bike or cargo rack.
336
2023 Super Duty (TFH) Canada/United States of America, enUSA, Edition date: 202211, DOMCross Traffic Alert (If Equipped)E231384
Page 363 of 738
CONNECTING A TRAILER
PRECAUTIONS
Do not tow a trailer until you drive yourvehicle at least 1,000 mi (1,600 km).
Consult your local motor vehicle laws fortowing a trailer.
See the instructions included with towingaccessories for the proper installation andadjustment specifications.
Service your vehicle more frequently if youtow a trailer. See Normal ScheduledMaintenance (page 600).
If you use a rental trailer, follow theinstructions the rental agency gives you.
When attaching the trailer wiring connectorto your vehicle, only use a proper fittingconnector that works with the vehicle andtrailer functions.
Account for the trailer coupler weight aspart of your vehicle load when calculatingthe total vehicle weight.
Do not exceed the load limits. SeeCalculating the Load Limit (page 353).
HITCHES
INSTALLING A HITCH
WARNING: You must use theheavy-duty drawbar pin supplied withyour vehicle when using the heavy-dutyhitch. Failure to follow this instructioncould result in the loss of control of yourvehicle, personal injury or death.
WARNING: You must use thedrawbar pin supplied with your vehicleor a pin that is designed to meet themaximum rating of your hitch. Failure tofollow this instruction could cause thetrailer to disconnect resulting in the lossof control of your vehicle, personal injuryor death.
Do not use a hitch that either clamps ontothe bumper or attaches to the axle.Distribute the load in your trailer so that10-15% for conventional towing or 15-25%for fifth wheel towing of the total weightof the trailer is on the tongue. Do notexceed the tongue load rating indicatedon the conventional hitch receiver.
Note:On pickup trucks, the trailer hitchprovided on the vehicle enhances crashprotection for the fuel system. Do notremove.
Hitch Components
The following components are required.Some are provided in certain vehicles.
•A trailer hitch with a 3 inch receiver anda 5/8 inch hitch pin. Check thestamped rating number on the pin todetermine the 21,200 lb (9,616 kg) or24,200 lb (10,976 kg) hitch pincapacity.
•A hitch pin sleeve stored in the glovecompartment to use when mountingthe 3 inch drawbar with the 3/4 inchpinhole.
•A cotter pin to help keep the hitch pinin place.
•A trailer hitch with a 3 inch receiver anda 5/8 inch hitch pin. Check thestamped rating number on the pin todetermine the 30,000 lb (13,607 kg)hitch pin capacity.
359
2023 Super Duty (TFH) Canada/United States of America, enUSA, Edition date: 202211, DOMConnecting a Trailer
Page 364 of 738
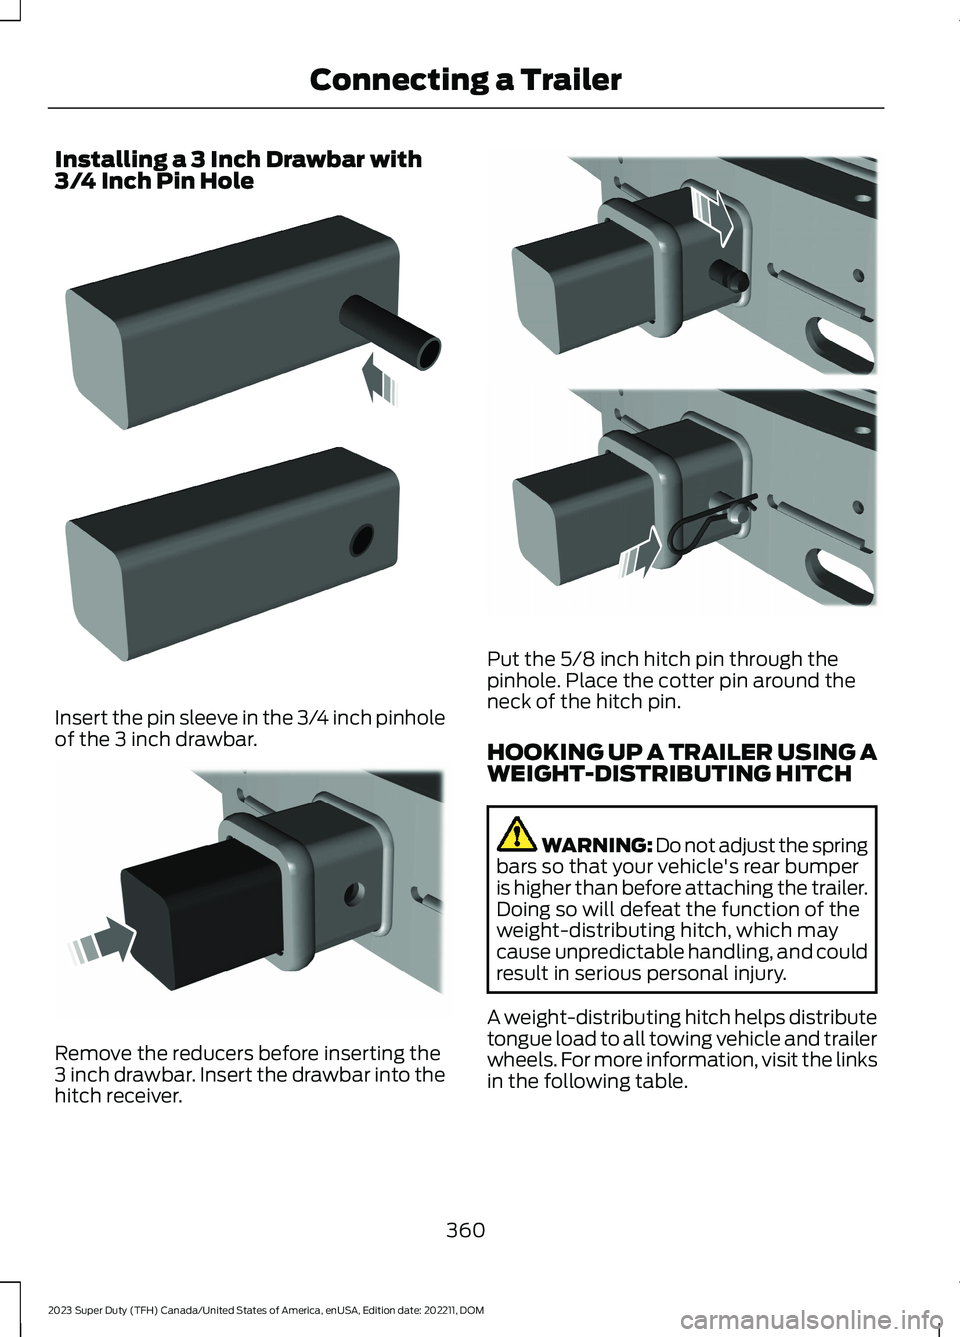
Installing a 3 Inch Drawbar with3/4 Inch Pin Hole
Insert the pin sleeve in the 3/4 inch pinholeof the 3 inch drawbar.
Remove the reducers before inserting the3 inch drawbar. Insert the drawbar into thehitch receiver.
Put the 5/8 inch hitch pin through thepinhole. Place the cotter pin around theneck of the hitch pin.
HOOKING UP A TRAILER USING AWEIGHT-DISTRIBUTING HITCH
WARNING: Do not adjust the springbars so that your vehicle's rear bumperis higher than before attaching the trailer.Doing so will defeat the function of theweight-distributing hitch, which maycause unpredictable handling, and couldresult in serious personal injury.
A weight-distributing hitch helps distributetongue load to all towing vehicle and trailerwheels. For more information, visit the linksin the following table.
360
2023 Super Duty (TFH) Canada/United States of America, enUSA, Edition date: 202211, DOMConnecting a TrailerE247903 E247902 E247909