door lock FORD TAURUS 2014 6.G Owner's Manual
[x] Cancel search | Manufacturer: FORD, Model Year: 2014, Model line: TAURUS, Model: FORD TAURUS 2014 6.GPages: 550, PDF Size: 7.21 MB
Page 120 of 550
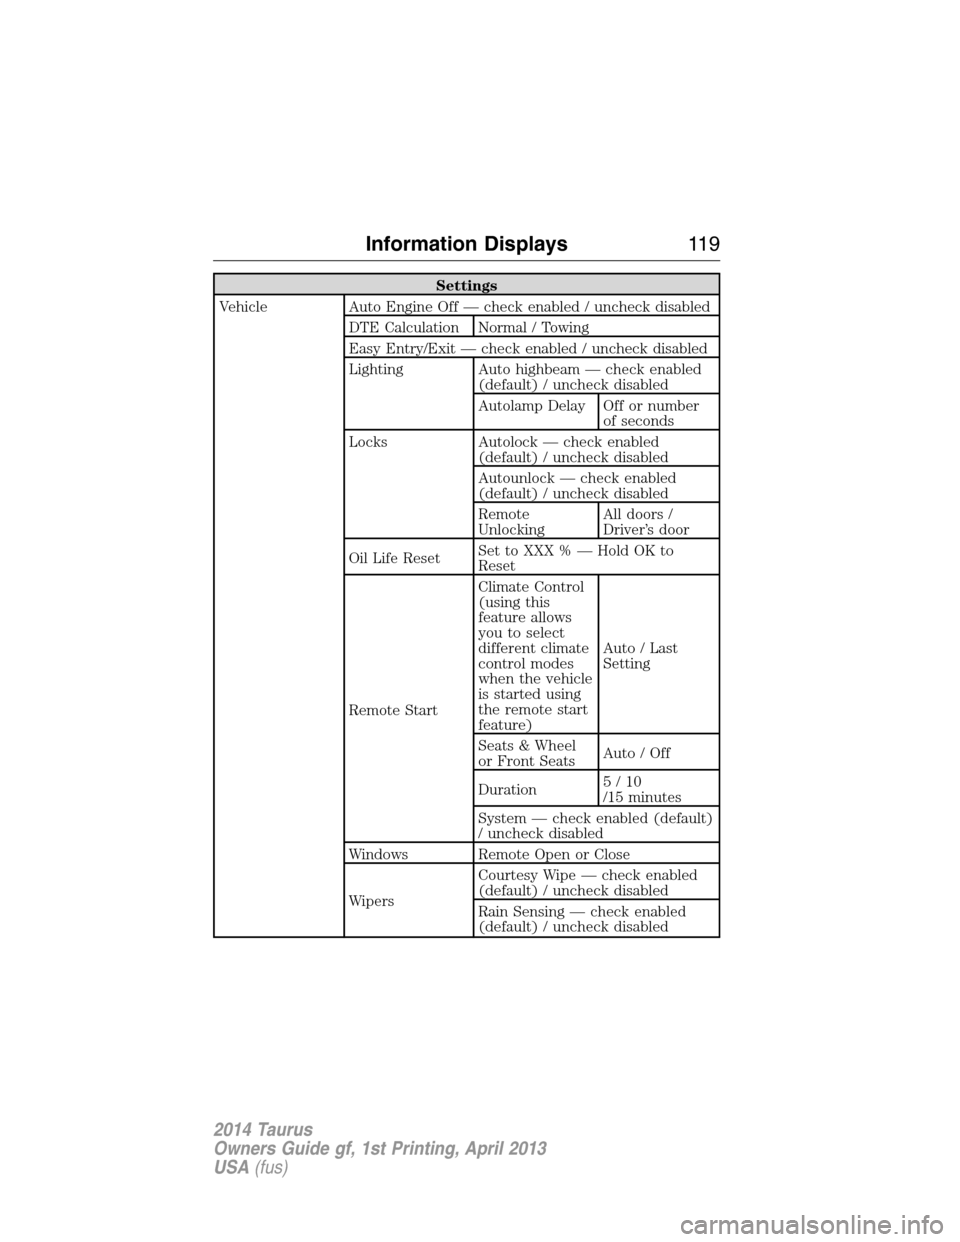
Settings
Vehicle Auto Engine Off — check enabled / uncheck disabled
DTE Calculation Normal / Towing
Easy Entry/Exit — check enabled / uncheck disabled
Lighting Auto highbeam — check enabled
(default) / uncheck disabled
Autolamp Delay Off or number
of seconds
Locks Autolock — check enabled
(default) / uncheck disabled
Autounlock — check enabled
(default) / uncheck disabled
Remote
UnlockingAll doors /
Driver’s door
Oil Life ResetSet to XXX % — Hold OK to
Reset
Remote StartClimate Control
(using this
feature allows
you to select
different climate
control modes
when the vehicle
is started using
the remote start
feature)Auto / Last
Setting
Seats & Wheel
or Front SeatsAuto / Off
Duration5/10
/15 minutes
System — check enabled (default)
/ uncheck disabled
Windows Remote Open or Close
WipersCourtesy Wipe — check enabled
(default) / uncheck disabled
Rain Sensing — check enabled
(default) / uncheck disabled
Information Displays11 9
2014 Taurus
Owners Guide gf, 1st Printing, April 2013
USA(fus)
Page 126 of 550
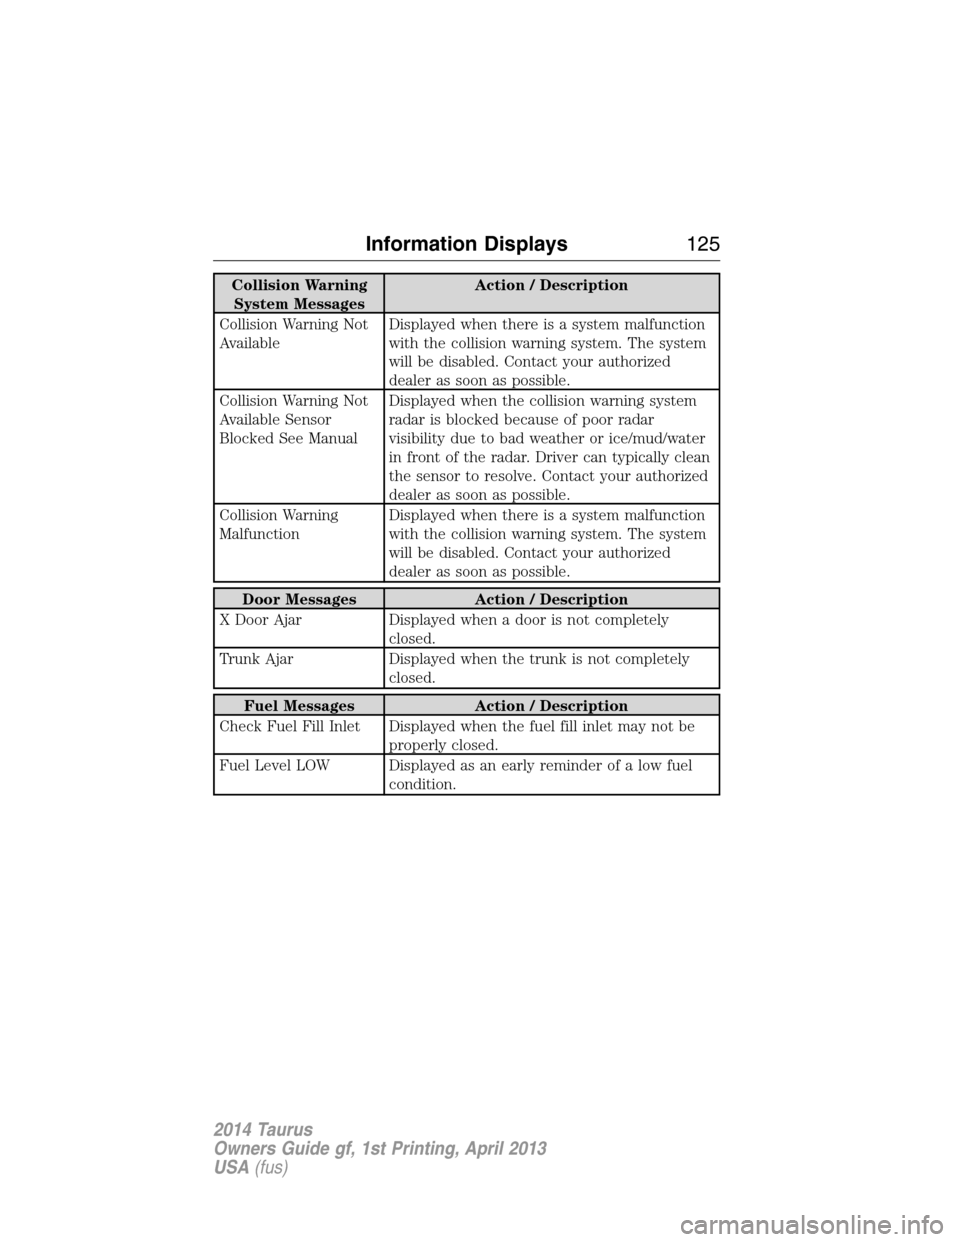
Collision Warning
System MessagesAction / Description
Collision Warning Not
AvailableDisplayed when there is a system malfunction
with the collision warning system. The system
will be disabled. Contact your authorized
dealer as soon as possible.
Collision Warning Not
Available Sensor
Blocked See ManualDisplayed when the collision warning system
radar is blocked because of poor radar
visibility due to bad weather or ice/mud/water
in front of the radar. Driver can typically clean
the sensor to resolve. Contact your authorized
dealer as soon as possible.
Collision Warning
MalfunctionDisplayed when there is a system malfunction
with the collision warning system. The system
will be disabled. Contact your authorized
dealer as soon as possible.
Door Messages Action / Description
X Door Ajar Displayed when a door is not completely
closed.
Trunk Ajar Displayed when the trunk is not completely
closed.
Fuel Messages Action / Description
Check Fuel Fill Inlet Displayed when the fuel fill inlet may not be
properly closed.
Fuel Level LOW Displayed as an early reminder of a low fuel
condition.
Information Displays125
2014 Taurus
Owners Guide gf, 1st Printing, April 2013
USA(fus)
Page 130 of 550
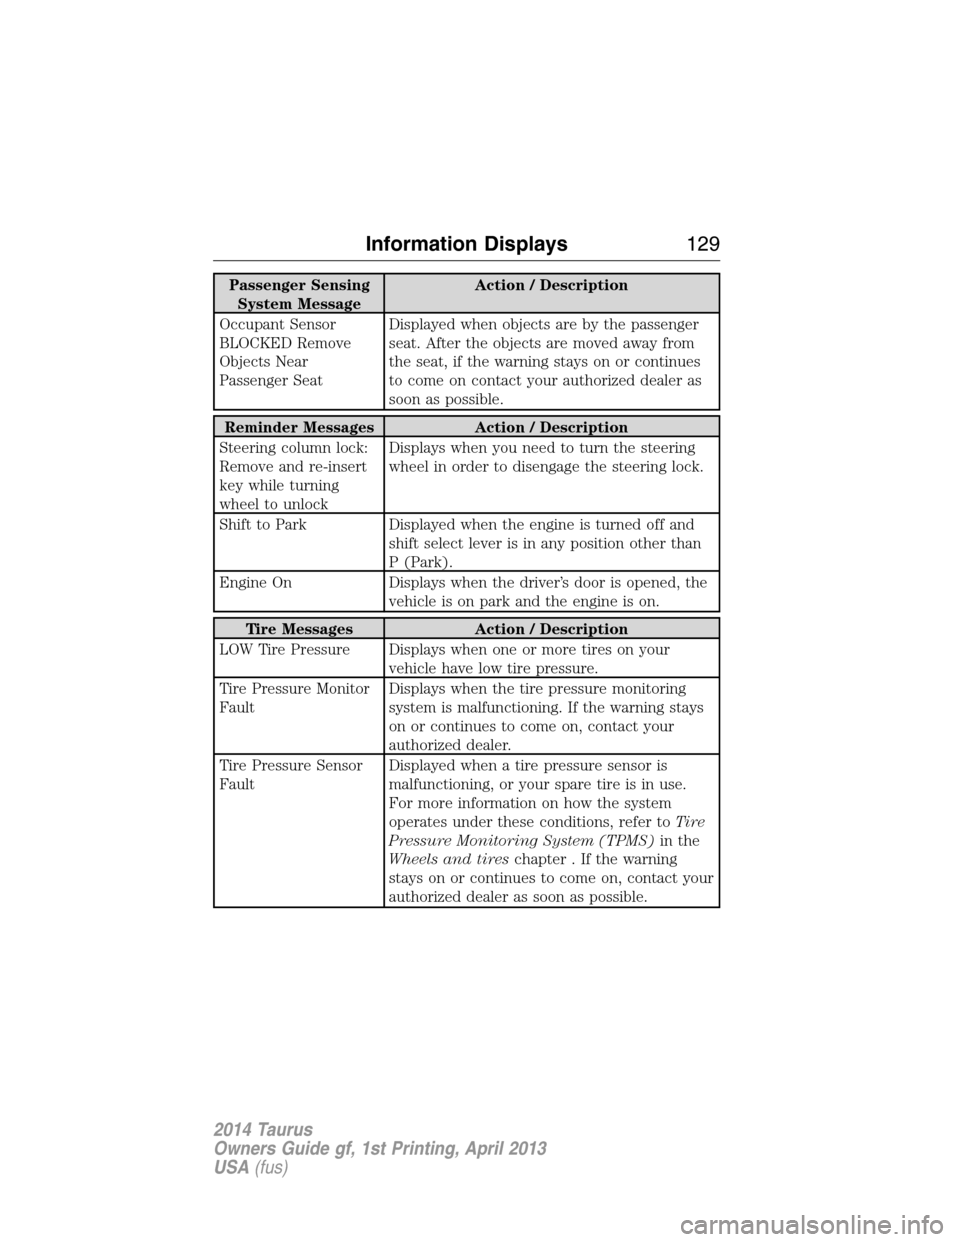
Passenger Sensing
System MessageAction / Description
Occupant Sensor
BLOCKED Remove
Objects Near
Passenger SeatDisplayed when objects are by the passenger
seat. After the objects are moved away from
the seat, if the warning stays on or continues
to come on contact your authorized dealer as
soon as possible.
Reminder Messages Action / Description
Steering column lock:
Remove and re-insert
key while turning
wheel to unlockDisplays when you need to turn the steering
wheel in order to disengage the steering lock.
Shift to Park Displayed when the engine is turned off and
shift select lever is in any position other than
P (Park).
Engine On Displays when the driver’s door is opened, the
vehicle is on park and the engine is on.
Tire Messages Action / Description
LOW Tire Pressure Displays when one or more tires on your
vehicle have low tire pressure.
Tire Pressure Monitor
FaultDisplays when the tire pressure monitoring
system is malfunctioning. If the warning stays
on or continues to come on, contact your
authorized dealer.
Tire Pressure Sensor
FaultDisplayed when a tire pressure sensor is
malfunctioning, or your spare tire is in use.
For more information on how the system
operates under these conditions, refer toTi r e
Pressure Monitoring System (TPMS)in the
Wheels and tireschapter . If the warning
stays on or continues to come on, contact your
authorized dealer as soon as possible.
Information Displays129
2014 Taurus
Owners Guide gf, 1st Printing, April 2013
USA(fus)
Page 156 of 550
HOMELINK® WIRELESS CONTROL SYSTEM (IF EQUIPPED)
WARNING:Make sure that the garage door and security device
are free from obstruction when you are programming. Do not
program the system with the vehicle in the garage.
WARNING:Do not use the system with any garage door opener
that does not have the safety stop and reverse feature as
required by U.S. Federal Safety Standards (this includes any garage
door opener manufactured before April 1, 1982).
Note:Make sure you keep the original remote control transmitter for
use in other vehicles as well as for future system programming.
Note:We recommend that upon the sale or lease termination of your
vehicle, you erase the programmed function buttons for security reasons.
SeeErasing the function button codeslater in this section.
Note:You can program a maximum of three devices. To change or
replace any of the three devices after it has been initially programmed,
you must first erase the current settings. SeeErasing the function
button codeslater in this section.
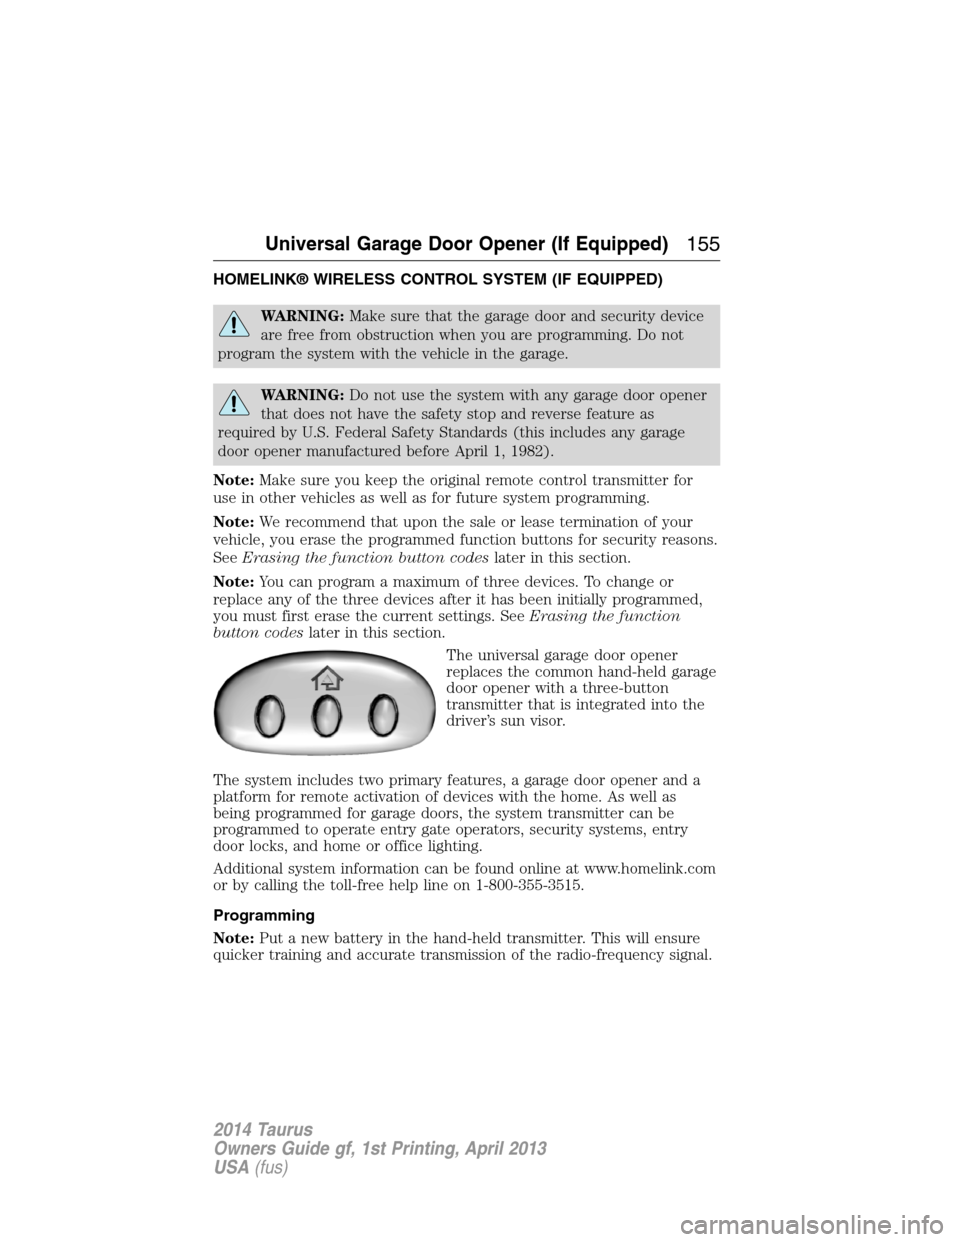
The universal garage door opener
replaces the common hand-held garage
door opener with a three-button
transmitter that is integrated into the
driver’s sun visor.
The system includes two primary features, a garage door opener and a
platform for remote activation of devices with the home. As well as
being programmed for garage doors, the system transmitter can be
programmed to operate entry gate operators, security systems, entry
door locks, and home or office lighting.
Additional system information can be found online at www.homelink.com
or by calling the toll-free help line on 1-800-355-3515.
Programming
Note:Put a new battery in the hand-held transmitter. This will ensure
quicker training and accurate transmission of the radio-frequency signal.
Universal Garage Door Opener (If Equipped)155
2014 Taurus
Owners Guide gf, 1st Printing, April 2013
USA(fus)
Page 170 of 550
Note:The heater is most effective when outdoor temperatures are below
0°F (-18°C).
The heater acts as a starting aid by warming the engine coolant. This allows
the climate control system to respond quickly. The equipment includes a
heater element (installed in the engine block) and a wire harness. You can
connect the system to a grounded 120–volt A/C electrical source.
We recommend that you do the following for safe and correct operation:
•Use a 16-gauge outdoor extension cord that is product certified
by Underwriter’s Laboratory or Canadian Standards Association.
This extension cord must be suitable for use outdoors, in cold
temperatures, and be clearly markedSuitable for Use with Outdoor
Appliances.Never use an indoor extension cord outdoors; it could
result in an electric shock or become a fire hazard.
•Use as short an extension cord as possible.
•Do not use multiple extension cords.
•Make sure that when in operation, the extension cord plug and the
heater cord plug connections are free and clear of water. This could
cause an electric shock or fire.
•
Make sure your vehicle is parked in a clean area, clear of combustibles.
•Make sure the heater, heater cord and extension cord are firmly
connected.
•Check for heat anywhere in the electrical hookup once the system has
been operating for approximately 30 minutes.
•Make sure the system is unplugged and properly stowed before driving
your vehicle. Make sure the protective cover seals the prongs of the
block heater cord plug when not in use.
•Keep plug terminals clean and free of dirt and corrosion.
•
Make sure the heater system is checked for proper operation before winter.
Using the Engine Block Heater
Make sure the receptacle terminals are clean and dry prior to use. Clean
them with a dry cloth, if necessary.
The heater uses 0.4 to 1.0 kilowatt-hours of energy per hour of use. The
system does not have a thermostat. It achieves maximum temperature
after approximately three hours of operation. Using the heater longer
than three hours does not improve system performance and
unnecessarily uses electricity.
Starting and Stopping the Engine169
2014 Taurus
Owners Guide gf, 1st Printing, April 2013
USA(fus)
Page 205 of 550
Deactivating the Park Assist Feature
The system can be deactivated manually by:
•pressing the active park assist button
•grabbing the steering wheel
•driving above approximately 20 mph (35 km/h) for 30 seconds during
an active park search
•driving above 6 mph (10 km/h) during automatic steering
•turning off the traction control system.
Certain vehicle conditions can also deactivate the system:
•Traction control has activated on a slippery or loose surface.
•Anti-lock brake system activation or failure.
•Any door (except the driver’s) opens.
•Something touches the steering wheel.
If a problem occurs with the system, a warning message is displayed,
followed by a chime. Occasional active park assist messages may occur in
normal operation. For recurring or frequent active park assist faults,
contact an authorized dealer to have your vehicle serviced.
Troubleshooting the System
The system does not look for a space
The traction control system may be off
Any door (except the driver’s) may not be completely closed
The system does not offer a particular space
Something may be contacting the front bumper or side sensors
There is not enough room on both sides of the vehicle in order to park
There is not enough space for the parking maneuver on the opposite
side of the parking space
The vehicle is farther than 5 ft (1.5 m) from the parking space
The vehicle is closer than 16 in. (40 cm) from neighboring parked
vehicles
The transmission is in R (Reverse); the vehicle must be moving
forward to detect a parking space
204Parking Aids
2014 Taurus
Owners Guide gf, 1st Printing, April 2013
USA(fus)
Page 308 of 550
WAXING
Regular waxing is necessary to protect your car’s paint from the
elements. We recommend that you wash and wax the painted surface
once or twice a year.
When washing and waxing, park your vehicle in a shaded area out of
direct sunlight. Always wash your vehicle before applying wax.
•Use a quality wax that does not contain abrasives.
•Follow the manufacturer’s instructions to apply and remove the wax.
•Apply a small amount of wax in a back-and-forth motion, not in
circles.
•Do not allow wax to come in contact with any non-body (low-gloss
black) colored trim. The wax will discolor or stain the parts over
time, such as:
•Bumpers
•Grained door handles
•Side mouldings
•Mirror housings
•Windshield cowl area.
•Do not apply wax to glass areas.
•After waxing, your car’s paint should feel smooth, and be free of
streaks and smudges.
REPAIRING MINOR PAINT DAMAGE
Your authorized dealer has touch-up paint to match your vehicle’s color.
Take your color code (printed on a sticker in the driver’s door jamb) to
your authorized dealer to make sure you get the correct color.
•Remove particles, such as bird droppings, tree sap, insect deposits, tar
spots, road salt and industrial fallout, before repairing paint chips.
•Always read the instructions before using the products.
CLEANING THE ENGINE
Engines are more efficient when they are clean because grease and dirt
buildup keep the engine warmer than normal.
When washing:
•Take care when using a power washer to clean the engine. The
high-pressure fluid could penetrate the sealed parts and cause
damage.
•Do not spray a hot engine with cold water to avoid cracking the
engine block or other engine components.
Vehicle Care307
2014 Taurus
Owners Guide gf, 1st Printing, April 2013
USA(fus)
Page 345 of 550
Preparation
Park the vehicle in a safe, level and secure area, away from moving
traffic. Turn the hazard lights on. Apply the parking brake and turn the
engine off. Inspect the flat tire for visible damage.
Sealant compound contains latex. To avoid any allergic reactions, use the
non-latex gloves located in the accessory box on the underside of the
temporary mobility kit housing.
Do not remove any foreign object that has pierced the tire. If a puncture
is located in the tire sidewall, stop and call roadside assistance.
1. Remove the valve cap from the tire valve.
2. Unwrap the clear tube from the compressor housing.
3. Remove the tube cap and fasten the metal connector of the tube to
the tire valve, turning clockwise. Make sure the connection is tightly
fastened.
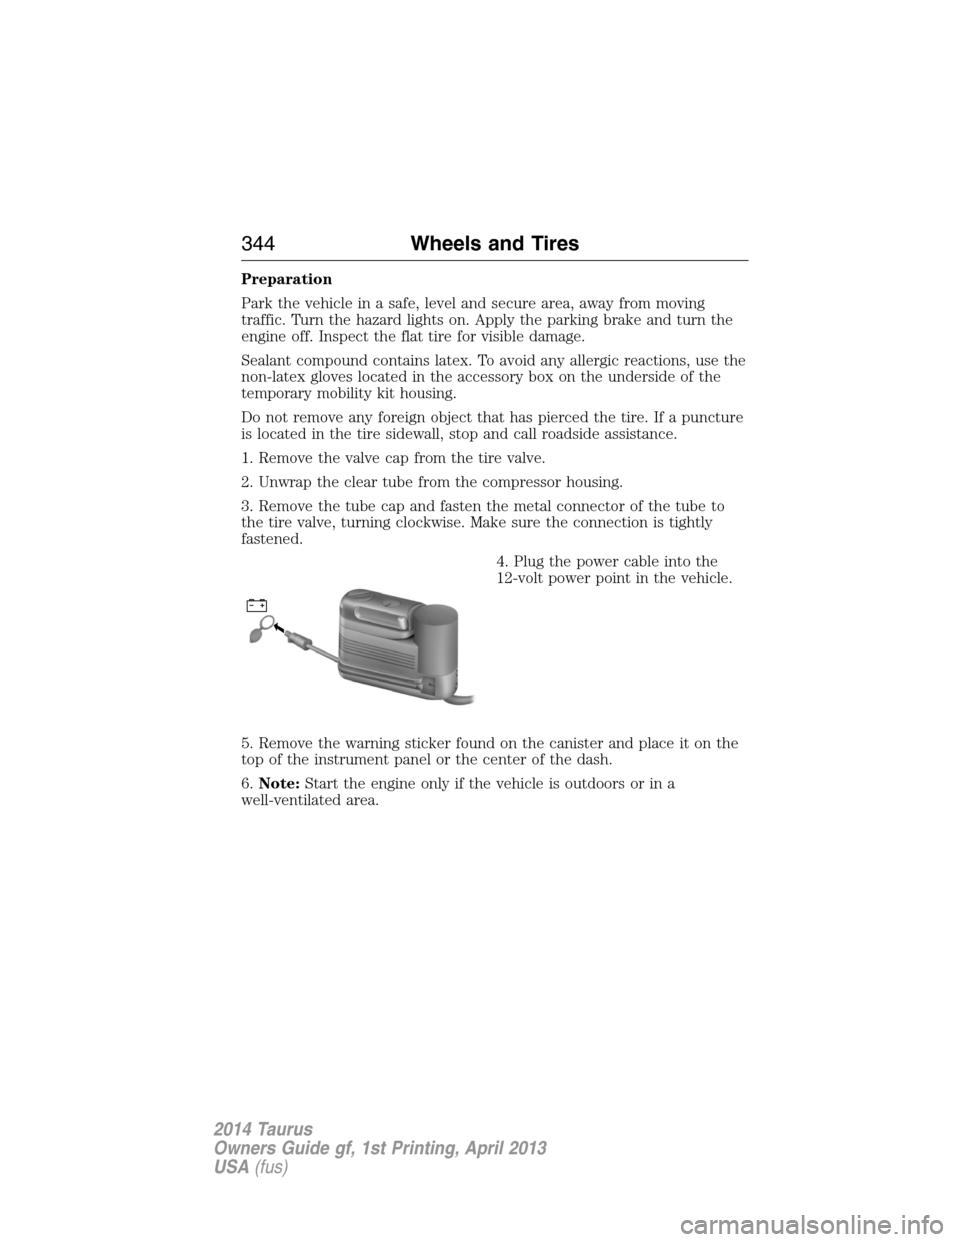
4. Plug the power cable into the
12-volt power point in the vehicle.
5. Remove the warning sticker found on the canister and place it on the
top of the instrument panel or the center of the dash.
6.Note:Start the engine only if the vehicle is outdoors or in a
well-ventilated area.
344Wheels and Tires
2014 Taurus
Owners Guide gf, 1st Printing, April 2013
USA(fus)
Page 346 of 550
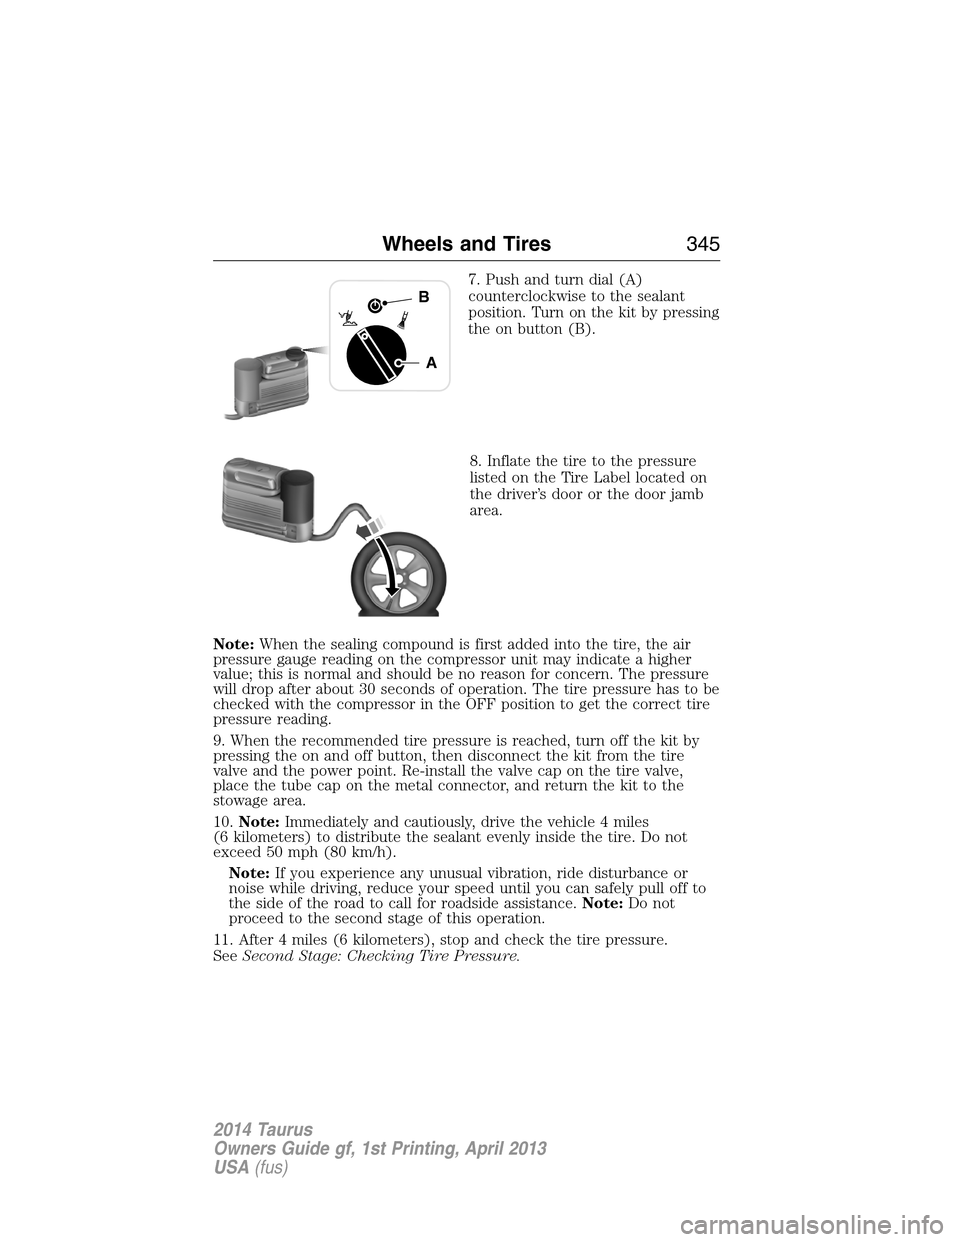
7. Push and turn dial (A)
counterclockwise to the sealant
position. Turn on the kit by pressing
the on button (B).
8. Inflate the tire to the pressure
listed on the Tire Label located on
the driver’s door or the door jamb
area.
Note:When the sealing compound is first added into the tire, the air
pressure gauge reading on the compressor unit may indicate a higher
value; this is normal and should be no reason for concern. The pressure
will drop after about 30 seconds of operation. The tire pressure has to be
checked with the compressor in the OFF position to get the correct tire
pressure reading.
9. When the recommended tire pressure is reached, turn off the kit by
pressing the on and off button, then disconnect the kit from the tire
valve and the power point. Re-install the valve cap on the tire valve,
place the tube cap on the metal connector, and return the kit to the
stowage area.
10.Note:Immediately and cautiously, drive the vehicle 4 miles
(6 kilometers) to distribute the sealant evenly inside the tire. Do not
exceed 50 mph (80 km/h).
Note:If you experience any unusual vibration, ride disturbance or
noise while driving, reduce your speed until you can safely pull off to
the side of the road to call for roadside assistance.Note:Do not
proceed to the second stage of this operation.
11. After 4 miles (6 kilometers), stop and check the tire pressure.
SeeSecond Stage: Checking Tire Pressure.
A
B
Wheels and Tires345
2014 Taurus
Owners Guide gf, 1st Printing, April 2013
USA(fus)
Page 347 of 550
Second Stage: Checking Tire Pressure
WARNING:The power plug may get hot after use and should be
handled carefully while unplugging.
Check the air pressure of your tires as follows:
1. Remove the valve cap from the tire valve.
2. Unhook the black hose from the side of the compressor and fasten
firmly on the valve stem by turning clockwise.
WARNING:If you are proceeding from theFirst stage:
Reinflating the tire with sealing compound and airsection
and have injected sealant in the tire and the pressure is below 20 psi
(1.4 bar), stop and call roadside assistance. If tire pressure is above
20 psi (1.4 bar), continue to the next step.
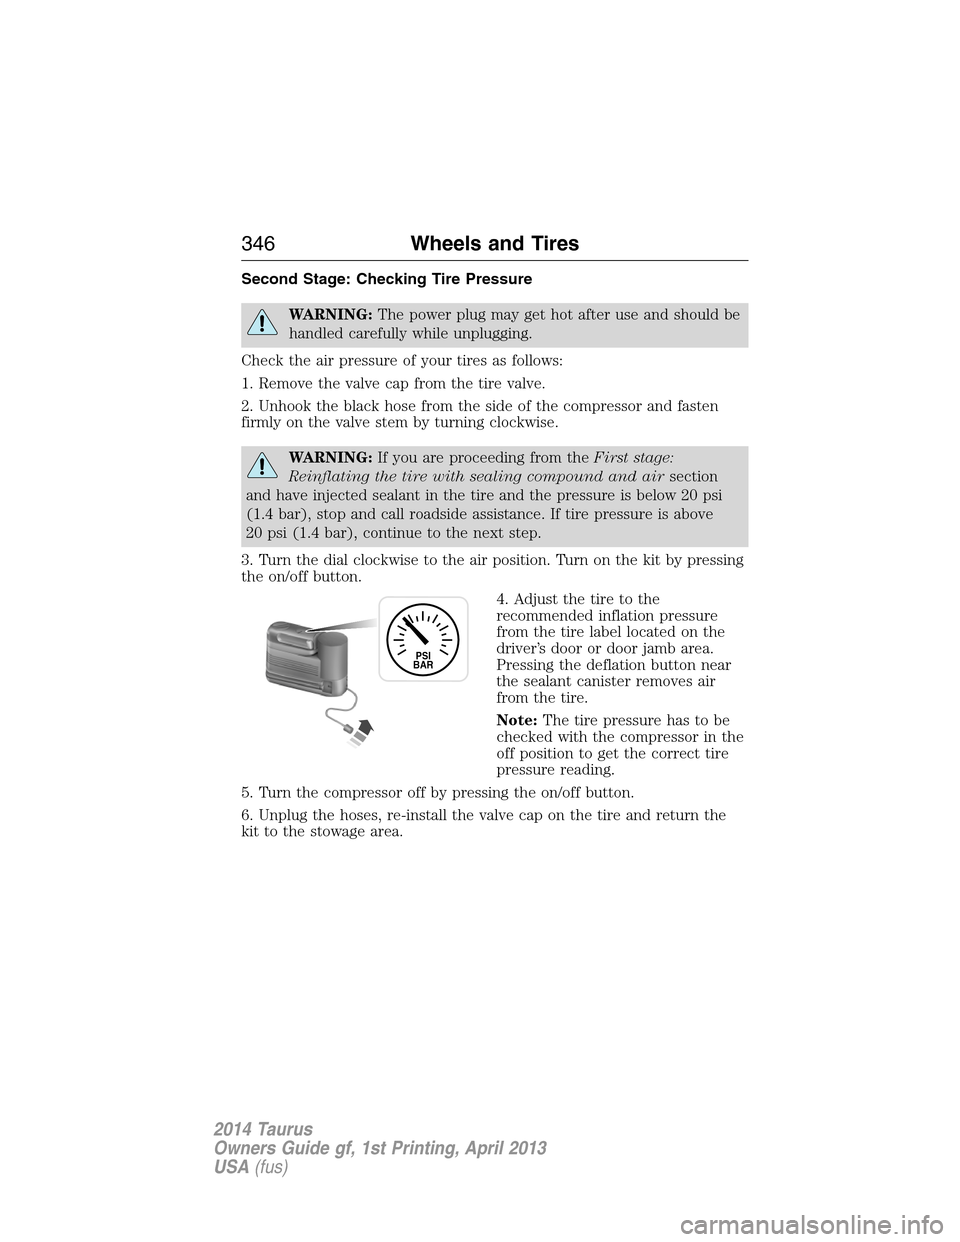
3. Turn the dial clockwise to the air position. Turn on the kit by pressing
the on/off button.
4. Adjust the tire to the
recommended inflation pressure
from the tire label located on the
driver’s door or door jamb area.
Pressing the deflation button near
the sealant canister removes air
from the tire.
Note:The tire pressure has to be
checked with the compressor in the
off position to get the correct tire
pressure reading.
5. Turn the compressor off by pressing the on/off button.
6. Unplug the hoses, re-install the valve cap on the tire and return the
kit to the stowage area.
PSI
BAR
346Wheels and Tires
2014 Taurus
Owners Guide gf, 1st Printing, April 2013
USA(fus)